
CH. 1 TOOLS OF THE TRADE
Now that you’ve decided you want to be a knifemaker, it’s time to set up a work space and make sure you have the right tools. As you first start out, don’t be limited by the thought that you need to invest a ton of money to have the best tools and a huge work space. While investing in certain equipment down the line may make the process easier, most of the tools you need to start making knives are probably in your garage right now. In this chapter, we’ll go over what kind of space you need to set up your workshop and what tools you need to complete the different tasks.

SETTING UP A SHOP
Someday, in a perfect world, I’ll have a huge and immaculate work space set up with every tool I could ever dream of. My reality at the moment is quite the opposite. As a self-proclaimed nomad who rarely spends more than a few months in one place, I find myself making do with what I have available—whether it be using someone else’s shop or setting up a work space in whatever place I can find at the time. There is no excuse for not being able to start on your journey into knifemaking, regardless of your current availability of space. Where there’s a will, there’s a way; and with a bit of ingenuity, you’ll be grinding metal in no time.
If you have a work space already set up in your garage, great. With a few modifications, you can get everything you need set up there to start making knives. If you don’t, there are plenty of other options. From sheds to lean-tos to tarped-in shelters, I’ve effectively used all sorts of different locations as a makeshift shop.
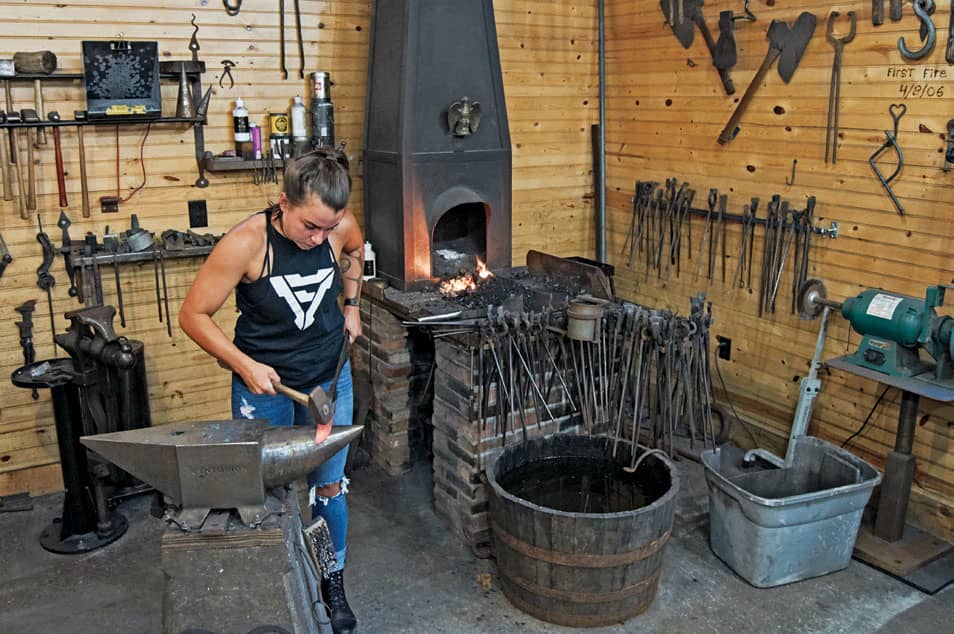
WORKING IN MY DREAM SHOP, ALTHOUGH THIS ONE HAPPENS TO BELONG TO NEW HAMPSHIRE–BASED BLACKSMITH STEVE ASH
The first requirement for a work space is having the ability to get it dirty. As you’re systematically taking metal away from the piece of steel that will become your knife, the metal dust that you’re removing will find its way onto and into everything. Add in using different glues, a forge, and working wood and leather, and keeping the place clean will become nothing short of impossible.
Additionally, your space should have ventilation. While wearing a respirator will help, you won’t want to have to wear it all the time. Being able to air out the smoke from working metal in the forge and the fumes from glue is important.

MY CURRENT SHOP IS SET UP IN AN OLD SUGAR SHACK IN MAINE. IN THE SPRING, IT IS USED FOR BOILING DOWN SAP TO MAKE MAPLE SYRUP.
You’ll also need access to electricity. I’ve used a generator in a pinch. While people made knives for thousands of years with absolutely no electricity, power tools make this process infinitely easier.
Most importantly, pick a location that’s protected from the elements and is easily accessible. Making a knife is a process, and being able to put down your tools and come back to it without much effort makes it easier to get in shop time. You can have the best shop in the world, but it will do you no good if you never spend time in it.

WORKING IN THE SHOP IN MAINE
SAFETY EQUIPMENT
Every time I think about safety, my mind conjures up images from cheesy old safety videos. There’s an old saying from one made in the 1940s that I quite enjoy: “Don’t learn safety by accident.” As a survivalist, I find I encounter a fair amount of danger in my life. This in no way means I’m careless. I like to save the calculated risk for adventures and protect myself from unnecessary hazards in the shop.
SAFETY GLASSES
With the use of most power tools, there is the risk of an unwanted object flying into your eye. This is especially true when grinding metal. Metal shards in the eye are unforgiving, painful, and gross. I’ll never forget how horrified I was as a kid trying to help my dad get a piece of metal out of his eyeball with a magnet after an accident in the garage. I’ve been wearing glasses or a face shield in the shop ever since. It’s like they always say, “To learn about eye protection, ask someone who has one.”
HEARING PROTECTION
The very first knifemakers lived in a much quieter world. Loud sounds can be hard to get away from in modern life, and the effects can be serious. Prolonged exposure to any elevated sound actually kills the nerve endings in the inner ear and causes permanent hearing loss. In my opinion, your time in the shop should enrich your life instead of adding unnecessarily to the slow demise of any part of your body. I use hearing protection whenever I use power tools, or if I am going to be spending a long time hammering. I’ve always said, “Hearing protection is a sound investment.”
RESPIRATOR
When grinding metal, the tiny metal flakes you remove become an airborne dust. Inhaling this dust over time can cause a disease called siderosis, or “welder’s lung,” which can have very serious complications. The annoyance of wearing a respirator is definitely worth it for your long-term health. After all, it’s like they always say: “Working safely is like breathing. If you don’t, you die.”
DRESS FOR THE OCCASION
Working around a forge can be incredibly hot. The same heat that is welcome in the winter can be stifling in the summer. I’ve been guilty of wearing shorts in the shop on hot days and usually come away from it with a few burn marks from hot sparks flying from my hammer and hitting my legs. If you’re wearing shorts, it’s possible for these sparks to land right inside of your boot and give you a good burn. When I was working as a farrier, I learned the hard way one of the reasons some knifemakers choose to wear leather bibs. As I was using a belt sander and grinding a horseshoe, the hot metal dust collected in a wrinkle in my sweatshirt. As the amount of dust and the temperature increased, it actually lit my shirt on fire.
Some blacksmiths also choose to wear gloves to further protect their hands. I’ve found that I can’t grip the tools quite as well when I’m wearing gloves, but it can be a bit uncomfortable when you’re working so close to a heat source. Your choice in attire really comes down to what amount of discomfort you’re willing to deal with. You’ve been warned; proceed at your own risk.

GOOFY SAYINGS ASIDE, MAKE SURE YOU UNDERSTAND THE POTENTIAL DANGERS YOU COULD ENCOUNTER AND TAKE THE PROPER PRECAUTIONS TO AVOID INJURY.
TOOLS
Knifemaking involves more than just the skill of metalworking. As you progress in the process of making your knife, you’ll be implementing other skill sets as you use different materials to add a handle and make a sheath. The following tools are a basic starting point for making a fixed-blade bushcraft-style knife using the process outlined in this book. Depending on your experience and familiarity with different tools, I encourage you to experiment and improvise to find what works best for you.
WORKBENCH
A workbench will not only be your primary work space but will also be used as a mounting platform for other tools, such as your vice. You can improvise with a sturdy table or make a simple platform out of scrap wood. It’s very important that your workbench be stable so that it doesn’t move around when you’re working on your blade. If anchoring it to the floor or wall isn’t possible, try to add weight on the bottom to create a solid base with as little movement as possible.

A SOLID WORKBENCH IS A MUST-HAVE IN ANY KNIFEMAKING SHOP. YOUR BENCH SHOULD BE A COMFORTABLE HEIGHT TO WORK AT WITHOUT HAVING TO BEND OVER.
ANGLE GRINDER
While not absolutely necessary, this tool is multifunctional and can be a great time-saver. I use an angle grinder any time I have to cut steel, and it can also be useful in profiling and grinding your blade. You’ll need a variety of different discs to perform different tasks, including metal cutting and grinding discs.

WHILE THE ANGLE GRINDER CAN BE A GREAT TIME-SAVER, MAKE SURE YOU USE IT WITH CAUTION. A SPINNING WHEEL THAT CAN CUT THROUGH METAL WILL MAKE EASY WORK OF YOUR LEG IF YOU LET IT.
DRILL
I prefer to use a drill press for all my hole-making needs when I have one available to me. I find I can keep my holes straighter than when using a hand drill, but either one will work fine.
FILES
I use files designed for both metal and wood at various stages of making a knife. While I do the bulk of material removal with power tools, files are very convenient for small tasks such as quickly removing a metal burr or doing some fine-tuning on the handle. Having a variety of files around gives you the option to slow things down and really take your time, especially when working on fine details.
BELT GRINDER
If you’re going to invest in one tool as a bladesmith, I would recommend getting a good belt grinder. While you can accomplish many of the same tasks by using an angle grinder, I find the belt grinder easier to use and learn on. From grinding bevels to shaping the handle to finishing, it has a multitude of purposes and is the tool I use the most in the shop. While it’s not necessary, it is a huge time-saver and will earn its keep if you plan on regularly making knives.
You can pick up a brand-new 1 × 30–inch (25 × 762 mm) belt grinder relatively cheaply. While not as rugged as its larger counterparts favored by professional knifemakers, it is affordable and functional for many things. The next step up is the 2 × 72–inch (51 × 1829 mm) belt grinder, which is more of a monetary investment but is also hardier than a small grinder. I use a variety of different belts and recommend getting several different metal grinding belts in grit 60 through 600.
The biggest advantage I find in using in a belt grinder over the angle grinder is the ease and control I have moving the blade over something that is stationary. When you use an angle grinder, you constantly have to readjust the clamping of your blade. I find it easy to lose track of what you’re doing and of the overall picture.

POSITION THE GRINDER AT ABOUT NAVEL HEIGHT IN YOUR SHOP SO YOU CAN LOOK DOWN OVER THE BELT AND SEE WHAT YOU’RE DOING.
QUENCH
A quench is a container for holding liquid to cool down your metal. Your shop should have two quenches, one containing water and one containing vegetable oil. When quenching a blade in oil after exposing it to high heat, there is the possibility of it “flaring up,” or having the oil start flaming. Make sure your quench is fireproof and has a lid so you can cut off the flow of oxygen if you need to. An old metal coffee can is a great improvised quench, provided that your whole blade will fit in it.
FORGING VS. STOCK REMOVAL
There are two main schools of thought in knifemaking: forging and stock removal. Forging involves employing the techniques of blacksmithing and heating metal in a forge to rearrange the steel into a blade. Stock removal skips the blacksmithing and heads right to the grinder, shaping the blade by systematically removing steel. These two processes aren’t necessarily used exclusively; many blacksmiths will finish up a blade on the grinder, and people who rely mostly on stock removal will occasionally turn to the forge for certain tasks. Each method has advantages and disadvantages.
There’s a very traditional feel to blacksmithing that immediately comes to mind when most people think of knifemaking, but it also demands a greater investment of time and space to learn the process and set up the shop. As you become more proficient, it’s possible to spend five minutes on the anvil and save thirty minutes of grinding. Before investing in a fully set-up smithy, look for a local blacksmith in your area so you can get your feet wet and see if it’s for you. Many smiths are more than happy for you to come in and observe. Don’t be surprised if you end up hammering on some metal before the end of the day.
Like many things in knifemaking, it ultimately comes down to personal preference. While there’s plenty of discussion as to which process is superior, I’ve seen beautiful, functional knives created using both methods. Setting up a forge regardless of what method you favor can be advantageous for heat-treating, but it’s possible to achieve the same results in a pit fire (outlined in chapter 6). If you don’t want to set up a forge right away, skip chapter 4 on blacksmithing, cut out your blade profile with the angle grinder, and head right to grinding in chapter 5.

MANY KNIFEMAKERS INCORPORATE BOTH BLACKSMITHING AND STOCK REMOVAL METHODS TO MAKE THEIR BLADES.
BLACKSMITHING TOOLS
The first blacksmithing setup I ever used belonged to my friend Slim Sharp. As his name implies, he has some height on me. At 6 feet 3 inches (110 cm), he is a full foot taller than I am. Starting out, I had no idea how much our height difference was affecting my experience and abilities as a blacksmith. I found myself tiring quickly and feeling sore, and I thought I needed to grit my teeth and muscle through the process. While blacksmithing does certainly involve putting in some elbow grease and mastering technique, a lot of the trouble I was having was because I wasn’t using my body mechanics to my advantage. Working in my own shop, everything became easier. By paying attention to the details and setting up your shop to your own personal specifications, you can be much more efficient. While you can still use someone else’s smithy, there is no one-size-fits-all setup; everything should be set up in accordance to your own body measurements.
The sheer number of different tools in a professional blacksmith shop and the unique and incredibly specific purpose each one serves can be overwhelming. As you start out, you don’t need to have everything. In fact, most blacksmiths will tell you that an important part of your journey is to learn to make each and every one of these tools along the way. Even if you don’t want to become a master smith, the time you can save by using the forge to start your blades is enough to make many knifemakers dabble in the art. The following tools are the bare minimum to get you started.
HAMMER
The hammer is an iconic representation of the blacksmith. It serves to form the connection between you and your steel, and it should feel like an extension of your own body. Even if I am headed to someone else’s shop, I always try to bring my own hammer. I like to imagine what TSA thinks as they scan my bag and wonder what I’m doing traveling with clothes, toiletries, and a hammer.
The head of your hammer should be a comfortable weight somewhere between one-and-one-half and three pounds. It should be light enough to use without causing muscle fatigue but heavy enough to move metal. Find the balance that works for you. The handle on your hammer should be roughly the same length as the distance between the tips of your fingers and your elbow. Your body is used to working with that length, and it helps you become more accurate in less time. Shave the handle down to fit your hand snugly. You should be able to grasp it easily without having to use a death grip. Hammering is all about being easy and efficient, so take the time to make your hammer as comfortable as possible.
TONGS
In one hand you’ll have your hammer, and in the other hand you’ll have your tongs. As the much less famous sister of the pair, the tongs are nonetheless important. You want to be able to hold on to the steel you’re working comfortably and securely. While pliers will do in a pinch, a good set of tongs will make your life easier. The most important thing in selecting a pair of tongs is that the jaws can firmly grasp the thickness of your steel. As someone with very small hands, I also like to find a pair I can grasp easily without straining my fingertips too much.
ANVIL
A good anvil is pretty expensive to buy brand new, but with some searching you can usually find them for sale secondhand or even sitting in the corner of an old barn gathering cobwebs. Anvil technology hasn’t changed a whole lot over the years, and I prefer to use an anvil that has some stories and imperfections. The main thing to watch out for is any major indentations or chips that will cause problems on the working surface.
While many master blacksmiths prefer to use an anvil over one hundred pounds, a knifemaker can get away with something much smaller. Ideally, I still like using an anvil that weighs at least fifty pounds. The lighter the anvil, the less efficient you will be because more of the energy from your hammer strike will go into the anvil instead of the piece of steel you’re trying to work. The bigger the anvil, the easier things become.
An anvil is specifically shaped for many of the processes involved in blacksmithing and includes such features as a horn and a hardy hole for inserting specific attachments. If you just want to get into the basics of pounding metal, any large chunk of steel can be used to improvise. I’ve heard of people using pieces of railroad tracks, broken forklift tines, or machine shafts turned on end and secured to a heavy base. People have practiced the art of blacksmithing without access to perfect store-bought anvils for thousands of years. Find what works for you.

SETTING UP YOUR ANVIL HEIGHT TO YOUR OWN BODY MECHANICS ASSURES YOU GET THE MOST POWER OUT OF EVERY HAMMER SWING. BY HAVING THE ANVIL MEET THE HAMMER WHERE YOUR KNUCKLES NATURALLY FALL, YOU AREN’T REACHING TO HIT YOUR STEEL OR STOPPING SHORT BEFORE YOU GET IN YOUR FULL SWING.
ANVIL STAND
Your anvil needs to be firmly anchored to a solid base, or anvil stand. Anvil stands are made from a large sturdy piece of either metal or wood. I prefer to use wood, as it is generally easy and cheap to obtain. Hardwood tends to work better, as it’s less prone to splitting. Oak, hickory, maple, and elm are all good choices. Make sure you cut the ends parallel to each other to make sure that your anvil sits flat on the stand. If possible, secure your stand to the ground to prevent wobbling.
To determine how tall your anvil stand should be, stand with your arm at your side making a fist. Your anvil should end up sitting just below where your knuckles fall. If you measure the distance between your knuckles and the floor, then subtract the height of your anvil, you should have a measurement for the height of your anvil stand.
As you are setting up your anvil, make sure to set it up within a few feet of your forge. You’ll want to be able to have enough room to access the forge but be able to get to the anvil quickly to prevent unnecessary cooling of the metal.
HARDY CUT
There are several tools and attachments that will be useful as you continue your journey into blacksmithing. The one I use the most when knifemaking is the hardy cut. A hardy is a kind of tool with a square shank that fits into the hardy hole on top of the anvil. The hardy cut can be used to quickly cut a piece of metal off the piece you’re working without having to cool your metal and use other tools. I use the hardy cut when I want to cut in the tip of a knife instead of pounding it in, which takes much more time and skill. You can also cut off any extra handle length that you find as you work. Most blacksmiths make their own hardy cuts, but you can find them secondhand quite easily. While it’s not essential to knifemaking, it is an incredibly useful tool. I recommend picking one up if you come across it.
FORGE
There are two main kinds of forges: propane-fired and coal-fired. They both have advantages and disadvantages. Either way, they’ll both heat your metal to working temperature and get the job done.
Coal Forge
There’s something to be said about the history behind a coal-fired forge and the ancient feel of pulling glowing metal from a pile of smoking coals. They’re quieter than a propane forge and extremely versatile, and they make it easy to get localized heat. They can also be a bit challenging for a beginner. There is an art to running and using a coal fire. They require more maintenance, and it’s more likely that you accidentally overheat and burn your work. They also take up more space and are less portable. Perhaps the biggest issue with coal-fired forges is that, due to the nature of coal, they are pretty dirty to run. The coal itself gets black dust everywhere, and the smoke can annoy any neighbors that happen to be downwind.

A SIMPLE HAND CRANK COAL FORGE
Propane Forge
Propane forges are clean burning, require less training and start time to use, and don’t need the constant maintenance of the coal forge. They don’t have the same old-school feeling that a coal forge does, but they’re convenient and portable and won’t make enemies out of your neighbors. That being said, they’re also noisy and a bit ornery and require proper ventilation to avoid the risk of carbon monoxide poisoning. Unlike a coal forge, you’re limited in the size of the project you undertake, as you can only work a piece of metal that fits within the dimensions of the chamber.

AN EXAMPLE OF A PROPANE FORGE
So what kind of forge should you set up in your shop? When you’re first getting started, I recommend using the two-brick propane forge. It’s cheap and easy to make and use, and it doesn’t take up much of your work space. While it has a very small chamber, it’s fully functional for making knives and is a great forge to learn on.
As you get into blacksmithing, you may find that you want a forge that is more durable and can accommodate bigger projects. Ultimately, the forge you’ll use in the long run will be dependent on the space you have and your own personal preference. Spend time using both kinds of forges so that you can get a feel for what you like best.
BUILDING A TWO-BRICK FORGE
While building your two-brick forge, you’ll be creating a fair amount of dust from working your firebricks. Make sure to complete the project in a space with good ventilation that you don’t mind getting dirty. The firebrick dust can damage your lungs, so wear your respirator.
MATERIALS AND EQUIPMENT
![]() 2 soft firebricks (9" × 41/2" × 21/2" [22.9 × 11.4 × 6.4 cm])
2 soft firebricks (9" × 41/2" × 21/2" [22.9 × 11.4 × 6.4 cm])
![]() metal cloth (12" × 24" × 1/4" [30.5 × 61 × 0.6 cm])
metal cloth (12" × 24" × 1/4" [30.5 × 61 × 0.6 cm])
![]() metal cloth wire
metal cloth wire
![]() furnace cement
furnace cement
![]() 16.9 oz (500 ml) plastic water bottle
16.9 oz (500 ml) plastic water bottle
![]() ruler
ruler
![]() marker
marker
![]() half-round file
half-round file
![]() wire brush
wire brush
![]() wire cutters
wire cutters
![]() drill
drill
![]() bit
bit
![]() respirator
respirator
![]() propane hand torch
propane hand torch
1. MARK OUT THE CHAMBER.
Stack your two bricks on top of each other and flip them on their ends. Using the ruler, find the center point of the two bricks and mark this spot. Place the water bottle centered on this mark and trace the bottom of the bottle. Repeat this process on the other end of the bricks. This cylinder will be the chamber of your forge.
2. CARVE THE CHAMBER.
Unstack your bricks and lay them on your work space. You’ll be removing a half-circle of material from the inside of each brick. Use your file to carve out the chamber, one side at a time. Be careful handling your firebricks, as they are very soft and break easily. Use your wire brush to clean out your file as it gets gummed up with the dust.

MARK OUT YOUR BRICKS TO DESIGNATE THE AREA YOU’LL BE CARVING OUT. YOU CAN MAKE THE CHAMBER SLIGHTLY LARGER IF YOU NEED TO, BUT DON’T MAKE IT TOO BIG, AS YOUR FORGE WON’T HEAT UP AS WELL.
3. DRILL THE TORCH HOLE.
Once you have the two firebricks carved out, place them together and make sure they make a hollow cylinder in the middle. Make any touch-ups you need to. It’s important to have a circular chamber so that the flame can swirl in your forge. Using your drill bit, drill a hole in the top brick, toward the back of the brick and angled slightly toward the front opening.

DRILLING THE TORCH HOLE. TEST THE TIP OF YOUR TORCH TO MAKE SURE IT FITS.
4. REINFORCE WITH CEMENT.
Spread the furnace cement in between the two bricks where they meet. Also, coat the inside with a thin layer. Let the cement dry for a couple of days.
5. WRAP WITH METAL CLOTH.
Take your metal cloth and fold it around your bricks. Cut off any excess and wrap the edges around the ends. Make note of where the hole in the side of your forge is. Using your wire cutters, cut out a piece of the metal cloth so that you can access this hole. Use your metal cloth wire to secure the cloth around the bricks. The soft firebricks have a tendency to crack, and this will help hold your forge together.
6. ATTACH TORCH.
Set your forge on a non-flammable surface, as it will get very hot. Insert the tip of the propane torch into the hole in the back of your forge. You’ll have to find a way to arrange your forge so that your torch can be vertical and the tip fits easily into the hole. You can use a few extra firebricks to prop up your torch and elevate your forge, or improvise with C-clamps or anything that is non-flammable and will keep your setup steady.
7. FIRE UP THE FORGE.
Turn on your torch and check out your new forge. It’s normal to get a few cracks on the first firing, but the metal cloth should hold everything together. You may need to adjust the angle of your torch slightly to get the right heat, so test it out on a piece of scrap metal before you try it out on your blade.

THE FORGE HEATING UP. THE FLAME SHOULD SWIRL AROUND INSIDE THE CHAMBER, AS THIS WILL CAUSE THE HEAT TO WRAP AROUND YOUR WORK AND GIVE THE MOST ECONOMICAL DISTRIBUTION OF HEAT.