The processor's instruction pointer is just that — a pointer to the instruction that is about to be executed. This register is the RIP in 64-bit, EIP in Protected Mode, and IP in Real Mode. It behaves very similarly to that of a CD player. You can only read one data stream at a time. To read elsewhere, you have to move the pointer to the new location to read. (A better visualization would be a record player with its needle that cannot skip around.)
The only way to read the value of the instruction pointer is to call a function with the CALL instruction and then read the value on the stack where you had been. There is no MOV EAX,EIP instruction.
There are four primary methods that can be used to change the position of the processor's instruction pointer: jump, call, interrupt, and return. You can jump a delta, near, or far distance; call and return near or far; interrupt; and return. These instructions tend to be the most confusing to an assembler, and the exact instruction that you think you are using sometimes is not.
Mnemonic | P | PII | K6 | 3D! | 3Mx+ | SSE | SSE2 | A64 | SSE3 | E64T |
|---|---|---|---|---|---|---|---|---|---|---|
JMP |
|
|
|
|
|
|
|
|
|
|
jmp | ptr16:16 | Far sel:addr | |
jmp | m16:16 | Near (Real Mode) | 20 |
This is a general-purpose instruction used to jump to another location in memory. It can be a delta-based jump, or a near or far JMP. In a Real Mode environment the addresses are 16-bit based, supporting a segment size up to 65,536 bytes, and thus the segment and/or offset need to be 16-bit each. In a Protected Mode environment the addresses are 32-bit based with a 16-bit segment-selector register.
Flags | O.flow | Sign | Zero | Aux | Parity | Carry |
|---|---|---|---|---|---|---|
- | - | - | - | - | - |
Flags: None are altered by this opcode.
The delta jump is in reality a hop in a signed direction. You will notice that the following JMP examples use an 8-bit signed destination value.
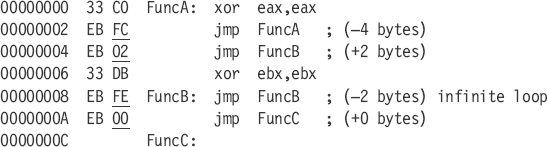
An EB FF opcode pair obviously is not used as it jumps into the middle of the jump instruction. If the address being jumped to is out of range in a (–128) reverse direction or a (127) forward direction, then the assembler will automatically switch to the E9 opcode, which supports 32 bits of signed direction in Protected Mode and 16 bits of signed direction in Real Mode.
This is a 32-bit value stored in a register, memory location, or 32-bit relative address.
NearAdrPtr  DWORD   offset  NearJmp         ; Near pointer
            DWORD   offset  OtherNearJmp    ; Near function
NearJmp proc    near
        ret
NearJmp endp

        jmp     NearJmp

        mov     ebx,offset NearJmp
        jmp     ebx

        mov     ebx,offset NearAdrPtr
        jmp     [ebx]

        xor     ebx,ebx
        jmp     NearAdrPtr[ebx]

jmp NearAdrPtr[ebx*4]This is a 48-bit value stored in a register, memory location, or 48-bit relative address. As Win32, Extended DOS, or other Protected Mode flat memory environments are pretty much what is developed for today, the need for the FAR pointer is, for the most part, only in the domain of the operating system or device driver developer. (Note that there are exceptions!)
FarAdrPtr   FWORD   offset  FarJmp          ; Far pointer
            FWORD   offset  OtherFarJmp     ; Far function
FarJmp  proc    far
        ret
FarJmp  endp

        jmp     far ptr FarJmp
This will be discussed further in the section on the RET instruction, but if you jump to code with an RET in the logic flow you need to make sure that the RET is a near return type if the previous call instruction was near, or the RET is a far return type if the previous call instruction was far. It needs to match the call instruction. For example, if you are executing a code fragment in a NEAR type function such as NearJmp and you jump to a different set of code, you should never jump into a FAR type procedure as the RET instruction when executed will be of the wrong type. Instead of a 32-bit value being popped off the stack in a Protected Mode environment, a 48-bit value would be popped, thus disorienting the pointers and eventually causing the program to crash! Even though the assembly code uses the same spelling of RET in the NEAR and FAR procs, the NEAR is translated to 0C3h and the FAR is translated to 0CBh. These have different meanings! If you specifically need a far return, try using RETF.
A simple rule to remember is for each NEAR or FAR call, have the appropriate matching RET; this is typically automatically done for you by the assembler unless you start jumping around in the code.
NearAdrPtr  DWORD   offset NearJmp    ; Near pointer
            DWORD   offset OtherNearJmp

NearJmp proc    near
        ret
NearJmp endp
vs
FarJmp  proc    far
        ret
FarJmp  endp
See Appendix C for memory/register mapping.
The same kind of memory reference that is used to access a memory table or array can also be used to access a jump vector. Almost any register can be used alone, in a pair addition, or with an optional base address and/or scale factor of {2, 4, or 8}, but you will note that there are some limitations in regard to the ESP register.
jmp     ...
jmp     NearAdrPtr[...]
eax | ebx | ecx | edx | esp | ebp | esi | edi |
ax | bx | cx | dx | sp | bp | si | di |
jcc | disp{8/16/32} | Near |
All of the instructions in the following table are conditional jumps, sometimes referred to as branch instructions. The instruction pointer (RIP/EIP/IP) is redirected to the relative address if the associated conditions are met as a logical TRUE. If they fail, the pointer merely executes the next line of code. For a properly optimized program, these instructions need to be minimally used and well positioned within the code.
The 8086 and 286 processors only support 8-bit displacement, not 16- or 32-bit displacement. Protected Mode uses an 8-bit or 32-bit displacement. The displacement gets sign extended and the address stored in the instruction pointer gets adjusted. The default is an 8-bit displacement [–128, 127] unless the jump is out of range; in that case, the larger displacement will be used. The goal is to organize your code so that a minimal number of bytes are required for the conditional branching logic.
Table 10-1. Comparison types. The same value types are contained with an individual cell. Complement types (opposites) are across from each other.
JA +JNBE | Jump if above. ZF=0, CF=0Jump if not below or equal. |
JAE +JNB | Jump if above or equal. CF=0Jump if not below. |
JC | Jump if carry. CF=1 |
JEJZ | Jump if equal. ZF=1Jump if zero. |
JG ±JNLE | Jump if greater. SF=OF. ZF=0.Jump if not less or equal. |
JGE ±JNL | Jump if greater or equal. SF=OFJump if not less. |
JO | Jump of overflow. OF=1 |
JPJPE | Jump if parity. PF=1Jump if parity even. |
JS | Jump if sign. SF=1 |
JBE +JNA | Jump if Below or Equal. ZF=1, CF=1Jump if not above. |
JB +JNAE | Jump if below. CF=1Jump if not above or equal. |
JNC | Jump if no carry. CF=0 |
JNEJNZ | Jump if not equal. ZF=0Jump if not zero. |
JLE ±JNG | Jump if less or equal. SF<>OF, ZF=1Jump if not greater. |
JL ±JNGE | Jump if less. SF<>OFJump if not greater or equal. |
JNO | Jump if not overflow. OF=0 |
JNPJPO | Jump if not parity. PF=0Jump if parity odd. |
JNS | Jump if no sign. SF=0 |
Comparison | (±) Signed | (+)Unsigned | ± | + |
|---|---|---|---|---|
op1 > op2 | OF = SF,ZF = 0 | ZF = 0,CF = 0 | Greater | Above |
op1 ≥ op2 | OF = SF | CF = 0 | GreaterEq | AboveEq |
op1 = op2 | ZF = 1 | ZF = 1 | Equal | Equal |
op1 ≤ op2 | OF ≠ SF,ZF = 1 | ZF = 1,CF = 1 | LessEq | BelowEq |
op1 < op2 | OF ≠ SF | CF = 1 | Less | Below |
Flags | O.flow | Sign | Zero | Aux | Parity | Carry |
|---|---|---|---|---|---|---|
- | - | - | - | - | - |
Flags: None are altered by this opcode.
Back in the early processors using these instructions made it very easy to calculate loop timing, etc., but the newer model Pentium processors use prediction mechanisms to help keep your code flowing at a pretty good rate typically based upon decisions the last time through and a touch of black box magic. When designing your code you should try to architect it to take advantage of the predictor. Better yet, use something called branchless code. Try to use logic to circumvent the need for branching logic.
Current Pentium type processors use different prediction mechanisms to help make the code run at its fastest rate. A bad prediction can cost you cycles, making optimization using the Jcc instructions quite tricky. We are not going to discuss the older processors as most are not made anymore and discussing them here would be pretty much a waste of time, print, paper, and trees! Alas, those of you working with embedded processors are typically using exact models and manufacturers and will therefore be, for the most part, using their related data books.
Warning
Different processors have different methods of branch prediction for different manufacturers. The prefetch and other cache buffers increase in size, and processors get faster as newer models of the processor become available on the market. With this said, it should be pointed out that the material being discussed here is probably already dated.
The most important optimization method for the 80×86 processors is using the branch prediction algorithm. These processors use what both Intel and AMD call a BTB (branch target buffer). This is essentially a history buffer of the behavior of the last n Jcc instructions. In a need for speed processors prefetch (preload) instruction code bytes before they are needed, translate them, and arrange them for processing within their multipipelines to be processed. When a relative or absolute jump or call occurs, that code is prefetched and prepared for processing. However, a problem comes up when a branch (Jcc) is encountered. Which way to go? Take the branch or flow through to the next instruction? Different solutions have been taken by different manufacturers. They have and use different sized BTBs, different prediction methodologies, different prefetch sizes, etc. This particular book is not about optimization but we will talk about the mechanism. The particulars depend on which manufacturer and which processor.
The Intel processor does its time sampling in cycles and uses a BTB as well as a prediction history. If a branch is taken, the branch is put into the BTB; if not taken (a flow through), the branch is not put into the BTB unless it was a false prediction. In other words, if executing instructions for the first time and none of the branches are taken, only flowed through, then they were all predicted correctly and thus are not put into the BTB. There is zero to no penalty for executing a branch instruction if the prediction was correct, but if wrong, there is a cycle penalty.
The instruction prefetch has four 32-byte buffers loaded sequentially (one at a time) until a branch is encountered, and then the BTB is used to predict a branch or not. If no predicted branch, the contiguous memory is loaded, but if a branch is predicted, the alternate prefetch buffer is loaded with the memory referenced by the branch. If the prediction was wrong, all the instruction pipelines are flushed and the prefetch mechanism begins again. So you should see the need to design your code to minimize the number of mispredictions. There is one other thing to be careful of and that has to do with two back-to-back Jcc instructions. If two Jcc instructions both have their last byte in the same 4-byte block, a misprediction can occur. This would only occur if the second branch has a displacement of 8 bits. Using a larger bit displacement, rearranging the code, or inserting a NOP instruction would solve the problem.
This method is bad as 14h and 16h are in the same 4-byte block {14h...17h}:
00000013        75      F8      jne     $Z1
00000015        74      07      jz      $Z2
The following is the best method to solve the problem, but only if your assembler lets you override an 8-bit displacement with a 32-bit one for Protected Mode, setting the last byte at 14h and 1ah. Note that in the following, the second code branch uses a 4-byte offset and not one byte. This is because it is outside the [–128, 127] range.
00000013        75      F8                 jne    $Z1
00000015        0f      84 00000007        jz   near ptr $Z2
Here is a 16-bit displacement for Real Mode setting the last byte at 14h and 18h:
00000013        75      F8         jne     $Z1
00000015        0f      84 0007    jz    near ptr $Z2
Not that I am urging you to use the NOP instructions, but this one is an alternative as 14h and 18h are in different 4-byte blocks. The NOP pushes the second conditional branch address further down.
00000013   75 F8       jne   $Z1
00000015   90          nop
00000016   90          nop
00000017   74 07       jz    $Z2
Branches that are not already in the BTB use the static prediction logic as follows.
The branch is predicted to be taken if a negative displacement, such as at the bottom of a loop. A flow through (branch not taken), would be a misprediction!
The branch is predicted not to be taken if a positive displacement such as a jump further down the code. The instruction pointer is expected to just flow through the branch instruction. A jump would be a misprediction.
$L1: nop
nop
jne $L1 ; Back-Branch-Taken
jz $L2 ;
Back-Branch-Taken
jz $L2 ; Forward-Branch-Not-Taken
nop
$L2: nop
Forward-Branch-Not-Taken
nop
$L2: nopA prefix of 3Eh (HT) is a hint to take the branch. A prefix of 2eh (HNT) is a hint not to take a branch (flow through). Only set if contrary to a static branch prediction. Sometimes there are no elements to test, so at the top of a function one might have an if conditional (size=0) empty test.
        test ecx,ecx
        db 3eh  ; Hint to take the branch
        jz $L9

                ; Insert looping code here

      $L9:
The default static prediction is to not branch as the jz is a forward-branch and the prediction logic does a flow through, but the 3eh says to override and take the branch as the length is typically expected to be zero most of the time.
The same rules for Intel apply here but with some minor changes. The AMD K6-2 chip uses a two-level 8192 entry branch prediction table. It is more effective to use only 8-bit displacements. Code with small loops should be aligned on 16-byte boundaries and code with loops that do not fit in the prefetch should be aligned on 32-byte boundaries. Small loops should be unrolled but large loops should not, due to inefficient use of the L1 instruction cache. A mispredicted branch is from one to four clocks. The penalty for a bad prediction if the branch is not in BTB is three clock cycles.
Removing branches from your code such as unrolling loops makes it more efficient by removing the possibility of misprediction. This is discussed in more detail in the next chapter. One method is to use the SETcc instruction to set Boolean flags. Another method is to use CMOV or FCMOV instructions to copy data. These methods can sometimes be manipulated to duplicate the same effect you were trying to achieve with the Jcc instruction without any possible prediction failure that would cost cycles.
For example, the following is the signed integer absolute number function n = ABS(n), which uses a Jcc instruction.
        test    eax,eax         ; Test if negative
        jns     $Abs1           ; Jump if positive

        neg     eax             ; Invert number, two's complement

$Abs1:                          ; eax is positive
As an alternative, we can do this without a Jcc instruction:
        mov     ecx,eax
        sar     ecx,31          ; all 1's if neg, all 0's if pos
        xor     eax,ecx         ; At this point we are one's complement
        sub     eax,ecx         ; n-(-1)=n+1 = two's complement
So you see, we did an ABS() function without any Jcc instructions; just a sleight of hand using general-purpose instructions. Admittedly this technique will not work on everything, but it will help in your optimizations. In Chapter 11 we will go into more detail.
Destination addresses of a jump should be code aligned to take advantage of the instruction prefetch.
align 16
Of course the Align statement must not be in the code flow, as unknown bytes are added to align the code, So it must always occur outside a function, thus after a JMP or RET statement. Another alignment type would be for fine-tuning on a byte-by-byte basis such as:
org $+3
...which aligns by moving the origin pointer from the $ current location by three bytes, effectively adding three unknown bytes. Typically you will find it paired with an alignment to create a fixed alignment point. This prevents any alignment of a previous function affecting the alignment of a following function.
        align   16
        org     $+3
Inside the code flow you can add nondestructive instructions such as the following to help align your code. Your flags may be altered but not the registers.
        nop             ; 1 byte
        mov     eax,eax ; 2 bytes
   66h  mov     ax,ax   ; 3 bytes
Let's start by examining a C type strlen() function designed to find the number of bytes in a zero-terminated ASCII string:
uint strlen(char *p)
{
        uint cnt = 0;

        while (*p++)
            cnt++;

        return cnt;
}
Let's try that in assembly and align the code to a 16-byte boundary:
                        align 16

00000000  54            push  ebp
00000001  8B EC         mov   ebp,esp
00000003  8B 54 24 08   mov   edx,[ebp+arg1] ; String

00000007  B8 FFFFFFFF   mov   eax,-1

0000000C  40            $L1:  inc eax
0000000D  8A 0A         mov   cl,[edx]       ; Get a character
0000000F  42            inc   edx
00000010  84 C9         test  cl,cl
00000012  75 F8         jnz   $L1            ; 0 terminator?
00000014  5D            pop   ebp
00000015  C3            ret                  ; return eax (length)
00000016
As you have probably noted, the entire function occupies 16h (22) bytes (000h..016h). It also has an efficiency problem. The 16-byte prefetch is first loaded with address 0000h...000fh, executes up to and including the "inc edx" and then reloads the prefetch with the next 16 bytes, address 0010h...001fh. The code then executes up to address 0013h and then the prefetch has to be reloaded with 0000h again. This continues over and over again until the zero terminator is encountered. Now if we tweak the alignment a tad we can contain this $L1 loop within one prefetch:
                           align 16
                           org $+4

00000004   54              push  ebp
00000005   8B EC           mov   ebp,esp
00000007   8B 54 24 08     mov   edx,[ebp+arg1]  ; String

0000000B   B8 FFFFFFFF     mov   eax,-1

00000010   40        $L1:  inc   eax
00000011   8A 0A           mov   cl,[edx]        ; Get a character
00000013   42              inc   edx
00000014   84 C9           test  cl,cl
00000016   75 F8           jnz   $L1             ; 0 terminator?

00000018   5D              pop   ebp
00000019   C3              ret                   ; return eax (length)
0000001A
You will now note that the beginning of the function actually starts on address 0004h, but the beginning of the loop is now aligned perfectly on a 16-byte boundary, allowing the entire loop to be contained with a single instruction prefetch load. This is a very old and simple alignment trick that is still usable on the newer processors.
pause
This was introduced with the P4. It indicates to the processor that this is a tight weight loop in one thread in a multithreaded application that is waiting for another thread. This is typically referred to as a spin loop. In essence, the processor is constantly testing and looping until a signal flag gets set.
        $L1:  cmp   eax,bSignal
              jne   $L1             ; I am *** BAD Code ***
Tip
Tight loops are a burden on the processor in a single or multithreaded environment. Inserting the PAUSE instruction indicates to the processor to let the thread snooze a micro-bit so as to allow the other threads more time to run. This is also effective in helping to reduce current drawn by a processor and so can help it run a bit cooler.
              cmp   eax,bSignal
              je    $L2             ; Already set so continue

$L1:          pause                 ; Snooze
              cmp   eax,bSignal
              jne   $L1             ; Loop if not ready yet!
$L2:
The code byte for the PAUSE instruction maps to a NOP instruction on previous processors so invisible to them!
"I would like you to write an insertion sort algorithm." Or "I would like you to write a function to convert a zero-terminated ASCII formatted string containing an upper/lowercase mix into just uppercase."
That is what the standard C runtime library function strupr() is for! The next time you are interviewing and they ask you to code the function strupr() but give you a minimal amount of information, smile, appear deep in thought, and then draw on that white board the following code in assembly. That will impress them! They will probably hire you.
The following is a sample string to uppercase conversion algorithm. It is only partially optimized as a do loop is used instead of a while loop so only one jump is utilized instead of two! It is also ASCII only as it has not been modified for SJIS, WCHAR, or Unicode strings. Using char c instead of char *p may or may not save you CPU cycles depending on the optimization ability of your compiler.
char *strupr(char *pStr)
{
    char *p;

    p = pStr;

    if (p != NULL)         // Test for NULL or assert()!
    {
        if (*p)            // If at least one character in string
        {
            do {           // do{} more efficient than while{}
                if (('a' <= *p) && (*p <= 'z'))
                {
                    *p -= 'a'-'A';   // 0x20;
                }

                ++p;
            } while (*p);  // Loop while characters
        }
    }

    return pStr;
}
Now try this in assembly. This can be done in one of two ways. If this function is called a lot and needs to be very fast, a table lookup could be used, as it would only cost a 256-byte enumeration table with indexes 61h to 7ah ("a" to "z") set to their uppercase equivalents.
struprtbl db    000h,001h,002h,003h,004h,005h,006h,007h,...
...etc
        xor     eax,eax

        mov     al,[edx]          ; Get a byte

$L1:    mov     al,struprtbl[eax]
        mov     [edx],al
        mov     al,[edx+1]        ; Get a byte
        inc     edx
        test    al,al
        jnz     $L1               ; Loop until a terminator
That code snippet is fine and dandy, but because there is a processor stall on line $L1, a technique learned earlier needs to be used. The following does just that and has no stall.
        mov     ebx,offset struprtbl
$L1:    xlatb
Obviously, using the memory alignment tricks learned in Chapter 2, "Coding Standards," in regard to the setting of memory, one could make this function fairly quick but a lot larger. But I leave that up to you.
The alternate method is using two comparisons similar to that used in the C code. The branch prediction within the CPU rewards you for a correct prediction and penalizes you for an incorrect one. If the English text string is examined it would be noted that it is mostly lowercase with some symbols and some uppercase. So if that is taken to advantage one can make this function pretty efficient.
Contrarily, writing the function strupr(), String Upper, the logic would want to skip around for symbols, uppercase, and extended ASCII and predict a flow through conversion for lowercase. In other words, skip below the conversion so the predictor will tend to be correct on a flow through.
;       strupr snippet
xyzzy   db     "Quick brown fox jumped!",0

        mov    al,[edx]   ; Get a character

$L1:    cmp    al,'a'
        jb     $L2        ; (1) Jump if symbols or uppercase
        cmp    al,'z'
        ja     $L2        ; (2) Jump if extended ASCII

        sub    al,20h     ; convert to uppercase
        mov    [edx],al   ; Save altered character

$L2:    inc    edx        ; Nothing to do, next!
        mov    al,[edx]   ; Get a character
        test   al,al
        jnz    $L1        ; 0 terminator?
That was pretty simple because I picked the simple one. The predictions for the JMP will succeed most of the time. Let's make things a little more interesting and try the complement function strlwr(), String Lower.
;       strlwr snippet

        mov    al,[edx]         ; Get a character

$L1:    cmp    al,'Z'
        ja     $L2              ; Jump if symbols or uppercase
        cmp    al,'A'
        jb     $L2              ; Jump if extended ASCII

        add    al,20h           ; convert to lowercase
        mov    [edx],al         ; Save altered character

$L2:    inc    edx              ; Nothing to do, next!
        mov    al,[edx]         ; Get a character
        test   al,al
        jnz    $L1              ; 0 terminator?
It is practically the same but definitely not very efficient as the branch predictor will fail more often. The following code is larger but more efficient.
;       strlwr snippet
;
        mov    al,[edx]

$L1:    cmp    al,'Z'
        jbe    $L4             ; Jump if symbol or uppercase

$L2:    inc    edx             ; Nothing to do; next!
        mov    al,[edx]        ; Get a character
        test   al,al
        jnz    $L1             ; 0 terminator?

;       Character is uppercase so we need to convert it!

$L3:    add    al,20h
        mov    [edx],al        ; Save altered character
        inc    edx             ; Advance string pointer!
        mov    al,[edx]        ; Get a character
        test   al,al
        jnz    $L1             ; 0 terminator?

; symbols or uppercase

$L4:    cmp    al,'A'
        jae     $L3            ; Jump up if uppercase

        inc    edx             ; Nothing to do; next!
        mov    al,[edx]        ; Get a character
        test   al,al
        jnz    $L1             ; 0 terminator?
In these examples it is basically known what the data would look like and this was taken to advantage so as to allow for the best data prediction, which could help the code run faster. Some types of data are hard to predict and those will require a little trial and error experimentation to get a handle on.
Tip
Branch predicting is not fortune-telling or soothsaying; it is pre-planning, data analysis, statistics, and a little dumb luck.
Mnemonic | P | PII | K6 | 3D! | 3Mx+ | SSE | SSE2 | A64 | SSE3 | E64T |
|---|---|---|---|---|---|---|---|---|---|---|
JCXZ |
|
|
|
|
|
|
| 32 |
|
|
JECXZ |
|
|
|
|
|
|
| 32 |
|
|
JRCXZ | 64 | ? |
jecxz | disp8 | |
jcxz | disp8 | |
jrcxz | disp8 | ±8-bit relative hop |
This instruction jumps to the relative destination address if RCX/ECX/ CX has a value of zero.
JCXZ    Jump if CX Zero
JECXZ   Jump if ECX zero
JRCXZ   Jump if RCX zero
Flags | O.flow | Sign | Zero | Aux | Parity | Carry |
|---|---|---|---|---|---|---|
- | - | - | - | - | - |
Flags: None are altered by this opcode.
jecxz $L1 | test ecx,ecx jz $L1 | |||
P bytes | 2 | 4 | ||
R bytes | 3 | 5 | ||
jcxz $L1 | test cx,cx jz $L1 | |||
P bytes | 3 | 5 | ||
R bytes | 2 | 4 | ||
This is pretty useful at the top of a function to detect a zero condition loaded from the stack. Note that the SETcc instruction does something very similar but this sample is to make JECXZ easier to understand.
        mov     ecx[ebp+arg1]   ; Get # of bytes
        jecxz   $xit            ; Jump if a value of 0
          :
          :
        mov     ecx,1           ; true

$xit:   mov     eax,ecx         ; false=0 true=1
retLOOPNZ destination
loope | disp8 | ±8-bit relative hop |
loopz | disp8 | |
loopne | disp8 | |
loopnz | disp8 |
The LOOP instruction decrements the ECX/CX register. If not a value of zero, the instruction pointer jumps to the destination address. If it is zero, the instruction pointer merely advances to the next instruction.
The LOOPZ and LOOPE instructions decrement the ECX/CX register. If not a value of zero and the zero flag is set from a previous instruction, then the instruction pointer jumps to the destination address. If it is zero, the instruction pointer merely advances to the next instruction.
The LOOPNZ and LOOPNE instructions decrement the ECX/CX register. If not a value of zero and the zero flag is not set from a previous instruction, then the instruction pointer jumps to the destination address. If it is zero, the instruction pointer merely advances to the next instruction.
Left and right columns are complemented instructions.
LOOPNZ LOOPNE | Jump if Below or Equal.ZF=1,CF=1 Jump if not above. |
Flags | O.flow | Sign | Zero | Aux | Parity | Carry |
|---|---|---|---|---|---|---|
- | - | - | - | - | - |
Flags: None are altered by this opcode.
$L1:    add     esi,4
        test    [esi],al
        loopnz  $L1
LOOP destination
Mnemonic | P | PII | K6 | 3D! | 3Mx+ | SSE | SSE2 | A64 | SSE3 | E64T |
|---|---|---|---|---|---|---|---|---|---|---|
LOOP |
|
|
|
|
|
|
|
|
|
|
loop | disp8 | ±8-bit relative hop |
The following table is based upon using the LOOP instruction. You will note that this instruction was only effective for the original 80×86 processor. Since that time, its use is limited to the Cyrix processor. If writing generic code, do not use it! Write a macro to replace it; better yet, forget it exists! But if writing Cyrix-specific code, then use it by all means; it will save you a clock cycle.
loop $L1 | dec ecx jz $L1 | dec cx jz $L1 | ||||
P bytes | 2 | 3 | 4 | |||
R bytes | 2 | 4 | 3 | |||
On the other hand, the LOOPZ and LOOPNZ instructions have an efficient CPU time. Even with the ability of processors to handle multiple instructions in multiple pipes, the LOOPZ and LOOPNZ instructions are the most efficient.
An alternative memory management scheme such as pancaking can be utilized. This is where a base (or sub-base) level is set and the next available memory pointer is merely advanced by the amount of memory needed. There is no memory-free function as memory is merely disposed of by resetting the memory available back to its original base (in essence, abandoning the memory), then merely making sure the base is on a 16-byte alignment. This is like a bottom based processor stack. A free memory pointer is preset to the bottom of the stack at the physical base level of that memory. As data is loaded into memory, the free pointer is moved higher up in memory. When it is decided it is time to release that memory, all allocated objects are instantly thrown away by merely resetting the free pointer to the base level again. Console games sometimes use this method to keep code space from having to deal with individual deallocations.
Obviously, since there is no need for reallocations, or freeing of memory, then there is no need for a header either.
There are other schemes. Just make sure your memory is 16-byte aligned. Now that any possible memory allocation alignment problems have been taken care of up front, it is time to move on to the good stuff.
When one orders "all you can eat" pancakes, either a short stack or a tall stack is delivered to your table. If you have not finished eating the stack of pancakes and the server brings you more, you do not pick them all up and place them under your older pancakes; you have them placed on top of those already on your plate. So this would be considered a LIFO (last in, first out) system. Those new pancakes will be the first to be eaten, will they not?
Well, a computer stack is like that. Memory is typically allocated from the bottom up, and data in that memory is low address to high address oriented. The computer stack starts from the top of memory and works its way down, and hopefully the two ends do not meet or boom! That is why you have to watch recursive functions; if they "curse" too much, they run out of memory. We will go into a little more depth as we discuss the PUSH and POP instructions.
Mnemonic | P | PII | K6 | 3D! | 3Mx+ | SSE | SSE2 | A64 | SSE3 | E64T |
|---|---|---|---|---|---|---|---|---|---|---|
PUSH |
|
|
|
|
|
|
|
|
|
|
push | #{8/16/32/64} |
push | rm{16/32/64} |
push | sreg16 |
This instruction pushes an 8-, 16-, 32-, or 64-bit immediate value on the stack depending on the processor mode. A 16-, 32-, or 64-bit general-purpose register or memory value, or 16-bit segment register or memory value can also be pushed onto the stack. When operands are a different size than the CPU mode, the data size of the data is extended and the stack remains aligned. POP is the complement of this instruction.
Flags | O.flow | Sign | Zero | Aux | Parity | Carry |
|---|---|---|---|---|---|---|
- | - | - | - | - | - |
Flags: None are affected by this opcode.
POP operand
Mnemonic | P | PII | K6 | 3D! | 3Mx+ | SSE | SSE2 | A64 | SSE3 | E64T |
|---|---|---|---|---|---|---|---|---|---|---|
POP |
|
|
|
|
|
|
|
|
|
|
pop | rm{16/32/64} |
pop | sreg16 |
This instruction pops a 16- or 32-bit register value or 16-bit segment register from the stack. PUSH is the complement of this instruction.
Flags | O.flow | Sign | Zero | Aux | Parity | Carry |
|---|---|---|---|---|---|---|
- | - | - | - | - | - |
Flags: None are affected by this opcode.
pusha
pushad
The PUSHA and PUSHAD instructions use the same opcode, which pushes in order the following list of registers: EAX, ECX, EDX, EBX, ESP, EBP, ESI, and EDI if in Protected Mode or AX, CX, DX, BX, SP, BP, SI, and DI if in Real Mode. In Protected Mode PUSHAD should be used and in Real Mode PUSHA should be used. POPAD/POPA are the complement of this instruction. This is no 64-bit push!
Flags | O.flow | Sign | Zero | Aux | Parity | Carry |
|---|---|---|---|---|---|---|
- | - | - | - | - | - |
Flags: None are affected by this opcode.
The following are the equivalent functions and push order of the general-purpose registers.
pushad | push eax push ecx push edx push ebx push esp push ebp push esi push edi | |
P bytes | 1 | 8 |
R bytes | 2 | 16 |
pusha | push ax push cx push dx push bx push sp push bp push si push di |
1 | 16 |
1 | 8 |
Intel recommends that you not use "complex" instructions and encourages you to use simple instructions instead.
Mnemonic | P | PII | K6 | 3D! | 3Mx+ | SSE | SSE2 | A64 | SSE3 | E64T |
|---|---|---|---|---|---|---|---|---|---|---|
POPA |
|
|
|
|
|
|
|
|
| 32 |
POPAD |
|
|
|
|
|
|
|
|
| 32 |
popa
popad
The POPAand POPAD instructions use the same opcode, which pops in reverse order the results of the complement instruction PUSHA or PUSHAD. The following registers are popped from the stack in this order: EDI, ESI, EBP, ESP, EBX, EDX, ECX, and EAX if in Protected Mode or DI, SI, BP, SP, BX, DX, CX or AX if in Real Mode.
Flags | O.flow | Sign | Zero | Aux | Parity | Carry |
|---|---|---|---|---|---|---|
- | - | - | - | - | - |
Flags: None are affected by this opcode.
The following are the equivalent functions and pop order of the general-purpose registers.
popad | pop edi pop esi pop ebp pop esp pop ebx pop edx pop ecx pop eax |
popa | pop di pop si pop bp pop sp pop bx pop dx pop cx pop ax |
See Chapter 3, "Processor Differential Insight."
Mnemonic | P | PII | K6 | 3D! | 3Mx+ | SSE | SSE2 | A64 | SSE3 | E64T |
|---|---|---|---|---|---|---|---|---|---|---|
ENTER |
|
|
|
|
|
|
|
|
|
|
enter #(16), 0 | |
enter #(16), 1 | |
enter #(16), #(8) |
This instruction allocates a stack frame for a procedure.
Mnemonic | P | PII | K6 | 3D! | 3Mx+ | SSE | SSE2 | A64 | SSE3 | E64T |
|---|---|---|---|---|---|---|---|---|---|---|
LEAVE |
|
|
|
|
|
|
|
|
|
|
leave
This instruction deallocates a stack frame for a procedure. The register pairings of SP and BP are dependent upon the mode running.
64-bit |
|---|
mov rsp,rbp pop rbp |
32-bit |
|---|
mov esp,ebp pop ebp |
16-bit |
|---|
mov sp,bp pop bp |
Now to discuss a totally different but related topic. These functions fall into one of two categories: the function and the procedure. Now as we all learned in school, a function returns a value and a procedure does not, but their code is typically written the same. The only real difference is that the calling code makes use of the EAX and/or EDX/EAX register(s) when the function returns.
Function | Procedure |
y = f( x ) | f( x ) |
Mnemonic | P | PII | K6 | 3D! | 3Mx+ | SSE | SSE2 | A64 | SSE3 | E64T |
|---|---|---|---|---|---|---|---|---|---|---|
CALL |
|
|
|
|
|
|
|
|
|
|
call | ptr16:16 | Far sel:addr | |
call | m16:16 | Near (Real Mode) | 20 |
This is a general-purpose instruction used to call near or far code in another location in memory followed up by a RET or RETF instruction.
Flags | O.flow | Sign | Zero | Aux | Parity | Carry |
|---|---|---|---|---|---|---|
- | - | - | - | - | - |
Flags: None are altered by this opcode.
This instruction is very similar to the JMP instruction except that it puts a return address on the stack so when a matching RET or RETF instruction is encountered, it will return to the next instruction following the CALL.
This is a 32-bit value stored in a register, memory location, or 32-bit relative address.
NearAdrPtr  DWORD   offset  NearJmp         ; Near pointer
            DWORD   offset  OtherNearJmp    ; Near function
NearJmp proc    near
        ret
NearJmp endp

        call    NearJmp

        mov     ebx,offset NearJmp
        call    ebx

        mov     ebx,offset NearAdrPtr
        call    [ebx]

        xor     eax,eax
        xor     ebx,ebx
        call    NearAdrPtr[ebx]

        call    NearAdrPtr[ebx*4]

call NearAdrPtr[eax+ebx*4]This is a 48-bit value stored in a register, memory location, or 48-bit relative address. As Win32, Extended DOS, or other Protected Mode flat memory environments are pretty much what is developed for today, the need for the FAR pointer is, for the most part, only in the domain of the operating system or device driver developer. (Note that there are exceptions.)
FarAdrPtr   FWORD   offset  FarJmp          ; Far pointer
            FWORD   offset  OtherFarJmp     ; Far function
FarJmp  proc    far
        ret
FarJmp  endp

        call     far ptr FarJmp
The same kind of memory reference that is used to access a memory table or array can also be used to access a call vector. Almost any register or register pair can be used alone or in an addition equation with an optional base address and scale factor of {2, 4, or 8}, but you will note that there are some limitations in regard to the ESP register.
call ...
call NearAdrPtr[...]
eax | ebx | ecx | edx | esp | ebp | esi | edi |
ax | bx | cx | dx | sp | bp | si | di |
call    word ptr [...]
call    dword ptr [...]
call    fword ptr [...]
call    NearAdrPtr[...]
See Appendix C for the mapping tables.
ret | Near | |
ret | # | |
retf | Far |
This is a general-purpose instruction used to return from a CALL instruction to a previous location in memory.
Flags | O.flow | Sign | Zero | Aux | Parity | Carry |
|---|---|---|---|---|---|---|
- | - | - | - | - | - |
Flags: None are altered by this opcode.
The various calls given in the following table push onto the stack the listed number of bytes as a return address. When this instruction is encountered, that value is popped off the stack. The 0C3h opcode pops a NEAR call and the 0CBh opcode pops a FAR call. The actual number of bytes also depends on whether the processor is in Protected or Real Mode. The number of bytes of stack displacement can also be specified by 0C2h versus 0CAh.
bytes on stack | RET opcode |
Ret w/Stack Adj | |
Protected Mode Near | 4 | 0C3h | 0C2h, #{16} |
Protected Mode Far | 6 | 0CBh | 0CAh, #{16} |
Real Mode Near | 2 | 0C3h | 0C2h, #{16} |
Real Mode Far | 4 | 0CBh | 0CAh, #{16} |
NearJmp proc    near
        ret
NearJmp endp
vs
FarJmp  proc    far
        retf
FarJmp  endp
Note that RETF is not really an instruction. With a procedural block marked as far, a RET instruction should automatically be encoded as a RET FAR. If your code has trouble at run time, peek at the assembly listing and verify the RET code byte is the correct one to match the call. Some macro assemblers allow the RETF reference to force a RET FAR.
Before we get too far along we should discuss the methods of passing arguments on a stack. In essence, a function call has to push arguments (if not a void function) onto the stack, push the current processor's instruction pointer (EIP or RIP) (the pointer to where the instruction being executed is) onto the stack, and perform a subroutine call. Use the stack yet again for any local data and then return to where it left off while unwinding the stack. There are three basic methods to this. From a high-level language such as C/C++ this is taken for granted, but from the low level of assembly language this has to be done carefully or the stack and program counter will be corrupted.
We are going to examine function calls using a 32-bit processor, as that is what most of you are currently using. Thus, each argument that gets pushed onto the stack is 4 bytes in size. An item such as a double-precision floating-point, which uses 8 bytes, is actually pushed as two halves — lower 4 bytes, upper 4 bytes. When the processor is in 64-bit mode, 8 bytes are pushed on the stack.
int     hello(int a, int b)
{
        int c = a + b;
        return c;
}

int i = hello(1, 2);The function call to hello is straightforward:
        00401118  push   2
        0040111A  push   1
        0040111C  call   hello
        00401121  add    esp,8
Once the instruction pointer (EIP) arrives at the first byte of the function hello, the stack will look similar to this:
Register | Address (N...N+3) | HexValue | Description |
|---|---|---|---|
0012FF00h | 00000002 | Arg#2 | |
0012FEFCh | 00000001 | Arg#1 | |
ESP= | 0012FEF8H | 00401121 | Return address |
0012FEF4H |
EIP= | 004010D0 | hello() |
The function hello looks similar to the following. I have left the addresses for each line of assembly for reference but they are not needed.
                                  ; Set up stack frame
        004010D0  push    ebp     ; Save old ebp
        004010D1  mov     ebp,esp ; Set local frame base
        004010D3  sub     esp,4
Let us peek at the stack one more time and note the changes:
Register | Address (N...N+3) | HexValue | Description |
|---|---|---|---|
0012FF00h | 00000002 | Arg#2 | |
0012FEFCh | 00000001 | Arg#1 | |
0012FEF8H | 00401121 | Return address | |
EBP= | 0012FEF4H | ??? | (old EBP) |
ESP= | 0012FEF0H | Local arg 'c' | |
0012FEECH |
EIP= | 004010E8 | hello() |
The EBP register is used to remember where the ESP was last, and the ESP is moved lower in memory, leaving room for the local stack arguments and positioned for the next needed push.
                         ; Do the calculation    a+b
        004010E8   mov          eax,dword ptr [ebp+8]
        004010EB   add          eax,dword ptr [ebp+0Ch]
                         ; Restore stack frame
        004010F1   mov          esp,ebp    ; Restore esp
        004010F3   pop          ebp        ; Restore ebp
        004010F4   ret                     ; Restore eip
So upon returning, anything lower than ESP in stack memory is essentially garbage, but the instruction pointer (EIP) is back to where it can continue in the code. But the stack pointer still needs to be corrected for the two arguments that were pushed.
        00401118  push    2
        0040111A  push    1
        0040111C  call    hello
        00401121  add     esp,8   ;2*sizeof(int)
They can either be popped:
        pop ecx
        pop ecx
...or, more simply, just adjust the stack pointer for two arguments, four bytes each:
add esp,8
So in a C declaration (CDECL) type function call, the calling function corrects the stack pointer for the arguments it pushed. One other item to note is that immediate values {1, 2} were pushed on the stack. So the stack was used for the arguments and for the instruction pointer.
Let us now examine the standard calling convention using this same code sample:
        00401118  push    2
        0040111A  push    1
        0040111C  call    hello
You will note that there is no stack correction upon returning. This means that the function must handle the stack frame correction upon returning.
                        ; Restore stack frame
        004010F1  mov          esp,ebp    ; Restore esp
        004010F3  pop          ebp        ; Restore ebp
        004010F   ret          8          ; Restore eip
In reality, the return instruction RET handles the stack correction by adjusting the return address by the number of bytes specified by the immediate value. In the previous snippet, it was adjusted by 8 bytes.
Let us now examine the fast calling convention using this same code sample. On a MIPS or PowerPC processor this is actually a very fast method of calling functions, but on an 80×86 it is not quite so fast. On those platforms there are 32 general-purpose registers of which a portion of them are used as stack arguments. As long as the number of arguments is reasonable the registers are used. When there are too many, the stack-like mechanism is used for the overage. On the 80×86 there are very few general-purpose instructions available in place of stack arguments for 16/32-bit mode. For example, under VC6 only two registers are available — ECX and EDX — at which point the stack is used for the additional arguments.
        mov     edx,2      ; arg#2  Register used
        mov     ecx,1      ; arg#1  Register used
        call    hello
You will notice that the arguments were actually assigned to registers and the stack was only used to retain the program counter (EIP) for the function return. Since the values are already in registers, there is no need for the function to access them from the stack or copy them to a register.
When three arguments are used, however:
        i = hello(1, 2, 3);

        push    3           ; arg#3  Stack used
        mov     edx,2       ; arg#2  Register used
        mov     ecx,1       ; arg#1  Register used
        call    hello
...the arguments that were pushed on the stack are stack corrected upon return by the function; this is the same as the fast call mechanism!
        mov     esp,ebp
        pop     ebp
        ret     4               ; One 4-byte arg to be popped.
It is very important to realize that both the calling routine and the function itself must be written using the same calling convention. These can all be used within a single application but can get very confusing as to which was used where, and so consistency is important or your code will fail.
int #
into
This is an operating system instruction typically used by an application to access a BIOS function. This is also referred to as a software interrupt. A hardware interrupt calls an interrupt procedure in response to servicing an IRQ (interrupt request). The base of the computer's memory is at memory location 0000:00000000h. At that base is a vector jump table. Multiplying 4 × the interrupt number will give you the offset to the entry that contains the address that will be vectored to.
Flags | O.flow | Sign | Zero | Aux | Parity | Carry |
|---|---|---|---|---|---|---|
- | - | - | - | - | - |
Flags: None are altered by this opcode.
The interrupt function is typically written in one of two ways. If written to service a hardware interrupt, it services some predefined single task. If written to service a software interrupt, it is written as a function library where it takes values in registers and services them based upon the specialized functionality. On the 80×86 type personal computer the older DOS operating system typically required the application programmer to call the BIOS using the INT instruction to access all the peripherals such as keyboard, display card, mouse, communications port, printer port, timer, etc. Sometimes a peripheral would use more than one interrupt, one to support the BIOS (basic input/ouput system) library interface and one to handle the IRQs.
Table 10-2. Device, interrupt, address, and IRQ mappings for PC
Device | Software INT | Hardware INT | 0000:???? Address | IRQ |
|---|---|---|---|---|
Debug (Break Point) | 3 | 3 | 000C-000Fh | 8 |
Keyboard | 16h | 9 | 0058-005Bh 0024-0027h | 1 |
RS232 Com#2 | 14h | 0Bh | 0050-0053h 002C-002Fh | 3 |
RS232 Com#1 | 14h | 0Ch | 0050-0053h 0030-0033h | 4 |
Video | 10h | - | 0040-0043h | - |
DOS (Primary Access) | 21h | 0084-0087h | - | |
Mouse | 33h | - | 00CC-00CFh | - |
There are many more interrupts, which are too numerous to list. No matter how the interrupt is written, they all end exactly the same way, with the IRET instruction.
Win32 developers will find that calling the function DebugBreak() actually calls INT 3. This effectively stops the debugger at the position of the instruction pointer.
iret | [Un]Signed | 16 |
iretd | [Un]Signed | 32 |
iretq | [Un]Signed | 64 |
This is a general-purpose instruction used to return from an interrupt to a previous location in memory.
Flags | O.flow | Sign | Zero | Aux | Parity | Carry |
|---|---|---|---|---|---|---|
- | - | - | - | - | - |
Flags: None are altered by this opcode.
cli
sti
The STI instruction is used to set the interrupt flag, thus enabling (allowing) interrupts, and the CLI instruction is used to clear the interrupt flag, thus disabling (preventing) interrupts. It should be noted that NMI (non-maskable interrupts) and exceptions are not prevented.
Flags | O.flow | Sign | Zero | Aux | Parity | Carry |
|---|---|---|---|---|---|---|
- | - | - | - | - | - |
Flags: None are altered by this opcode.
When an interrupt is being serviced due to an elapsed timer, keyboard key pressed, communications received or sent, etc., the interrupt flag bit is automatically cleared to 0, thus preventing any other interrupts from interrupting (disturbing) the interrupt code already being run. The interrupt flag is automatically set to 1 upon the IRET instruction being executed.
IService proc  far
         push  eax

;             Insert your interrupt code here

         pop   eax
         iret
IService endp
If an interrupt is going to take some time to process and is not a quick in and out, a programmer will typically insert an STI instruction at the top of the interrupt to allow interrupts to occur. If at some point interrupt-critical hardware is being accessed, the CLI instruction will be called first to temporarily disable interrupts, the hardware will be accessed, and the STI instruction will be used to immediately allow interrupts again.
IService proc    far
         sti                ; Enable Interrupts
         push    eax

;               Insert your interrupt code here

         pop     eax
         iret
IService endp
When interrupts are re-enabled inside an interrupt, there is a possibility that the event that instigated the interrupt can cause a new event requesting a new interrupt before the interrupt was done servicing the first interrupt. This interrupt "nesting" needs to be accounted for in your code through the use of a flag, etc., typically not allowing the body of the interrupt code to be executed by the second (nested) interrupt. It should return immediately. The body of the code, however, should take into account that interrupt nesting may have taken place and therefore should compensate for it. A simple directly manipulated flag can solve this problem. Something to keep in mind is that the only absolute is the code segment where the interrupt is! Data is unknown, so we actually store the data segment value in the code segment so we can access the application data.
        IServCS    dw      0
        IServCnt   dd      0

        IService   proc    far
                   test    cs:IServCnt,0
                   jnz     $Nest           ; Jump if reinterant

                   inc     cs:IServCnt     ; Set our flag
                   sti                     ; Enable interrupts
                   push    ds              ; Save data segment
                   push    eax             ; Save any registers we'll use

                   mov     ds,cs:IServCS   ; Get our real Data Segment

        ;                 Insert your interrupt code here

                   cli     ; Disable interrupts
        ;                  Insert your interrupt-sensitive hardware code
                   sti     ; Enable interrupts

        ;                  Insert your other interrupt code here

                   pop     eax              ; Restore registers
                   pop     ds
                   dec     cs:IServCnt

       $Nest:      iret
       IService    endp
You should note that the flag test occurred before the interrupt was re-enabled. This was to ensure that another interrupt did not occur while the possibility of nested interrupt was tested for. If application code wants to very temporarily stop interrupts so it can set up interrupt-sensitive hardware, all it needs to do is call the CLI instruction followed by a STI instruction.