
Understanding the calendar's different views and functions
Noting Notes
Mingling with Contacts
Keying in on Keynote
Mastering Pages
Crunching Numbers
We hate to break the news to you, but your iPad isn't all fun and games. It has a serious side. It can remind you of appointments, help you keep all your contacts straight, and if you're willing to purchase iWork apps, deliver a first-class spreadsheet, word processor, and presentation program.
Over the next several pages, we look at some of the less sexy functions of your iPad. Indeed, we'd venture to say that no one bought an iPad because of its calendar, note-taking ability, or address book. Still, having these programs is awfully handy, and we're confident you'll feel the same way if you spring for some of or all the optional iWork apps.

Notes is an application that creates text notes that you can save or send through e-mail. To create a note, follow these steps:
Tap the Notes icon on the Home screen.
Tap the + button in the upper-right corner to start a new note.
The virtual keyboard appears.
Type the note.
When you're finished, tap the Done button in the upper-right corner to save the note.
The Done button appears only when the virtual keyboard is on-screen, however, so you can't see it in Figure 12-1.

After a note is saved, you can do the following:
Tap the Notes button in the upper-left corner of the screen to see a list of all your notes. When the list is on-screen, just tap a note to open and view, edit, or modify it.
Tap the left- or right-arrow button at the bottom of the screen to read the previous or next note.
Tap the Letter icon at the bottom of the screen to e-mail the note using the Mail application (see Chapter 11 for more about Mail).
Tap the Trash Can icon at the bottom of the screen to delete the note.
Note
We'd be remiss if we didn't remind you that you can sync notes with your computer (see Chapter 3).
And that's all she wrote. You now know everything there is to know about creating and managing notes with Notes.
The Calendar program lets you keep on top of your appointments and events (birthdays, anniversaries, and so on). You open it by tapping the Calendar icon on the Home screen. The icon is smart in its own right because it changes daily; the day of the week and date are displayed.
Mac users can sync their calendars with either iCal or Microsoft Entourage; PC users can sync calendars with Microsoft Outlook. See Chapter 3 for more info on how to sync.
Note
You cannot create new calendars on your iPad — they must be created on your Mac or PC and then synced.
You have four main ways to peek at your calendar(s): Day, Week, Month, and List views. Choosing one is as simple as tapping the Day, Week, Month, or List button at the top of the Calendar screen. From each view, you can always return to the current day by tapping the Today button in the lower-left corner.
From a single calendar view, you can look at appointments from an individual calendar, or consolidate several calendars — like one for home, one for your kid's activities, and one for your job — in a single view. Here's how:
To pick the calendars you want to display, follow these steps:
Tap the Calendars button at the upper-left corner of the screen.
That summons a Show Calendars window.
Tap each calendar you want to view by tapping its entry.
A check mark appears. Tap an entry again so that a given calendar won't appear, and the check mark disappears. To show all the calendars, tap the All option. To make them disappear, tap All again. In the example shown in Figure 12-2, all the calendars are selected.
Warning
Be careful: To-do items created on your Mac or PC calendars aren't synced and don't appear on your iPad.

You can also choose to view your calendar or calendars in different views:
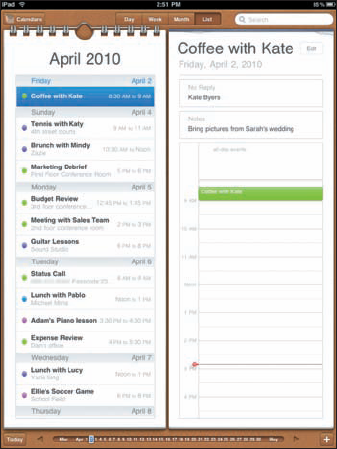
List view: List view isn't complicated. As its name indicates, List view, shown in Figure 12-3, presents a list of current and future appointments on the left side of the screen, and an hour-by-hour view of the day that is highlighted on the right. About eight hours of the highlighted date are visible in landscape mode; about ten are visible in portrait mode. You can drag the list up or down with your finger or flick to rapidly scroll through the list. To switch the day shown, tap the right or left arrow on the bottom of the screen, or tap or drag the timeline.
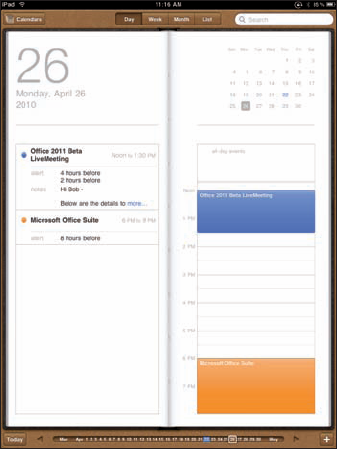
Day view: Day view, shown in Figure 12-4, reveals the appointments of a given 24-hour period (though you have to scroll up or down to see an entire day's worth of entries). As in the List view, you can drag or tap the timeline to move to a new date or press the left or right arrows for the same purpose.
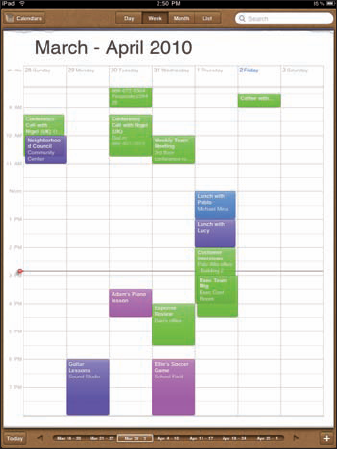
Week view: As you would expect, the Week view displayed in Figure 12-5 shows your appointments over a 7-day period. Again, use the arrows or timeline at the bottom of the screen to change the time frame that you see. You'll notice of course that the timeline now reflects one-week intervals, which is the way it should be.
Month view: By now, you're getting the hang of these different views. When your iPad is in Month view, as it is in Figure 12-6, you can see appointments from January to December. In this monthly calendar view, a colored dot (designating a specific calendar) and short description appear on any day that has appointments or events scheduled. Tap that day to see the list of activities the dot represents.

Consider that you scheduled an appointment with your dentist months ago, but now you can't remember the date or the time. You could pore through your daily, weekly, or monthly calendars or scroll through a list view until you land on the appointment. But that is the very definition of inefficiency. The much faster way is to just type the name of your dentist in the Search box in the upper-right corner of the various Calendar screens. You're instantly transported to the date and time of the entry from your current Calendar view.
In Chapter 3, you discover pretty much everything there is to know about syncing your iPad, including syncing calendar entries from your Windows machine (using the likes of Microsoft Outlook) or Mac (using iCal or Microsoft Entourage).
Of course, in plenty of situations, you enter appointments on the fly. Adding appointments directly to the iPad is easy. Follow these steps:
Tap the Calendar icon at the top of the screen, and then tap the Day, Week, Month, or List button.
Tap the plus sign (+) button in the lower-right corner of the screen.
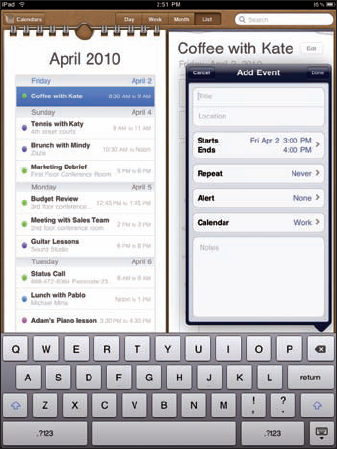
The Add Event screen, shown in Figure 12-7, appears along with the virtual keyboard.
Tap the Title and Location fields and finger-type as much (or as little) information as you feel is necessary.
Set the time for the entry by tapping the Starts/Ends field and then proceeding as follows:
If your calendar entry has a start time or end time (or both):
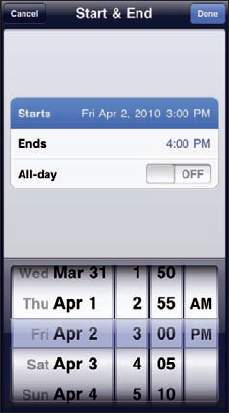
In the Start & End screen that appears (see Figure 12-8), choose the time the event starts and then the time it ends.
Use your finger to roll separate wheels for the date, hour, and minute (in 5-minute intervals) and to specify AM or PM. It's a little like manipulating one of those combination bicycle locks or an old-fashioned date stamp used with an inkpad.
Tap Done when you're finished.
If you're entering a birthday or another all-day milestone, tap the All-Day button so that On (rather than Off) is showing. Then tap Done.
Note
Because the time isn't relevant for an all-day entry, note that the bottom half of the screen now has wheels for just the month, day, and year, and not hours and minutes.
If you're setting up a recurring entry, such as an anniversary, tap the Repeat window. Tap to indicate how often the event in question recurs and then tap Done.
The options are Every Day, Every Week, Every 2 Weeks, Every Month, and Every Year.
If you want to set a reminder or alert for the entry, tap Alert. Then tap a time, and then tap Done.
Alerts can be set to arrive on the actual date of an event, 2 days before, 1 day before, 2 hours before, 1 hour before, 30 minutes before, 15 minutes before, or 5 minutes before. When the appointment time rolls around, you hear a sound and see a message like the one shown in Figure 12-9. Tap View Event to check out the details of the appointment or tap Close if you feel the reminder you just received will suffice.
Tip
If you're the kind of person who needs an extra nudge, set another reminder by tapping the Second Alert field, which appears only after you've set one alert.
Tap Calendar to assign the entry to a particular calendar, and then tap the calendar you have in mind (Home or Work, for example), assuming that you have multiple calendars. Then tap Done.
If you want to enter notes about the appointment or event, tap Notes. Type your note on the virtual keyboard, and then tap Done.
Back on the Add Event screen, tap Done after you finish entering everything.

Tip
After you create calendar entries, check out the following tips for working with your calendar:
Turn off a calendar alert by tapping Settings

To modify an existing calendar entry, tap the entry, tap Edit, and then make whichever changes need to be made.
To wipe out a calendar entry altogether, tap the entry, tap Edit, and then tap Delete Event. You have a chance to confirm your choice by tapping either Delete Event (again) or Cancel.
Calendar entries you create on your iPad are synchronized with the calendar you specified in the iTunes Info pane.
If you work for a company that uses Microsoft Exchange ActiveSync, calendar entries and meeting invitations from coworkers can be pushed to your device so that they show up on the screen moments after they're entered, even if they're entered on computers at work. Setting up an account to facilitate this pushing of calendar entries to your iPad is a breeze, although you should check with your company's tech or IT department to make sure that your employer allows it. Then follow these steps, which are similar to adding an e-mail account, covered in Chapter 5:
Tap Settings.
Tap Mail, Contacts, Calendars.
From the Add Account list, tap Microsoft Exchange.
Note
Only one account that takes advantage of Microsoft Exchange ActiveSync can be configured to work on your iPad.
Fill in the e-mail address, username, password, and description fields, and then tap Next.
Enter your server address on the next screen that appears. The rest of the fields should be filled in with the e-mail address, username, and password you just entered. Tap Next.
If your company uses Microsoft Exchange 2007, you don't have to enter the address of your Exchange server — your iPad can determine it automatically.
Tap the On switches for all the information types you want to synchronize using Microsoft Exchange, from among Mail, Contacts, and Calendars.
You should be good to go now, although some employers may require you to add passcodes to safeguard company secrets.
Tip
If your business-issued iPad is ever lost or stolen — or it turns out that you're a double-agent working for a rival company — your employer's IT administrators can remotely wipe your device clean. You too can wipe the slate clean, if you subscribe to Apple's $99 MobileMe (formerly .Mac) service and take advantage of the Find My iPad feature explained in Chapter 13.
Setting your default calendar and time zone
Choose a default calendar by tapping Settings
If you travel long distances for your job, you can also make events appear according to whichever time zone you selected for your calendars. In the Calendar settings, tap Time Zone Support to turn it on, and then tap Time Zone. Type the time zone location on the keyboard that appears.
When Time Zone Support is turned off, events are displayed according to the time zone of your current location.
The iPad has one more important button, located in the lower-right corner of the screen — but you see it only when the Exchange calendar syncing feature is turned on (see the preceding section) and you receive an invitation to attend a meeting with someone in your company or organization. The Invitations button is represented by an arrow pointing downward into a half-rectangle. If you get an invitation in this manner, the listing appears in your calendar with a dotted line around it. You need an Internet connection to respond to an invitation. The following steps walk you through the process:
Tap the Invitations button to view your pending invitations.
Tap any of the items on the list to see more details.
For example, suppose that a meeting invitation arrives from your boss. You can see who else is attending the shindig (by tapping Invitees); send them an e-mail, if need be; and check scheduling conflicts, among other options.
Tap Accept to let the meeting organizer know you're attending. Tap Decline if you have something better to do (and aren't worried about upsetting the person who signs your paycheck), or tap Maybe if you're waiting for a better offer.
Tip
You can choose to receive an alert every time someone sends you an invitation. In the Calendar settings, tap New Invitation Alerts so that the On button in blue is showing.
MobileMe subscribers can keep calendar entries synchronized between your iPad and PC or Mac. When you make a scheduling change on your iPad, it's automatically updated on your computer and vice versa. Choose MobileMe from the Add Account screen to get started.
You can subscribe to calendars that adhere to the so-called CalDAV and iCalendar (.ics) standards, which are supported by the popular Google and Yahoo! calendars, or iCal on the Mac. Although you can read entries on the iPad from the calendars you subscribe to, you can't create new entries from the iPad or edit the entries that are already present.
To subscribe to one of these calendars, follow these steps:
Tap Settings
Choose either Add CalDAV Account or Add Subscribed Calendar.
Enter the URL of the calendar you want to subscribe to.
If prompted, enter a username, password, and optional description.
After you subscribe to a calendar, it appears just like any another calendar on your iPad.
Warning
Calendars you subscribe to are read-only. In other words, you can't change existing events or add new ones.
If you read the chapter on syncing (Chapter 3), you know how to get the snail-mail addresses, e-mail addresses, and phone numbers that reside on your PC or Mac into the iPad. Assuming that you went through that drill already, all those addresses and phone numbers are hanging out in one place. Their not-so-secret hiding place is revealed when you tap the Contacts icon on the Home screen.
To add contacts from within the Contacts app, tap the + button at the bottom of the screen and type in as much or as little profile information as you have for the person. Tap Add Photo to add a picture from your photo albums. You can edit the information later by tapping the Edit button when a contact's name is highlighted.
A list of your contacts appears on the left panel of the screen, with one contact name, Rosemarie Hall in the example shown in Figure 12-10, highlighted in blue. On the right you can see a mug shot of Rosemarie plus her phone number, e-mail address, regular address, and birthday. You also find an area to scribble notes on a contact. We guess there was not much to say about Rosemarie.
Tip
You have three ways to land on a specific contact:
Flick your finger so that the list of contacts on the left side scrolls rapidly up or down, loosely reminiscent of the spinning Lucky 7s (or other pictures) on a Las Vegas slot machine. Think of the payout you'd get with that kind of power on a One-Armed Bandit.
Move your fingers along the alphabet on the left edge of the Contacts list or tap one of the teeny-tiny letters to jump to names that begin with that letter.
Start to type the name of a contact in the Search field near the top of the Contacts list. Or, type the name of the place your contact works. When you're at or near the appropriate contact name, stop the scrolling by tapping the screen.
Tip
Note that when you tap to stop the scrolling, that tap doesn't select an item in the list. This may seem counterintuitive the first few times you try it, but we got used to it and now we really like it this way.

You can change the way your contacts are displayed. Tap Settings
You can search contacts by entering a first or last name in the Search field, or by entering a company name.
Tip
You can locate people on your iPad without actually opening the Contacts app. Type a name in the Spotlight Search field (refer to Chapter 2), and then tap the name in the search results. If you're searching contacts with a Microsoft Exchange account, you may be able to search your employer's Global Address List, GAL for short. This typically works in one of two ways:
Tap the Groups button in the upper-left corner of the All Contacts screen and tap the appropriate Exchange server name to find folks. Groups on your computer might reflect, say, different departments in your company, friends from work, friends from school, and so on.
Or, you might search a so-called LDAP server, which stands for the Lightweight Directory Access Protocol. It strikes us that there's nothing "lightweight" about something called an LDAP server, but we digress.
You can initiate an e-mail from within Contacts by tapping an e-mail address under a contact's listings. Doing so fires up the Mail program on the iPad with the person's name already in the To field. For more on the Mail app, we direct you to Chapter 5.
You can also share a contact's profile with another person. Tap the Share button, and once again, the Mail program answers the call of duty. This time, the contact's vCard is embedded in the body of a new Mail message. Just address the message and send it on its merry way. A vCard is kind of like an electronic business card. You can identify it by its .vcf file format.
Finally, you can tap a contact's snail-mail address to launch the Maps app and see it there.
Hey it happens. A person falls out of favor. Maybe he or she is a jilted lover. Or maybe you just moved cross country and no longer will call on the services of your old gardener.
Removing a contact is easy, if unfortunate. Tap a contact and then tap Edit. Scroll to the bottom of the Edit screen and tap Delete Contact. You get one more chance to change your mind.
Because Apple is pretty much without equal when it comes to manufacturing beautiful-looking hardware, it's sometimes easy to overlook the fact that the company knows a thing or two about making great software too. So while the vast majority of apps in the App Store are created not by Apple itself but by outside software developers, the gang in Cupertino knows how to pick its spots when it comes to producing its own apps. Nowhere is that truer than with the iWork software suite that Apple has completely redesigned for the iPad.
If you're unfamiliar with iWork, it's a "productivity" package that's popular with the Mac faithful that includes the Pages word processor, the Keynote presentation program, and the Numbers spreadsheet — in other words, the kind of programs you use for, well, work.
In the App Store, each iPad version of these programs costs $9.99. If you buy all three, you're still paying less than half the $79 it costs for the complete iWork version for Mac OS X.
Of course, iWork on the iPad, while slick and simple, isn't quite as full-featured as its Mac sibling. And we've heard the arguments, valid for some, that when it comes to doing heavy duty-work work, you might want to get a more traditional desktop or laptop computer. Still, with iWork, you can indeed do a lot, if not most, of the stuff you need to accomplish work-wise — and with the kind of style and (dare we even say it) fun that you expect from Apple products. We recommend tooling around with Keynote by touching and holding objects and moving them around.
With that, we describe an overview of each iWork app in the following sections.
Keynote is all about producing polished business presentations for clients, customers, and would-be clients and customers.
When you initially open Keynote — and for that matter when you open the other two apps in the iWorks suite for the first time — you're treated to helpful tutorials on how to use the programs.
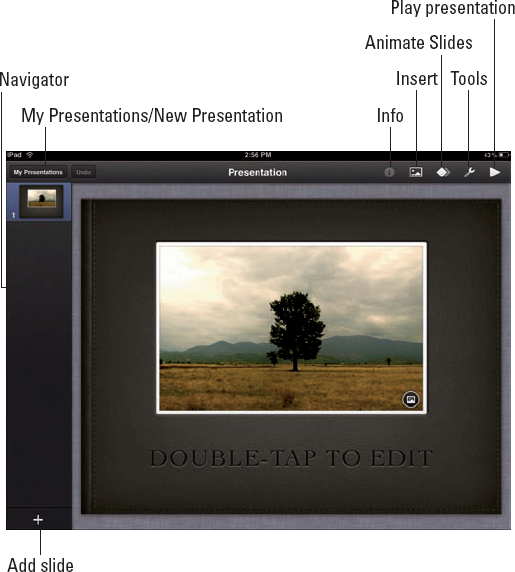
The basics: Down the left side of the Keynote screen is the Navigator, a vertical strip that contains every slide in your presentation. Flick up or down in the list to see all the slides. You can drag slides around to rearrange them in any order. You can tap them to cut, copy, paste, delete, or skip them. And just below the Navigator is the Add Slide + button that you tap — you guessed it — to add a new slide.
It's worth noting that Keynote, unlike Pages, Numbers, and most other apps for the iPad, only works in landscape mode, probably because presentations look better that way.
You find the following on the Keynote toolbar:
My Presentations: Tap this button in the upper-left corner of the screen to summon any presentation you've already completed or still have in progress. This button and all others are labeled in Figure 12-11.
Undo: A potential lifesaver (okay, presentation saver). If you make a mistake, just tap the Undo button and it's like whatever turned you off in the first place never happened. Don't you wish real life had an Undo button sometimes?
Info: Tap here to change the properties of an object or text, with different borders and effects. For example, you might add shadows and reflections to an object.
Insert: Tap this icon to insert photos, tables, charts, or shapes to a slide.
Animate Slides: You have all sorts of neat choices, from a Flash Bulbs effect to twirling objects around.
Tools: You find a bevy of helpful instruments. You can check spellings, number slides, turn on edge guides, consult an online user guide, and use a Find function to search for words in presentations.
Play: The most exciting control of all. Tap Play to watch your presentation come to life full-screen.
Now that you know the basics, here's how to get going:
Tap New Presentation.
Choose a theme.
Out of the gate, you have a dozen handsome themed templates to choose from, including those visible in Figure 12-12. Think of themes as a great head start; they come with text and image placeholders that you can substitute with your own words and pictures.
Tip
If desired, import a Keynote '09 or Microsoft PowerPoint presentation from your computer.
Connect the iPad to your computer, open iTunes, and choose the iPad under Devices. On the Summary page, choose Apps and then scroll to the bottom of the screen on your computer and select Keynote in the Apps list in the File Sharing section. Click Add and find the presentation you want to transfer to your iPad in the Choose a File: iTunes window that opens. Click Choose when you find the file in question.

In much the same way, you can also transfer iWork documents between your computer and the iPad for Pages and Numbers.
Warning
You can export iWork documents from the iPad to your computer in a similar fashion. But while Keynote documents can be exported in the Keynote or PDF file formats, you cannot export a file in the Microsoft PowerPoint or PPT file format. It's too bad, given that PowerPoint remains the 800-pound gorilla of the presentation software field.
To print slides, you have to export your presentation to a computer through iTunes, e-mail, or the iWork.com public beta, which you can access with an Apple ID. Don't fret if you don't have one; it's easy to sign up.
Unfortunately, as this book went to press, there was no direct way to print Keynote presentations or other iWork documents from the iPad, though a few inelegant workarounds are available. We hope by the time you read this, direct solutions from Apple will, um, present themselves.
The toolbar at the top of the Pages word processor has a similar look and feel to the Keynote toolbar and is shown in Figure 12-13. A My Documents/New Document button is in the upper-left corner, adjacent to the Undo button. At the upper right are the now-familiar Info (for changing fonts and styles), Insert (for adding pictures, tables, charts, and so on), and Tools buttons. You also find a Full Screen button in the rightmost corner of the screen.
Like its iWork brethren, Pages allows you to start off with a custom template, though a blank page may work best for most people. Templates cover resumés, formal letters, party invites, and term papers, among others.
Tip
As you start working in Pages, the following tips are handy to know:
When you double-tap text, a style ruler appears at the top, for changing paragraph and character styles (for example, bold, italic, and underline), text alignments, and page breaks.
As with Keynote, you can move, resize, and rotate objects in a document and add your own pictures.
Double-tap any word in a document, tap More, and tap Definition for a dictionary entry. You may not find the meaning of life here, but at least you'll find the meaning for the word in question. In other words, we think it's a nice feature.
Tap and hold your finger along the right edge of the screen to make the Pages Navigator appear. Drag this handy tool up and down the screen to preview your document inside its transparent window. The number on the right tells you the page you are on.
If you plan on doing a lot of writing in Pages, consider getting Apple's optional physical iPad Keyboard Dock or using a Bluetooth wireless keyboard. This is a matter of personal preference, of course.
Tap the Share button after tapping the My Documents button to send a Pages document via e-mail, to share it at
iWork.com, or to export it. You can export your document in the Pages, PDF, or Microsoft Word.docfile formats.

Warning
When you import documents to work inside Pages (and for that matter, the other iWork apps), they don't always come through clean. Fonts from the original document may be missing or altered, and when that happens you see a warning message. The same goes for headers and bookmarks. Hopefully such formatting challenges will be fixed in the future.
Perhaps more than any other iWork app, Numbers best exploits multitouch and lets you become a whiz at number crunching in no time. As with Keynote and Pages, the Numbers spreadsheet relies on a similar button scheme at the top of the screen. The button in the upper-left corner is labeled New Spreadsheet or My Spreadsheets, depending on the view you're in.
Apple has supplied 16 useful Getting Started templates that appear when you tap the New Spreadsheet button. Your options range from Checklist and Expense Report sheets to Invoice and Employee Schedule sheets.
Tip
A few tips can help you start working with Numbers:
You can import spreadsheets from Numbers on your Mac, or Microsoft Excel on a Windows PC or Mac. And of course, you can start out on the iPad with a blank slate as well.
To enter data in a spreadsheet cell, just double-tap the cell to automatically bring up the keyboard you need for the sheet you're working on (digits, duration, date and time, or text).
Numerous functions and formulas are built into the app, in such areas as engineering, finance, and statistics.
Tables and charts have the kind of pizzazz Apple is famous for.
As with Keynote and Pages, you can export spreadsheets to iWork or send them via e-mail. To do so, tap the icon on the My Spreadsheets page that looks like a right-pointing arrow coming out of a rectangle. It's labeled in Figure 12-14.
Note
We do have our quibbles: Numbers, alas, only supports the Numbers and PDF file formats, not the popular Microsoft Excel (.xls) file format.
There you have it — your iPad at work. Okay, you can admit it now. That wasn't so bad. In fact it was even fun!
