Mapping your route with Maps
YouTube and you
Social media: It's even better on an iPad
In this chapter, you look at apps that require Internet access to function but don't rely on your iPad's Web browser (Safari). We call them Internet-enabled apps because they display information collected over your Internet connection — whether Wi-Fi, 3G, or EDGE wireless data network — in real time. These include apps for maps, YouTube videos, and social networking.

In our other book, iPhone For Dummies (published by Wiley), we said that the Maps feature was one of the sleeper hits of our iPhone experience and an application we both use more than we expected because it's so darn handy. Since then, the Maps app has become better and more capable. With Maps, you can quickly and easily discover exactly where you are, find nearby restaurants and businesses, get turn-by-turn driving instructions from any address to any other address, and see real-time traffic information and a photographic street view of many locations as well.
Note
You won't be able to use the apps in this chapter unless you're connected to the Internet via either Wi-Fi or 3G.
First you're asked whether Maps can use your current location; a few seconds later, you see a blue circle (see Figure 6-1), which indicates your approximate location. And if you move around, your iPad can update your location and adjust the map so that the location indicator stays in the middle of the screen.

Note
Just so you know, if you tap, drag the map, or zoom in and/or out, your iPad will continue to update your location, but it won't continue to center the marker. That's a good thing, but it also means that the location indicator can move off the screen.
How does it do that?
Maps uses iPad's Location Services to determine your approximate location using available information from your wireless data network. Wi-Fi-only models use local Wi-Fi networks; iPad Wi-Fi + 3G models use assisted GPS plus cellular data. If you're not using Location Services, turning it off conserves your battery. (To turn it off, tap Settings
To find a person, place, or thing with Maps, follow these steps:
Tap the Search field in the upper-right corner of the screen to make the keyboard appear.
Now type what you're looking for.
You can search for addresses, zip codes, intersections, towns, landmarks, and businesses by category and by name, or combinations, such as New York, NY 10022, pizza 60645, or Auditorium Shores Austin TX.
(Optional) If the letters you type match names in your Contacts list, the matching contacts appear in a list below the Search field. Tap a name to see a map of that contact's location.
Maps is smart about it, too; it displays only the names of contacts that have a street address. See the section "Maps and contacts," later in this chapter, for more details.
When you finish typing, tap Search.
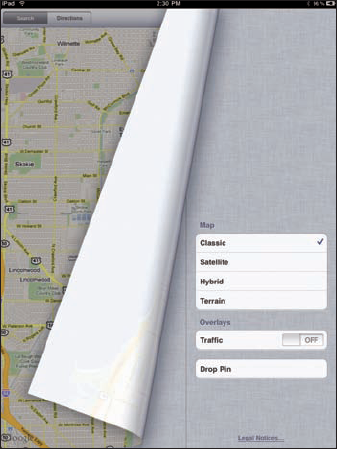
After a few seconds, a map appears. If you searched for a single location, it is marked with a single pushpin. If you searched for a category (pizza 60645, for example), you see multiple pushpins, one for each matching location, as shown in Figure 6-2.
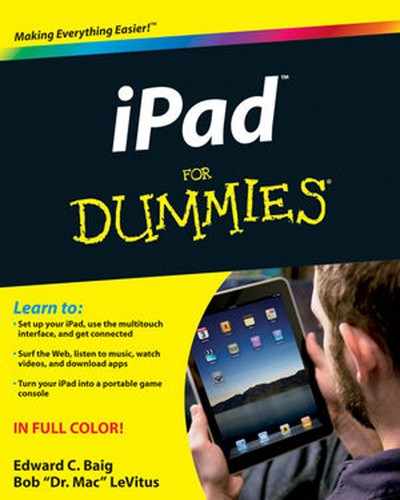
The preceding section talks about how to find just about anything with Maps. Now here's a look at some ways you can use what you find. First, find out how to work with what you see on the screen. Four views are available at any time: Classic, Satellite, Hybrid, and Terrain. (Figure 6-2 shows the Map view.) Select one view by tapping the curling page in the lower-right corner of the screen. The map then curls back and reveals several buttons, as shown in Figure 6-3.

In Classic, Satellite, Hybrid, or Terrain view, you can zoom to see either more or less of the map — or scroll (pan) to see what's above, below, or to the left or right of what's on the screen:
To zoom out: Pinch the map or tap using two fingers. To zoom out even more, pinch or tap using two fingers again.
To zoom in: Unpinch the map (some people refer to this as a "spread") or double-tap (the usual way — with just one finger) the spot you want to zoom in on. Unpinch or double-tap with one finger again to zoom in even more.
An unpinch is the opposite of a pinch. Start with your thumb and a finger together and then spread them apart.
Tip
You can also unpinch with two fingers or two thumbs, one from each hand, but you'll probably find that a single-handed pinch and unpinch are handier.
To scroll: Flick or drag up, down, left, or right.
Maps and contacts go together like peanut butter and jelly. For example, here are two helpful tasks that illustrate maps and contacts at work.
To see a map of a contact's street address, follow these steps:
Tap the little Bookmarks icon to the left of the Search field.
Tap the Contacts button at the bottom of the overlay.
Tap the contact's name whose address you want to see on the map.
Alternatively, just type the first few letters of a contact's name in the Search field and then tap the name in the Suggestions list that appears below the Search field whenever what you type matches one or more contact names.
If you find a location by typing an address into the Search field, you can add that location to one of your contacts or create a new contact with a location you've found. To do either one, follow these steps:
Tap the location's pushpin on the map.
Tap the little i in a blue circle to the right of the location's name or description (shown next to Gullivers Pizzeria in Figure 6-2) to display its Info screen (see Figure 6-4).
Tap the Add to Contacts button to create a new entry for Gullivers in your Contacts list.
Tap Create New Contact or Add to Existing Contact, whichever is applicable.
Fill in the new contact information and tap Done. Or, select an existing contact from the list that appears.
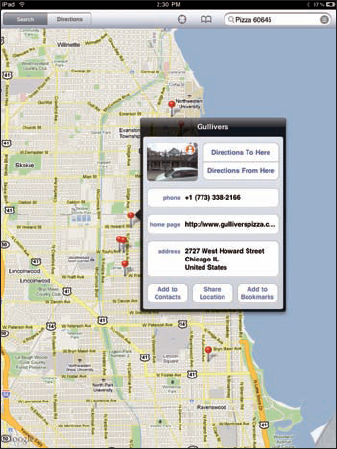
Figure 6-4. The Info screen for Gullivers Pizzeria appears as an overlay when you tap the little i in a blue circle on the right side of Gullivers' name (shown in Figure 6-2).
You can also get driving, walking, and public transit directions from most locations including a contact's address to any other location including another contact's address. You see how to do that in the "Smart map tricks" section, later in this chapter.
At the bottom of this overlay, you see three buttons: Bookmarks, Recents, and Contacts. The following sections give you the lowdown on these buttons.
Bookmarks in the Maps application work like bookmarks in Safari. When you have a location you want to save as a bookmark so that you can reuse it later without typing a single character, follow these steps:
Tap the little i in a blue circle to the right of the location's name or description.
The Info overlay for that location appears (refer to Figure 6-4).
Tap the Add to Bookmarks button on the Info overlay.
You may have to scroll down the Info overlay to see the Add to Bookmarks button.
After you add a bookmark, you can recall it at any time. To do so, tap the Bookmarks icon, tap the Bookmarks button at the bottom of the overlay, and then tap the bookmark name to see it on a map.
Tip
The first things you should bookmark are your home and work addresses and your zip codes. These are things you use all the time with Maps, so you might as well bookmark them now to avoid typing them over and over.
Tip
Use zip code bookmarks to find nearby businesses. Choose the zip code bookmark, and then type what you're looking for, such as 78729 pizza, 60645 gas station, or 90201 Starbucks.
You can also drop a pin anywhere on the map. A pin is similar to a bookmark but is often handier than a bookmark because you can drop it by hand. Why? If you don't know the exact address or zip code for a location but can point it out on a map, you can drop a pin (but you couldn't create a bookmark). You drop a pin as follows:
Tap the curling page in the lower-right corner.
Tap the Drop Pin button (refer to Figure 6-3).
A pin drops on-screen, and you see the words "Tap and Hold Anywhere to Drop a Pin" with a little i in a blue circle after it.
Tap and hold on the location you want to mark with a pin.
Tap the little i and the Dropped Pin overlay appears, where you can fill in some details about the pin and take similar actions to those that appear in the overlay shown in Figure 6-4.
To manage your bookmarks, first tap the Edit button in the upper-left corner of the Bookmarks overlay. Then:
To move a bookmark up or down in the Bookmarks list: Drag the little icon with three gray bars that appears to the right of the bookmark upward to move the bookmark higher in the list or downward to move the bookmark lower in the list.
To delete a bookmark from the Bookmarks list: Tap the – sign in a red circle to the left of the bookmark's name and then tap the red Delete button.
When you're finished using bookmarks, tap anywhere outside the overlay to return to the map.
Maps automatically remembers locations you've searched for and directions you've viewed in its Recents list. To see this list, tap the Bookmarks icon and then tap the Recents button at the bottom of the overlay. To see a recent item on the map, tap the item's name.
To clear the Recents list, tap the Clear button in the upper-left corner of the overlay and then tap the big red Clear All Recents button at the bottom of the overlay or tap Cancel if you change your mind.
When you're finished using the Recents list, tap anywhere outside the overlay to return to the map.
To see a list of your contacts, tap the Bookmarks icon and then tap the Contacts button at the bottom of the overlay. To see a map of a contact's location, tap the contact's name in the list.
To limit the Contacts list to specific groups (assuming that you have some groups in your Contacts list), tap the Groups button in the upper-left corner of the overlay and then tap the name of the group. Now only contacts in this group are displayed in the list.
When you're finished using the Contacts list, tap the Done button in the upper-right corner of the overlay to return to the map.
The Maps application has more tricks up its sleeve. Here are a few nifty features you may find useful.
You can get route maps and driving directions to any location from any location as follows:
Tell your iPad to get directions for you. You can do so in a couple of ways:
If a pushpin is already on the screen: Tap the pushpin and then tap the little i in a blue circle to the right of the name or description. This action displays the item's Info overlay. Now tap the Directions to Here or Directions from Here button to get directions to or from that location, respectively.
When you're looking at a map screen: Tap the Directions button in the upper-left corner of the screen. The Search field transforms into Start and End fields.
Tap in the Start or End field to designate the starting and ending points of your trip.
You can either type them or choose them from a list of your bookmarks, recent maps, or contacts.
(Optional) If you need to swap the starting and ending locations, tap the little swirly arrow button between the Start and End fields.
When the start and end locations are correct, tap the Start button in the blue banner overlay near the lower-right corner of the screen, as shown in Figure 6-5.
When you tap the Start button, it changes into left- and right-arrow buttons.
Navigate your directions using the arrows or a list.
Arrows: Tap the arrow buttons to display the next or previous step in your route, as shown in Figure 6-6. Tap the right-arrow button to see the first of your turn-by-turn driving directions. Then, to see the next step in the directions, tap the right arrow again; to see the preceding step, tap the left arrow.
List: If you prefer to see your driving directions displayed as a list with all the steps at once, tap the List button on the left side of the blue banner; the directions appear in an overlay, as shown in Figure 6-7. Tap any step in the list to see that leg of the trip displayed on the map.

Figure 6-7. Step-by-step driving directions displayed as a list with the final leg of the trip displayed on the map.
If you want to return to the step-by-step directions in the blue banner and use the arrow buttons to navigate again, tap the little rectangle to the left of the word Directions in the overlay. The list disappears and the banner reappears.
When you're finished with the step-by-step directions, tap the Search button at the top of the screen to return to the regular map screen and single Search field.


Tip
As well as step-by-step directions work, we wish the iPad offered the type of audible turn-by-turn directions feature found on some dedicated GPS devices. You know — where some friendly male or female voice barks out instructions (such as "turn right on Main Street").
However, several companies, including TomTom (http://iPad.tomtom.com), Navigon (http://www.navigon.com), Magellan (http://www.magellangps.com), and MotionX (http://drive.motionx.com), offer iPhone apps that do just that. And while none of them has released an iPad version of their GPS navigation app at the time of this writing, we think it's only a matter of time before some or all of them do. Chapter 7 explains how to determine whether you can use iPhone apps on your iPad and how to find iPad-specific apps.
After you've provided a starting and ending location but before you tap the Start button, the blue banner displays three icons on its left side: a car, a bus, and a person walking (refer to Figure 6-5). In the preceding example, we showed directions by car, which is the default.
For public transportation information, tap the Bus icon. You then have the following options:
To see the departure and arrival times for the next bus or train, as shown in Figure 6-8, tap the little clock that appears on the blue banner. Tap the Load More Times button to see additional departures and arrivals.
To see the route directions, tap the Start button. Then, to see the next step in the directions, tap the right-arrow button; to see the preceding step, tap the left arrow.
Or, if you prefer to see the public transportation directions displayed as a list with all the steps at once, tap the List button on the left side of the blue banner; the directions appear in an overlay, as shown in Figure 6-9.
Tip
Tap any item in the list to see that leg of the trip displayed on the map. If you want to return to the step-by-step directions in the blue banner and use the arrow buttons to navigate again, tap the little rectangle to the left of the word Directions in the overlay. The list disappears and the banner reappears.

Figure 6-9. Step-by-step directions for public transportation to Gullivers with the second leg showing on the map.
For step-by-step directions for walking, tap the Person Walking icon. Walking directions generally look a lot like driving directions except for your travel time. For example, driving time in Figure 6-5 is approximately 10 minutes with traffic; walking time (not shown) is estimated at 1 hour and 25 minutes.
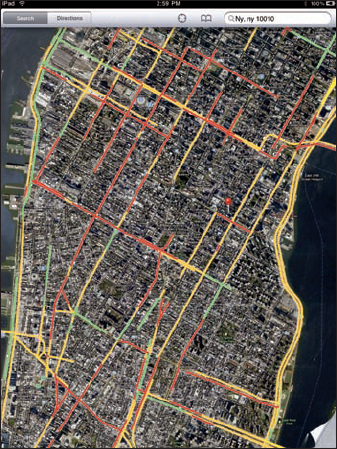
You can find out the traffic conditions for the map you're viewing by tapping the curling page in the lower-right corner of the screen and then tapping the Traffic switch so that it says On. When you do this, major roadways are color-coded to inform you of the current traffic speed, as shown in Figure 6-10. Here's the key:
Green: 50 or more miles per hour
Yellow: 25 to 50 miles per hour
Red: Under 25 miles per hour
Gray: No data available at this time
Warning
Traffic info doesn't work in every location, but the only way to find out is to give it a try. If no color codes appear, assume that it doesn't work for that particular location.
If a location has a little i in a blue circle to the right of its name or description (refer to Figure 6-2), you can tap it to see additional information about that location.
As we explained earlier in this chapter, you can get directions to or from that location, add the location to your bookmarks or contacts, or create a new contact from it. You can do two more things with some locations from their Info screen:
Tap its e-mail address to launch the Mail application and send an e-mail to it.
Tap its URL to launch Safari and view its Web site.
Not all locations have any or all of these three options, but we thought you should know anyway.
YouTube has come to define video sharing on the Internet. The wildly popular site, now owned by Google, has become so powerful that American presidential hopefuls and even politicians in other countries campaign and hold debates there. As you might imagine, YouTube has also generated controversy. The site has been banned in some foreign countries. And Viacom has sued YouTube for more than $1 billion over alleged copyright infringements. (Let the lawyers fight over such matters.)
All the while, YouTube staked a humongous claim on mainstream culture. That's because YouTube is, well, about you and us and our pets and so on. It is the cyberdestination, as YouTube boldly proclaims, to "Broadcast Yourself."
Apple has afforded YouTube its own cherished icon on the Home screen. Many millions of videos are available on the iPad, nearly the complete YouTube catalog.
So where exactly do YouTubers find the videos that can offer them a blissful respite from their day? You might want to start by tapping one of the seven buttons along the bottom of the screen.
But before we start down that road, if you know what you're looking for, you can search for it, be it a specific video, topic, videographer's name, or almost anything else you might want to search for, from any of the seven "departments" we're about to describe. You see, all seven of 'em offer a Search field in their upper-right corner. Just tap in it and the by-now-familiar virtual keyboard appears. Type a search phrase and then tap the Search key on the keyboard to generate results.
In Figure 6-11, we typed (what else?) ipad.

Now all you have to do is tap one of 'em to watch it.
Now we go over those seven buttons at the bottom of the screen, namely:
Featured: Videos recommended by YouTube's staff. Flick upward to scroll down the page and see more videos.
Tip
When you get to the bottom of the page, tap the Load More button to see even more featured videos.
Top Rated: These are videos that are rated highly by YouTube viewers. Tap the Today, This Week, or All button in the upper-left corner of the screen to filter the videos you see.
Note
You can rate videos on your iPad as long as you have a YouTube account, but don't waste your time trying to figure out how to create one from within the YouTube app — you can't. You'll have to launch Safari or another Web browser (on your iPad or computer) and surf to
www.youtube.comto create your account. We suggest you do that now, because several of the features we're about to describe are useful only if you're signed in to your (you guessed it) YouTube account.Most Viewed: These are the videos that most YouTube viewers are watching. Tap All to see the most watched YouTube videos of all time. Tap Today or This Week to check out the videos most currently in vogue.
Favorites: If you're signed in to your YouTube account, you can add videos that you like to your Favorites list. Tap the Favorites icon, which looks like the an open book at the bottom of the screen and also appears when you're watching a video, as you soon see in Figure 6-12. We think it's supposed to be an open book but we could be wrong.
At the top of the Favorites screen are two tabs: Favorites and Playlists, with Favorites selected by default. Favorites is one big list of videos you like; Playlists are individual lists of your favorite videos categorized however you like. Bob, for example, has a Family Guy playlist, a South Park playlist, a stupid Mac tricks playlist, and so on.
If you tap the Playlists tab, you can see a list of your playlists. Of course, you must be signed in to a YouTube account to use this feature. And, surprisingly, you can't create a playlist while using the YouTube app. You have to visit
www.youtube.comwith a Web browser to create one.After you've created a playlist, you can add videos to it the same way you add them to your Favorites list (which, as we mentioned, you find out how to do very soon).
The Edit button in the upper-left corner of the Favorites and Playlists screens lets you delete videos that are no longer your favorites. Tap the button and then tap the little X in the upper-left corner of each video that you want to remove from your Favorites list or playlists. When you're finished deleting videos, tap the Done button (also found in the upper-left corner).
Tip
Your Favorites list and playlists are automatically saved and synced among all your devices — Mac, PC, iPhone, iPod touch, and/or iPad. Add a video to your Favorites list or a playlist on your iPad, and the next time you visit YouTube with your Web browser, you'll see the video in your Favorites list or playlist. Nice touch!
Subscriptions: These are videos from any YouTube accounts you subscribe to. Let's all say it together now: You can't subscribe to a videographer's YouTube channel with the YouTube app. And you need to be logged on to your YouTube account to use this feature.
My Videos: These are videos you've uploaded to YouTube yourself. Of course, you must be logged on to your YouTube account to use this feature. What else is new? And, of course, if you've never uploaded a video to YouTube, this screen will be blank even if you are logged on.
History: This is a list of all the videos you've viewed recently.
To watch a YouTube video regardless of how you got to it — through one of the seven methods described in the preceding section or by searching for it — just tap it. The movie begins to load, and after a brief wait — how long a wait is determined by the speed of your Wi-Fi or 3G network — the video begins to play.
You should see the controls described in this section, but if you don't, just tap the video to bring up the video controls if they're hidden. Many of these controls are identical to the video controls explained in Chapter 9, but YouTube videos also display special controls of their own, including buttons for adding this video to your Favorites list or playlists, sharing this video with friends, rating this video, and several others, as shown in Figure 6-12.
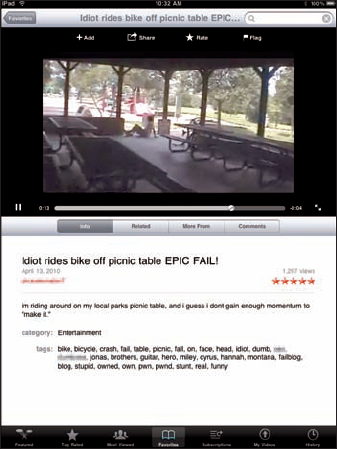
In the gray banner across the top of the screen you have (from left to right) the Back button (which says Favorites because that's the screen I was on when I tapped this video), the name of this video (Idiot rides bike off picnic table EPIC FAIL!), and the Search field.
Below the gray banner are four buttons:
Add: Add this video to your Favorites list or a playlist.
Share: Opens a new e-mail message with the title of the video as its subject and "Check out this video on YouTube" and the URL for the video as the message. Just tap the blue plus button to choose an addressee from your Contacts list or type an e-mail address and then tap the Send button.
Rate: Lets you rate this video from one to five stars.
Flag: Lets you flag this video as inappropriate.
Beneath the video in another gray banner (from left to right) are the Play/Pause button (a pair of vertical lines in Figure 6-12), the Scrubber bar, the playhead, and a pair of arrows. The first three are self-explanatory; tap the arrows to expand the video to full-screen.
Last but not least, you can see a gray banner below the Scrubber bar with four additional buttons: Info, Related, More From, and Comments. Tap one to see that particular information about this video.
If you've given an iPad to your kid or someone who works for you, you may not want that person spending time watching YouTube videos. You want him or her to do something more productive, like homework or the quarterly budget.
That's where parental (or might we say "Mean Boss") restrictions come in. Please note that the use of this iron-fist tool can make you really unpopular.
To restrict access to YouTube, follow these steps:
Tip
Instead of restricting access totally, you can also set restrictions based on TV, movie, or app ratings.
If you made YouTube a no-no, when you return to the Home screen, the YouTube icon is missing in action. Same goes for any other restricted activities. To restore YouTube or other privileges, go back into Restrictions and tap Disable Restrictions or tap the Off switch so that it says On again. Of course, you have to reenter your passcode before you can do so.
Tip
Restrictions can also be applied to iTunes, Safari, the App Store, installing new apps, and location settings, as you see when we delve into Settings further (see Chapter 13).
Your iPad doesn't include any specific social media apps right out of the box, but you can add free client apps for the major social media networks including Facebook, MySpace, and Twitter.
That's the good news. The bad news is that as of this writing, none of the three have updated their official client apps to run natively on the iPad. While we are certain they'll get around to releasing bigger, better, iPad-friendly apps soon, for now all we can show you are the iPhone versions of their apps running at iPhone resolution.
Note that you don't actually need an app to participate in social networking. All three of the networks we mentioned can be fully utilized using Safari on your iPad. And frankly, unlike the iPhone, where the Safari experience was hampered by the tiny screen and keyboard, all three Web sites are eminently usable on your iPad. So, if you want to check them out and don't feel like downloading their apps, here are their URLs:
Facebook:
www.facebook.comMySpace:
www.myspace.comTwitter:
http://twitter.com
Now we'd be remiss if we didn't at least point out some of the niceties you get when you access one of these social media networks using an app instead of a browser, so here are a few of our insights.
Note: Both of your authors grew up in an era when telephones had cords and dials, televisions used rabbit-ear antennas, and gas was a mere 30 cents a gallon. In other words, we are both long past the age where social networking is as important to us as breathing. That said, Bob has a couple of kids who are of an age (18 and 21) where they'd rather be without food or water than be without Facebook. And although Bob's not exactly a prolific social networker, he does maintain a modest presence on Facebook (Bob LeVitus) and Twitter (@LeVitus). Give him a shout on either service if you're a social networking type. Being a social guy, Ed is a semiregular in all these places, so feel free to say hi. And if you're the social networking type yourself, kindly spread the word about our book here, assuming of course that you do like it (which we hope very much). Follow @edbaig and/or @levitus on Twitter.
The Facebook iPhone app, shown in Figure 6-13, makes it easy to access the most popular Facebook features with a single finger tap.

Figure 6-13. The Facebook iPhone app sports a clean interface with quick access to many popular Facebook features.
That said, we hope the Facebook iPad app is something more than just a higher-resolution version of the iPhone app. Why? Well, the iPad, unlike the iPhone, has a thoroughly usable Web browser, and quite frankly, we'd rather look at our Facebook Live Feed in Safari (shown on the left in Figure 6-14) than in the current version of the Facebook iPhone app (shown on the right in Figure 6-14).
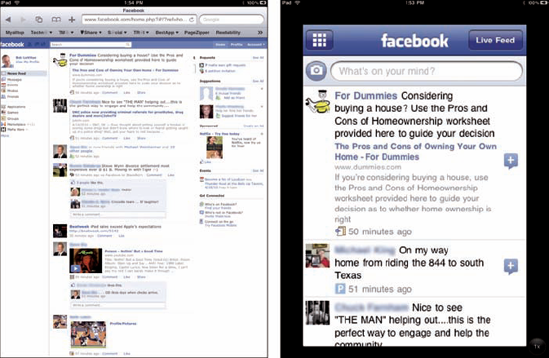
Figure 6-14. Bob's Facebook Live Feed as seen in Safari (left) and in the Facebook iPhone app (right).
On the other hand, Safari can't provide push notifications for Facebook events such as messages, wall posts, friend requests and confirmations, photo tags, events, and comments, whereas the iPhone app does all that and more.
The bottom line is that there's nothing to prevent having the best of both worlds. So if you're a heavy Facebook user, consider using the Facebook iPhone app for some things (like push notifications and status updates) and Safari for others (like reading your Wall or Live Feeds).
Disclaimer: We reserve the right to take back everything we just said if an iPad version of the Facebook app becomes available and if it's more appropriate for the iPad than the iPhone app.
The MySpace app provides us with the same dilemma as the Facebook app (and the official Twitter app, which we get to in a minute): As of this moment, an iPad version isn't available. And as far as we can see, you don't have any reason to use the iPhone app 'cause it doesn't even offer push notifications (as the Facebook app does).
Take a look at the MySpace app and MySpace viewed with Safari in Figure 6-15 and then decide.

Figure 6-15. Bob's MySpace home page as seen in Safari (left) and in the MySpace iPhone app (right).
Again, we reserve the right to say something nice about the MySpace iPad app if they introduce one. But for now we think you'll enjoy interacting with MySpace more if you use Safari.
Twitter puts a slightly different spin on social networking. Unlike Facebook or MySpace, it doesn't try to be encompassing or offer dozens of features, hoping that some of them will appeal to you. Instead, Twitter does one thing and does it well. That thing is letting its users post short messages called tweets quickly and easily from a variety of platforms including Web browsers, mobile phones, smartphones, and other devices.
Twitter users then have the option of "following" any other Twitter user's tweets. The result is a stream of short messages that looks something like Figure 6-16 when displayed in Safari.
Tip
Just how short are tweets? Glad you asked. You're limited to a mere 140 characters. That's barely longer than this Tip. So be as concise as possible.
Now Twitter is a unique case for a couple of other reasons, too. The first is that unlike Facebook and MySpace, a number of third-party Twitter clients are already available for the iPad. The second is that Twitter just bought one of the most popular third-party Twitter clients for the iPhone ("Tweetie") and has announced that it will offer Tweetie for the iPhone and the iPad at no charge starting soon after this book goes to press.
Note
Tweetie 2, the current version for the iPhone, sells for $2.99 and Twitter fans are glad to pay it — it really is that good.
And finally, almost all the Twitter client apps make it easier (than using the Web browser interface shown in Figure 6-16) to upload and integrate photos with your tweets.
Anyway, we'd be remiss if we didn't show you what some of the existing Twitter clients for the iPad look like.
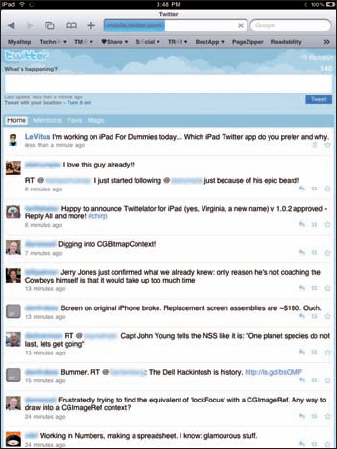
First up is TweetDeck for iPad, which is currently free and sports an elegant user interface, as you can see in Figure 6-17.
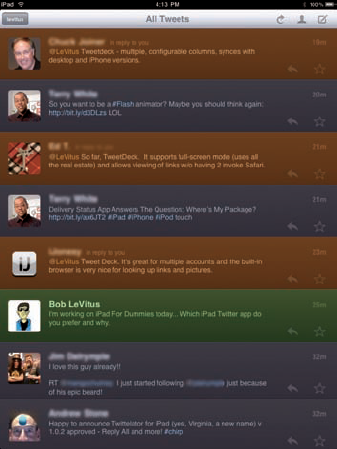
For what it's worth, after Bob sent out a tweet asking his followers which iPad Twitter client they preferred (as you can see at the top of Figure 6-16), the overwhelming majority of responses were for TweetDeck, which many of his friends say is the best of the bunch so far.
Tip
Some of these responses can be seen in Figure 6-18.

Figure 6-17. TweetDeck is a free Twitter client that offers a clean design and easy-to-use interface.
Another free Twitter client is Twitterrific for iPad, which is ad-supported but still easy on the eye and easy to use, as shown in Figure 6-18.
Finally, Twitter clients that aren't free include Twittelator for iPad ($4.99), Tweet Flow ($0.99), and many more. Also an in-app upgrade for Twitterrific for $4.99 removes all advertising.
Our advice is that if you like Twitter or want to try tweeting, start with one of the free clients like TweetDeck or Twitterrific. Then, if you really get into Twitter, you can check out the client apps that cost a few bucks and decide whether the additional features are worth it to you.