
In This Chapter
Importing your pictures
Viewing and admiring pictures
Creating a slideshow
Using pictures for wallpaper
E-mailing pictures
Assigning photos to contacts
Adding photos to MobileMe
Throughout this book, we sing the praises of the iPad's vibrant multitouch display. You'd be hard-pressed to find a more appealing portable screen for watching movies or playing games. As you might imagine, the iPad you have recently purchased (or are lusting after) is also a spectacular photo viewer. Images are crisp and vivid, at least those that were properly shot by you. (C'mon, we know Ansel Adams is a distant cousin.) Over the next few pages, you discover how best to make the digital photos that reside on the iPad come alive, no matter how they managed to arrive on your machine. Though we regret that out of the gate, the iPad lacks a built-in camera — we would have loved to see one as much for its potential virtues in letting you engage in video chats versus actually capturing snapshots — we can't get too down on Apple for version 1.0 shortcomings. In other words, when it comes to pictures and the iPad, we're focusing on the positive.

Even in the absence of a digital camera, you'll discover a few ways to get pictures onto the iPad. Alas, one of the methods involves buying an accessory. We zoom in in the following sections.
We devote an entire chapter (Chapter 3) to synchronizing data with the iPad, so we won't dwell on it here. But because syncing pictures is still the most common way to import images to the iPad, we'd be remiss for not mentioning it in this chapter. You can manage the sync process for pictures from a PC or Macintosh by choosing the Photos tab on the iPad Device page in iTunes on your computer, as we describe in Chapter 3. (The assumption here is that you already know how to get pictures onto your computer.)
Quickie reminder: On a Mac, you can sync photos via iPhoto software version 4.03 or later and Aperture. On a PC, you can sync with Adobe Photoshop Elements 3.0 or later. Alternatively, with both computers, you can sync with any folder that contains pictures.
When the iPad is connected to your computer, click the Photos tab on the iPad Device page in iTunes on the PC or Mac. Then select the appropriate check boxes to specify the Albums, Events, and Faces you want to synchronize. Or, select All Photos, Albums, Events, and Faces if you have ample storage on the iPad to accommodate all of them.
So what are Events and Faces anyway? Here's a quick look at these staple features in iPhoto on the Mac:
Events: In their infinite wisdom, the folks at Apple figured that most pictures shot on a given day are tied to a specific occasion, say, Junior's birthday party or a wedding ceremony. So the iPhoto program on a Mac automatically groups them as such by placing all the pictures taken on that day into a single collection. Don't worry: You can split a day's worth of pictures into more than one event, if, say, the birthday party was in the morning and the wedding was at night. Apple automatically names an event by its date; you can change it to something more descriptive (Timmy's Softball Game or Geri's Graduation).
Faces: As its name implies, Faces is a collection of pictures on a single common thread: Whose mug is in them? In our experience with Faces, the technology, while pretty darn impressive, isn't perfect.
Tip
Almost all the digital cameras we're aware of come with a USB cable that can be used to transfer images to a computer. Of course, the iPad isn't a regular computer, and it isn't equipped with a USB port.
Instead, Apple is selling an optional $29 iPad Camera Connection Kit. The kit wasn't available for testing at the time we prepared this book. But here's how it's supposed to work (and we have no reason to doubt that this is indeed how it will work):
Connect your camera to your iPad using one of the two connectors in the kit.
Two small connectors are included, and each fits into the iPad's dock connector at the bottom of the machine. One connector has a USB port, the other an SD slot.
If you're going the USB route, kindly use the cable that comes with your camera, because no such cable comes with Apple's kit.
Make sure that the iPad is unlocked.
If you haven't already done so, turn on the camera and ensure that it's set to properly transfer pictures.
Consult the manual that came with the camera if you're unsure of which setting to use.
The Photos app on the iPad opens and displays the pictures that you will be able to import from the camera.
Tap Import All to select the entire bunch, or tap the individual pictures you want to include if you'd rather cherry-pick.
A check mark appears next to each image you select. And that's pretty much it: The Pad organizes the pictures into albums and such, as described later in this chapter.
You're free at this point to erase the pictures from your camera.
The SD Card reader connector accommodates the SD memory cards common to so many digital camera models. The procedure works almost identically to the USB connector, except you're inserting the SD gizmo into the dock connector port rather than the USB connector mentioned previously. Just be careful to insert the SD gently, to prevent any damage.
Note
The Camera Connection Kit supports many common photo formats, including JPEG and RAW. The latter is a format favored by photo enthusiasts.
So where exactly do your pictures hang out on the iPad? Well, we just explained in the preceding section what happens to images saved from e-mails and the Internet: They reside in a Saved Photos album.
Other imported images are grouped in the same albums as they were on the computer, or lumped together as Events, Faces, and — when the embedded metadata inside an image identifies where a picture was shot — under a very cool feature called Places. We have more to say about Places later in this chapter.
So now that you know where the pictures are, you're ready to discover how best to display them and share them with others — and how to dispose of the duds that don't measure up to your lofty photographic standards.
Get ready to literally get your fingers on the pics (without having to worry about smudging them). The following steps walk you through the basics of navigating among your pictures with the Photos app:
Tap the Photos app on the Home screen.
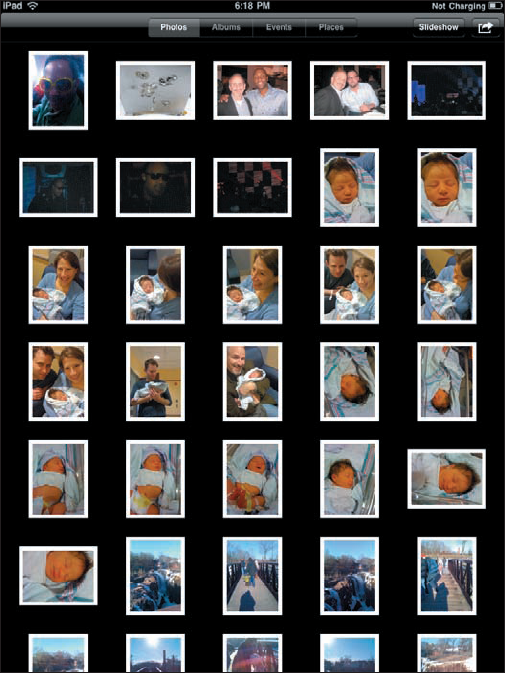
The app opens with a grid of thumbnail images on top of a black background, as shown in Figure 10-1. The Photos tab at the top of the screen is highlighted because you are in the Photos view. If the thumbnail you have in mind doesn't appear on this screen, flick your finger up or down to scroll through the pictures rapidly or use a slower dragging motion to pore through the images more deliberately. So, if you have more photos than can possibly show up on the screen at any one time, which is highly probable, your flicking or dragging skills will improve quickly.
Tap or pinch the photo you want to display.
These lead to slightly different outcomes. When you tap an image, the picture rapidly gets bigger, practically jumping off the screen. If you pinch instead, by putting your thumb and forefinger together and then spreading them apart, you have more control over how the image grows in size. You can also keep your finger pressed against the image to drag it around.
To navigate through collections of images, tap Albums, Events, Faces, or Places at the top of your iPad screen. Or pinch them.
You see stacks or collections of pictures. Tap an album, event, or faces pile, and all the underlying pictures scatter into a mass of individual images. It's an orderly escape, because the individual pictures once again appear in a grid. Most likely, you'll again have to scroll up or down to see all the pictures in the collection. As before, tap any of the individual pictures you want to focus on.
But what if you pinch a collection instead of tapping? The answer depends on how you pinched. If you pinched just a little bit, the pictures spread out slowly enough that you can preview some of the images in the pile. Let go and the collection opens up (unless, that is, you hadn't pinched far enough, and the images retreat into a stack). If you do what we call a wider pinch, the entire collection opens. As before, tap a picture to see a large view of it.
With an individual photo on the screen, tap the picture to open the picture controls at the top and bottom of the screen.
These are shown in Figure 10-2. We discuss what they do later but want you to know how to summon them, because we're certain at some point or another you'll be calling on them.
To make the controls disappear, tap the screen again or just wait a few seconds and they go away on their own.
Tap the Home button when you're finished with the Photos app.

Photographs are meant to be seen, of course, not buried in the digital equivalent of a shoebox. And, the iPad affords you some neat ways to manipulate, view, and share your best photos.
You've no doubt already figured out (from the preceding section) how to find a photo and view it full-screen and display picture controls. But you can do a lot of maneuvering of your pictures without summoning those controls. Here are some options:
Skip ahead or view the previous picture: Flick your finger left or right.
Landscape or portrait: The iPad's wizardry (or, more specifically, the device's accelerometer sensor) is at work. When you turn the iPad sideways, the picture automatically reorients itself from portrait to landscape mode, as the images in Figure 10-3 show. Pictures shot in landscape mode fill the screen when you rotate the iPad. Rotate the device back to portrait mode and the picture readjusts accordingly.
Remember: The rotate lock discussed in Chapter 1 must be switched off.
Tip
Show a picture to a friend by flipping the iPad over. The iPad always knows which is right side up.
Zoom: Double-tap to zoom in on part of an image. Double-tap again to zoom out. Alternatively, spread and pinch with your thumb and index finger to zoom in and zoom out. The downside to zooming is that you can't see the entire image.
Pan and scroll: This cool little feature is practically guaranteed to make you the life of the party. After you zoom in on a picture, drag it around the screen with your finger. Besides impressing your friends, you can bring front and center the part of the image you most care about. That lets you zoom in on Fido's adorable face as opposed to, say, the unflattering picture of the person holding the dog in his lap.
Skim: A bar appears at the bottom of the screen when you summon picture controls. Drag your finger across the bar in either direction to quickly view all the pictures in an open album.
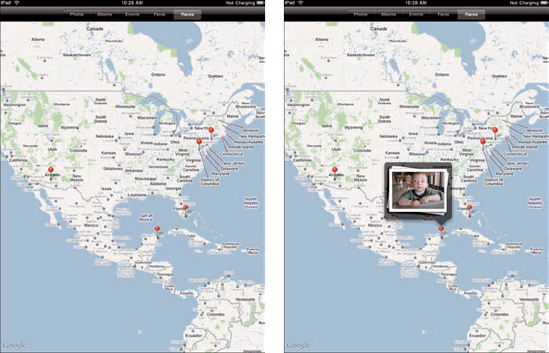
Map it: If you tap on the Places tab instead of an album or event or faces collection, a map like the one shown in Figure 10-4 appears. Notice the red pins on the map shown at the left. These indicate that pictures were taken in the location shown on the map. Now tap a pin, and a stack of all the images on the iPad shot in that area appears, as shown in the image on the right. As before, you can tap or pinch the collection to open it.

Tip
You can also spread your fingers on a map to enlarge it and narrow the pictures taken to a particular area, town, or even neighborhood. For more on Maps, flip to Chapter 6.
Those of us who store a lot of photographs on computers are familiar with running slideshows of those images. It's a breeze to replicate the experience on the iPad:
Open an album by tapping it, or display all your photos in the Photos view.
Tap the Slideshow button in the upper-right corner of the screen.
The Slideshow Options window shown in Figure 10-5 appears. We explore these and other options in the next section. But if you just want to start the slideshow from here, continue to Step 3.
Tap Start Slideshow.
Your only obligation is to enjoy the show.

Both the Settings options and the Slideshow button enable you to add special effects to your slideshows. Under Settings, you can alter the length of time each slide is shown, change the transition effects between pictures, and display images in random order. With Slideshow Options, you can add transitions and music.
From the Home screen, tap Settings
Play Each Slide For: You have five choices (2 seconds, 3 seconds, 5 seconds, 10 seconds, 20 seconds). When you're finished, tap the Photos button to return to the main Settings screen for Photos.
Repeat: If this option is turned on, the slideshow continues to loop until you stop it. The Repeat control may be counterintuitive. If Off is showing, tap it to turn on the Repeat function. If On is showing, tap it to turn off the Repeat function.
Shuffle: Turning on this feature plays slides in random order. As with the Repeat feature, tap Off to turn on shuffle or tap On to turn off random playback.
Tap the Home button to leave these photo settings and return to the Home screen.
To select transitions and music for your slideshows, tap the Slideshow button to select options (refer to Figure 10-5):
Transition: You can change the effect you see when you move from one slide to the next. Again, you have five cool choices (cube, dissolve, ripple, wipe, or a personal favorite of ours, origami, in which the images fold out in ways similar to the Japanese folk art of paper folding). Why not try them all to see what you like? Tap the Photos button when you're finished.
Music: Adding music to a slideshow couldn't be easier. From the Slideshow Options window, tap the Play Music option so that it's turned on. Then tap Music to choose your soundtrack from the songs stored on the device. Ed loves backing up slideshows with Sinatra, Sarah Vaughan, or Gershwin, among numerous other artists. Bob loves using Beatles songs or stately classical music.
Even when the iPad is locked, it can do something special — turn into a handsome animated digital picture frame, a variation on the slideshow feature. To turn on this feature, tap the Picture Frame icon in the lower-right corner of a Lock screen, as shown in Figure 10-6.
Inside Picture Frame Settings, reachable like all other settings when you tap the Settings icon on the Home screen, you can choose one of two transitions (dissolve or origami), turn a "zoom in on faces" feature on or off, and arrange to play slides in random or shuffle mode. And, of course, you can pick the albums, faces, or events to include in your slideshow.

Tip
To truly take advantage of the frame feature, you'll want to prop up the iPad so that you can see it, such as by using Apple's optional $29 iPad Dock.
You can pause the slideshow by tapping the Picture Frame icon or sliding the slider to unlock the iPad. To disable the feature altogether, tap General under Settings, tap Passcode Lock so that it is on (you have to enter your passcode at this point, if you have one), and tap Picture Frame so that the setting is off.
You can take advantage of the photos on the iPad in a few more ways. In each case, you tap the picture and make sure that the picture controls are displayed. Then tap the icon in the upper-right corner that looks like an arrow trying to escape from a rectangle. That displays the choices shown in Figure 10-7.
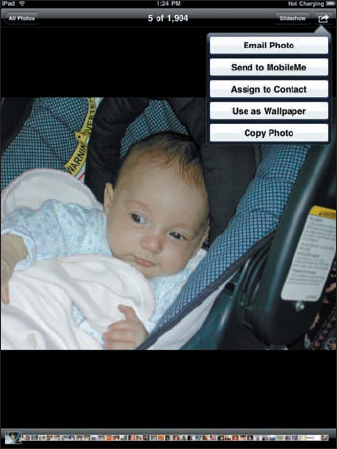
Email Photo: Some photos are so precious that you just have to share them with family members and friends. When you tap Email Photo, the picture is automatically embedded in the body of an outgoing e-mail message. Use the virtual keyboard to enter the e-mail addresses, subject line, and any comments you want to add — you know, something profound, like "Isn't this a great-looking photo?" (Check out Chapter 5 for more info on using e-mail.)
Send to MobileMe: If you're a member of Apple's $99-a-year MobileMe online service (formerly .Mac and before that iTools), you can publish a photo to an album in the MobileMe Gallery. Tap the Send to MobileMe control (it only shows up if you've set up a MobileMe account on the iPad), and then tap the appropriate gallery album to which you want to add the picture. Enter the title of the photo and an optional description in the spaces provided on the Publish Photo screen that pops up. Tap Publish. Your photo is on its way to the Internet cloud.
Assign to Contact: You can assign a picture to someone in your contacts list. To make it happen, tap Assign to Contact. Your list of contacts appears on the screen. Scroll up or down the list to find the person who matches the picture of the moment. You can drag and resize the picture to get it just right. Then tap Set Photo.
You can also assign a photo to a contact by starting out in Contacts, as we explain in Chapter 12. Sneak peek on that chapter: From Contacts, choose the person, tap Edit, and then tap Add Photo. At that point, you can select an existing portrait from one of your on-board picture albums.
To change the picture you assigned to a person, tap her name in the contacts list, tap Edit, and then tap the person's thumbnail picture, which also carries the label Edit. From there, you can select another photo from one of your albums, edit the photo you're already using (by resizing and dragging it to a new position), or delete the photo you no longer want.
Use as Wallpaper: The default background image on the iPad when you unlock the device is an idyllic lake scene. Dramatic though it may be, you probably have an even better photograph to use as the iPad's wallpaper. A picture of your spouse, your kids, or your pet, perhaps?
When you tap the Use as Wallpaper button, you see what the present image looks like as the iPad background picture. You can move and resize the picture through the now-familiar action of dragging or pinching against the screen with your fingers. When you're satisfied with the wallpaper preview, tap the Set Home Screen button to make it your new Home background, or tap Set Lock Screen to have the image appear when the iPad is locked. Or, you can tap Set Both to make that image your Home and Locked wallpaper screens. These choices are shown in Figure 10-8. Per usual, you also have the option to tap Cancel. (You can find out more about wallpaper in Chapter 13.)
Copy Photo: Tap this button when you want to copy a photo and paste it elsewhere.
Tip
Alternatively, you can also press and hold your finger against a photo until a Copy button appears. Tap that button, and now you can paste the image into an e-mail, for example, by preparing a message, holding your finger against the screen until a Paste button appears, and then pressing the button to paste it into the body of the message.

Tip
In addition to the photo tricks that come ready to use on your iPad, we encourage you to check out the App Store, which we explore in greater depth in Chapter 7. As of this writing, dozens of photography-related applications, some free, are available. These come from a variety of sources and range from Photobucket for iPad, which is free, to Alterme's 99-cent Color Splash Effects, which lets you convert a picture to black and white, except for a single object in the image which has a splash of color.
We told a tiny fib by intimating that photographs are meant to be seen. We should have amended that statement by saying that some pictures are meant to be seen. Others, well ... you can't get rid of them fast enough. Fortunately, the iPad makes it a cinch to bury the evidence:
Deleting photos in the Saved Photos album: Some pictures, namely those you saved from an e-mail or Web page and that now reside in the aptly-named Saved Photos album, are easy to dispose of. Just tap the soon-to-be-whacked picture to open it, and tap the Trash Can icon that appears in the upper-right corner when you summon Picture Controls. To finish the job, tap the big red Delete Photo button. Or, tap anywhere else on the screen if you have second thoughts and decide to keep the picture on your iPad.
Tip
Deleting multiple photos in Saved Photos: When the Saved Photos album is open, tap the icon in the upper-right corner that resembles a right-pointing arrow that leans out of a rectangle. A red Delete button shows up in the upper-left corner of the screen. Now tap each photo that you want to get rid of; a check mark appears on each one. When you've identified the doomed bunch, tap Delete, or tap Cancel to save them.
Note
Removing synced photos: The Trash Can icon only appears in the Saved Photos album. That's because the other pictures on your iPad — those that you synced through your PC or Mac — must be deleted from the photo album on your computer first. Then when you resync those albums, the photos are no longer on your iPad.