
In Chapter 5, you created a view hierarchy (a scroll view with two subviews) and presented it on screen by explicitly adding the scroll view as a subview of the application’s window. It is more common to do this using a view controller.
A view controller is an instance of a subclass of UIViewController. A view controller manages a view hierarchy. It is responsible for creating view objects that make up the hierarchy, for handling events associated with the view objects in its hierarchy, and for adding its hierarchy to the window.
In this chapter, you will create an application named HypnoNerd. In HypnoNerd, the user will be able to switch between two view hierarchies – one for being hypnotized and the other for setting a reminder for hypnosis on a future date.

To make this happen, you are going to create two UIViewController subclasses: BNRHypnosisViewController and BNRReminderViewController. You will use the UITabBarController class to allow the user to switch between the view hierarchies of the two view controllers.
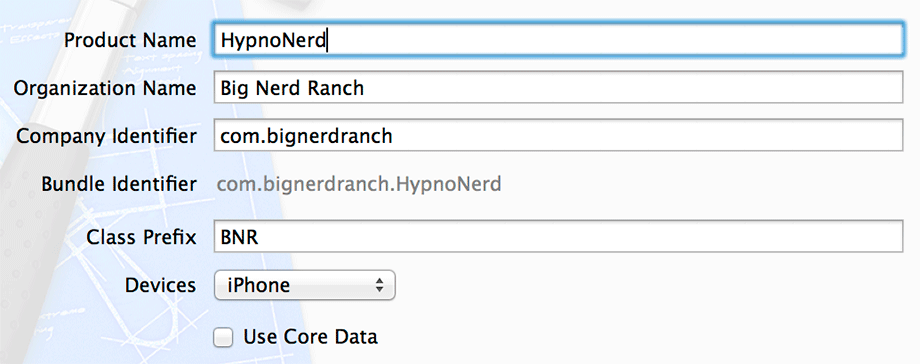
Create a new iOS project (Command-Shift-N) from the Empty Application template. Name this project HypnoNerd and configure the project as shown in Figure 6.2.
You are going to reuse the BNRHypnosisView class from Hypnosister in this project.
In Finder, locate the directory containing your Hypnosister project. Drag the BNRHypnosisView.h and BNRHypnosisView.m files from Finder into the project navigator in Xcode.
In the sheet that appears, check the box to Copy items into destination group’s folder (if needed) and the box next to the HypnoNerd target and click Finish (Figure 6.3).

This will create copies of the two files and add them to HypnoNerd’s directory on the filesystem and to the HypnoNerd project.
From the File menu, select New → File... From the iOS section, select Cocoa Touch and then choose Objective-C class. Click Next.
Name this class BNRHypnosisViewController and choose NSObject as its superclass (Figure 6.4). Click Next and save the files to finish creating the class.

You created the class with the NSObject template to start with the simplest template possible. By starting simple, you get the chance to see how the pieces work together.
Open BNRHypnosisViewController.h and change the superclass to UIViewController.
@interface BNRHypnosisViewController : NSObject@interface BNRHypnosisViewController : UIViewController @end
As a subclass of UIViewController, BNRHypnosisViewController inherits an important property:
@property (nonatomic, strong) UIView *view;
This property points to a UIView instance that is the root of the view controller’s view hierarchy. When the view of a view controller is added as a subview of the window, the view controller’s entire view hierarchy is added.

A view controller’s view is not created until it needs to appear on the screen. This optimization is called lazy loading, and it can often conserve memory and improve performance.
There are two ways that a view controller can create its view hierarchy:
-
programmatically, by overriding the UIViewController method loadView.
-
in Interface Builder, by loading a NIB file. (Recall that a NIB file is the file that gets loaded and the XIB file is what you edit in Interface Builder.)
Because the view hierarchy of BNRHypnosisViewController consists of only one view, it is a good candidate for being created programmatically.
Open BNRHypnosisViewController.m and import the header file for BNRHypnosisView. Then override loadView to create a screen-sized instance of BNRHypnosisView and set it as the view of the view controller.
#import "BNRHypnosisViewController.h"
#import "BNRHypnosisView.h"
@implementation BNRHypnosisViewController
- (void)loadView
{
// Create a view
BNRHypnosisView *backgroundView = [[BNRHypnosisView alloc] init];
// Set it as *the* view of this view controller
self.view = backgroundView;
}
@end
When a view controller is created, its view property is nil. If a view controller is asked for its view and its view is nil, then the view controller is sent the loadView message.
The next step is to add the view hierarchy of the BNRHypnosisViewController to the application window so that it will appear on screen to users.
There is a convenient method for adding a view controller’s view hierarchy to the window: UIWindow’s setRootViewController:. Setting a view controller as the rootViewController adds that view controller’s view as a subview of the window. It also automatically resizes the view to be the same size as the window.
In BNRAppDelegate.m, import BNRHypnosisViewController.h at the top of the file. Then create an instance of BNRHypnosisViewController and set it as the rootViewController of the window.
#import "BNRAppDelegate.h"
#import "BNRHypnosisViewController.h"
@implementation BNRAppDelegate
- (BOOL)application:(UIApplication *)application
didFinishLaunchingWithOptions:(NSDictionary *)launchOptions
{
self.window = [[UIWindow alloc] initWithFrame:[[UIScreen mainScreen] bounds]];
// Override point for customization after application launch
BNRHypnosisViewController *hvc = [[BNRHypnosisViewController alloc] init];
self.window.rootViewController = hvc;
self.window.backgroundColor = [UIColor whiteColor];
[self.window makeKeyAndVisible];
return YES;
}
The view of the root view controller appears at the start of the run of the application. Thus, the window asks for it when setting the view controller as its rootViewController.
Given what you learned in Chapter 4, you can imagine what the core of setRootViewController: looks like:
- (void)setRootViewController:(UIViewController *)viewController
{
// Get the view of the root view controller
UIView *rootView = viewController.view;
// Make a frame that fits the window's bounds
CGRect viewFrame = self.bounds;
rootView.frame = viewFrame;
// Insert this view as window's subview
[self addSubview:rootView];
// Update the instance variable
_rootViewController = viewController;
}
At the beginning of this implementation, the BNRHypnosisViewController is asked for its view. Because the BNRHypnosisViewController has just been created, its view is nil. So it is sent the loadView message that creates its view.
Build and run the application. HypnoNerd looks a lot like Hypnosister did. Under the hood, however, it is quite different. You are using a view controller to present the BNRHypnosisView instead of adding the view object itself to the window. This adds a layer of complexity, which, as you will see by the end of the chapter, gives you power and flexibility to do neat things.