
Let’s get started on your interface. You have selected Main.storyboard to reveal its single scene in the canvas (Figure 1.9).

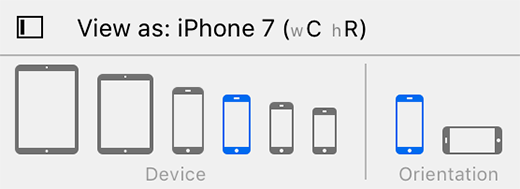
To start, make sure your scene is sized for iPhone 7. At the bottom of the canvas, find the View as button. It will likely say something like View as: iPhone 7 (wC hR). (The wC hR will not make sense right now; we will explain it in Chapter 17.) If it says iPhone 7 already, then you are all set. If not, click on the View as button and select the fourth device from the left, which corresponds to iPhone 7 (Figure 1.10).
It is time to add your view objects to that blank slate.
Make sure that the utility area within Xcode’s window is visible. You may need to click on the rightmost button of the ![]() control in the top-right corner of the window. The utility area is to the right of the editor area and has two sections: the inspector and the
library. The top section is the inspector, which displays settings for a file or object that is selected in the editor area.
The bottom section is the library, which lists items that you can add to a file or project.
control in the top-right corner of the window. The utility area is to the right of the editor area and has two sections: the inspector and the
library. The top section is the inspector, which displays settings for a file or object that is selected in the editor area.
The bottom section is the library, which lists items that you can add to a file or project.
At the top of each section in the utility area is a selector for different inspectors and libraries (Figure 1.11).

Your application interface requires four view objects: two buttons to accept user input and two text labels
to display information. To add them, first make sure you can see the object library, as shown in Figure 1.11,
by selecting the ![]() tab from the library selector.
tab from the library selector.
The object library contains the objects that you can add to a storyboard file to compose your interface. Find the Label object by either scrolling down through the list or by using the search bar at the bottom of the library. Select this object in the library and drag it onto the view object on the canvas. Drag the label around the canvas and notice the dashed blue lines that appear when the label is near the center of the canvas (Figure 1.12). These guidelines will help you lay out your interface.

Using the guidelines, position the label in the horizontal center of the view and near the top, as shown in Figure 1.12. Eventually, this label will display questions to the user. Drag a second label onto the view and position it in the horizontal center, closer to the middle. This label will display answers.
Next, find Button in the object library and drag two buttons onto the view. Position one below each label.
You have now added four view objects to the ViewController’s UI. Notice that they also appear in the document outline. Your interface should look like Figure 1.13.

Now that you have created the view objects, you can configure their attributes. Some attributes of a view, like size, position, and text, can be changed directly on the canvas. For example, you can resize an object by selecting it in the canvas or the document outline and then dragging its corners and edges in the canvas.
Begin by renaming the labels and buttons. Double-click on each label and replace the text with ???. Then double-click the upper button and change its name to Next Question. Rename the lower button to Show Answer. The results are shown in Figure 1.14.

You may have noticed that because you have changed the text in the labels and buttons, and therefore their widths, they are no longer neatly centered in the scene. Click on each of them and drag to center them again, as shown in Figure 1.15.

To test your UI, you are going to run Quiz on Xcode’s iOS simulator.
To prepare Quiz to run on the simulator, find the current scheme pop-up menu on the Xcode toolbar (Figure 1.16).

If it says something generic like iPhone 7, then the project is set to run on the simulator and you are good to go. If it says something like Christian's iPhone, then click and choose iPhone 7 from the pop-up menu. The iPhone 7 scheme will be your simulator default throughout this book.
Click the triangular play button in the toolbar. This will build (compile) and then run the application. You will be doing this often enough that you may want to learn and use the keyboard shortcut Command-R.
After the simulator launches you will see that the interface has all the views you added, neatly centered as you configured them in Interface Builder.
Now go back to the current scheme pop-up menu and select iPhone 7 Plus as your simulator of choice. Run the application again and you will notice that while the views you added are still present, they are not centered as they were on iPhone 7. This is because the labels and buttons currently have a fixed position on a screen, and they do not remain centered on the main view. To correct this problem, you will use a technology called Auto Layout.
As of now, your interface looks nice in the Interface Builder canvas. But iOS devices come in ever more screen sizes, and applications are expected to support all screen sizes and orientations – and perhaps more than one device type. You need to guarantee that the layout of view objects will be correct regardless of the screen size or orientation of the device running the application. The tool for this task is Auto Layout.
Auto Layout works by specifying position and size constraints for each view object in a scene. These constraints can be relative to neighboring views or to container views. A container view is just a view object that, as the name suggests, contains another view. For example, take a look at the document outline for Main.storyboard (Figure 1.17).

You can see in the document outline that the labels and buttons you added are indented with respect to a View object. This view object is the container of the labels and buttons, and the objects can be positioned and sized relative to this view.
To begin specifying Auto Layout constraints, select the top label by clicking on it either on the canvas or in the document outline. At the bottom of the canvas, notice the Auto Layout menus, shown in Figure 1.18.

With the top label still selected, click on the ![]() icon to
reveal the Align menu shown in Figure 1.19.
icon to
reveal the Align menu shown in Figure 1.19.

Within the Align menu, check the Horizontally in Container checkbox to center the label in the container. Then click the Add 1 Constraint button. This constraint guarantees that on any size screen, in any orientation, the label will be centered horizontally.
Now you need to add more constraints to center the lower label and the buttons
with respect to the top label and to lock the spacing between them. Select the four
views by Command-clicking on them one after another
and then click on the ![]() icon to open the Add New Constraints menu
shown in Figure 1.20.
icon to open the Add New Constraints menu
shown in Figure 1.20.

Click on the red vertical dashed segment near the top of the menu. When you click on the segment, it will become solid red (shown in Figure 1.20), indicating that the distance of each view is pinned to its nearest top neighbor. Also, check the Align box and then select Horizontal Centers from the pop-up menu. For Update Frames, make sure that you have Items of New Constraints selected. Finally, click on the Add 7 Constraints button at the bottom of the menu.
If you made any mistakes while adding constraints, you may see red or
orange constraints and frames on the canvas instead of the correct blue lines. If
that is the case, you will want to clear the existing constraints and go through the
steps above again. To clear constraints, first select the background (container)
view. Then click the ![]() icon to open the Resolve Auto
Layout Issues menu. Select Clear Constraints
under the All Views in View Controller section (Figure 1.21). This will clear away any constraints that
you have added and give you a fresh start on adding the constraints back in.
icon to open the Resolve Auto
Layout Issues menu. Select Clear Constraints
under the All Views in View Controller section (Figure 1.21). This will clear away any constraints that
you have added and give you a fresh start on adding the constraints back in.

Auto Layout can be a difficult tool to master, and that is why you are starting to use it in the first chapter of this book. By starting early, you will have more chances to use it and get used to its complexity. Also, dealing with problems before things get too complicated will help you debug layout issues with confidence.
To confirm that your interface behaves correctly, build and run the application on the iPhone 7 Plus simulator. After confirming that the interface looks correct, build and run the application on the iPhone 7 simulator. The labels and buttons should be centered on both.
A connection lets one object know where another object is in memory so that the two objects can communicate. There are two kinds of connections that you can make in Interface Builder: outlets and actions. An outlet is a reference to an object. An action is a method that gets triggered by a button or some other view that the user can interact with, like a slider or a picker.
Let’s start by creating outlets that reference the instances of UILabel. Time to leave Interface Builder and write some code.
In the project navigator, find and select the file named ViewController.swift. The editor area will change from Interface Builder to Xcode’s code editor.
In ViewController.swift, start by deleting any code that the template added between class ViewController: UIViewController { and the final brace, so that the file looks like this:
import UIKit

class ViewController: UIViewController {

}
(For simplicity, we will not show the line import UIKit again for this file.)
Next, add the following code that declares two properties. (Throughout this book, new code for you to add will be shown in bold. Code for you to delete will be struck through.) Do not worry about understanding the code or properties right now; just get it in.
class ViewController: UIViewController {
    @IBOutlet var questionLabel: UILabel!
    @IBOutlet var answerLabel: UILabel!
}
This code gives every instance of ViewController an outlet named questionLabel and an outlet named answerLabel. The view controller can use each outlet to reference a particular UILabel object (i.e., one of the labels in your view). The @IBOutlet keyword tells Xcode that you will connect these outlets to label objects using Interface Builder.
In the project navigator, select Main.storyboard to reopen Interface Builder.
You want the questionLabel outlet to point to the instance of UILabel at the top of the UI.
In the document outline, find the View Controller Scene section and the View Controller object within it. In your case, the View Controller stands in for an instance of ViewController, which is the object responsible for managing the interface defined in Main.storyboard.
Control-drag (or right-click and drag) from the View Controller in the document outline to the top label in the scene. When the label is highlighted, release the mouse and keyboard; a black panel will appear. Select questionLabel to set the outlet, as shown in Figure 1.22.

(If you do not see questionLabel in the connections panel, double-check your ViewController.swift file for typos.)
Now, when the storyboard file is loaded, the ViewController’s questionLabel outlet will automatically reference the instance of UILabel at the top of the screen, which will allow the ViewController to tell the label what question to display.
Set the answerLabel outlet the same way: Control-drag from the ViewController to the bottom UILabel and select answerLabel (Figure 1.23).

Notice that you drag from the object with the outlet that you want to set to the object that you want that outlet to point to.
Your outlets are all set. The next connections you need to make involve the two buttons.
When a UIButton is tapped, it calls a method on another object. That object is called the target. The method that is triggered is called the action. This action is the name of the method that contains the code to be executed in response to the button being tapped.
In your application, the target for both buttons will be the instance of ViewController. Each button will have its own action. Let’s start by defining the two action methods: showNextQuestion(_:) and showAnswer(_:).
Reopen ViewController.swift and add the two action methods after the outlets.
class ViewController: UIViewController {
    @IBOutlet var questionLabel: UILabel!
    @IBOutlet var answerLabel: UILabel!

    @IBAction func showNextQuestion(_ sender: UIButton) {

    }

    @IBAction func showAnswer(_ sender: UIButton) {

    }
}
You will flesh out these methods after you make the target and action connections.
The @IBAction keyword tells Xcode that you will be making these connections in Interface Builder.
Switch back to Main.storyboard. Let’s start with the Next Question button. You want its target to be ViewController and its action to be showNextQuestion(_:).
To set an object’s target, you Control-drag from the object to its target. When you release the mouse, the target is set, and a pop-up menu appears that lets you select an action.
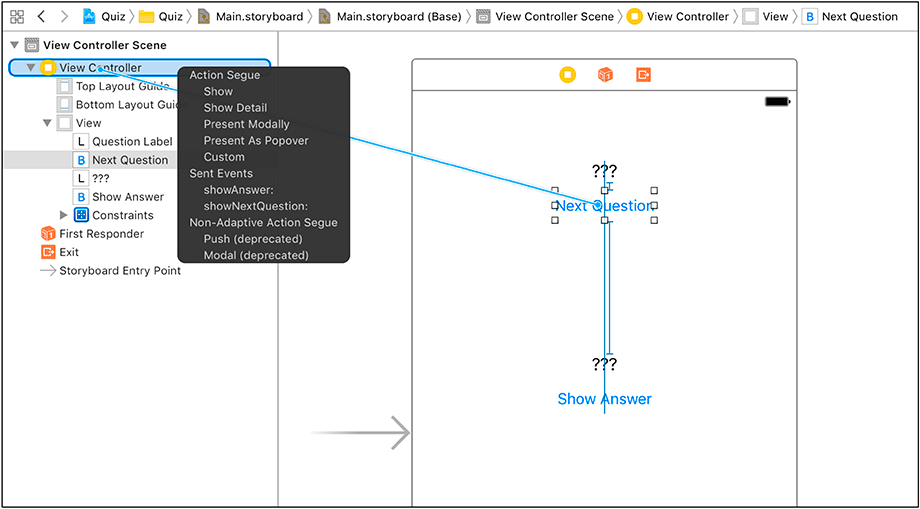
Select the Next Question button in the canvas and Control-drag to the View Controller in the document outline. When the View Controller is highlighted, release the mouse button and choose showNextQuestion: under Sent Events in the pop-up menu, as shown in Figure 1.24.
Now for the Show Answer button. Select the button and Control-drag from the button to the View Controller. Choose showAnswer: from the pop-up menu.
There are now five connections between the ViewController and the view objects. You have set the properties answerLabel and questionLabel to reference the label objects – two connections. The ViewController is the target for both buttons – two more. The project’s template made one additional connection: The view property of ViewController is connected to the View object that represents the background of the application. That makes five.
You can check these connections in the connections inspector. Select the View Controller in the document outline. Then, in the utilities area, click the ![]() tab to reveal the connections inspector
(Figure 1.25).
tab to reveal the connections inspector
(Figure 1.25).

Your storyboard file is complete. The view objects have been created and configured and all the necessary connections have been made to the controller object. Let’s move on to creating and connecting your model objects.