
Chapter 5: Using Windows (Live) Essentials
In This Chapter
![]() Windows Live is dead, long live Windows Live!
Windows Live is dead, long live Windows Live!
![]() Beating the Metro tiled programs with Windows Essentials
Beating the Metro tiled programs with Windows Essentials
![]() Getting Windows (Live) Essentials
Getting Windows (Live) Essentials
![]() Using Windows (Undead?) Essentials
Using Windows (Undead?) Essentials
I have good news and bad news.
The bad news: Windows Live, the hodge-podge bundle of unrelated programs and services that Microsoft clubbed together in one (actually, many) of its frequent re-branding exercises, is pretty much dead. While Windows Live Essentials were hyped as one of the great reasons to buy Windows 7, in Windows 8.1 they’re going the way of the do-do. Sic transit gloria computerii.
The good news: Several of the Windows Live programs are considerably better than their Windows 8.1 Metro tiled counterparts, in many respects, at least for now. Windows Live programs aren’t going away. If you don’t mind running orphaned programs on your desktop, a handful of Windows Live programs, in particular, are worth picking up.
 The two new (well, only 1-year-old) Windows Live programs — Photo Gallery and Movie Maker — are worth considering. Many people think that Windows Live Photo Gallery runs rings around the Metro Photo app. Windows Movie Maker isn’t anything at all like the videos-for-sale Metro Video app.
The names changed just about the time Windows 8 shipped. Microsoft dropped the “Live” nomenclature. Where once we had Windows Live Essentials, we now have Windows Essentials, a ragtag collection of free downloadable programs consisting of Windows Family Safety; Windows Mail (not to be confused with a dozen other Microsoft programs with similar or identical names); Microsoft SkyDrive (which replicates all the functions that come standard in Windows 8.1); Windows Movie Maker; Windows Photo Gallery; and Windows Writer. Microsoft has, uh, retired the old Windows Live Messenger.
Windows Essentials and Windows Live applications don’t work worth beans on a touch-only tablet. They weren’t designed for a touch interface, although they will work, if you have a very high tolerance for pain. Bottom line? Don’t even try to install or use the Windows Live/Essentials apps unless you have a functioning keyboard and mouse.
Introducing the Applications and How They’ve Changed
Windows Live started in 2005 as a re-re-branding of some MSN applications and gradually took on new cloud features. Windows Live Hotmail, Windows Live SkyDrive, Windows Live Calendar, Windows Live Contacts, and Windows Live ID have almost nothing in common, except they all run in the cloud.
“Windows Live” as a brand took on greater prominence when Microsoft decided to pull many applications out of Windows, with the Vista deadlines imminent, and thrust them into a post-Vista-ship-date collection of downloadable PC programs known as Windows Live Essentials. Such Windows apps as Windows Live Mail, Windows Live Messenger, Windows Live Movie Maker, and Windows Live Photo Gallery also have almost nothing in common, except they run on Windows and they’re available for free download to any Windows customer.
Here’s what happened to the old Windows Live apps:
![]() Windows Live ID (formerly known as Microsoft Wallet, Microsoft Passport, .Net Passport, and Microsoft Passport Network) has been rebranded Microsoft Your Account and referred to informally as your Microsoft Account. Your old Microsoft Live ID, typically an e-mail address that ends in
Windows Live ID (formerly known as Microsoft Wallet, Microsoft Passport, .Net Passport, and Microsoft Passport Network) has been rebranded Microsoft Your Account and referred to informally as your Microsoft Account. Your old Microsoft Live ID, typically an e-mail address that ends in @hotmail.com or @live.com,will still work, as will one of the new @outlook.com e-mail addresses. In addition, Microsoft now accepts any e-mail address as a Microsoft Account.
![]() Windows Live Hotmail (formerly Hotmail, Microsoft Hotmail, and MSN Hotmail) turned into Hotmail, once again, and then it got a Metro style interface and became Outlook.com. Everybody still calls it Hotmail. I talk about Hotmail and Outlook.com in Book X, Chapter 4.
Windows Live Hotmail (formerly Hotmail, Microsoft Hotmail, and MSN Hotmail) turned into Hotmail, once again, and then it got a Metro style interface and became Outlook.com. Everybody still calls it Hotmail. I talk about Hotmail and Outlook.com in Book X, Chapter 4.
![]() Windows Live SkyDrive turned into SkyDrive for Windows and now is known as Microsoft SkyDrive. It's baked into Windows 8.1; highly unlikely you'll want to install the program in Windows 8.1, but you may well want to install it on your other Windows machines, Mac, iPad, iPhone, Windows Phone, Android tablet or phone — and a Linux version is on its way. Windows Live Mesh (formerly Live Mesh, Windows Live Sync, and Windows Live FolderShare) have been folded into SkyDrive, although Microsoft has squashed PC-to-PC sync. In Windows 8.1, you can access your SkyDrive folder directly from File Manager, you can use the tiled SkyDrive app, which I talk about in Book IV, Chapter 4, or you can access SkyDrive (
Windows Live SkyDrive turned into SkyDrive for Windows and now is known as Microsoft SkyDrive. It's baked into Windows 8.1; highly unlikely you'll want to install the program in Windows 8.1, but you may well want to install it on your other Windows machines, Mac, iPad, iPhone, Windows Phone, Android tablet or phone — and a Linux version is on its way. Windows Live Mesh (formerly Live Mesh, Windows Live Sync, and Windows Live FolderShare) have been folded into SkyDrive, although Microsoft has squashed PC-to-PC sync. In Windows 8.1, you can access your SkyDrive folder directly from File Manager, you can use the tiled SkyDrive app, which I talk about in Book IV, Chapter 4, or you can access SkyDrive (www.skydrive.com) directly through any web browser.
![]() Windows Live Messenger was absorbed into Skype. Although plenty of copies of Messenger are still floating around, if you want to install it on a machine that hasn’t had it before, you need to get Skype. Microsoft wants you to move up to full video calls, instead of just plunking on a keyboard.
Windows Live Messenger was absorbed into Skype. Although plenty of copies of Messenger are still floating around, if you want to install it on a machine that hasn’t had it before, you need to get Skype. Microsoft wants you to move up to full video calls, instead of just plunking on a keyboard.
![]() Windows Live Photo Gallery gained a couple of minor features and is now known as Windows Photo Gallery. While Microsoft would love it if everyone would use its Windows 8.1, tiled Metro Photos app, there’s absolutely no question that Windows Photo Gallery runs rings around Metro Photos, if you want to do anything at all with your photos besides just look at them.
Windows Live Photo Gallery gained a couple of minor features and is now known as Windows Photo Gallery. While Microsoft would love it if everyone would use its Windows 8.1, tiled Metro Photos app, there’s absolutely no question that Windows Photo Gallery runs rings around Metro Photos, if you want to do anything at all with your photos besides just look at them.

![]() Windows Live Movie Maker, quite surprisingly, received a major upgrade to become Windows Movie Maker. In several Windows All-in-One For Dummies books, I’ve traced the way Movie Maker has gone from pretty good to absolutely awful. Microsoft cut many important features and just didn’t bother to put them back in as it “upgraded” the product. The new, improved, Windows Movie Maker 2012 has all its old features back and several impressive new ones to boot. If you ever work with video — even if you only string together clips of your summer vacation — this new Windows Movie Maker is worth a look.
Windows Live Movie Maker, quite surprisingly, received a major upgrade to become Windows Movie Maker. In several Windows All-in-One For Dummies books, I’ve traced the way Movie Maker has gone from pretty good to absolutely awful. Microsoft cut many important features and just didn’t bother to put them back in as it “upgraded” the product. The new, improved, Windows Movie Maker 2012 has all its old features back and several impressive new ones to boot. If you ever work with video — even if you only string together clips of your summer vacation — this new Windows Movie Maker is worth a look.
In case you were wondering, the Windows 8.1 tiled Video app lets you play videos and encourages you to buy more. It doesn’t lift a finger to help you make videos.
If you're editing videos, particularly in order to share them, it's hard to beat Vimeo (www.vimeo.com). Hey, even the White House uses it.
There are also many good video editing apps for both tablets and phones — and for the Mac. iMovie for the Mac, iPad, and iPhone created the whole genre. Take a look at, oh, Magisto for Apple or Android, or Vine if you’re sharing short clips. Look in the respective app stores. (Sorry, as of this writing there are no Metro apps for Vimeo, Magisto, or Vine.)
![]() Then we have all the old Windows Live apps that are slowly (and in some cases, not very successfully) morphing into tiled apps. Windows Mail (formerly Windows Live Mail, not to be confused with Vista’s Windows Mail) gets neglected because its younger cousin the Windows 8.1, tiled Metro Mail app needs all the attention. Windows Live Calendar becomes, more or less, the tiled Metro Calendar; Windows Live Contacts turns into the tiled Metro People program.
Then we have all the old Windows Live apps that are slowly (and in some cases, not very successfully) morphing into tiled apps. Windows Mail (formerly Windows Live Mail, not to be confused with Vista’s Windows Mail) gets neglected because its younger cousin the Windows 8.1, tiled Metro Mail app needs all the attention. Windows Live Calendar becomes, more or less, the tiled Metro Calendar; Windows Live Contacts turns into the tiled Metro People program.
Windows Essentials apps are still around and available for download from Microsoft, and they’re going to be running for many years. That leaves you, the Windows 8.1 customer, in an enviable position: You can pick and choose which apps you want to use and which to let stew until Microsoft makes them better.
Microsoft likely will keep improving its tiled Metro apps until they approach, and then supersede, the Windows Essentials apps in terms of functions. But you get to decide if you prefer the Windows Essentials way of doing things or if you’re ready to jump to the Metro side.
 People I know who are straddling the Metro tiled and Legacy sides of the fence mention three Windows Essentials apps that are still appealing, in spite of the tiled app candy:
![]() Windows Mail: The tiled Metro Mail app still won’t do much of what advanced Windows Live Mail users want, so they’d rather stick with the devil they know. Windows Mail, nee Windows Live Mail, is very similar to Outlook Express, if you’ve been around the block with that one.
Windows Mail: The tiled Metro Mail app still won’t do much of what advanced Windows Live Mail users want, so they’d rather stick with the devil they know. Windows Mail, nee Windows Live Mail, is very similar to Outlook Express, if you’ve been around the block with that one.
Personally, I use Gmail (www.mail.google.com), and I love it. See Book X, Chapter 3.
![]() Windows Photo Gallery: Windows 8.1’s tiled Metro Photos is getting better, but it still doesn’t have a small fraction of the tools or the user interface that good old Windows Photo Gallery has.
Windows Photo Gallery: Windows 8.1’s tiled Metro Photos is getting better, but it still doesn’t have a small fraction of the tools or the user interface that good old Windows Photo Gallery has.
Given a choice, I'd go with Flickr (www.flickr.com). Much, much better than any Windows product.
![]() Windows Movie Maker: Never one of the most popular Live apps, Windows Movie Maker occupies a unique niche. The tiled Metro Video app is all about selling videos to Windows users. Movie Maker concentrates on letting you build your own.
Windows Movie Maker: Never one of the most popular Live apps, Windows Movie Maker occupies a unique niche. The tiled Metro Video app is all about selling videos to Windows users. Movie Maker concentrates on letting you build your own.
I'd use iMovie or Vimeo (www.vimeo.com) instead of WMM. No question. It's just that you have to have a Mac or iPad or iPhone in order to use iMovie.
Some people I know swear by Windows Live (er, previously Live) Writer. They use it to put together blogs. It’s genuinely useful, if you get used to the interface and the way you have to move things across to the blog editor, and it produces blog entries that are a thousand times better than ones copied from Word — Word tends to insert all sorts of really lousy HTML code, even when you just copy simple stuff. If you write blog entries commonly (WordPress, Drupal, many others), it’s worthwhile to give Windows Writer a shot.
In the rest of this chapter, I take quick looks at all three of those Essentials apps, starting with an explanation about how to download and install any or all of them with Windows 8.1.
Getting the Windows Essentials Apps
Want to install a couple of Live-ly ones? Here’s how to get the Windows Essentials you want, and let the others sit and stew:
1. Start your favorite web browser and go to www.download.live.com.
Any browser will do, either on the tiled Metro side or desktop style.
2. Click the Download Now button at the top.
Your browser downloads wlsetup-web.exe, which is the Windows Live setup program.
3. Double-click the installer or do whatever you need to do (depending on your browser) to run it.
 You may get a warning message saying the installer was downloaded from an untrusted location. Yes, it came from the Microsoft web servers. Snicker and ignore the message.
You may get another message that says you must install .NET Framework 3.5 on your machine. Sigh once, heavily, and click Download and install this feature. (Windows 8.1 ships with .NET Framework 4.5, but some Windows Live programs require the earlier version, .NET Framework 3.5.)
4. When the Windows Essentials 2012 installer asks if you want to install all the Windows Essentials (Recommended), click Choose the Programs You Want to Install.
You see the program list shown in Figure 5-1.
5. Take a look at the list in the first section of this chapter and choose the Windows Essentials programs that strike your fancy. Click Install.
I choose Photo Gallery and Movie Maker (which is one check box because they have to be installed together), Writer, and Mail, being very careful to deselect the other boxes.
The Windows Essentials Installer churns away for a while and then comes back with a simple message that tells you to click Done to get going with the programs.

Figure 5-1: Pick the Windows Essentials programs you want to install.
Windows, in its inimitable way, sticks new tiles on your Metro All Apps screen, one for each of the new applications that you’ve installed. Most of the tiles go into the All Apps category called Desktop, but Windows Writer goes into a group called Windows Live. No idea why. The installer doesn’t put anything on your desktop or on your Metro Start screen, so in order to start the apps, you have to flip over to the All Apps screen or modify your Metro Start screen or desktop taskbar so you can open the programs from the desktop. Book VI, Chapter 2 explains how to beef up your taskbar.
Personally, I use Writer all the time and Photo Gallery occasionally, so I hop over to the Metro All Apps screen (possibly by pressing the Windows key), right-click each tile, and choose Pin to Start and/or Pin to Taskbar.
Using Windows Live Mail
Most people know Windows (formerly Live) Mail as the progeny of the venerable, if quirky Outlook Express. The fact that Microsoft has three — yes, three — completely different e-mail programs called “Windows Mail” may trip you up. Here’s the scorecard:
![]() Some people (and Microsoft) call the new, tiled, Windows 8 Metro Mail app “Windows Mail.” I have no idea why. It just confuses the issue.
Some people (and Microsoft) call the new, tiled, Windows 8 Metro Mail app “Windows Mail.” I have no idea why. It just confuses the issue.
![]() The mail program that shipped with Windows Vista was called “Windows Mail.” Vista’s Windows Mail is very similar to Outlook Express. It isn’t anything at all like Metro Mail and it only bears faint familiar similarities with Windows Live Mail.
The mail program that shipped with Windows Vista was called “Windows Mail.” Vista’s Windows Mail is very similar to Outlook Express. It isn’t anything at all like Metro Mail and it only bears faint familiar similarities with Windows Live Mail.
![]() Windows Live Mail, following the demise of the term “Live,” has turned into “Windows Mail.” That’s the Windows Mail we’re considering in this chapter. It’s an independent program that was based on the design principals of Outlook Express but re-written almost entirely.
Windows Live Mail, following the demise of the term “Live,” has turned into “Windows Mail.” That’s the Windows Mail we’re considering in this chapter. It’s an independent program that was based on the design principals of Outlook Express but re-written almost entirely.
Choosing an e-mail program
No, you can’t use Outlook Express with Windows 8.1.
Q: What happened to Outlook Express?
A: Oh, it went away a long time ago. Outlook Express was the free e-mail program that shipped in Windows XP. It’s kaput. Bygones.
Q: What happened to the first Windows Mail?
A: It disappeared, too. Windows Mail was a barely warmed-over minor upgrade to Outlook Express. Microsoft shipped Windows Mail as the free e-mail program in Windows Vista. But Microsoft forgot about Windows Mail shortly after it shipped. Orphaned. Abandoned at birth.
Q: So what do we do now, Ollie?
A: If you want to continue to use a desktop e-mail program with quite a few features, Windows (formerly Live) Mail is a good choice. For Windows 8.1 users, the tiled Metro Mail app is shaping up to be pretty capable, but the jury’s still out on whether the features will match Windows Mail and whether using the tiled Metro Mail with a mouse will ever get to be comparable to Windows Mail.
Windows (formerly Live) Mail pulls mail down and stores it on your computer. Windows Mail gobbles up mail sent to your e-mail address, whatever your address may be, using traditional Internet e-mail computers (POP3 servers). It can also grab mail from Hotmail/Outlook.com, Google’s Gmail, Yahoo! Mail, and many other online mail services.
Of course, if you want to spend some money, Microsoft has offered Outlook for ages; it’s part of Microsoft Office. If you’re willing to go online for e-mail, look at Hotmail/Outlook.com (Book X, Chapter 4), Gmail (Book X, Chapter 3), and Yahoo! Mail. And then there’s Outlook Web Apps. . . The last time I counted, Microsoft was supporting ten very different e-mail programs.
Running Windows (formerly Live) Mail
If you’ve installed Windows (formerly Live) Mail and want to run it for the first time, take these steps — and precautions:
1. Start Windows Mail by tapping or clicking the Metro All Apps tile or, if you followed my advice, by clicking the Windows Live Mail icon (yes, it’s called Windows Live Mail) on the desktop taskbar.
WLM whizzes and gurgles for a bit and then shows you the Add Your E-mail Accounts dialog box, shown in Figure 5-2.

Figure 5-2: If you have a @hotmail.com or @live.com or @outlook.com ID, type it here to connect.
2. If you have a Hotmail/Outlook.com account (or Xbox account, or any other duly registered Microsoft account) and you want to use Windows Live Mail to access that account, click or tap the line that says Sign in to Windows Live. Fill in the information from your Hotmail account. Click Sign In.
Note that you have to fill in your account information, even if you’ve logged on to Windows with a Microsoft account. Windows isn’t smart enough to fill it in for you.
Starting with a Hotmail/Outlook.com account is a quick and easy way to get going with Windows Live Mail: WLM understands Hotmail/Outlook.com, and you don’t have to futz with any settings.
On the other hand, you may want to use a conventional e-mail account, in which case you need to fill out the details (see the earlier sidebar, “E-mail client, POP3, and bafflegab”). Your Internet service provider (ISP) should’ve given you all that information.
If you set up a @hotmail.com or @live.com or @outlook.com account, WLM downloads your messages and shows them to you, as in Figure 5-3.
You’re ready to read, write, send, and receive, so you may as well.
See the next section for details.

Figure 5-3: Connecting to a Hotmail/Outlook.com account is two-step easy.
You may want to use Windows (formerly Live) Mail to read your RSS Feeds, but I greatly prefer Feedly (www.feedly.com), which is trivially easy to hook up with Chrome or any other web browser.
Adding e-mail accounts
If you grew up with e-mail, you’re lucky. Windows Mail should behave more or less the way you expect. If you were born before, oh, 1990, you may not be so adept. This section scratches the surface of what there is to know about e-mail. It should suffice to get you started on the right foot.
The process of setting up mail accounts — and you can set up dozens, if you choose — is a simple one. Get your accounts in order, and you’re free to create, send, and receive e-mail messages at will. Or to Will.
How many e-mail accounts do you need? Many people have several e-mail addresses — perhaps one for work, one for school, and one for personal use.
I strongly recommend that you not add e-mail accounts for several people in Windows Mail. You can add a hundred accounts for yourself, but the minute you add an account for your significant other or your kids or your parents, things get sticky — not just because you all find yourselves reading each other’s mail but because replying, deleting, and forwarding other people’s mail gets real hairy, real fast.
If more than one person is using Windows Live Mail, set up a separate Windows account for each person (see Book II, Chapter 4). It doesn’t matter if you use Microsoft accounts or Local accounts, just get one account for each person. That way, even if you don’t put passwords on the Windows accounts, you can keep the mail sorted out automatically. Little Billy won’t accidentally delete Daddy’s notification about winning the Irish lottery. Little Melinda won’t accidentally leave her love letter in the family Sent Items folder.
To add other e-mail accounts or modify your existing one, follow these steps:
1. Start Windows Live Mail (probably by clicking the icon on the desktop taskbar, or the tile on the Metro Start screen or All Apps list). When you get there, click the Accounts tab.
You see the Accounts Ribbon, as shown in Figure 5-4.

Figure 5-4: The Accounts Ribbon makes adding other e-mail addresses easy.
2. On the left, click the Email icon.
Windows Live Mail shows you the Add Your Email Accounts dialog box, shown in Figure 5-5.

Figure 5-5: Add just about any e-mail address and Windows Live Mail will handle it.
3. Fill in the dialog box fields and click Next.
Microsoft has a big database of domain names (that’s the part of your e-mail address to the right of the @ sign) and if your domain is in that big database, Windows Live Mail can guess at all the settings necessary to set up e-mail service.
4. If Microsoft can’t find the settings for your domain, you see a dialog box that says Configure Server Settings. Using information from your e-mail service provider, fill it out and click Next.
Unfortunately, the only place you can find that info is from the people you pay to handle your e-mail.
5. If you got all the settings right, WLM tells you that it has added your new e-mail account. Click Finish.
The mail from your new account appears in a second group of folders on the left.
In case you’re wondering, Windows Live Mail doesn’t remove any messages from where they’re stored “in the cloud.” So, for example, if you put your Gmail address in Windows Live Mail and use WLM to look at your Gmail, you can still log on to Gmail, and all your mail will be there.
Someday it’ll be easy to set up e-mail accounts. That day hasn’t arrived yet.
Creating a message
When you’re ready to create a message, follow these steps:
1. Start Windows Live Mail and click the Home tab. On the left edge of the Home Ribbon, click E-mail Message.
A message window appears, as shown in Figure 5-6, so that you can type your message.

Figure 5-6: Writing a new message.
2. Choose the recipient for the message.
You can enter the person’s e-mail address in two different ways:
• Type the e-mail address on the To line.
• Click the To text and select the recipient you want from the Address Book. (To select a recipient, select the contact from the list on the left, click the To button, and then click OK.)
 Note that this is your Hotmail address book, which may or may not be connected to your Windows 8.1 tiled People app.
3. Enter a subject for your message. For best results, keep it fairly short and make it descriptive. Then type the body of your message.
You have a wide-open space to do just that. You can enter the words the way you want them without any fancy formatting or you can change the look of the text by choosing a different font and size, changing colors, indenting information, and more.
4. If you have more than one e-mail account, make sure, on the right, that you have selected the correct account to send the message. Then click Send.
You can wait for Windows Live Mail to automatically send the message, a minute or two down the line, or you can click the Send/Receive icon on the Home Ribbon, and it is sent immediately.
That should get you started.
Managing Windows Photo Gallery
Remember that photo I took of Dad falling out of the fishing boat? You know, the one from 1998? Or was it 1996? Wait a sec. Gimme a minute. I have it right here. Uh, no, it must be over here. Hmmm, maybe it’s in this folder down here. Is it on the network drive? Er, where in the %$#@! did I put that thing?
The tiled Metro style app called Photos is fancy and glitzy, brings together photos from all over the place, including SkyDrive, and has only the most rudimentary controls for handling large numbers of pictures. The editing capabilities barely extend beyond the Cro-Magnon level. Compared to the iPad’s iPhoto, Microsoft’s tiled Metro Photo is just plain embarrassing. You can read about it in Book IV, Chapter 3.
Of course, Microsoft is good at plowing resources into a faltering product if there's a profit to be made, so the Windows 8.1, tiled Metro Photos app will get better. Until it does, you have a very good alternative over on the desktop side of the fence. (Or you can do what I do and use Flickr, www.flickr.com.)
Windows Photo Gallery brings a handful of sophisticated tools to the thorny problems of gathering, fixing, and, most of all, finding pictures on your computer.
Unfortunately, WPG (as it’s known to its friends) can’t read your mind. If you want to retrieve that shot of Dad falling out of the fishing boat, you need to tag (mark) the picture with some pertinent keywords that you can later find. I don’t know about you, but it’d take me a year or two to go through all my old shots and sort them out. By the time I was done, I’d have to start all over again with new shots. Like the hare versus the tortoise, I’d probably never finish.
That’s the fundamental problem with the fancy, WPG indexing methods — indeed, with indexing anything. Windows Photo Gallery can’t create indexes out of thin air. You have to do the work before you can reap the rewards — and it’s debatable whether all the time you might invest in cataloging your pictures will ever pay off.
You have to put the garbage in before you can take it out, eh?
Picasa does many of the same things as WPG: organizing, viewing, touching up large numbers of photos stored on your PC. When people ask me which is better — Windows Photo Gallery or Picasa — I ask them, “What week is it?” Features in both programs change constantly: When either Photo Gallery or Picasa runs out ahead with a new feature, the other catches up within a month or two. One of these days the tiled Metro Photos app will be in the running, too.
Some people prefer storing their pictures on the Internet, where they're easy to share with other people. Flickr (www.flickr.com) has an enormous array of tools for improving, storing, sharing, and retrieving pictures. If that sounds like something you'd like to do, check it out.
Leafing through the Gallery
Here’s how to get started with Windows Photo Gallery for the first time:
1. After you’ve installed it (see the earlier section, “Getting the Windows Essentials Apps”), start Windows Photo Gallery either by tapping or clicking the Windows Photo Gallery tile on the All Apps menu or (if you took my advice) by clicking the Windows Photo Gallery icon on the taskbar.
The first time you start WPG, it’ll ask you to sign in with your e-mail address. If you have a Microsoft account, signing in will make it easier to connect to SkyDrive.
The WPG startup routine may also ask if you want to use WPG to open files of the following types: JPG, TIF, JXR, PNG, WDP, BMP, and ICO. Those are filename extensions. (In Book VI, Chapter 1, I explain why it’s important to be able to see filename extensions. Here’s one more example.)
2. You probably do want WPG to take over those file types, so if you see the notification, click Yes.
See Table 5-1 for a comparison of the relative merits of the different file types.
WPG scans your Pictures and Videos folders and shows you thumbnails of both in the main window, as shown in Figure 5-7.
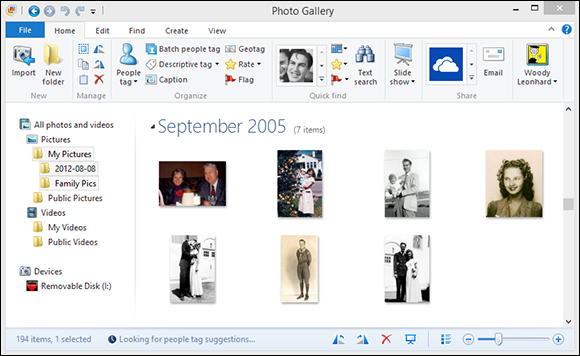
Figure 5-7: The main window for WPG.
The WPG development team likes to say that Windows Photo Gallery is designed to store your “digital memories.” Gag me with a RAMDAC. What they’re really saying is that Windows Photo Gallery works with only the kinds of picture files that are commonly produced by digital cameras — JPG and MPG (and to a lesser extent, TIF) files. You can use RAW format pictures, but only if the camera manufacturer has a program (a codec) that can pass them on to WPG. You can’t use Photo Gallery to modify GIF, PCX, or WMF files — another reason why it’s important to have Windows show your filename extensions (see Book VI, Chapter 1).
3. You can have WPG show you more or less of the gallery in the ways you would expect by hopping through the navigation pane on the left: Click, oh, Pictures, and WPG shows you only the pictures in your Pictures folder.
4. To edit a still photo, double-click it.
WPG shows the photo all by itself and brings up the Edit Ribbon, as shown in Figure 5-8. See the section “Touching up pictures,” later in this chapter.
If you want to edit a file that’s in a format WPG can’t edit (for example, GIF or BMP), double-click the file to go into single picture view and tap or click the icon Make a Copy. Windows Photo Gallery lets you save the file in JPG, TIF, or WDP format, all of which are editable in WPG.
When you’re done with the picture, click the big red “X” icon in the upper-right corner that’s marked Close File. You go back to the main window (refer to Figure 5-7).

Figure 5-8: Edit a single picture with WPG’s extensive tools.
5. To view, but not edit, a video, double-click it.
WPG shows you the video, with simple tools to start and stop, tag, and delete. If you want to edit your video, you need Windows Movie Maker, which may or may not work — the subject of the next section in this chapter.
6. When you’re done, click the X in the upper-right corner to exit WLMP.
Table 5-1 File Types That WPG Can Handle
|
Filename Extension |
Relative File Size |
Description |
|
JPG |
1MB |
When you take photos on a camera, they’re usually created in JPG format. JPG is lossy, which means that this kind of file can be manipulated by the computer (or camera) to make it smaller, even though the quality suffers. If you edit and re-edit a JPG file, the quality of the file may decrease substantially. |
|
TIF |
10MB |
This lossless format is almost universal. Its file sizes are big, but the quality never changes. It’s commonly used for scans and archive and fax files. |
|
PNG |
6MB |
The PNG (pronounced “ping”) lossless format is easier to compress than TIF, but it isn’t as universally recognized: Many programs can’t handle PNG. In fact, WPG can show you PNG files, but it won’t help you edit them. |
|
WDP or HDP |
Varies |
Windows Media Photo, also known as WMPhoto or HD Photo, is a Microsoft proprietary format that can be lossy or lossless. It isn’t widely used. |
|
BMP |
10MB |
The Windows bitmap is lossless and used mostly for screen shots nowadays. WPG can show you BMP files, but it won’t help you edit them. |
|
ICO |
N/A |
Windows icon files typically contain many icons. Windows Live Picture Gallery can “handle” them — in the sense that you can double-click an ICO file and WPG steps you through all the icons in the file. WPG doesn’t show the file in the Gallery, though, and it doesn’t help you edit the icons. |
Adding photos to Photo Gallery
Any pictures or videos that you add to your PC’s Pictures or Videos Libraries (see Book VII, Chapter 3, for a discussion of showing and using Libraries) will get picked up by WPG automatically. So if you want to add photos or videos to WPG, you only need to figure out a way to get them into your Pictures or Videos Libraries.
Although there are sneaky ways to get photos and videos into the Libraries, most people will use one of two methods:
![]() Use File Explorer to copy or move a picture (JPG, TIF, JXR, PNG, WDP, BMP, or ICO file) or video (ASF, AVI, MPEG, MPG, MP4, WMV, MOV) to one of the Libraries.
Use File Explorer to copy or move a picture (JPG, TIF, JXR, PNG, WDP, BMP, or ICO file) or video (ASF, AVI, MPEG, MPG, MP4, WMV, MOV) to one of the Libraries.
![]() Use WPG’s Picture and Video Import program to pull them off a camera, phone, tablet, or sufficiently advanced toaster oven and add them to the Photo Gallery automatically.
Use WPG’s Picture and Video Import program to pull them off a camera, phone, tablet, or sufficiently advanced toaster oven and add them to the Photo Gallery automatically.
Here’s how to import pictures using WPG:
1. Attach your camera, phone, tablet, camera-equipped toaster oven, or car to your PC using a USB cable.
Bluetooth works, too. Sometimes. Alternatively, you can take the SD card or other memory card out of your camera and put it in the PC, if you have an SD card reader.
If everything works according to plan, a toaster notification appears in the upper right and invites you to tap (or click) the notification to choose what to do. If you see a notification like that, click or tap it and choose View Pictures/Photo Gallery.
2. If you aren’t in WPG yet, start it. You end up on the main window (refer to Figure 5-7) with the Home Ribbon visible. On the left of the Home Ribbon, click Import.
The Import Photos and Videos app appears, as in Figure 5-9.
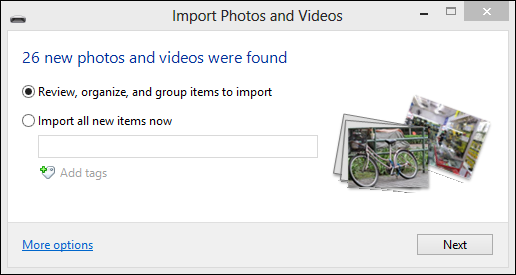
Figure 5-9: WPG will bring in photos and videos, optionally tag them, and put them in your Pictures or Videos Libraries.
3. Select the Review, Organize, and Group Items to Import option and click Next.
The Import app looks at the time and date stamps on the pictures and groups them into suggested folders, based on when you took the pictures. Click and type in names for each of the folders and optionally add tags by clicking the Add Tags link.
If you don’t like the way the import program breaks up your pictures into groups, you can change the sensitivity of the time grouping by moving the Adjust Groups slider in the lower-right corner.
4. When your pictures are grouped and tagged appropriately, click Import.
The pictures are put in separate folders inside your Pictures folder; similarly, videos go in your Videos folder.
You can optionally have the Import app delete the pictures and videos as they’re being imported.
Selecting the Delete Files from Device After Importing box requires a small leap of faith, but after you use the Import Pictures and Videos program a couple of times, you’ll probably let Windows do the deleting. If something goes bump in the night and you accidentally delete photos on your camera memory card, don’t panic. File undelete programs such as Recuva (see Book X, Chapter 5) take advantage of the fact that the data (your picture) isn’t deleted until the camera needs to re-use the space on the memory card. With a bit of luck, you can recover pictures that you took a long, long time ago.
5. Move the pictures around using File Explorer, if you like.
They’re files. Treat them as such.
Tagging pictures
If you’ve spent more than ten minutes looking for a photo, you already know that browsing for pictures based on their location on disk can drive you nuts in no time. That’s why tags were invented.
When you tag your pictures, the Photo Gallery keeps an index that makes it lightning-quick to find any pic with the specific tag. The problem, of course, is that you have to type a tag or two or three before Photo Gallery has anything to find.
Windows Photo Gallery draws a distinction between people tags, geo tags, and descriptive tags. It’s a useful distinction, as you can see later in this section, but don’t let the distinction fool you. Deep down at heart, a people tag or a geo tag is a descriptive tag, where the tag is just the name of the person or the location.
Say you took a picture of your dad falling out of a fishing boat at Lake Isabella. You may want to tag the picture with a people tag of George (hey, that’s my dad’s name), a geo tag of Kern County, and, oh, fishing and boat. After you tag a 100,000 pictures or so, you can tell Photo Gallery to show all pics that have the name tag George or the geo tag Kern County or the descriptive tag boat and narrow your choices considerably.
To add a tag to a picture or group of pictures, follow these steps:
1. Start WPG.
The Home Ribbon should be showing.
2. At the top, in the Ribbon, tap or click the Descriptive Tag item. Then select the pictures you want to tag.
To give a bunch of pictures the same tag or tags, hold down Ctrl while clicking each picture. Alternatively, if the pictures are contiguous (one after another), you can click the first picture, hold down Shift, and click the last picture, or you can “lasso” them by clicking and dragging a box over the pictures you want to select.
WPG shows selected pictures with a shaded border around them, as shown in Figure 5-10.

Figure 5-10: Tagging pictures of Yangon’s Shwedagon Pagoda.
3. In the pane on the right, click Add Geotag under the Geotag heading (or People Tag or Descriptive Tags), type the tag you want to add, and press Enter.
You can separate tags with spaces to give a particular picture or video multiple tags.
Tags that you assign to a picture travel with the picture. Say you tag a photo as George, fishing, and boat, and send a copy of the picture to your brother, and your brother then puts the picture in his Pictures folder. The tags will travel with the photo, and he can use Windows Photo Gallery to find the picture by using any of the tags.
Windows Photo Gallery has several advanced features, one of which — face recognition — can be a huge help in tagging. To use it, click the Find tab, and click the down arrow next to the People icon. Choose All Detected But Not Tagged (see Figure 5-11). Wait a minute or two, and WPG will show you all the pictures that contain faces WPG has detected but doesn’t have People tags associated.
On the right, set up tags for the people (or take them from one of your Windows 8.1, tiled, People app contacts list). After you’ve done a few, you’ll find that WPG can recognize some people and recommend the correct name to go with the picture.
Scary.

Figure 5-11: WPG can scan for faces that it hasn’t yet tagged with a name.
Finding a tagged picture
If your tags are in good shape, Windows Photo Gallery can find the tagged pictures in a split second. Here’s how:
1. Bring up Windows Photo Gallery. Click the Find tab.
You see the Find options shown at the top of Figure 5-12.

Figure 5-12: WPG’s extensive Find capabilities can search on all sorts of criteria — even, as in this case, on a person’s face.
2. To find a person, select the person’s picture in the People box.
The “detected” people are ones who match the physical characteristics of the ones you’ve identified by tagging.
3. To find any kind of tag (including a People tag), click the Text Search icon on the right, and type the search criteria in the Search box.
If you type more than one tag, Photo Gallery retrieves all pictures that match any of the tags — in Boolean terms, the search is an AND search (such as find George AND fishing AND boat).
WPG looks for the text in any form: People tags, Geo tags, Captions, regular Descriptive tags — even file or folder names.
Typing on the search bar performs a search only on items that you can see. For example, if you're viewing items tagged George and you search for Rubye, you see only results tagged with both George and Rubye.
If you assign a first and last name to a People tag, you can search on either or both. So if you have a photo tagged Snidely Whiplash and do a text search, that photo will appear in the results for both Snidely and Whiplash.
Touching up pictures
Windows Photo Gallery offers a small set of the most-used, photo touch-up tools, specifically designed to be easy to use and not particularly intimidating — or powerful. You may find them useful, especially if you don’t have a more capable program at hand.
Many picture-editing programs change a picture permanently: Once you change a picture and save it, you can’t go back. WPG is smarter than that. It keeps a copy of your original picture in its Original Photos folder, which is located at C:Users<name>AppDataLocalMicrosoftWindows Photo GalleryOriginal Images. If you ever want to revert to the original picture, on the Edit Ribbon, tap or click Revert to Original.
Here’s how to safely and effectively touch up your pictures:
1. In WPG, double-click the picture you want to edit.
You see a full-size rendition of the picture and the Edit Ribbon, as shown in Figure 5-13.
2. To let WPG try to adjust everything on its own, click the Auto Adjust icon.
Windows Photo Gallery analyzes the picture and automatically adjusts the brightness, contrast, and color. It also straightens the photo, if it seems a little skewed.
If you don’t like what WPG did to your picture, click the tiny Undo icon up at the top.

Figure 5-13: The picture is ready for editing.
3. Choose from the appropriate buttons to crop, adjust red-eye, retouch, straighten, or futz with the color or contrast.
To get the most accurate red-eye correction, you usually need to zoom in so that you can pick out the devilish eye. To do so, click and drag the slider in the lower-right corner of the window. Then hold down Alt while you click and drag the picture, moving it around so that you can reach the eye. When you have the eye in, uh, sight, release Alt and click and drag a box around the eye. Make the box as small as you can while still getting all the red. Release the mouse button, and Windows Live does its level best to get the red out. See the sidebar, “There’s red in your eye,” for more about preventing red-eye.
4. When you’re done, click the X Close File icon on the right of the Ribbon.
Remember you can always bring back your original picture by opening it and clicking Revert to Original.
Planning panoramas and fuses
Have you ever taken a series of shots, side by side, trying to convey the vastness of a scene? Have you ever taken a bunch of group photos where Billy’s blinking in one shot, Melinda’s blinking in another, and little Stevie’s sticking out his tongue in the third? Windows Photo Gallery can “stitch” side-by-side shots, tying them together automatically into a panorama, or meld the shots together with Photo Fuse to bring out the best. It’s so easy that you won’t believe your eyes.
Here’s how to stitch together a bunch of photos into a panorama:
1. Get the photos into your Pictures Library so WPG can get to them.
In Figure 5-14, I import five photos, taken from left to right, from my office balcony.
2. Select the photos that you want WPG to use to create a panorama.
In this case, I press Ctrl+A and select all five shots.
3. On the Create Ribbon, click the icon for Panorama.
WPG stitches the pictures together and then asks you for a filename for the stitched result.

Figure 5-14: Five photos, taken from left to right, from my office in Patong.
4. WPG creates the new picture and saves it with the filename you specify.
See the result in Figure 5-15.

Figure 5-15: The stitched panorama of the five photos in Figure 5-14.
Mechanically, Photo Fuse works exactly the same way: Choose the photos, go to the Create Ribbon, and choose Photo Fuse. WPG steps you through choosing which of the different pieces look better (so, for example, you can say you don’t want Billy’s blinking eyes). In the end, give the result a filename, and it’s all put together.
Panning Windows Movie Maker
The Windows 8.1, tiled Metro Photos app should, someday, be as capable as Windows Photo Gallery. Unfortunately, it isn’t at all clear if Microsoft is going to beef up Metro Photos or Metro Video to the point that it can supplant Windows Movie Maker. Right now, Metro Video only looks like an excuse for Microsoft to sell you movies. Although it can play videos in your Videos Library, that only seems to be a come-on to get you to spend money on the Microsoft Video Store.
The latest version of Windows Movie Maker has several worthwhile features. But don’t let your Apple-fan friends see WMM. They’ll probably want to show you iMovie, and it’ll absolutely ruin your day.
If you need a video editor with more oomph, check out Adobe Premiere Elements, which costs around $75 and offers all the capabilities an amateur videographer may need. For help using the program, turn to Adobe Premiere Elements For Dummies, (published by John Wiley & Sons) by Keith Underdahl.
That said, for a rudimentary video-editing app that connects very easily with YouTube, Facebook, Flickr, and Vimeo, Windows Movie Maker ain’t bad. It works in a widely recognized file format known as H.264. The new Video Stabilization feature works a treat, if your camera doesn’t have built-in stabilization. (Most recent cameras do, but phones and small cameras don’t.)
Windows Movie Maker also has extensive, sound over-dubbing capabilities, with a full, independent narrator track and easy hooks into AudioMicro, Free Music Archive, and Vimeo Music Store to make it easier to find (and perhaps buy) music usage rights — a must if you’re going to upload your video to YouTube.
When you install Windows Photo Gallery, Windows Movie Maker comes along for the ride.