
![]()
Building Practical Application Features
In this chapter, I’ll describe techniques you can use to tackle typical requirements that you might find in business applications. This chapter will pull together content from previous chapters and show you the following:
- how to add file-storage capabilities to your application
- how to integrate your application with GPS and mapping systems
- how to develop screens that work against less common data structures
I’ll begin by showing you how to build screens to store documents such as Office documents and photos in your database. Next, I’ll describe screen-design techniques you can apply to various data structures. This includesscreens that users can use to select multiple records, screens to manage self-joined data, and screens that bind to a single row of data. Finally, I’ll describe GPS and mapping techniques and finish the chapter by describing code you can use to summarize data.
The ability for users to upload and download documents such as spreadsheets, Word documents, and images can be very valuable. To start this chapter, I’ll describe the techniques you can use to add file-storage capabilities to your application.
As a prerequisite, you need to define a table that includes a property with a data type of binary. In this chapter, I’ll use a table called IssueDocuments to demonstrate the coding techniques. Figure 11-1 shows the schema of this table.

Figure 11-1. Table structure for document storage
Once you have set up your data, the next step is to create screens that users can use to upload and download files. The screen-design techniques you use are significantly different for HTML and desktop applications, so I’ll begin by describing how to develop screens for the HTML client.
Adding File Support to HTML Client Applications
The screen designer in LightSwitch doesn’t include file upload and download controls. To provide this functionality, you will need to develop custom controls, and in this section I’ll show you how.
There are two approaches you can take to add file-upload capabilities to your application. The first technique works only with HTML5 browsers, while the second technique provides compatibility with older browsers. In this section, I’ll show you how to build a custom control that attempts to use the HTML5 technique. If the client doesn’t support HTML5, the control automatically reverts to the legacy approach.
HTML5 provides a standard way to interact with local files through the File API specification. By using this feature, you can work with files on the client before you send them to the server. This enables you, for example, to validate data or create thumbnails of images on the client without requiring a round trip to the server. We can use this feature to develop a file upload control; Figure 11-2 illustrates a high-level view of the control that we’ll build in this section.

Figure 11-2. HTML 5 file-upload technique
This technique relies on a custom control that consists of two elements: a File Browse button (i.e., an HTML input of type file) and a DIV that shows the results. When the user selects a file, the control uses the local file-processing feature of HTML5 to read the file. The custom control retrieves the contents as a base-64 encoded string, adds the data to the local change set, and shows the results in the DIV. When the user clicks the Save button, the HTML client calls the data service’s Save operation. The change set that the client sends to the server includes the file that the user selects.
Although the HTML5 File API is simple and efficient, a disadvantage is that not all users use modern HTML5-compliant browsers. Therefore, it is necessary to devise a fallback method to maintain compatibility with older browsers. If a user uses an older browser, the custom control automatically reverts to a backwardly compatible technique, which is illustrated in Figure 11-3.

Figure 11-3. Non HTML5 File Upload Technique
As Figure 11-3 shows, if the custom control detects that the client browser isn’t HTML5 compliant, it generates a control that contains three elements: a File Browse button, a hidden iframe, and a DIV that shows the progress details (an iframe is an HTML control that displays a web page inside another web page).
Once the user selects a file, the control submits the file to a server-side ASP.NET HTTP handler via the hidden iframe. This iframe enables the browser to submit the file to the server without interrupting the user’s ability to interact with the other parts of the screen. The HTTP handler mimics the job that the HTML5 File API would carry out. It produces a base-64 encoded representation of the file and returns the result to the client. When the HTTP handler returns the result, the contents of the hidden iframe will contain the base-64 representation of the file. The custom control detects when the iframe finishes loading and displays the progress detail DIV in the same way as the HTML5 custom control does.
Building a Custom File Upload Control
Now that you have some understanding of how this technique will work, let’s write the JavaScript code to generate the custom control. To do this, go to your HTML client project and create a new JavaScript file in your Scripts folder. Name your file prols-controls.js and add the contents shown in Listing 11-1.


To add a file upload control to a screen, you would call the createfileUploader method from the render method of a custom control. To make this code available in your application, you need to add a link to the prols-controls.js file in your default.htm page. You can do this by adding the following tag to the lower part of your page, just before the end of the body tag:
![]()
The next part of this solution is to create the HTTP handler to support non-HTML5-compatible browsers. This handler accepts a file and returns the base-64 representation.
In the root of your server project, create a folder called Content. Inside this folder, create a subfolder called DocUtils. Right-click the DocUtils folder and select the “Add > Generic Handler” menu item. Name your new handler GetBase64String.ashx (Figure 11-4). If the “Add > Generic Handler” menu item doesn’t appear, you can use the “Add > New Item” menu item instead.

Figure 11-4. Adding a new generic handler
Next, modify the contents of the ProcessRequest method as shown in Listing 11-2.


The code on this page carries out a relatively simple task. It produces the same response that the HTML5 FileReader generates. It uses the .NET Convert method to base-64 encode the file content and adds the preamble of "data:{mime-type};base64," to the start of the response ![]() .
.
Adding a File Upload Control to Your Screen
The final part of the solution is to add your custom control to a screen. Here are the screen-design steps to build a screen to enable users to upload files into the IssueDocument table:
- Use the Common Screen Set template to create a set of screens for the IssueDocument table.
- Open the AddEditIssueDocument screen. Set the control type for the Issue File data item to “Custom Control.”
- In the properties sheet for the IssueFile custom control, click the Edit Render Code link. Add the code that’s shown in Listing 11-3.
Listing 11-3. File upload JavaScript code

At this point, you can run your application. Figure 11-5 shows the appearance of the Add/Edit Issue Document screen.

Figure 11-5. Document upload control at runtime
As Figure 11-5 shows, the custom control displays a Browse button. After the user selects a file, the custom control adds the document to the local change set. Once this process completes, the custom control displays a confirmation message on the screen. Notice that the screen highlights the issue file custom control in red. This is because the IssueDocument table defines Issue File as a required field. If you don’t like this red coloration, you can disable it by setting the “Validation Rendering” option to Custom in the properties sheet of the custom control.
The ability to upload files is just one half of this solution. Users need some way to retrieve files that are stored in the database, and in this section I’ll show you how to implement this feature.
We’ll use LightSwitch’s Server Application Context API. This feature enables clients to communicate directly with the LightSwitch middle tier without having to go through the Save or Query pipelines. Figure 11-6 shows a high-level overview of how this download function will work.

Figure 11-6. Downloading files via the Server Application Context API
By using the Server Application Context API, you can access your data workspace from custom .NET applications. This, for example, allows you to create ASP.NET or MVC applications that can access your LightSwitch data. You can use the Server Application Context API to add custom functions to your application’s server project, which you would do by creating an HTTP handler.
To create a handler that returns the file contents, navigate to your server project, right-click the folder ContentDocUtils, and add a new generic handler. Name your handler DownloadIssueDocument.ashx. Now, modify the contents of the ProcessRequest method, as shown in Listing 11-4.


The DownloadIssueDocument.ashx handler provides a URL endpoint that users can call to download issue documents. For example, the URL http://WebServer/Content/DocUtils/DownloadIssueDocument.ashx?id=8 would return the document that’s attached to the IssueDocument record with an ID of 8.
The final step is to add a hyperlink to the ViewIssue Document screen. In the screen designer, add a data item for the ID property of the IssueDocument table. In the properties sheet, change the display name setting to Issue File (Figure 11-7). Also, set the “Disabled Rendering” and “Read-Only Rendering” options to Custom.

Figure 11-7. Configuring a custom control
In the properties sheet, click the Edit Render Code link and add the code that’s shown in Listing 11-5.
Listing 11-5. Custom control code to show a Download Document File hyperlink

This code builds a hyperlink and sets the target to the Download Issue Document ASHX handler. The first part of this code builds the initial part of the URL (http://WebServer/) ![]() . It sets the value to be identical to the root URL of the LightSwitch application. Next, the code appends the ID value of the selected document record to the URL
. It sets the value to be identical to the root URL of the LightSwitch application. Next, the code appends the ID value of the selected document record to the URL ![]() The next line builds the HTML anchor tag and sets the target attribute to _blank.
The next line builds the HTML anchor tag and sets the target attribute to _blank. ![]() This prompts the browser to open the hyperlink in a new window. If you don’t specify this attribute, the hyperlink would navigate the user away from your LightSwitch application. You can now run your application; Figure 11-8 shows how the View Document screen looks at runtime.
This prompts the browser to open the hyperlink in a new window. If you don’t specify this attribute, the hyperlink would navigate the user away from your LightSwitch application. You can now run your application; Figure 11-8 shows how the View Document screen looks at runtime.

Figure 11-8. Final screen showing Download Document File hyperlink
You might wonder why we set the “Disabled Rendering” option on the control to disabled earlier in this task. If you were to retain the default setting of automatic, LightSwitch disables the hyperlink on the custom control and prevents the user from downloading the file. The automatic setting makes the hyperlink non-clickable, because the ID property that the custom control binds to is non-editable. To further improve this code, you could add code to prevent the hyperlink from showing if the file content is empty, or improve the presentation of the control by adding a hyperlinked image that triggers the download.
Working with Mobile Device Cameras
All modern mobile devices have built-in cameras. Certain types of applications can benefit greatly from camera integration. For example, estate agent or surveying applications could include a feature that enables the user to take a photo.
With HTML5, it’s very simple to add a File Upload button that opens the built-in camera. In the custom control code I showed you earlier (Listing 11-1), the file upload control generates an HTML input with the type attribute set to file. To configure the File Upload button so that it opens the built-in camera, you simply modify the custom control code so that it generates an HTML input with the accept and capture attributes populated, as shown in Listing 11-6.
Listing 11-6. Opening a mobile device’s camera or microphone

If you now run your application on a mobile device, the File Upload button will open the built-in camera rather than show the File Browse dialog. The majority of up-to-date browsers on Android or iOS devices will support this behavior. As Listing 11-6 illustrates, you can also set the capture mode so that it opens the video recorder or voice-recording application on the mobile device instead.
Adding File Support to Desktop Client Applications
So far, I have showed you how to add file upload and download capabilities to a HTML client application. In this section, I’ll show you how to add the same features to a desktop application.
![]() Caution Note that the code sample in this section applies only to desktop applications in desktop client mode. This code will not work for desktop applications in web client mode.
Caution Note that the code sample in this section applies only to desktop applications in desktop client mode. This code will not work for desktop applications in web client mode.
Uploading Files
Fortunately, it’s easier to add a file upload control to a desktop application than to an HTML client application. Let’s review the steps to add a file upload control to a New Data screen that binds to the IssueDocument table. Once you create your data-entry screen, the first step is to add a new button to it. Name your button UploadFileToDatabase and add the code shown in Listing 11-7.


To display the Silverlight File Open or Save dialogs, you must call code that executes on the main UI thread ![]() . This is because the file dialog represents a UI task, and the logic must therefore run on the UI thread.
. This is because the file dialog represents a UI task, and the logic must therefore run on the UI thread.
The File Open dialog ![]() displays a control that allows the user to select a file. Once the user selects a file, the code reads the file data into a byte array using a FileStream object
displays a control that allows the user to select a file. Once the user selects a file, the code reads the file data into a byte array using a FileStream object ![]() . It then assigns the data to the IssueFile property
. It then assigns the data to the IssueFile property ![]() . Next, the code saves the filename and file extension of the document in the same block of code.
. Next, the code saves the filename and file extension of the document in the same block of code.
You can set the File Open dialog’s Filter property to limit the file types that the user can select. This example configures the dialog to show all files by setting the *.* filter, but you could supply a list of pipe-delimited file extensions and descriptions with which to apply the filter (as shown in the commented-out line of code).
A very important point is that this code works only in desktop applications. It won’t work in a browser-based desktop application. If you attempt to run this code in a browser application, you’ll receive the security exception “Dialogs must be user-initiated.” This is because the button code runs on the screen-logic thread, and by subsequently invoking the File Open dialog on the main UI thread, Silverlight loses the fact that the action was indeed user initiated. Desktop applications don’t suffer from this problem, because the elevated trust of a desktop Silverlight application allows you to open the file dialog from any code. In a browser application, the code that launches file dialogs must be at the top of the call stack. If you wish to use the Silverlight file dialogs in a browser application, you can do so by creating a custom button control and handling the button’s click event.
![]() Note When you create commands that work only in desktop applications, it’s a good idea to disable your command in browser applications by writing code in your command’s CanExecute method (UploadFileToDatabase_CanExecute in this example). Chapter 22 describes this process in more detail.
Note When you create commands that work only in desktop applications, it’s a good idea to disable your command in browser applications by writing code in your command’s CanExecute method (UploadFileToDatabase_CanExecute in this example). Chapter 22 describes this process in more detail.
Downloading and Saving Files
To allow users to open the files that are stored in the database, you can build a File Save feature to save files locally on the end-user PC. In this section, I’ll show you how to open a File Save dialog to enable the user to choose where to save the file. To create this feature, create a Details screen based on the IssueDocument table and name it IssueDocumentDetails.
Create a new button on your screen and call your method SaveFileFromDatabase. Add the code shown in Listing 11-8.


Just as before, this code must execute on the main UI thread for the Save File dialog to display correctly ![]() . The Save dialog prompts the user to enter a filename and location
. The Save dialog prompts the user to enter a filename and location ![]() . The final part of this code writes the data to the file using a MemoryStream object
. The final part of this code writes the data to the file using a MemoryStream object ![]() .
.
Opening Files with the Default Application
A slight disadvantage with the previous approach is that it’s not very joined up. Once the file save operation completes, the user needs to locate and open the file outside of LightSwitch. To improve this behavior, you can create a button that a user can click to download and open the file in the default application (Figure 11-9).

Figure 11-9. Opening files in the registered application
In this example, I’ll show you how to add a button to a screen that binds to an issue document record. When a user clicks this button, the application starts the registered application and opens the document that’s associated with the record. This technique consists of two main steps:
- Save the file to an interim file location.
- Use the shell execute method to start Word and open the saved file.
Because this code calls automation code to open an application on the client PC, the security restrictions in Silverlight will prevent this technique from working in a browser application. On a related issue, the initial step of this sample saves the file onto the local file system. The security restrictions in Silverlight limit the places where you can save files. These limitations depend on the technique you use to save your file and are described in Table 11-1.
Table 11-1. Ways to Save a File in a Desktop Application
|
Method |
Description |
|---|---|
|
Use the classes in the System.IO namespace |
You can only save files in specific locations. These include the My Documents, My Music, My Pictures, and My Videos folders of the current user. |
|
Use the Silverlight SaveFileDialog dialog |
You can save files to any location that the user has permissions to read/write. |
|
Use isolated storage |
This is a virtual file system that Silverlight provides. |
If you want to save a file to a temporary location without any user intervention, there are two options you can choose from. You can create your file in the My Documents folder or you can create the file in isolated storage.
Isolated storage is a virtual file system that Silverlight provides. The isolated storage location is a hidden folder that exists on the end user’s machine. This makes it an ideal place to save temporary files.
However, the disadvantage of using isolated storage is that Silverlight imposes a default storage quota, and administrators can also specify additional storage quotas. Therefore, there’s no guarantee there’ll be sufficient space for you to save your file.
This example saves the temporary file in the My Documents folder, but the code includes a comment that shows you how to use isolated storage instead.
To create this example, open the Issue Document Details screen and create a new button called OpenFileFromDatabase. Add the code from Listing 11-9.


The first part of the code builds the path where you’ll save your file ![]() . It then saves your data into this file
. It then saves your data into this file ![]() and opens it by calling the Shell command
and opens it by calling the Shell command ![]() .
.
Validating File Sizes
To round off this section, let’s look at a technique you can use to impose a maximum size on files that are stored in your database. By providing a size limit, you can prevent users from bloating the size of your database.
To implement this feature, you must apply validation at the entity level. This means that your validation logic will apply both to HTML and desktop clients. Listing 11-10 shows the code used to prevent users from uploading files that are larger than 2MB.


LightSwitch exposes Binary and Image properties in code as byte arrays. The code in this listing calculates the file size in megabytes by dividing the byte array length by 1,048,576. If you want to calculate the size in kilobytes, you would divide by 1,024 instead. Table 11-2 shows the conversion values that you would use. If you need to carry out many conversions, it would be a good idea to add this logic into a helper method.
Table 11-2. Converting Byte Array Length
|
Unit of Measurement |
Divisor |
|---|---|
|
Kilobyte (KB) |
1,024 |
|
Megabyte (MB) |
1,048,576 (1,024 × 1,024) |
|
Gigabyte (GB) |
1,073,741,824 (1,024 × 1,024 × 1,024) |
|
Terabyte (TB) |
1,099,511,627,776 (1,024 × 1,024 × 1,024 × 1,024) |
Selecting Multiple Records
In some scenarios, you can improve productivity by providing functions that can work against multiple records. For example, an invoicing system might contain a checkbox list of all available products. A user could check all the products that a customer wants to purchase and click a button to add the products to the order. An important design task is to devise a screen that allows the user to select multiple records. In this section, I’ll show you how to accomplish this in an HTML client application. To demonstrate the technique, I’ll show you how to build a checkbox list that a user can use to close multiple records with a single click of a button (Figure 11-10).

Figure 11-10. Multi-record selection technique
Unfortunately, there isn’t a straightforward way to construct this type of user interface. You could try to accomplish this by storing the selected items in a temporary table and adding code to the Save pipeline to carry out the bulk operation. The benefit of this technique is that it aligns closely with MVVM principles, and you can easily reuse the server-side objects and code in both desktop and HTML client applications. But, in practice, storing multiple selections in temporary tables is messy. You need to pre-populate the temporary tables with data, make sure to store the user selections against the correct session (a user could open multiple copies of your application or open multiple screens), and clean up the data in the temporary table afterward.
Therefore, I’ll describe an alternative method that works by rendering an unbound checkbox against each item in a list. Compared to using temporary tables, this technique is simple and relatively self-contained. This approach consists of a custom control that includes a checkbox and issue description. When a user selects an item, the screen stores the selected issue ID value in an array. Once the user chooses all the required records, the user can complete the action by clicking a button on the screen. This button calls a web method that performs the bulk data operation using the Application Server Context API.
To create the custom control, use the Browse Data Screen template to add a screen that is based on the issue table. Change the tile list control to a list control, remove the Item Tap action for the list control, change the group beneath the control to a custom control, and remove any child controls beneath the custom control. Figure 11-11 shows the appearance of this screen in the designer.

Figure 11-11. Multi-record selection technique
In the properties sheet for the custom control, click the Edit Render Code link and add the code that’s shown in Listing 11-11.
Listing 11-11. Custom control code to add a checkbox and description

This code generates the HTML content for each row in the list control. It creates a checkbox control ![]() and a label
and a label ![]() with the issue subject title. The code uses jQuery to add an event handler for the click event of the checkbox
with the issue subject title. The code uses jQuery to add an event handler for the click event of the checkbox ![]() . This code adds or removes the issue ID value from the array of selected issues. To enable you to identify each checkbox in client-side code, this code sets the ID of each checkbox control to a unique identifier that begins with a chk prefix and ends with the primary-key value
. This code adds or removes the issue ID value from the array of selected issues. To enable you to identify each checkbox in client-side code, this code sets the ID of each checkbox control to a unique identifier that begins with a chk prefix and ends with the primary-key value ![]() .
.
To add the code that defines the array of selected issues and the helper methods to add and remove items, add a new JavaScript file to your Scripts folder. Name your file prols-multiselect.js and add the code that’s shown in Listing 11-12. Once you create this file, add a reference to it in your default.htm file, as shown in Listing 11-12
Listing 11-12. Multi-select JavaScript helper files

This completes the code that stores the selected items. To build the screen button code that closes the selected issues, add a button to your screen and choose the option to write a custom method. Name your method CloseIssues and add the code that’s shown in Listing 11-13.
Listing 11-13. Issue Closure screen button code

The code in Listing 11-13 calls a web method to perform the issue-closure operation. Specifically, the code retrieves a comma-separated list of the selected ID values ![]() and posts the results to the web method
and posts the results to the web method ![]() . When the operation succeeds, the code displays a message box that contains the result from the server and finishes by clearing the checkboxes on the screen. To ensure that the array is empty when the screen opens, this listing contains code that clears the array when the user first opens the screen
. When the operation succeeds, the code displays a message box that contains the result from the server and finishes by clearing the checkboxes on the screen. To ensure that the array is empty when the screen opens, this listing contains code that clears the array when the user first opens the screen ![]() .
.
To create the server-side web method, add a new handler file in the content folder of your server project called CloseIssues.ashx. Next, add the ProcessRequest code that’s shown in Listing 11-14.


At this point, you can run your application and use your screen to close multiple issues. The first part of this code splits the CSV data into an array ![]() . Next, the code loops through the array of ID values and uses the Server Application Context API to access each issue record. The code sets the closed date value of each issue record
. Next, the code loops through the array of ID values and uses the Server Application Context API to access each issue record. The code sets the closed date value of each issue record ![]() and calls the SaveChanges method
and calls the SaveChanges method ![]() to save the changes to the database. Finally, the code returns a message to the caller
to save the changes to the database. Finally, the code returns a message to the caller ![]() .
.
Note that in this example, I implemented the issue-closure functionality through a server-side method. I chose this method in order to demonstrate a mechanism that you can extend so as to apply additional server-side logic. For this particular example, however, you could simplify your code by modifying the data on the client, rather than passing the task to a server-side method.
![]() Note In the case of desktop client applications, it’s not simple to add an unbound checkbox that calls custom code. I’ll show you later in this book how to accomplish this type of UI by creating a custom control.
Note In the case of desktop client applications, it’s not simple to add an unbound checkbox that calls custom code. I’ll show you later in this book how to accomplish this type of UI by creating a custom control.
Assigning and Unassigning Self-Joined Data
At some point, you may encounter the need to manage self-joined data. You usually encounter this type of data structure in systems that model hierarchies. If you attempt to create a screen that manages self-joined data, your screen may not work as you expect. To explain this further, let’s look at what happens when you build a screen that’s based on the Engineer table. This table includes a self-join that stores the manager/subordinate relationship for each engineer (Figure 11-12).
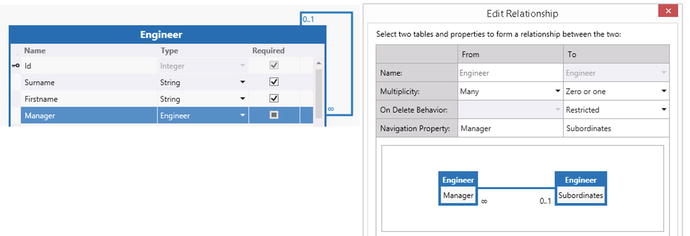
Figure 11-12. Self-join in Engineer table
If you create a Details screen for the Engineer table and include the Engineer Subordinates data item, you end up with a screen that looks like Figure 11-13.

Figure 11-13. Default subordinate data grid
By default, LightSwitch renders the subordinate collection as a data grid. The biggest problem with this screen is that the Add and Delete buttons on the data grid perform the addition and deletion of engineer records, rather than the assignment and de-assignment of subordinates.
To allow users to assign subordinates, you can add a control that enables the user to select an engineer and then add a button that carries out the assignment. To de-assign an engineer, you can add a button to de-assign the selected engineer in a list.
Let’s go over the steps to add a subordinate assignment feature to an Engineer screen. First, create a screen that’s based on the Engineer table. In the case of a desktop application, use the Details Screen template, whereas for an HTML client application, use the Add/Edit Details Screen template. In the Add New Screen dialog, include the Engineer Subordinates data item so that you can see the related engineer records. Now, carry out the following steps in the screen designer:
- Add a local property called EngineerToAdd.
- Drag the EngineerToAdd property onto your screen to create an auto-complete box control (for a desktop application) or a details picker control (for an HTML client application).
- Create a button called AssignSubordinate and add the AssignSubordinate code, as shown in Listing 11-15.
To add a button to un-assign an engineer as a subordinate, carry out the following tasks:
- For a desktop application, change the subordinate data grid to a data list. Next, create a button on your screen and name it DeassignSubordinate.
- For an HTML client application, change the subordinate tile list control to a table control and add a button called DeassignSubordinate inside the table row. Unlike with desktop applications, users cannot select a row in a list here, and the workaround is to add a Deassign button against each subordinate record in a table (Figure 11-14).

Figure 11-14. Example screen design (HTML client)
- Add the DeassignSubordinate code, as shown in Listing 11-15.


The Assign Subordinate button adds the selected engineer to the engineer’s subordinate collection ![]() . In practice, you may want to write additional code to check that the user hasn’t left the auto-complete box blank.
. In practice, you may want to write additional code to check that the user hasn’t left the auto-complete box blank.
The Deassign Subordinate button removes the engineer that’s selected in subordinates data list ![]() .
.
For desktop applications, assigning and deassigning engineers to the subordinates collection doesn’t automatically refresh the data list of subordinates (calling the refresh method alone on the subordinates collection won’t work either). The simplest way to address this problem is to save and refresh your screen ![]() . However, note that this may not be ideal, because it saves all changes that have been made on the screen. Therefore, you might want to add a confirmation message to check that the user wants to carry out the save.
. However, note that this may not be ideal, because it saves all changes that have been made on the screen. Therefore, you might want to add a confirmation message to check that the user wants to carry out the save.
The code for HTML client applications works slightly differently. To assign an engineer as a subordinate, the code sets the Manager property for the subordinate engineer. To unassign an engineer, the code clears the Manager property for the subordinate engineer.
When you now run your screen, you’ll be able to assign and deassign subordinates as shown in Figure 11-15.

Figure 11-15. Subordinate allocation grid
Creating Screens to Work with Single-Row Tables
A useful design technique is to build a table that stores only a single row of data. An ideal use for this type of structure is to store application configuration settings. In this section, I’ll show you how to create a screen that’s based on a table called AppOption (Figure 11-16). This table allows administrators to control application settings, such as reporting configuration and email settings.

Figure 11-16. AppOption table
To create a screen that binds to the first record in a table, the first step is to create a new screen. For desktop applications, create a New Data screen and set the data source of the screen to be the table you want to use—in this case the AppOption table. Now, add the code in Listing 11-16 to the InitializeDataWorkspace method.
The steps to carry out for an HTML client application are slightly different. In this case, select the Browse Data Screen template and leave the screen data drop-down blank. The reason for choosing the Browse Data Screen template is because LightSwitch automatically adds an entry in the application’s navigation menu for screens that are based on this template. Name your screen AppOptionsEdit and carry out the following additional steps:
- Click the Add Data button and add a local AppOptions property called AppOptionProperty.
- Create data controls for the AppOptionProperty property by dragging the properties from the screen member list onto your screen. By default, LightSwitch adds AppOptionProperty as a summary control. Change the summary control to a rows layout in order to create data controls for each data property in theAppOptionProperty property. By default, the AppOptionProperty controls will be read-only. Uncheck the “Use Read-only controls” checkbox on the rows layout, or change the controls to be editable controls.
- Add a button to your screen to allow the user to save the record. Name your button SaveAppOption. Figure 11-17 shows how your screen should now look.

Figure 11-17. Screen design of a single-record edit screen
- Add the code for the screen create method and the code that runs when the user clicks the Save button, as shown in Listing 11-16.


For desktop applications, the New Data Screen template creates a screen with controls that bind to a property called AppOptionProperty. The first part of the code sets the property to the first record in the table by calling the FirstOrDefault method ![]() . If the method returns null, the table is empty. In this case, the code assigns a new instance of an AppOption entity to the AppOptionProperty
. If the method returns null, the table is empty. In this case, the code assigns a new instance of an AppOption entity to the AppOptionProperty![]() .
.
The logic in the HTML client example works in the same way. The code in the created method calls a query that calls the top(1) method so as to return the first row in the table ![]() . This code uses the promise pattern to execute the query asynchronously. If a record exists, the code sets the AppOptionProperty property to the first (and only) record that the query returns. Otherwise, the code assigns a new instance of an AppOption entity to the AppOptionProperty property
. This code uses the promise pattern to execute the query asynchronously. If a record exists, the code sets the AppOptionProperty property to the first (and only) record that the query returns. Otherwise, the code assigns a new instance of an AppOption entity to the AppOptionProperty property ![]() . The code that runs when the user clicks the Save button calls the saveChanges method on the data workspace. When the save operation succeeds, the code returns the user back to the previous screen. You can now run your application; Figure 11-18 shows the appearance of the HTML client version of this screen at runtime.
. The code that runs when the user clicks the Save button calls the saveChanges method on the data workspace. When the save operation succeeds, the code returns the user back to the previous screen. You can now run your application; Figure 11-18 shows the appearance of the HTML client version of this screen at runtime.
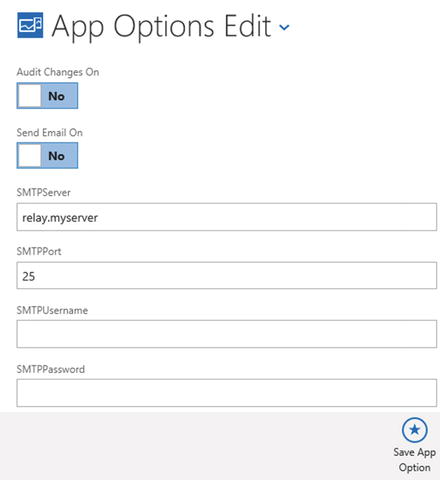
Figure 11-18. Application options screen
Nesting Data-Selection Controls
To round off this section of UI features, let’s look at a simple and useful technique that you can apply during screen design. This technique involves linking sets of detail-picker controls or auto-complete boxes. To give an example in the context of an automotive application, you could build a drop-down list of car manufacturers. When a user selects a manufacturer, the screen will populate a drop-down list of car models that are associated with the manufacturer.
To demonstrate this technique, I’ll show you how to build a Search screen that filters issue records by assigned engineer. This screen contains a control that shows a list of departments. When the user selects a department, the screen populates a second control that shows the engineers that belong in the department.
To create this example, create the engineer and department tables as shown in Figure 11-19. As this diagram shows, a (zero-or-one)-to-many relationship exists between the department and engineer tables.

Figure 11-19. Engineer and Department tables
The next step is to create two queries. The first query returns a set of issues that are filtered by the assigned engineer. This query populates the main data control on the screen. The second query returns engineer records that are filtered by department. The purpose of this query is to populate the control that shows the list of engineers.
Figure 11-20 illustrates these two queries. The first query is called IssuesByEngineer and filters the assigned engineer ID by an integer parameter called AssignedToId. The query that filters engineer records by department is called EngineersByDepartment. This query is based on the Engineer table and filters the DepartmentId property by a parameter called DepartmentId.

Figure 11-20. IssuesByEngineer and UsersByDepartment queries
Let’s review the screen-design steps to carry out once you create the two queries. For HTML client applications, create a screen that’s based on the Browse Data template. For desktop applications, create a screen that’s based on the Editable Grid Screen template. In both cases, choose the IssuesByEngineer query as the data source for your screen. Now, carry out the following steps in the screen designer:
- Click the Add Data Item button and add a local Department property to your screen. Name your property DepartmentProperty. Next, add an Engineer property to your screen and name it EngineerProperty.
- Drag DepartmentProperty and EngineerProperty onto your screen. For a desktop application, set the control type of both properties to the auto-complete box control. For an HTML client application, set the control type to the detail picker control.
- To add more meaningful descriptions to these properties, you can change the description of DepartmentProperty to “Show users by department” and the description of the EngineerProperty to “Select Engineer.”
- Click the Add Data Item button, select the Query radio button, and add the EngineersByDepartment query to your screen. Figure 11-21 illustrates how the HTML client version of the screen now looks.

Figure 11-21. Screen designer view of screen
The next step is to configure the query parameters. Figure 11-22 illustrates the following three steps to carry out in the screen designer:
- Set the DepartmentId parameter value of the EngineersByDepartment query to DepartmentProperty.Id.
- Open the properties sheet for the EngineerProperty auto-complete box or detail picker control. Use the Choices drop-down to set the data source to EngineersByDepartment.
- Set the AssignedToId parameter value of the IssuesByEngineer query to EngineerProperty.Id
.

Figure 11-22. Query parameter binding
At this point, you can run your application (Figure 11-23). When you open this screen, you can choose a department. Once you select a department, the screen sets the engineers control to only show engineers who belong to the department you select. When you select an engineer, the main section of the screen will show all issue records that are assigned to that engineer.

Figure 11-23. Nested detail picker control at runtime
Working with Locations
Most modern mobile devices include GPS, and, because of this, location-based applications are very common. In this section, I’ll describe techniques you can use to add location-based functionality to your HTML client applications. I’ll show you how to determine the location of a user and how to plot locations on a map.
You can determine the location of a device by writing JavaScript code. In this section, I’ll show you how to add a button to a screen that binds to a department record. When the user clicks the button, the code will populate the Longitude and Latitude fields on the screen.
To follow this example, create a set of screens for the Department table by using the Common Screen Set template. The screenshot in the previous section shows the schema of this table. Next, open the Add/Edit Department screen and add a button called GetLocation. Now, add the code that’s shown in Listing 11-17.
Listing 11-17. Picking up the GPS location

When you run this screen and click the button, the code will populate the longitude and latitude properties, as shown in Figure 11-24. This code uses the JavaScript navigator object. This object provides details about the browser, and you can use it to find properties including the browser name and version. Most importantly, the navigator object provides access to the geolocation object, which you can use to determine the geographical location of a user.

Figure 11-24. Determining a user’s location
The location results will depend on the browser and device. The Chrome and Firefox browsers on PCs use Google’s location service to estimate your location. Google’s service uses the signal strength of WiFi access points and information about your router and IP address to estimate a location. If you open your application on a device with GPS, the Geolocation API will likely use a GPS reading.
The result from the getCurrentPosition method enables you to determine the longitude and latitude of the device. If available, you may be able to determine other location properties such as altitude, heading, or speed. These properties are summarized in Table 11-3.
Table 11-3. getCurrentPosition Properties
|
Property |
Description |
|---|---|
|
Latitude |
The latitude value in decimal degrees |
|
Longitude |
The longitude value in decimal degrees |
|
Accuracy |
The accuracy of position |
|
Altitude |
Altitude, measured in meters above the mean sea level |
|
altitude Accuracy |
The accuracy of the altitude |
|
Heading |
Heading, measured in degrees clockwise from north |
|
Speed |
Speed, measured in meters per second |
If you’re unfamiliar with geolocation, the longitude and latitude readings that the getCurrentPosition method returns (in decimal degrees) might not be very meaningful. Therefore, Figure 11-25 illustrates these values in the form of a diagram.

Figure 11-25. Longitude and latitude measurements
When you call getCurrentPosition, you can specify an error handler and timeout, and it’s useful to do this to prevent the geolocation code from hanging your application.
Finally, it’s worth noting that the accuracy of GPS readings can vary. When you call the getCurrentPosition method for the first time, there may not be sufficient time for the device to turn on the GPS and lock onto sufficient satellites to give an accurate reading. In this situation, the Geolocation API tends to return the last known location. Because of this, second or subsequent calls to getCurrentPosition will usually return a more accurate location.
Integrating with Mapping Systems
To help visualize locations, you can use mapping services to display the location data in your database. Let’s review how to use Google maps to display the locations that you store in your database. I’ll show you how to embed a map on a screen that binds to a department record. This map will include a pinpoint to highlight the location of the department record.
To display a Google map on a web page, there are two main steps to carry out. The first step is to add a DIV onto your page to host the map control. The second step is to initiate the map with JavaScript code and to supply the location that you want the map to show. To render a Google map on a screen, you need to create a custom control to host the map.
First, create a View Details screen and set the department table as the data source. Next, add a custom control that binds to the Department property. To do this, drag the Department property onto your screen and use the drop-down to change the control type to Custom Control (Figure 11-26).

Figure 11-26. Screen designer view of Department screen
Next, add the following line into the body section of your default.htm file:
![]()
Finally, add the render code for your custom control as shown in Listing 11-18.
Listing 11-18. Adding a Google map

The code in Listing 11-18 defines a DIV to host the map control ![]() . The next section defines the code that runs when the DIV is ready. This code determines the longitude and latitude values of the department record
. The next section defines the code that runs when the DIV is ready. This code determines the longitude and latitude values of the department record ![]() and uses these values to configure the options of the map. The final line of code initializes the map with the options that you define
and uses these values to configure the options of the map. The final line of code initializes the map with the options that you define ![]() .
.
At this point, you can run your screen; Figure 11-27 illustrates the appearance at runtime.

Figure 11-27. Map screen at runtime
![]() Note If you want to use Bing maps instead of Google maps, you can find a code sample on the official MSDN help site. However, the official sample is more complicated, because it uses the Bing Developer API, which requires you to first register and obtain a Bing Maps authentication key.
Note If you want to use Bing maps instead of Google maps, you can find a code sample on the official MSDN help site. However, the official sample is more complicated, because it uses the Bing Developer API, which requires you to first register and obtain a Bing Maps authentication key.
Summarizing Data
In the final part of this chapter, I’ll show you how to produce counts and sums of data. A practical example of where you could apply this could be on a Line Item screen in an order system. This type of screen often contains a running total of the quantities and prices. The second purpose of this section is to highlight the technical way in which LightSwitch produces the count.
Showing Aggregate Counts/Sums/Averages
To explain how to generate sums of data, this section develops a timesheet feature that enables engineers to record the time that they’ve spent on issues. The Data Entry screen will include a running sum of the time. Figure 11-28 shows the schema of the timesheet table.

Figure 11-28. Schema of timesheet table
For HTML client applications, add a Browse Data screen based on this table. For desktop clients, add an Editable Grid screen. For both application types, click the Add Data Item button and add a local property called TotalMinutes. Set the data type of this property to double. The purpose of this property is to store a running count of the time duration. Drag this property onto the screen designer to create a data control for this property (Figure 11-29).

Figure 11-29. Create a property called TotalMinutes and drag it onto the design surface
For HTML client applications, select the data control that binds to the Timesheet collection. This would be the tile list control, or the list or table control if you decided to change the control type. Now, open the properties sheet and click the Edit Postrender Code link. Enter the code that’s shown in Listing 11-19.
In the case of a desktop application, select the Timesheet collection, click the Write Code button, and add code to the Changed method as shown in Listing 11-19.


At this point, you can run your application; Figure 11-30 shows the appearance at runtime. Let’s get a brief explanation of how this code works. In the HTML client example, the first part of the code databinds the DurationMins property to a function. This function iterates through the items in collection to work out the sum.

Figure 11-30. Screen at runtime showing a count of total minutes
In the case of the desktop application, the code uses the LINQ Sum operator to determine the sum.
Querying Data Remotely
An interesting aspect of the .NET code in the previous section is that LightSwitch sums the data locally. To illustrate this concept further, let’s take a look at the slightly more complex example that’s shown in Listing 11-20. This code is based on an Engineer Detail screen.
Listing 11-20. Querying data collections
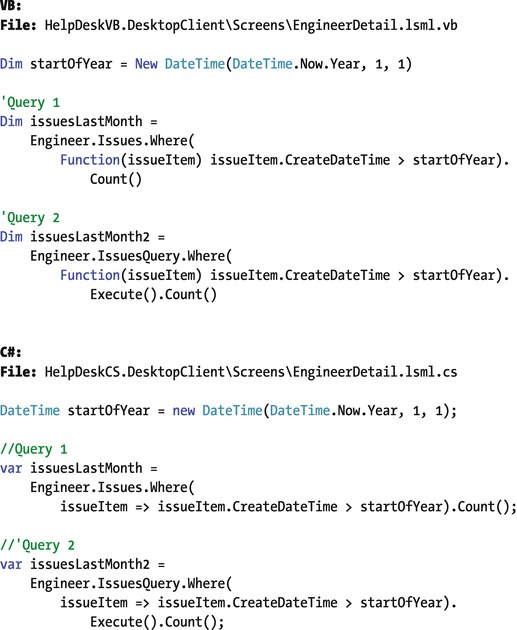
This code returns a count of engineer issues that have been created since the start of the year. Although query 1 looks very similar to query 2, there’s a big difference between these two code samples.
The data source for query 1 is a navigation property. Navigation properties are of type EntityCollection<T>. Technically, LightSwitch carries out any queries against a navigation property locally.
The code in query 2 calls the <CollectionName>Query method. This method returns an IDataServiceQueryable, and the main difference between this and an EntityCollection<T> object is that LightSwitch can delegate the task of filtering the data to the SQL Server.
In this particular example, each engineer could be associated with hundreds or even thousands of issue records. Therefore, it’s much more efficient to perform this query remotely. Figure 11-31 illustrates the actual SQL that SQL Server executes by highlighting the output from SQL Server Profiler. This output proves that when you use <CollectionName>Query as a data source, SQL Server carries out the filtering, not LightSwitch.

Figure 11-31. The SQL Profiler result of querying navigation properties and IDataServiceQueryables
Although it might seem more efficient to perform your querying remotely, there are good reasons to query your data locally. If the data that you want to use is already loaded on the client, it’s quicker to query the data that’s already there.
Also, not all standard query operators support remote execution, and there may be features you want to include that you can achieve only with a local query. To demonstrate such a feature, let’s look at an example that works on the desktop version of the Timesheet screen. This example includes a button that merges rows that refer to the same issue. Figure 11-32 illustrates the function of this button.

Figure 11-32. Merging duplicate issues
To create this example, create a Detail screen for an engineer and include the related TimeTracking data collection. Add a button to your screen, and add the code that’s shown in Listing 11-21.


The first part of this code groups the Timesheet records by issue and selects groups that contain more than one timesheet record.
The second part of the code loops through the collection of grouped records, sums the total duration into the first record ![]() , and deletes the remaining records in the group
, and deletes the remaining records in the group ![]() .
.
Notice how this code uses the Except operator to exclude the first record, and then uses the ForEach operator to loop through the duplicate records that require deletion.
Summary
In this chapter, I covered practical features you can add to your application. This included how to add file-storage capabilities, how to integrate with mapping and GPS systems, and how to summarize data. I also described screen-design techniques that you can apply to various data structures. This included multiple-record selection, self-joined data, and tables that store a single row of data.
To add file-storage capabilities to your application, I explained how to build screens to upload and download files from the database. For HTML clients, I showed you how to build a custom file upload control. To improve efficiency, this custom control uses the local file-processing capabilities within HTML5 browsers. If the client browser isn’t HTML5 compatible, the custom control automatically falls back to a more compatible but less efficient method. To enable users to retrieve files from the database, I explained how to add a file-download hyperlink to a screen. This hyperlink calls a server-side ASHX handler that uses the Server Application Context API to retrieve the file.
For desktop client applications, you can use the Silverlight File Open and Save dialogs to enable users to upload and download files. It can be awkward to work with Silverlight file dialogs on LightSwitch screens. This is because you need to open the file dialog on the UI thread. Also, because of security restrictions, you can’t easily use the Silverlight dialogs on a desktop web application without writing additional custom control code. With desktop applications, you can write code that downloads and saves the file locally and opens the file with the registered application. This provides a simple way for users to open and view a file with just a single click of a button.
To improve the workflow of your application and to allow users to carry out actions against multiple records, I showed you how to build a screen in an HTML client application that supports multiple-record selection. This technique builds a custom control that includes a checkbox against each item. The code stores the checked selections in a JavaScript array. You would create an ASHX handler that uses the Server Application Context API to carry out any data tasks you want to carry out. You would then create a button on your screen that calls the handler through a jQuery post and passes through the array data.
In the table designer, you can build a data structure to model a hierarchy. In this chapter, I gave the example of a screen that enables users to manage the manager/subordinate relationship between engineers in your database. To allow the assignment of subordinates, you would add a control. You would then create a button that adds the selected user to the subordinates collection of the managing engineer.
An effective way to store application-configuration details is to store the details in a table. This table would contain just a single row; I described a screen-design technique you can use to read and write single rows to a table. This technique relies on code that runs when the screen opens. The code queries the database to see if a row exists in the table. If so, the code retrieves the record. Otherwise, the code creates a new record.
Another useful screen-design technique is the ability to create sets of related data-picker controls. In this example, I showed you how to add an auto-complete box or modal window control that contains a list of department records. When a user selects a department, the code populates a second data control with a list of engineer records that are associated with the department. To filter the contents of an auto-complete box or modal window control by another control, you would bind the data source of the control to a parameterized query. You can then set the parameter value of this query to the value that the user selects from the first auto-complete box or modal window picker.
Most modern mobile devices include GPS, and in HTML client applications you can write JavaScript code to add location awareness to your application. I showed you how to use the navigator.geolocation object to obtain the longitude and latitude of the device. I also showed you how to help users visualize data by adding Google maps onto LightSwitch screens. To add a map to a screen, you need to create a custom control with a DIV. You would then call JavaScript methods from the Google Maps API to fill the DIV with a map.
Finally, I showed you code you can use to produce counts and sums of data. An important part of this exercise was to highlight where LightSwitch carries out the query. In desktop applications, LightSwitch carries out any aggregate functions you perform on navigation properties locally. If you carry out the same task against the underlying navigation property query, LightSwitch can delegate the query execution to SQL Server. You can use this technique to improve performance when generating counts and sums.