
![]()
Searching Data
A characteristic of a well-designed application is the ease with which users can find data. The ability to quickly locate records can help businesses save both time and money. An application with effective search capabilities can reduce the likelihood of a user entering duplicate records, and this can help keep your database clean.
In this chapter, I’ll show you how to add better search capabilities to your application. Specifically, I’ll show you how to do the following:
- allow users to filter records by multiple criteria, including related records
- provide search with more-refined pattern-matching capabilities
- use server code to apply more-advanced filter operations
Other helpful topics I’ll cover in this chapter include how to match records phonetically and how to debug queries that fail to execute at runtime.
An Overview of Built-In Search
To begin this chapter, let’s take a look at the search textbox in HTML client and desktop applications (Figure 10-1). This feature matches the search criteria you enter against string fields where the “is searchable” setting is set to true in the table designer. LightSwitch carries out this search using the contains operator.

Figure 10-1. The built-in search feature on LightSwitch screens is very limited
The screenshot in Figure 10-1 illustrates some of the limitations of this built-in search. First, it’s not possible to filter records by related properties. For example, you can’t filter the records by assigned engineer. Second, the built-in search carries out the search against string fields only. This leaves no way for you to filter, for example, by the create date of an issue.
Walkthrough 10-1. Building Custom Search
To improve upon the built-in search, you will learn in this walkthrough how to build a custom Search screen. Figure 10-2 shows the screen that we’ll build. Building a custom Search screen involves two distinct parts. First, you will need to create a custom query. The second step is to create a screen based on this query.

Figure 10-2. Custom Search screen
Defining a Search Query
To build a search query, you first need to decide the fields you want your user to search against. Once you do this, you add a new query by right-clicking the issue table in Solution Explorer and choosing the “Add Query” menu item. Next, define the filter conditions, as shown in Figure 10-3.

Figure 10-3. Create a parameterized query with optional parameters
This query defines conditions to filter the description, assigned engineer, and target end date fields against optional parameters. This query uses the “And” operator to combine four filter conditions. The benefit of using optional parameters is that the query won’t apply a filter if a user fails to supply the parameter value. By using this technique, you can build a screen that initially shows all records. The user can then reduce the number of results by progressively entering criteria values.
To filter by a related field, such as the assigned engineer, this query defines a filter condition that filters the numeric Engineer > Id property against an optional parameter.
Creating the Search Screen
The next step is to build a screen that’s based on your search query. In the case of an HTML client application, create a new screen based on the Browse Data Screen template. For desktop clients, choose the Editable Grid Screen template. In both cases, set the data source of your screen to the search query that you created—in this example, the IssueSearch query.
At this point, the screen designer will look similar to the screenshot that’s shown in Figure 10-4. When the screen template creates your screen, it detects that your query includes parameters. Because of this, it automatically adds data-entry controls to enable users to enter search criteria values. As you would expect, the screen template binds these data-entry controls to local properties and maps the query parameters to these properties.

Figure 10-4. LightSwitch creates local properties that bind to the query parameters
Note that for HTML client applications, the screen template generates read-only data-entry controls. You therefore need to change these to editable controls to enable users to enter the search criteria values. In this example, you’ll need to change the control for the target end date properties to Date/Time pickers and change the control for the problem description to a textbox control. You can also set the control for the assigned engineer ID to a modal picker control. By doing so, users will be able to select an engineer by name, rather than by numeric ID.
For desktop client applications, the screen template creates a screen that includes editable controls for the entry of the search criteria values. It sets the assigned engineer ID property to use an auto-complete box, which will enable the user to select an engineer by name during runtime.
At this point, you can run your application. When you open your search screen, you’ll be able to use the controls to filter the data that the screen shows.
The important part of this walkthrough is that it highlights the key role that the underlying query plays in terms of developing a custom Search screen. In the remainder of this chapter, I’ll focus on techniques you can use to further refine this underlying query.
Building Advanced Searches
Up until now, the queries I’ve showed you have all been built with the graphical screen designer. The graphical designer can only take you so far. If you want to develop more sophisticated search routines, you need to understand how to apply query filter conditions with LINQ code. In this section, I’ll introduce the theory of how LINQ works and then follow this up by showing you examples of how to use LINQ code in your applications.
Introducing LINQ
LINQ is the .NET framework component that provides querying capabilities. With LightSwitch, there are two main places where you can utilize LINQ code. The first is in Silverlight desktop applications. Here, you can write screen code to access and filter data. The second is in server-side queries. Here, you can extend your queries to include filter operations that you can’t perform with the graphical designer. This is where the focus of this chapter lies.
With LINQ, you can express queries using two different types of syntax: Query Syntax and Method (or Lambda) Syntax. Let’s take a look at these two different flavors of LINQ.
Understanding Query Syntax Code
You commonly find Query Syntax used in documentation, and the key characteristic of this syntax is that it’s quite readable. The syntax itself looks a bit like SQL.
Figure 10-5 shows a snippet of Query Syntax code. This figure highlights valid code you can add to an Engineer Details screen on a desktop application. This code returns a collection of open issues that are associated with an engineer, sorted in date-descending order. The purpose of this figure is to summarize the parts that make up a query.
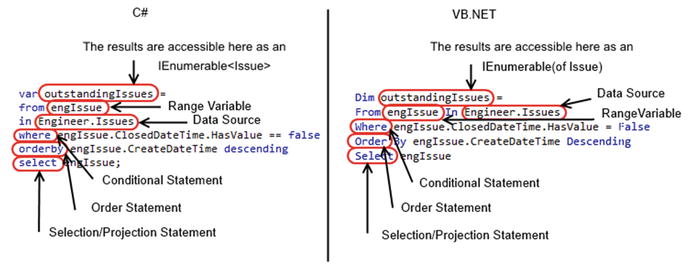
Figure 10-5. Parts that make up a query expressed using Query Syntax
Let’s take a closer look at this syntax. Every query needs a data source, and in this sample, the Engineer.Issues navigation property is the data source. Because the code belongs to a Detail screen, Engineer refers to the Engineer query that the Detail screen template generates.
The engIssue variable is called the range variable. This behaves just like the iteration variable in a for-each loop, although no actual iteration takes place in a LINQ query. You can use this variable to refer to each element in the data source, which enables you to conditionally filter the results by using a where clause. The compiler infers the data type of engIssue, and because of this there’s no need for you to explicitly declare this as an Issue object.
The select clause at the end of the statement specifies the type of each returned element. This allows you to return only a subset of properties from the Issue entity, if required.
A very important characteristic of LINQ you should be aware of is deferred execution. This means that the application executes the query at the point at which it requires the data, and not on the line that contains the select clause. If you define a LINQ query and don’t use the results, your application will not execute the query.
Understanding Method (Lambda) Syntax Code
Although Query Syntax is generally easier to read and write, there are certain operations that you can perform only with Method Syntax. Retrieving the element with the maximum value in a source sequence is one example.
Method Syntax queries are characterized by lambda expressions, such as the one shown in Figure 10-6.

Figure 10-6. Parts that make up a query expressed using Method Syntax
This figure illustrates the same query as before, but expressed using Method Syntax rather than Query Syntax. The where method, which is shown in this illustration, is an example of a Standard Query Operator. Standard Query Operators are extension methods on top of objects that implement the IEnumerable or IDataServiceQueryable interface. You can use Standard Query Operators to carry out useful tasks against collections of data, such as filtering or ordering. In many cases (as with the example shown in Figure 10-6), you can control the way that many of these Standard Query Operators work by supplying a lambda expression.
The Standard Query Operators you can apply in a LINQ query depend on the data source that you choose. For this example, where the data source is a navigation property, there are over fifty Standard Query Operators you could apply. In addition to the where and orderby operators, there are many other useful operators that you can use. For example, there are various aggregate operators, which include count, min, max, and average. When the data source is a navigation property, any additional operators you apply will apply locally in memory. However, if you compose a remote query against the actual OData service, the set of operators you can use is limited to the set that OData supports.
Filtering Data with Lambda Expressions
To explain how lambda expressions work, let’s take a closer look at the where operator and lambda expression from Figure 10-6:
![]()
The where operator requires you to supply a Func delegate that returns a Boolean. The return value indicates whether the object you supply (engIssue) meets the criteria for inclusion in the where clause.
engIssue is called the lambda parameter. This represents a single issue in the collection of issue responses that you’re working against. This code uses .NET’s implicit data-typing feature, which saves you from having to define the data type of engIssue. You could equally write the expression like this:
![]()
If you want to construct more-complex query expressions, you can do so by using the navigation properties that your lambda parameter exposes.
In the C# version, the lambda parameter must be enclosed in brackets if you don’t use implicit typing. You must also use brackets if you specify more than one lambda parameter.
In C#, the => operator is called the lambda or goes to operator. This separates the lambda parameter(s) from the actual expression.
In VB, the Function keyword specifies the lambda expression, and the lambda parameters are defined inside brackets following the Function keyword. VB developers may find it strange to see the Function keyword used without a function name being specified. For example, a typical function in VB looks like this.
Public Function GetIssue (issueId As Integer) As Issue
As you can see, the function name here is called GetIssue. In the lambda expression code, you can omit the function name, because the syntax uses a feature of .NET 3.5 called anonymous methods. Prior to .NET 3.5, methods had to be explicitly named, which would have resulted in your having to write more code.
The final part of the lambda expression tests to see if the ClosedDateTime value is null. If true, the query returns the record in the results.
Practical Querying Examples
Now that you understand the basic theory of how LINQ works, this section will describe several query techniques you can use in your application. The code samples in this section apply additional filter conditions by adding code to the PreprocessQuery method of a server query.
Filtering by Related Child Items
In the walkthrough at the start of this chapter, I showed you how to use the graphical designer to filter issue records by the assigned engineer property (assigned engineer is a related property).
Working in the other direction, however, you can’t filter a query on the engineer table by a property in the issue table. Figure 10-7 illustrates this limitation by showing how the drop-down box in an engineer query doesn’t contain an entry for the Issue navigation property.

Figure 10-7. You cannot filter by child items in the graphical designer
Fortunately, you can overcome this restriction by writing LINQ code. To demonstrate how to do this, I’ll show you how to build a query to return engineer records that are assigned to issues that are overdue.
The process to extend a server query with LINQ involves writing code in the PreprocessQuery method of a server-side query. The PreprocessQuery method defines code that LightSwitch executes before it submits your query to the underlying data store. This is a common technique, which you’ll apply to the rest of the examples throughout this chapter.
To create this example, right-click the engineer table and create a query called EngineersWithOutstandingIssues. Click the Write Code button and select the PreprocessQuery method. When the code editor opens, enter the code that’s shown in Listing 10-1. Once you create this query, you can create a Browse screen based on it to view the output.


In the code that’s shown here, the PreprocessQuery method includes a parameter called query that defines the query’s output. So, to customize your query further, you would need to apply additional LINQ query operators to this parameter.
The first part of this code applies the where operator on the set of engineer records. For each specific record, if the condition inside the where operator resolves to true, the query will return the specific record in the final output. engItem is the range variable. This variable allows you to reference individual engineer properties in the query data source.
This code applies a second where operator on the issues navigation property of the engItem variable. This call returns issue records that are associated with the engineer where the issue status description matches the value “open.” The code then applies the Any operator on this result. The Any operator returns true if one or more issue records match the “open” condition. If this call returns true, the query will include the engineer record in the final output.
Once you complete and save this query, you can build a screen that uses this query, just like the custom Search screen example.
Exists, In
Exists or in type queries are useful because they help you find records where related child records exist. To illustrate this type of query, the following sample shows you how to return engineers who are associated with one or more records in the issue table. In traditional order-processing systems, this is the type of query you would use to identify customers with orders. If you’re more conversant with SQL, Listing 10-2 provides the SQL translation to illustrate what this example strives to achieve.
Listing 10-2. SQL equivalent of Exists query

To recreate this example, create a query called EngineersWithIssues. Click on the Write Code button, select the PreprocessQuery method, and enter the code shown in Listing 10-3.
Listing 10-3. Returning all engineer records with related issue records

This code is similar to the previous example. It uses the where standard operator and applies the Any operator on the Issues navigation property to determine whether the query should include the engineer record in the final query output.
Not Exists, Not In
As a natural progression of the previous example, here´s how to perform a not exists or not in type query. This type of query returns records where no related child records exist. The ability to perform this type of query can be very useful. Referring again to the typical order-processing system, you can use this technique to find all customers who have not yet placed an order.
To demonstrate this technique in the Help Desk application, let’s look at how to create a query to return engineers without associated issues. Just like before, Listing 10-4 shows the equivalent SQL that you would use to perform this query.
Listing 10-4. SQL equivalent of Not In query

To recreate this example, create a query called EngineersWithNoIssues and add the code shown in Listing 10-5 to the PreprocessQuery method of your query.
Listing 10-5. Returning all users who have never raised issues
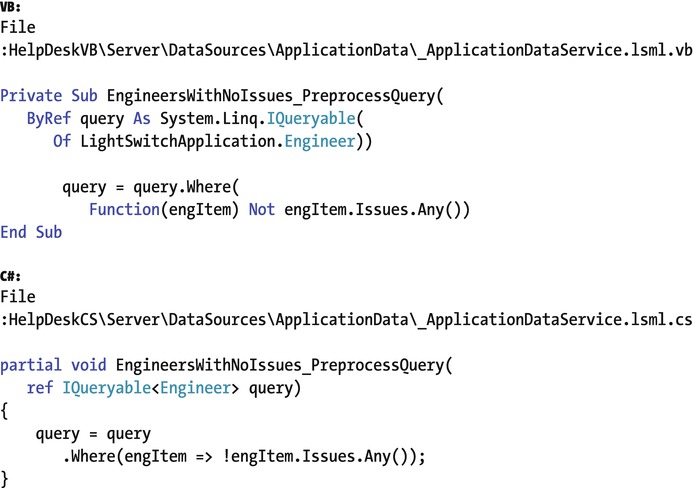
This code works in the same way as the engineers with issues query. The simple difference with this example is that the code negates the condition inside the where operator.
Filtering by Date Elements
The ability to filter records by date elements is a useful technique for you to understand. A typical use for this type of code is to find people who were born on a specific day and month. To demonstrate this technique, here’s how to create a query to return issue records that were raised during a specific month and year.
To enable the end user to specify the month and year, create a query on the Issue table called IssuesByMonthAndYear and create two integer parameters called IssueMonth and IssueYear (Figure 10-8). Use the properties sheet to set the Is Optional property of both of these parameters to true.

Figure 10-8. IssueMonth and IssueYear parameters
Now, enter the code that’s shown in Listing 10-6.
Listing 10-6. Filtering by month and year parameter values

At this point, you can build a screen that uses this query by using the Editable Grid Screen (desktop application) or Browse Data Screen (HTML client) templates.
Figure 10-9 shows an illustration of a screen that uses this query. The textbox control isn’t the friendliest control in which to enter month and year numbers. To improve this, you could use a custom control. Alternatively, you could create month and year lookup tables in your application. Although this might sound convoluted, this offers a simple solution that you can reuse in both HTML and desktop applications.

Figure 10-9. Screenshot of the final screen
Top N Records
A fairly simple but common requirement is the ability to return a top number of records in a given sequence. Let’s see a demonstration of how to create a query that returns the top five records from the Department table with the greatest floor area.
To create this query, add a query based on the Department table called DepartmentsByFloorSpace. Now, add the code shown in Listing 10-7 to the query’s PreprocessQuery method.
Listing 10-7. Top five departments with the greatest floor area

To order the results, this query calls the OrderByDescending query operator. The code supplies a lambda expression to indicate the property to order by. The take operator defines the number of records to return. In this case, the code returns the top five records. To improve this code further, you could add a parameter to enable the user to choose the number of records to return, rather than use a hardcoded value of five.
String-Matching Examples
The simplest and most practical way for users to search data is to use free text criteria. However, in some circumstances, the pattern matching that LightSwitch applies on the built-in Search screens may not effectively return the records that the user is looking for. In this section, I’ll show you ways to offer more refined text searches.
Matching Non-Concurrent Words
To understand the difficulties that users might encounter, let’s examine the behavior of LightSwitch’s built-in search feature. Figure 10-10 shows a Browse screen that contains issue records that relate to computer problems. Imagine a scenario where a user wishes to find all records that contain the words Dell and screen in the problem description.

Figure 10-10. Search screen showing the results of a search
The screenshot on the left part of Figure 10-10 shows the full set of records in the database. The screenshot on the right shows the search results when a user enters the criteria “dell screen” into the search box. The result of this search fails to return “issue 1.” This is because LightSwitch uses the contains operator, and therefore matches only the records where the words dell and screen appear next to each other.
The search result clearly doesn’t return the expected results. Therefore, I’ll now show you how to match records where the search terms don’t appear concurrently in the record.
The first step is to build a query that’s based on the Issue table. Name your query IssuesMatchAll and add a parameter called Criteria (Figure 10-11).

Figure 10-11. Add a query parameter called Criteria
Next, click the Write Code button and add the code in Listing 10-8 to the query’s PreprocessQuery method.
Listing 10-8. Query to match non-concurrent words

The code in Listing 10-8 splits the criteria value into an array of separate words. The LINQ query applies the All operator to this array to test whether the problem description field contains all of the words in the array.
Once you save your query, you can build a screen that’s based on this query. Figure 10-12 shows how the resulting screen now returns the expected result.

Figure 10-12. Search screen showing correct records
Matching Multiple Words (Optionally)
The previous example returns results that contain all of the search-criteria words that a user enters. Another common requirement is the need to return records that match some of words a user enters, rather than all. In this scenario, imagine that a user wants to find all issue records that relate to either HP or Dell computers. If the user enters “Dell HP” into the search box, the search returns zero results (Figure 10-13). The reason for this is that LightSwitch performs a match on records that contain the exact words Dell HP, and no such records exist.

Figure 10-13. Search screen returns no matches for “dell hp”
Let’s see how to build a query to return records that match any of the words that the user supplies. The first step is to add a query that’s based on the Issue table. Name your query IssuesMatchSome and add a parameter called Criteria. Next, click the Write Code button and add the code that’s shown in Listing 10-9 to the query’s PreprocessQuery method.
Listing 10-9. Query to partially match one or more words

This code looks almost identical to the code in Listing 10-8. The main difference is that the code in Listing 10-9 applies the Any operator, as opposed to the All operator. After you save your query, you can create a Browse Data screen that’s based on this query. Figure 10-14 shows the final screen at runtime and illustrates how the result includes all records that contain the text Dell or HP.

Figure 10-14. Search screen that shows the correct results
Case Sensitivity
An important point about the examples in the book so far is that the searches are all case insensitive. For instance, if a user carries out a search on the word dell (with a lowercase d), the search results will include all records that include the word Dell, irrespective of whether the word is spelled with a lower- or uppercase d.
When you carry out a search, LightSwitch coverts your query into a SQL statement. The collation sequence of the database determines the case sensitivity of the search results. The default collation sequence on a computer with US settings is SQL_Latin1_General_CP1_CI_AS (the CI in the collation name stands for case insensitive). This is the reason why the search results you see are case insensitive. You can change this behavior by changing to a case-sensitive collation on the table columns where you want to carry out case-sensitive searches. You would apply this change to your SQL Server database after you deploy your application.
Phonetic Searching
It’s likely that some of your users will struggle to spell correctly. So, to make your application easier to use, you can develop Search screens that carry out phonetic-based “fuzzy” searches. This technique is particularly useful when you want to build screens to carry out searches against people. On one project I worked on, I developed a workflow that prevented users from entering new records until the user had carried out a phonetic search on existing records. You can use this technique to help minimize the occurrence of users entering duplicate records in a database.
Figure 10-15 illustrates the end result of this example. It shows how, when a user carries out a search with an incorrect spelling of Mohammed, the output yields many likely results. The name Mohammed is a good example, because variations of this name exist that begin with Mu as well as Mo. This variation makes it difficult for users to carry out a “contains” search by entering the first few characters of the name.

Figure 10-15. Search screen that shows the result of a phonetic search
Let’s look at the steps you can carry out to add phonetic search capabilities to your application. First, create a query that’s based on the Engineer table. Name your query EngineerPhoneticSearch and add a parameter called Name.
Next, click the Write Code button and add the code that’s shown in Listing 10-10 to the query’s PreprocessQuery method. Make sure to add an imports/using statement to the System.Data.Objects.SqlClient namespace.
Listing 10-10. Query to carry out Soundex search

The code in Listing 10-10 uses Soundex. This popular algorithm converts the phonetic sound of a word into a numeric representation that is called a soundcode. This code calls the soundcode method in the SqlFunctions namespace to determine the soundcode of the search criteria and the engineer firstname. The code returns records where both of these match. Note that this code works only against records in the Intrinsic (or SQL Server) data sources.
Debugging Queries
Most developers make mistakes while writing code, and a very difficult type of exception to diagnose is the runtime LINQ error. To illustrate this type of error, Figure 10-16 shows a query that intentionally contains an error.

Figure 10-16. Example of an invalid LINQ query
To the uninitiated, this query looks okay. For further reassurance, Visual Studio reports no errors, and the code even compiles perfectly. But at runtime, you’ll notice that there’s clearly a problem. In the case of a desktop application, LightSwitch displays a red X and tells you that it’s unable to load data. There’s very little information to help you determine the exact cause of the problem. Fortunately, the HTML client behaves better, because it actually gives you a meaningful error message (Figure 10-17).

Figure 10-17. Runtime error behavior
With this particular type of error, Visual Studio doesn’t break at runtime, even if you enable the option that appears in the Debug ![]() Exceptions dialog. A good technique you can use to diagnose query errors is to handle the Query_ExecuteFailed method. At runtime, you can place a breakpoint here and examine the queryDescriptor parameter to work out the cause of the error (Figure 10-18).
Exceptions dialog. A good technique you can use to diagnose query errors is to handle the Query_ExecuteFailed method. At runtime, you can place a breakpoint here and examine the queryDescriptor parameter to work out the cause of the error (Figure 10-18).

Figure 10-18. Interrogate the queryDescriptor parameter for additional help
The reason why this error occurs is because LightSwitch converts the LINQ expression to a SQL expression at runtime. An exception occurs because SQL Server has no method that is equivalent to the .NET method AddMonths. The compiler doesn’t detect this condition at compile time because it checks only for valid LINQ syntax. At compile time, LightSwitch doesn’t know what the underlying data store is—it could be Oracle or MySQL, as much as it could be SQL Server. Therefore, this error only manifests itself at runtime when LightSwitch attempts to convert the query to TSQL.
Walkthrough 10-2. Opening a Search Screen
In the final part of this chapter, I’ll show you how to append a search feature to the header section of an HTML client application. This feature is a permanent fixture that always appears at the top of your application. Figure 10-19 shows the runtime view of this walkthrough. When a user enters a search term and clicks the Go button, the application opens the Issue Search screen and prepopulates the search criteria of the Search screen to the value that the user enters.

Figure 10-19. Runtime view of search screen
As a prerequisite, you should create the Browse Issue Search screen that I showed you at the start of this chapter (Walkthrough 10-1). There is, however, one slight modification you need to make to your Search screen. You should check the “Is parameter” checkbox in the properties sheet of the IssueProblemDescription property.
Once you modify your Search screen, open your default.htm file and add the code that’s shown in Listing 10-11. You can add this toward the end of your file, just before the closing body tag.
Listing 10-11. Opening a Search screen

At this point, you can run your application. When you enter a search term and click the Go button, the application opens the Search screen and filters the records by the problem description you enter.
This code defines a DIV and applies CSS so as to position the textbox in the top-right section of the screen ![]() . The code defines an HTML textbox and a button. The code that handles the on-click event of the button opens the Search Issue screen. It passes the search criteria by using jQuery to determine the value that the user enters into the search textbox
. The code defines an HTML textbox and a button. The code that handles the on-click event of the button opens the Search Issue screen. It passes the search criteria by using jQuery to determine the value that the user enters into the search textbox ![]() .
.
Summary
A well-designed application makes it simple for users to find data. In this chapter, you learned several techniques to implement more-sophisticated search methods into your applications.
Adding custom search into your application involves two parts: query design and screen design. The first part is to add a query to carry out the search. Your query will filter the underlying data source based on parameters you define. You can define parameters as optional. By doing so, users can choose not to provide a value, and LightSwitch will omit the filter clause that uses the parameter when the query executes.
The second part is to create a screen that uses the query as the data source. When you create a new screen based on a query with parameters, LightSwitch adds local screen properties that bind to the query parameters. These local screen properties allow users to enter the search criteria at runtime. To filter by associated records, you can configure your screen to allow users to enter search criteria through data picker controls.
To carry out more-sophisticated searches, you need to extend your query with LINQ code. The process to do this is to create a query and then to write code in the preprocess query method. This chapter showed you LINQ code you can use to filter records by child items and date elements. You also saw how to find records where child records either exist or do not exist. This type of filtering can be particularly useful. In traditional order-processing systems, you could use this type of query to identify customers who have placed, or have not placed, orders.
You saw how to devise search queries to match more precisely against the text criteria that a user enters in order to provide better search results. This includes how to return records that contain all of the search criteria words a user enters and how to return records that include at least some of the words a user enters. You also saw how to implement phonetic searches using Soundex. This technique works effectively when you want to build screens to find users by name.
Finally, I showed you how to use the Query_ExecuteFailed method to debug any runtime LINQ errors that you might encounter in your application.