
![]()
Enhancing Desktop Screens with .NET Code
Just as with the HTML client, you can build perfectly capable desktop applications without writing code. However, by knowing how to write .NET screen code, you can enhance your application with richer and more valuable features. This chapter will focus purely on screen code, and by end of it, you’ll be able to carry out the following tasks:
- access screen properties, controls, and data with code
- handle screen events and write code to respond to changes in data
- write code to perform navigation tasks
This chapter will show you how to extend the desktop Help Desk application. You will learn how to build and show custom text on a screen. To assist you with data entry, you’ll find out how to configure default screen values. You’ll learn how to conditionally set the color of controls and how to create a label that keeps a running count of the number of remaining characters that a user can enter in a textbox.
Useful design techniques that I’ll describe in this chapter include how to customize the dialogs on data grids and how to build a combined add/edit screen.
Adding Code to Your Application
To start this chapter, I’ll describe how and where you can write .NET code in LightSwitch screens. Throughout the lifecycle of a screen, LightSwitch exposes screen events you can handle. For example, if you want to perform some task when your user saves a screen, you can do so by writing code in the Saving method.
Just like the HTML screen designer, the toolbar includes a Write Code button that contains a drop-down list of methods you can use. The content of the Write Code button varies depending on the screen template type that you’ve chosen; Figure 9-1 shows the Write Code button methods based on screen type.
As Figure 9-1 shows, the available methods are grouped into sections that include Screen Property Methods, General Methods, and Access Control Methods. I’ll now describe the methods that developers most commonly use from each of these groups.

Figure 9-1. Screen rvents by screen template type
General Methods
Desktop applications trigger general events throughout the lifecycle of a screen. These events allow you to execute code (for example) when a user loads, saves, or closes a screen.
You can use the InitializeDataWorkspace method to run code just before LightSwitch initializes your screen (and data workspace).
The Saving method enables you to run custom code just before a user attempts to save the data on a screen. The Saving event includes a parameter called handled. If you set this to true, LightSwitch will not perform the save operation. This enables you to carry out your own custom save logic. Earlier in this book (Chapter 6), the “Handling Conflicts in Code” example demonstrated this technique.
LightSwitch fires the Closing event just before a user closes a screen. The method signature for this event includes a parameter called cancel. If you set this to true, LightSwitch prevents the screen from closing.
LightSwitch executes the code in the CanRun method before it opens a screen. This allows you to write code to control who can view a screen. You can find example code in the authorization chapter (Chapter 22).
With some imagination, you can write code in the CanRun method so as to carry out tasks that are outside the intended security purpose of this method. For example, you can create a dummy screen so that LightSwitch creates an entry in your application’s navigation panel. This provides an entry point into the dummy screen’s CanRun method, and allows you to execute Silverlight code outside the context of your screen object. In Chapter 22, the “Opening Screens Conditionally at Login” example demonstrates this technique.
On screens with data grids or collections of data, you can write code that runs when a user modifies the data in the collection. The typical events you can handle are the Changed and SelectionChanged events. LightSwitch fires these events immediately after the data in a collection changes and after the selected item in the collection changes, respectively.
If you want to use these methods, you must first select the collection from the left-hand side of the screen designer before you click the Write Code button. If you don’t, the collection methods won’t appear in the drop-down list of available methods. Developers new to LightSwitch often make the mistake of not selecting the collection, and then struggle to understand why the collection methods don’t appear.
The methods in the Screen Property group allow you to write code when a screen loads, changes, or validates a property. For example, you can add code to the loaded method of an Issue Detail screen that shows an alert if the issue is overdue. In Figure 9-1, notice there isn’t a loaded method that you can handle in the case of a New Data screen. This is because unlike Details and Editable Grid screens, this screen type doesn’t need to load any data.
Working with Code and Data
Now that we’ve covered the entry points where you can write code, let’s review some practical examples of how to enhance your application with code. This section will show you how to construct custom text, set the screen title, and access the data in collections.
The code samples in this section form the basis of an Engineer Dashboard screen. This screen mimics the type of start-up screen that users often see when they log in to a business application. Because this screen is based on data that relates to a specific engineer, you can create it by using the Details Screen template and selecting the Engineer table in the screen data drop-down.
Figure 9-2 demonstrates the type of functionality you can add to such a screen. For example, you can write code to call queries and show summarized statistical information. You can also build navigation features to help users more quickly find data and open screens. For instance, you can add links to open screens, or an auto-complete box to help users quickly search for issue records. In this section, I’ll explain how you can build some of this functionality into your application.

Figure 9-2. Engineer Dashboard Screen
Displaying Custom Text and Information
A very common scenario in business applications is the need to build and display custom text. To illustrate such a scenario, let’s look at how to build a label to display the top five oldest issues in the database.
Presenting the data requires a label, so the first step is to add a label to your screen. As mentioned previously, an important principle of screen design is that all labels (and everything you show on a screen) must bind to data properties. Because of this, local properties are very important in LightSwitch screen design—they provide the foundations on which to build a screen.
To create a label, open your screen, click the Add Data Item button, and add a new string property called IssuesOverdueLabel (Figure 9-3). After you add your property, create a label by dragging the IssuesOverdueLabel property from the screen member list onto your screen. Change the control type to a label and use the properties sheet to set the display name to “Top 5 Oldest Issues.” While in the properties sheet, increase the line setting to enable the label to show multi-line text.

Figure 9-3. Adding a local string property to support a new label
To add the query that retrieves the top five oldest issues, click the Add Data Item button, choose the Query radio button, select the Issues entity set, and name your query Top5OldestIssues. To configure your query so that it shows the correct data, select your query in the screen designer and click the Edit Query link. When the query designer opens, configure your query to sort the data in descending target end date sequence (Figure 9-4). To configure the query so that it returns only five records, select the query in the screen designer and set the “No. of items to display per page” to 5 in the properties sheet.

Figure 9-4. Configure the sort sequence and number of items to display per page
The final part is to write the code to execute the query and to set the label text. To do this, click the Write Code button, choose the InitializeDataWorkspace method, and add the code that’s shown in Listing 9-1.
Listing 9-1. Constructing custom text to display on a screen

At this stage, you can run your application. At runtime, the label will show the top five oldest issues in the database. A key point of this example is that it highlights how you can access screen properties in code. Also important, it highlights how the property and collection object names in code exactly match the names that you see in the screen designer, as shown in Figure 9-5.

Figure 9-5. You can access screen collection property in code using the name in the screen member list
Accessing Grid and List Values
If you want to write code to access the items that are shown in a data grid or data list, you must access the underlying data collection. The reason you do this is because all data grids and lists are bound to a data collection. I make this point because often developers from different backgrounds are accustomed to accessing grid values through the properties and methods of a UI control.
LightSwitch exposes data collections as visual collections (the fully qualified type name is Microsoft.LightSwitch.Framework.Client.VisualCollection). On a screen that contains a data grid or list, this object contains the records that the screen has loaded. An important point is that if you loop over the items of a visual collection in code, you only loop through the items that have been shown to the user. This is the reason why, in the previous example, you can limit the initial amount of data to five records by setting the “No. of items to display per page” to 5.
Visual collections also include methods you can call to perform useful tasks, such as adding new records and opening records in a modal window. These methods are highlighted in Table 9-1.
Table 9-1. Visual Collection Methods
|
Method |
Description |
|---|---|
|
SelectedItem |
Gets or sets the record that is currently selected in the visual collection |
|
AddAndEditNew |
Adds a new record to the visual collection and opens a modal window to edit it. You can optionally supply a completeAction argument. This specifies a method that runs when the modal window closes. |
|
AddNew |
Adds a new record to the visual collection |
|
EditSelected |
Opens a modal window for the currently selected item |
|
DeleteSelected |
Marks the currently selected record for deletion and removes it from the visual collection. The actual deletion happens when the data workspace is saved. |
Setting the Screen Title in Code
You can access your screen’s title in code through the DisplayName property. Listing 9-2 shows how to set the screen title to “Engineer Dashboard” in code. The ability to access the screen title in code means you can set the value dynamically. For example, you could append a count of outstanding issues to the screen title.
Listing 9-2. Setting the screen title in code

Figure 9-6 shows the screen tab title at runtime. In addition to the DisplayName property, a useful method you can call is the SetDisplayNameFromEntity method. This allows you to pass in an entity and to set the screen title using the summary property of the entity you supply. By default, LightSwitch uses this method on any screens you create based on the Details Screen template.
![]()
Figure 9-6. Setting the screen title in code
Setting Default Screen Values
On data-entry screens, you can help users by setting default values. To set the value that’s shown on a control, you would set the value on the underlying property.
To demonstrate this technique, let’s modify the New Issue screen so that it sets the target end date to three days after the current date, and set the Priority field to medium.
Setting the target end date is relatively straightforward. However, setting a default priority value is a bit more complex, because priority is a related property. In code, it’s not possible to set the priority value by simply setting a string value of medium. Priority is a related item, so it’s necessary to assign an object that represents a medium-priority object in code. Therefore, you need to create a query that returns a single “Medium” priority object. To do this, create a query by right-clicking the Priority table in Solution Explorer and selecting the Add Query item. Name this query PriorityMedium. In the query designer, create a filter to return the record that matches the description “medium” (Figure 9-7). Make sure to configure your query so that it returns just a single record.

Figure 9-7. Creating a query to return a medium priority
After you create your query, open the Create New Issue screen in the designer. Click the Add Data Item button and add the PriorityMedium query to your screen. Next, click the Add Code button and add the code from Listing 9-3 to the InitializeDataWorkspace method.
Listing 9-3. Setting default control values

Once you add this code, you can run your application. You’ll now find that the New Issue screen sets default values for both the Priority and Issue Date controls.
Navigating Screens
Screen navigation plays an important role in all applications. Typical applications allow users to open child screens and to pass values between screens. Figure 9-8 highlights the navigation section in the Dashboard screen, which contains a set of navigation links. In this section, I’ll describe how to add these types of links to your application.

Figure 9-8. Engineer Dashboard screen
Opening Screens from Buttons or Links
In Chapter 4, I showed you how to create navigation links that open child screens by adding a label and setting the Target Screen property to the name of the screen you want to launch. Although this technique is simple and requires no code, there are some disadvantages. First, this technique only really works on labels inside a data grid. The screen designer grays out the “show as link” option on labels outside of a grid. The second problem is that the label text must bind to data, so it’s therefore difficult to alter the text that the label shows. To overcome these limitations, let’s explore a code technique you can use to open screens without using labels.
To create a link or button, select a group container such as a rows command and choose the right-click option to add a button. After you add the button, you can use the properties sheet to change the control to a link (Figure 9-9).

Figure 9-9. Creating a screen command and link
Although it’s fairly simple to add a button or link, the actual screen layout takes a bit of effort. Figure 9-10 shows you what this layout looks like at design time compared with how it looks at runtime. Notice how the layout defines sets of groups, each containing one command. To make sure that all your links line up, make sure that the horizontal alignment settings are all set to left, rather than stretch.

Figure 9-10. Laying out your screen
Laying out controls at design time is difficult, because you can’t visualize how the screen will appear. As I mentioned in Chapter 4, the trick to effective layout design is to use the runtime screen designer. This enables you to change the appearance settings and to see immediately the effect that it has on your running screen.
Once you create your button, you can double click it in the screen designer to open the code window. Here, you can write code that uses the Show methods of the Application object to open your screens.
Another area where you may want to open screens is through a cell on a data grid. As I mentioned earlier, the difficulty with using a label is that the display text binds to a property, which means that you can’t display static text on the label.
The way to get around this problem is to use a grid-row button. In the designer, expand the Command Bar group in the Data Grid Row and click on the Add button to add a new button.
Figure 9-11 shows an example Engineer screen that’s used by managers. This is a simple screen that’s based on the Editable Grid Screen template. This screen includes two links on the right side of the grid that allow a manager to view the dashboard and time-tracking screens for an engineer. This highlights how you can apply the static text “View Dashboard,” rather than binding to a data property on the underlying data source.

Figure 9-11. Adding command buttons on a grid
The code that opens the dashboard screen is shown in Listing 9-4. Notice how the code uses the SelectedItem property of the visual collection to return the ID of the engineer in the selected row.
Listing 9-4. Opening screens from a data grid command

Adding Unbound Auto-Complete Boxes
The Engineer Dashboard screen screenshot contains a Quick Search feature that engineers can use to quickly find and open issue records through an auto-complete box.
To create this feature, the first step is to add an auto-complete box that’s unconnected with the main data on your screen. There are many scenarios in which it is very useful to add auto-complete boxes to a screen. For example, it can be useful to add one to a custom Search screen to make it easier for users to select search criteria.
Just like in the string property example, you can add additional data controls by using the Add Data Item button. To add an auto-complete box that shows issues, select Issue from the Type drop-down box and name your property IssueSelectionProperty. Next, drag your IssueSelectionProperty from the screen member list onto your screen content tree.
By default, your auto-complete box will search all records in the issue table. If you want to restrict the auto-complete box choices, create a query on the issue table and apply some filters. Add the query to your screen through the Add Data Item dialog and set the choices property of your auto-complete box to the name of the query through the properties sheet.
Finally, to use this auto-complete box to open issue records, you can add a button to your screen called Open Issue and add the code that’s shown in Listing 9-5. This code opens the selected issue in the default screen by calling the ShowIssueDetail method and passing the issue ID of the IssueSelectionProperty.
Listing 9-5. Opening screens from an unbound drop-down

Refreshing All Open Screens
It’s possible to write code that refreshes all open screens in an application. The code that carries out this task is shown in Listing 9-6.
Listing 9-6. Refreshing all open screens

This code uses the Application object’s ActiveScreens ![]() collection to find all open screens. It then calls the Refresh method
collection to find all open screens. It then calls the Refresh method ![]() on each screen. This code involves some complexity, as it needs to call the Refresh method on the same thread that owns the screen. The threading code
on each screen. This code involves some complexity, as it needs to call the Refresh method on the same thread that owns the screen. The threading code ![]() invokes the logic on the correct thread, and I’ll explain how this works in the “Working with Threads” section.
invokes the logic on the correct thread, and I’ll explain how this works in the “Working with Threads” section.
Passing Arguments into Screens
With LightSwitch, you can supply arguments when you open a screen by defining screen parameters on the target screen. This is a useful feature, because you can use this technique to pass values between screens.
To demonstrate this technique, this example shows you how to add an engineer parameter to the Create New Issue screen. This example shows how to default the engineer to the argument that the code supplies when the screen opens.
To create this example, open the Create New Issue screen, click the Add Data Item button, add a local property of type integer, and name your property EngineerIDParam. To configure the EngineerIDParam property as a parameter, select the engineer EngineerIDParam and check the “Is Parameter” checkbox, as shown in Figure 9-12. You can also make parameters optional by unchecking the “Is Required” checkbox.
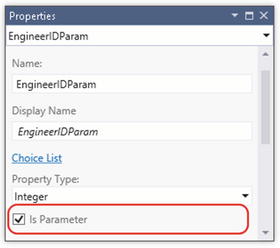
Figure 9-12. Defining screen parameters
To build the logic in the Create New Issue screen that sets the default assigned engineer for the new issue, add the code seen in Listing 9-7 to the InitializeDataWorkspace method of your screen. This code performs a query that looks up the required engineer by ID value. It does this by calling the SingleOrDefault method and supplying the engineer ID value. The code then sets this engineer to the AssignedEngineer property of the new issue record.


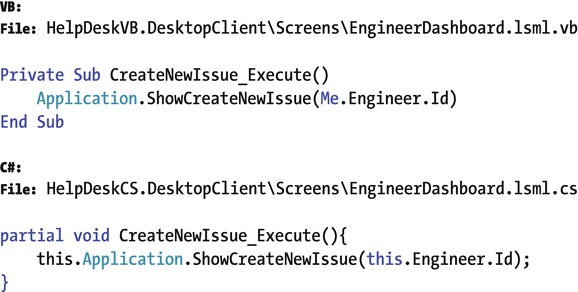
To pass an engineer to the Create New Issue screen, you can simply call the screen’s show method and provide the engineer ID that you want to use (Listing 9-8). The code in this listing shows how you would do this from a button on the Engineer Detail screen.
If you want to add multiple parameters to a screen, it’s important to recognize the correct sequence in which to supply the arguments. You can easily determine this in the code editor, because IntelliSense shows you the correct order in which to supply the screen arguments.
Listing 9-8. Passing arguments when opening a screen
Showing MessageBox and InputBox alerts
If you want to show an alert or prompt the user to confirm an action, call the ShowMessageBox method. Listing 9-9 demonstrates this method.

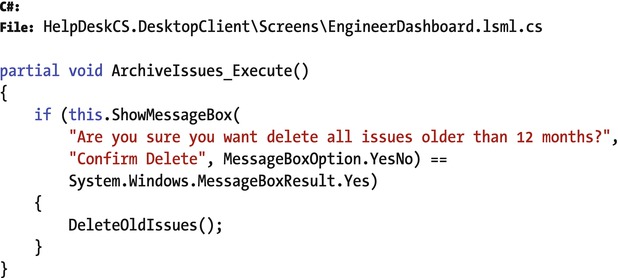
This code sample refers to a feature that enables a user to delete records. The ShowMessageBox method includes parameters to set the message, caption, and buttons that appear in the message box. The return value allows you to control the logic flow in your application. In this example, the code calls a user-defined method called DeleteOldIssues when the user clicks “yes.”
If you want to open a dialog that a user can use to enter text, use the ShowInputBox method rather than the ShowMessageBox method. Figure 9-13 shows how these dialog boxes look at runtime.

Figure 9-13. ShowMessageBox and ShowInputBox dialogs
![]() Tip Make sure not to confuse the screen object’s ShowMessageBox method with the MessageBox.Show method that belongs in the System.Windows.MessageBox namespace. It’s easy to make this mistake if you rely on the IntelliSense suggestions. The MessageBox.Show method may raise a cross-thread access exception at runtime when you call it.
Tip Make sure not to confuse the screen object’s ShowMessageBox method with the MessageBox.Show method that belongs in the System.Windows.MessageBox namespace. It’s easy to make this mistake if you rely on the IntelliSense suggestions. The MessageBox.Show method may raise a cross-thread access exception at runtime when you call it.
Working with Controls
In this section, I’ll provide a more in-depth explanation of how to access controls with code. I’ll show you how to toggle the visibility of controls, set the focus to a control, and obtain references in code in order to set other attributes and to handle events.
There are two ways to access a screen control. You can use the FindControl method to access the view model, or you can access the actual underlying Silverlight control. I’ll explain both techniques.
Finding Controls Using FindControl
The key to working with controls is to use the FindControl method. This returns an object of type IContentItemProxy, which represents LightSwitch’s View-Model object. The IContentItemProxy members that you can access are shown in Table 9-2.
Table 9-2. IContentItemProxy Methods and Properties
|
Methods/Properties |
Description |
|---|---|
|
Focus |
Sets the focus to the control |
|
DisplayName |
Allows you to change the display name of your control. The screen uses the display name to set the label text. |
|
IsEnabled |
The control is disabled if this is set to false. The control will still be visible, but is grayed out. |
|
IsReadOnly |
If set to true, the control becomes read-only, and the user won’t be able to edit the contents of the control. |
|
IsVisible |
The control will not be visible if this is set to false. |
|
SetBinding |
You can call this method to carry out data binding. |
As you can see, there are several useful properties that you can access, such as the IsVisible and IsEnabled properties. A related method is the FindControlInCollection method. This enables you to obtain an IContentItemProxy reference to a control that belongs inside a data grid. You’ll see an example of how to use this method later on.
Setting the Focus to a Control
By using IContentItemProxy’s Focus method, you can set the focus to a specific control. Listing 9-10 shows how to set the focus to the Problem Description field on a New Issues Data Entry screen.
Listing 9-10. Setting the focus to a control

The FindControl method requires you to supply the name of the control. If your code doesn’t work, double check the name you are passing into this method. Because you can add multiple controls that bind to the same property on a screen, the control that you want to use might not match the name of your property. For example, your control might be named ProblemDescription1 if you add more than one problem description control onto your screen. You can determine the correct control name by checking the name setting in the properties sheet.
Hiding and Showing Controls
A useful property that the IContentItemProxy object exposes is the IsVisible property. You can use this property to show and hide controls in code.
To demonstrate how to use this property, this example shows you how to organize the Issue Detail screen by moving the issue closure controls into a separate group. To help simplify the view of this screen for users, you can hide these controls and add a button that will make them visible. By reducing the number of visible controls on the screen, you can make better use of the available screen space. Here are the steps to follow this example:
- Create a rows layout called ClosureGroup. In the properties sheet, set the Is Visible property to false.
- Add a new button to your screen and name your button ToggleVisibility. Set the Display Text property of this button to “Show Closure Details.”
- Move the controls that relate to issue closure into your new group. The layout of your screen should now appear as shown in Figure 9-14.

Figure 9-14. Hiding and showing controls
In the screen layout that’s shown in Figure 9-14, notice how I added the ToggleVisibility button to a container rows layout called “button container.” This is a screen-design trick that allows you to left align buttons (or specific sections of a screen) by applying the alignment setting to a specific group layout.
Now, add the code shown in Listing 9-11. Notice how this uses the FindControl method to toggle the visibility of the rows layout that contains the closure controls ![]() , and also sets the display text of the button depending on the mode selected
, and also sets the display text of the button depending on the mode selected ![]() .
.


You’re now ready to run your screen. Figure 9-15 shows how this looks at runtime. As the image shows, the ToggleVisibility button allows the user to hide and show the controls that relate to the closure of an issue.

Figure 9-15. Clicking the button toggles the visibility of the closure details group
Making Checkboxes Read-Only
The properties sheet for a checkbox control doesn’t include a setting to set the control to read-only. On a read-only screen, users can often interpret Boolean values more clearly through a checkbox control, rather than through a label that reads true or false.
Fortunately, you can make checkboxes read-only by writing code. In this example, I’ll show you how to disable the active checkbox on an Editable Grid screen. (In our data schema, the active property stores whether or not the engineer is actively employed). To recreate this example, add the code from Listing 9-12 to the InitializeDataWorkspace method of your screen.
Listing 9-12. Making checkboxes read-only

Because you need to make each checkbox in every row of your data grid read-only, the code begins by looping through the Engineers collection ![]() . It obtains an IContentItemProxy object for each engineer in the collection by calling the FindControlInCollection method and supplying an engineer object. It disables the checkbox by setting the IsEnabled property to false
. It obtains an IContentItemProxy object for each engineer in the collection by calling the FindControlInCollection method and supplying an engineer object. It disables the checkbox by setting the IsEnabled property to false ![]() .
.
Referencing the Underlying Silverlight Control
Although you can use the IContentItemProxy object to set the visibility, focus, and read-only state of a control, there are many other control attributes you can’t access through this technique. To gain access to further control attributes, you need to reference the underlying Silverlight control. To demonstrate how to access the attributes of a label control, this example shows you how to set the color of a label to red. In the context of the sample Help Desk application, you can use this technique to conditionally set an issue count label to red if it exceeds a threshold level.
Accessing the underlying Silverlight control requires you to first use the FindControl method to return an IContentItemProxy object. This provides you with two ways to access the Silverlight control. You can either handle the ControlAvailable event or data bind your screen properties to dependency properties on your control by calling the SetBinding method. In this example, I’ll show you how to use the ControlAvailable method. Developers most often use the SetBinding technique to add custom controls to a screen, and I’ll describe this technique further in Chapter 13.
Let’s assume you add a label to your screen called IssuesOverdueLabel and want to set the foreground color to red. Listing 9-13 shows the code you would add to the InitializeDataWorkspace method of your screen in order to accomplish this.
Listing 9-13. Referencing a control using ControlAvailable

When you handle the ControlAvailable event, you can access the underlying Silverlight control through the ControlAvailableEventArgs parameter.
Because LightSwitch labels are rendered as Silverlight text blocks, you can simply declare a variable and cast IssuesOverdueLabel to an object of type System.Windows.Controls.TextBlock ![]() . This allows you to access all of the text-block properties in code and enables you to set the foreground color
. This allows you to access all of the text-block properties in code and enables you to set the foreground color ![]() .
.
If you want to access a LightSwitch control in code but don’t know what the underlying Silverlight type is, here’s how to find out: handle the ControlAvailable event, set a break point in this method, and query e.Control.GetType() in the immediate window. The result will show what the underlying type is.
As the name suggests, LightSwitch fires the ControlAvailable event when the control becomes available. This means that when you write code that handles this event, you won’t encounter any errors that might occur if you try to access the control too early.
Handling Silverlight Control Events
When you write code in the ControlAvailable method, you can also add event handlers to handle the events that the Silverlight control raises.
To give you an example of the sort of events you can handle, Table 9-3 shows you some of the events that the Silverlight textbox control raises. There are many more events you can use. This table only shows a subset, but it hopefully gives you an idea of the sort of events you can handle.
Table 9-3. Events Raised by the Silverlight Textbox Control
|
Event |
Description |
|---|---|
|
GotFocus |
Occurs when the textbox receives the focus |
|
KeyDown |
Occurs when a keyboard key is pressed while the textbox has focus |
|
KeyUp |
Occurs when a keyboard key is released while the textbox has focus |
|
LostFocus |
Occurs when the textbox loses focus |
|
SelectionChanged |
Occurs when the text selection has changed |
|
TextChanged |
Occurs when content changes in the textbox |
To give a practical demonstration of how you can utilize Silverlight events, the following example shows you how to add a feature to a textbox control. This feature keeps a running count of the number of characters that a user enters into the textbox. In the context of the sample Help Desk application, we can apply this to the Issue Response screen—a screen that engineers can use to respond to users. The response text is limited to 1000 characters, and by using this feature users can easily see the number of remaining characters they can enter into the textbox.
Create a new screen based on the Issue Response table, add a new local integer property called ResponseTextCount, and enter the code shown in Listing 9-14.


When the screen first loads, the code in the InitializeDataWorkspace method adds an event handler called TextBoxAvailable to handle the ControlAvailable event of the ResponseText textbox ![]() . This intial code also intitializes the ResponseTextCount property value to 1000.
. This intial code also intitializes the ResponseTextCount property value to 1000.
When the ResponseText control becomes available, the code adds an event handler called TextBoxKeyUp to handle the KeyUp event of the control ![]() .
.
The TextBoxKeyUp method runs whenever the user types a character into the response textbox and recalculates the number of remaining characters ![]() . Figure 9-16 illustrates how this screen appears at runtime.
. Figure 9-16 illustrates how this screen appears at runtime.

Figure 9-16. Screen shows the number of remaining characters
Working with Threads
So far, you’ve seen a few examples of code that includes threading syntax. I’ll now explain how this works in more detail.
LightSwitch desktop applications are multi-threaded. This means that the application can perform multiple tasks at the same time, which results in better use of resources and a more responsive user interface.
Although each thread provides an independent execution path, threads are not completely isolated from one another. The threads in a LightSwitch application can share data and memory. This explains why multi-threading is so useful. In a LightSwitch application, one thread can fetch data from the data service while another thread updates the UI as soon as the data arrives.
You can categorize threads into two distinct types: UI threads and worker threads. UI threads are responsible for creating and controlling UI elements, whereas worker threads are generally responsible for carrying out long-running tasks, such as fetching data.
Multi-threaded applications start with a single thread (the main thread) that the operating system and CLR (the .NET Common Language Runtime) creates. LightSwitch creates additional threads off of the main thread, and your application thus becomes multi-threaded.
You can execute user code that has been written in LightSwitch in one of three threads. Certain tasks will work only on a specific thread. If your code attempts to run code on the wrong thread, you’ll receive a runtime exception.
From a practical perspective, the key point to understand is that you must run code on the correct thread. .NET threading is a complex topic and is beyond the scope of this book. But to help you choose the correct thread, here are three simple rules to follow:
- UI Rule – You must execute any code that interacts with the user on the UI thread. If you try to perform UI tasks on a worker thread, you’ll get an exception.
- Thread Affinity Rule –Silverlight objects and controls inherit from the DependencyObject class. Because of this, these objects have thread affinity—only the thread that instantiates the object can subsequently access its members. If you try accessing these members from a different thread, you’ll get an exception.
- Worker Thread Rule – If you want to perform data-access or long-running tasks, you should carry out this work on a worker thread. If you carry out this work on the UI thread, you’ll make your application unresponsive. This means that it’ll be slow to respond to keystrokes and mouse clicks, or might freeze for long periods of time.
Figure 9-17 illustrates the threads that make up a LightSwitch application. Your application starts execution on a main UI thread. The main thread spawns an application thread, which is responsible for opening screens and performing global logic that isn’t associated with any specific screen. The code in your Application class executes in this thread. You’ll find the file in the folder DesktopClientUsercode.

Figure 9-17. Threads in a LightSwitch application
Each screen in a LightSwitch application also has its own worker (or logic) thread. By default, LightSwitch executes any user code that you write on the screen’s logic thread. For example, if you click on the Write Code button and then write some code in the screen’s created method, or write some custom code that handles the click of a button, that code will execute on the screen’s logic thread. This is good news, because you don’t need to worry about doing something that could freeze your UI.
If you need to run some code that updates your UI, you’ll need to execute that code on the main UI thread. To do that, you would use a Dispatcher object. The syntax that allows you to reference the three threads is as follows:
- Main Dispatcher (UI thread) – Microsoft.LightSwitch.Threading Dispatchers.Main
- Application Dispatcher (Application thread) – Application.Details.Dispatcher
- Screen Dispatcher (Screen Logic thread) – Screen.Details.Dispatcher
The Dispatcher object includes a method called BeginInvoke. You can call this method to define the code that you want to execute asynchronously on the thread. This means that the calling code carries on executing, and the code that you want to invoke will be queued for execution.
Asynchronous code execution is very useful, but depending on the feature you want to build, synchronous code execution may be more suitable. It’s not too difficult to achieve this with LightSwitch. By adding an imports (VB) or using statement to the Microsoft.LightSwitch.Threading namespace at the start of your code file, you can access an extension method through the dispatcher object called Invoke. Unlike the BeginInvoke method, the Invoke method executes your code synchronously, and the calling thread will wait for completion before it continues. By calling Invoke rather than BeginInvoke, you can block your application while your code runs; LightSwitch shows an hourglass to the user during this process. A very important caveat is that you should never call the Invoke method from the UI thread. You will deadlock your application if you do this. Therefore, you should only ever call this method fromt the application or screen logic threads.
The benefit of calling Invoke is that in some scenarios you might want your application to show a “wait state” in order to provide a positive indication that your process is in progress. Also, Invoke makes it easier for you to handle any return values from the code that you invoke, and can simplify any error-handling code that you want to write.
Finding Out Which Thread Your Code Is Executing On
When you debug a piece of code, it’s useful to know what thread your code belongs to. You can find this out by querying the dispatcher’s CheckAccess method in the immediate window (see Figure 9-18).

Figure 9-18. Checking what thread your code runs on
This figure highlights a breakpoint on a line of code in the InitializeDataWorkspace method. This illustrates that when you query the CheckAccess method on the Main and Application dispatchers, the result is false. This indicates that the code isn’t executing on any of those two threads. When you query the CheckAccess method on the screen-logic dispatcher, the result is true. This confirms that the code executes on the logic thread.
Understanding When to Execute Code on a Different Thread
The previous section highlighted an important characteristic about threading—you must execute any code that updates your UI on the main UI thread. You also learned that, by default, LightSwitch executes any screen code that you write on the logic thread. Given these two conflicting conditions, you might imagine that for any display-related task, you need to manually invoke your code on the UI thread. Thankfully, this isn’t the case. In the vast majority of situations, LightSwitch takes care of updating your UI without your needing to write any custom threading code. This section will show you how this works technically.
Earlier in this chapter, I showed you how to use the FindControl method to return an IContentItem object to help set UI-related properties, such as DisplayName, IsVisible, and IsEnabled. An IContentItem object represents the view model for a data item, and a screen consists of controls that data-bind to your view model. So, if you hide a control by setting the IsVisible property to false, you actually will not interact directly with the UI. Therefore, there’s no need for you to write any special code that involves the UI thread.
Another interesting characteristic about LightSwitch objects is that, in most cases, you can update property values from any thread. Take a look at the code shown in Listing 9-15. This listing highlights a snippet of code in the initialize method of the Create New Issue screen.
Listing 9-15. Example of threading code

In this example, IssueProperty ![]() is a local screen property. This code demonstrates that you can set the ProblemDescription property from either the UI thread or the logic thread without LightSwitch throwing a cross-thread access exception. If you place a breakpoint in this code you can use the Immediate Window to find who owns this object by issuing the following command: ?Me.IssueProperty.Details.Dispatcher.ToString
is a local screen property. This code demonstrates that you can set the ProblemDescription property from either the UI thread or the logic thread without LightSwitch throwing a cross-thread access exception. If you place a breakpoint in this code you can use the Immediate Window to find who owns this object by issuing the following command: ?Me.IssueProperty.Details.Dispatcher.ToString
The Immediate Window returns the following result: "Microsoft.LightSwitch.Threading.BackgroundDispatcher".
This result indicates that the screen logic thread owns IssueProperty. Based on this result, you would expect the assignment operator in ![]() to work, because this code invokes the command on the logic thread. But the curious thing is this: Why does LightSwitch allow you to update the IssueDescription property on the UI thread
to work, because this code invokes the command on the logic thread. But the curious thing is this: Why does LightSwitch allow you to update the IssueDescription property on the UI thread ![]() without throwing an exception?
without throwing an exception?
The answer is that many LightSwitch objects inherit from a class called DualDispatcherObject. (You’ll find this in the Microsoft.LightSwitch.Threading namespace.) An object that inherits from this class has affinity not to just one thread, but rather to two threads: the main thread and the screen logic thread. From a practical perspective, this means you can access these objects from either thread without causing an exception. However, the act of getting or setting a property behaves differently depending on whether you call the code on the UI or the logic thread. Let’s look at the differences.
When you write code on the UI thread that tries to get the value of a property that hasn’t been loaded, LightSwitch begins to load the value asynchronously, and it immediately returns the current uninitialized value (for example, null). When the property value finally loads, it raises the PropertyChanged event to notify listeners that the property value has changed. At this point, any screen controls that bind to the property will update themselves.
When you write code on the screen logic thread that tries to get the value of a property that hasn’t been loaded, LightSwitch loads the data synchronously and blocks the execution of your code until the property loads. This behavior is acceptable, because blocking the logic thread won’t affect the responsiveness of the UI.
Given the theory I just explained, there are some practical observations you’ll notice when you run the code in Listing 9-15. If you debug the code and place a breakpoint on the line that sets the property value on the UI thread ![]() , you’ll find that this line of code succeeds. When you step over this line, LightSwitch won’t throw an exception. Here’s the interesting observation: if you use the debugger to interrogate the value just after you step over this line of code, you’ll notice that the debugger returns null (or nothing). In other words, LightSwitch hasn’t actually set the property value at that point.
, you’ll find that this line of code succeeds. When you step over this line, LightSwitch won’t throw an exception. Here’s the interesting observation: if you use the debugger to interrogate the value just after you step over this line of code, you’ll notice that the debugger returns null (or nothing). In other words, LightSwitch hasn’t actually set the property value at that point.
The reason for this is that LightSwitch won’t allow the UI thread to modify data directly, because it might cause synchronization issues. For example, if you were to run code on the logic thread that works with data, and if the UI thread were able to modify the same data halfway through the logic thread’s operation, this behavior will likely cause inconsistencies and errors in your application. To resolve this problem, the UI thread queues up any data changes on the screen logic thread. This explains why, in this instance, the debugger doesn’t immediately show the change that you make to the data.
Let’s examine the difference when you place breakpoint on the line that sets the property value on the logic thread ![]() . Once again, you can step over this line without LightSwitch throwing an exception. But if you now use the debugger to interrogate the value after you step over that line of code, the debugger will return the correct value. This shows that, in the case of code that runs on the logic thread, LightSwitch modifies properties immediately and synchronously without any delay.
. Once again, you can step over this line without LightSwitch throwing an exception. But if you now use the debugger to interrogate the value after you step over that line of code, the debugger will return the correct value. This shows that, in the case of code that runs on the logic thread, LightSwitch modifies properties immediately and synchronously without any delay.
In most cases, LightSwitch carries out the tricky job of managing threading issues for you. It’s only when you carry out some UI work that’s a bit out of the ordinary that you need to manually invoke the code on the UI thread. Here are some examples from this book where you need to do this:
- showing Silverlight file open and file save dialogs
- generating PDF files
- working with the Silverlight Web Browser control
If you forget to invoke your code on the UI thread or are unsure of when to do so, there’s no need to worry too much. You’ll soon find out, because you’ll receive an error at runtime. You can use the exception LightSwitch returns to identify the threading problem and modify your code so that it executes on the correct thread.
Reacting to Data Changes
To implement certain features in more advanced applications, you need a technique that makes your UI react to changes in your data.
LightSwitch entities implement the INotifyPropertyChanged interface and raise an event called PropertyChanged whenever the value of any property in an entity changes. To make your application react to data changes, you can handle this event and carry out any UI changes in an event handler.
Although you can achieve similar results by handling Silverlight’s LostFocus event, there are several advantages to using PropertyChanged. If you use the LostFocus technique to monitor multiple properties, you’ll need to create an event handler for each control. By using the PropertyChanged method, you need only set up one event handler, and you can use the same code to detect changes in any number of properties.
Furthermore, the LostFocus method is more fragile, because it assumes what the underlying Silverlight control will be. You can potentially break your application by changing the control type.
The example that follows shows you how to create a New Data screen based on the engineer table. This table includes properties that relate to security clearance, such as:
- SecurityVetted. Required, Boolean field.
- SecurityClearanceRef. String field.
- VettingExpiryDate. Date field.
By default, the screen will hide the security reference and vetting expiry date text boxes. When the user checks the security vetted checkbox, the screen will reveal these controls.
The PropertyChanged method works differently on screens that are based on the New Data Screen and Details Screen templates. I’ll start by describing the technique on a New Data screen.
Using PropertyChanged on a New Data Screen
To handle the PropertyChanged event for an entity on a New Data screen, create a new screen based on the engineer table. Move the security properties into a new rows layout called SecurityGroup, as shown in Figure 9-19.

Figure 9-19. Layout of the new data screen
After you create your screen, enter the code shown in Listing 9-16.


The created method defines an event handler called EngineerFieldChanged that handles the PropertyChanged event of the EngineerProperty. You need to add this event handler by using code that executes on the main UI thread ![]() . If you fail to do this, you’ll receive an error that says It is not valid to execute the operation on the current thread.
. If you fail to do this, you’ll receive an error that says It is not valid to execute the operation on the current thread.
The EngineerFieldChanged method includes a parameter of type PropertyChangedEventArgs. You can determine the name of the property that has changed by querying the PropertyChangedEventArgs’s PropertyName property ![]() .
.
If the SecurityVetted property has changed, the code calls the FindControl method ![]() to hide the group that contains the controls related to security vetting. Figure 9-20 shows how the final screen looks at runtime.
to hide the group that contains the controls related to security vetting. Figure 9-20 shows how the final screen looks at runtime.

Figure 9-20. Checking SecurityVetted unhides the security vetting group
Using PropertyChanged on a Details Screen
The code you use on a Details screen to react to data changes is different from the code you would use on a New Data screen. The reason for this is because a Details screen uses a query that returns a single record filtered by the primary-key value, whereas a New Data screen binds to a local property, rather than to a query. In order to monitor PropertyChanged on a Details screen, you need to create a local property that you can monitor.
In this section, I’ll show you how to create a Details screen that carries out the same function as in the New Data screen example. The layout of this screen is identical to the layout of the New Data screen example. Once you create the screen, add the code that’s shown in Listing 9-17.

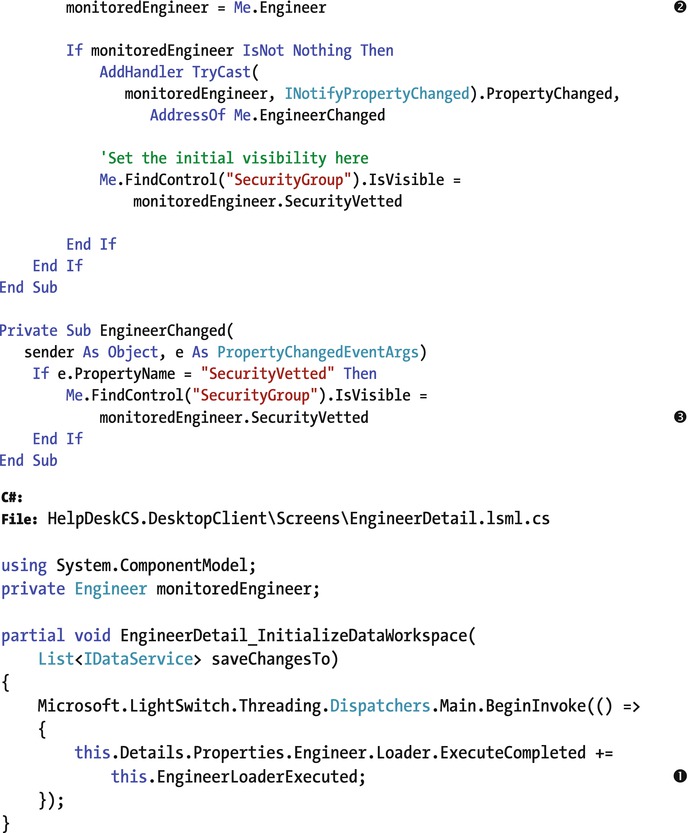

This code adds an event handler in the InitializeDataWorkspace method that handles the ExecuteCompleted event of the query loader ![]() . When the loader finishes executing the query, the code saves the engineer in a local property called monitoredEngineer
. When the loader finishes executing the query, the code saves the engineer in a local property called monitoredEngineer ![]() .
.
You can then handle the PropertyChanged event on the monitorEngineer property to detect any changes that have been made to the engineer. Just as before, the code uses the SecurityVetted property value ![]() to set the visibility of the security-vetting group.
to set the visibility of the security-vetting group.
Walkthrough: Practical Screen Enhancements
To conclude this chapter, this walkthrough will describe some practical enhancements you can apply to your application. In this section, I’ll show you how to enhance Data Entry screens, create a combined Add/Edit screen, and customize the dialogs that appear in data grids.
Creating a Continuous New Data Screen
The screens you create with the New Data Screen template behave in a specific way. When a user saves a record, LightSwitch closes the screen and reopens the record in the Details screen for your entity.
You might want to allow the user to immediately enter another record, rather than display the newly created record in a Details screen.
To make this change, open the code file for your New Data screen and delete the lines in the Saved method that close the screen and reopen the entity in the Details screen (Listing 9-18 ![]() ). To allow the entry of another new record, add a line that creates an instance of a new entity
). To allow the entry of another new record, add a line that creates an instance of a new entity ![]() .
.
Listing 9-18. Reset the New Data screen after a save

By modifying a Data Entry screen in this way, you can create a screen that works more effectively for high-volume data entry.
Designing an Add/Edit Screen
As you’re aware, you can use the Details Screen template to build a screen that enables a user to view data. For most applications, you also need to build a separate screen to enable users to create new data records. Unlike for the HTML client, the screen designer for desktop applications doesn’t include a screen template to build a combined edit and view screen.
In this walkthrough, I’ll describe a technique you can use to build a combined Add/Edit and View screen. If you want to create screens that look consistent for adding and viewing data, this technique saves you from having to carry out the same customization in two places. It’ll also make your application more maintainable, because there’ll be fewer screens to deal with in your application. Here are the steps to build a combined Add/Edit screen:
- Create a Details screen for the Issue entity and make it the default screen. Name your screen AddEditIssue.
- LightSwitch creates an ID property called IssueId. Make this optional by unchecking the “Is Required” checkbox.
- Click the Add Data Item button and add a local property of data type issue. Name this IssueProperty.
- Delete the content on the screen that’s bound to the issue query.
- Recreate the screen controls by dragging the IssueProperty property onto screen content tree. By default, LightSwitch creates IssueProperty as an auto-complete box. Change the control type to a rows layout.
Now, add the following code to the query’s loaded method, as shown in Listing 9-19.


When you create a screen that uses the Details template, LightSwitch creates a query that returns a single issue by the primary-key value. It creates a screen parameter/property called IssueId.
If all your screen controls bind to this query, your screen won’t work in Add mode. To overcome this problem, create a local issue property called IssueProperty and bind the UI controls on the screen to this property.
Then make the IssueId screen parameter optional. If the code that opens the screen doesn’t supply an IssueId value, the code sets IssueProperty to an instance of a new issue ![]() to enable the user to enter a new issue. If the code that opens the screen supplies an IssueId, the code sets IssueProperty to the issue that’s returned by the issue query
to enable the user to enter a new issue. If the code that opens the screen supplies an IssueId, the code sets IssueProperty to the issue that’s returned by the issue query ![]() .
.
Because we configure this screen as the default screen, any issue record that a user opens through a summary control will use this screen.
Just like other Data Entry screens, users can use the navigation menu to open your Add/Edit screen. Alternatively, you can add the code in Listing 9-20 to a command button so as to open your screen in Add mode.
Listing 9-20. Opening the Add/Edit screen to add a new record

![]() Tip If you find yourself repeating the same tasks during screen design, you can save yourself time in the long run by creating extensions. Chapter 20 shows you how to create a screen template extension you can use to create Add/Edit screens without your having to carry out the tasks that are shown here every time.
Tip If you find yourself repeating the same tasks during screen design, you can save yourself time in the long run by creating extensions. Chapter 20 shows you how to create a screen template extension you can use to create Add/Edit screens without your having to carry out the tasks that are shown here every time.
Customizing Data-Grid Dialogs
The data-grid control includes buttons that users can use to add and edit records. But the Data Entry screens that LightSwitch shows are auto-generated and can’t be modified (Figure 9-21)
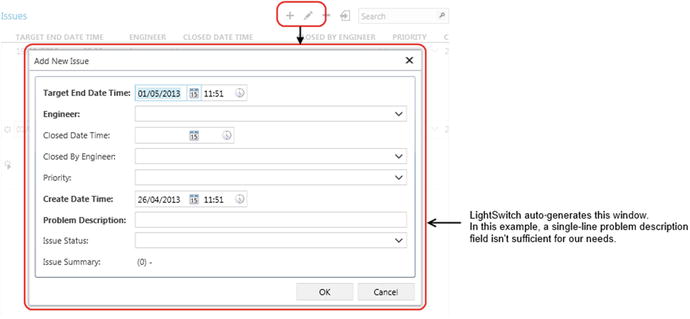
Figure 9-21. Data grid dialogs are not customizable
If you want to customize the data-entry windows that open from the data grid, remove the default Add and Edit buttons and build your own modal window.
In this walkthrough, we’ll customize the data grid on the Issue Search screen. We’ll modify the auto-generated window shown in Figure 9-22 to hide the issue-closing details, and to make the Problem Description field multi-line. As this screenshot shows, the auto-generated screen doesn’t include enough space to enter a long problem description. Here are the steps to build a custom modal window screen:
- Open an Editable Grid screen for the Issue table.
- At the root level of the screen, add a new group and change the group type to Modal Window. Name this group IssueWindow.
- Add the data items that you want to show by dragging them from the Issues > SelectedItem property onto your modal window. Make the Problem Description field multi-line by setting the lines property to a value greater than 1.
- Add an OK button to your modal window by right-clicking the modal window group and choosing the “Add Button” option. Name your button SaveItem. Add a Cancel button and call it CancelItem.
- Hide the modal window’s Show button by unchecking the “Show Button” checkbox in the properties window. You’ll open this modal window in code, so the default show button isn’t necessary.
- Delete the data grid’s Add, Edit, and Delete buttons in the command bar of your data grid.
- Create new Add, Edit, and Delete buttons in your data grid’s command bar section (name these methods AddItem, EditItem, and DeleteItem). Create their CanExecute and Execute methods.

Figure 9-22. Creating the modal window
Your screen should now look like that in Figure 9-22. Now, add the code that’s shown in Listing 9-21.


LightSwitch includes two methods you can use to work with modal windows (the OpenModalWindow and CloseModalWindow methods). Both of these methods require you to supply the name of the modal window that you want to open or close.
The Add Item button creates a new issue record by calling the visual collection’s AddNew method ![]() . After you call this method, the new issue becomes the selected item. When the code opens your modal window
. After you call this method, the new issue becomes the selected item. When the code opens your modal window ![]() it shows the new record, as the contents of the modal window are bound to the visual collection’s selected item.
it shows the new record, as the contents of the modal window are bound to the visual collection’s selected item.
The Edit button simply calls the OpenModalWindow method ![]() and displays the issue that’s currently selected in the data grid. Both the Save and Cancel buttons close the modal window by calling the CloseModalWindow methods. The Cancel button calls the DiscardChanges method
and displays the issue that’s currently selected in the data grid. Both the Save and Cancel buttons close the modal window by calling the CloseModalWindow methods. The Cancel button calls the DiscardChanges method ![]() to undo any changes that have been made to the issue. This method restores the issue to the state that it was in when the screen was first loaded. Unfortunately, it isn’t easy to undo only the changes that the user made in the modal window without writing lots of extra code.
to undo any changes that have been made to the issue. This method restores the issue to the state that it was in when the screen was first loaded. Unfortunately, it isn’t easy to undo only the changes that the user made in the modal window without writing lots of extra code.
Figure 9-23 shows how the screen looks at runtime. This is a big improvement over the auto-generated window (Figure 9-23).

Figure 9-23. Customized data-grid dialog
To extend this sample further, you can set the title of the modal window so that it shows the entity being edited. To do this, set the DisplayName property of the modal window by calling the FindControl method.
Summary
This chapter showed you how to enhance desktop applications with .NET code. In terms of where you can write code, I described the screen events you can handle and showed you how to write code that reacts to changes in data. I explained how to access properties, data collections, and screen controls in code. Other useful topics in this chapter included how to write navigation code and how to use parameters to pass values to screens.
Starting with the event model, LightSwitch raises events throughout the lifecycle of a screen. You can handle these events and write code that runs when a user loads, saves, or closes a screen. The Write Code button in the screen designer contains a drop-down you can use to handle these events.
An important principal of screen design is that all data items on a screen must bind to data properties. You can use the Add Data Item button to add properties to your screen. All available data properties on your screen are visible in the screen members list, and you can access all your data properties in code by using the name you see in the screen member list. Because data controls bind to data properties, you would modify the value of the underlying property to change the value on a screen control. To set the default value of a control for a new record, you would therefore set the value on the underlying data property.
You can use a checkbox option in the properties sheet to configure a property as a parameter. By defining screen parameters, you can write code that opens a screen and supplies values to the newly created screen. The example in this chapter describes how you can use this technique to supply default values to a new Data Entry screen.
By using the Add Data Item dialog, you can add a local entity property to your screen. Afterward, you can drag this property onto your screen to build an auto-complete box that’s unconnected with the main data on your screen. You can use this technique to provide a control that users can use to enter search criteria, or to carry out other tasks that are related to the workflow of an application.
The LightSwitch API creates methods you can call to open screens. The Application object exposes a show method for each screen in your application. You call the show method to open a specific screen. Other screen-design techniques I covered in this chapter include how to display message boxes by calling a method called show message box.
As you would expect, you can access the controls on a screen through code. Broadly, there are two techniques you can use. First, you can call a method called FindControl to return an IContentItemProxy object. By using this object, you can set the visibility, display name, and read-only properties of a control.
Once you obtain a reference to an IContentItemProxy object, you can handle an event called ControlAvailable. By handling this event, you can access the underlying Silverlight. The benefit of this is that it allows you to access the specific properties of the Silverlight control and also allows you to handle the events that the control raises. For example, you can use this technique to set the colors of a control or to handle Silverlight control events such as KeyUp or LostFocus.
In some scenarios, you may need to write code to react to changes in data. One way to use apply this technique is to cast your property to the INotifyPropertyChanged interface and to write an event handler that handles the PropertyChanged event. The code that adds the event handler must run on the main UI thread. In this chapter, I described the multi-threaded nature of LightSwitch applications. A LightSwitch application includes a main UI thread and multiple logic threads. The benefit of multiple threads is that your application is less likely to hang while carrying out long-running operations. However, you sometimes need to take care to execute code on the correct thread in order to avoid cross-thread access exceptions.
In the final part of this chapter, I described some practical code samples you can use in your application. I showed you how to create a combined Add/Edit screen. This saves you from having to maintain two separate screens for creating and editing data. I also showed you how to customize the Data Entry screens that the data-grid control opens. LightSwitch auto-generates these screens, and they often don’t render data too well. I showed you how to overcome this problem by creating your own modal windows and attaching them to buttons on your data grid.