
Chapter 3: Creating a Space Shooter
This chapter enters new territory as we begin development on our second game, a twin-stick space shooter. The twin-stick genre refers to any game in which the player input for motion spans two dimensions or axes, typically one axis for movement and one for rotation. Example twin-stick games include Zombies Ate My Neighbors and Geometry Wars. Our game will rely heavily on coding in C# to demonstrate just how much can be achieved with Unity procedurally (that is, via script), without using the editor and level-building tools. We'll still use the editor tools to some extent but won't rely on it as heavily as we did in the previous chapters.
Try to see the game created here and its related work in abstract terms, that is, as general tools and concepts with multiple applications. For your own projects, you may not want to make a twin-stick shooter, and that's fine. However, it's essential to see the ideas and tools used here as transferrable, as the kind of things you can creatively use for your games.
In this chapter, we'll learn how to create reusable components that will reduce the amount of work you need to do in the future. By configuring the camera, you'll also learn the differences between a 2D and 3D camera. And we will also learn how to generate objects at runtime, which will enable you to spawn any object you want in your own projects.
This chapter covers the following important topics:
- Creating reusable components
- Player controllers and shooting mechanics
- Basic enemy movement and AI
- Configuring a 2D camera
- Selecting and customizing particle systems
- Spawning enemies during gameplay
Now let's roll up our sleeves, if we have any, and get stuck into making a twin-stick shooter.
Technical requirements
This chapter assumes that you have not only completed the game project from the previous two chapters, but also have a good, basic knowledge of C# scripting generally, though not necessarily in Unity.
The completed TwinStickShooter project can be found in the book companion files in the Chapter03/End folder. Most assets for this game (including sound and textures) were sourced from the freely accessible site, OpenGameArt.org. Here, you can find many game assets available through the public domain or creative common licenses.
Looking ahead – the completed project
Before we start work on the twin-stick shooter game, let's see what the completed project looks like and how it works. As shown in Figure 3.1, the game will contain one scene where the player controls a spaceship that can shoot oncoming enemies:

Figure 3.1 – The completed twin–stick shooter game
The directional keyboard arrows, and WASD, move the spaceship around the level, and it will always turn to face the mouse pointer. Clicking the left mouse button will fire ammo.
Now that we have an idea of what we're aiming for, we can start the project.
Starting the project
To get started, perform the following steps:
- Create a new Unity 3D project without any packages or specific assets. Details about creating new projects can be found in Chapter 1, Exploring the Fundamentals of Unity.
Important note
The project we create in this chapter will technically be 2D; however, in an attempt to not introduce too many new topics at once, we will start with a 3D project, and configure it to our needs. We'll see that many of the items we relied on to create the collection game can just as easily be used in a 2D game.
- Create folders to structure and organize the project assets. This is very important to keep track of your files as you work. Create folders for Textures, Scenes, Materials, Audio, Prefabs, and Scripts:
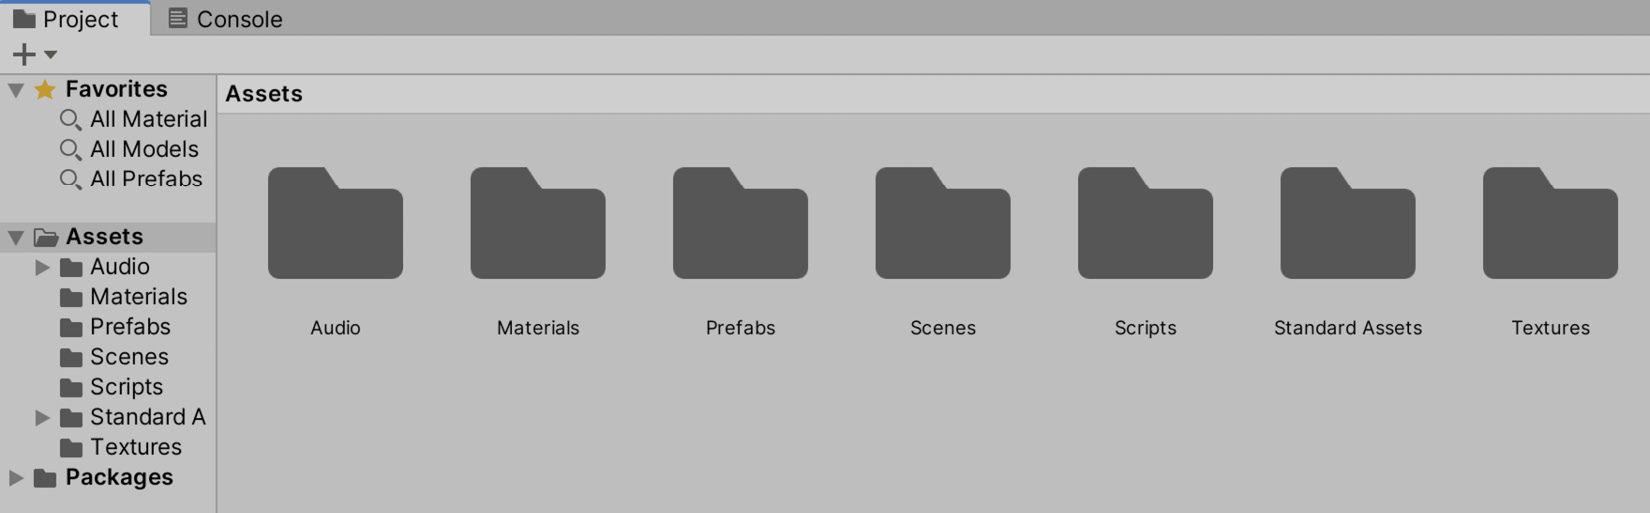
Figure 3.2 – Creating folders for structure and organization
Next, our game will depend on some graphical and audio assets. These are included in the book companion files in the Chapter03/End/Assets folder, but can also be downloaded online from OpenGameArt.org. Once they are downloaded, we can import them into the project.
Importing assets
Most projects you undertake in Unity will require external resources, and this project is no different. You will often need to import and configure sound, images, 3D models, and even other people's code, and this process will become second nature to you as you create the projects in the book.
Important note
As a reminder, when we import assets, we are making a copy of the original. During the import process, Unity will create a corresponding meta file for each asset. Please do not remove or edit this file yourself as it includes necessary import settings. For information on the import process, see Chapter 1, Exploring the Fundamentals of Unity, and Unity's online documentation: https://docs.unity3d.com/Manual/ImportingAssets.html.
In this section, we will go through how to import and configure textures and audio.
Importing textures
Let's start with textures for the player spaceship, enemy spaceships, and star-field background. Drag and drop textures from Windows Explorer or Finder to the Unity Project panel in the Textures folder. Unity imports and configures the textures automatically:
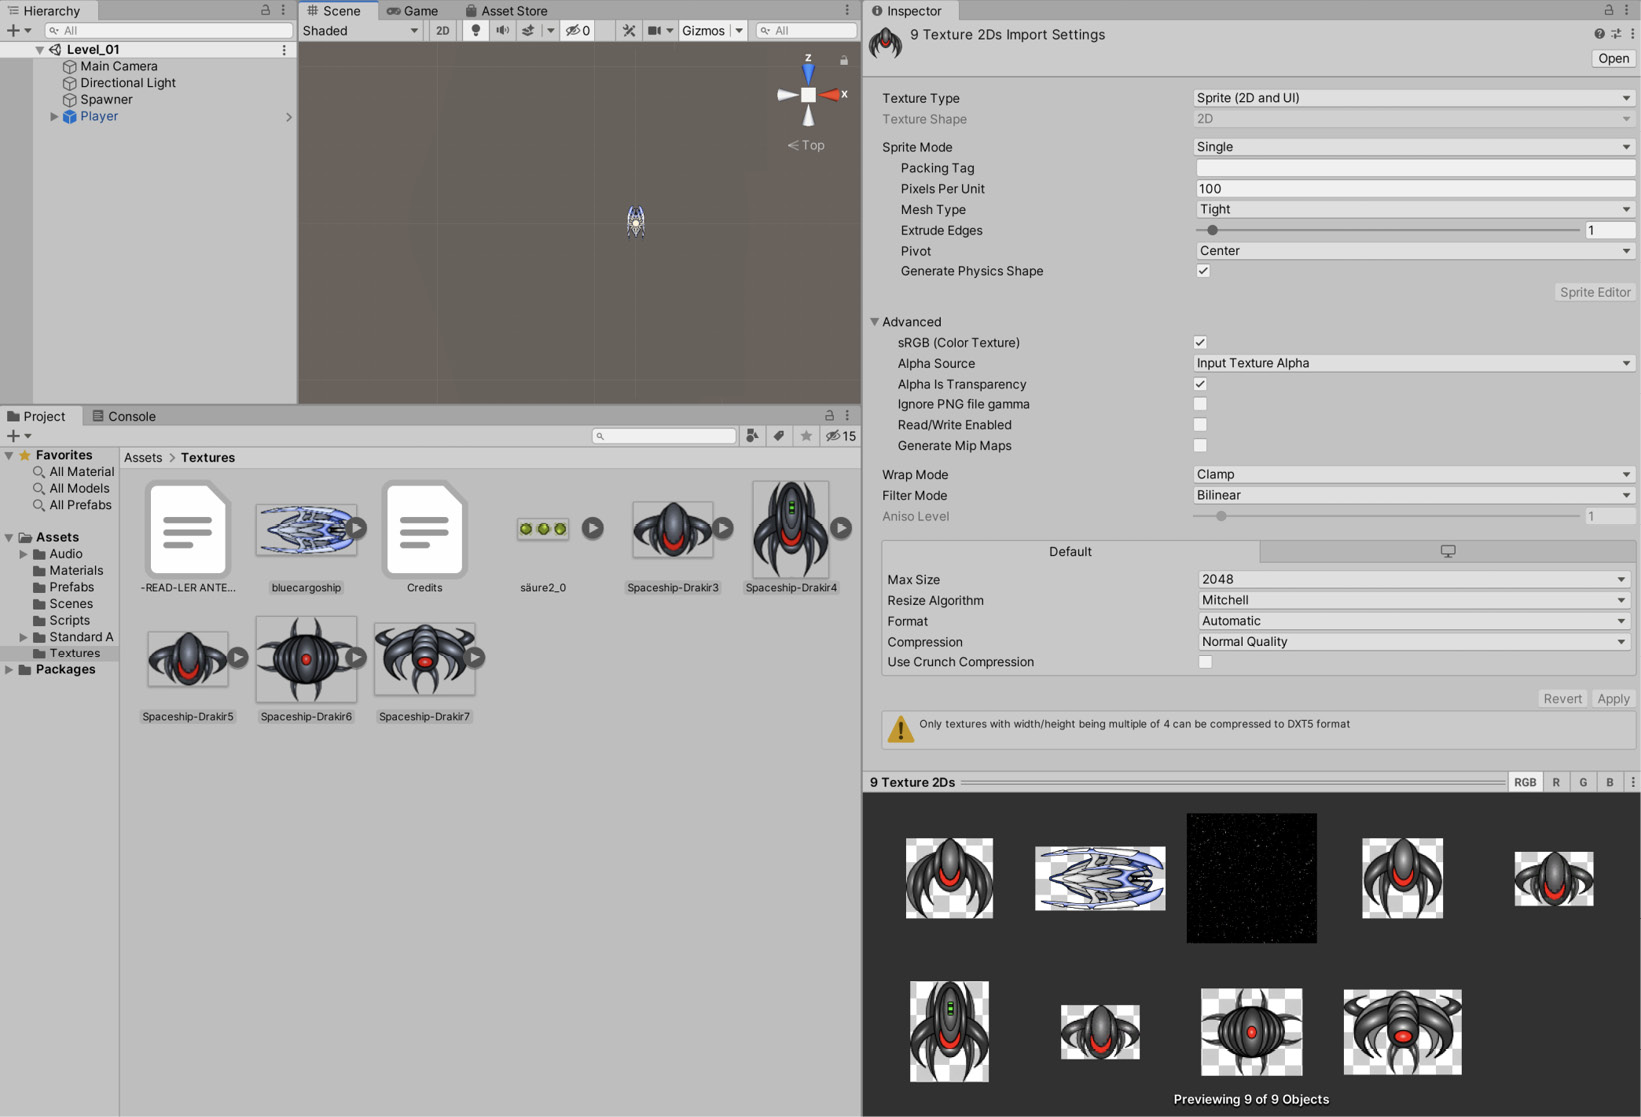
Figure 3.3 – Importing texture assets for the spaceship, enemies, star-field background, and ammo
Tip
The use of the provided assets is optional. You can create your own if you prefer. Just drag and drop your textures in place of the included assets, and you can still follow along with the tutorial.
By default, Unity imports image files as regular textures for use on 3D objects, and it assumes that their pixel dimensions are a power-2 size (4, 8, 16, 32, 64, 128, 256, and so on). If the size is not one of these, then Unity will up-scale or down-scale the texture to the nearest valid size. This is not appropriate behavior, however, for a 2D top-down space shooter game in which imported textures should appear at their native (imported) size without any scaling or automatic adjustment. To fix this, perform the following steps:
- Select all the imported textures.
- In Inspector, change the Texture Type from Default to Sprite (2D and UI).
- Click on Apply to update the settings, and the textures will retain their imported dimensions.
- Remove the checkmark from the Generate Mip Maps box if it is enabled:

Figure 3.4 – Changing the texture type for imported textures
Disabling generating Mip Maps will prevent Unity from automatically downgrading the quality of textures based on their distance from the camera in the scene. This ensures that your textures retain their highest quality. More information on 2D texture settings and Mip Maps can be found at the online Unity documentation: http://docs.unity3d.com/Manual/class-TextureImporter.html.
Important note
Later in the chapter, we will drag and drop the textures to the scene, which will add them as sprite objects. You must drag and drop them from the Project panel to the Hierarchy panel, not to the scene view. When you do this, the texture will be added as a sprite object in the scene. We'll make frequent use of this feature as we create spaceship objects.
With the textures successfully imported, we can move on to importing the audio files.
Importing audio
Music and audio effects are important. They add an extra level of immersion and, on occasion, are a core part of the gameplay experience (think Cadence of Hyrule on the Nintendo Switch). With that in mind, it's important that you familiarize yourself with the process of importing and configuring audio files.
Important note
The assets used in this section can be found in the Chapter03/End/Assets/Audio folder and were downloaded from OpenGameArt.org.
To import the audio, drag and drop the files from the folder to the Project panel. Unity will import and configure the assets. You test the audio from within the Unity Editor by pressing Play on the preview toolbar from the Inspector, as shown in Figure 3.5:
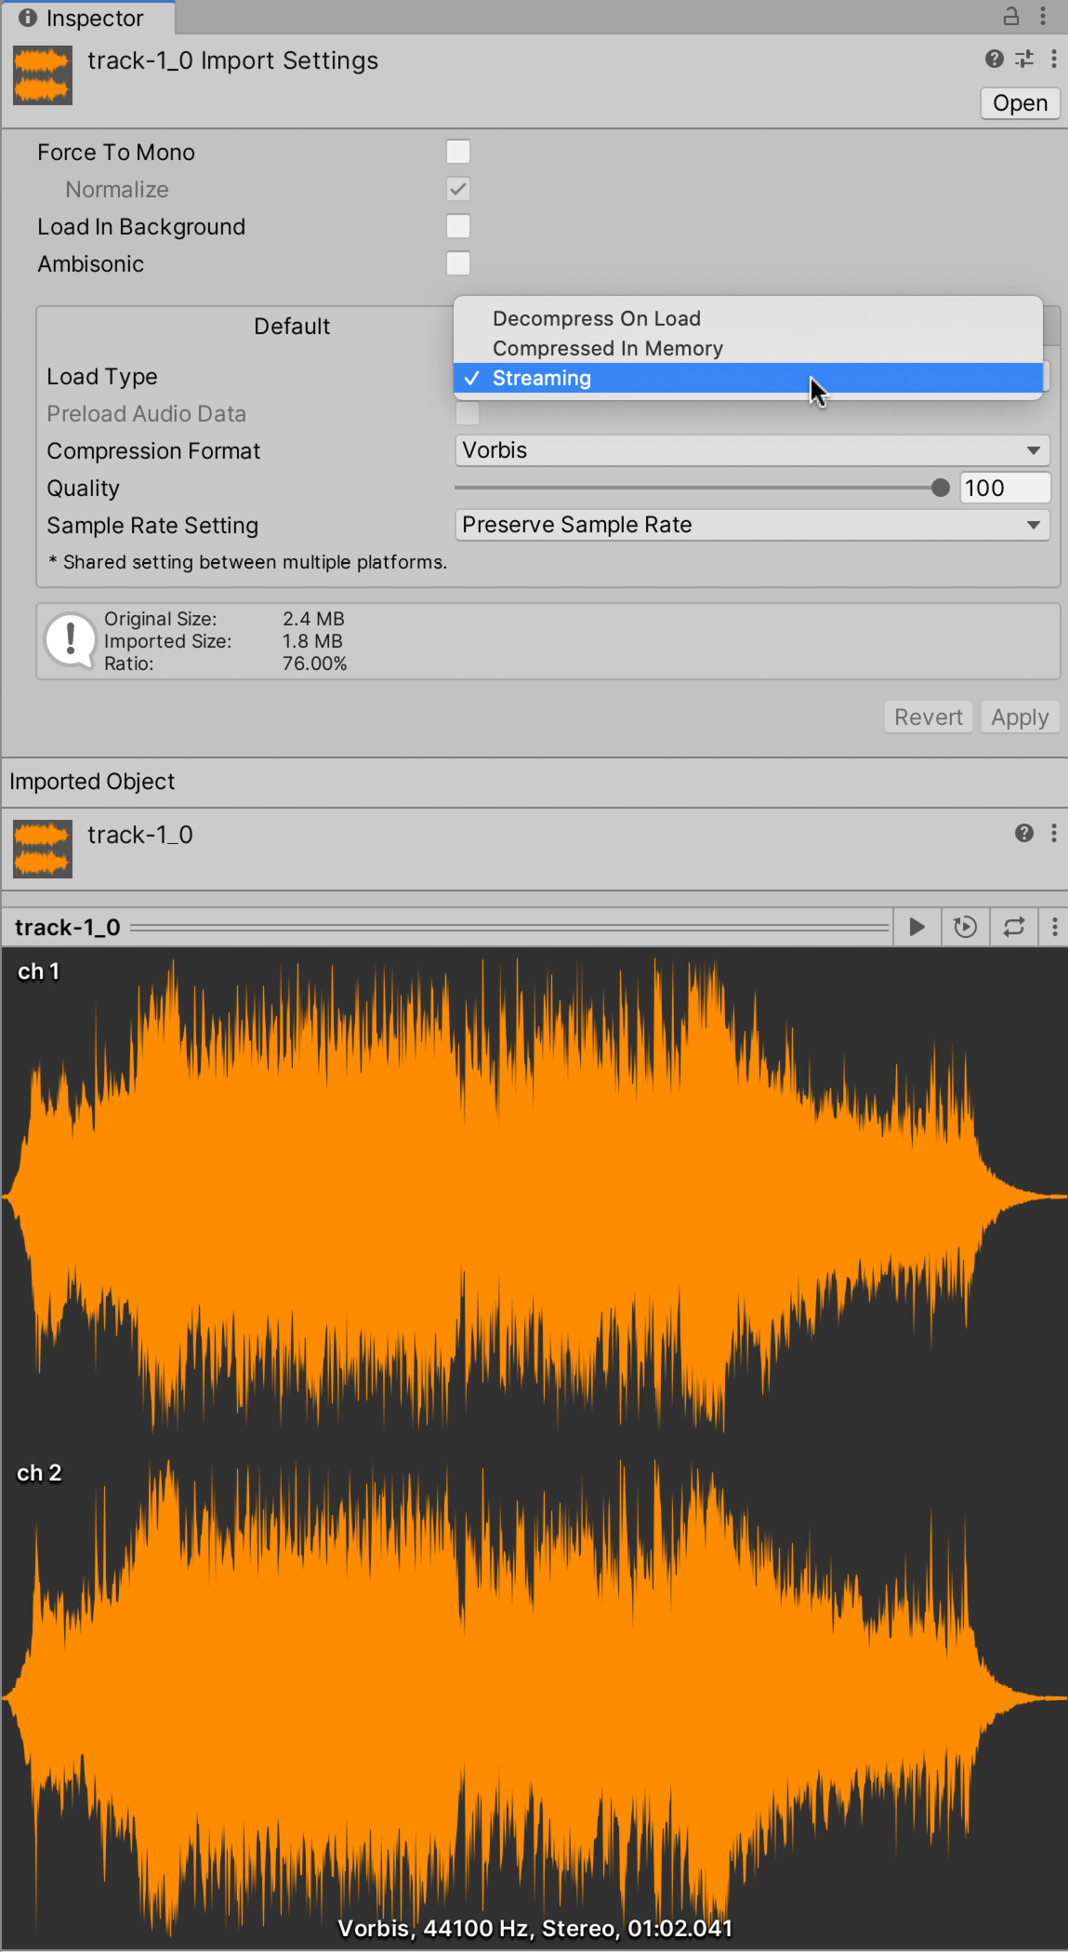
Figure 3.5 – Previewing audio from the object Inspector
As with texture files, Unity imports audio files using a set of default parameters. These parameters are typically suitable for short sound effects such as footsteps, gunshots, and explosions. However, for longer tracks such as music, they can be problematic, causing long level-loading times. To fix this, select the music track in the Project panel and, from the Load Type drop-down box, select the Streaming option, as shown in Figure 3.5. This option ensures that the music track is streamed as opposed to loaded wholly in memory at level startup.
Important note
In future projects, we won't go step by step through importing assets. However, you can always refer back to this section, and any differences will be noted.
And that's it! Both the textures and audio files required for this project are ready to use in our game. Now it is time to start creating our own assets, beginning with the player object.
Creating the player object
We've now imported most assets for the twin-stick shooter, and we're ready to create a player spaceship object. This will be the object that the player will control and move around. Creating this might seem a straightforward matter of simply dragging and dropping the relevant player sprite from the Project panel to the scene, but things are not so simple. The player object is a complex object with many different behaviors, as we'll see shortly. For this reason, more care needs to be taken when creating the player. Let's start with the GameObject, which will contain our custom components.
Creating the GameObject
The GameObject will hold all of the data and components required for our player, including position and collision data, as well as custom functionality we add through writing scripts. To create the player object, perform the following steps:
- Create an empty GameObject in the scene by navigating to GameObject | Create Empty from the application menu.
- Name the object Player.
- The newly created object may or may not be centered at the world origin of (0, 0, 0), and its rotation properties may not be consistently 0 across X, Y, and Z. To ensure a zeroed transform, you could manually set the values to 0 by entering them directly in the Transform component for the object in the Inspector. However, to set them all to 0 automatically, click on the icon with the three dots in the top-left corner of the Transform component and select Reset from the context menu:

Figure 3.6 – Resetting the Transform component
- Drag and drop the Player dropship sprite (in the Textures folder) from the Project panel to the newly created Player object in the Hierarchy panel. Dragging the texture to the player object will make it a child of the player object, which becomes the parent.
Child/parent hierarchy
In Unity, you'll often add objects as children of other objects. A child object is positioned, scaled, and rotated relative to their parent. But a parent's transform is not affected by their children, so you can move a child without moving a parent, but if you move a parent object, the child will also move.
Rotate this child object ship by 90 degrees on the X-axis, and 90 degrees on the Z-axis. This rotation orientates the sprite in the direction of its parent's forward vector. Make sure you have the child object selected and not the parent Player object:
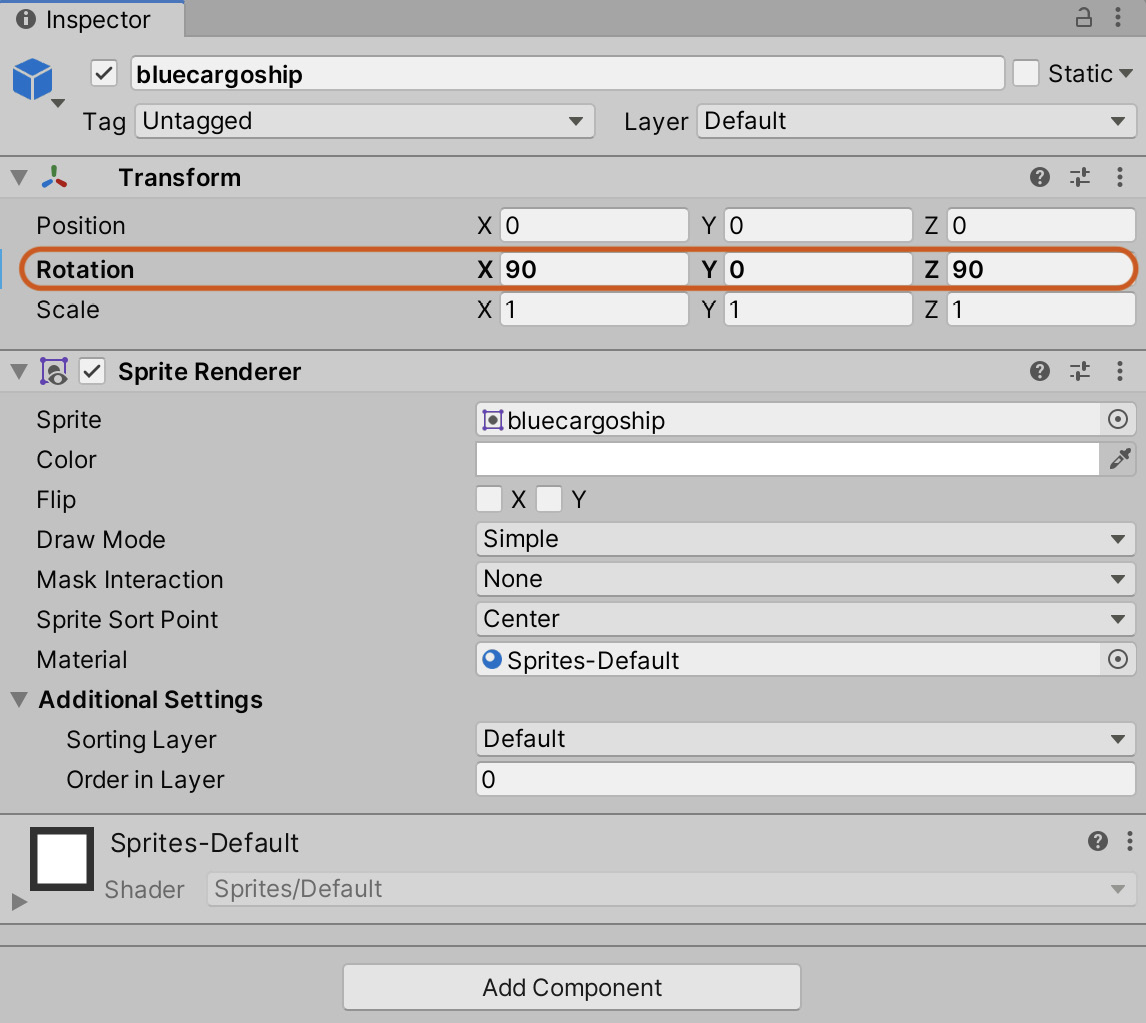
Figure 3.7 – Aligning the player ship
You can confirm that the ship sprite has been aligned correctly in relation to its parent by selecting the Player object and viewing the blue forward vector arrow. The front of the ship sprite and the blue forward vector should be pointing in the same direction. If they're not, then continue to rotate the sprite by 90 degrees until they're in alignment. This will be important later when coding player movement to make the ship travel in the direction it's looking:

Figure 3.8 – The blue arrow is called the forward vector
With the GameObject created, visible to the player, and rotated to suit our needs, it's time to add functionality by adding components.
Adding components
We'll prepare the Player object so that it is solid and affected by physical forces. It must collide with other solid objects and take damage from enemy ammo when hit. To facilitate this, two additional components should be added to the Player object, specifically a Rigidbody and Collider:
- Select the Player object (not the Sprite object).
- Select Component | Physics | Rigidbody from the application menu to add a Rigidbody.
- Select Component | Physics | Capsule Collider from the application menu to add a collider.
2D components
You may have noticed that there are 2D counterparts to the components we're adding here specifically, Rigidbody2D and Capsule Collider 2D. We'll cover them in Chapter 5, Creating a 2D Adventure Game.
The Collider component approximates the volume of the object, and the Rigibody component uses the collider to determine how physical forces should be applied. Let's adjust the capsule collider a little because the default settings typically do not match up with the Player sprite as intended. Adjust the Direction, Radius, and Height values until the capsule encompasses the Player sprite and represents the volume of the player:
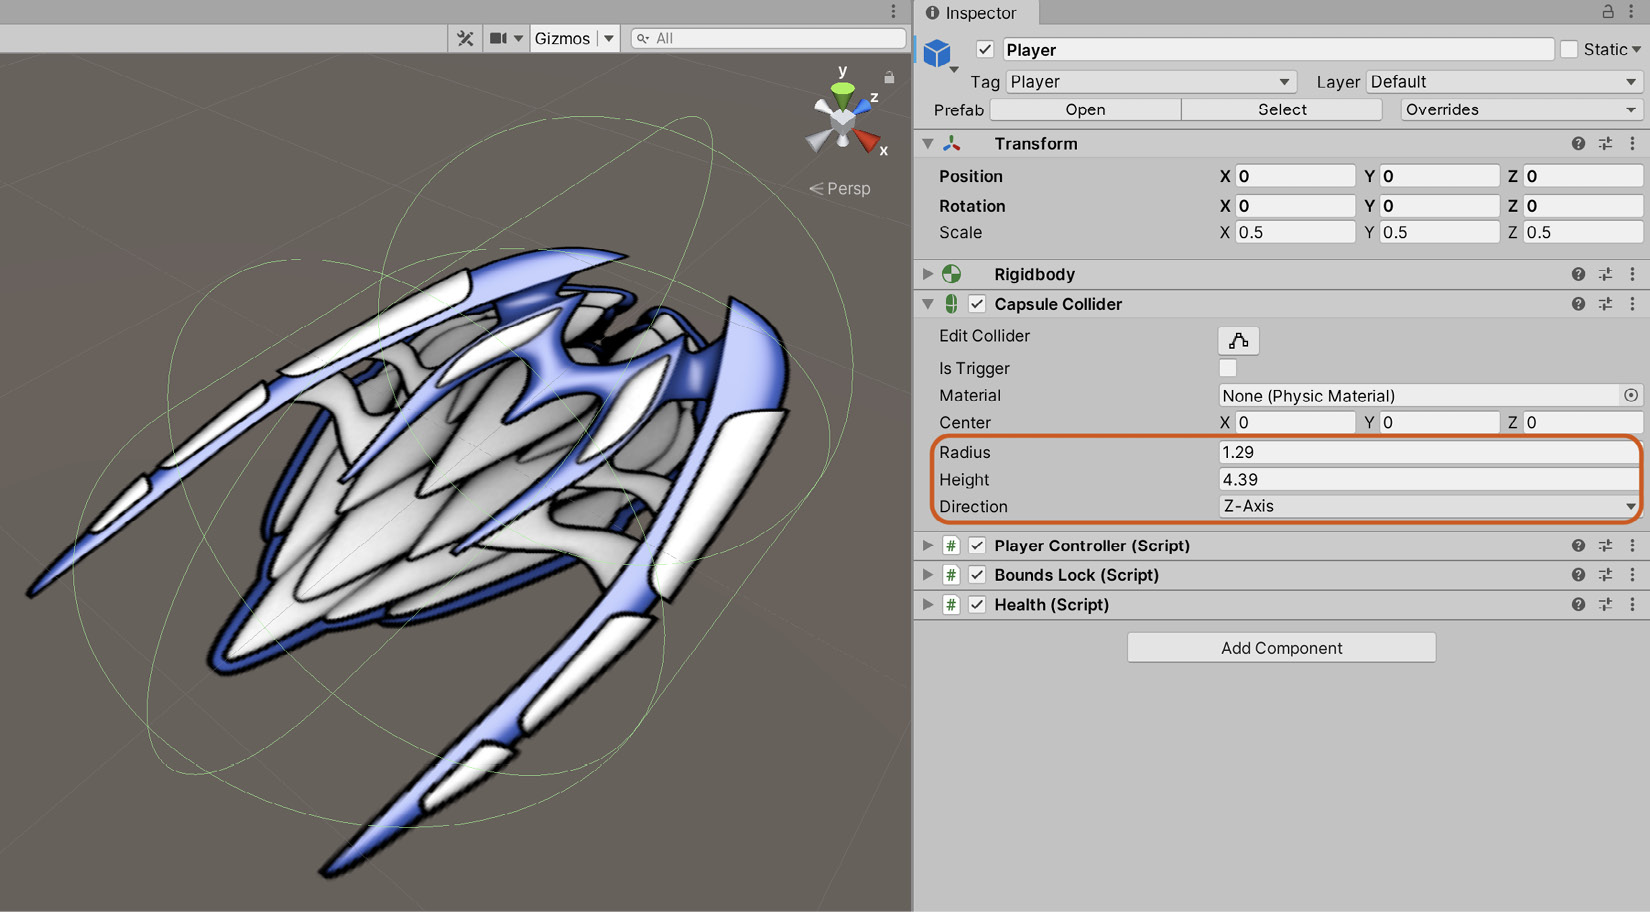
Figure 3.9 – Adjusting the spaceship capsule collider
By default, the Rigidbody component is configured to approximate objects that are affected by gravity, which is not appropriate for a spaceship that flies around. To fix this, Rigidbody should be adjusted as follows:
- Disable the Use Gravity checkbox to prevent the object from falling to the ground.
- Enable the Freeze Position Y checkbox and the Freeze Rotation Z checkbox to prevent the spaceship moving and rotating around axes that are undesirable in a 2D top-down game, as shown in Figure 3.10:

Figure 3.10 – Configuring the Rigidbody component for the player spaceship
On previewing the game thus far, the spaceship probably looks too large. We can fix this quickly by changing the scale of the Player object. I've used a value of 0.5 for the X, Y, and Z axes, as shown in Figure 3.10.
Excellent work! We've now configured the player spaceship object successfully. Of course, it still doesn't move or do anything specific in the game because we haven't added any code yet. That's something we'll turn to next by adding logic to react to player input.
Controlling the player
The Player object is now created in the scene, configured with both Rigidbody and Collider components. However, this object doesn't respond to player controls. In a twin-stick shooter, the player provides input on two axes and can typically shoot a weapon. The control scheme for our game is outlined here:
- The keyboard WASD buttons guide player movements up, down, left, and right.
- The mouse controls the direction in which the player is looking and aiming.
- The left mouse button fires a weapon.
To implement this, we'll need to create a PlayerController script file. Right-click on the Scripts folder of the Project panel and create a new C# script file named PlayerController.cs:
public class PlayerController : MonoBehaviour
{
public bool MouseLook = true;
public string HorzAxis = "Horizontal";
public string VertAxis = "Vertical";
public string FireAxis = "Fire1";
public float MaxSpeed = 5f;
private Rigidbody ThisBody = null;
void Awake ()
{
ThisBody = GetComponent<Rigidbody>();
}
}
The following points summarize the code sample:
- The PlayerController class should be attached to the Player object in the scene. It accepts input from the player and will control the movement of the spaceship.
- The Awake function is called once when the object is created and is typically used to retrieve references to objects required by the component. You cannot rely on the order in which objects receive an Awake call. During this function, the Rigidbody component (used for controlling player movement) is retrieved. The Transform component can also be used to control player movement through the Position property, but this ignores collisions and solid objects.
Now that we're retrieving the components we require, we can make use of them in the FixedUpdate function:
public class PlayerController : MonoBehaviour
{
…
void FixedUpdate ()
{
float Horz = Input.GetAxis(HorzAxis);
float Vert = Input.GetAxis(VertAxis);
Vector3 MoveDirection = new Vector3(Horz, 0.0f, Vert);
ThisBody.AddForce(MoveDirection.normalized * MaxSpeed);
ThisBody.velocity = new Vector3 (Mathf.Clamp(ThisBody.velocity.x, -MaxSpeed, MaxSpeed), Mathf.Clamp(ThisBody.velocity.y, -MaxSpeed, MaxSpeed), Mathf.Clamp(ThisBody.velocity.z, -MaxSpeed, MaxSpeed));
if(MouseLook)
{
Vector3 MousePosWorld = Camera.main.ScreenToWorldPoint(new Vector3(Input.mousePosition.x, Input.mousePosition.y, 0.0f));
MousePosWorld = new Vector3(MousePosWorld.x, 0.0f, MousePosWorld.z);
Vector3 LookDirection = MousePosWorld - transform.position;
transform.localRotation = Quaternion.LookRotation
(LookDirection.normalized,Vector3.up);
}
}
}
Let's summarize the preceding code:
- The FixedUpdate function is called once before the physics system is updated, which is a fixed number of times per second. FixedUpdate differs from Update, which is called once per frame and can vary on a per-second basis as the frame rate fluctuates. For this reason, if you ever need to control an object through the physics system, using components such as Rigidbody, then you should always do so in FixedUpdate and not Update.
- The Input.GetAxis function is called on each FixedUpdate to read the axial input data from an input device, such as the keyboard or gamepad. This function reads from two named axes, Horizontal (left-right) and Vertical (up-down). These work in a normalized space of -1 to 1. This means that when the left key is pressed and held down, the Horizontal axis returns -1 and, when the right key is being pressed and held down, the horizontal axis returns 1. A value of 0 indicates that either no relevant key is being pressed or both left and right are pressed together, canceling each other out. A similar principle applies to the vertical axis. Up refers to 1, down to -1, and no keypress relates to 0. More information on the GetAxis function can be found online at http://docs.unity3d.com/ScriptReference/Input.GetAxis.html.
- The Rigidbody.AddForce function applies a physical force to the Player object, moving it in a specific direction. The MoveDirection vector encodes the direction of movement and is based on player input from both the horizontal and vertical axes. This direction is multiplied by our maximum speed to ensure that the force applied to the object is capped. For more information on AddForce, refer to the online Unity documentation at http://docs.unity3d.com/ScriptReference/Rigidbody.AddForce.html.
- The Camera.ScreenToWorldPoint function converts the screen position of the mouse cursor in the game window to a position in the game world. This code is responsible for making the player always look at the mouse cursor. However, as we'll see soon, some further tweaking is required to make this code work correctly. For more information on ScreenToWorldPoint, refer to the Unity online documentation at http://docs.unity3d.com/ScriptReference/Camera.ScreenToWorldPoint.html.
The preceding code allows you to control the Player object, but there are some problems. One of them is that the player doesn't seem to face the position of the mouse cursor, even though our code is designed to achieve this behavior. The reason is that the camera, by default, is not configured as it needs to be for a top-down 2D game. We'll fix this shortly, but before we move away (no pun intended) from the movement code, let's add one more feature: preventing the player from moving out of the bounds of the game.
Limiting movement
As the game stands now, it's possible to move the player outside the boundaries of the screen. The player can fly off into the distance, out of view, and never be seen again. Not ideal! The player movement should be limited to the camera view or bounds so that it never exits the view.
There are different ways to achieve bounds locking, most of which involve scripting. One way is to clamp the positional values of the Player object between a specified range, a minimum, and a maximum. Consider Code Sample 3.3 for a new C# class called BoundsLock. This script file should be attached to the player:
public class BoundsLock : MonoBehaviour
{
public Rect levelBounds;
void LateUpdate ()
{
transform.position = new Vector3 (Mathf.Clamp(transform.position.x, levelBounds.xMin, levelBounds.xMax), transform.position.y, Mathf.Clamp(transform.position.z, levelBounds.yMin, levelBounds.yMax));
}
}
There's not a lot new here that we haven't seen in previous code samples, except possibly the Mathf.Clamp function, which ensures that a specified value is capped between a minimum and maximum range.
Tip
Understanding the order of execution of event functions, such as LateUpdate, is important. I outline the order of execution whenever appropriate in this book, but you can find more information here: https://docs.unity3d.com/Manual/ExecutionOrder.html.
To use the BoundsLock script, perform the following steps:
- Drag and drop the file to the Player object.
- Specify the bounds in the Inspector:

Figure 3.11 – Setting Bounds Lock
You may be wondering how I came up with those numbers. And it's a good question. I could have used trial and error by setting some initially random numbers, playing the game, refining the numbers, and repeating that process until I had the bounds precisely as I want. However, there's a far more productive way to do it by using Unity's Gizmos.
As discussed in Chapter 1, Exploring the Fundamentals of Unity, we use gizmos all the time in Unity. They add visual representations to GameObjects, imparting additional useful information that will help us develop games. Unity provides many built-in gizmos that make using the editor much easier; for example, the outline of selected objects is a gizmo, if you're using the move tool, that is also a gizmo; even the green outline of a collider is a gizmo. This list goes on, and not only does Unity provide their own gizmos, but we can also write our own.
Important note
Gizmos are only visible in the Unity Editor. They will not be visible to end users, so do not rely on any gizmos for gameplay. For instance, if we wanted the player to see the bounds of the level, a gizmo would not be an appropriate tool for the job.
We'll use a gizmo to visualize the bounds of the level so that we can see in real time how our settings affect the size and position of the bounds. To do this, add a new function to the BoundsLock script:
public class BoundsLock : MonoBehaviour
{
…
void OnDrawGizmosSelected()
{
const int cubeDepth = 1;
Vector3 boundsCenter = new Vector3(levelBounds.xMin + levelBounds.width * 0.5f, 0, levelBounds.yMin + levelBounds.height * 0.5f);
Vector3 boundsHeight = new Vector3(levelBounds. width, cubeDepth, levelBounds.height);
Gizmos.DrawWireCube(boundsCenter, boundsHeight);
}
}
In OnDrawGizmosSelected, we call Gizmos.DrawWireCube, which will draw a wireframe of a cube with a specified center and size. The center and size are calculated using the levelBounds rectangle that we created earlier. I've set the cubeDepth arbitrarily to 1 as our game is 2D, and we are not concerned about the depth of the level bounds. As the function name hints, the gizmo will be drawn only if the object is selected in the hierarchy. As we only really need the level bounds visible while we edit them, this is perfect for us.
Tip
OnDrawGizmosSelected is an event function provided by Unity. We could have also used the OnDrawGizmos function. OnDrawGizmos is called every frame and will draw the gizmo even when the object isn't selected, whereas OnDrawGizmosSelected requires the object to be selected. Which function to use depends on your needs. If you want the gizmo to be visible most of the time, then OnDrawGizmos is more appropriate. If, however, you only need it to be shown when a specific object is selected, such as in our level bounds example, then OnDrawGizmosSelected is more appropriate.
To test whether the gizmo is working correctly, in the Unity Editor, select the Player object. As the BoundsLock script is attached to that object, a white cube wireframe should be drawn in the Scene view, as shown in Figure 3.12:
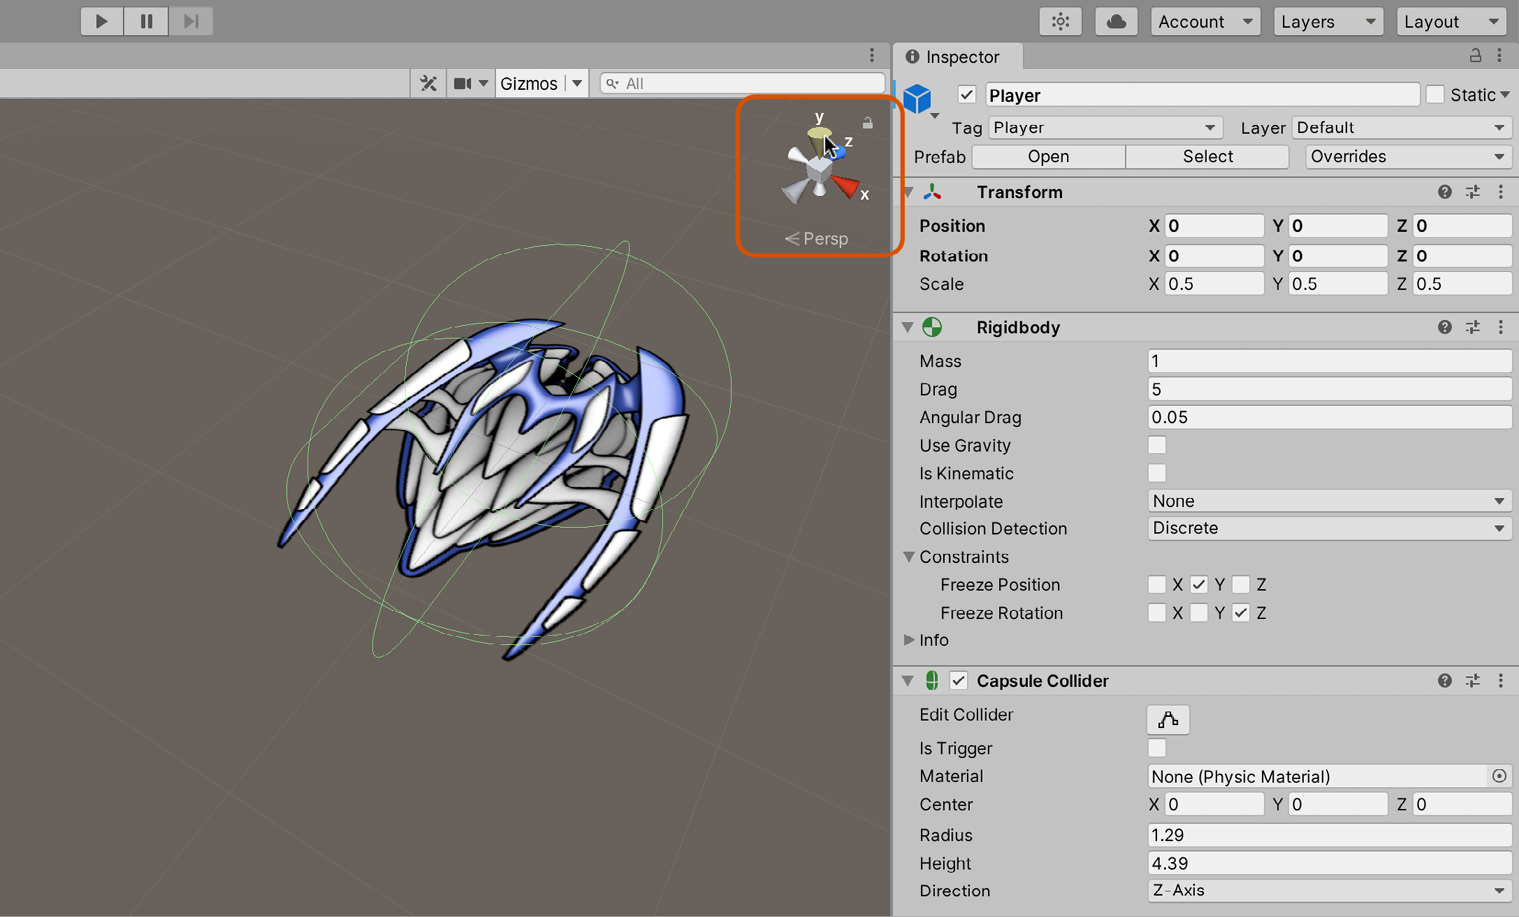
Figure 3.12 – Level bounds displayed using a gizmo
If you edit the Level Bounds rectangle on the Player object, you'll notice that the gizmo's size is automatically adjusted to reflect the new level bounds. Perfect! Using this, you can easily customize the level bounds to suit your needs.
Tip
Gizmos can also be viewed in the Game tab by selecting the gizmo button on the panels toolbar. However, as previously mentioned, even with this setting turned on, they will not be visible in the final compiled game.
Now take the game for a test run by pressing Play on the toolbar. The player spaceship should remain in view and be unable to move offscreen. Splendid!
As stated earlier, you may have an issue where the player object does not face the cursor correctly. Because the project was initially created as a 3D project, the camera is not configured correctly for our needs, so we will need to change that now and, in the process, learn how easy it is to switch a camera from a 3D to a 2D perspective.
Configuring the cameras
In this section, we'll configure the scene and game camera. Remember that any changes to the scene camera won't change the playable game. It is only used to navigate the scene to help you create it, whereas changing the game's camera will change how the player views the game.
We'll start with the scene camera:
- Switch the Scene viewport to a top-down 2D view by clicking on the up arrow in the top-right corner of the Scene viewport:

Figure 3.13 – Changing the viewport perspective
You can confirm that the viewport is in a top view because it will list Top as the current view:

Figure 3.14 – Top view in the Scene viewport
- From here, you can have the scene camera conform to the viewport camera exactly, giving you an instant top-down view for your game. Select the camera in the scene (or from the Hierarchy panel and choose GameObject | Align With View from the application menu).
This makes your game look much better than before, but there's still a problem. When the game is running, the spaceship still doesn't look at the mouse cursor as intended. This is because the camera is a Perspective camera, and the conversion between a screen point and world point is leading to unexpected results. We can fix this by changing the camera to an Orthographic (2D) camera:
- Select the camera in the scene.
- In the Inspector, change the Projection setting from Perspective to Orthographic:
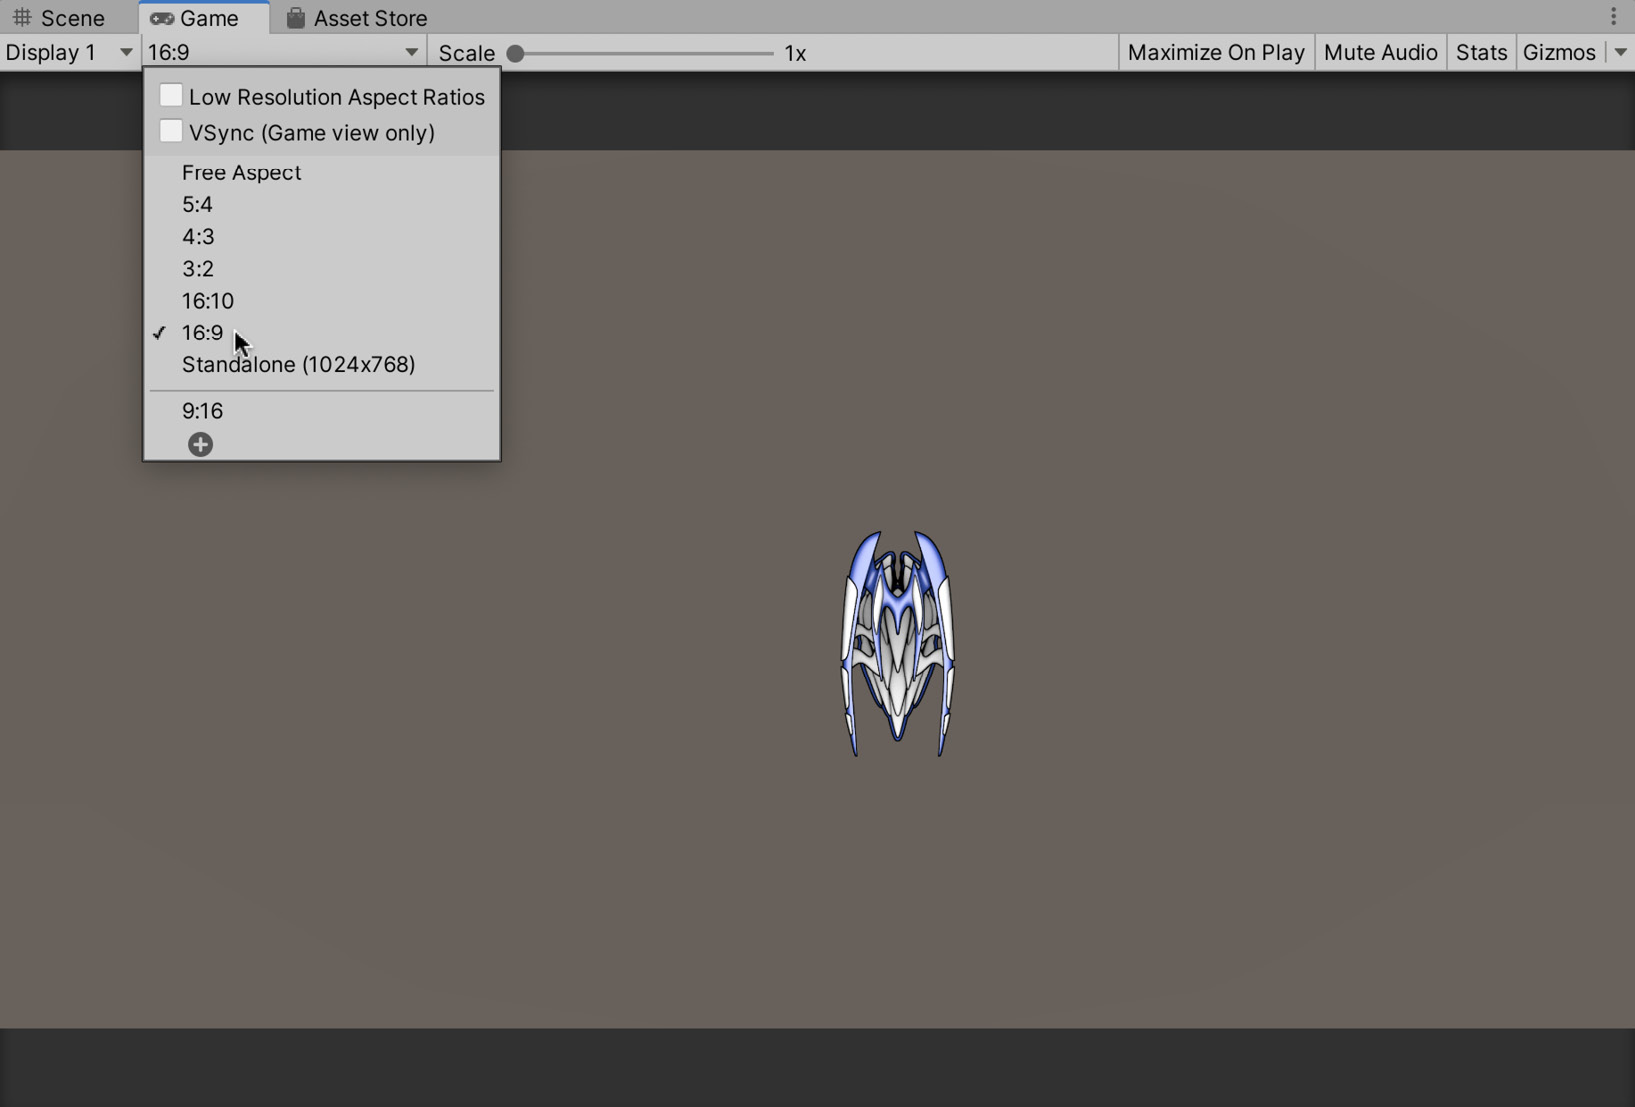
Figure 3.15 – Changing the camera to orthographic mode
Every orthographic camera has a Size field in the Inspector, which is not present for perspective cameras. This field controls how many units in the world view correspond to pixels on the screen. We want a 1:1 ratio between world units to pixels to ensure that our textures appear at the correct size, and that any cursor movement has the intended effect. The target resolution for our game will be Full HD, which is 1920 x 1080, and this has an aspect ratio of 16:9. For this resolution, set the orthographic size to 5.4, as shown in Figure 3.15.
Important note
The formula used to calculate the orthographic is screen height (in pixels) / 2 / 100 (Pixels per Unit). Don't worry if this isn't very clear at this stage; it is covered in detail in Chapter 5, Creating a 2D Adventure Game. For now, it is enough to know that our assets use a pixel per unit value of 100, hence 1080 / 2 / 100 = 5.4.
- Finally, make sure that your Game tab view is configured to display the game at a 16:9 aspect ratio. If it isn't, click on the aspect drop-down list at the top-left corner of the Game view and choose the 16:9 option:
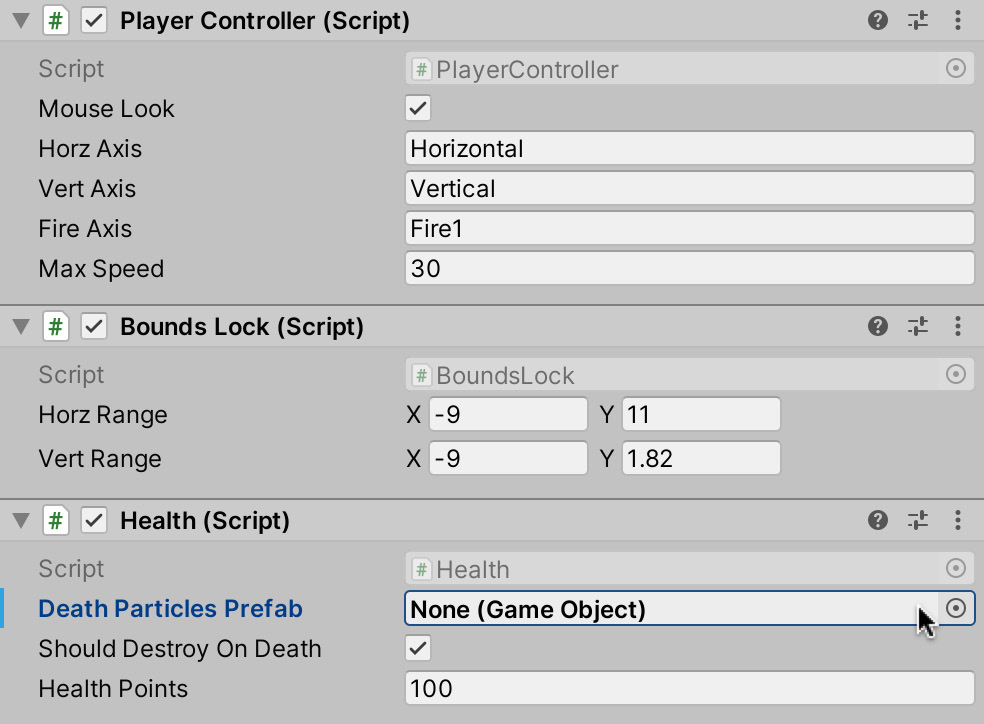
Figure 3.16 – Displaying the game at a 16:9 aspect ratio
Now try running the game, and you have a player spaceship that moves based on WASD input and also turns to face the mouse cursor. Great work! The game is taking shape. However, there›s lots more work to do, including creating our first reusable component: the Health component.
Creating a Health component
Both the player spaceship and enemies need health. Health is a measure of a character's presence and legitimacy in the scene, typically scored as a value between 0-100. 0 means death, and 100 means full health. Health is, in many respects, specific to each instance: the player has a unique health rating, and the enemy theirs. There are nevertheless many things in common, in terms of behavior, between player and enemy health, that it makes sense to code health as a separate component and class that can be attached to all objects that need health. Create a new class called Health, which should be attached to the player and all enemies or objects that need health:
public class Health : MonoBehaviour
{
public GameObject DeathParticlesPrefab = null;
public bool ShouldDestroyOnDeath = true;
[SerializeField] private float _HealthPoints = 100f;
}
The Health class maintains object health through a private variable, _HealthPoints. The _HealthPoints variable is declared as a SerializedField, allowing its value to be visible in the Inspector while maintaining a private scope, in other words, not accessible by other scripts. The prefab variable, on the other hand, is public, allowing its value to be both seen in the Inspector and changeable from elsewhere in the code if needed.
We want to be able to change the _HealthPoints variable from another script and have some logic to check for when it reaches zero. We could create a setter function to accomplish this, but instead, we'll make use of C# properties:
public class Health : MonoBehaviour
{
…
public float HealthPoints
{
Get { return _HealthPoints; }
Set
{
_HealthPoints = value;
if(HealthPoints <= 0)
{
SendMessage("Die", SendMessageOptions.DontRequireReceiver);
if(DeathParticlesPrefab != null)
{
Instantiate(DeathParticlesPrefab,
transform.position, transform.rotation);
}
if(ShouldDestroyOnDeath) { Destroy(gameObject);
}
}
}
}
}
Let's summarize the preceding code:
- _HealthPoints is now accessible through a C# property, HealthPoints. This property features both get and set accessors to return and set the health variable.
- The Health class is an example of event-driven programming. The class could have continually checked the health of the object in an Update function. Instead, the check for death is made during the C# property set method. This makes sense because the properties mutator is the only place where health will ever change. Not having to check the health of every object on every frame saves a lot of work. Imagine if you had thousands of objects on screen at once, and each one was constantly checking its own health! You'd see a significant performance increase by writing event-driven code.
- The Health class uses the SendMessage function that lets you call any other function on any component attached to the object by specifying the function name as a string. In this case, a function called Die will be executed on every component attached to the object (if such a function exists). If no function of a matching name exists, then nothing happens for that component. This is a quick and easy way to run customized behavior on an object in a type-agnostic way without using polymorphism. The disadvantage of SendMessage is that it internally uses a process called Reflection, which is slow and performance-prohibitive. For this reason, SendMessage should be used infrequently. More information can be found online at https://docs.unity3d.com/ScriptReference/GameObject.SendMessage.html.
When the health script is attached to the player spaceship, it appears as a component in the Inspector. As shown in Figure 3.17, it contains a field for Death Particles Prefab:
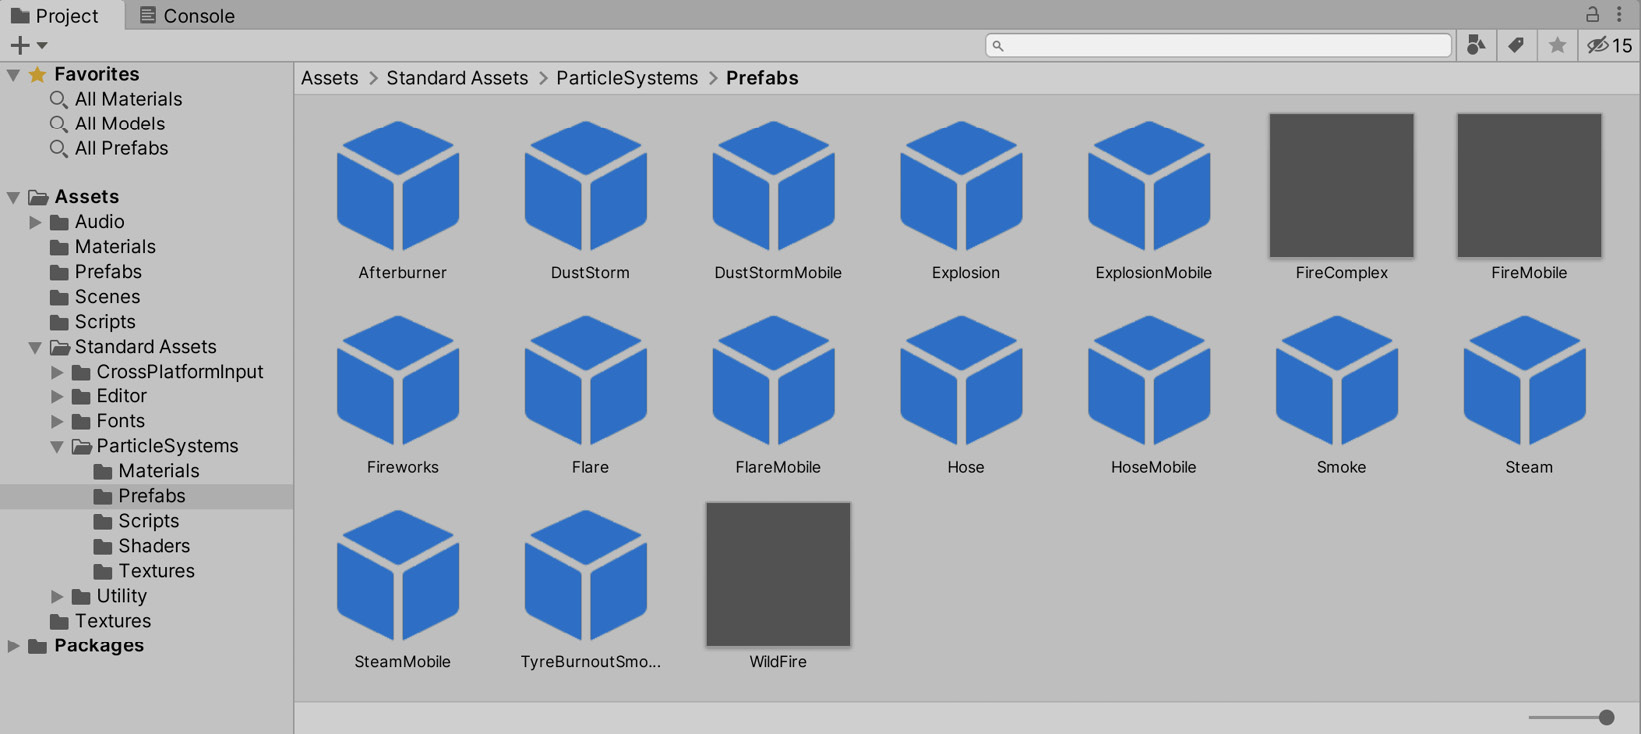
Figure 3.17 – Attaching the health script
This field is optional (it can be null), and is used to specify a particle system to be instantiated when the health of the object reaches zero. This will let us instantiate an explosion particle effect when the player dies. But first, we have to create one.
Creating the explosive particle system
In this twin-stick shooter game, both the player and enemies are spaceships. Therefore, a suitable particle effect for their destruction would be an explosive fiery ball. To achieve explosions, we can use a particle system. This refers to a special kind of object that features two main parts, namely, a Hose (or Emitter) and Particles. The emitter spawns or generates new particles into the world, and the particles are many small objects or pieces that, once spawned, move and travel along a trajectory. Particle systems are ideal for creating rain, snow, fog, sparkles, or, in our case, explosions!
With that in mind, let's select and customize a particle system for our game.
Selecting the particle system
We can create our own particle systems from scratch using the menu option GameObject | Particle System, or we can use any pre-made particle system included with Unity. In this game, we'll use some of the premade particle systems. To do this, perform the following steps:
- First import the Unity Standard Assets package. I won't go into detail how to do this here as it was covered in Chapter 1, Exploring the Fundamentals of Unity, so please refer back to that chapter for a step-by-step guide.
- Once the Standard Asset Package has been imported, the particle systems will be added to the Project panel in the Standard Assets | ParticleSystems | Prefabs folder:
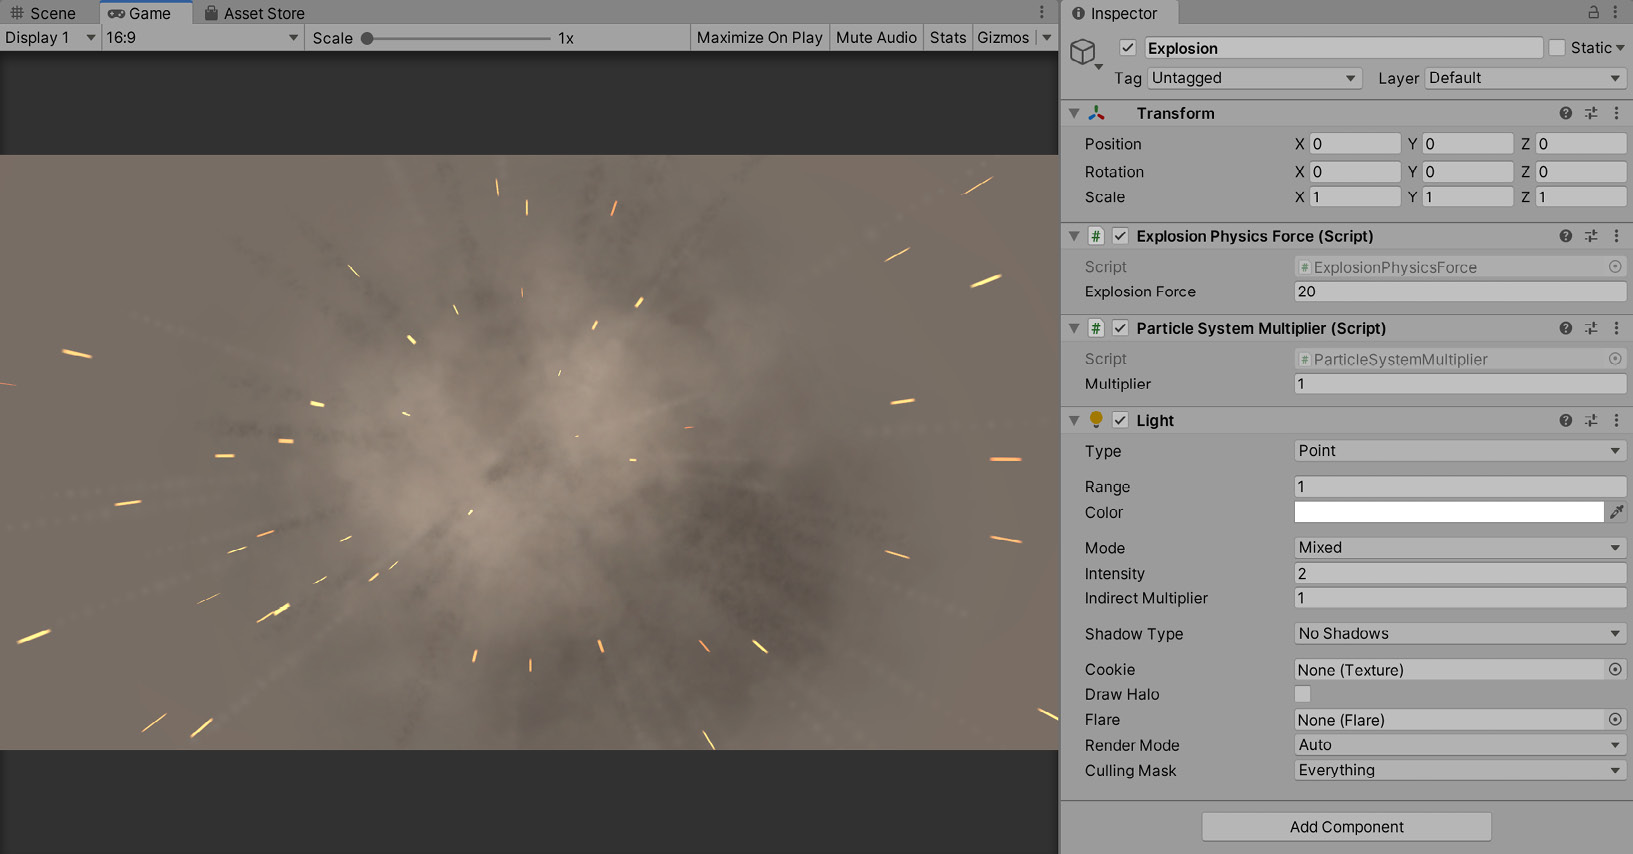
Figure 3.18 – Particle systems imported to the Project panel
Tip
Note that the preview for a particle system is only played in the Scene view while it is selected in Hierarchy.
- You will observe from Figure 3.18 that an explosion system is included among the default assets. To make sure it is fit for our purposes, you can test it by dragging and dropping the explosion to the scene and pressing play on the toolbar to see the explosion in action, as shown in Figure 3.19.
Great! We're almost done, but there's still a bit more work to do. We've now seen that an appropriate particle system is available, and we could drag and drop this system to the Death Particles Prefab slot in the Health component in the Inspector. This will work technically: when a player or enemy dies, the explosion system will be spawned, creating an explosion effect. However, the particle system will never be destroyed! This is problematic because, with every enemy death, a new particle system will be spawned. This raises the possibility that, after many deaths, the scene will be full of disused particle systems. We don't want this; it's bad for performance and memory usage to have a scene full of unused objects lingering around. To fix this, we'll modify the explosion system slightly, creating an altered prefab that will suit our needs. In future, we'll look at more advanced object management techniques, such as object pooling, but now we will simply destroy the objects after a specified time.
Customizing the particle system
To begin altering the particle system, drag and drop the existing explosion prefab anywhere to the scene and position it at the world origin, as shown in Figure 3.19:
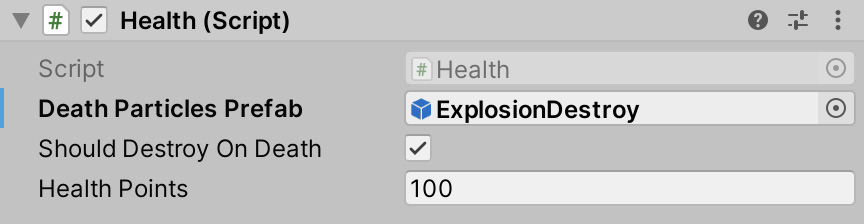
Figure 3.19 – Adding an explosion system to the scene for modification
Next, we must refine the particle system to destroy itself soon after instantiation. To accomplish this, we'll create a new C# script called TimedDestroy.cs:
public class TimedDestroy : MonoBehaviour
{
public float DestroyTime = 2f;
void Start ()
{
Destroy(gameObject, DestroyTime);
}
}
The TimedDestroy class destroys the object to which it's attached after a specified interval (DestroyTime) has elapsed. The script is simple: in the Start function, a call to Destroy is made, passing the script's gameObject and the desired DestroyTime. This call holds no surprises and will destroy the object after the desired amount of time has passed.
Tip
You can also destroy a particle system on completion by setting Stop Action to Destroy in the Inspector. This setting will destroy the particle system without the need to write a single line of code. However, this is not entirely suitable for our explosion particle, as it actually consists of several particle systems that are all children of a parent object. We could have set Stop Action for each particle system individually, but this would not have destroyed the parent object. These parent objects would accumulate over time, thereby reducing the performance of our game.
Drag and drop the TimedDestroy script to the explosion particle system in the scene and then press Play on the toolbar to test that the code works and that the object is destroyed after the specified interval. Remember that, as DestroyTime is a public variable, it can be adjusted in the Inspector.
The TimedDestroy script should remove the explosion particle system after the delay expires. So, let's create a new and separate prefab from this modified version. To do this, perform the following steps:
- Rename the explosion system in the Hierarchy panel to ExplosionDestroy.
- Drag and drop the system from Hierarchy to the Project panel in the Prefabs folder. Unity will automatically create a new prefab, representing the modified particle system.
- Now, drag and drop the newly created prefab from the Project panel to the Death Particles Prefab slot on the Health component for the player in the Inspector. Setting this field means that the prefab is instantiated when the player dies:

Figure 3.20 – Configuring the health script
If you run the game now, you'll see that you cannot initiate a player death event to test the particle system generation. Nothing exists in the scene to destroy or damage the player, and if you set the Health points to 0 in the Inspector, it doesn't use the C# property set function. For now, however, we can write temporary code that triggers an instant kill when the spacebar is pressed. Refer to Code Sample 3.7 for the modified health script:
public class Health : MonoBehaviour
{
…
void Update()
{
if(Input.GetKeyDown(KeyCode.Space))
{
HealthPoints = 0;
}
}
}
Run the game now and press the Spacebar to trigger an instant player death. You should see the player object removed from the game and the particle system generated until the timer destroys that too.
Excellent work! We now have a playable, controllable player character that supports health and death functionality. We'll introduce enemies to the game next.
Creating the enemy object
The enemies in our game will take the form of roaming spaceships that will be spawned into the scene at regular intervals and will follow the player, drawing nearer and nearer. Essentially, each enemy represents a combination of multiple behaviors working together, and these should be implemented as separate scripts. Let's consider them in turn:
- Health: Each enemy supports health functionality. They begin the scene with a specified amount of health and will be destroyed when that health falls below 0. We already have a health script created to handle this behavior.
- Movement: Each enemy will continuously be in motion, traveling in a straight line along a forward trajectory.
- Turning: Each enemy will rotate and turn toward the player even as the player moves. In combination with the movement functionality, this will ensure that the enemy is always moving toward the player.
- Scoring: Each enemy rewards the player with a score value when destroyed.
- Damage: Enemies cannot shoot but will harm the player on collision.
Now that we've identified the range of behaviors applicable to an enemy, let's create an enemy in the scene.
Creating the GameObject
We'll make one specific enemy, create a prefab from that, and use it as a basis to instantiate multiple enemies:
- Start by selecting the player character in the scene and duplicating the object with Ctrl + D or select Edit | Duplicate from the application menu. We will edit this duplicate to become our enemy.
- Rename the object to Enemy and ensure that it is not tagged as Player, as there should be one and only one object in the scene with the Player tag. Set the tag to Untagged, as shown in Figure 3.21:
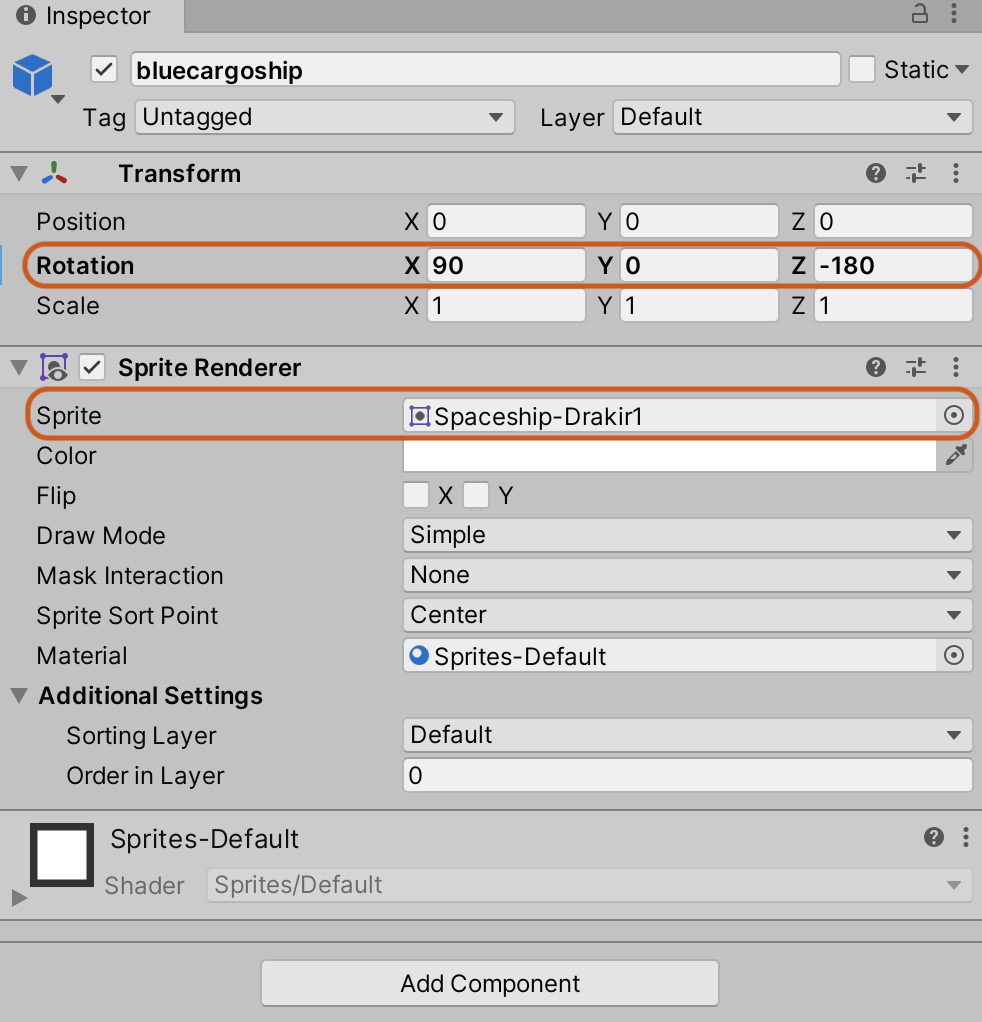
Figure 3.21 – Removing a Player tag from the enemy, if applicable
- Temporarily disable the Player GameObject, allowing us to focus more clearly on the Enemy object in the Scene tab.
- Select the child object of the duplicated enemy and, from the Inspector, click on the Sprite field of the Sprite Renderer component to pick a new sprite. Pick one of the darker imperial ships for the enemy character, and the sprite will update for the object in the viewport:
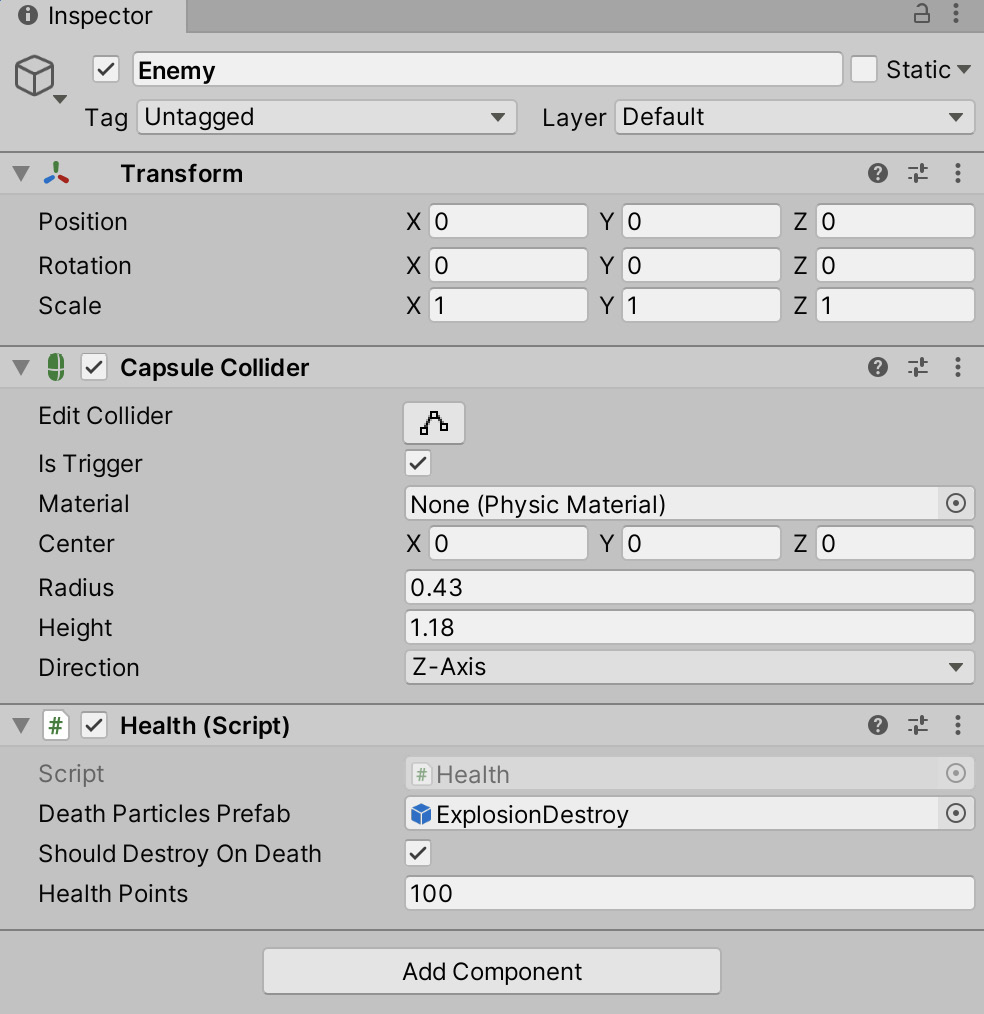
Figure 3.22 – Selecting a sprite for the Sprite Renderer component
- After changing the sprite to an enemy character, you may need to adjust the Rotation values to align the sprite to the parent forward vector, ensuring that the sprite is looking in the same direction as the forward vector, as shown in Figure 3.22.
- Lastly, select the parent object for the enemy and remove the Rigidbody, PlayerController, and BoundsLock components, but keep the Health component as the enemy should support health. See Figure 3.23 for the updated component list. Also, feel free to resize the Capsule Collider component to better approximate the Enemy object:
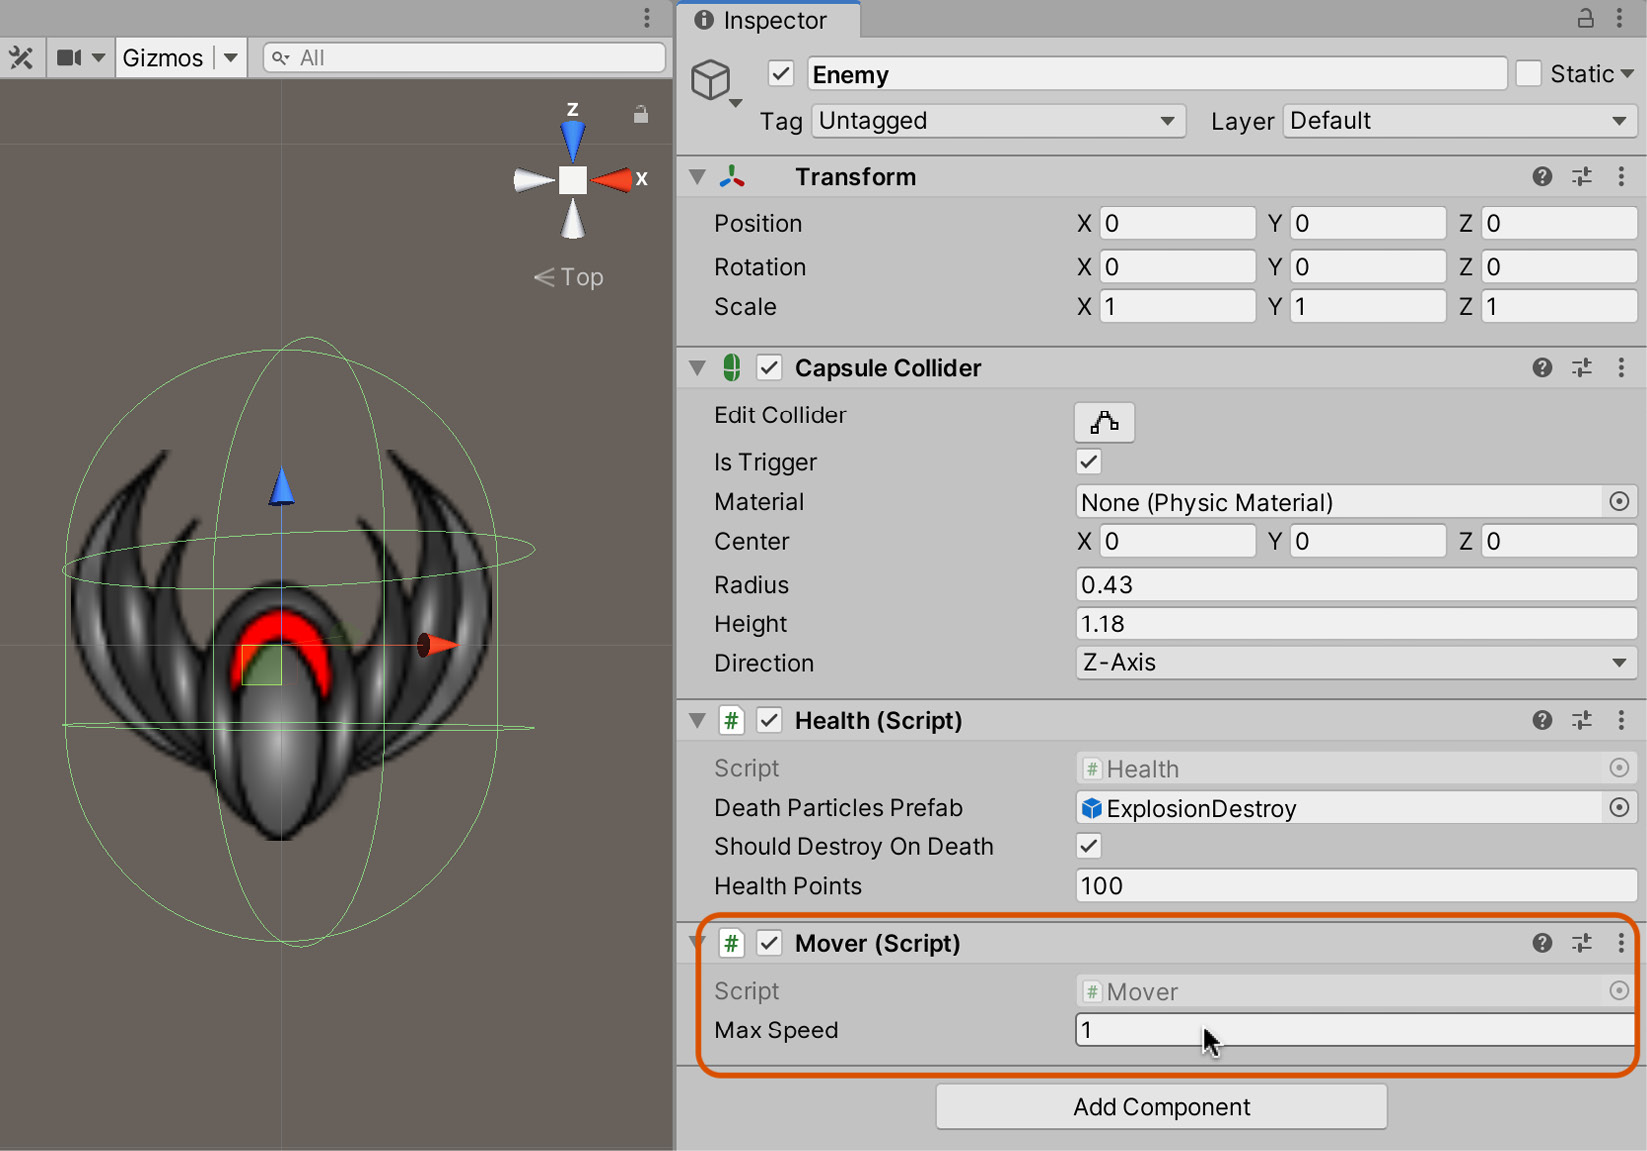
Figure 3.23 – Adjusting enemy sprite rotation
Tip
When designing scripts for your games, try to create them in such a way that they can be reused as much as possible, such as our Health component. If we had added logic specific to the player in the Health component, we wouldn't have been able to add it to both our enemy and player objects. We would most likely have ended up writing duplicate code for the enemy objects.
Now that we have the base enemy object, we can start adapting its behavior with custom scripts, starting with moving the enemy to chase the player.
Moving the enemy
As a reminder, the enemy should continually move in the forward direction at a specified speed. To achieve this, create a new script called Mover.cs and add it to the Enemy object:
public class Mover : MonoBehaviour
{
public float MaxSpeed = 10f;
void Update ()
{
transform.position += transform.forward * MaxSpeed * Time.deltaTime;
}
}
The following points summarize the code sample:
- The script moves an object at a specified speed (MaxSpeed per second) along its forward vector. To do this, it uses the Transform component.
- The Update function is responsible for updating the position of the object. It multiplies the forward vector by the object speed and adds this to its existing position to move the object further along its line of sight. The Time.deltaTime value is used to make the motion frame rate independent style moving the object per second as opposed to per frame. More information on deltaTime can be found at http://docs.unity3d.com/ScriptReference/Time-deltaTime.html.
It's always good practice to frequently test your code. Your enemy may move too slow or too fast. So, we'll do that now by pressing Play on the toolbar. If the enemy's speed isn't correct, perform the following steps:
- Stop playback to exit game mode.
- Select the enemy in the scene.
- From the Inspector, adjust the Max Speed value of the Mover component:
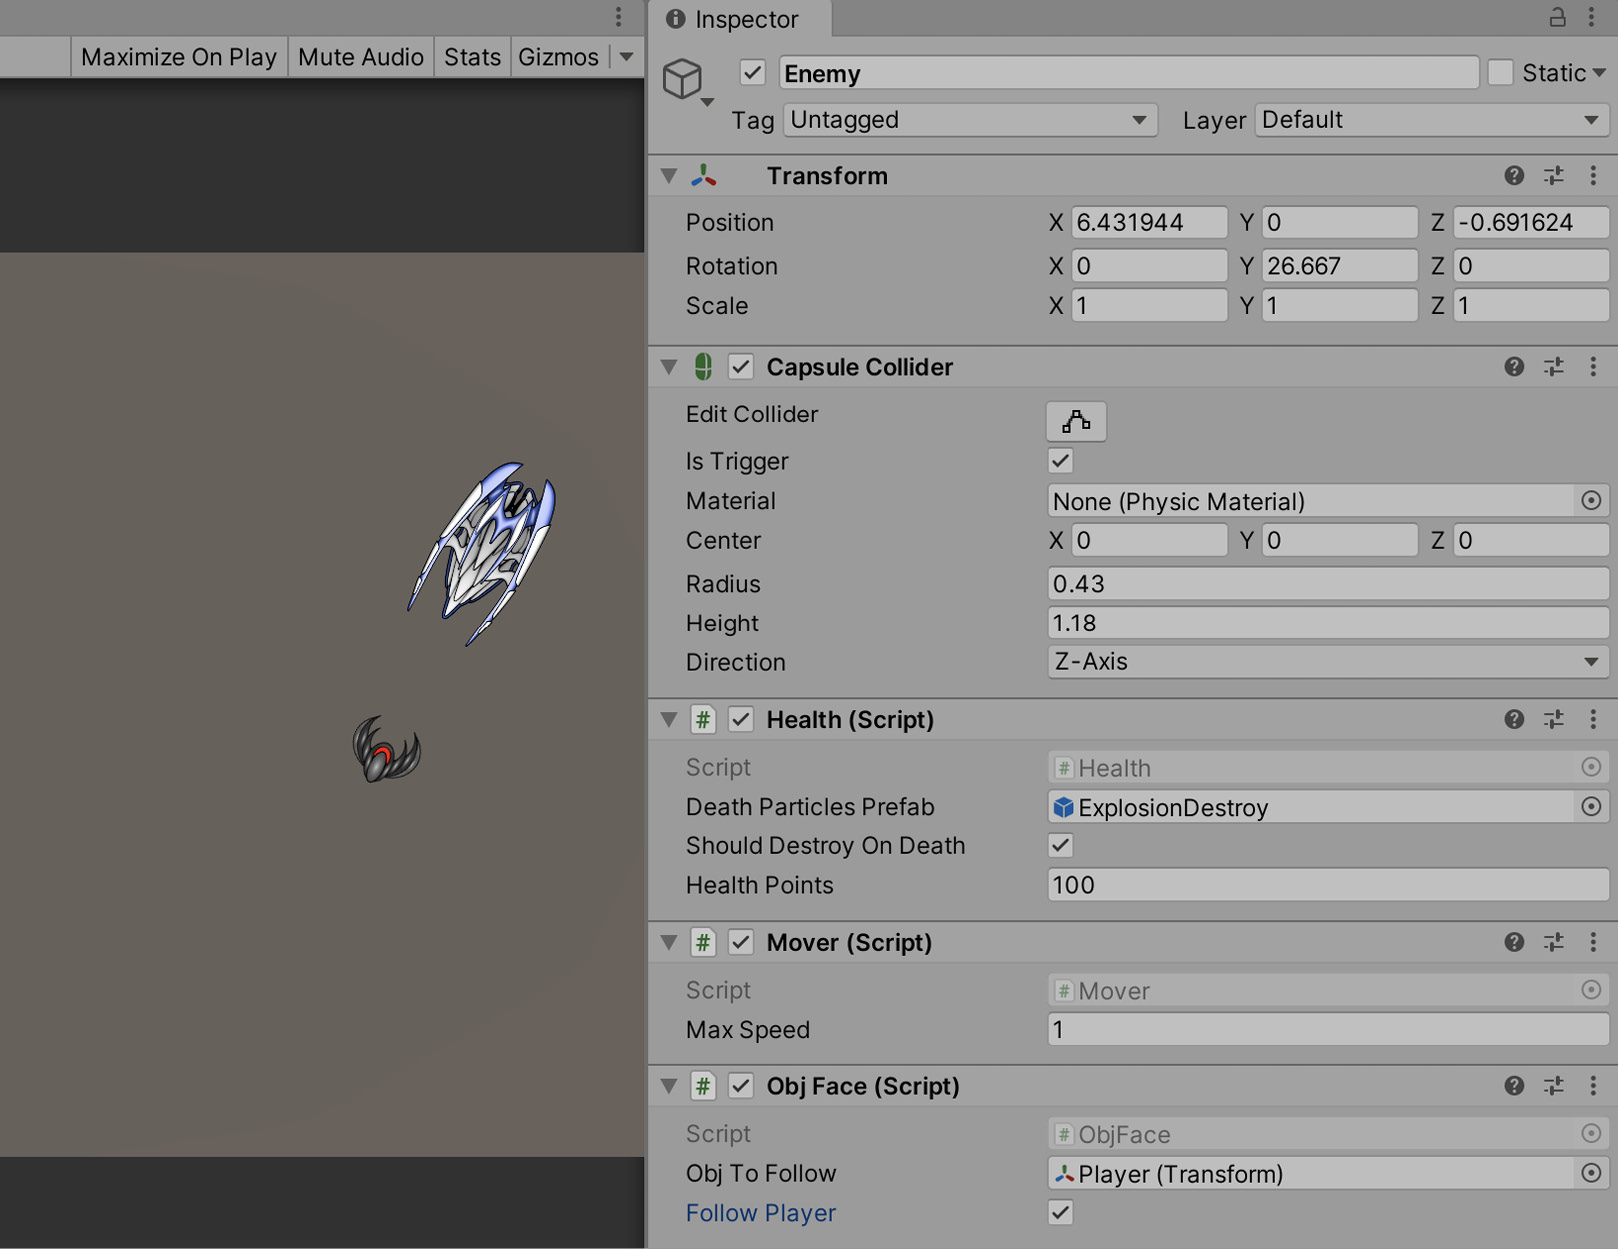
Figure 3.24 – Adjusting enemy speed
The enemy will now move forward, but this won't be much of a challenge for the player, as it will be effortless to avoid. To increase the difficulty, let's make the enemy turn toward the player. Turning toward the player, combined with moving in its forward direction, will create a suitable chase mechanic.
Turning the enemy
In addition to moving in a straight line, the enemy should also continually turn to face the player. To achieve this, we'll write another script that works in a similar manner to the player controller script, but instead of turning to face the cursor, the enemy turns to face the player. This functionality should be encoded in a new script file called ObjFace.cs and, once again, be attached to the enemy object:
public class ObjFace : MonoBehaviour
{
public Transform ObjToFollow = null;
public bool FollowPlayer = false;
void Awake ()
{
if(!FollowPlayer) { return; }
GameObject PlayerObj =
GameObject.FindGameObjectWithTag("Player");
if(PlayerObj != null) { ObjToFollow = PlayerObj.transform;
} }
void Update ()
{
if(ObjToFollow==null)
{
return;
}
//Get direction to follow object
Vector3 DirToObject = ObjToFollow.position - transform.position;
if(DirToObject != Vector3.zero)
{
transform.localRotation = Quaternion.LookRotation
(DirToObject.normalized,Vector3.up);
}
}
}
The following points summarize the code sample:
- The ObjFace script will always rotate an object so that its forward vector points toward a destination point in the scene.
- In the Awake event, the FindGameObjectWithTag function retrieves a reference to the only object in the scene tagged as Player, which should be the player spaceship. The player represents the default look-at destination for an enemy object.
- The Update function is called automatically once per frame and will generate a displacement vector from the object location to the destination location. This vector represents the direction in which the object should be looking. The Quaternion.LookRotation function accepts a direction vector and will rotate an object to align the forward vector with the supplied direction. This keeps the object looking toward the destination. More information on LookRotation can be found at http://docs.unity3d.com/ScriptReference/Quaternion.LookRotation.html.
Before testing the code, make sure of the following:
- The Player object in the scene is tagged as Player.
- The Player object is enabled (we previously disabled the object for testing).
- The enemy's position is offset from the player.
- The Follow Player checkbox on the Obj Face component is enabled in the Inspector.
Figure 3.25 shows these settings in practice:
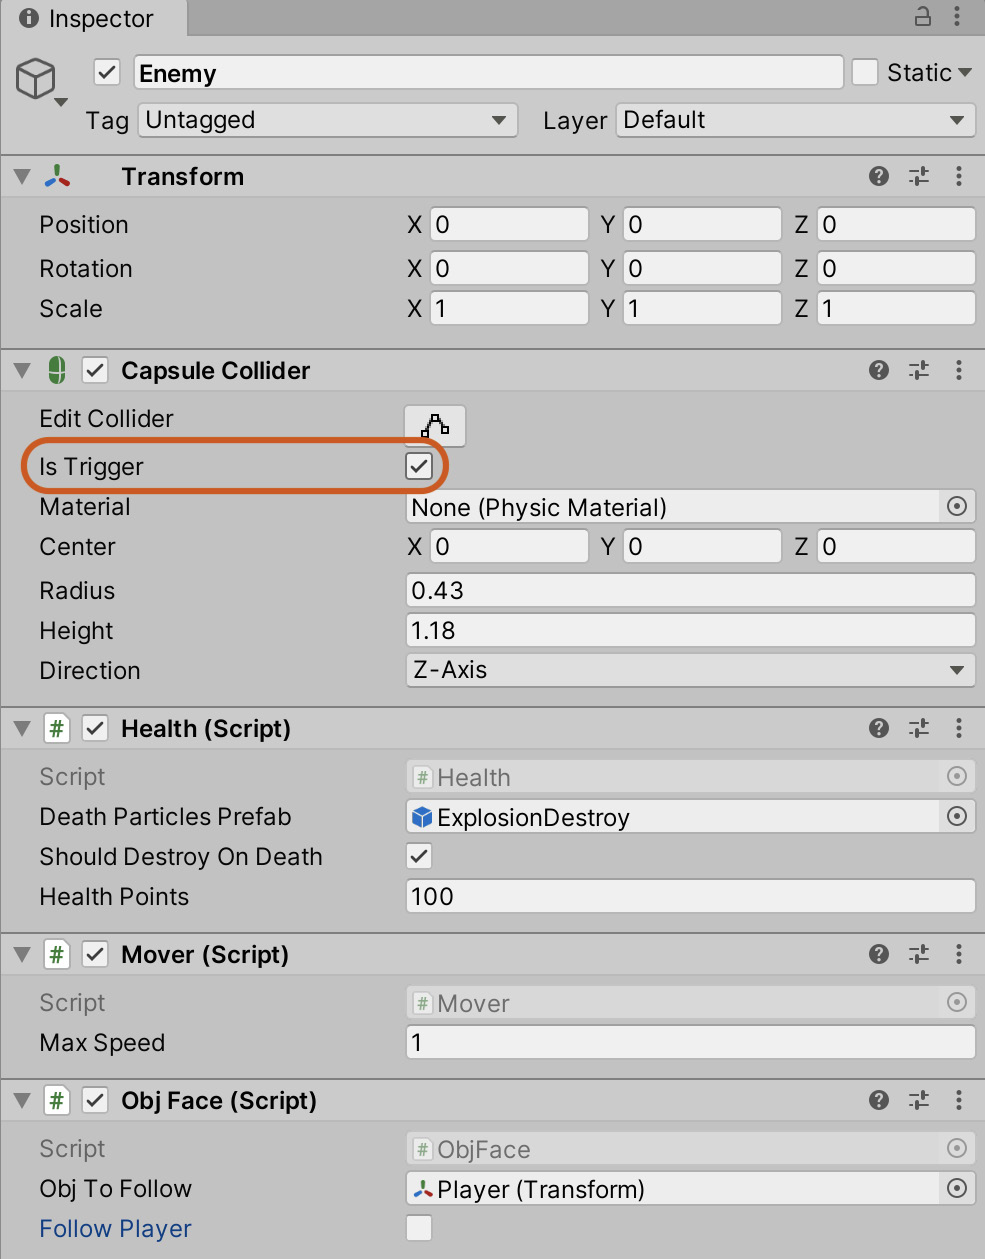
Figure 3.25 – Enemy spaceship moving toward the player
This is looking excellent! However, it's not very challenging if the enemy doesn't damage the player when they collide, so we will resolve that next.
Dealing damage to the player
If and when the enemy finally collides with the player, it should deal damage and potentially kill the player. To achieve this, a collision between the enemy and player must be detected. Let's start by configuring the enemy. Select the Enemy object and, from the Inspector, enable the Is Trigger checkbox on the Capsule Collider component, as shown in Figure 3.26:
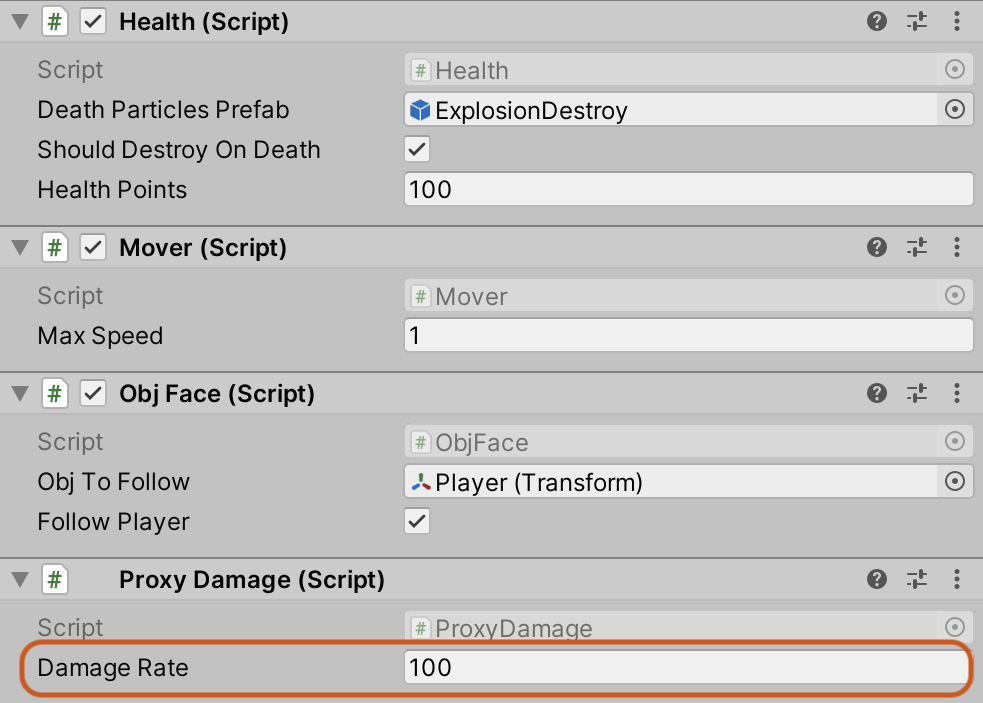
Figure 3.26 – Changing the enemy collider to a trigger
Setting a collider as a trigger means that we can still respond to collision events, but Unity will not try to resolve (separate) the collisions.
Next, we'll create a script that detects collisions and deals damage to the player for as long as the collision state remains. Refer to the following code (ProxyDamage.cs), which should be attached to the enemy character:
public class ProxyDamage : MonoBehaviour
{
//Damage per second
public float DamageRate = 10f;
void OnTriggerStay(Collider Col)
{
Health H = Col.gameObject.GetComponent<Health>();
if(H == null)
{
return;
}
H.HealthPoints -= DamageRate * Time.deltaTime;
}
}
The following points summarize the code sample:
- The ProxyDamage script will deal damage to any colliding object with a Health component.
- The OnTriggerStay event is called once every frame for as long as an intersection state persists. During this function, the HealthPoints value of the Health component is reduced by the DamageRate, which is multiplied by Time.deltaTime to get the damage per second (DPS).
After attaching the ProxyDamage script to an enemy, you can use the Inspector to set the Damage Rate of the Proxy Damage component. The Damage Rate represents how much health should be reduced on the player, per second, during a collision. For a challenge, I've set the value to 100 health points:
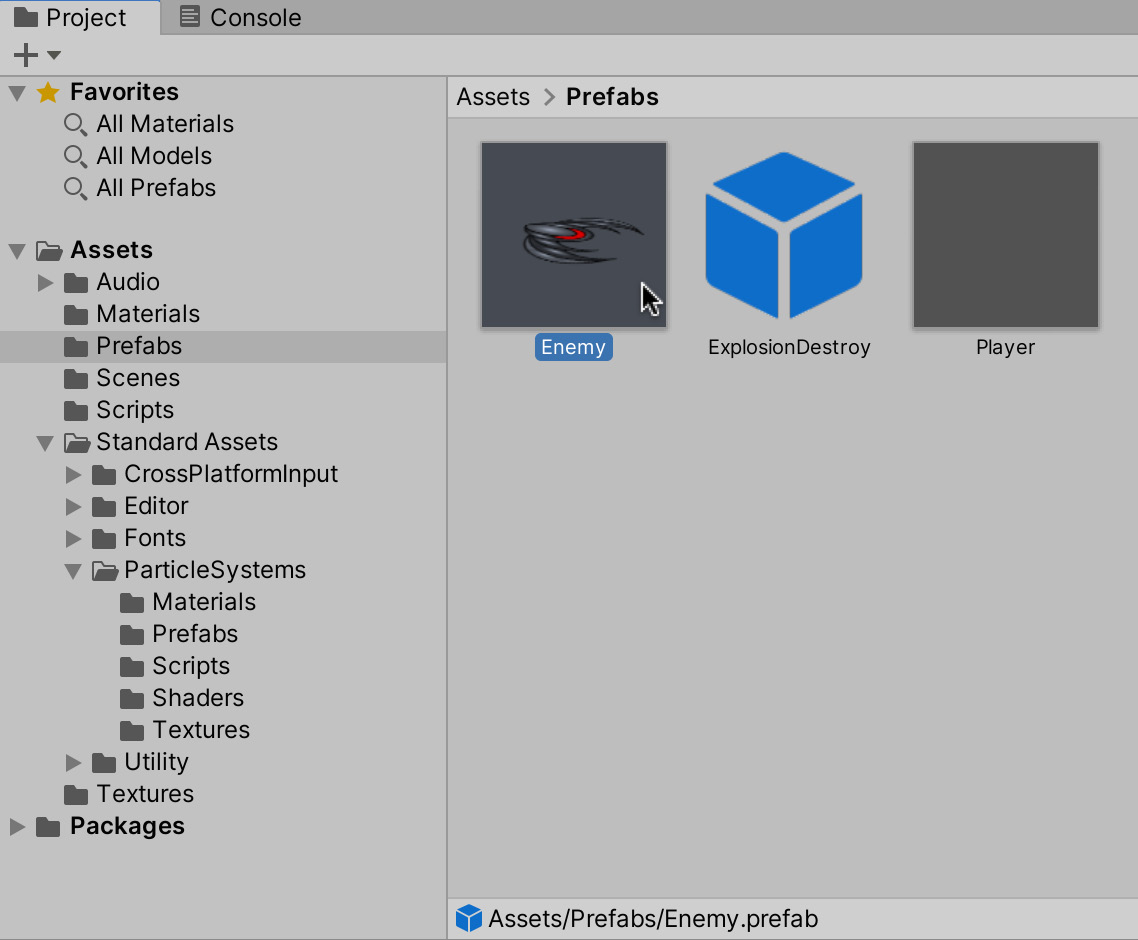
Figure 3.27 – Setting Damage Rate for a Proxy Damage component
Time for a test run: press Play on the toolbar and attempt a collision between the player and enemy. After 1 second, the player should be destroyed. Things are coming along well. However, we'll need more than one enemy to make things challenging.
Spawning enemies
To make the level fun and challenging, we'll need more than simply one enemy. In fact, for a game that's essentially endless, we'll need to add enemies continually and gradually over time. Essentially, we'll need either regular or intermittent spawning of enemies, and this section will add that functionality. Before we can do this, however, we'll need to make a prefab from the enemy object. The steps are the same as for previously created prefabs: select the enemy in the Hierarchy panel and then drag and drop it to the Project panel in the Prefabs folder:
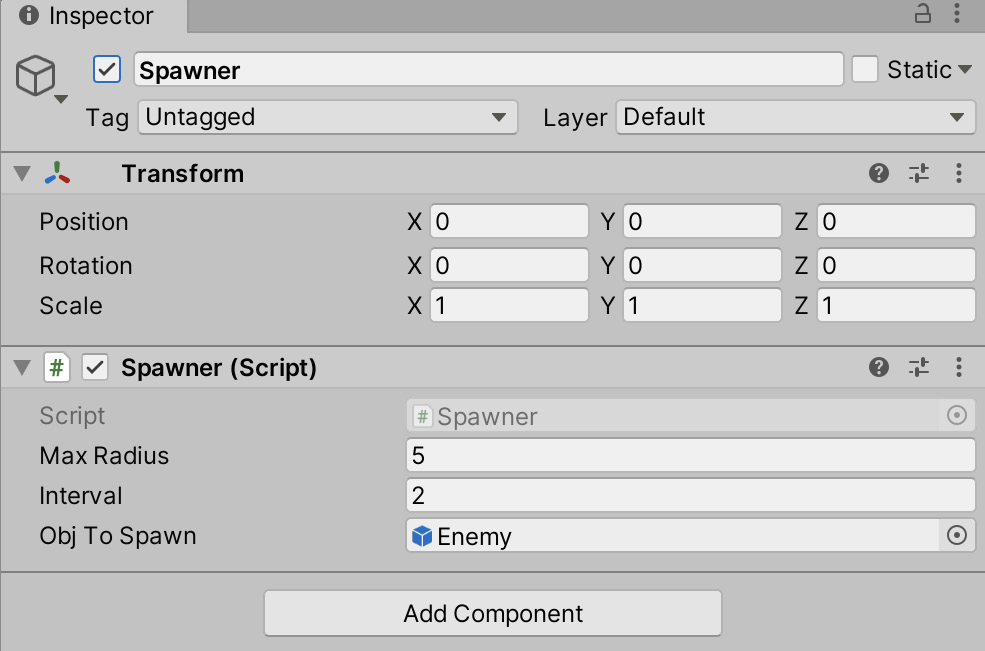
Figure 3.28 – Creating an enemy prefab
Now, we'll make a new script, called Spawner.cs, that spawns new enemies in the scene over time within a specified radius from the player spaceship. This script should be attached to a new, empty GameObject in the scene:
public class Spawner : MonoBehaviour
{
public float MaxRadius = 1f;
public float Interval = 5f;
public GameObject ObjToSpawn = null;
private Transform Origin = null;
void Awake()
{
Origin = GameObject.FindGameObjectWithTag ("Player").transform;
}
void Start ()
{
InvokeRepeating("Spawn", 0f, Interval);
}
void Spawn ()
{
if(Origin == null) { return;
}
Vector3 SpawnPos = Origin.position + Random. onUnitSphere * MaxRadius;
SpawnPos = new Vector3(SpawnPos.x, 0f, SpawnPos.z); Instantiate(ObjToSpawn, SpawnPos, Quaternion. identity);
}
}
During the Start event, the InvokeRepeating function will spawn instances of ObjToSpawn (a prefab) repeatedly at the specified Interval, measured in seconds. The generated objects will be placed within a random radius from a center point, Origin.
The Spawner class is a global behavior that applies scene-wide. It does not depend on the player, nor any specific enemy. For this reason, it should be attached to an empty GameObject. Create one of these by selecting GameObject | Create Empty from the application menu. Name the new object something memorable, such as Spawner, and attach the Spawner script to it.
Once added to the scene, from the Inspector, drag and drop the Enemy prefab to the Obj To Spawn field in the Spawner component. Set the Interval to 2 seconds and increase the Max Radius to 5, as shown in Figure 3.29:
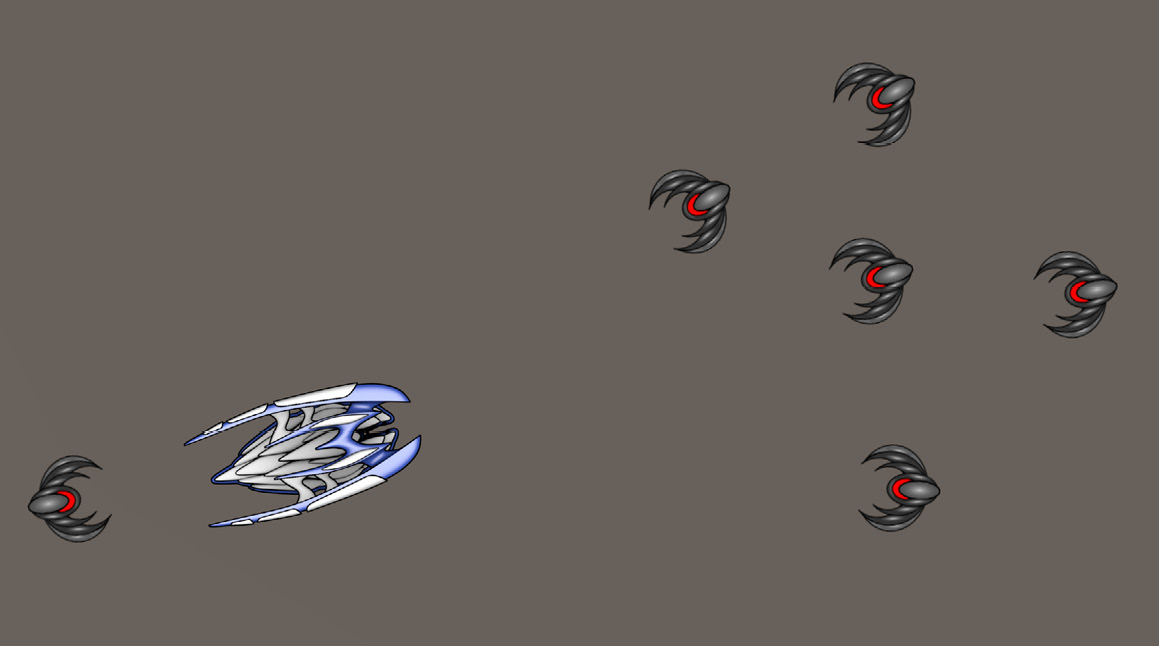
Figure 3.29 – Configuring Spawner for enemy objects
Now (drum roll), let's try the level. Press Play on the toolbar and take the game for a test run:

Figure 3.30 – Spawned enemy objects moving toward the player
You should now have a level with a fully controllable player character surrounded by a growing army of tracking enemy ships! Excellent work!
Summary
Good job on getting this far! The space shooter is really taking shape now, featuring a controllable player character that relies on native physics, twin-stick mechanics, enemy ships, and a scene-wide spawner for enemies. All these ingredients together still don't make a game: we can't shoot, we can't increase the score, and we can't destroy enemies. These issues will need to be addressed in the next chapter, along with other technical issues that we'll undoubtedly encounter. Nevertheless, we now have a solid foundation.
By writing a health script and adding it to both the player and the enemy object, we've reduced the amount of code we need to write. Of course, there will always be times when you need to write code that is specific to one object, but whenever possible, you should design code that can be reused. By converting the 3D camera to a 2D camera, we've learned the differences between the two, and how to configure them. This information will prove useful in the future as even in 3D games, you may want a 2D camera for certain features, such as the UI.
In the next chapter, we'll create the projectiles for the player to shoot, and in doing so, we'll look at several important topics, including object management techniques and physics. We'll discuss object pooling, a method of preventing unnecessary object creation and destruction, a tool that you'll end up using frequently in your future projects. We'll also create a scoring system, where each enemy defeated awards the player a specific number of points, and we'll develop a UI to display the score. Lastly, we'll add some final touches to improve the overall experience, including adding a background image and some sound effects.
Test your knowledge
Q1. SerializableField renders…
A. public variables hidden in the Inspector
B. private variables visible in the Inspector
C. protected variables hidden in the Inspector
D. public variables visible in the Inspector
Q2. Importing audio with the Streaming Load type means...
A. the audio will be loaded in its entirety at startup
B. the audio will be loaded in segments
C. the audio will be muted
D. the audio will be deleted
Q3. Orthographic cameras remove...
A. perspective effects
B. distant objects
C. post-processing
D. MeshRenderers
Q4. The Input.GetAxis function lets you read input from...
A. horizontal and vertical axes
B. VR touch controllers
C. mobile touches
D. mouse clicks
Further reading
Refer to the following links for more information: