
Chapter 4: Continuing the Space Shooter Game
This chapter continues on from the previous one by completing the twin-stick space shooter game. At this point, we already have a working game. The gamer can control a spaceship using two axes: movement and rotation. The WASD keys on the keyboard control movement and the spaceship rotates to face the mouse cursor. In addition to player controls, the level features enemy characters that spawn at regular intervals and move toward the player. Finally, both the player and enemies support a Health component, which means both objects are susceptible to damage. Right now, however,the game lacks two essential features: the player cannot fight back against the enemies and there is no system to keep track of and display the score. This chapter tackles these issues and more.
Once you've completed this chapter, you should have a solid understanding of the following topics:
- Creating a projectile
- Spawning the projectile at runtime
- Memory management and pooling
- Configuring background audio
- Creating a score system and a basic UI to display the score
- Debugging and testing
- Profiling the game's performance
Generating projectiles, as we'll see, presents a particularly interesting problem regarding memory management. However, before we get to that, let's look at the technical requirements for this chapter and create the projectile prefab.
Technical requirements
As this chapter is a continuation of the previous one, it assumes that you have completed and are comfortable with the information provided in the last chapter, specifically how to create a new script and add it to an object as a component, and creating prefabs from objects in the scene.
The project so far can be found in the book's companion files in the Chapter04/Start folder. You can start there and follow along with this chapter if you don't have your own project already. If you want to test the final game, you can find the completed project in the Chapter04/End folder.
Creating the projectile system
Currently, the level contains a player and an enemy ship, which the player must shoot, as shown in Figure 4.1:

Figure 4.1 – The game so far
The player doesn't yet have any method of killing the enemy, so we'll start the chapter by implementing the last significant system missing from the game: the projectile system. Thinking carefully about how we want our weapon systems to behave, we can identify a few concepts that need development:
- The projectile spawn location: We need a way to spawn projectiles at a position relative to the player or enemy ships.
- We need the projectile itself. If you've read the previous chapters, you won't be surprised to hear that we'll create this as a prefab.
- We need a system to spawn the projectiles. This system will be slightly more complex than simply instantiating and destroying the missiles when required, for reasons that will become apparent.
- Lastly, we will need to configure Unity's physics system to prevent collisions between the projectiles shot by the player and the player's ship.
Any future projectile system you create may have different requirements and therefore require you to implement different systems.
We'll tackle each of these areas in order, starting with the projectile spawn location.
Implementing the projectile spawn location
We'll call the points where bullets are spawned and fired "turrets." For this game, the player will have only one turret, but ideally, the game should support easily adding more turrets if desired. Let's jump right in and create the first turret:
- Add a new empty GameObject to the scene by selecting GameObject | Create Empty from the application menu.
- Name the new object Turret.
- Position the Turret object to the front of the spaceship, making sure that the blue forward vector arrow is pointing ahead in the direction that the projectile will be fired.
- Make the turret a child of the spaceship by dragging and dropping it in the Hierarchy panel.
Once you've followed these steps, you'll have a setup similar to Figure 4.2:

Figure 4.2 – Positioning a Turret object as a child of the spaceship
Creating a Turret object for the ammo as a spawn location is an excellent start, but for ammo to be fired, we'll need an ammo object. Specifically, we'll create an Ammo prefab that can be instantiated as ammo when needed. We'll do this next.
Creating the projectile prefab
When the player presses the fire button, the spaceship should shoot projectile objects. These objects will be based on an Ammo prefab. As part of the prefab creation, we will configure the projectile's texture, reuse a previously written script to enable projectile movement, and add new logic to handle collisions with enemies. We'll start by configuring the projectile's texture; that way, we can more easily see the projectile move and collide with enemies, which will help us debug any issues when we get to that stage.
Configuring the projectile's texture
To start, we'll configure the texture to be used as the projectile graphic:
- Open the Textures folder in the Project panel, and select the Ammo texture. This texture features several different versions of an ammo sprite, aligned in a row. When ammo is fired, we don't want to show the complete texture; instead, we want to show either just one of the images or the images played as an animation sequence, frame by frame:
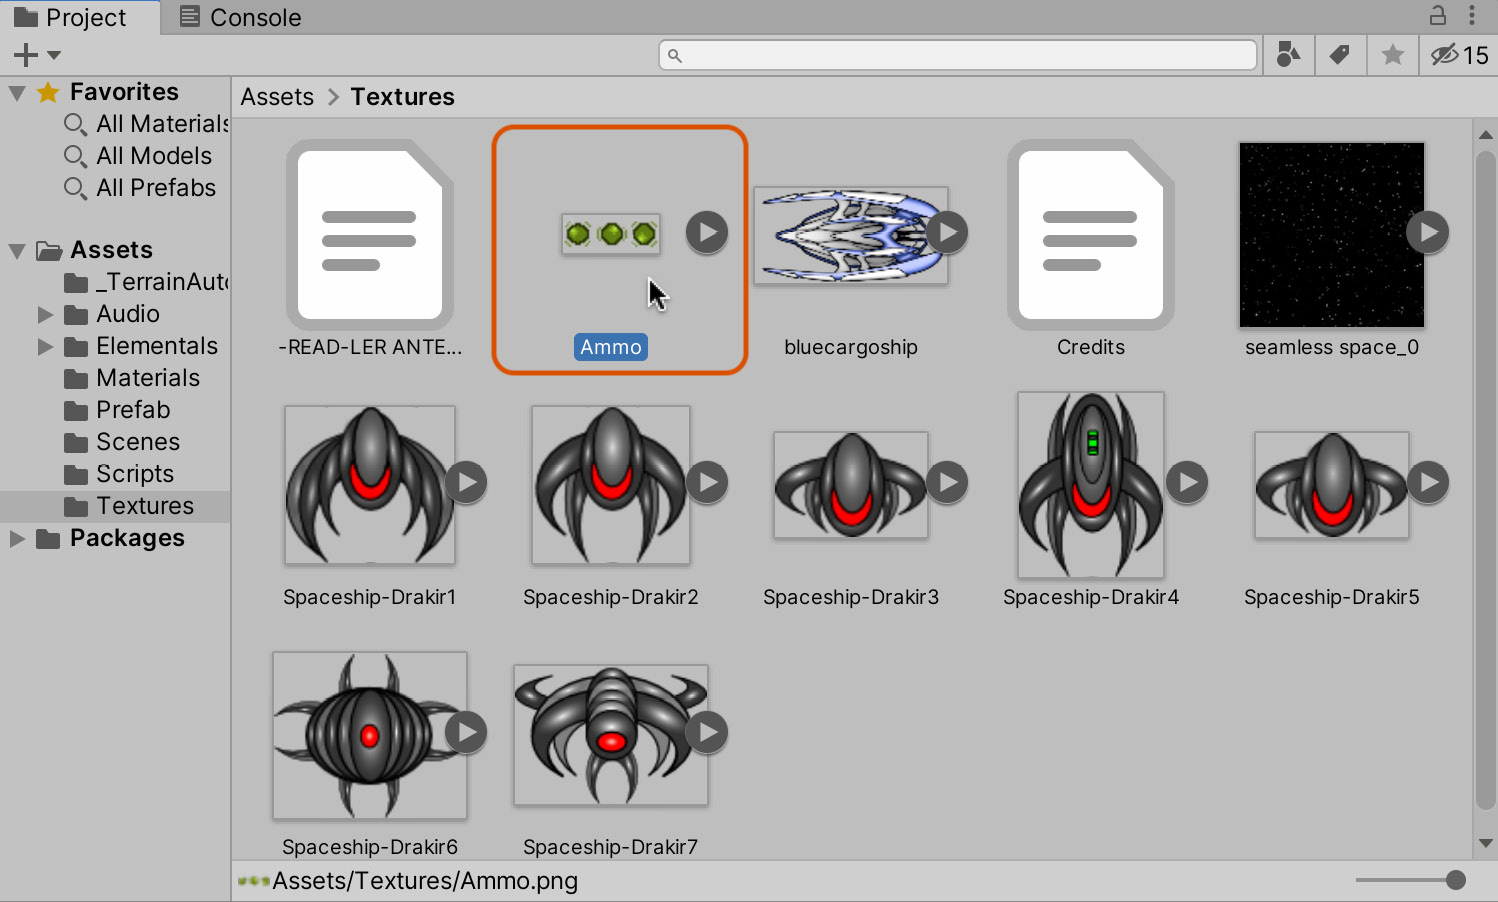
Figure 4.3 – Preparing to create an Ammo prefab
Currently, Unity recognizes the texture (and each ammo element) as a complete unit. We can use the Sprite Editor, however, to separate each part.
- Select the texture in the Project panel.
- From the Inspector, change the Sprite Mode dropdown from Single to Multiple, which informs Unity that more than one sprite is contained within the texture space:
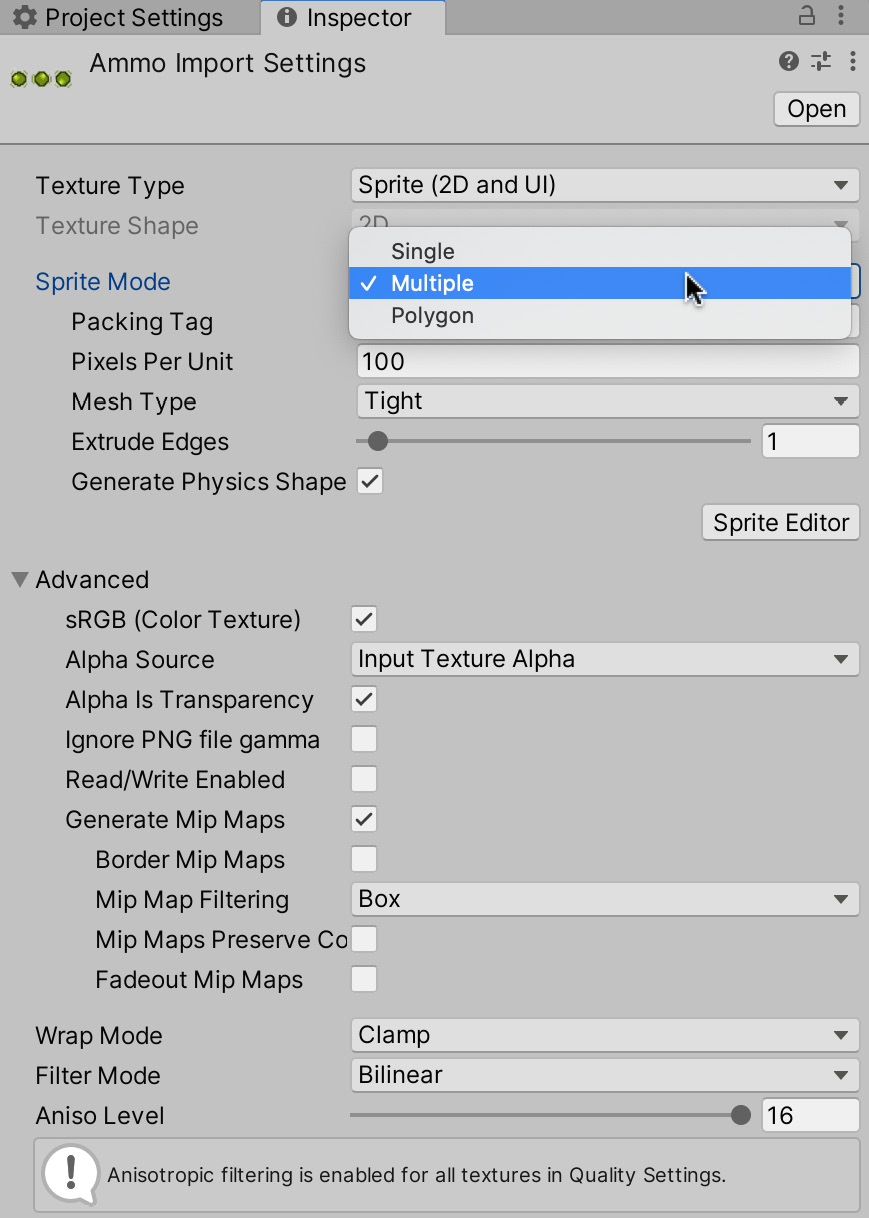
Figure 4.4 – Selecting Multiple as the texture type
- Click on the Apply button to apply the changes so far.
- Click on the Sprite Editor button from the Inspector, which will open the Sprite Editor window, allowing you to isolate each sprite.
- Click and drag your mouse to select each sprite, making sure that the Pivot setting is aligned to the object's center, as shown:
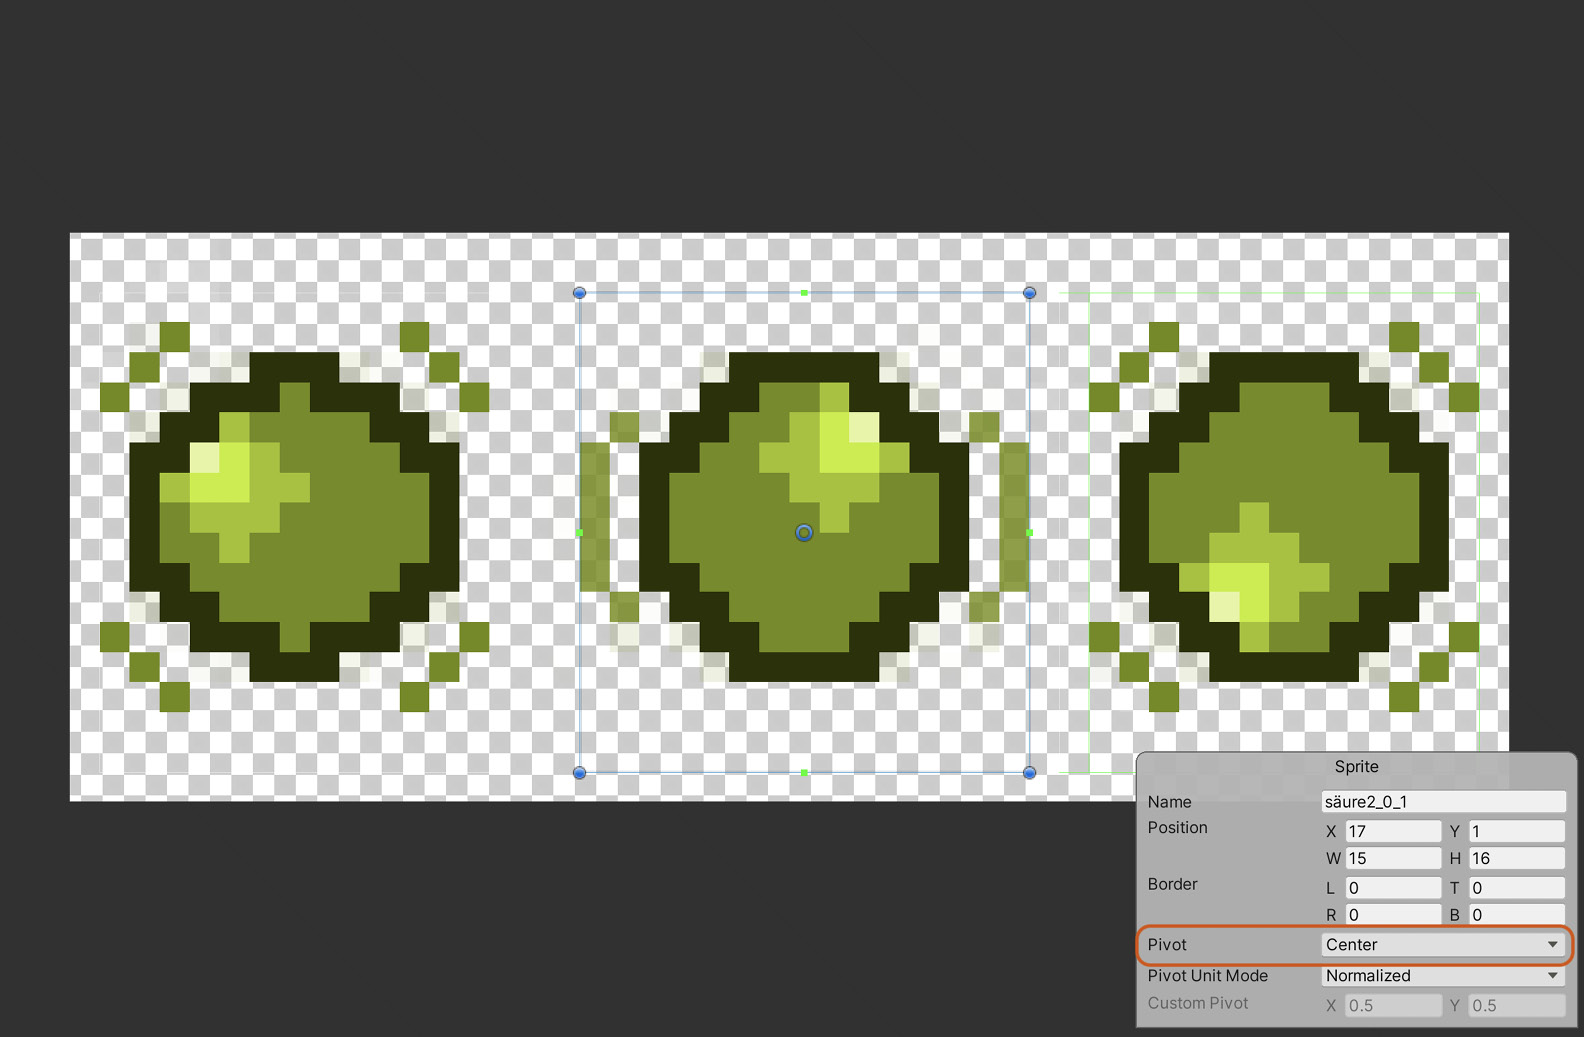
Figure 4.5 – Separating multiple sprites in the Sprite Editor
- Lastly, click on Apply to accept the changes.
After accepting the changes in the Sprite Editor, Unity automatically cuts the relevant sprites into separate units, each of which can now be selected as an object in the Project panel by clicking on the left arrow to the side of the texture:
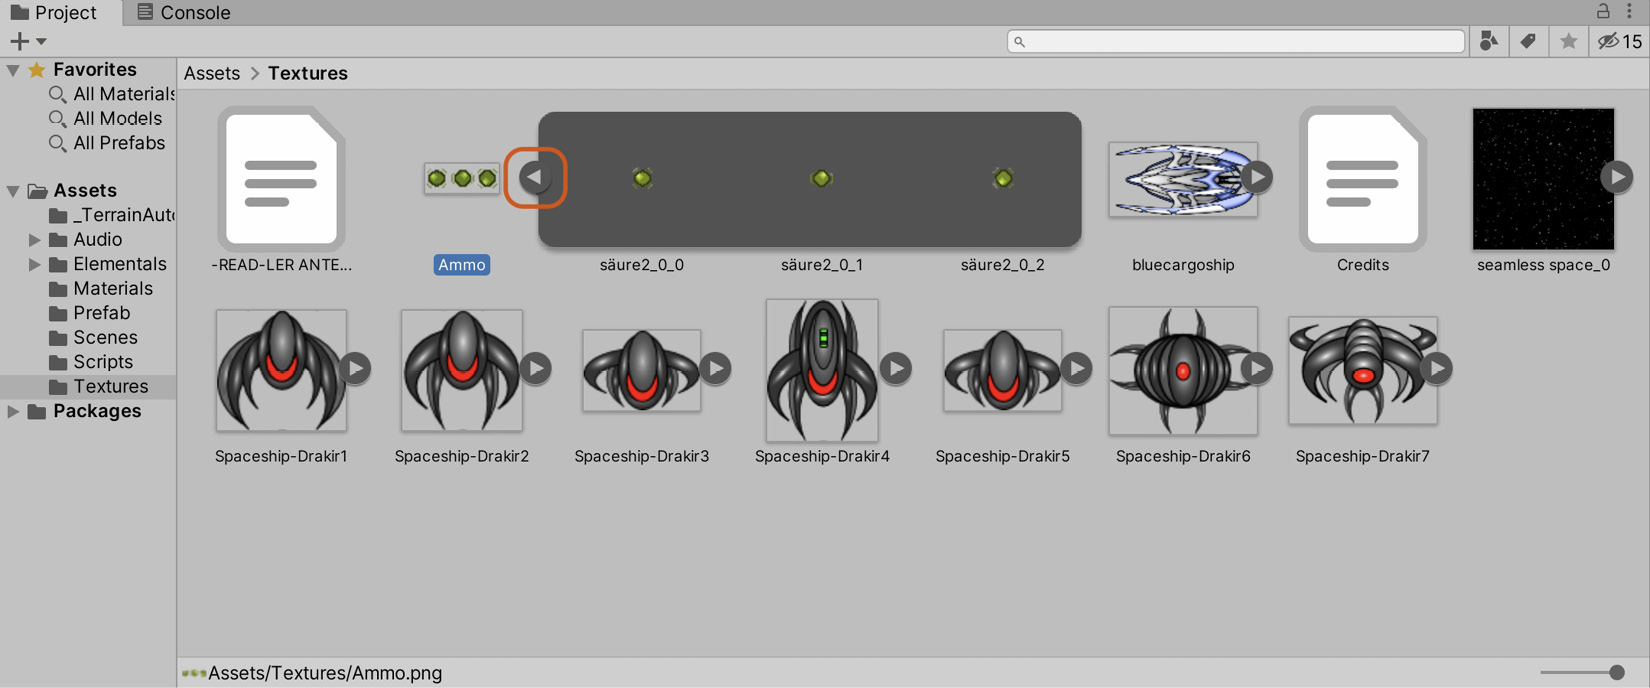
Figure 4.6 – Expanding all sprites within a texture
Now that we've separated the sprites, drag and drop one of them from the Project panel to the scene via the Hierarchy panel. On doing this, it will be added as a Sprite object. This object represents the beginning of our Ammo prefab. The sprite itself may not initially be oriented to face the game camera. Rename the object to Ammo_Sprite and, if required, rotate the sprite by 90 degrees on the X axis, as shown in Figure 4.7:

Figure 4.7 – Rotating the ammo sprite
With the initial projectile object created, correctly rotated, and visible to the player (and us), we can move on to configuring the object so that it moves through the scene when spawned by the player.
Adding projectile movement
As we've previously created a movement script, enabling movement for the projectile will be quick and easy. However, before we can attach the Mover script, we'll create a parent object to attach the script to:
- Create a new empty GameObject in the scene (GameObject | Create Empty from the application menu), and rename it Ammo.
- Make this new object a parent of Ammo_Sprite and ensure that its local forward vector is pointing in the direction that the ammo should travel, as shown in Figure 4.8:

Figure 4.8 – Configuring an ammo object
- Drag and drop the Mover.cs script from the Project panel to the Ammo parent object via the Hierarchy panel to add it as a component.
- Select the Ammo object and, in the Inspector, change the ammo's Max Speed value in the Mover component to 7.
- Finally, add a Box Collider to the object to approximate its volume (Component | Physics | Box Collider from the application menu).
- Press play on the toolbar. The Ammo object should shoot forward as though fired from a weapon.
Tip
If the projectile moves up or down incorrectly, then make sure that the parent object is rotated so that its blue forward vector is pointing forward, as shown in Figure 4.8.
Great! Now that the projectile is moving through the scene, we can set up collisions so that it destroys any enemies in its path.
Handling projectile collisions
Any objects that we want to collide in Unity should have a Rigidbody component attached so that they are included in Unity's physics system. We'll add and configure a Rigidbody component for the ammo now:
- Select the Ammo object.
- Select Component | Physics | Rigidbody from the application menu.
- On the Rigidbody component in the Inspector, disable the Use Gravity checkbox to prevent the ammo from falling to the ground during gameplay:

Figure 4.9 – Removing gravity from the Ammo object
For our purposes, gravity does not need to apply to the ammo as it should simply travel along and eventually be destroyed. This highlights an essential point in game development generally: real-world physics need not apply to every object accurately. We only need physics to make objects appear correct to the player when they're looking.
In addition to adding a Mover script and physics components, we also need the ammo to damage objects and destroy or disable itself on collision. To achieve this, create a new script file called Ammo.cs. The entire code for this is included in the following code block, as follows:
public class Ammo : MonoBehaviour
{
public float Damage = 100f;
public float LifeTime = 2f;
void OnEnable()
{
CancelInvoke();
Invoke("Die", LifeTime);
}
void OnTriggerEnter(Collider Col)
{
Health H = Col.gameObject.GetComponent<Health>();
if(H == null) { return; }
H.HealthPoints -= Damage;
Die();
}
void Die()
{
gameObject.SetActive(false);
}
}
The following points summarize the preceding code:
- The Ammo class should be attached to the Ammo prefab object and will be instantiated for all ammo objects created. Its primary purpose is to damage any objects with which it collides.
- The OnTriggerEnter function is invoked for the ammo when it enters a trigger attached to a movable entity, such as the player or enemies. It retrieves the Health component attached to the object, if it has one, and reduces its health by the Damage amount. The Health component was created in the previous chapter.
- Notice that each ammo object will have a LifeTime value. This represents the amount of time in seconds for which the ammo should remain alive and active after it is generated in the scene. After the lifetime expires, the ammo should either be destroyed entirely or deactivated (more on this shortly).
- The Invoke function is used to disable the ammo object after the LifeTime interval. The function call is scheduled in the OnEnable event, which is called automatically by Unity each time an object is activated (changed from disabled to enabled).
To apply the new script to the ammo object, take the following steps:
- Drag and drop the Ammo script file from the Scripts folder in the Project panel to the Ammo.
- Drag and drop the whole Ammo object in the scene back to the Project panel in the Prefabs folder to create a new Ammo prefab, as shown in Figure 4.10:

Figure 4.10 – Creating an Ammo prefab
Congratulations! You've now created an Ammo prefab, which we will spawn from the turret location we previously set up. However, before we can start work on the spawn system, we need a method of creating and storing projectiles efficiently, which is where the object pool design pattern comes in.
Creating an object pool
The Ammo prefab created so far presents us with a technical problem that, if not taken seriously, has the potential to cause serious performance issues in our game. When the spaceship weapon is fired, we'll need to generate ammo that launches into the scene and destroys the enemies on collision. This is fine in general, but the problem is that the player could potentially press the fire button many times in quick succession, and could even hold down the fire button for long periods of time, thereby spawning potentially hundreds of Ammo prefabs. We could use the Instantiate function to generate these prefabs dynamically, but this is problematic because instantiating is computationally expensive. When used to instantiate many items in succession, it will typically cause a nightmarish slowdown that'll reduce the frames per second (FPS) to unacceptable levels. We need to avoid this!
The solution is known as Pooling, Object Pooling, or Object Caching. In essence, it means that we must spawn a large and recyclable batch of ammo objects at the level startup (a pool of objects) that initially begin hidden or deactivated, and we activate the objects as and when needed. When the ammo collides with an enemy, or when its lifetime expires, we don't destroy the object entirely; we deactivate it again, returning it to the pool for reuse later if needed. In this way, we avoid all calls to instantiate, apart from the initial pool creation, and recycle the ammo objects that we have.
To get started with coding the object pool, we'll make an AmmoManager class. This class will be responsible for two things:
- Generating a pool of ammo objects at scene startup
- Giving us a valid and available ammo object from the pool on demand, such as on weapon-fire
Consider the following AmmoManager code block created to achieve this:
public class AmmoManager : MonoBehaviour
{
public static AmmoManager AmmoManagerSingleton = null;
public GameObject AmmoPrefab = null;
public int PoolSize = 100;
public Queue<Transform> AmmoQueue = new Queue<Transform>();
private GameObject[] AmmoArray;
void Awake ()
{
if(AmmoManagerSingleton != null)
{
Destroy(GetComponent<AmmoManager>());
return;
}
AmmoManagerSingleton = this;
AmmoArray = new GameObject[PoolSize];
for(int i = 0; i < PoolSize; ++i)
{
AmmoArray[i] = Instantiate(AmmoPrefab, Vector3.zero, Quaternion.identity, transform) as GameObject;
Transform ObjTransform = AmmoArray[i].transform;
AmmoQueue.Enqueue(ObjTransform); AmmoArray[i].SetActive(false);
}
}
public static Transform SpawnAmmo (Vector3 Position, Quaternion Rotation)
{
Transform SpawnedAmmo = AmmoManagerSingleton.AmmoQueue.Dequeue();
SpawnedAmmo.gameObject.SetActive(true);
SpawnedAmmo.position = Position;
SpawnedAmmo.localRotation = Rotation;
AmmoManagerSingleton.AmmoQueue.Enqueue(SpawnedAmmo);
return SpawnedAmmo;
}
}
The following points summarize the code block:
- AmmoManager features an AmmoArray member variable, which holds a complete list (a sequential array of references) of all ammo objects to be generated at startup (during the Awake event).
- AmmoArray will be sized to PoolSize. This is the total number of ammo objects to be generated. The Awake function generates the ammo objects at the beginning of the level and adds them to the queue using Enqueue.
- Once generated, each ammo object is deactivated with SetActive(false) and held in the pool until needed.
- AmmoManager uses the Queue class from the Mono library to manage how specific ammo objects are selected from the pool. The queue is a First-In, First-Out (FIFO) structure. The object removed from the queue is always the object at the front. More information on the Queue class can be found online at https://msdn.microsoft.com/en-us/library/7977ey2c%28v=vs.110%29.aspx.
- The Enqueue function of the Queue object is called during Awake to add objects initially to the queue, one by one, as they are generated.
- The SpawnAmmo function generates a new item of ammo in the scene. This function does not rely on the Instantiate function but uses the Queue object instead. It removes the first ammo object from the queue, activates it, and then adds it to the end of the queue again behind all the other ammo objects. In this way, a cycle of generation and regeneration happens, allowing all ammo objects to be recycled.
- AmmoManager stores a singleton object, meaning that one, and only one, instance of the object should exist in the scene at any one time. This functionality is achieved through the static member, AmmoManagerSingleton.
To use this class, take the following steps:
- Create a new GameObject in the scene called AmmoManager by selecting GameObject | Create Empty from the application menu.
- Drag and drop the AmmoManager script from the Project panel to the new object in the Hierarchy.
- Drag and drop the Ammo prefab from the Prefabs folder to the Ammo Prefab slot for the Ammo Manager component in the object's Inspector:

Figure 4.11 – Adding AmmoManager to an object
The scene now features an AmmoManager object to maintain an ammo pool. However, nothing in our existing functionality connects a fire button press from the gamer with the generation of a projectile in the scene. Let's fix that now.
Spawning projectiles
The game now has an efficient way of storing projectiles that we can retrieve when required. We'll put this system to the test soon as we create the logic to spawn the projectiles whenever the player presses a specific button. The functionality we require will sit nicely in the PlayerController script that we started in the previous chapter. The amended PlayerController class is included in the following code block. Only the changes are included in the following code; for the full class, please refer to the Chapter04/End/Assets/Scripts folder:
public class PlayerController : MonoBehaviour
{
public string FireAxis = "Fire1";
public float ReloadDelay = 0.3f;
public bool CanFire = true;
public Transform[] TurretTransforms;
Void Awake ()
{
ThisBody = GetComponent<Rigidbody>();
}
Void FixedUpdate ()
{
…
if(Input.GetButtonDown(FireAxis) && CanFire)
{
foreach(Transform T in TurretTransforms)
{
AmmoManager.SpawnAmmo(T.position, T.rotation);
}
CanFire = false;
Invoke ("EnableFire", ReloadDelay);
}
}
void EnableFire()
{
CanFire = true;
}
}
In summary, we have the following:
- PlayerController now features a TurretTransform array variable, which will list all the children to be used as turret spawn locations.
- During the Update function, PlayerController checks for a fire button press. If detected, the code cycles through all turrets and spawns one ammo object at each turret location.
Once the ammo is fired, ReloadDelay is engaged (set to true). This means that the delay must first expire before new ammo can be fired again later.
After adding this code to PlayerController, select the Player object in the scene, enter 1 in the Size field of Turret Transforms, and then drag and drop the empty object onto the Turret Transforms slot. This example uses only one turret, but you could add more if desired:

Figure 4.12 – Configuring Turret Transform for spawning ammo
Now you're ready to playtest and fire ammo. By playing the scene and pressing fire on the keyboard or mouse (left-click), projectiles will be generated. Excellent! However, when testing, you may notice two main problems. First, the ammo is the incorrect size. Second, the ammo sometimes bounces, flips, or reacts to the player's spaceship. Fixing the size issue is simple:
- Select the Ammo prefab in the Project panel.
- In the Inspector, enter a new scale in the Transform component.
However, fixing the second issue, where the projectile collides with the player ship, is slightly more complex, and involves editing Unity's physics settings, which is what we'll look at next.
Configuring projectile physics
If the ammo appears to bounce or react to the player's spaceship, then we'll need to make the ammo immune or unresponsive to the Player object. To achieve this, we can use physics layers:
- Select the Player object in the scene.
- From the Inspector, click on the Layer dropdown, and choose Add Layer from the context menu.
- Name the layer Player to indicate that all objects attached to the layer are associated with the player:
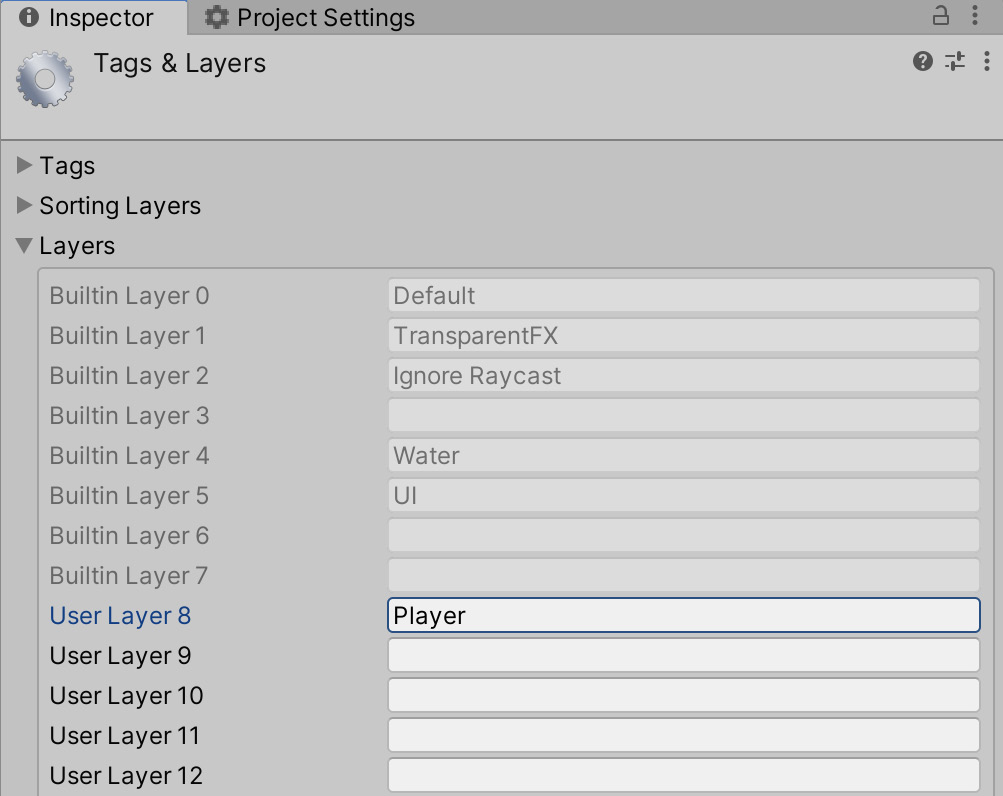
Figure 4.13 – Creating layers
- Assign both the Player object in the scene and the Ammo prefab in the Project panel to the newly created Player layer by selecting each in turn, clicking on the Layer dropdown, and choosing the Player option:
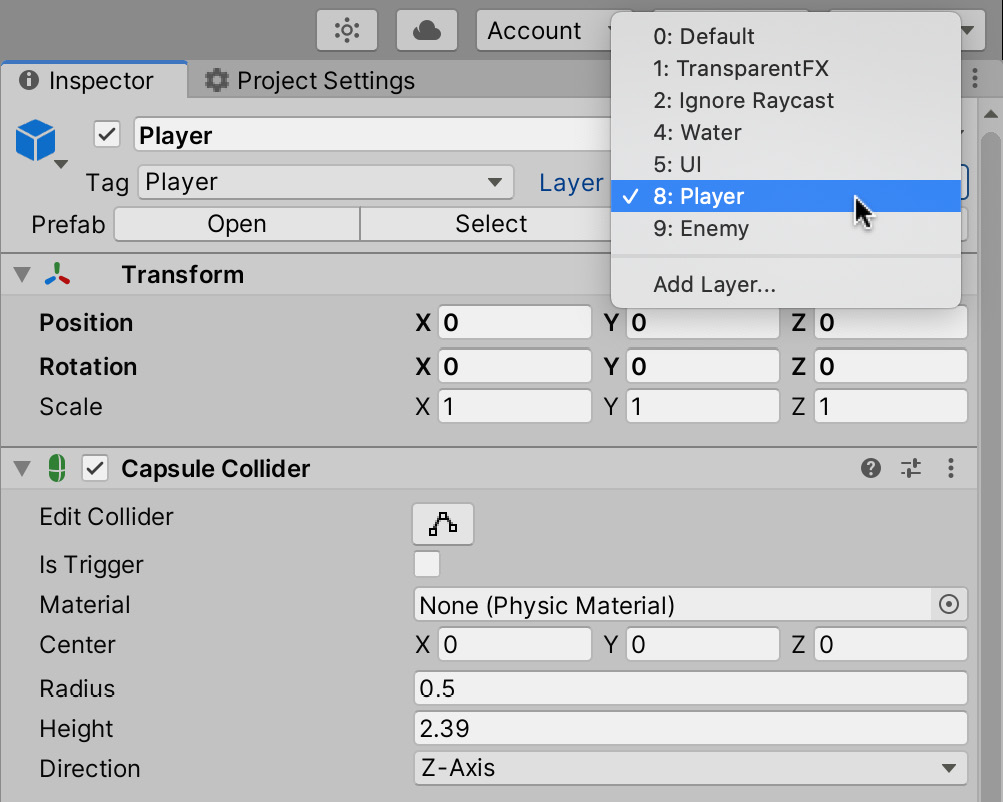
Figure 4.14 – Assigning the player and ammo to the Player layer
- If prompted with a pop-up dialog, choose to change the children also. This ensures that all child objects are also associated with the same layer as the parent.
Both Player and Ammo have now been assigned to the same layer. From here, we can make all objects in the same layer ignore each other.
- Navigate to Edit | Project Settings from the Application menu.
- In the window that appears, select Physics.
- The global Physics settings appear in the Project Settings window. At the bottom of the window, Layer Collision Matrix displays how layers interact with each other. Intersecting layers with a checkmark can and will affect each other. For this reason, remove the checkmark for the Player layer to prevent collisions from occurring between objects on this layer, as shown in Figure 4.15:
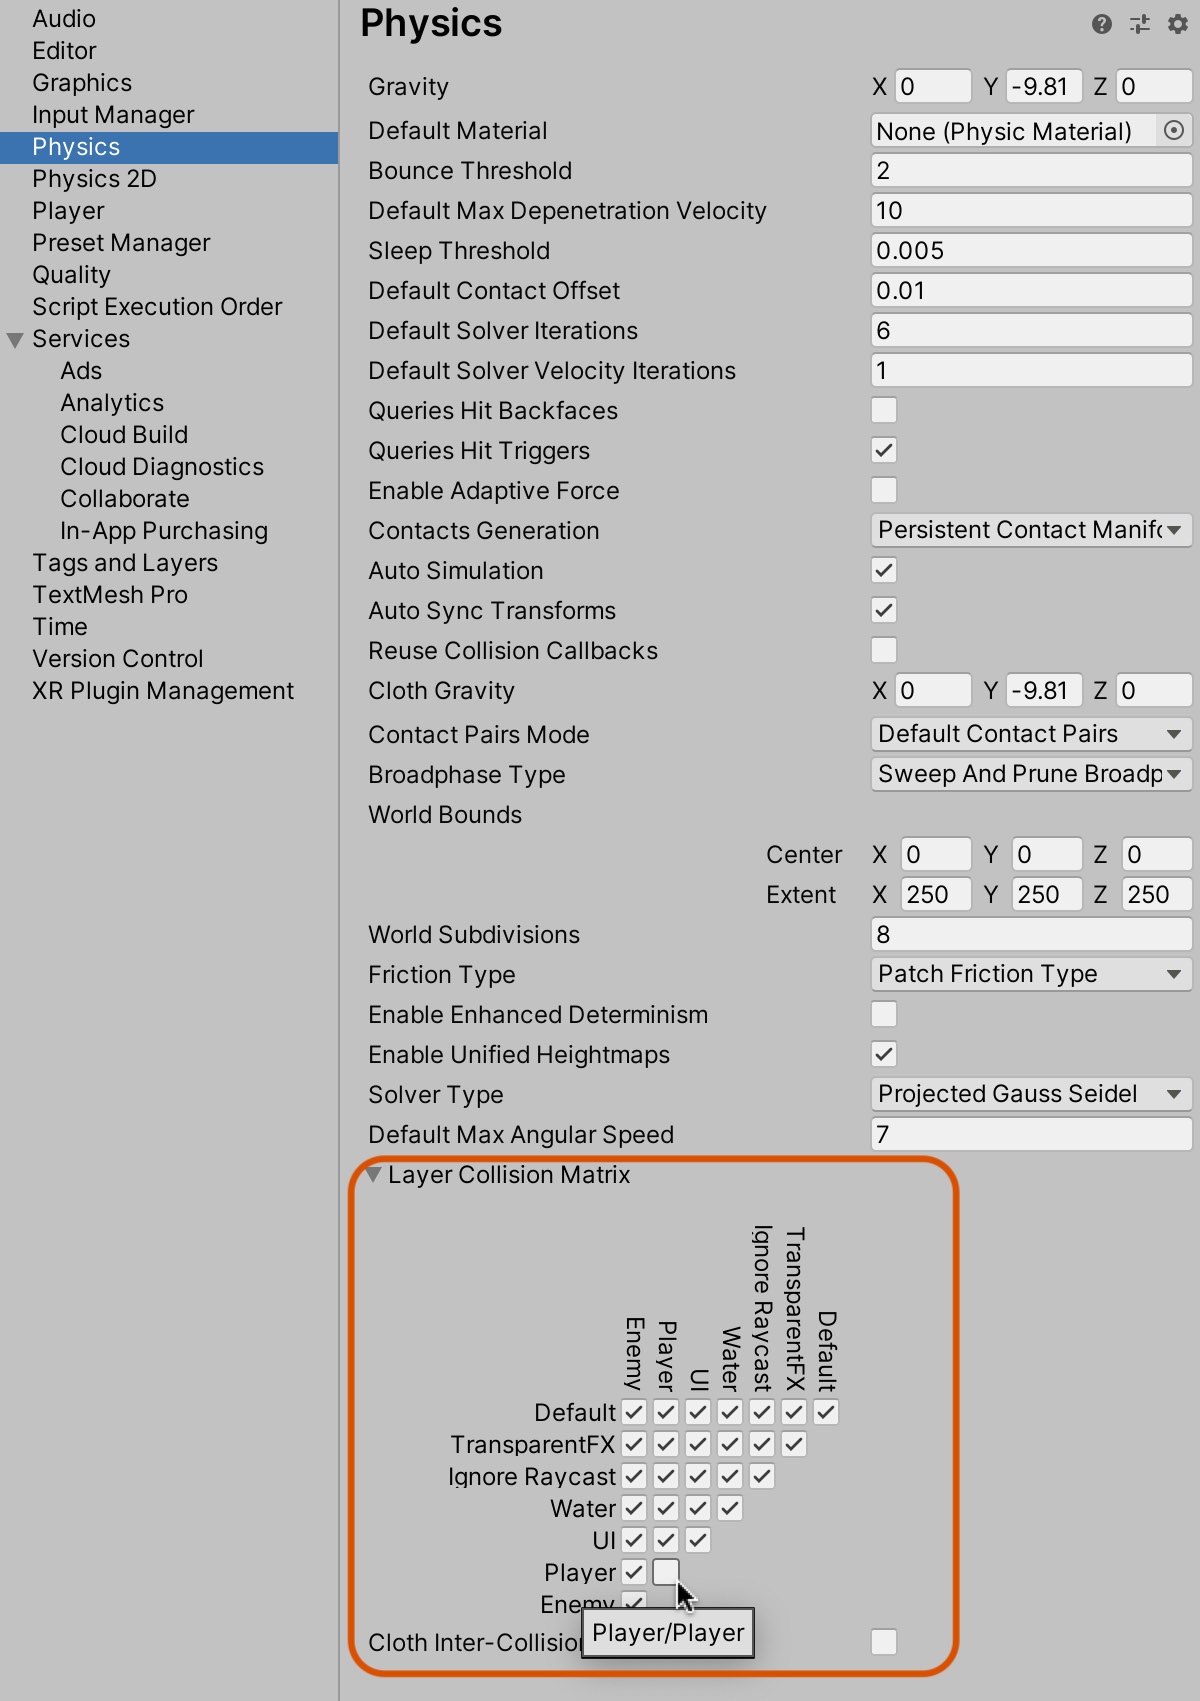
Figure 4.15 – Setting the Layer Collision Matrix to prevent objects on the Player layer from colliding
With the Layer Collision Matrix set, test the game again by pressing Play on the toolbar. When you do this and press fire, the projectiles should no longer react to the player spaceship. The projectile should, however, still collide with and destroy the enemies:
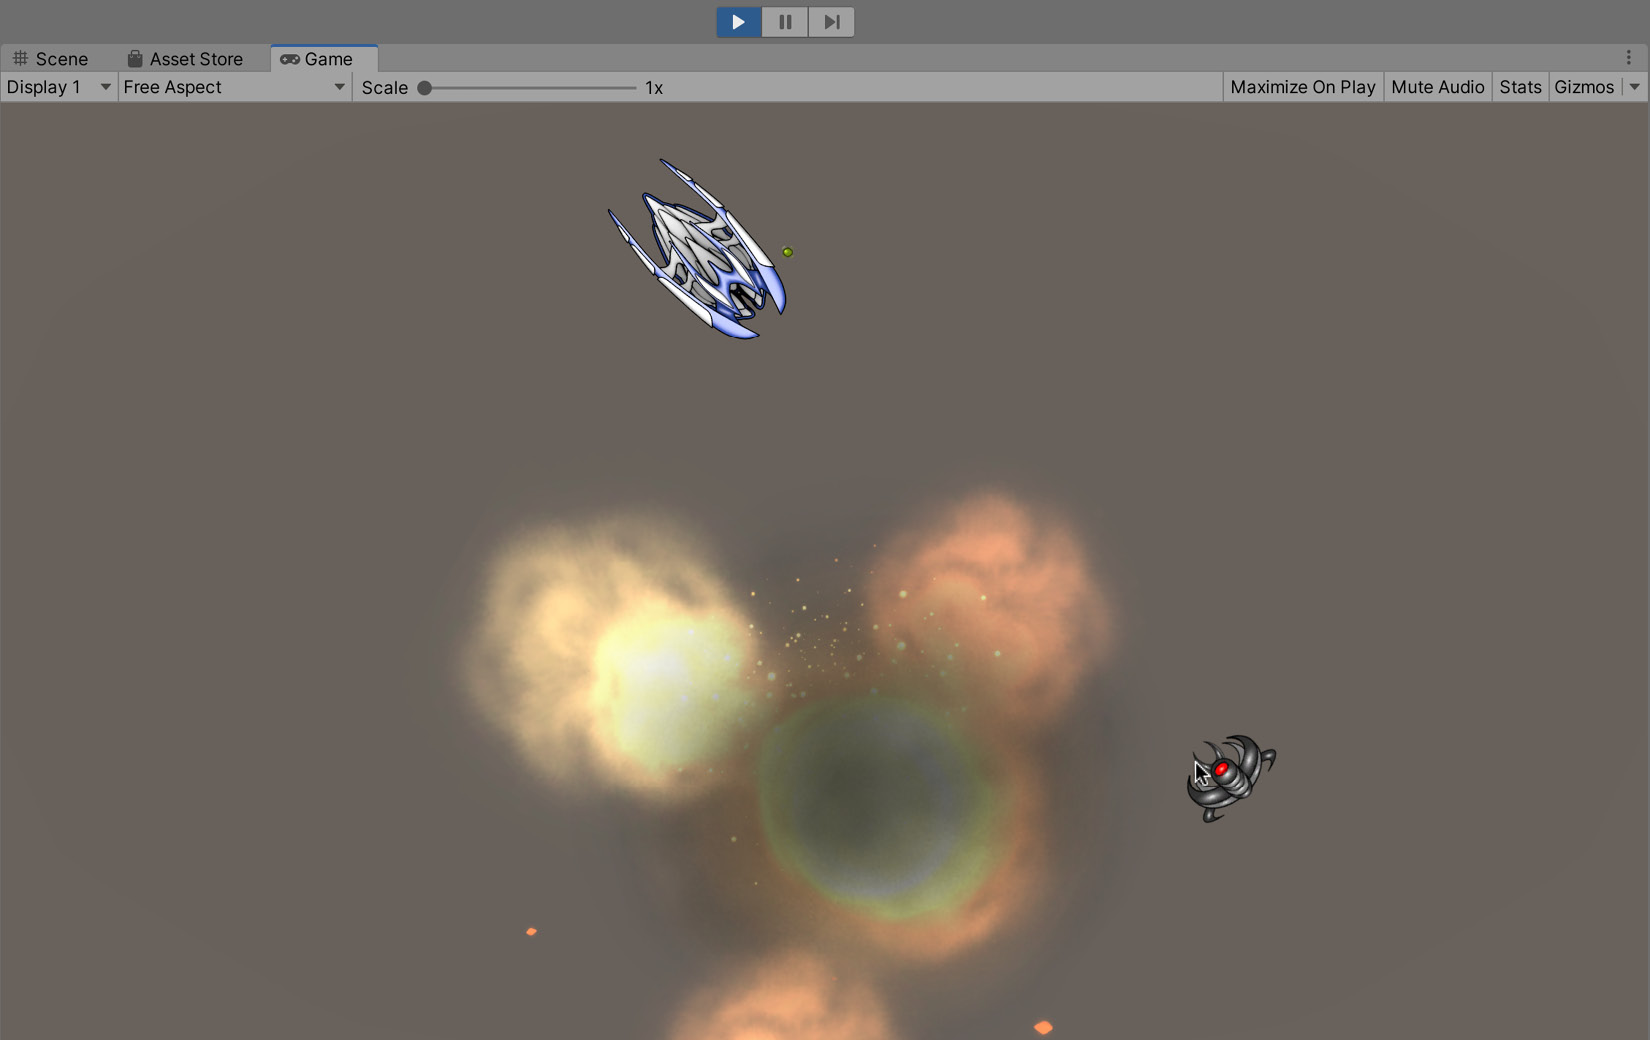
Figure 4.16 – Destroying enemies by shooting projectiles!
Excellent work! We now have a spaceship that can fire weapons and destroy enemies, and the physics works as expected. Maybe you'd like to customize the player controls a little, or perhaps you want to use a gamepad. The next section will explore this further.
Customizing controls
You may not like the default controls and key combinations associated with the input axes—Horizontal, Vertical, and Fire1. Perhaps you want to change them. Even if you don't want to change the controls for this game, you most certainly will in a future project, so it's good to know how.
The input axes are read using the Input.GetAxis function (shown earlier) and are specified by human-readable names, but it's not immediately clear how Unity maps specific input buttons and devices to these virtual axes. Here, we'll see how to customize them. To get started, do the following:
- Access the input settings by navigating to Edit | Project Settings from the Application menu.
- Select Input Manager in the Project Settings window that opens.
On selecting this option, a collection of custom-defined input axes appears as a list. This defines all the axes used by the input system. The Horizontal and Vertical axes should be listed here:
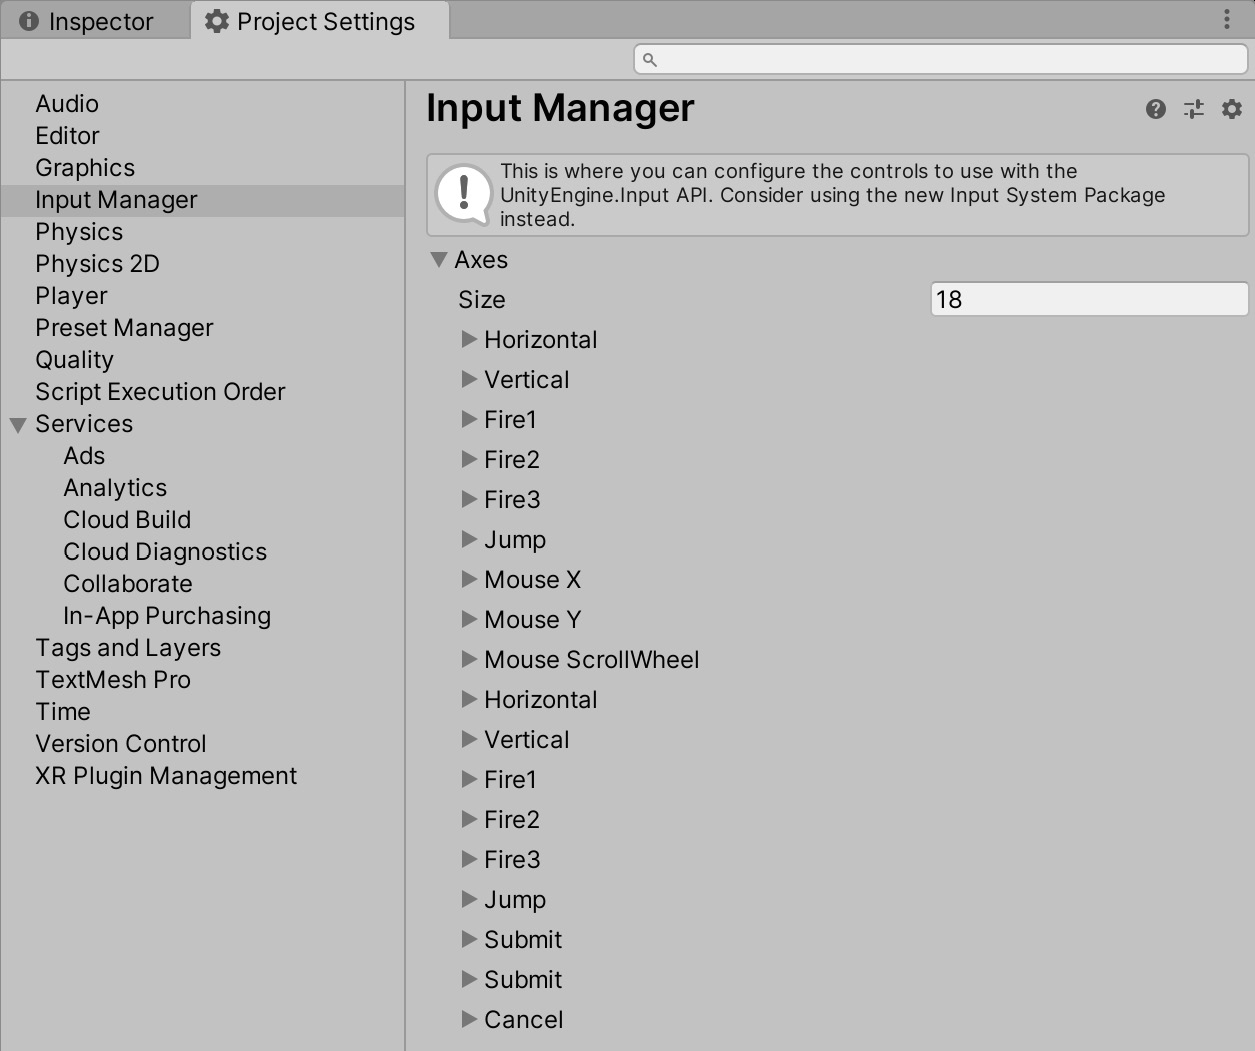
Figure 4.17 – Exploring the input axes
By expanding each axis in the Project Settings panel, you can specify how specific keys and controls on hardware devices, such as a keyboard and mouse, will map to an axis. The Horizontal axis, for example, is defined twice. For the first definition, Horizontal is mapped to the left, right, and A and D keys on the keyboard. Right and D are mapped as Positive Button because, when pressed, they produce positive floating-point values from the Input.GetAxis function (0–1). Left and A are mapped as Negative Button because, when pressed, they result in negative floating-point values for Input.GetAxis. This makes it easy to move objects left and right using negative and positive numbers:
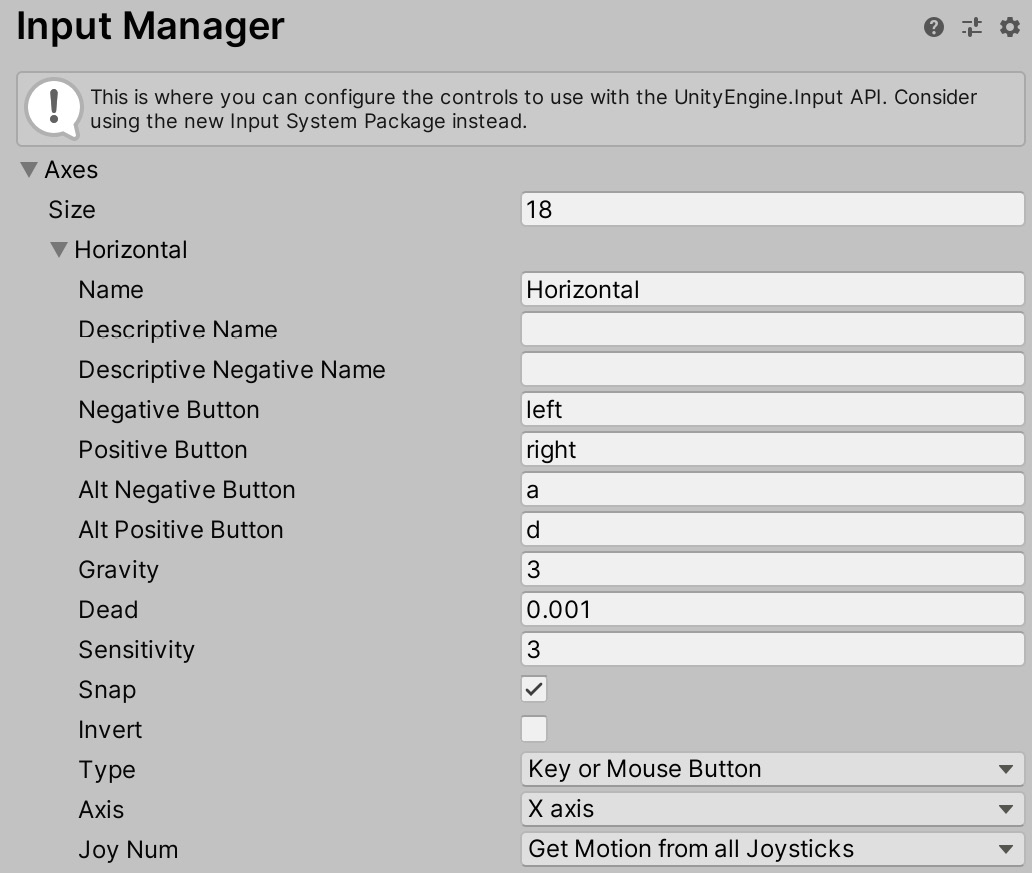
Figure 4.18 – Configuring an input axis
As mentioned, the Horizontal input is defined twice—once near the top of the list and again near the bottom. These two definitions are accumulative and not contradictory—they stack on top of one another. They allow you to map multiple devices to the same axis, giving you cross-platform and multidevice control over your games.
By default, Horizontal is mapped in the first definition to the left, right, A, and D keys on the keyboard, and in the second definition, to joystick motion. Both definitions are valid and work together. You can have as many definitions for the same axis as you need, depending on the controls you need to support.
More Information
More information on player input and customizing controls can be found in the online Unity documentation at https://docs.unity3d.com/Manual/class-InputManager.html.
For this project, the controls will remain at their defaults, but go ahead and change or add additional controls if you want to support different configurations.
With the player now controlled precisely as we want, and able to shoot projectiles that collide with and destroy our enemies, there's one last thing missing from our core gameplay loop—keeping track of and displaying the score.
Creating the score system
We want to be able to assign a point value to each enemy and have a visible score increase with each kill. This goal can be split into two tasks: first, we need the UI to display the score and second, we need logic to track the current score and push any changes to the UI. As the second task (the score logic) requires the UI, we'll start by creating an interface to display the score before moving on to the logic.
Implementing the score UI
UI is an acronym for user interface and refers to all the 2D graphical elements that sit atop the game window and provide information to the player:
- Create a new UI Canvas object by selecting GameObject | UI | Canvas from the application menu.
- The Canvas object defines the total surface or area in which the UI lives, including all buttons, text, and other widgets. Initially, the Canvas object may be too large or too small to be seen clearly in the viewport, so select the Canvas object in the Hierarchy panel and press the F key on the keyboard to focus the object. It should appear as a sizeable, vertically aligned rectangle, as shown in Figure 4.19:

Figure 4.19 – Examining the Canvas object in the viewport
The Canvas object is not visible itself in the Game tab. Instead, it acts as a container. Even so, it strongly influences how contained objects appear on the screen in terms of size, position, and scale. For this reason, before adding objects and refining the design of an interface, it's helpful to configure your Canvas object first. To do this, take these steps:
- Select the Canvas object in the scene.
- From the Inspector, click on the UI Scale Mode drop-down option under the Canvas Scaler component.
- From the drop-down list, choose the Scale With Screen Size option.
- For the Reference Resolution field, enter 1920 for the X field and 1080 for the Y field, as shown in Figure 4.20:
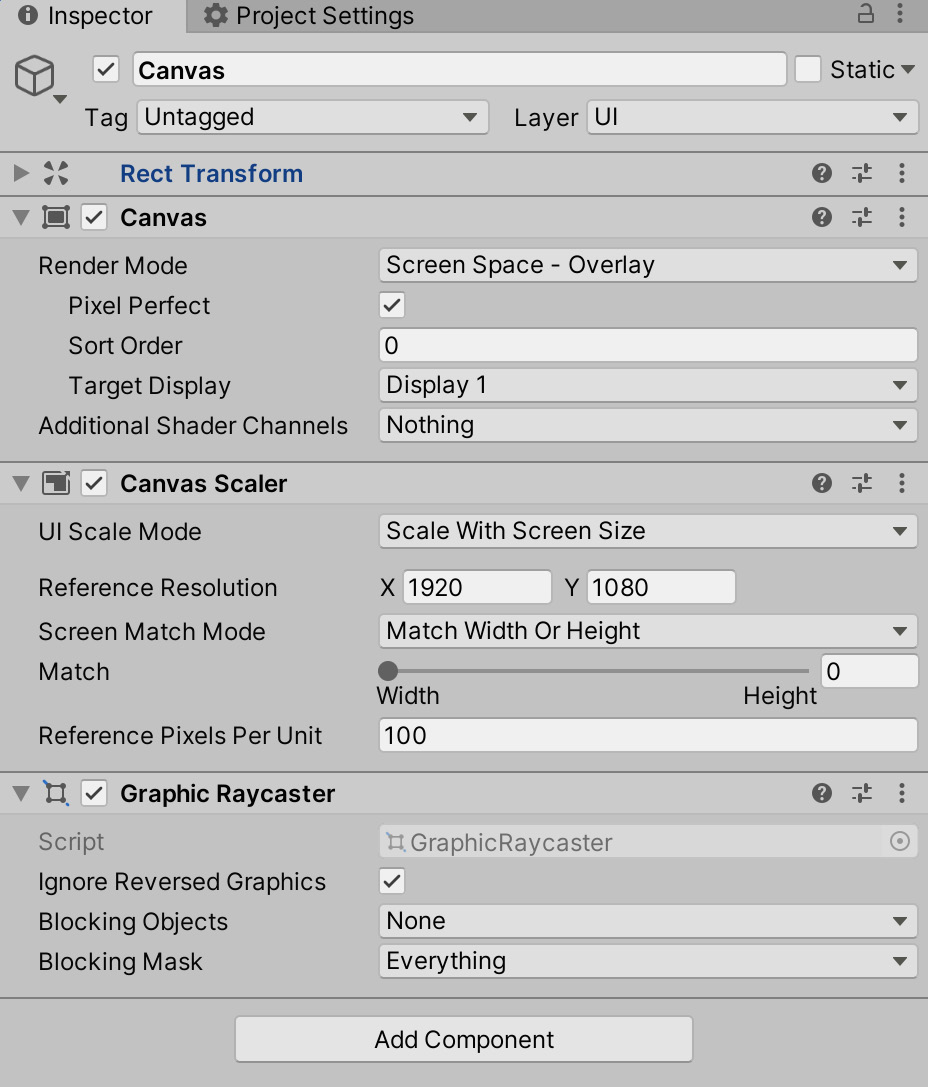
Figure 4.20 – Adjusting the Canvas Scaler component
By adjusting the Canvas Scaler component to Scale With Screen Size, the UI for the game will automatically stretch and shrink to fit the target resolution, ensuring that each element is scaled to the same proportions, maintaining the overall look and feel. This is a quick and easy method to create a UI once and have it adjust its size to fit nearly any resolution. It may not always be the best solution to maintaining the highest quality graphical fidelity, but it's functional and suitable for many applications.
In any case, before proceeding with the UI design, it's helpful to see both the Scene viewport and Game tab side by side in the interface (or across two monitors, if you have a multi-monitor configuration). This allows us to build the interface in the Scene viewport, and then preview its effects in the Game tab. You can rearrange the Scene and Game tabs by dragging and dropping the Game tab beside the Scene tab in the Unity Editor. Your Unity Editor should then look similar to the one in Figure 4.21:

Figure 4.21 – Docking the Scene and Game tabs side by side
Next, let's add the text widget to the UI to display the game score:
- Right-click on the Canvas object in the Hierarchy panel.
- Select UI | Text from the context menu that appears.
This creates a new text object as a child of the Canvas object, as opposed to a top-level object with no parent. The text object is useful to draw text on screen with a specific color, size, and font setting.
By default, the text object may not initially appear visible in either the scene or viewport, even though it's listed as an object in the Hierarchy panel. However, look more closely at the scene, and you're likely to see a very small and dark text object, which appears both in the Canvas and the Game tab, as shown in Figure 4.22:

Figure 4.22: Newly created text objects can sometimes be difficult to see
By default, new text objects feature black text with a small font size. For this project, these settings will need to be changed:
- Select the Text object in the Hierarchy panel, if it's not already selected.
- From the Inspector, on the Text component, change the text color to white and the font size to 20:

Figure 4.23 – Changing the text size and color
The text still appears too small, even after changing its size. If you increase the size further, however, the text may disappear from view. This happens because each text object has a rectangular boundary defining its limits. When the font size increases beyond what can fit in the boundary, the text is hidden altogether. To fix this, we'll expand the text boundary:
- Switch to the Rect Transform tool with T or select the tool from the toolbar.
- On activating the Rect Transform tool, a clearly defined boundary will be drawn around the selected text object in the Scene viewport, indicating its rectangular extents. To increase the boundary size to accommodate larger text, click and drag on the boundary edges with the mouse to adjust them as needed.
- Adjusting the rectangle will not change the text size but will increase the boundary size, and now you can increase Font Size to improve text readability:
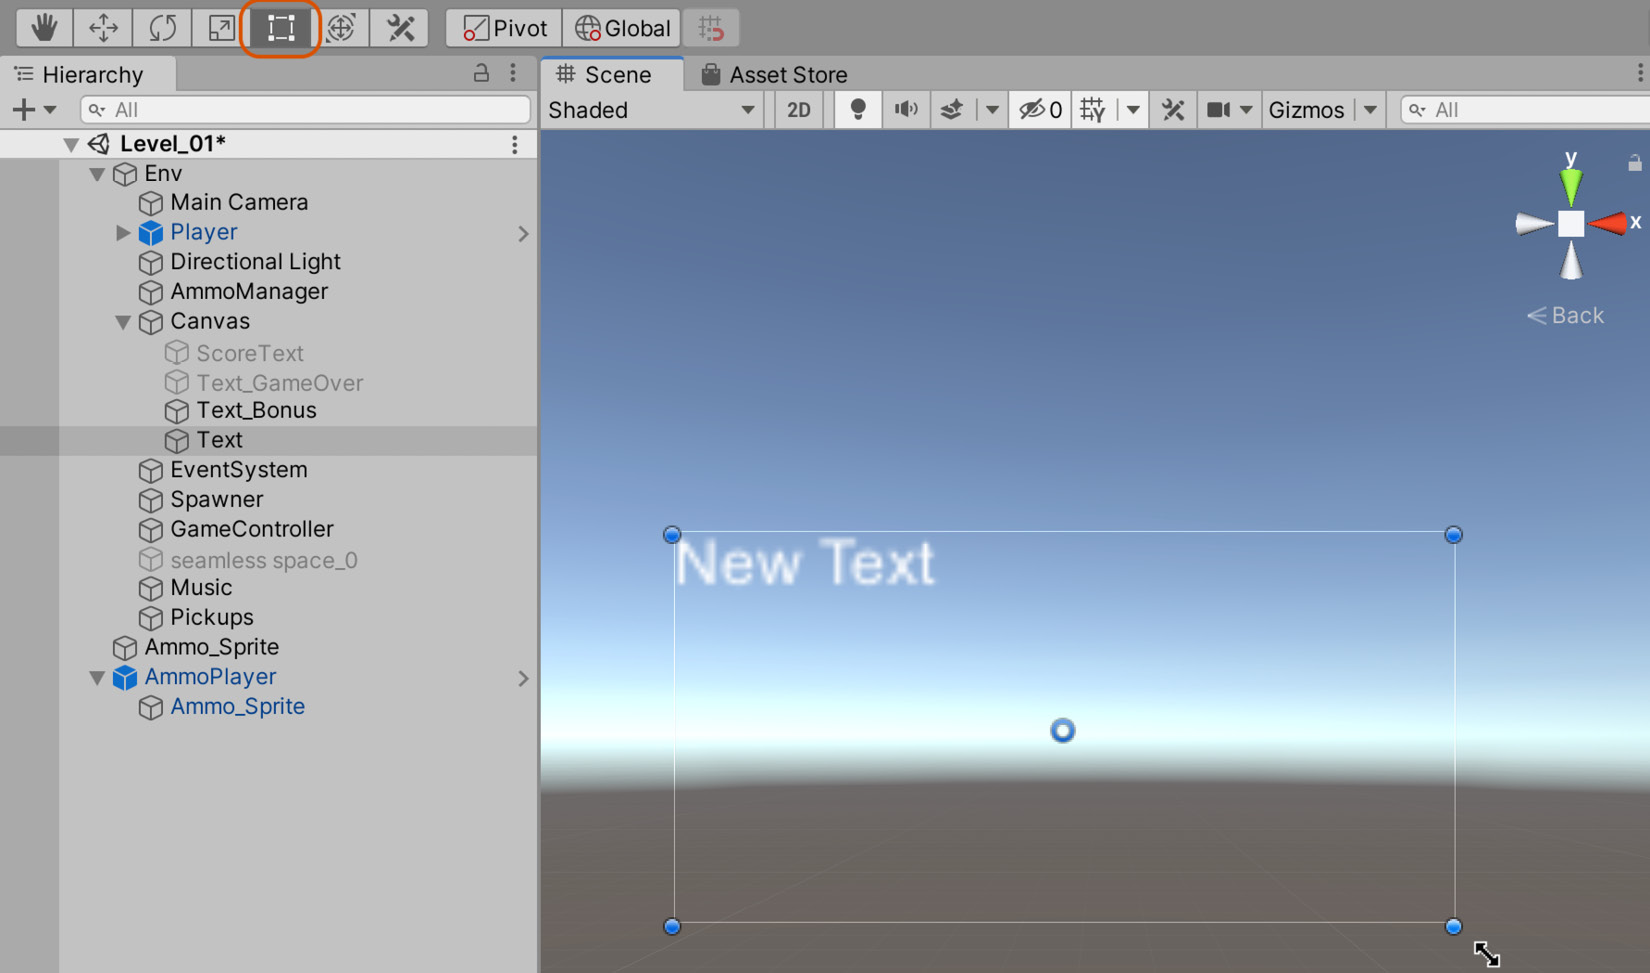
Figure 4.24 – Adjust the text rectangle to support larger font sizes
- In addition to setting the text boundary size, the text can also be vertically aligned to the boundaries' center by clicking on the center alignment button for the vertical group. For horizontal alignment, the text should remain left-aligned to allow for the score display, as shown in Figure 4.25:

Figure 4.25 – Aligning text within the boundary
Although the text is now aligned vertically within its containing boundary, we'll still need to align it as a whole to the canvas container to ensure that it remains on screen at the same position and orientation, even if the Game window is resized and realigned. To do this, we'll use Anchors:
- Select the transform tool (W).
- Reposition the text object to the top-right corner of the screen at the location where the score should appear. The object will automatically move within a 2D plane as opposed to 3D space.
As you move the text object in the Scene viewport, check its appearance in the Game tab to ensure that it looks correct and appropriate. To better understand what it will look like in-game, you can set the Text field in the Inspector to Score:, as shown in Figure 4.26. However, this is not essential as we will update this text programmatically soon::

Figure 4.26 – Positioning the Score text within the Game tab
To secure the position of the text object on screen (preventing it from sliding or moving), even if the user resizes the Game tab, we can set the object's Anchor position to the top-right corner of the screen. Using an Anchor ensures that the text is always positioned as a constant, proportional offset from its Anchor. To configure an Anchor for the text object, do the following:
- Click on the Anchor Presets button under the Rect Transform component in the Inspector. When you do this, a preset menu appears from which you can choose a range of alignment locations. Each preset is graphically presented as a small diagram, including a red dot at the location of anchor alignment.
- Select the top-right preset, as shown in Figure 4.27:

Figure 4.27 – Aligning the text object to the screen
Excellent work! The text object is now ready to use. Of course, in play mode, the text remains unchanged and doesn't display a real score. That's because we need to add some code. However, overall, the text object is in place, and we can move on to writing that code.
Scripting the score logic
To display a score in the newly created UI, we'll first need to create a scoring system in code. The score functionality will be added to a general, overarching GameController class, responsible for all game-wide logic and features. The code for GameController is included in the following code block:
public class GameController : MonoBehaviour
{
public static GameController ThisInstance = null;
public static int Score;
public string ScorePrefix = string.Empty;
public Text ScoreText = null;
public Text GameOverText = null;
void Awake()
{
ThisInstance = this;
}
void Update()
{
if(ScoreText!=null) {
ScoreText.text = ScorePrefix + Score.ToString();
}
}
public static void GameOver()
{
if(ThisInstance.GameOverText!=null) {
ThisInstance.GameOverText.gameObject. SetActive(true); }
}
}
In summary, we have the following:
- The GameController class uses the UnityEngine.UI namespace. This is important because it includes access to all the UI classes and objects in Unity. If you don't include this namespace in your source files, then you cannot use UI objects in that script
- The GameController class features two public Text members—namely, ScoreText and GameOverText. These refer to two text objects, both of which are optional as the GameController code will work just fine even if the members are null. ScoreText is a reference to a text UI object to display score text, and GameOverText will be used to display a message when a game-over condition occurs.
To use the new script, take the following steps:
- Create a new, empty object in the scene named GameController.
- Drag and drop the GameController script file to that object.
- Drag and drop the ScoreText object to the Score Text field for GameController in the Inspector.
- In the Score Prefix field, enter the text that should prefix the score itself. The score, on its own, is simply a number (such as 1,000). The prefix allows you to add text to the front of this score, indicating to the player what the numbers mean:

Figure 4.28 – Creating a GameController object to maintain the game score
Now, take the game for a test run, and you'll see the score display at the top-right corner of the Game tab using the UI text object. The score will always remain at 0 because we are yet to write the functionality to increase it. For our game, the score should increase when an enemy object is destroyed. To achieve this, we'll create a new script file, ScoreOnDestroy:
public class ScoreOnDestroy : MonoBehaviour
{
public int ScoreValue = 50;
void OnDestroy()
{
GameController.Score += ScoreValue;
}
}
The script should be attached to any object that assigns you points when it's destroyed, such as the enemies. ScoreValue specifies the total number of points awarded. To attach the script to the enemy prefab, take the following steps:
- Select the Prefabs folder in the Project panel.
- From the Inspector, click on the Add Component button.
- Type ScoreOnDestroy into the search field to add the component to the prefab:
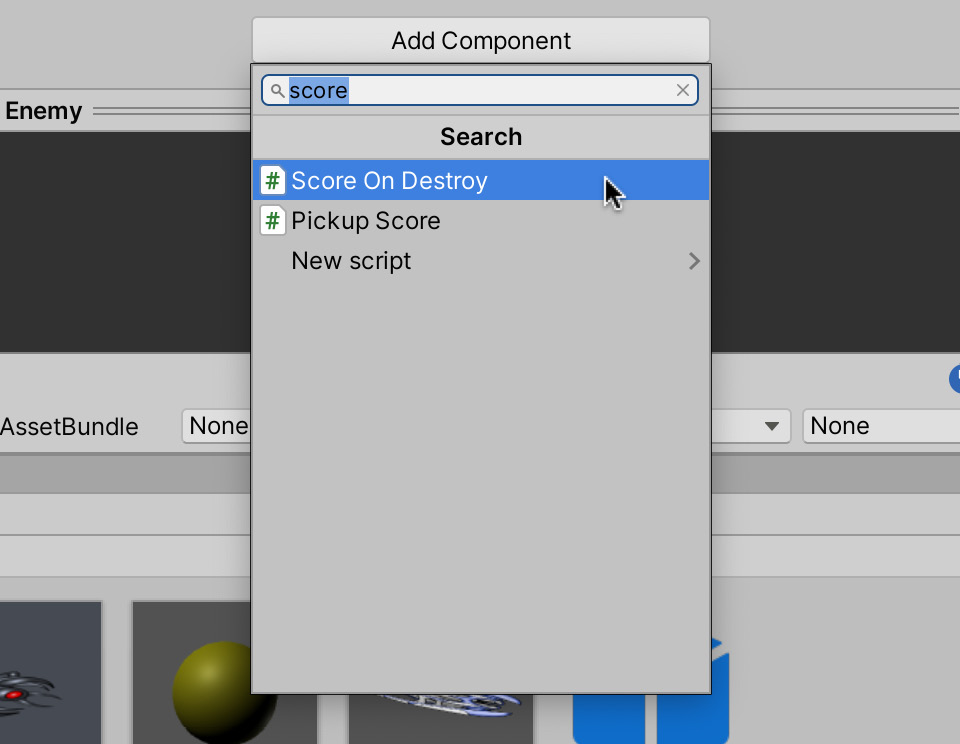
Figure 4.29 – Adding a score component to the enemy prefab
- Once added, specify the total number of points to be allocated for destroying an enemy. For this game, a value of 50 points is assigned.
Great work! You now have destroyable enemies that assign you points on destruction. This means that you can finally have an in-game score and could even extend gameplay to include high-score features and leaderboards. This also means that our game is almost finished and ready to build, but before that, we'll add a couple of small final touches.
Adding the final touches
In this section, we'll add the final touches to the game. We'll start by adding a background image to fit the space theme, and then we'll move on to adding background music. These small additions should have a significant impact on the feel of the game.
Adding a background image
First on the agenda is fixing the game background! Until now, the background has displayed the default background color associated with the game camera. However, as the game is set in space, we should display a space background. To do this, take the following steps:
- Create a new Sprite object in the Scene that'll display a space image by navigating to GameObject | 2D Object | Sprite from the menu.
- Drag and drop the space texture from the Project panel to the Sprite field on the Sprite Renderer component in the scene.
- Rotate the object 90 degrees on the X axis.
- Position the object at the world origin (0, 0, 0).
- Scale the object until it fills the viewport. I used a scale of 3 on the X and Y axes.
The correctly configured background is shown in Figure 4.30:

Figure 4.30 – Configuring the background
With those steps completed, you should now have an appropriate background for your space game!
UI Image
There are several different methods of implementing a background image. We could, for example, have created the background as a UI image. We could then use the rectangle and Anchors tools, outlined in the Implementing the score UI section, to make it fullscreen.
With the background looking the part, let's make it sound the part too by adding background music, an integral component of many games.
Implementing background music
Now that the level has a suitable background, let's add some background music, which will play on a loop. To do this, take the following steps:
- Select the music track in the Project panel from the Audio folder.
- In the Inspector, set the music Load Type option to Streaming, and ensure Preload Audio Data is disabled. These audio settings improve loading times as Unity will not need to load all music data to memory as the scene begins:
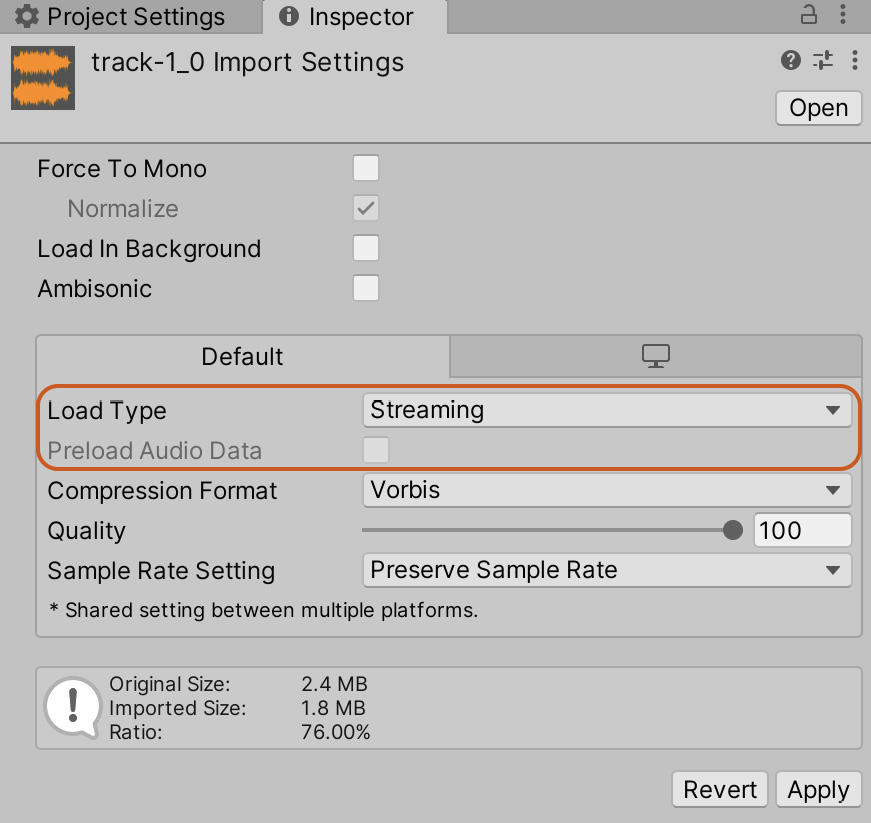
Figure 4.31 – Configuring audio data ready for playback
- Next, create a new empty GameObject in the scene and name it Music.
- Drag and drop the Music track from the Project panel to the Music object, adding it as an Audio Source component. Audio Source components play sound effects and music.
- Under the Audio Source component in the Inspector, enable the Play On Awake and Loop checkboxes. These settings ensure the music starts at the level's beginning and loops seamlessly for the lifetime of the scene.
- Lastly, the Spatial Blend field should be set to 0, which represents 2D:

Figure 4.32 – Creating a GameObject with an Audio Source component
2D sounds have a consistent volume throughout the level regardless of the player's position because 2D sounds are not spatially located. 3D sounds, in contrast, are used for gunshots, footsteps, explosions, and other sounds that exist in 3D space and whose volume should change based on how close the player is standing to them when they play.
Now, let's take the game for a test run! Click on the Play button on the toolbar and test it out. If the music doesn't play, check that the Mute Audio button is disabled in the Game tab:

Figure 4.33 – Playing a game – disabling Mute Audio, if necessary
And that's almost a wrap! We've implemented every feature we desired in our space game. However, before we move on to the next project, we'll look at the tools Unity provides to help you test and diagnose potential performance issues.
Testing and diagnosis
With practically all games, you'll need to spend considerable time testing and debugging to reduce bugs and errors as much as humanly possible. With this sample program, very little debugging and testing has been required by you, but that's not just because the game is simple. It's because I've already prechecked and pretested most of the code and functionality before presenting the material to you in this book, ensuring that you get a smooth learning experience. For your own projects, however, you'll need to do lots of testing. One way to get started is by using the Stats panel. To open this panel, click on the Stats button in the Game tab:

Figure 4.34 – Viewing game performance information via the Stats panel
More Information
More details on the Stats panel are included in Chapter 2, Creating a Collection Game, and more information can be found online in the Unity documentation at http://docs.unity3d.com/Manual/RenderingStatistics.html.
Another debugging tool is the Profiler. This tool is useful when the Stats panel has already helped you identify a general problem, such as a low FPS, and you want to dig deeper to find where the problem might be located.
More Information
More details on the Profiler are included later in Chapter 6, Continuing the 2D Adventure.
To use the Profiler tool, do the following:
- Select Window | Analysis | Profiler from the Application menu.
- With the Profiler window open, click on Play on the toolbar to playtest your game. When you do this, the Profiler window fills with color-coded performance data in a graph, as shown in Figure 4.35:

Figure 4.35 – During gameplay, the Profiler populates with data
Important Note
Reading and understanding the graph requires some experience, but as a general rule, watch out for mountains and peaks (sharp fluctuations) in the graph as this could indicate a problem, especially when it roughly coincides with frame rate drops.
- If you want to investigate further, pause the game and then click in the graph. The horizontal axis (the x axis) represents the most recent frames, and the vertical axis represents workload. When you click in the graph, a line marker is added to indicate the frame under investigation:

Figure 4.36 – Investigating performance data with the Profiler
Beneath the graph, you'll find detailed information on the currently selected module. In Figure 4.36, the CPU Usage module is selected, so this area will show a timeline of CPU instructions.
More Information
More information on the Profiler can be found in the online Unity documentation at https://docs.unity3d.com/Manual/Profiler.html.
Now, finally, we're ready to build a standalone version of our game to send off to friends, family, and testers! The process to do this is the same as detailed in Chapter 2, Creating a Collection Game, to build the coin collection game.
Summary
Great work! We're really on a roll now, having completed two Unity projects. Both the coin collection game and twin-stick shooter are, ultimately, simple games in that they don't rely on advanced mechanics or display sophisticated features. However, even complicated games, when boiled down to their fundamental ingredients, can be found to rest on a similar foundation of essential concepts such as the ones that we've covered so far. That's why our projects are so critical to understanding Unity from the ground up. In this project alone, we've learned how to spawn prefabs at runtime, import textures and audio, create a basic UI, implement reusable components, and determined how to cache objects using an object pool. No matter what project you are working on, some or all of these techniques will be useful.
In this chapter, while we created a game with a 2D perspective, we used mostly 3D components. In the next chapter, we'll be going fully 2D and creating a 2D platform game. Moving from 3D to 2D brings a few changes in our workflow, and these will be discussed in detail, as well as important 2D topics such as sprites, environmental physics, and 2D movement. We'll also look at adding post-processing effects. These effects can help improve the look of the game and are applied to the image before it appears onscreen.
Test your knowledge
Q1. Static variables are...
A. Hidden variables for static objects
B. Shared variables across all instances of a class
C. Protected variables
D. Constants
Q2. The Profiler is useful for...
A. Pausing gameplay
B. Identifying performance issues
C. Removing objects
D. Checking audio levels
Q3. UI objects are useful for...
A. Creating interface elements
B. Making animations
C. Sorting objects by name
D. Editing mesh objects
Q4. The Layer Collision Matrix lets you…
A. Prevent groups of objects from colliding
B. Make objects collide
C. Remove all collisions
D. Activate low-quality collisions
Further reading
For more information, take a look at the following links: