Chapter 1: Exploring the Fundamentals of Unity
Unity is a game engine that works with your existing asset pipeline (such as 3D modeling software) and can be used to compile video games that work seamlessly across multiple platforms and devices, including Windows, Mac, Linux, Android, and iOS. Using Unity, developers import ready-made assets (such as music, textures, and 3D models), and assemble them into a coherent whole, forming a game world that works according to a unified logic. This book focuses on developing games in Unity 2020 — taking you step by step through how to create increasingly complex projects.
This chapter starts the first project on our list, which will be a fun collection game. By the end of the next chapter, you'll have pieced together a simple but complete game. As part of the process, you'll become familiar with the fundamentals of developing in Unity, including the following:
- New features in Unity 2020
- Creating new projects using Unity Hub
- How to navigate the Unity editor
- Unity project structure
- Importing assets using the Package Manager
- Using the Unity editor to create a level
- Creating optimized lighting effects
- How to playtest the game
Using the information in this chapter, you will gain an understanding of how to create new projects from scratch, navigate the Unity editor, and import assets, information that will be invaluable for years to come as you develop your own projects in Unity.
Remember, it doesn't matter if you've never used Unity before. We'll go through everything that is required step by step, starting with the new features found in Unity 2020.
Technical requirements
This book is about Unity and developing games in that engine. The basics of programming as a subject is, however, beyond the scope of this book. So, I'll assume that you already have a working knowledge of coding generally but have not coded in Unity before.
You can download the example code files for this book from GitHub at https://github.com/PacktPublishing/Unity-2020-By-Example.
Once downloaded, you can find the CollectionGame project in the Chapter01/End folder.
Exploring new features in Unity 2020
Before we start our first project, let's take a moment to look at the new features introduced since the previous edition of this book. We'll cover all of these, and much more!
Starting with Unity Hub, while not technically part of Unity 2020 (it is a separate application), it makes it easy to manage multiple Unity projects and versions. I will guide you through creating a new project using Unity Hub in this chapter. Once an empty project has been created, we will import assets using the new Package Manager — an easy way to manage a project's assets (more on this shortly).
In the world of 2D, a new tool called Sprite Shape will help us create more dynamic and flexible environments from within the Unity editor. Whether 2D or 3D, Artificial Intelligence (AI) is an ever-evolving field, and not to be left behind, Unity has introduced a new machine learning toolkit called ml-agents. This is an exciting new way to create intelligent agents (any dynamic non-playable character) in a game. Rather than defining exactly how an agent should act in every situation, we can provide the tools for the agent to learn how best to achieve their goals, whatever they may be.
It's an exciting time for Augmented Reality (AR), with the inclusion of ARFoundation in Unity, an AR toolkit, which we will use to blend reality and gaming. Lastly, we'll take a look at state of the art and investigate how we can optimize our games by using DOTs, a multi-threaded data-oriented technology stack. Don't worry if that sounds scary; it will all become clear as we progress through the book.
Now that we have an understanding of the some of the new topics covered in this book, let's design the first game we will implement in Unity 2020.
Introducing the first game
In the first game we will create, the player will control a character in the first person to explore an environment, collecting coins before a time limit runs out. If the timer runs out, the game is over. On the other hand, if all coins are collected before the timer expires, the player wins. The controls will use the industry-standard WASD keyboard setup, where W moves forward, A and S move left and right, and D walks backward. Head movement is controlled using the mouse, and coins are collected by colliding with them.
The benefit of developing this type of game is that it will demonstrate all the core Unity features, and we won't need to rely on any external software to make assets, such as textures, meshes, and materials.
See Figure 1.1, which features the coin collection game in action in the Unity Editor:
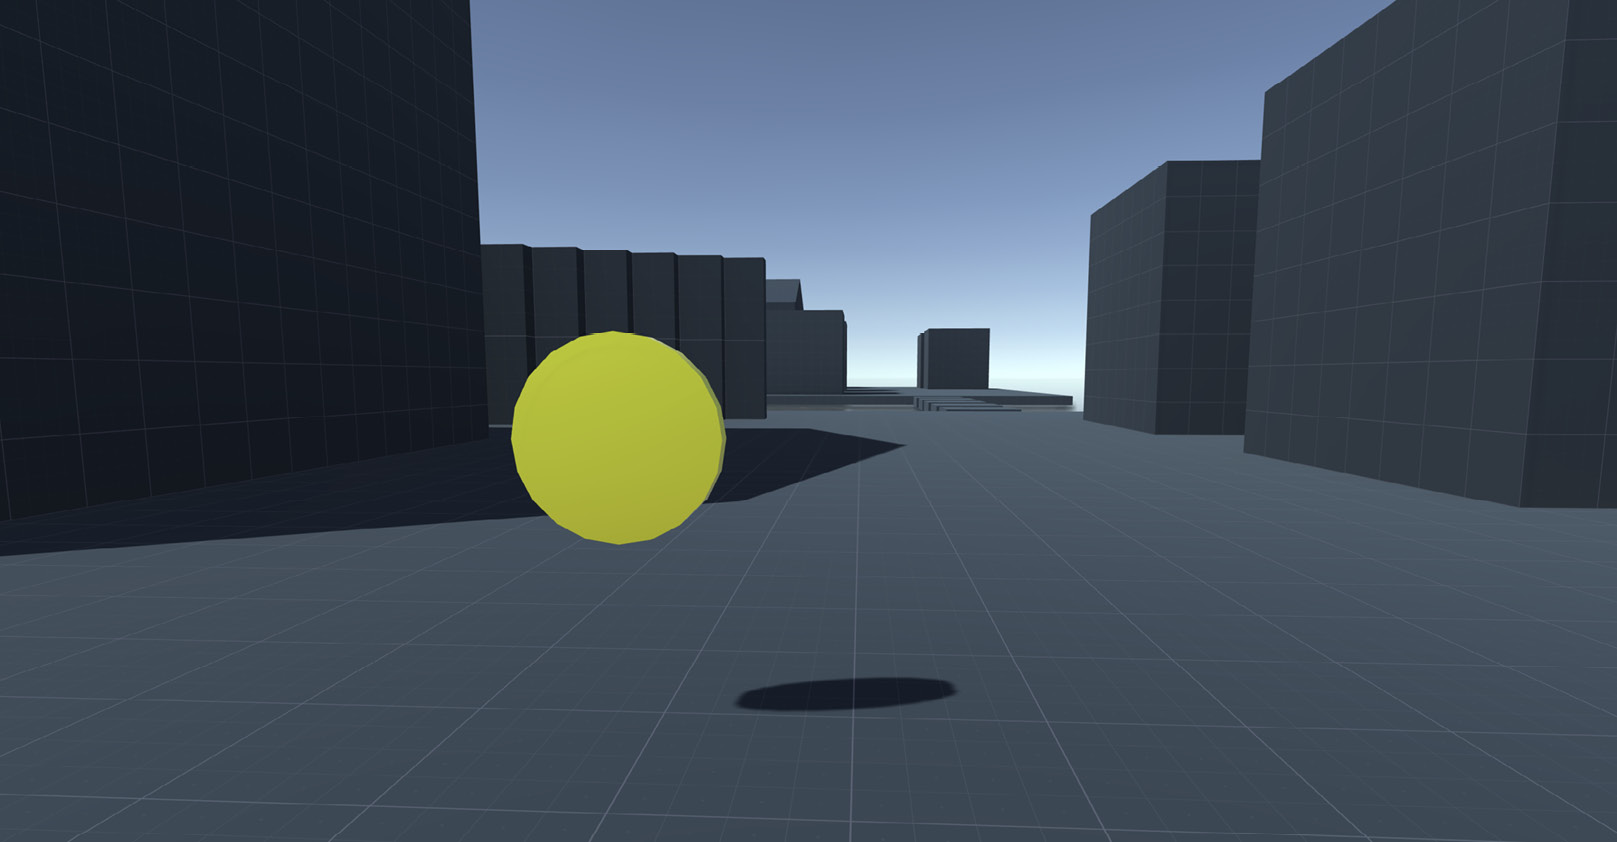
Figure 1.1 – The completed coin collection game
Important note
The completed CollectionGame project, as discussed in this chapter and the next, can be found in the book companion files in the Chapter02/End folder.
Now that we have an idea of the type of game we'll be making, in the next section, we can start development by creating the initial project structure.
Getting started with Unity
Every time you want to make a new Unity game, including coin collection games, you'll need to create a new project. Generally speaking, Unity uses the term project to mean a game. There are two main ways to make a new project, and it really doesn't matter which one you choose because both end up in the same place. If you're already in the Unity interface, looking at an existing scene or level, you can select File | New Project... from the application menu, as shown in Figure 1.2:
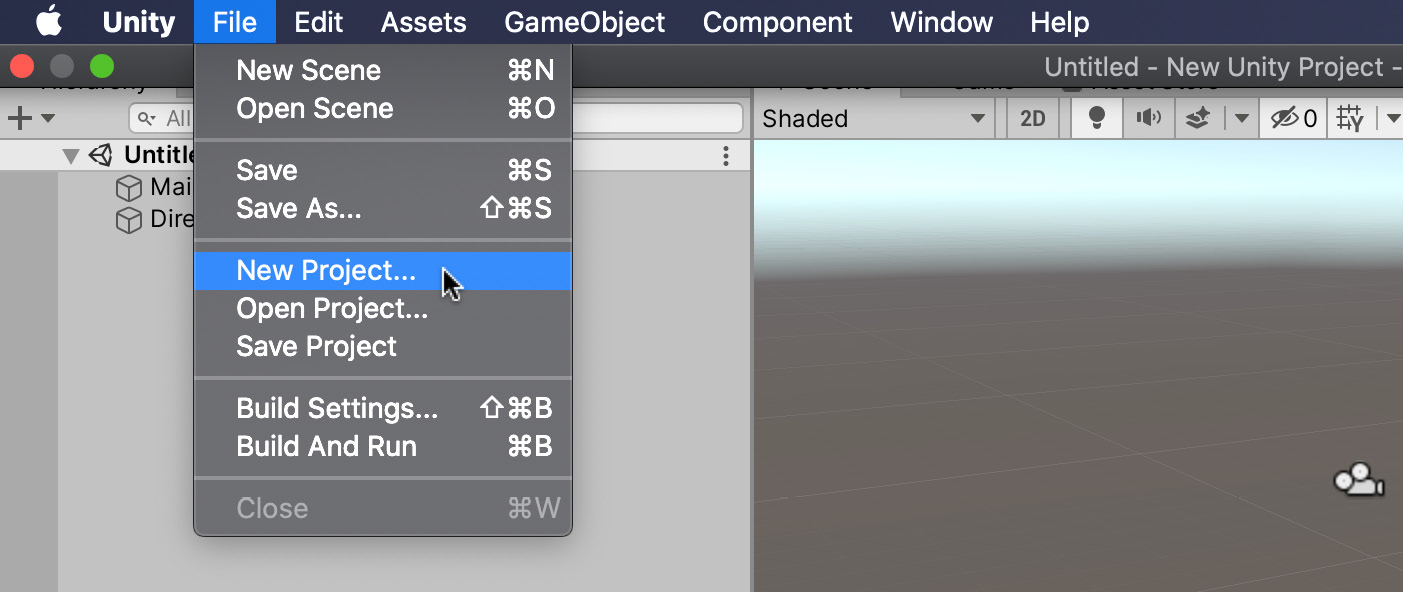
Figure 1.2 – Creating a new project via the main menu
After selecting the New Project option, Unity leads you to the project creation wizard.
Alternatively, you can create a new project using Unity Hub, as shown in Figure 1.3. Unity Hub is a standalone application that you can use not only to manage your projects, but your Unity installations as well. So, if you want to have multiple different versions of Unity installed (for example, 2019 and 2020), Unity Hub makes this easy. With Unity Hub open, you can access the new project wizard by choosing the NEW button:

Figure 1.3 – Unity Hub
On reaching the project creation wizard, Unity can generate a new project for you on the basis of a few settings:
- Fill in the name of your project (such as CollectionGame).
- Select a folder on your computer to contain the project files that will be generated automatically.
- Unity provides several project templates, as outlined here:
2D: A standard project setup for working in a 2D space. 2D-specific settings are configured for texture importing, the scene view, and the lighting and camera settings in the sample scene.
3D: A project configured to use Unity's built-in render pipeline.
3D With Extras: The same as 3D, but includes a new post-processing stack and additional sample content to show off the new processing stack.
High Definition RP: A project configured for high-end platforms. It uses a Scriptable Render Pipeline (SRP) called High Definition Render Pipeline (HDRP), which provides additional rendering control by allowing you to configure render settings using C# scripts.
Universal RP: This uses the Universal Render Pipeline (URP). This pipeline is similar to HDRP but suitable for a broader range of devices, including mobile. The URP will be explored in more detail in a later chapter.
Throughout the book, we'll create a number of 2D, 3D, and URP projects. For this project, choose the 3D option from the template section to create a 3D game.
- Finally, click on the CREATE button to complete the project generation process, as shown in Figure 1.4

Figure 1.4 – Creating a new project
Once you've clicked on CREATE, after some initial setup, the Unity editor will open. If this is your first time viewing the editor, it may seem daunting, but don't worry, I will guide you through how it all works, and you'll be creating games in no time. We'll start by taking a look at the Project panel and how we can import assets into the project, which we'll use to make our game.
Introducing the Project panel
You now have a new project. This represents the starting point for any game development in Unity. The newly created project contains an example scene, but nothing else: no meshes, textures, or any other assets. You can confirm this by checking the Project panel area at the bottom of the editor interface. This panel displays the complete contents of the project folder, which corresponds to an actual folder on your local drive created earlier by the new project wizard, as shown in Figure 1.5:

Figure 1.5 – The Unity Project panel docked at the bottom of the interface
This panel will soon be populated with more items, all of which we can use to build a game.
If your interface looks different from Figure 1.5, in terms of its layout and arrangement, then you can reset the UI layout to its defaults. To do this, click on the Layout drop-down menu from the top-right corner of the editor interface, and choose Default:

Figure 1.6 – Switching to the default interface layout
Tip
The sample scene can safely be deleted. You will be shown how to create a new scene shortly.
As well as a sample scene, Unity also includes a Packages folder, just below the Assets folder, as shown in Figure 1.5. A package is a collection of assets that can be used in your game. A new project already contains several packages, but they can be safely ignored for now, as we won't be using them for this project. We will instead install a new package shortly.
Important note
If you navigate to the Packages folder in a file browser, you may reasonably expect to see the installed packages. Instead, however, you'll be greeted with a JSON file that lists the packages included in your project. The packages are actually stored with Unity. This way, you don't need to re-download packages that are used in other projects. They can be downloaded once and shared between all of your projects as required.
You can view the contents of your project folder directly, via either Windows Explorer or Mac Finder, by right-clicking the mouse in the Project panel from the Unity Editor to reveal a context menu, and from there, choose the Show in Explorer (Windows) or Reveal in Finder (Mac) option:
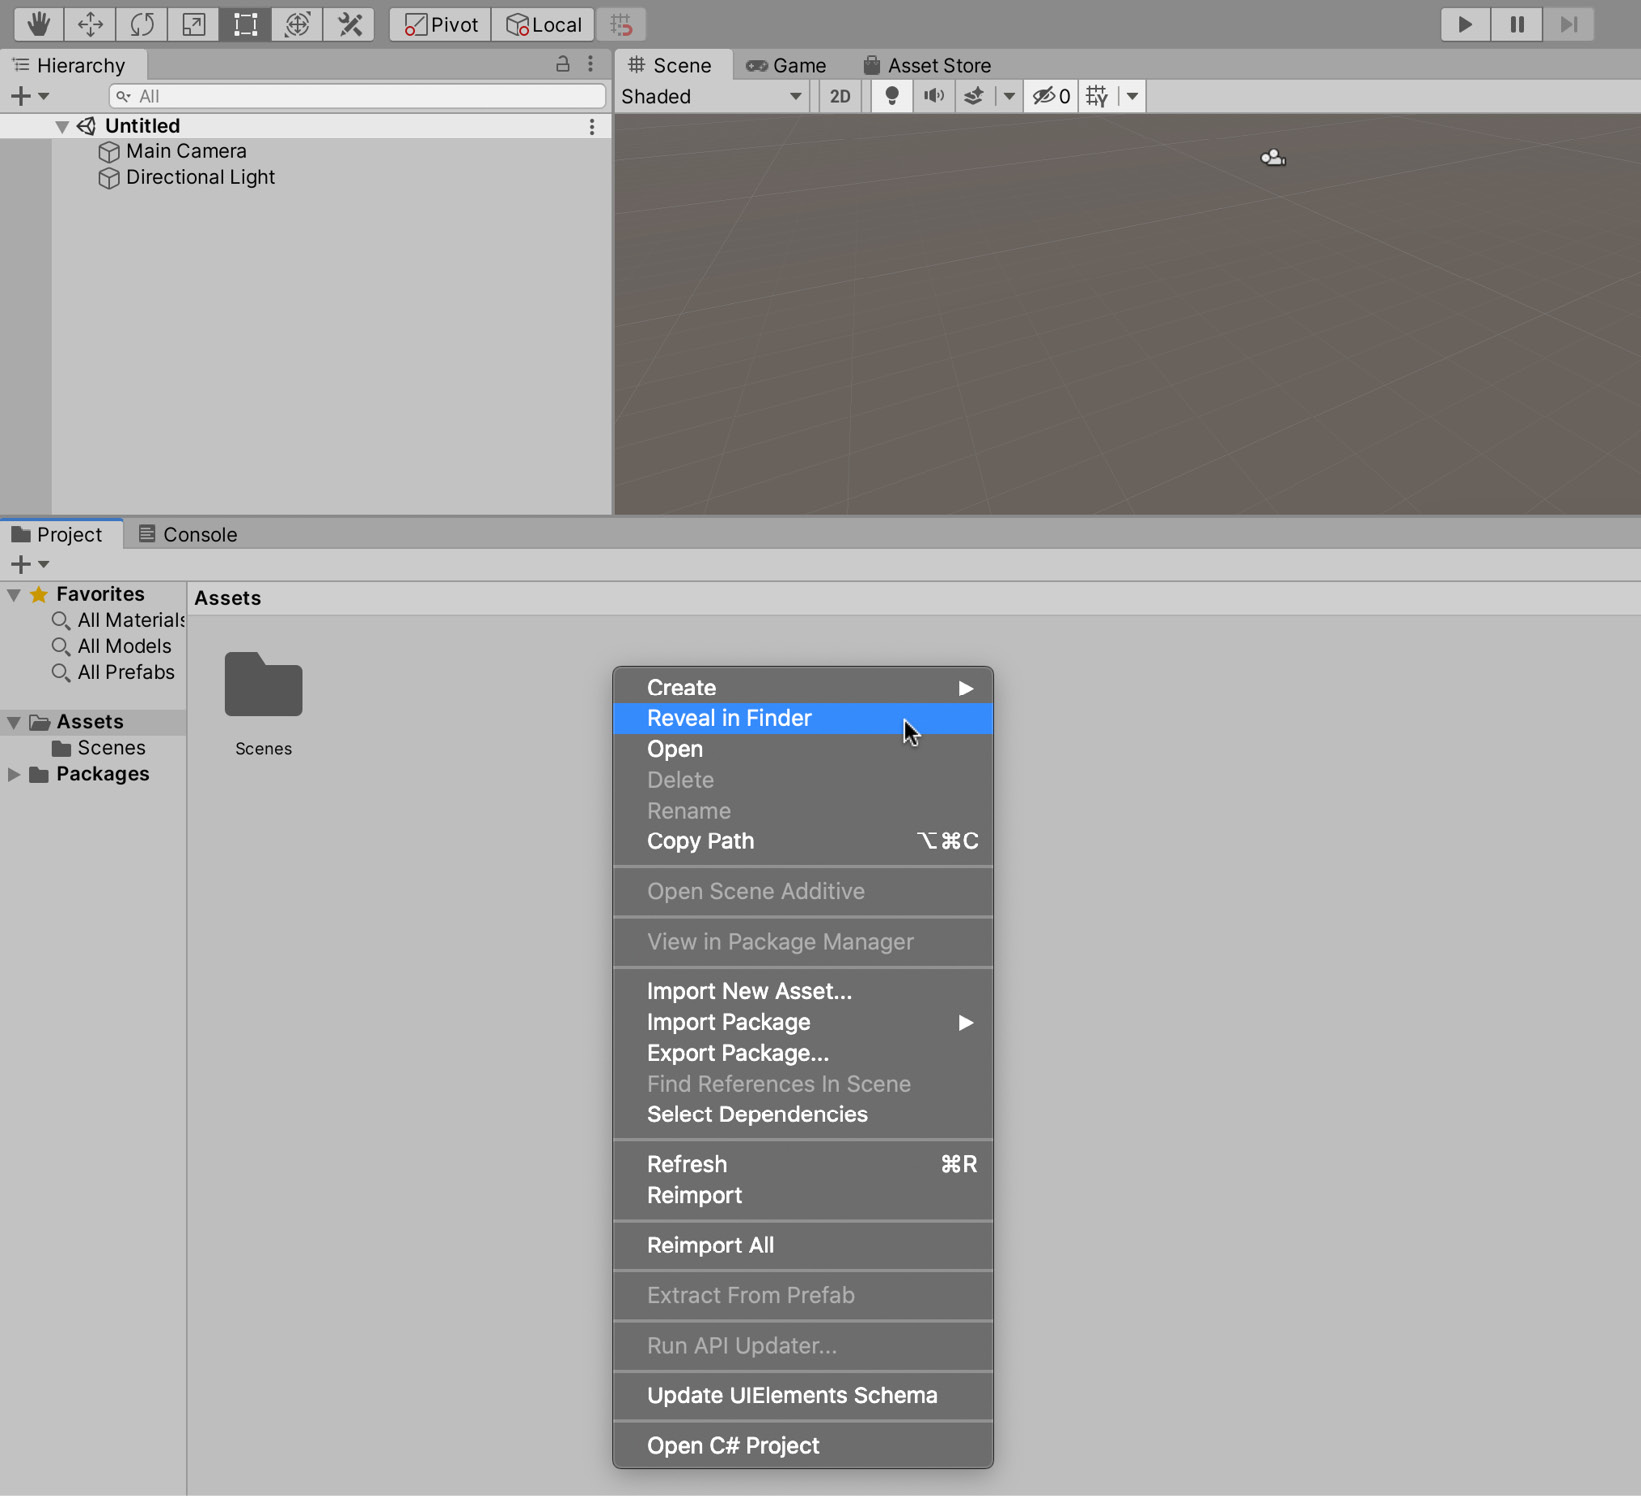
Figure 1.7 – Opening the project folder via the Project panel
Clicking on Reveal in Finder displays the folder contents in the default system file browser. This view is useful to inspect files, count them, or back them up. However, don't change the folder contents manually this way via Explorer or Finder. Specifically, don't move, rename, or delete files from here; doing so can corrupt your Unity project irretrievably. Instead, delete and move files where needed within the project window in the Unity Editor. This way, Unity updates its metadata as appropriate, ensuring that your project continues to work correctly.
The common folders and files that are generated with a Unity project include:
- Assets: This is the folder where all your game's resources are stored, including scripts, textures, and audio files.
- Library: Unity processes and converts the files in the Assets folder so they are ready to be compiled in your game. The processed files are stored here.
- obj: This folder stores temporary files generated by MonoDevelop when a project is built.
- Temp: This folder also stores temporary files, but these files are generated by Unity during the build process.
- Packages: As mentioned previously, this folder contains a JSON file with a list of packages added to the project. More on packages shortly.
- ProjectSettings: This folder stores project-level settings, including physics, layers, tags, and time settings.
- UserSettings: This folder stores settings related to your editor; for example, if you apply a custom layout to the Unity editor, that will be saved here.
- Assembly-CSharp.csproj: This is a project file generated by MonoDevelop.
- CollectionGame.sln: This is a solution file that stores the structure of the CollectionGame project in Visual Studio (the IDE used to create the C# scripts).
Important note
Viewing the project folder in the OS file browser will display additional files and folders not visible in the Project panel, such as Library and ProjectSettings, and maybe a Temp folder. Together, these are known as the project metadata. They contain additional settings and preferences that Unity needs in order to work correctly. These folders and their files should not be edited or changed.
With a solid understanding of how to view assets using the Project panel, we'll next import external assets that will help us create our game.
Importing assets
Assets are the ingredients or building blocks for games—the building blocks from which they're made. There are many different types of assets, including:
- Meshes (or 3D models), such as characters, props, trees, houses, and more.
- Textures, which are image files such as JPEGs and PNGs (these determine how the surface of a mesh should look)
- Music and sound effects to enhance the realism and atmosphere of your game
- Scenes, which are 3D spaces or worlds where meshes, textures, sounds, and music live, exist, and work together holistically as part of a single system
Games cannot exist without assets—they would otherwise look completely empty and lifeless. For this reason, we'll need assets to make the coin collection game we're working toward. After all, we'll need an environment to walk around and coins to collect!
Unity, however, is a game engine and not primarily an asset creation program, like Blender or Photoshop (though it can create assets). This means that assets, such as characters and props, are typically made first by artists in external, third-party software. From here, they are exported and transferred ready-made to Unity, and Unity is only responsible for bringing these assets to life in a coherent game. Third-party asset creation programs include Blender (which is free), Maya or 3DS Max to make 3D models, Photoshop or GIMP (which is also free) to create textures, and Audacity (which again is free) to generate audio. There are plenty of other options, too. The details of these programs are beyond the scope of this book. In any case, Unity assumes that you already have assets ready to import to build a game. For the coin collection game, we'll use assets created by Unity. So, let's import these into our project.
To do this, you first need to download the Standard Asset package from the Unity Asset Store. The standard asset package contains a number of useful objects that will help us create a game. However, we'll go into the contents of this package in more detail shortly. For now, follow these steps:
- Navigate to https://assetstore.unity.com and search for Standard Assets.
- Once on the Standard Assets page, click on Add to My Assets, as shown in Figure 1.8:
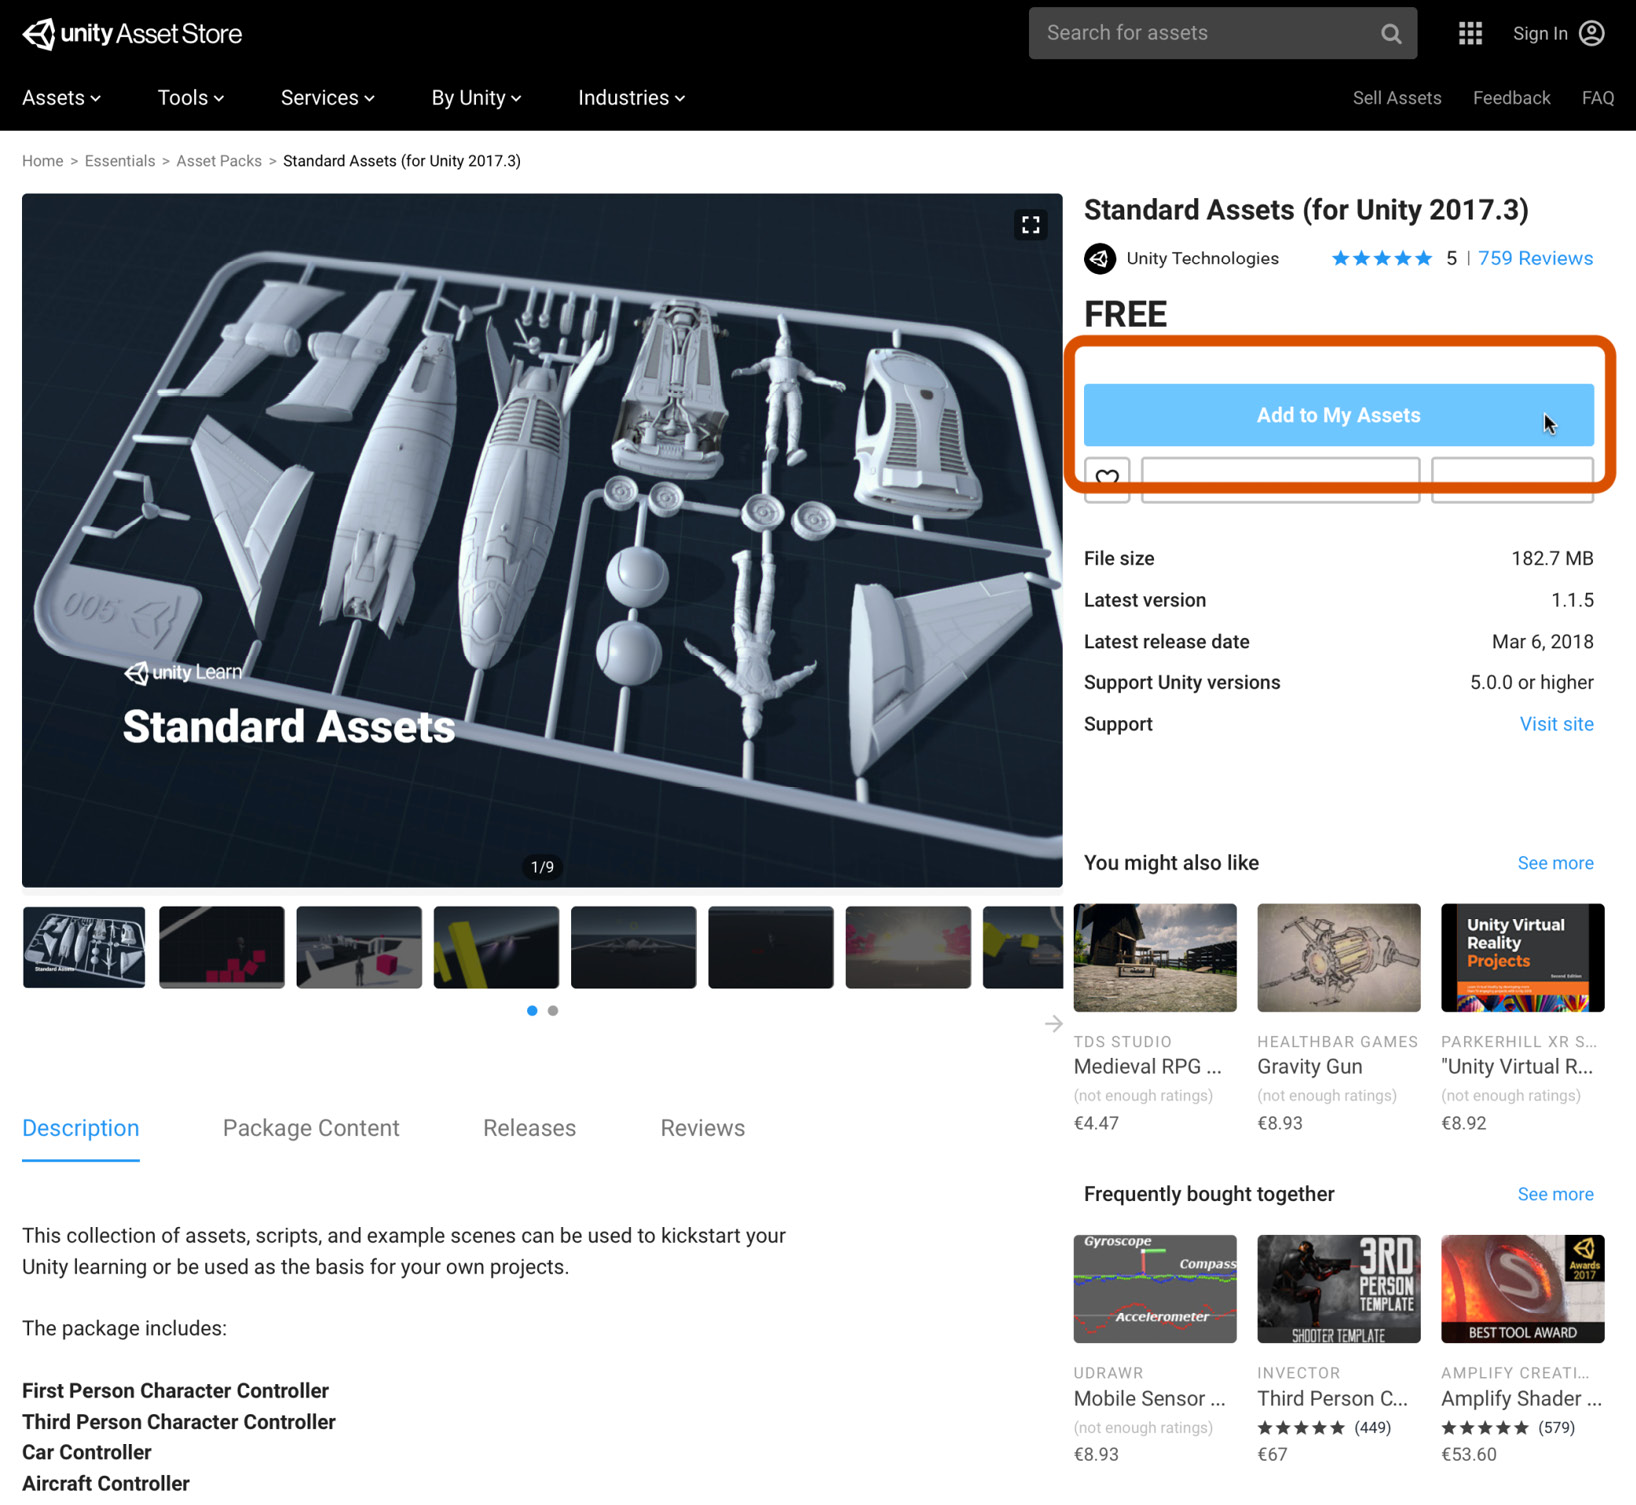
Figure 1.8 – Standard Assets page on the Unity Asset Store
The Unity Asset Store is a great place to find assets made by other developers, from 3D models to complete projects. Some are free, but many can be downloaded for a small fee.
Important note
If you have difficulty in finding the Standard Asset package or it doesn't work with your version of Unity, please follow the instructions in the Entering the world section in Chapter 8, Creating Artificial Intelligence, where we write our own.
- Once the package has been added to your assets, you can find it in the Package Manager. Head back into Unity and select Window | Package Manager from the application menu:
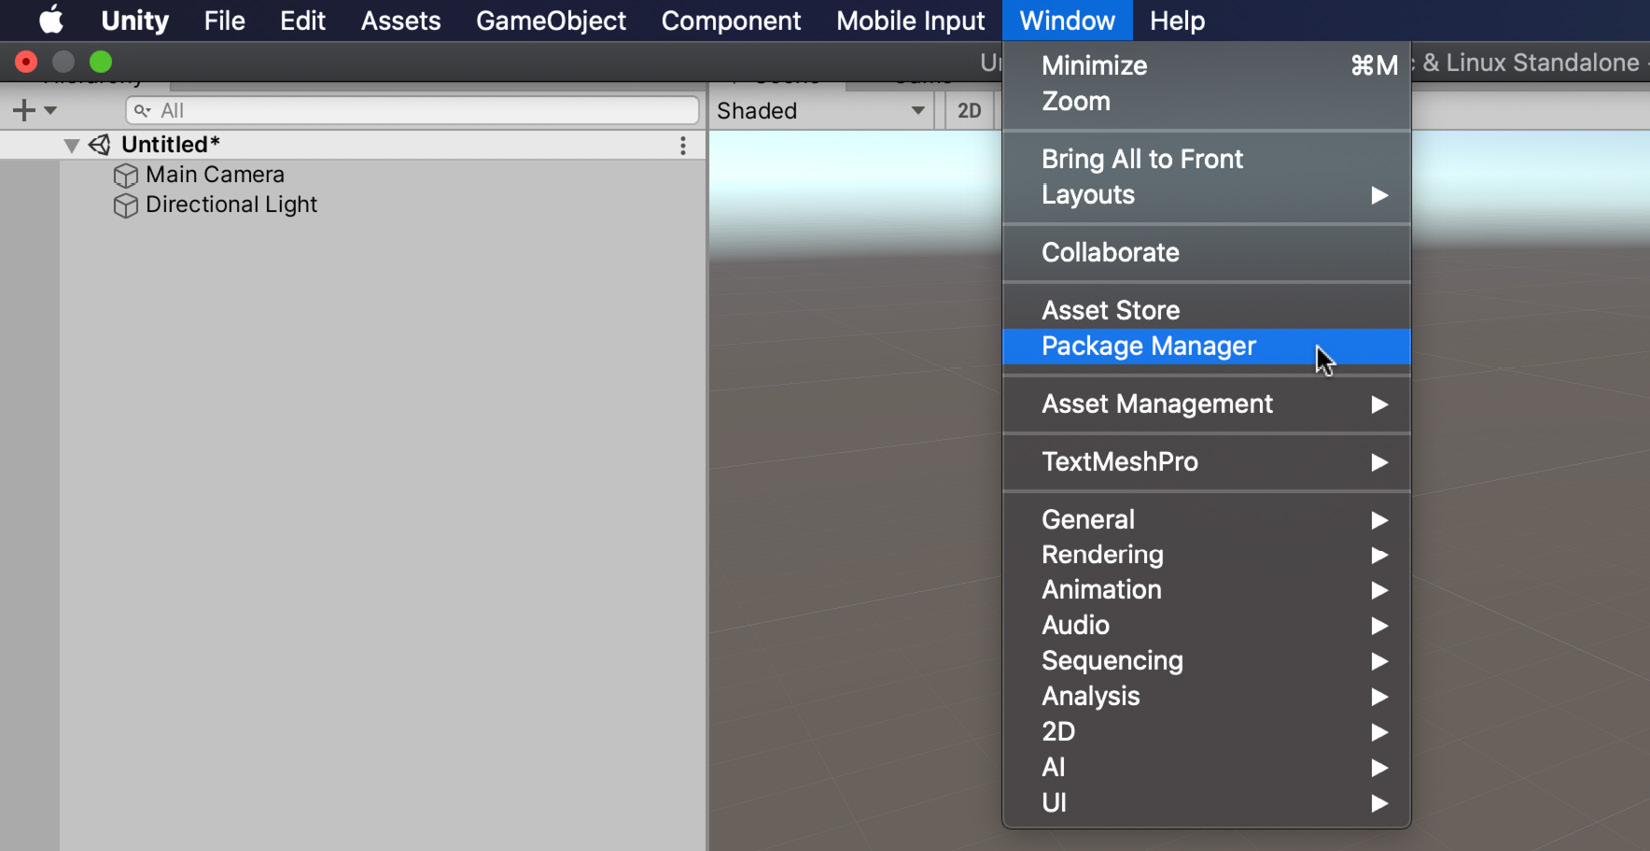
Figure 1.9 – Opening the Package Manager window
- The Package Manager is a relatively new feature of Unity. It is used to add packages to, and remove packages from, the current project. Remember, a package is simply a collection of assets. We want to add the Standard Assets package, so select that and click on Import:

Figure 1.10 – Importing assets via the Package Manager
Important note
Your list of packages will most likely differ from mine. Unity contains many built-in packages, and any package added from the Unity Asset Store will also appear here.
Each time you import a package, you will be presented with an Import dialog. Here, you can specify which assets you want to add to your project. Leave all settings at their defaults, and click on Import:

Figure 1.11 – Choosing assets to import
Important note
Make sure you don't modify the folder structure of imported assets. Unity will only be able to determine whether an asset has changed if the project structure remains the same. For example, if you import a package that places a material in the Assets/Materials folder and you move that asset when you come to update the package, Unity will think the material is missing and re-add it to the project—resulting in two versions of the asset.
By default, Unity decompresses all files from the package into the current project, ready for use. These files are copies of the originals. So, any changes made to them will not affect or invalidate the originals, which Unity maintains internally in a .meta file. Every asset (including folders) has a corresponding meta file, which contains information on the import settings of the asset and should not be deleted or renamed unless you are also deleting or renaming the associated asset.
The files include models, sounds, textures, and more, and are listed in the Unity Editors project window:

Figure 1.12 – Browsing imported assets from the Project panel
The imported assets don't yet exist in our game scene or level. They don't appear in the game, and they won't do anything when the level begins! Rather, they're only added to the Project panel, which behaves like a library or repository of assets, from which we can pick and choose to build up a game when needed. To get more information about each asset, you can select the asset by clicking on it with the mouse, and asset-specific details will be shown on the right-hand side of the Unity Editor in the Inspector panel. Inspector is a property sheet editor that appears on the right-hand side of the interface. It is context-sensitive and always changes to display properties for the selected object, as shown in Figure 1.13:

Figure 1.13 – The Inspector window displays all the properties for the currently selected object
We've now created a Unity project and imported a large library of assets, in the form of a package, using the Package Manager. The package includes architectural meshes for walls, floors, ceilings, and stairs. This means that we're now ready to build our first level using these assets!
Starting a level
This section covers many fundamental topics that will be useful not only for the remainder of this book, but for your career as a Unity developer:
- In Creating a Scene, you'll be introduced to the space that will contain our level. I'll show you how to create a new scene and explain what is included in a scene by default.
- Once we've created a new scene, we can start customizing the space by adding and positioning objects. In Adding a Floor Mesh, we add a floor object to the scene, which our character (which we'll add later) will be able to traverse.
- With the first objects added, we'll take a moment to look at how we can customize their size and position in Transforming Objects.
- Before we add additional objects to the scene, it is essential to be able to navigate around the scene view so you can place objects exactly where you want them. This is covered in Navigating the Scene.
- Once we can navigate the scene, we will continue to add new features in Adding Level Features, including houses and a bridge. The houses will be positioned using a Unity feature called Vertex Snapping.
- At this point, the level will look flat with minimal shadows and lighting. We'll improve this by enabling lighting and adding a sky to the game in Adding Lighting and a Skybox.
There's a lot to cover! So, let's jump right in and create the first scene of our game.
Creating a scene
A scene refers to a 3D space, the space-time of the game world—the place where things exist. Since all games happen in space and time, we'll need a scene for the coin collection game. In our game, a scene represents a level. The words scene and level can be used interchangeably here. In other games, you may find that a scene contains multiple levels, but in this book, we will limit each scene to one level.
To create a new scene, perform the following steps:
- Select File | New Scene from the application menu.
- Alternatively, press Ctrl + N on the keyboard.
When you do this, a new and empty scene is created. You can see a visualization or preview of the scene via the Scene tab, which occupies the largest part of the Unity interface:
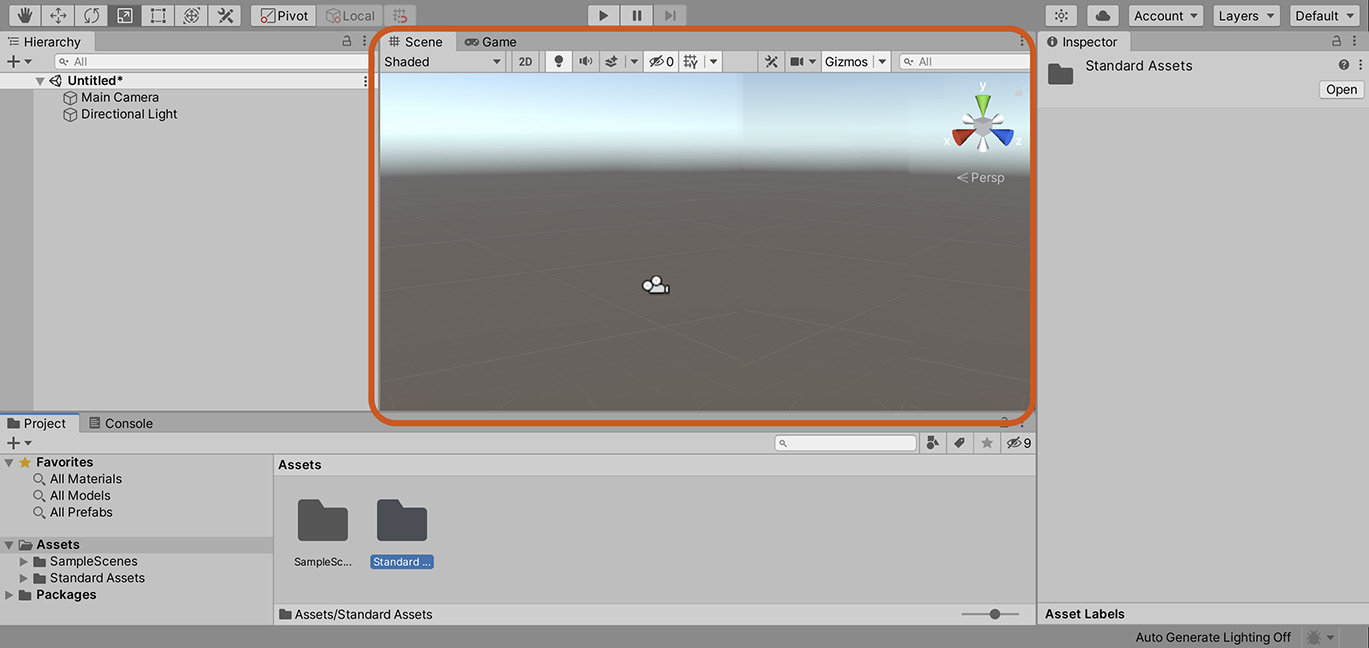
Figure 1.14 – The Scene tab displays a preview of a 3D world
Important note
As shown in Figure 1.14, other tabs besides the scene are visible and available in Unity. These include a Game and a Console window; in some cases, there could be more as well. For now, we can ignore all the tabs except scene. The scene tab is designed for quick and easy previewing of a level during its construction.
Each new scene begins empty; well, almost empty. By default, each new scene begins with two objects; specifically, a light to illuminate any other objects that are added, and a camera to display and render the contents of the scene from a specific vantage point. You can view a complete list of all the objects existing in the scene using the Hierarchy panel, which is docked to the left-hand side of the Unity interface, as shown in Figure 1.15. This panel displays the name of every GameObject in the scene. In Unity, the word GameObject refers to a single, independent, and unique object that lives within the scene, whether visible or not. When a GameObject is first created, it only has a Transform component, which includes position, scale, and rotation fields (more on the Transform component in the Transforming objects section). To extend the functionality of GameObjects, you add components. Component-based architecture is one of the core tenants of Unity; as such, we'll be taking advantage of existing components and creating entirely new components in every project in this book. GameObjects and components are discussed further in the section entitled Improving the scene:

Figure 1.15 – The Hierarchy panel
Tip
You can also select objects in the scene by clicking on their name in the Hierarchy panel.
With the scene created, we can start building the environment by adding a traversable floor mesh.
Adding a floor mesh
Next, let's add a floor to the scene. After all, the player needs something to stand on! We could build a floor mesh from scratch using third-party modeling software, such as Maya, 3DS Max, or Blender. However, the Standard Asset package, which was imported earlier, conveniently contains floor meshes that we can use. These meshes are part of the Prototyping package.
To access them via the Project panel, follow these steps:
- Open the Standard Assets folder by double-clicking it and then accessing the Prototyping/Prefabs folder.
- From here, you can select objects and preview them in the Inspector window:
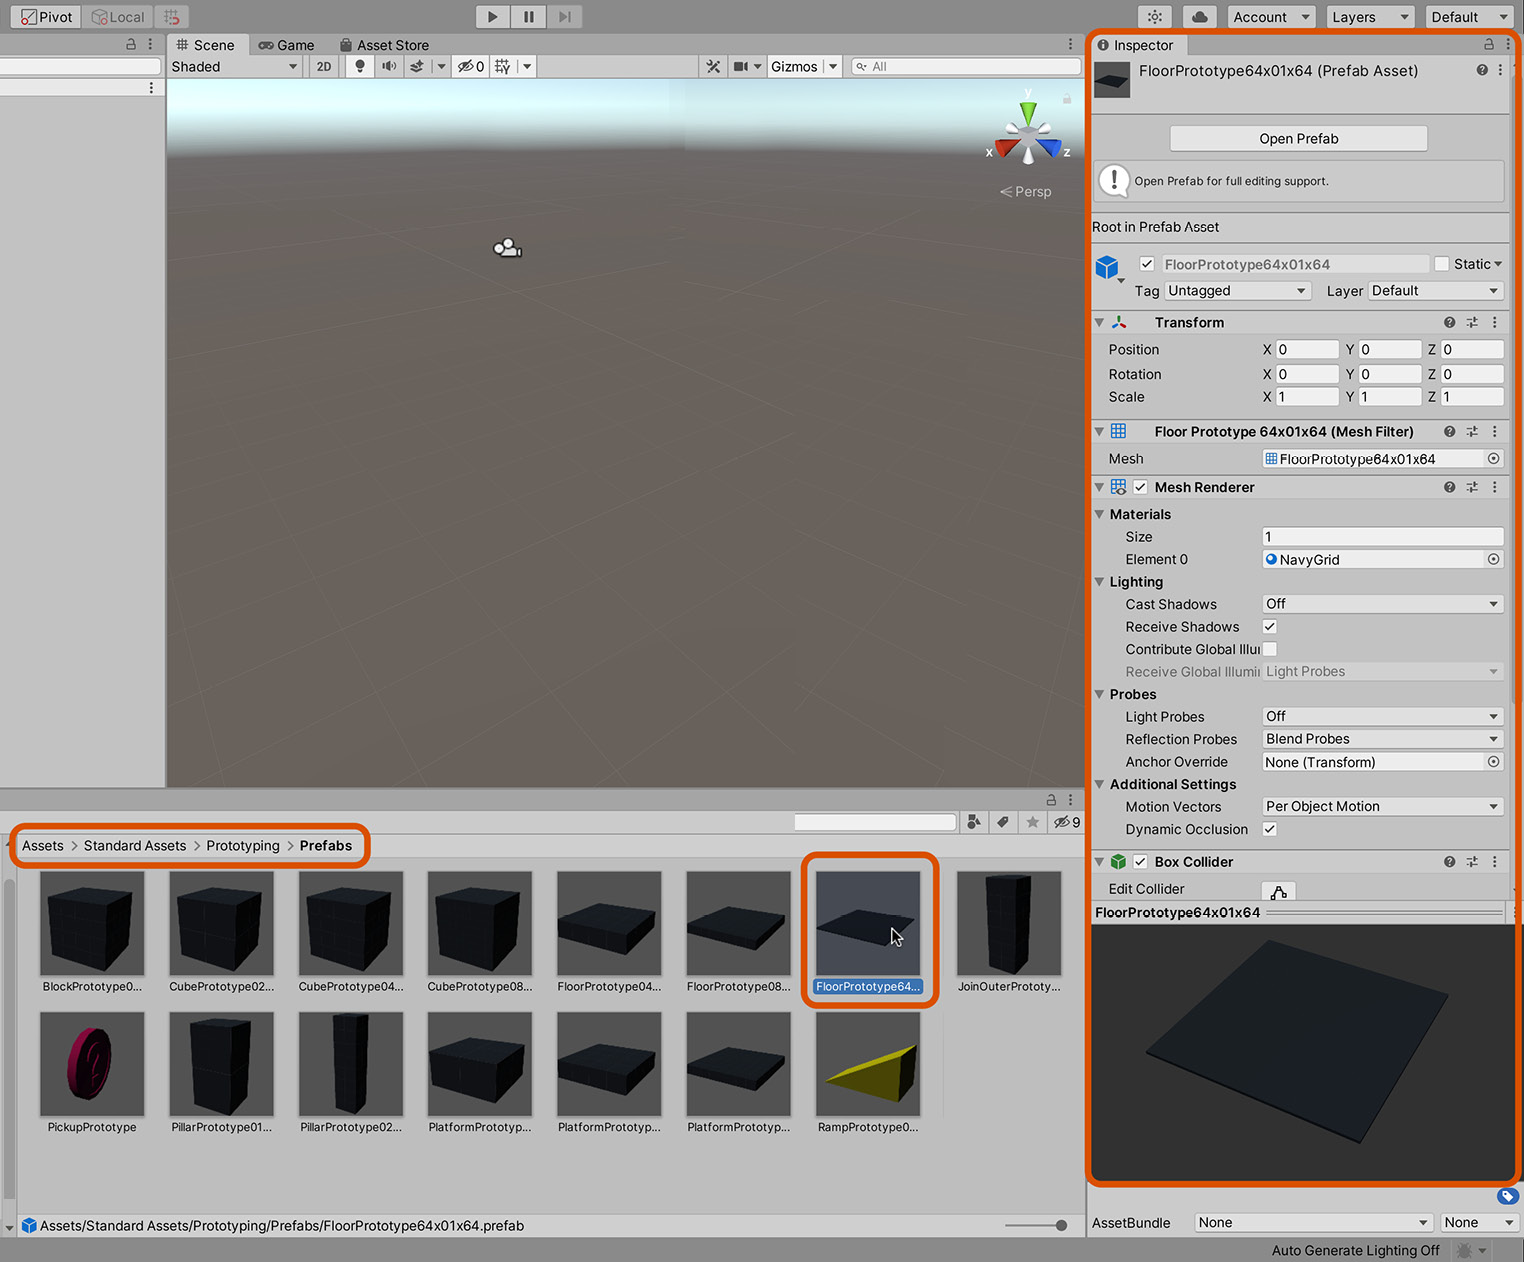
Figure 1.16 – The Standard Assets/Prototyping folder contains many meshes for quick scene building
Tip
You could also quickly add a floor to the scene by choosing GameObject | 3D Object | Plane from the application menu. However, this just adds a dull, gray floor, which isn't very interesting. Of course, you could change its appearance. As we'll see later, Unity lets you do this. However, for this tutorial, we'll use a specifically modeled floor mesh via the Standard Assets package from the Project panel.
The mesh named FloorPrototype64x01x64 (as shown in Figure 1.16) is suitable as a floor. To add this mesh to the scene, drag and drop the object from the Project panel to the scene view. Notice how the scene view changes to display the newly added mesh within the 3D space, and the mesh name also appears as a listing in the hierarchy panel:

Figure 1.17 – Dragging and dropping mesh assets from the Project panel to the Scene view will add them to the scene
The floor mesh asset from the project window has now been instantiated as a GameObject in the scene. This GameObject is a copy or clone of the mesh asset. The instance of the floor in the scene still depends on the floor asset in the Project panel. However, the asset does not depend on the instance. Deleting the floor in the scene will not delete the asset; but, if you remove the asset, you will invalidate the GameObject. You can also create additional floors in the scene by dragging and dropping the floor asset from the Project panel to the scene view.
Each time, a new instance of the floor is created in the scene as a separate and unique GameObject, although all the added instances will still depend on the single floor asset in the Project panel:
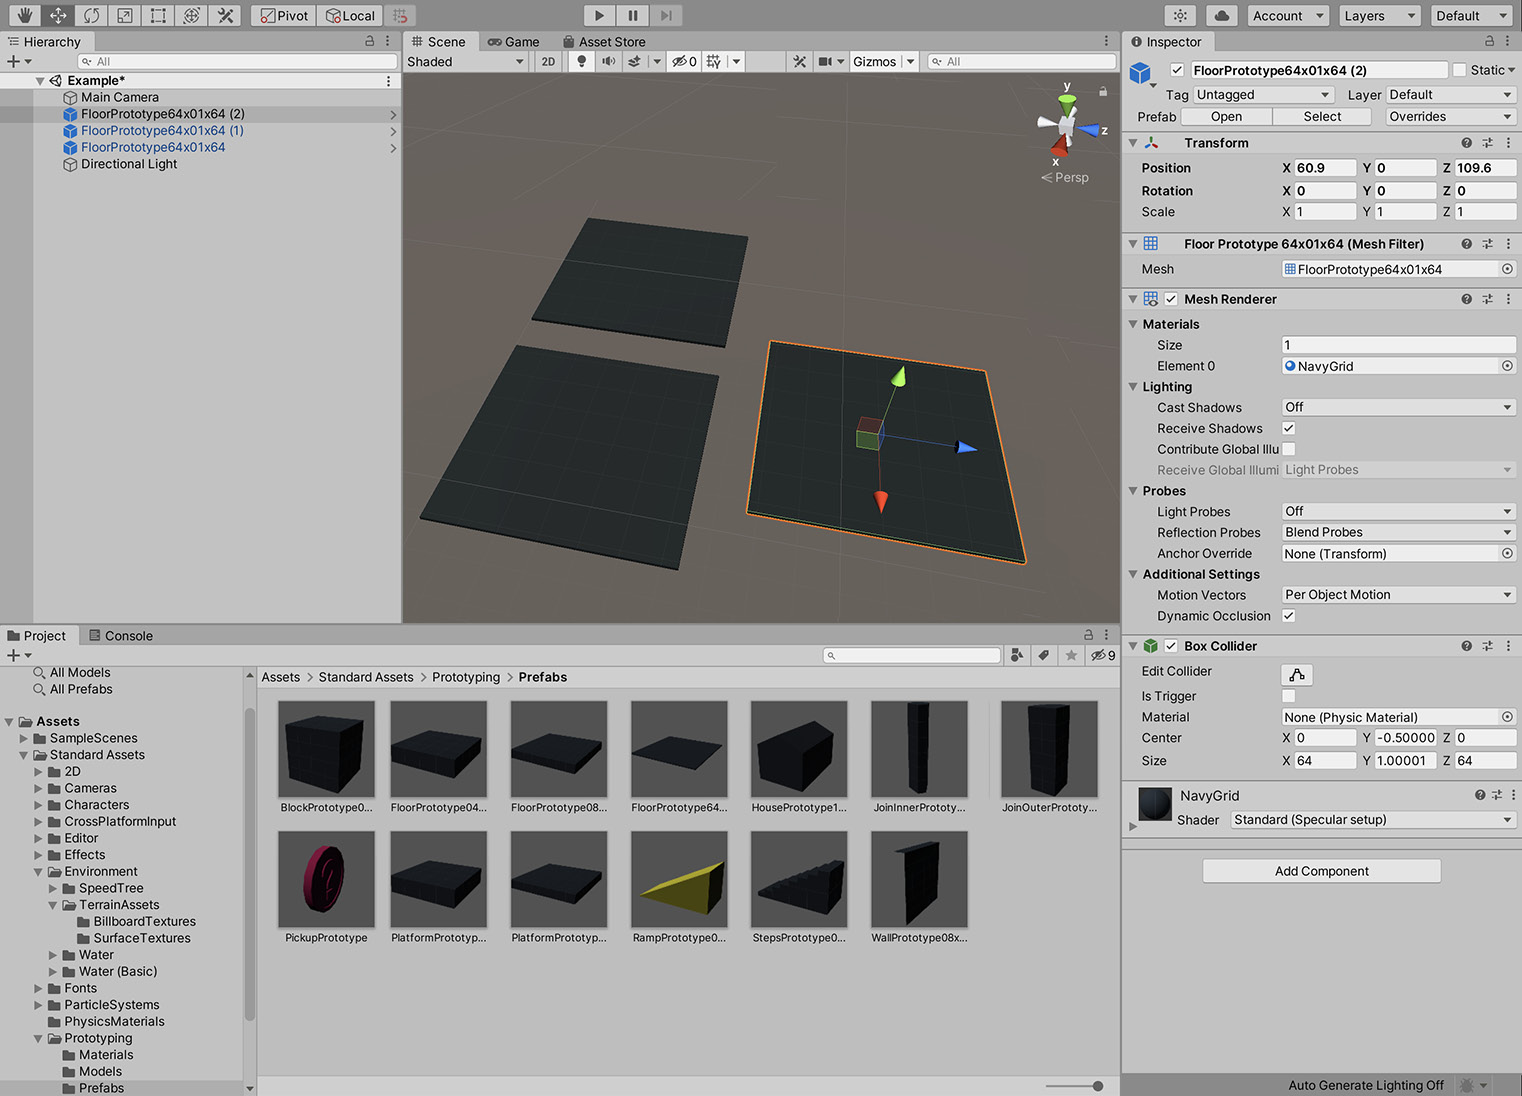
Figure 1.18 – Adding multiple instances of the floor mesh to the scene
We don't actually need the duplicate floor pieces. So, let's delete them. Just click on the duplicates in the scene view and then press Delete on the keyboard to remove them. Remember, you can also select and delete objects by clicking on their name in the hierarchy panel and pressing Delete. Either way, this leaves us with a single floor piece and a solid start to building our scene. One remaining problem, though, concerns the floor and its name. By looking carefully in the hierarchy panel, we can see that the floor name is FloorPrototype64x01x64. This name is long, obtuse, and unwieldy. We should change it to something more manageable and meaningful. This is not technically essential but is good practice in terms of keeping our work clean and organized. There are many ways to rename an object. One way is to first select it and then enter a new name in the name field in the Inspector window. I've renamed it to WorldFloor:

Figure 1.19 – Renaming the floor mesh
As you can see from Figure 1.19, there are a number of other variables you can change on the object. Just below the name field, you'll notice a Transform heading. It is here where you can change the Scale, Rotation, and Position of an object, which we will often want to, as when we add an object to the scene, it may not always have the correct size or be in the right place. We'll look at the Transform component in the next section.
Transforming objects
A scene with a floor mesh has been established, but this alone is not very interesting. We should add more varied objects, such as buildings, stairs, columns, and perhaps even more floor pieces. Otherwise, there would be no world for the player to explore. Before building on what we have got, however, let's make sure that the existing floor piece is centered at the world origin. Every point and location within a scene are uniquely identified by a coordinate, measured as an (X, Y, Z) offset from the world center (origin).
The current position for the selected object is always visible in the Inspector panel. In fact, the Position, Rotation, and Scale of an object are grouped together under a category (component) called Transform:
- Position indicates how far an object should be moved in three axes from the world center.
- Rotation indicates how much an object should be turned or rotated around its central axes.
- Scale indicates how much an object should be shrunk or expanded to smaller or larger sizes. A default scale of 1 means that an object should appear at normal size, 2 means twice the size, 0.5 means half the size, and so on.
Together, the position, rotation and scale of an object constitute its transformation.
To change the position of the selected object, you can simply type new values in the X, Y, and Z fields for position. To move an object to the world center, simply enter (0, 0, 0), as shown in Figure 1.20:

Figure 1.20 – Centering an object to the world origin
This will move the objects pivot point to the world origin. The pivot point is the designated position around which the object will rotate and scale. For the floor mesh, the pivot point is set to the center of the mesh, so when it is positioned at the world center, it will be this point that resides at the location (0, 0, 0).
Setting the position of an object, as we've done here, by typing numerical values, is acceptable and appropriate for the specifying of exact positions. However, it's often more intuitive to move objects using the mouse. To do this, let's add a second floor piece and position it away from the first. Drag and drop a floor piece from the Project panel to the scene to create a second floor GameObject. Then, click on the new floor piece to select it and switch to the Move Tool. To do this, press W on the keyboard or click on the Move Tool icon from the toolbar at the top of the editor interface. The move tool allows you to reposition objects in the scene:

Figure 1.21 – Accessing the move tool
When the translate tool is active and an object is selected, a gizmo appears centered on the object. The translate gizmo appears in the scene view as three colored perpendicular axes: red, green, and blue, corresponding to X, Y, and Z, respectively.
To move an object, hover your cursor over one of the three axes (or planes between axes), and then click and hold the mouse while moving it to slide the object in that direction. You can repeat this process to ensure that your objects are positioned where you need them to be. Use the translate tool to move the second floor piece away from the first, as shown in Figure 1.22:

Figure 1.22 – Translate an object using the translate gizmo
You can also rotate and scale objects using the mouse, as with translate. Press E to access the rotate tool or R to access the scale tool, or you can activate these tools using their respective toolbar icons from the top of the editor. Other available tools are the rect tool and the combined tool, which allow you to move, rotate, or scale an object using one tool. When these tools are activated, a gizmo appears centered on the object, and you can click and drag the mouse over each specific axis to rotate or scale objects as needed:
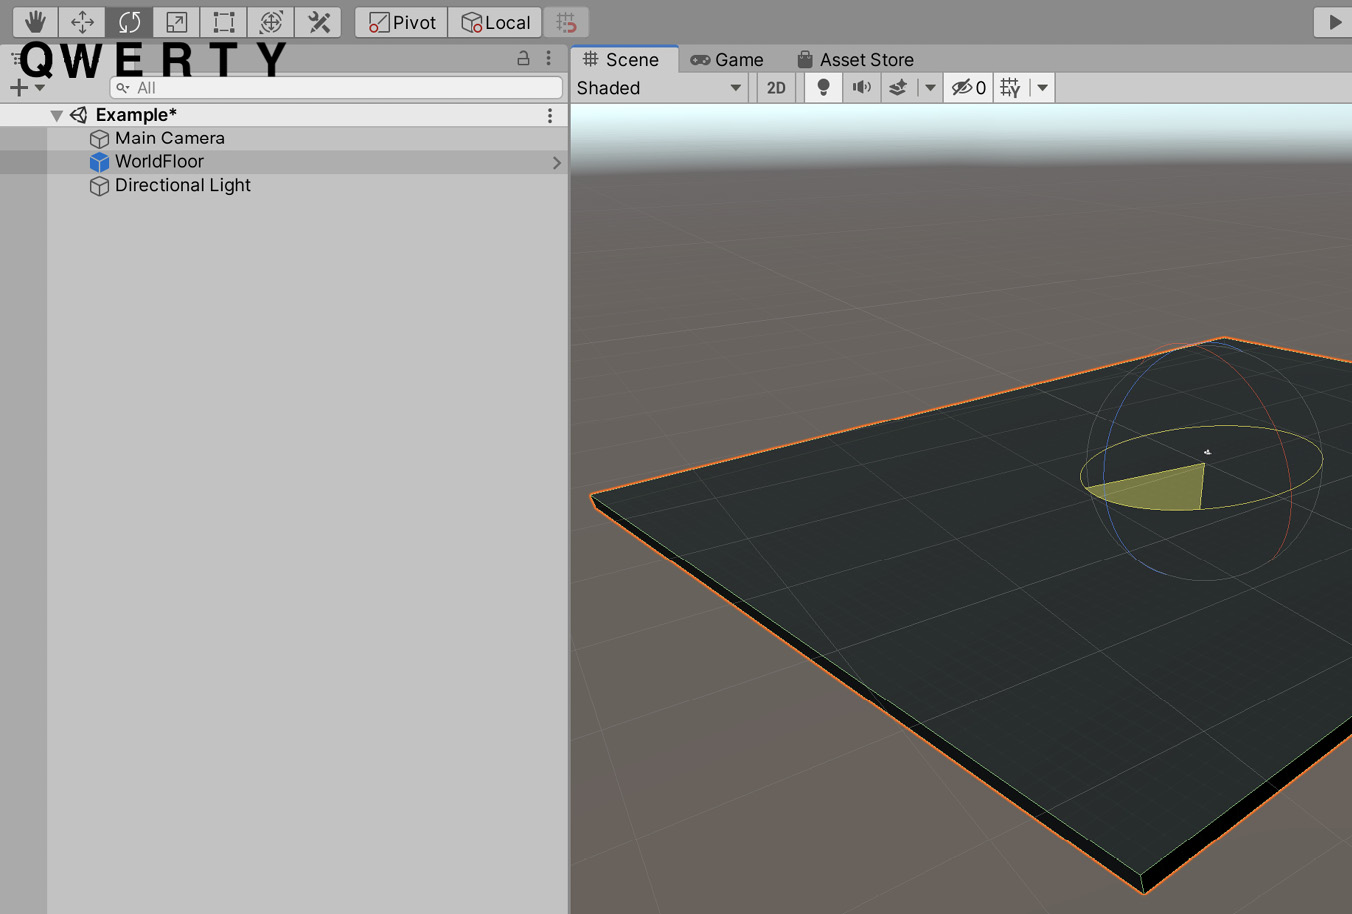
Figure 1.23 – Accessing the tools
Being able to translate, rotate, and scale objects quickly through mouse and keyboard combinations is very important when working in Unity. For this reason, make using the keyboard shortcuts a habit, as opposed to accessing the tools continually from the toolbar.
Navigating the scene
In addition to moving, rotating, and scaling objects, you'll frequently need to move around yourself in the scene view in order to see the world from different positions, angles, and perspectives. This means that you'll frequently need to reposition the scene preview camera in the world. You'll want to zoom in and zoom out of the world to get a better view of objects and change your viewing angle to see how objects align and fit together properly. To do this, you'll need to make extensive use of both the keyboard and mouse together.
To zoom closer or further from the object you're looking at, simply scroll the mouse wheel up or down—up zooms in and down zooms out.
To pan the scene view left or right, or up or down, hold down the middle mouse button while moving the mouse in the appropriate direction. Alternatively, you can access the hand tool from the application toolbar or by pressing Q on the keyboard, and then clicking and dragging in the scene view while the tool is active. Pan does not zoom in or out, but slides the scene camera left and right, or up and down.
Sometimes, while building levels, you'll lose sight entirely of the object that you need. In this case, you'll often want to shift the viewport camera to focus on that specific object. To do this automatically, select the object by clicking on its name in the hierarchy panel, and then press the F key on the keyboard. Alternatively, you can double-click its name in the hierarchy panel.
After framing an object, you'll often want to rotate around it in order to quickly and easily view it from all important angles. To achieve this, hold down the Alt key on the keyboard while clicking and dragging the mouse to rotate the view.
Lastly, it's helpful to navigate a level in the scene view using first-person controls, that is, controls that mimic how first-person games are played. This helps you experience the scene at a more personal and immersive level. To do this, hold down the right mouse button and use the WASD keys on the keyboard to control forward, backward, and strafing movements. Movement of the mouse controls head orientation. You can also hold down the Shift key while moving to increase movement speed.
The great thing about learning the versatile transformation and navigation controls is that, on understanding them, you can move and orient practically any object in any way, and you can view the world from almost any position and angle. Being able to do this is critically important in building quality levels quickly. All of these controls, along with some others that we'll soon see, will be used frequently throughout this book to create scenes and other content in Unity. With these controls in mind, we'll continue to build the environment by adding additional level features, including houses and a bridge to connect the two floor meshes.
Adding level features
Now that we've seen how to transform objects and navigate the scene viewport successfully, let's proceed to complete our first level for the coin collection game:
- Separate the two floor meshes, leaving a gap between them that we'll fix shortly by creating a bridge, which will allow the player to move between the spaces like islands. Use the translate tool (W) to move the objects around:

Figure 1.24 – Separating the floor meshes into islands
Tip
If you want to create more floor objects, you can use the method that we've seen already by dragging and dropping the mesh asset in the Project panel in the scene viewport. Alternatively, you can duplicate the selected object in the viewport by pressing Ctrl + D on the keyboard. Both methods produce the same result.
- Then add some props and obstacles to the scene. Drag and drop the house prefab onto the floor. The house object (HousePrototype16x16x24) is found in the Assets/Standard Assets/Prototyping/Prefabs folder:

Figure 1.25 – Adding house props to the scene
On dragging and dropping the house in the scene, it may align to the floor nicely with the bottom against the floor, or it may not. If it does, that's splendid and great luck! However, we shouldn't rely on luck every time because we're professional game developers! Thankfully, we can make any two mesh objects align easily in Unity using vertex snapping. This feature works by forcing two objects into positional alignment within the scene by overlapping their vertices at a specific and common point.
For example, consider Figure 1.26. Here, a house object hovers awkwardly above the floor and we naturally want it to align level with the floor and perhaps over to the floor corner. To achieve this, perform the following steps:
- Select the house object (click on it or select it from the Hierarchy panel). The object to be selected is the one that should move to align and not the destination (which is the floor), which should remain in place:

Figure 1.26 – Misaligned objects can be snapped into place with Vertex Snapping
- Next, activate the translate tool (W) and hold down the V key for vertex snapping.
- With V held down, move the cursor around and see how the gizmo cursor sticks to the nearest vertex of the selected mesh. Unity is asking you to pick a source vertex for the snapping.
- Move the cursor to the bottom corner of the house, and then click and drag from that corner to the floor mesh corner. The house will then snap align to the floor, precisely at the vertices.
- When aligned this way, release the V key. It should look similar to Figure 1.27:

Figure 1.27 – Align two meshes by vertices
- Now you can assemble a complete scene using the mesh assets included in the Prototyping folder. Drag and drop props in the scene, and using translate, rotate, and scale, you can reposition, realign, and rotate these objects; using vertex snapping, you can align them wherever you need. Give this some practice.
See Figure 1.28 for the scene arrangement that I made using only these tools and assets:

Figure 1.28 – Building a complete level
You'll notice in Figure 1.28 that everything looks relatively flat, with no highlights, shadows, or light or dark areas. This is because scene lighting is not properly configured for best results, even though we already have a light in the scene, which was created initially by default. We'll fix this now.
Adding lighting and a skybox
The basic level has been created in terms of architectural models and layout; this was achieved using only a few mesh assets and some basic tools. Nevertheless, these tools are powerful and offer us a number of options to create a great variety of game worlds. One important ingredient is missing for us, however. This ingredient is lighting.
Let's start setting the scene for the coin collection game by enabling the sky, if it's not already enabled. To do this, perform the following steps:
- Click on the Extras drop-down menu from the top toolbar in the scene viewport.
- From the context menu, select Skybox to enable skybox viewing. A Skybox is a large cube that surrounds the whole scene. Each interior side has a continuous texture (image) applied to simulate the appearance of a surrounding sky. For this reason, clicking the Skybox option displays a default sky in the scene viewport:
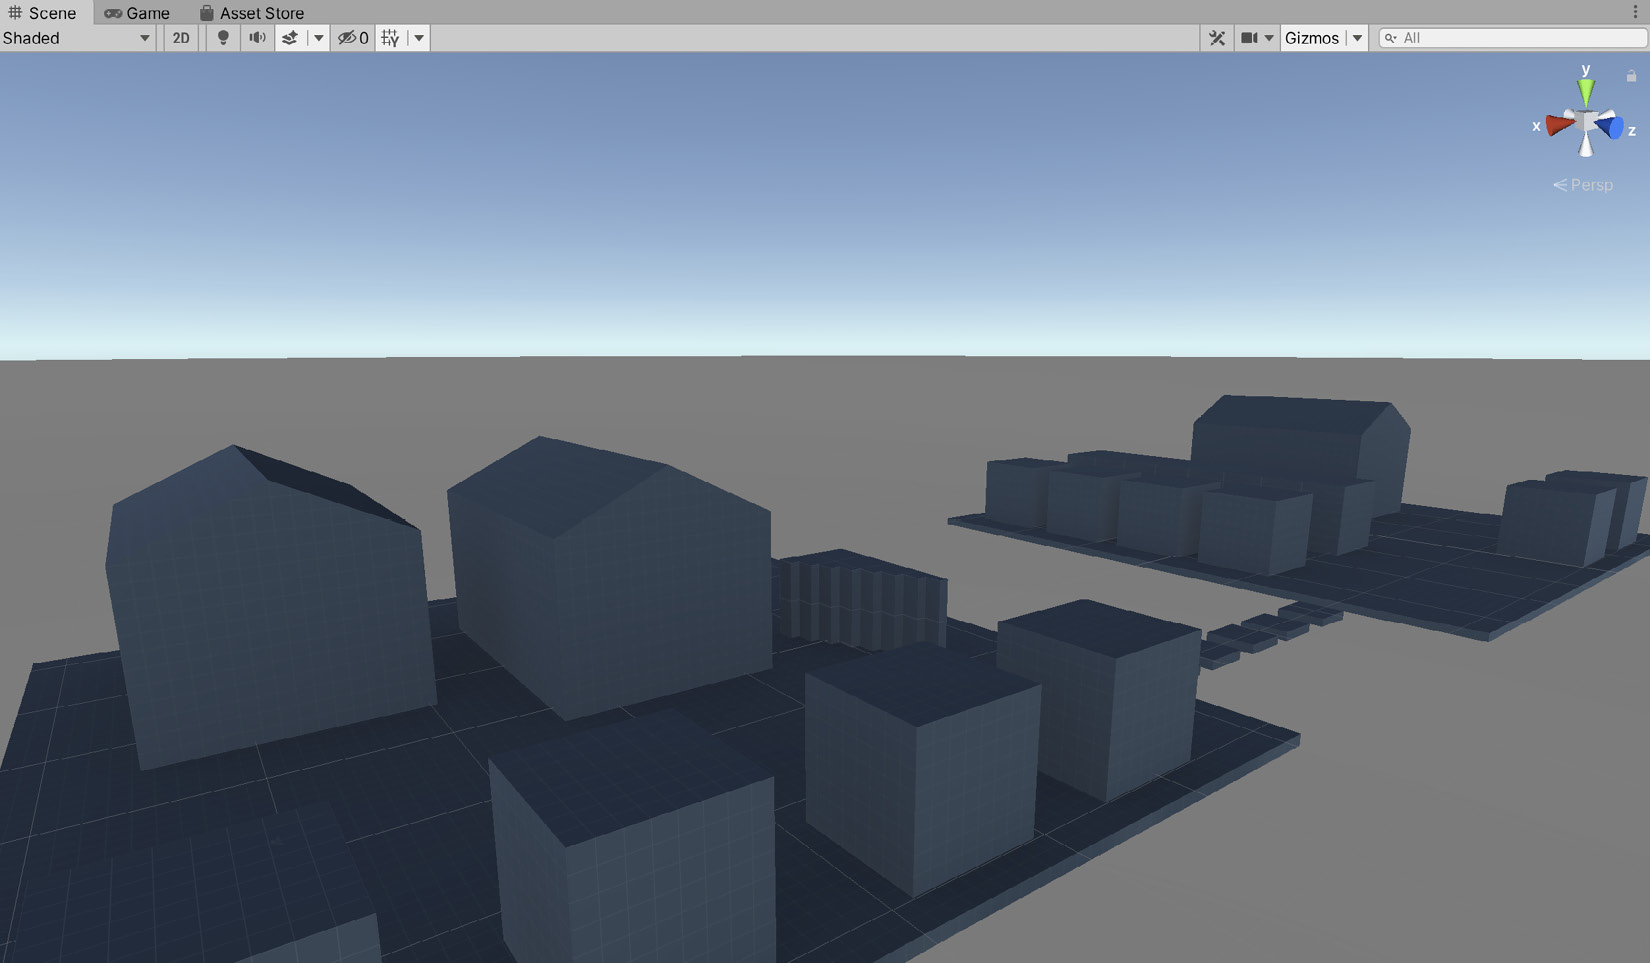
Figure 1.29 – Enabling the sky
- Although the skybox is enabled and the scene looks better than before, it's still not illuminated properly—the objects lack shadows and highlights. To fix this, be sure that lighting is enabled for the scene by toggling on the lighting icon at the top of the scene view, as shown in Figure 1.30. This setting changes the visibility of lighting in the scene view but not in the final game:

Figure 1.30 – Enabling scene lighting in the Scene viewport
Enabling the lighting display for the viewport will result in some differences to the scene appearance and, again, the scene should look better than before. You can confirm that scene lighting is taking effect by selecting Directional Light from the Hierarchy panel and rotating it. All objects in the scene are illuminated based on the rotation of the directional light, so by rotating the light object, you are, in effect, changing the time of day. Moving the object, in contrast, will not affect the scene lighting. A directional light represents a large and very distant light source, existing far beyond the bounds of our game. No matter where you position the lighting object in the scene, the other objects will stay illuminated in the same way. Instead of moving the light object, you can change the Intensity field on the Light component to alter the mood of the scene. This changes how the scene is rendered, as seen in Figure 1.31:

Figure 1.31 – Rotating the scene directional light changes the time of day
Undo any rotations to the directional light by pressing Ctrl + Z on the keyboard. To prepare for final and optimal lighting, all non-movable objects in the scene should be marked as Static. This signifies to Unity that the objects will never move, no matter what happens during gameplay. By marking non-movable objects ahead of time, you can help Unity optimize the way it renders and lights a scene.
To mark objects as static, perform the following steps:
- Select all non-movable objects (which includes practically the entire level so far). By holding down the Shift key while selecting objects, you can select multiple objects together, allowing you to adjust their properties as a batch through the Inspector panel.
- Enable the Static checkbox via the Inspector panel. The Static checkbox is shown in Figure 1.32:
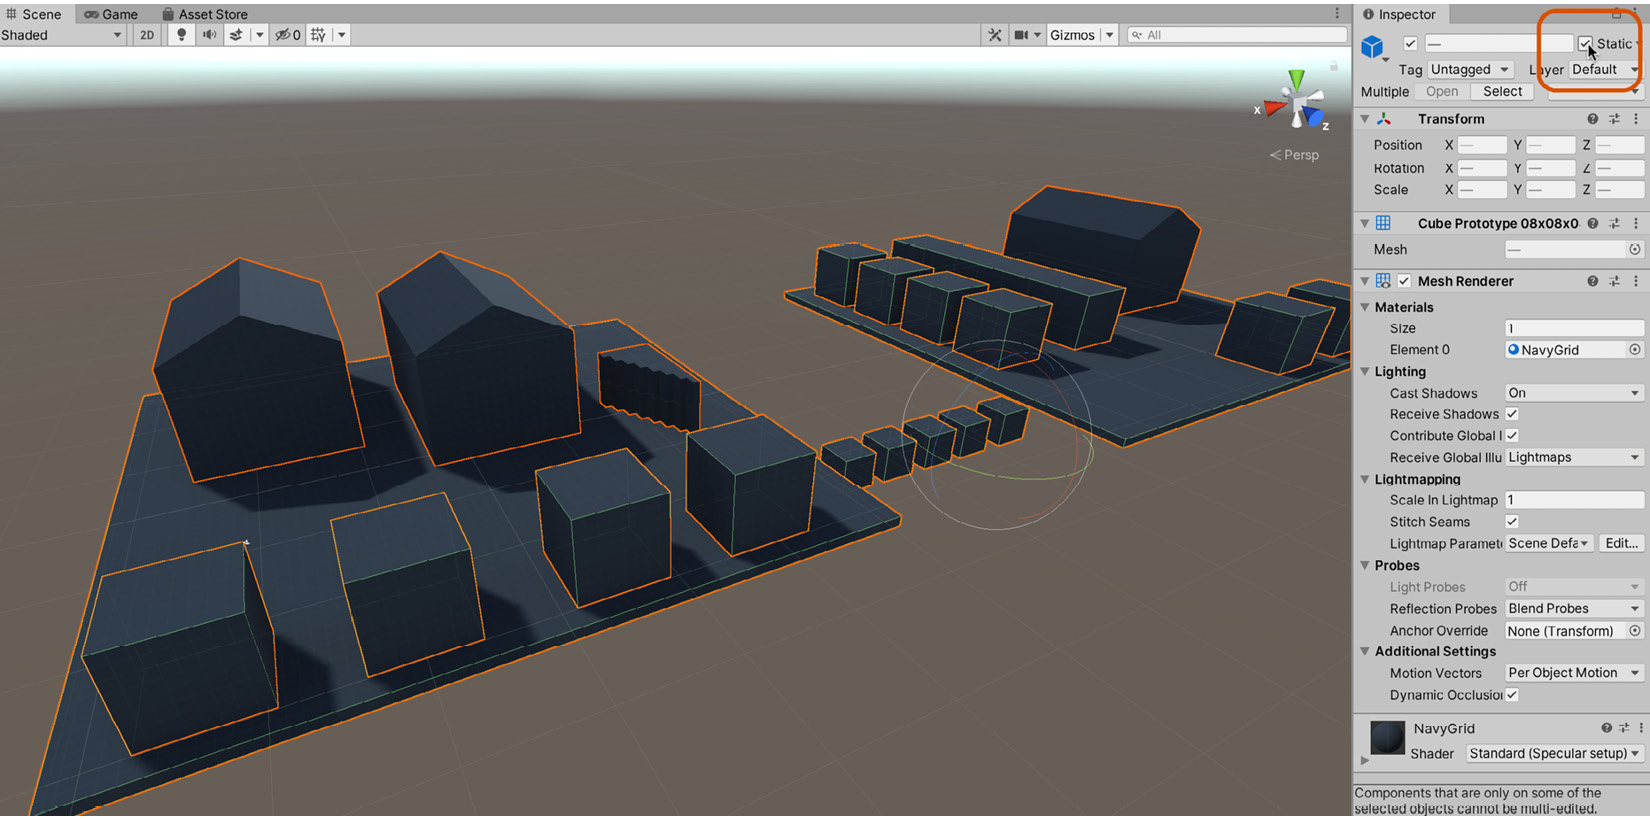
Figure 1.32 – Enabling the Static option for multiple non-movable objects improves lighting and performance
When you enable the Static checkbox for geometry, Unity autocalculates scene lighting in the background—effects such as shadows, indirect illumination, and more. It generates a batch of data called the GI Cache, featuring light propagation paths, which instructs Unity how light rays should bounce and move around the scene to achieve greater realism.
If your objects are not casting shadows, they may have the Cast Shadows option disabled. To fix this, perform the following steps:
- Select all meshes in the scene.
- Then, from the Inspector panel, click on the Cast Shadows context menu from the Mesh Renderer component, and choose the On option.
When you do this, all mesh objects should cast shadows, as shown in Figure 1.33:

Figure 1.33 – Enabling cast shadows from the Mesh Renderer component
Voilà! The meshes now cast shadows. Splendid work! In reaching this point, you've created a new project, populated a scene with meshes, and successfully illuminated them with directional lighting. That's excellent. However, it'd be even better if we could explore our environment in the first person. We'll see how to do precisely that next.
Testing the game
The environment created thus far for the coin collection game has been assembled using only the mesh assets included with the Standard Assets package. My environment, as shown in Figure 1.28, features two main floor islands with houses, and a stepping-stone bridge that connects the islands. Your version may be slightly different, and that's fine.
Now, the level, as it stands, contains nothing playable. It's currently a static, non-interactive, 3D environment made using the editor tools. In this chapter, we'll correct this by allowing the player to wander around and explore the world in first-person, controlled using the standard WASD keys on the keyboard. Once the character has been added to the scene, we can then perform our first playtest of the game using the Game panel. Lastly, we will deal with any warning messages shown when we play the game.
Adding a playable character
For the playable character, we will use a ready-made asset, which contains everything necessary to create a quick and functional first-person character:
- Open the Standard Assets/Characters/FirstPersonCharacter/Prefabs folder.
- Then, drag and drop the FPSController asset from the Project panel in the scene. You will then have a scene that looks similar to the one in Figure 1.34:
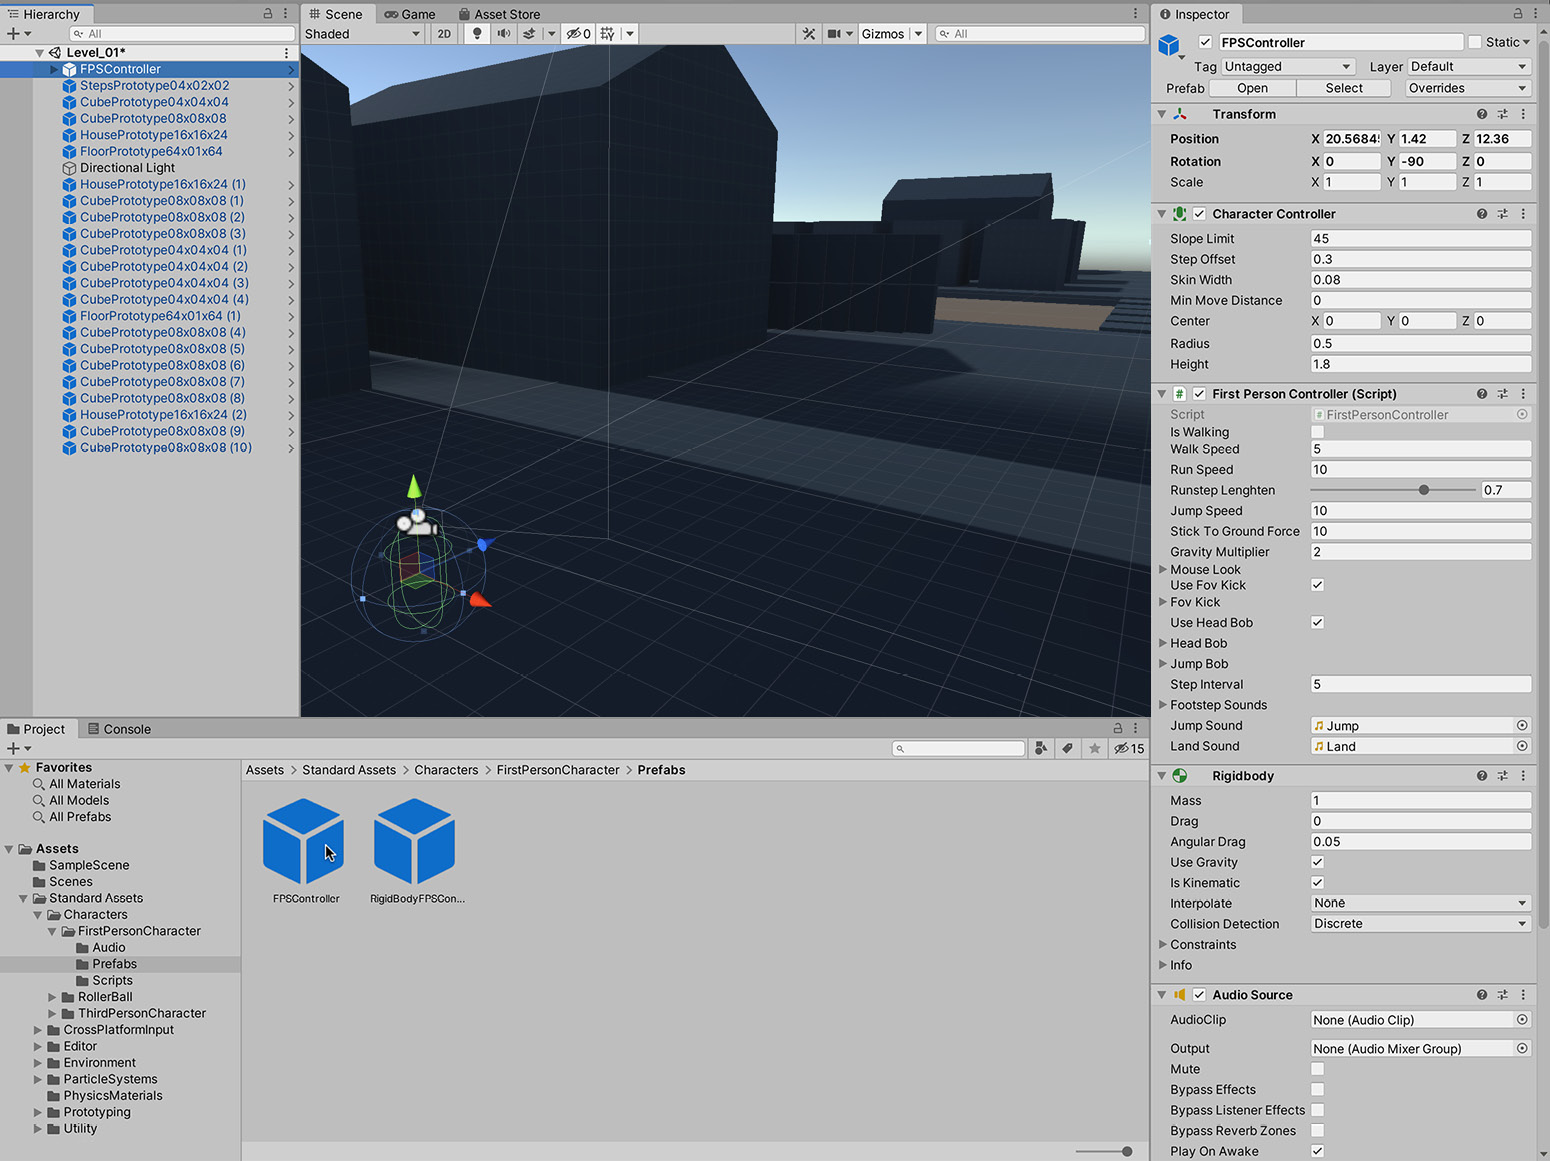
Figure 1.34 – Adding an FPSController to the scene
- After adding the first-person controller, click on the Play button in the Unity toolbar to playtest the game:

Figure 1.35 – Unity scenes can be playtested by clicking on the play button from the toolbar
On clicking Play, Unity typically switches from the Scene tab to the Game tab, which will be explored in the next section.
Using the game panel
As we've seen, the scene tab is a director's-eye view of the active scene; it's where a scene is edited, crafted, and designed. In contrast, the Game tab is where the active scene is played and tested from the perspective of the gamer. From this view, the scene is displayed through the main game camera. While play mode is active, you can playtest your game using the default game controls, provided that the game tab is in focus.
The first-person controller uses the WASD keys on the keyboard and mouse movements control head orientation:

Figure 1.36 – Playtesting levels in the Game tab
Important note
You can switch back to the scene tab while in play mode. You can even edit the scene and change, move, and delete objects there too! However, any scene changes made during play will automatically revert to their original settings when you exit play mode. This behavior is intentional. It lets you edit properties during gameplay to observe their effects and debug any issues without permanently changing the scene. This rule, however, doesn't apply to changes made to assets in the Project panel, including prefabs. Changes to these objects are not reverted when you exit play mode.
Congratulations! You should now be able to walk around your level. When finished, you can easily stop playing by clicking on the play button again or by pressing Ctrl + P on the keyboard. Doing this will return you to the scene tab.
Tip
Unity also features a Toggle-Pause button to suspend and resume gameplay.
You may notice that, on playing the level, you receive an information message in the Console window. In the next section, we'll go through the types of messages you may receive, what is causing this specific message, and how we can resolve it.
Understanding console messages
The console window is where any errors, warnings, or information messages are displayed. Sometimes, a message appears just once, or sometimes it appears multiple times, as in Figure 1.37:

Figure 1.37 -The console outputs information, warnings, and errors
By default, this window appears at the bottom of the Unity Editor, docked beside the Project panel. This window is also accessible manually from the application menu, Window | General | Console.
Information messages are typically Unity's way of making best practice recommendations or suggestions based on how your project is currently working. Warnings are slightly more serious and represent problems either in your code or scene, which (if not corrected) could result in unexpected behavior and suboptimal performance. Finally, errors describe areas in your scene or code that require careful and immediate attention. Sometimes, errors will prevent your game from working altogether, and sometimes errors happen at runtime and can result in game crashes or freezes. Errors are printed in red, warnings in yellow, and information messages appear as a default gray.
The console window, therefore, is useful because it helps us debug and address issues with our games. Figure 1.37 has identified an issue concerning duplicated audio listeners. An audio listener is a component attached to an object, which represents an ear point. It enables the ability to hear sound within the scene from the position of the audio listener. Every camera, by default, has an audio listener component attached. Unity doesn't support multiple active audio listeners in the same scene, which means that you can only hear audio from one place at any one time. We are receiving this message because our scene now contains two cameras, one that was added automatically when the scene was created, and another one that is included in the first-person controller. To confirm this, select the first-person controller object in the hierarchy panel and click on the triangle icon beside its name to reveal more objects underneath, which are part of the first-person controller:

Figure 1.38 – Finding the camera on a first-person controller
Select the FirstPersonCharacter object, which is underneath the FPSController object (as shown in Figure 1.38). The FirstPersonCharacter object is a child of the FPSController, which is the parent. This is because FPSController contains or encloses the FirstPersonCharacter object in the Hierarchy panel. Child objects inherit the transformations of their parents. This means that as parent objects move and rotate, all transformations will cascade downward to all children. From the Inspector panel, you can see that the object has an Audio Listener component:

Figure 1.39 – The FirstPersonController object contains an Audio Listener component
We could remove the audio listener component from FPSController, but this would prevent the player hearing sound from a first-person perspective. So, instead, we'll delete the original camera created by default in the scene. To do this, select the original camera object in the hierarchy and press Delete on the keyboard. This removes the audio listener warning in the console during gameplay. Now, if you play the game, the message should no longer appear.
We've come a long way, we've added a first-person character to the game, playtested using the Game panel, and made changes in response to a message shown in the Console panel. Great work! This iteration of playtesting and reacting to messages in the Console window will become second nature as we progress through the book, and understanding and debugging these messages is a big part of developing in Unity.
Now that we have covered the basics, we can work on improving our scene by adding water around our islands and starting on the collectible coins (an important part of a collectible coin game!).
Improving the scene
The collection game is making excellent progress. We now have something playable insofar as we can run around and explore the environment in the first person. However, the environment could benefit from additional polish. Right now, for example, the floor meshes appear suspended in mid-air with nothing beneath them to offer support. It's also possible to walk over the edge and fall into an infinite drop. And there's a distinct lack of coins in our collectible coin game. We'll fix both of these issues in this chapter, starting with adding a water plane to support the islands.
Adding a water plane
To add water, we can use another ready-made Unity asset included in the Project panel:
- Open the Standard Assets/Environment/Water/Water/Prefabs folder.
- Drag and drop the WaterProDaytime asset from the Project panel into the scene. This appears as a circular object, which is initially smaller than needed:

Figure 1.40 – Adding water to the environment
- After adding the water prefab, position it below the floor and use the scale tool to increase its planar size (X, Z) to fill the environment outward into the distant horizon. This creates the appearance that the floor meshes are smaller islands within an expansive world of water:
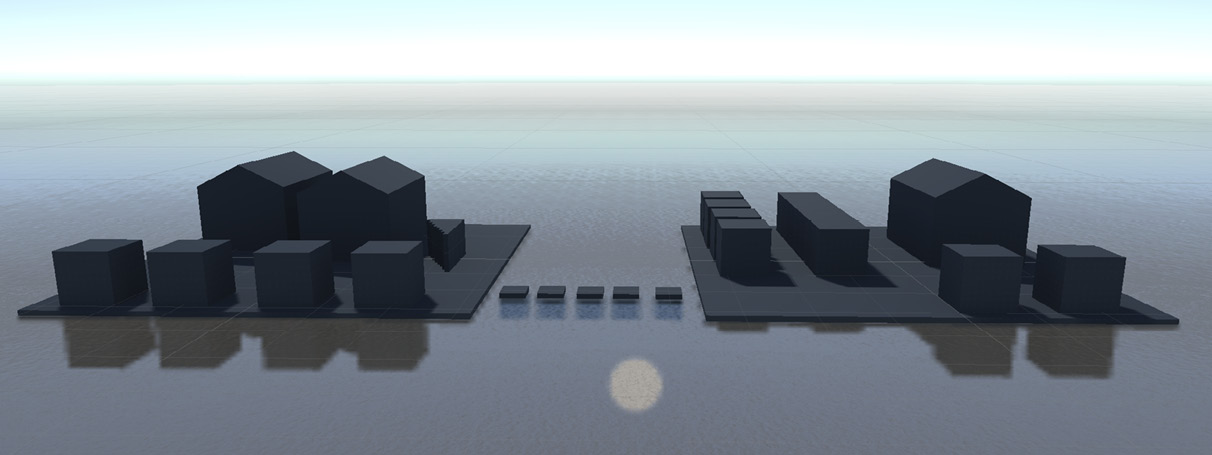
Figure 1.41 – Scaling and sizing water for the environment
Now, let's take another test run in the game tab. Press Play on the toolbar and you should see the water in the level. Unfortunately, you can't walk on the water, nor can you swim or dive beneath it. If you try walking on it, you'll simply fall through it, descending into infinity as though the water had never been there. Right now, the water is an entirely cosmetic feature.
The water is a substanceless, ethereal object through which the player can pass easily. Unity doesn't recognize it as a solid or even a semi-solid object. As we'll see in more detail later, you can make an object solid very quickly by attaching a Box Collider component to it. Colliders and physics are covered in more depth from Chapter 3, Creating a Space Shooter, onward. For now, however, we can add solidity to the water by first selecting the Water object from the Hierarchy panel (or in the scene view) and then by choosing Component | Physics | Box Collider from the application menu:

Figure 1.42 – Attaching a Box Collider to a Water object
Attaching a component to the selected object changes the object itself; it changes how it behaves. Essentially, components add behavior and functionality to objects, making them behave in different ways.
When a Box Collider is added to the water, a surrounding green cage or mesh appears. This approximates the volume and shape of the water object and represents its physical volume, namely, the volume of the object that Unity recognizes as solid. You can see this approximation in Figure 1.43:

Figure 1.43 – Box Collider approximate physical volume
If you play the game now, your character will walk on water as opposed to falling through. True, the character should be able to swim properly, but walking might be better than falling. To achieve full swimming behavior would require significantly more work and is not covered here. If you want to remove the Box Collider functionality and return the water back to its original state, select the Water object, click on the cog icon on the Box Collider component, and then choose Remove Component from the context menu, as shown in Figure 1.44:

Figure 1.44 – Removing a component from a GameObject
With the water set up precisely as we want it, we'll move back on land and start creating the coins for our game.
Adding a coin
At this point, our game has an environment and a method of navigation. But we're missing a core feature of our collection game – there are no coins for the player to collect! So far, we haven't had to write a single line of code. However, in order to implement collectible coins, we'll need to do just that. We'll write the C# scripts in the next chapter, but we can get started here by creating the coin object itself. To do this, we'll use a Cylinder primitive that's scaled to form a coin-looking shape:
- Create a cylinder by selecting GameObject | 3D Object | Cylinder from the application menu:
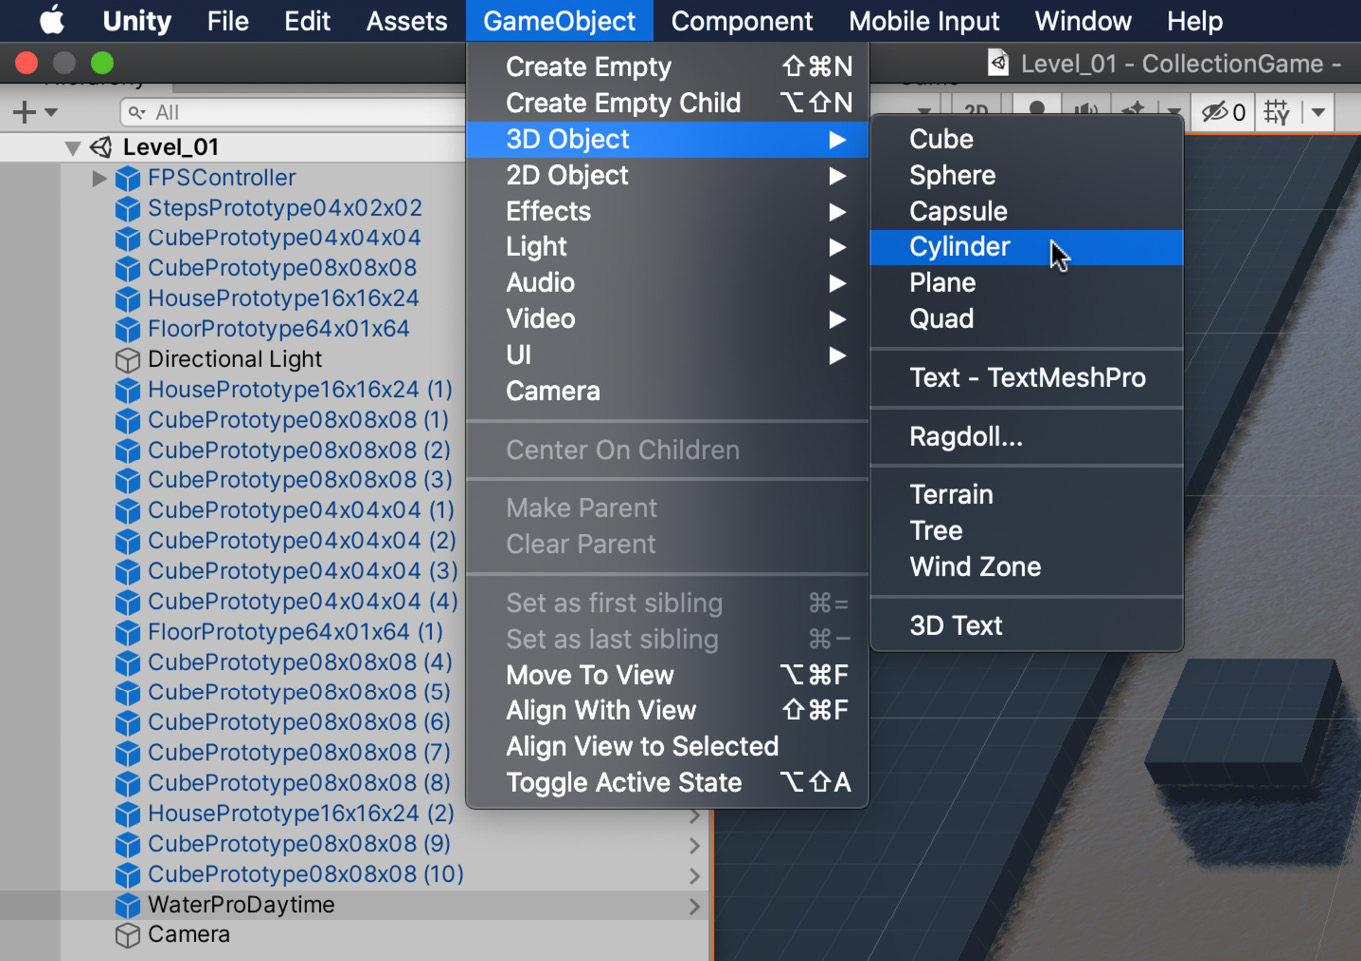
Figure 1.45 – Creating a cylinder
Initially, the cylinder looks nothing like a coin. However, this is easily changed by scaling non-uniformly on the Z axis to make the cylinder thinner. Switch to the scale tool (R) and then scale the cylinder inward so that it looks similar to Figure 1.46:

Figure 1.46 – Scaling the cylinder to make a collectible coin
- By default, the cylinder is created with a Capsule Collider as opposed to a Box Collider. As you scale the object, the collider will also change size. However, sometimes it may not have the dimensions we would like. You can change the size of the Capsule Collider component by adjusting the radius field from the Inspector panel when the coin is selected. Alternatively, you could remove the Capsule Collider altogether and add a Box Collider instead. Either way is fine; generally, choose the simpler shape where possible. The colliders will be used in a script in the next chapter to detect when the player collides with a coin:

Figure 1.47 – Adjusting the Capsule Collider for the coin
We now have the basic shape and structure for a coin. We will improve it in the next chapter by making it collectible and assigning a material to make it look shiny. However, by using only a basic Unity primitive and scale tool, we were able to generate a shape that resembles a coin.
Saving the scene
Overall, the scene is looking good and is worth saving to disk so that we don't lose it. To save the scene, perform either of the following steps:
- Choose File | Save Scene from the application menu.
- Alternatively, press Ctrl + S on the keyboard or else.
If you're saving the scene for the first time, Unity displays a pop-up save dialog, prompting you to name the scene (I called it Level_01 and saved it in the Scenes folder). After saving the scene, it becomes an asset of the project and appears in the Project panel. This means that the scene is now a genuine and integral part of the project and not just a temporary work in progress as it was before. Notice also that saving a scene is conceptually different from saving a project. For example, the application menu has entries for Save Scene and Save Project. Remember, a project is a collection of files and folders, including assets and scenes. A scene, by contrast, is one asset within the project and represents a complete 3D map that may be populated by other assets, such as meshes, textures, and sounds. Thus, saving a project saves the configuration between files and assets, including scenes. Saving a scene, in contrast, just retains the level changes within that specified scene:
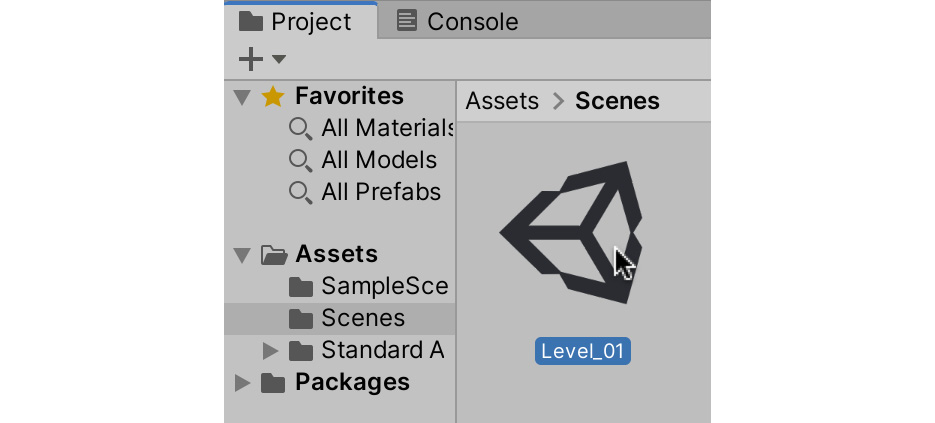
Figure 1.48 – Saved scenes are added as assets within your project
Tip
You can see in Figure 1.48 that I've saved my scene in the Scenes folder. If you want to save it somewhere else, folders can be created in your project by right-clicking on any empty area in the Project panel and choosing New Folder from the context menu, or else choose Assets | Create | Folder from the application menu. You can easily move and rearrange assets among folders by simply dragging and dropping them. And that's it! The scene is saved to a file at the location you specified. As we progress through the book, make sure you regularly save your scenes to ensure that you do not lose any progress.
Summary
Congratulations! On reaching this point, you have laid the foundations for a coin collection game that will be complete and functional by the end of the next chapter. Here, we've seen how to create a Unity project from scratch and populate it with assets, such as meshes, textures, and scenes. In addition, we've seen how to create a scene for our game and use a range of assets to populate it with useful functionality. This knowledge is fundamental to becoming a Unity developer. By mastering these topics, you lay a solid foundation on which you will build the rest of the projects in this book and your own games.
In the next chapter, we'll resume work from where we ended here by making a coin that is collectible and establishing a set of rules and logic for the game, making it possible to win and lose.
Test your knowledge
Q1. To manage Unity projects and installations, you can use…
A.Unity Editor
B. Unity Hub
C. Package Manager
D. Project Panel
Q2. Once you've added an asset using the Unity Asset Store, you can import it into your project using…
A. the Unity Asset Store itself
B. the project creation wizard
C. Unity Hub
D. Package Manager
Q3. Assets are imported directly into the…
A. Object Inspector
B. Hierarchy
C. scene
D. Project panel
Q4. You can quickly create first-person controls using…
A. camera objects
B. capsules
C. first-person controllers
D. Box Colliders
Q5. The Prototyping package is most useful for...
A. building levels
B. prototyping code
C. animating objects
D. creating camera effects
Q6. When pressed in the scene tab, the F key will...
A. center the view on the selected object
B. remove the selected object
C. hide the selected object
D. freeze the selected object
Q7. You can access the Snapping Feature by pressing...
A. the C key
B. the V key
C. the D key
D. the E key
Further reading
Refer to the following links for more information:
- https://docs.unity3d.com/Manual/GettingStartedInstallingHub.html
- https://learn.unity.com
- https://docs.unity3d.com/Manual/upm-ui.html
- https://docs.unity3d.com/Manual/CreatingScenes.html
- https://docs.unity3d.com/Manual/GameObjects.html
- https://www.packtpub.com/gb/game-development/unity-by-example-build-20-mini-projects-in-unity-video
