12. Automating Tasks
There are some things you do over and over again in Photoshop, as if you were working on an assembly line. But if there are tasks that you perform frequently, why not let Photoshop take care of the tedious stuff? Automation features, including actions and droplets and scripts, accomplish routine tasks quickly so that you can get back to being creative. For example, you can easily convert a bunch of images to grayscale using the same settings, apply a new color profile to an entire folder of images at once, or apply standard sharpening values to a collection of photos.
Playing Actions
The simplest way to automate tasks is to record and play actions. An action is a recorded set of steps that you play back to apply them to one or more files.
Actions live in the Actions panel (choose Window > Actions). There are already a bunch of them in there, grouped in the Default Actions set. You can play these actions to apply a sepia tone or vignette, save an image as a Photoshop PDF, or convert images to grayscale.
To play an action, open the image you want to apply it to, and then select the action and click the Play button in the Actions panel. You can expand an action to see the individual steps included in it.
Figure 12.1. You can view the steps in an action in the Actions panel.

To apply actions to multiple files at once:
- Open the files you want to apply the action to. (You don’t need to do this if you’ll be applying the action to an entire folder’s worth of files.)
- Choose File > Automate > Batch.
- In the Play area of the Batch dialog box, choose an action set, and then choose the action you want to run.
Figure 12.2. The Batch dialog box.

- If you want to apply the action to files you opened, choose Opened Files from the Source menu. Otherwise, choose Folder and specify a folder that contains the files you want to apply the action to. Photoshop will run the action against all the files in the folder that it can open.
- Choose an option from the Destination menu. You can have Photoshop save and close the files after it applies the action, or save them to a folder you specify.
- Click OK to run the action for all the files you’ve specified.
Recording Actions
Some of the default actions can be handy, but what makes the feature so powerful is that you can record your own actions.
To create a new action set, click the Create New Set button in the Actions panel, name the set, and click OK.
To record an action:
- Click the New Action button.
- Name the action, select an action set to group it in, and then click Record.
- Perform all the tasks that you want to include in the action. Take all the time you need to record the action accurately. The time it takes you to record the action has no effect on the time it takes to run.
- When you’re done, click the Stop button.
Tip
If you’re recording a straightforward, action such as coloring a text layer red, you can probably go straight to recording. But if you’re recording an action that involves multiple sophisticated steps, take the time to think through the process, and then rehearse the steps to make sure you’re doing them in the right order. Note the steps for yourself, so you’ll have a guide as you record the action.
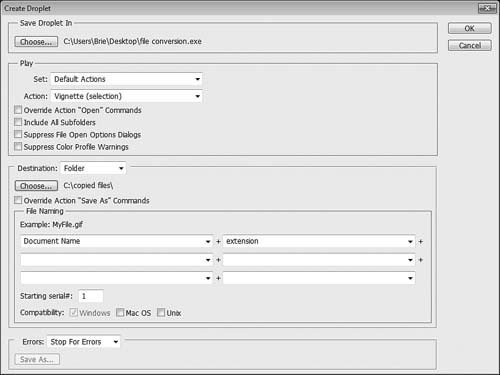
Creating Droplets
Droplets take actions a step further. Using a droplet, you can apply an action to a file without even opening it.
To create a droplet:
- Choose File > Automate > Create Droplet.
Figure 12.3. Create a droplet to apply actions to files on your computer without opening Photoshop.
- In the Create Droplet dialog box, choose an action from an action set.
- From the Destination menu, choose whether you want to save and close the file, move it to a new folder, or neither.
• If you choose Folder, click Choose and then select the folder for the newly saved files.
• If you choose Save and Close, Photoshop saves each file with its original name and closes it, leaving it in the original folder.
• If you choose None, Photoshop honors any Save or Close commands in the action. If there are none, it leaves the files open.
- If you chose Folder, set up the file-naming protocol for the newly saved files. You can append a file extension, date, or serial number to each image.
- Select any options you want to apply. You can override any Open commands in the action, apply the action to files in all subfolders of the folder you drop the droplet on, suppress file open options dialog boxes and color profile warnings so the action won’t be interrupted (defaults will be accepted), or override Save As commands in the action. You can also stop the action when it runs into errors or have it keep going and log the errors so you can refer to them later.
- Click OK.
- To use the droplet, drag an image or folder of images onto the droplet in Explorer (Windows) or the Finder (Mac OS).
Using Scripts
You can take automation even further by creating your own scripts for Photoshop. It supports scripting languages such as VB Script in Windows and AppleScript in Mac OS. You can also use JavaScript to write scripts that work with either Windows or Mac OS.
I don’t have either the space or the expertise to tell you how to write your own scripts here, but some pretty fantastic resources are available online. Photoshop mavens not only provide scripting tutorials, but they share sample scripts that you can copy and use as they are or use as the basis for your own custom scripts. A quick Web search on “Photoshop scripts” should get you on your way.
Photoshop automatically includes some scripts without any effort on your part. You can delete all empty layers, export layers to files, and perform other tasks using scripts that are already installed.
To run a script, choose File > Scripts, and then select a script.
If you copy or write additional JavaScript scripts, save them with a JS or JSX extension to the Photoshop CS5/Presets/Scripts folder. They’ll show up automatically in the Scripts submenu.
Tip
If you want to use a script saved elsewhere on your system, choose File > Scripts > Browse, and then navigate to the script you want to run.
Creating Presets in Camera Raw
Automation isn’t just for Photoshop. You can apply sets of adjustments to images in Camera Raw.
To create a preset:
- In Camera Raw, apply the adjustments you want to include in the preset.
- Click the Presets tab.
- Click the New Preset button at the bottom of the Presets panel.
- In the New Preset dialog box, name the preset, select which settings you want to include in the preset, and then click OK.
To apply a preset, do one of the following:
• Click its name in the Presets panel in Camera Raw.
• Select an image in Bridge, and then choose Edit > Develop Settings > [preset name].