9. Preparing Images for the Web
When you’re working with online images, you need to strike a balance between quality (which you want to be as high as possible) and file size (which you want to be as small as possible). You also need to save files in formats that can be viewed by Web browsers, of course.
You can optimize images for the Web as they are, or you can prepare images as navigation tools for Web sites. Either way, end by optimizing the images just before uploading them.
If you’re designing a Web site, use layers and slices to create hyperlinks and buttons. You can also create animated GIF or QuickTime movies from images in Photoshop.
Slicing Images
If you want to use areas of an image to link to other pages or images, slice it. You can also use slices to optimize different parts of an image with different settings.
A slice is a rectangular area of an image that you define based on layers, guides, selections, or the Slice tool. When you export a sliced image, Photoshop saves each slice as a separate file and creates an HTML table or Cascading Style Sheet (CSS) code to display the sliced image.
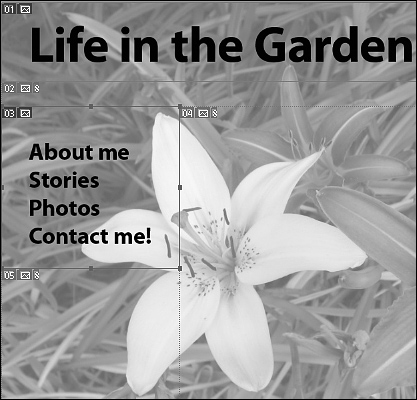
Figure 9.1. Slices are rectangular areas on an image.
To see the slices, select the Slice tool ![]() or Slice Select tool
or Slice Select tool ![]() . Each slice has a number and a badge. User slices have blue badges; auto slices have gray badges. Each slice is numbered, beginning with 1 in the upper-left corner of the image. (As you create more slices or divide existing slices, the slice numbers shift accordingly.)
. Each slice has a number and a badge. User slices have blue badges; auto slices have gray badges. Each slice is numbered, beginning with 1 in the upper-left corner of the image. (As you create more slices or divide existing slices, the slice numbers shift accordingly.)
Figure 9.2. Each slice has a badge that provides information about that slice.
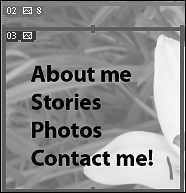
A small mountain symbol on a badge indicates that the slice contains content; an X indicates that it doesn’t. A box with a page corner turned up means the slice was created from a layer. An infinity symbol indicates that the slice is linked to other slices for the purposes of optimization.
Creating slices
Slices exist in relationship to each other. If you create one slice (called a user slice), Photoshop automatically divides the rest of the image into rectangular slices appropriately called auto slices. If you create even a single slice, the entire image must be sliced.
To create a slice with the Slice tool:
- Select the Slice tool (grouped with the Crop tool).
- Drag a rectangular slice on the image. Photoshop automatically creates auto slices everywhere else in the image.
To divide one slice into multiple even slices:
- Select the existing slice with the Slice Select tool.
- Click Divide in the options bar.
- In the Divide Slice dialog box, select Divide Horizontally Into or Divide Vertically Into, and type the number of slices you want to create. If you prefer, you can specify how many pixels per slice instead.
Figure 9.3. To divide a slice evenly into multiple slices, click the Divide button in the options bar.

Tip
If you want all your slices to be the same size and evenly spaced, create a single user slice for the entire image. Then select the slice, and use the Divide button on the options bar to divide the original slice into as many vertical or horizontal rows of slices as you need.
To create slices based on layers:
- In the Layers panel, select the layer you want to create a slice from.
- Choose Layer > New Layer Based Slice.
If you create slices based on layers, Photoshop uses the dimensions of the layer for the slice and includes all its pixel data. When you edit the layer, move it, or apply a layer effect to it, the slice automatically includes any new pixels.
Tip
You can unlink a layer-based slice from its layer. To do so, select it with the Slice Select tool and click Promote in the options bar.
To create slices from guides:
- Add guides to your image.
- Select the Slice tool.
- Click Slices from Guides in the options bar.
Note
If you create slices from guides, you’re replacing any slices that already existed and any options associated with those slices; all you’ll have are the slices from guides.
Note
You can create slices that have no content, and then add text or HTML source code to them. These are called No Image slices. You might want to use these so you that you can edit text in any HTML editor, without returning to Photoshop. However, if the text is too large for the slice, it can break the HTML table and result in unwanted gaps.
Editing slices
After you create a slice, you can select it with the Slice Select tool, and then move, resize, or align it. To select a slice, click it with the Slice or Slice Select tool. A gold bounding box indicates the selected slice.
Double-click a slice with the Slice Select tool to edit its attributes. In the Slice Options dialog box, you can name the slice, specify a URL, and enter a target. You can change the options for both user slices and auto slices, but if you change options for an auto slice, it becomes a user slice.
Figure 9.4. Be careful to enter the exact filename for your URL in the Slice Options dialog box. Otherwise, viewers will be frustrated when they click the link.
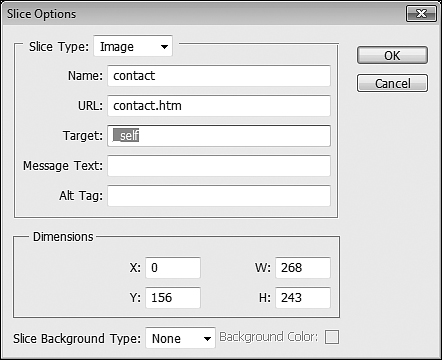
The URL is the page the slice links to. If you don’t have the URL created yet, type the # sign so you can preview the slice’s functionality without including an actual link.
The target determines whether the linked site opens in the same browser window or a new one. Type _self to display the linked file in the same browser window. Type _blank to open it in a new browser window.
Creating Animations
Animation is change over time. That sounds like a physics equation, but really it just means that, in an animation, something moves or is altered. You can create animations in Photoshop by modifying your image across time and exporting it as an animated GIF file or a QuickTime movie. The Animation panel contains a sequence of frames, with each frame varying slightly from the one that precedes it. Quickly viewing the frames creates the illusion of movement. For example, you might want an inner glow to gradually appear on an image, or you might want to shift a layer so that text begins on the left side and ends on the right. Just about anything you can change in Photoshop, you can show in an animation.
Tip
If you’re creating an animation, use the Motion workspace, so you have easy access to the Layers and Animation panels.
To open the Animation panel, choose Window > Animation. The Animation panel originally displays a single frame of your current image.
Figure 9.5. The Animation panel, displaying frames.
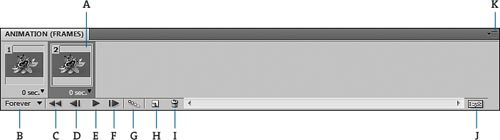
A. Frames B. Loop options C. Select first frame D. Select previous frame E. Play F. Select next frame G. Tween frames H. Duplicate frame I. Delete frame J. Convert to timeline K. Animation panel menu
• To create frames from layers, choose Make Frames from Layers from the Animation panel menu.
• To modify an existing image for your animation, first duplicate it: select the existing frame in the Animation panel, and click the Duplicate Selected Frames button at the bottom of the Animation panel. The new frame is based on the original. Now change that frame: add a layer effect, move a text layer, change the opacity, or make any other change that you want to animate. The changes you make are reflected in the duplicate frame.
Figure 9.6. Duplicate the frame and make changes to it.

• To add frames that represent transitional stages between the two frames, use the Tween function. The word tweening, which comes from the traditional term in betweening, describes the process of adding or modifying a series of frames between two existing frames, varying the attributes that change evenly between the new frames. You can edit tweened frames individually after you create them.
To tween frames:
- Select the first and last frames.
- Click the Tween button at the bottom of the Animation panel.
- In the Tween dialog box, specify how many frames to add between the two frames, whether to affect all the layers, and which parameters to affect (position, opacity, and effects).
- Click OK.
Figure 9.7. Tweened frames.

If you select two contiguous frames, new frames are added between the frames. If you select more than two frames, existing frames between the first and last selected frames are altered by the tweening operation. If you select the first and last frames in an animation, these frames are treated as contiguous, and tweened frames are added after the last frame. (This tweening method is useful when the animation is set to loop multiple times.)
Tip
In addition to frames, the Animation panel can display a timeline, in which each layer has its own line. To create a timeline, click the Convert to Timeline icon in the Animation panel. Conversely, to work with frame animation when you have multiple layers in an image file, click the Convert to Frame Animation icon.
You can rearrange frames in the Animation panel as well. To move a frame, just drag it to a new position.
Click the Play button at the bottom of the Animation panel to test it. This previews the animation, though it may be a bit jerkier than it would be in a browser.
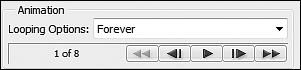
You can determine how many times an animation plays by selecting an option in the lower-left corner of the Animation panel. The default is once, but you can select 3 Times, Forever, or Other to enter your own number.
To save an animated GIF, choose File > Save for Web & Devices. Select a GIF preset, choose options in the Animation area in the lower-right corner of the dialog box, and then click Save.
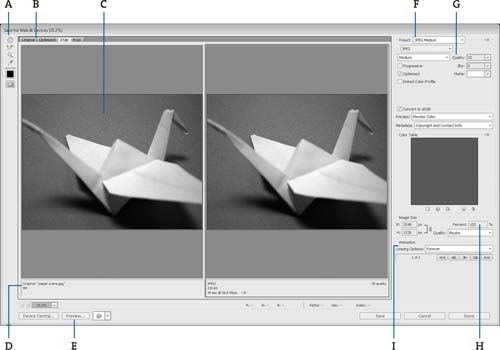
Figure 9.8. Set looping options in the Animation section of the Save for Web & Devices dialog box.
To export a QuickTime movie, choose File > Export > Render Video. Then select the options you want to apply, and click Render.
Optimizing Images for the Web
How you balance image quality with image size depends on the image you’re working with. The best format, resolution, and quality settings vary. Therefore, the Save for Web & Devices dialog box gives you the opportunity to preview different settings to see how they affect the size and quality of your image. You can apply different settings to different slices as well, saving file size where appropriate without sacrificing quality in more complex areas of the image.
JPEG, GIF, and PNG are the most common Web compression formats. As a general rule, use JPEG compression for continuous-tone images and GIF compression for broad areas of color.
To optimize an image for the Web:
A. Toolbar B. View tabs C. Preview windows D. File information E. Preview in Web browser F. Preset menu G. Format settings H. Image size I. Animation options
- Choose File > Save for Web & Devices.
- Select a tab at the top of the dialog box to preview the original with an alternative or with three other options.
Figure 9.9. The Save for Web & Devices dialog box.
- Select a preset from the right side of the dialog box. A preset automatically selects a file format, algorithms, colors, dither percentage, and other options.
- Compare the image quality in the preview windows. Also, note the file size listed beneath each preview window.
- Select another preset, or adjust the settings to achieve the balance between quality and image size that works for you.
- To modify the settings for a slice, select the Slice Select tool and then select a slice. Then select a preset from the right side of the dialog box, or adjust the format and its settings individually.
- When you’ve found the combination that works best for your image, select that preview window, and click Save.
- In the Save Optimized dialog box, choose HTML and Images to save the image (including any slices) and an HTML file that references the image and slices. You can also choose to save only the HTML file or only the images.
- If you’re saving slices, choose All Slices to save them all.
- Name the HTML file and click Save.