11. Organizing Images in Bridge
In the age of digital photography, we all have too many photos to keep track of easily. Adobe Bridge can help you wrangle your images and find the ones you’re looking for.
Adobe Bridge is included with all the Creative Suite applications except Adobe Acrobat. It’s a handy application whether you just want to browse thumbnails of your photos or need to search on metadata, including keywords. You can use it to open images directly in Adobe Camera Raw, instead of Photoshop—and you can even access some of Photoshop’s neatest features (such as Photomerge) directly from Bridge. In addition to adding and searching metadata, you can rank and group images, so there’s an organizational method for just about everyone.
Importing Images into Bridge
Use the Photo Downloader utility to download images from your camera or memory card onto your hard drive. They’ll automatically appear in Bridge, so you can review and organize them, or go right into photo-editing mode!
Figure 11.1. The Photo Downloader utility can transfer images from your camera to your hard drive and show them in Bridge.

To download photos in Bridge:
- Connect your camera to your computer or insert your memory card.
- Choose File > Get Photos from Camera.
- Choose a location on your hard drive for the photos; you can create a new folder for them using a date format or your own custom name.
- If you want to rename the files, select a name format.
- If you want to be selective about which images you download to your system, click Advanced Dialog, and then select the ones you want to include.
- Click Get Photos. Voilà!
Viewing Files in Bridge
Adobe Bridge is an Adobe application, so there are plenty of panels involved. By default, the ones you’re most likely to need are already open, including:
• The Favorites and Folders panels, which you use to navigate to the files you’re interested in
• The Content panel, which displays everything in the selected folder
• The Preview panel, which gives you an isolated view of the selected image or file
• The Metadata panel, which displays additional information about the selected file
• The Keywords panel, which lists the keywords associated with the file
• The Filter and Collections panels, which make it easier to find specific files
Figure 11.2. Adobe Bridge displays your images, as well as a wealth of information about them.

A. Menu bar B. Application bar C. Favorites and Folders panels D. Filter and Collections panels E. Breadcrumbs F. Content panel G. Workplace Switcher H. Search box I. Preview panel J. Metadata and Keywords panels K. Thumbnail slider
Just like Photoshop, Bridge includes workspaces, designed to display panels in a configuration most efficient for a particular task. Select a workspace from the Workspace Switcher in the application bar, or choose one from the Window > Workspace submenu. If you want to emphasize the preview as you scroll through images, select the Filmstrip workspace. To create a Web gallery, use the Output workspace. For most tasks in Bridge, the Essentials workspace works just fine.
Of course, if you want to create your own workspace, you can. Configure the panels however you like (drag them to reposition or resize them; open new ones by choosing Window > [panel name]; close the ones you don’t want). Then choose Window > Workspace > New Workspace, name it, and enjoy it.
Figure 11.3. The Filmstrip workspace displays images across the bottom, with a prominent Preview panel.

The Favorites panel is especially useful if you’re likely to return to the same folders (say, a Photos folder or a Projects folder) over and over. To add a folder to the Favorites panel, navigate to the folder in the Folders panel, and then choose File > Add to Favorites. Or select the folder in the Content panel and then drag it into the Favorites panel.
To see a full-screen preview of an image, select its thumbnail in the Content panel, and then choose View > Full Screen Preview, or just press the spacebar.
Tip
To view a slide show of the contents of selected thumbnails or of an entire folder (currently displayed in the Content panel), choose View > Slideshow or press Ctrl+L (Windows) or Command+L (Mac OS). To set options, including how long each image stays on the screen and what the transitions look like, choose View > Slideshow Options.
Adding Metadata
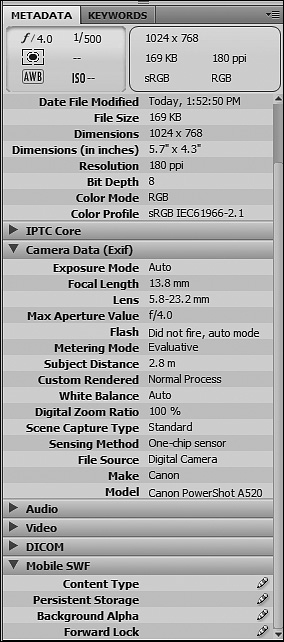
Metadata is information about a file, including keywords, the date the file was created, the name of the person who created it, copyright information, its resolution, its color space, and so on. When you download a photo from a digital camera, metadata comes along with it. You can view that information in Bridge, in the appropriately named Metadata panel. Some metadata is fixed; you can’t edit the creation date or bit depth in Bridge, for example, because it would no longer be accurate. However, you can edit a great deal of information.
Tip
You can choose which metadata fields are included in the Metadata panel. Choose Edit > Preferences (Windows) or Adobe Bridge CS5 > Preferences (Mac OS). Then select Metadata from the list on the left. Select the fields you want to include.
To add or edit the content of a metadata field, click the pencil icon to the right of it. Then enter the information, such as your address or contact information, or a description of the image.
Tip
If you’re working with medical images, such as X-rays and CT scan data, use the DICOM section in the Metadata panel to record patient and study information.
Figure 11.4. Some metadata is captured by your camera; other metadata you can enter or edit yourself.
Adding Keywords
You can enter keywords in the Metadata panel, but working with keywords is easier in the Keywords panel.
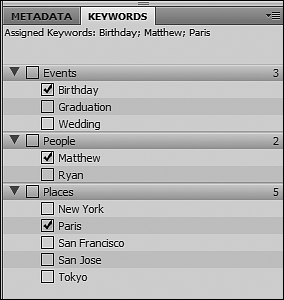
Bridge provides default keyword categories to get you started: Events, People, Places, and Other Keywords. You can add your own keywords to each of these categories, or create categories of your own. Actually, categories is my word—Bridge calls the categories keywords, and it refers to keywords grouped under them as sub keywords. You can search on the categories themselves, so technically, they are, in fact, keywords in their own right. But I prefer to refer to categories and keywords to reduce confusion.
Figure 11.5. Create keywords and categories that are meaningful to you.
To add a keyword to an existing category:
- Select the category name.
- Choose New Sub Keyword from the Keywords panel menu, or click the New Sub Keyword icon (which looks like a plus with an indent) at the bottom of the panel.
- Type the keyword.
To add a new category:
- Choose New Keyword from the Keywords panel menu, or click the New Keyword icon (a plus sign) at the bottom of the panel.
- Type the category name.
To apply keywords to images:
- Select the image or images to which you want to apply the keywords.
- Click next to the keywords in the Keywords panel that you want to assign. You can select the category name (or main-level keyword) separately.
Searching with Metadata
Metadata can provide useful information about images you’re previewing, but it’s even more useful as an aid to finding the images you want. If you’ve invested the time to create meaningful keywords and add useful image descriptions, you can locate images in Bridge quickly.
To search for photos by keyword:
- Select the folder you want to search. If you want to search your entire hard drive, select the name of your hard drive in the Folders panel.
- Enter the keyword in the search field in the upper-right corner of the Bridge window. Keywords are not case sensitive.
- Press Enter or Return. All files with the associated keyword appear in the Content pane.
Figure 11.6. To search for photos with a specific keyword, enter it in the Search field.

To search based on other metadata or on multiple keywords:
- Select the folder you want to search. Unfortunately, you can only filter one folder at a time.
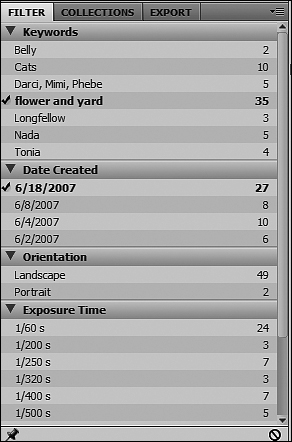
- In the Filter panel, select the criteria in each category that you want to see.
Criteria in categories are cumulative so, for example, if you select “Sally” under Keywords and “Landscape” under Orientation, you’ll see only landscape images with the keyword Sally.
However, criteria within a category are noninclusive. If you select both “Sally” and “Cats” under Keywords, you’ll see images that have either the keyword Sally or the keyword Cats or both.
Figure 11.7. Select criteria in the Filter panel to limit which files appear in the Content panel.
Creating Collections
Collections are groups of images, gathered from anywhere on your hard drive. Once you’ve created a collection, anytime you select it in the Collections panel, Bridge displays the files in the collection.
To create a collection:
- Select the files you want to include.
- In the Collections panel, click the New Collection button at the bottom of the panel.
- Click Yes when asked if you want to include the selected files in the collection.
- Name the collection.
To add a file to a collection, just drag it from the Content pane onto the collection name in the Collections panel.
Tip
You can let Bridge create collections for you, called Smart Collections. Click the Create Smart Collection button at the bottom of the Collections panel. Select the folder to search (and it can include subfolders), and specify the criteria to use, such as specific keywords. Then name the collection. Note that you can’t add files manually to the Smart Collections.
Labeling Images
There’s yet another way to classify and locate images in Bridge: rankings. You can apply a rating of one to five stars to any document. To apply a rating, select the file, and click a dot beneath its thumbnail. Click the first dot to apply one star, the fourth dot to apply four stars, and so on. Alternatively, you can select the image, and choose Label > [star rating]. You can also label an image with Reject, making it easier to delete those later.
Figure 11.8. Star ratings appear under images, if the thumbnails are large enough in the Content panel.
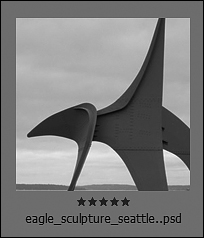
Figure 11.9. The Reject label appears in red beneath an image.

In addition to star ratings, you can apply your own colored labels to files. Select a thumbnail, and then choose Label > [label name], or use the keyboard shortcuts to apply the label. To change the label names, enter new ones in the Preferences dialog box. Choose Edit > Preferences (Windows) or Adobe Bridge CS5 > Preferences (Mac OS). Then select Labels in the list on the left, and enter a name for each label.
Figure 11.10. You can customize label names in the Preferences dialog box.

To view images with a particular rating or label, select the label or rating in the Filter panel.
Stacking Images
If your folders are stuffed full of images, consider grouping similar files in stacks, so it’s easier to see what’s in the Content panel.
To create a stack:
- Select the images you want to include in the stack. Usually, it makes sense to stack images that were taken at the same time, or that are similar in some other way.
- Choose Stacks > Group as Stack.
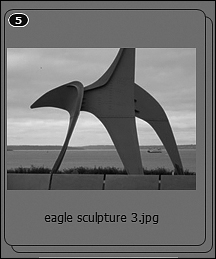
You can tell when you encounter a stack because there’s a number in the upper-left corner of the thumbnail; the number indicates how many images are in the stack.
Figure 11.11. A small number badge indicates that images are stacked.
To see all the images in the stack again, just click the number in the upper-left corner of the stack. Bridge displays the images with a border so you can see which images remain part of the stack. To close the stack, click the number again.
You can add metadata or keywords to an entire stack at once. You can also use a stack to create a panorama.
If you decide you want to free your images from the stack permanently, select the stack and choose Stacks > Ungroup from Stack.
Jumping Off from Bridge
Just to be clear: that’s jumping off from Bridge, not jumping off a bridge. Bridge provides a handy way to organize and preview your images, but it’s also a gateway to other Adobe applications.
To open an image in Photoshop, double-click its thumbnail in Bridge. Bridge determines which application to open based on the file-type associations listed in its Preferences dialog box.
Note
If you’ve previously edited the file in Camera Raw, a JPEG or TIFF image might open in Camera Raw instead.
To open a JPEG, TIFF, or raw format image in Camera Raw, select it in Bridge, and choose File > Open in Camera Raw.
To apply a Photoshop feature such as Photomerge or Lens Correction to images, select them and choose Tools > Photoshop > [feature]. Bridge opens the files in Photoshop and automatically applies the feature.
Figure 11.12. Commands in the Tools menu provide a shortcut to some Photoshop features.
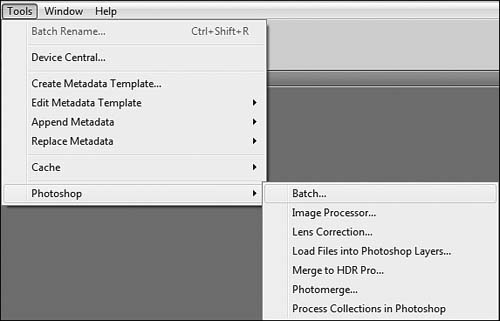
If you have other Adobe Creative Suite applications installed, you can access their features through the Tools menu in Bridge as well.