
Chapter 4: Imaging and Color
UNDERSTANDING IMAGE FILE FORMATS
Digital files can be saved in a number of file formats. For any type of file, the extension at the end (for example, “JohnDoePortrait.raw”) indicates the format in which your file has been saved. Each file format has a purpose. Refer to the chart below for saving and working with files—whether you want to use the files for editing, posting online, sharing via email or printing.
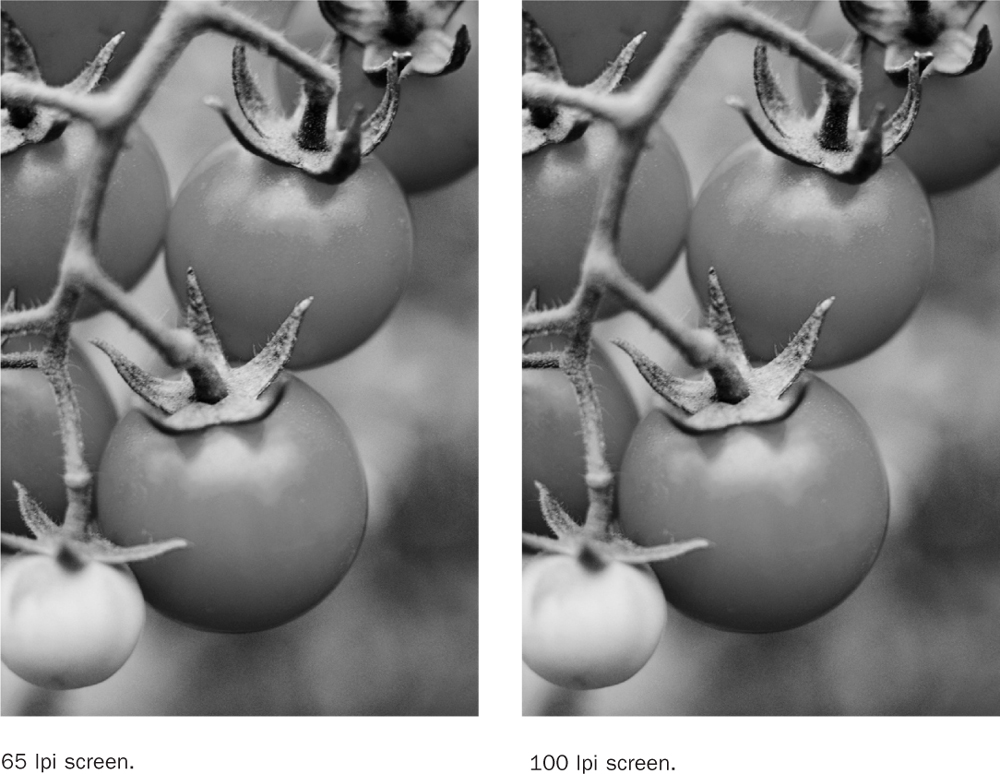
HALFTONE SCREENS
The halftone screens that are used to convert a continuous-tone image to one that can be printed come in a variety of densities measured by lines per inch (lpi), a term the industry uses for referring to the size of a screen’s halftone dot. High screen rulings of 175 or 200 lpi have more halftone dots per inch and, therefore, smaller dots. Low screen rulings such as 65 or 85 lpi have larger dots. The size of a halftone dot can affect an image’s quality. Those with a high Ipi show more detail. However, the choice of halftone screen is often dictated by the type of paper used. Paper with a low degree of absorbency, such as coated stocks, tend to resist dot gain or the spreading of halftone dots in a halftone screen and are suitable for high lpi halftone screens. Printing images on inexpensive uncoated stocks, such as newsprint, tends to result in dot gain and requires a halftone screen with a low lpi.

Enlarged halftone screen.

TINT VALUES FOR HALFTONE SCREENS
Screen rulings affect the perception of a screen tint as well as how overprints and reverses are perceived against the tints. Consult the chart to the right to get an idea of how a reverse or overprint will look against a screened background.

DUOTONES
A duotone is a halftone printed in two colors, usually black and a second color. One plate is made for the black, picking up the highlights and shadow areas; a second plate is made for the second color, picking up the middle tones. When combined, the two plates produce a monochromatic reproduction with a full range of tones.

Red impression

Black impression

Duotone printed in red and black
FINDING THE BEST SCANNING RESOLUTION
When you select a dpi for an image scan, you are designating the amount of image information your scanner will capture—the higher the dpi, the more image data, or potential for clarity your image file will have. Although scanning at a high dpi may ensure that every detail of your image will be captured, the large size of high-resolution image files makes them cumbersome to work with. Scanning at optimum resolution means getting the best image clarity and reproduction you can achieve with the lowest possible file size or dpi.
To choose the best scanning resolution for an image, start with your image output in mind:
•Digital display—Anything that will be displayed on a computer monitor or as part of a digital presentation (PowerPoint, etc) should be scanned at 72 dpi. This is the best image reproduction you can achieve, because a computer monitor’s resolution is just 72 dpi. .
•Print output for studio printers—Scanning for print reproduction depends on your output device. A 300 dpi studio printer requires images scanned at 300 dpi for optimum clarity. Let this 300 dpi rule of thumb be your guide when scanning line art and continuous-tone imagery for studio output.
•Print output for commercial printers—The scanning resolution for a continuous tone image such as photograph or illustration that will be converted to a halftone should be dictated by the lpi of your halftone screen. When scanning for halftone output, the scanning resolution for your image should be a dpi that is double the lpi of your line screen. For example, a photograph reproduced with a 150 lpi halftone screen (standard for a magazine) should be scanned at 300 dpi. However, if the same photograph appears in a newspaper (where halftone screens are generally 85 lpi), the scanning dpi should be 170 dpi.
SCALING AN IMAGE
Beyond output, the other consideration to keep in mind when scanning an image is scale. Reflective art that is reduced will gain clarity, whereas, reflective art that is enlarged will lose it. For instance, when a 300 dpi scanned image is enlarged by 200 percent double its original size), its image resolution is reduced to 150 dpi. If the same image is reduced by 50 percent, its resolution becomes 600 dpi. It’s best to scale your image to a size that is close to the size it will appear in its final destination, and then pick the appropriate dpi.
When scaling an image, use this formula to arrive at the right percentage:
Size of your reduction or enlargement × 100 ÷ the size of your original = percentage.
Example: 8” image scaled to 4” (4 × 100 = 400 ÷ 8 = 50%)
STANDARD DIGITAL IMAGE SIZES FOR WEB
When considering images for online use, note that there are many variations. However, there are several common standards. For example, if you make your images larger than 460 pixels, most standard blogs will not be able to fit this size into a standard post. Below are several standard image sizes:
•Thumbnail: 150px in the long dimension, or smaller, for example 75 × 75px
•Small: 240px in the long dimension
•Medium: 460px in the long dimension
•Large: 520px in the long dimension
•Very large: 800px in the long dimension
Common best practices for using images around the Web: use a thumbnail linked to a larger version; decrease the image resolution to 72dpi; use JPEG format for photos and GIF format for text or line art.
STANDARD AD UNIT GUIDELINES
To prepare images for use in advertising units, consult the Ad Unit Guidelines developed by the IAB for standard sizes for banners, skyscrapers and buttons in various sizes. Advertising units come in three categories: Skyscrapers and verticals; horizontals and buttons; rectangles and squares.
Interactive Advertising Bureau (IAB)
116 East 27th Street, 7th Floor
New York, New York 10016
(212) 380-4700