
Chapter 13: Printing and Finishing
GENERAL GUIDE TO PRINTING PROCESSES
There are many ways of applying ink to paper. The most appropriate option depends on budget, the printing surface, the quantity of the run, and the turnaround time involved. Consult the following list for an overview of the printing methods most commonly available.
Offset Lithography: This is the most commonly used method of printing where an image on a plate is offset onto a rubber blanket cylinder which, in turn, transfers the image to a sheet of paper. The process is based on making the printing image ink receptive and water repellent, while the nonprinting areas are rendered water receptive and ink repellent. Offset presses may have more than one printing unit, with each delivering a different color. They come in a range of sizes and can accommodate single sheets as well as rolls of paper.
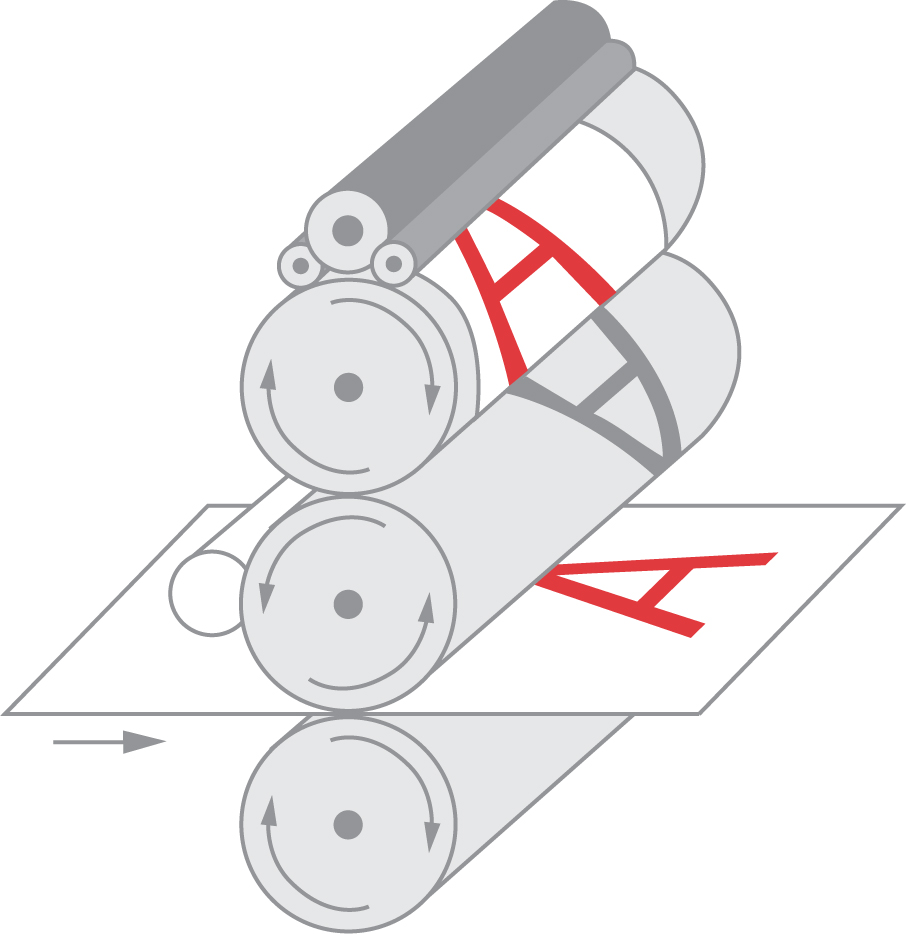
Offset printing involves three rotating cylinders: plate, blanket, and impression. The plate cylinder first contacts the dampening rollers, wetting the plate area. Contact is then made with the inking rollers where the dampened nonimage areas repel the ink. The inked image is then transferred from the plate cylinder to the rubber blanket cylinder. The soft rubber surface of the blanket creates a clear and sharp impression on a range of paper surfaces.
Letterpress: One of the oldest and most basic forms of printing, letterpress uses letters molded from lead that are inked and pressed against the paper. Images and graphics can be applied with an etched plate. Text, imagery, and graphics are locked together on the press bed in a “chase." The process typically yields a soft, inked impression on paper. More time intensive than offset, letterpress printing is most often used for printing art books, invitations and announcements, and other situations where an antique or artistic image is desired.
Gravure: Web presses are fitted with cylinders that carry an etched plate. The plate transfers the inked, etched image directly onto the paper. Gravure offers excellent image reproduction, but because of the expense involved in platemaking, it is usually reserved for extremely large runs such as catalog printing, postage stamps, and packaging applications.
Engraving: Similar to gravure, engraving also involves an etched plate that carries an inked impression. With engraving, the paper is positioned and forced against the plate with tremendous pressure, drawing the ink from the depressed areas on the plate and yielding a slightly embossed surface, with a slightly indented impression on the back of the paper. Limit engraved designs to 4" × 9" (101.6 × 228.6 mm), the size of most engraving plates. Engraving yields sharp imagery and text, but the expense involved in platemaking makes it suitable for long and repeat runs, such as currency and postage stamps. Engraving is often used when a prestigious, formal look is desired for corporate stationery.
Thermography: Similar to engraving in appearance, thermography uses a combination of heat-cured powder and ink to create a raised impression. Thermography costs less than engraving and is often used on business cards and stationery. The process is not appropriate for printing halftones or large areas of color, which are likely to have a pitted or mottled appearance.
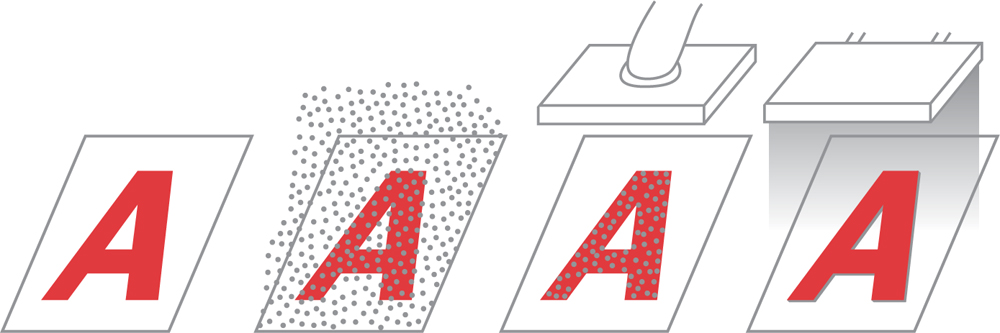
Thermography involves applying powder to a slow-drying ink. After the excess powder is vacuumed away, heat is applied. The curing of the ink and powder causes it to swell, creating a raised impression.
Screen printing: A squeegee is pulled across a silk screen to which a stencil has been applied, forcing the ink onto the surface of the paper or substrate. More labor intensive than offset, screen printing is used for printing on surfaces not accommodated on an offset press, such as fabric, industrial papers, acrylic, and metal. The process can be done by hand or by machine. Halftone screens need to be coarse, ranging from 65 to 85 lpi. (See Chapter 4, Imaging and Color, for more information on halftone screens.) Often used for printing signage, bottles, garments and other unusual shapes and surfaces.
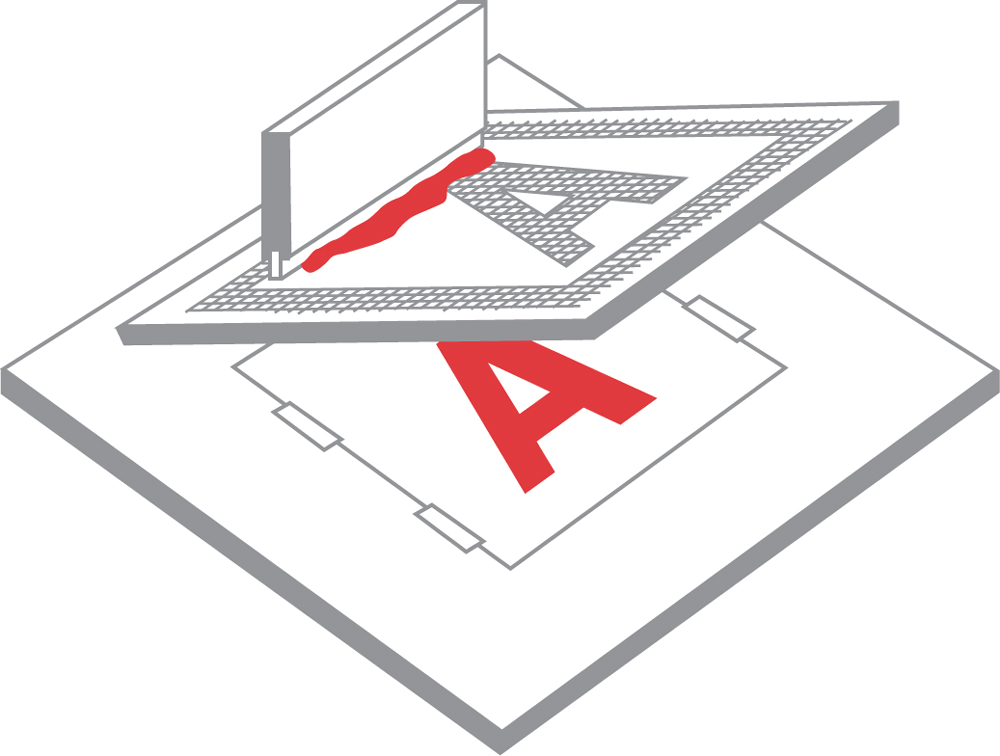
Screen printing involves forcing ink through a mesh screen onto a substrate beneath the screen. The stenciled area on the screen acts as a mask, preventing ink from passing through the nonimage areas of the mesh.
Flexography: Web presses are fitted with rubber or soft plastic plates with a raised impression for printing on unusual surfaces not appropriate for offset printing. Substrates include kraft paper, tissue, vinyl, and other types of plastic. Flexography is often used for printing toilet tissue, bread wrappers, plastic bags, and other types of packaging as well as cartons, shopping, and grocery bags.
Digital: Often referred to as “on-demand" printing because of its quick turnaround time, digital printing is quickly becoming a viable alternative to traditional offset printing. It is particularly useful for printing short-run (under 1,000) four-color jobs where set-up time and charges would make traditional four-color offset cost prohibitive. The digital process differs from offset in that it is a toner-on-paper process, rather than an ink-on-paper process. Because the color sits on top of the paper, it can flake off at folds or spines. Digital printing also places limitations on sheet sizes, with many presses limited to paper sizes of 11" × 17" (279.4 × 431.8 mm) or less, as well as the types of papers that can be used. When using a digital process, check to see what size and basis weight restrictions may be involved.
Holography: Holographic or three-dimensional imagery is created by digitizing an image so that it is divided into several layers. The process involves bouncing laser beams off of mirrors and focusing them onto a photosensitive plate. The holographic design is then embossed onto coated white paper that is metallized for a shimmery effect. Holography requires working closely with specialized vendors over a period of several weeks, and set-up charges can make the process cost prohibitive for small-run projects. Holography is used on credit cards, trading cards, book covers, beverage packaging, and other situations where high-volume makes it a cost-effective option.
Lenticular printing: The process creates an animated effect where images flip back and forth when viewed from different angles. (For instance, a photograph of an individual with an eye that actually winks). It is achieved by laminating a plastic lens over two or more images that have been digitized and broken down into a series of dots. Producing a lenticular image requires working closely with a lenticular vendor to produce digital imagery that meets their requirements. The expense and time involved make lenticular printing suitable for mass-production situations such as product manufacture and packaging but unrealistic for small-run or short-turnaround projects.
TRAPPING TOLERANCES
Keeping colors in register means aligning them on press exactly as they have been specified. But when two colors are adjoining, there is always the possibility that a colorless gap may occur between the colors if registration isn’t exact. To compensate for this, a slight overlap, called a trap, is created between the two colors. The amount of trapping will vary, depending on the absorbency of the paper or substrate and printing method used. Although most commercial printers take responsibility for creating traps, it’s useful to know how trapping tolerances can vary for different printing methods. The following chart shows typical trapping tolerances for a variety of printing processes and substrates:
| Printing Method | Sheetfed offset |
| Substrate | uncoated paper |
| Trap (inches) | 0.003 |
| Trap (mm) | 0.08 |
| Trap (pt.) | 0.25 |
| Printing Method | Sheetfed offset |
| Substrate | coated paper |
| Trap (inches) | 0.003 |
| Trap (mm) | 0.08 |
| Trap (pt.) | 0.25 |
| Printing Method | Web offset |
| Substrate | coated paper |
| Trap (inches) | 0.004 |
| Trap (mm) | 0.10 |
| Trap (pt.) | 0.30 |
| Printing Method | Web offset |
| Substrate | uncoated paper |
| Trap (inches) | 0.005 |
| Trap (mm) | 0.14 |
| Trap (pt.) | 0.40 |
| Printing Method | Web offset |
| Substrate | newsprint paper |
| Trap (inches) | 0.006 |
| Trap (mm) | 0.15 |
| Trap (pt.) | 0.45 |
| Printing Method | Gravure |
| Substrate | coated paper |
| Trap (inches) | 0.003 |
| Trap (mm) | 0.08 |
| Trap (pt.) | 0.25 |
| Printing Method | Flexography |
| Substrate | coated paper |
| Trap (inches) | 0.006 |
| Trap (mm) | 0.15 |
| Trap (pt.) | 0.45 |
| Printing Method | Flexography |
| Substrate | newsprint paper |
| Trap (inches) | 0.008 |
| Trap (mm) | 0.20 |
| Trap (pt.) | 0.60 |
| Printing Method | Flexography |
| Substrate | kraft/corrugated paper |
| Trap (inches) | 0.010 |
| Trap (mm) | 0.25 |
| Trap (pt.) | 0.75 |
| Printing Method | Screen printing |
| Substrate | fabric |
| Trap (inches) | 0 |
| Trap (mm) | 0 |
| Trap (pt.) | 0 |
| Printing Method | Screen printing |
| Substrate | paper |
| Trap (inches) | 0.006 |
| Trap (mm) | 0.15 |
| Trap (pt.) | 0.45 |
TYPES OF OFFSET LITHOGRAPHY
Offset lithography is the most widely used method of printing. The process can be broken down into two basic categories: sheetfed offset and web offset. Print shops are often set up to specialize in one of these two types of offset printing. Consult the following descriptions for further information on which method is most appropriate for a specific project.
Sheetfed Offset: Individual sheets of paper pass through the press. Small, sheetfed presses print on papers smaller than 18 inches (457.2 mm) in width and are used for printing fliers, letterheads, envelopes, and business cards. Larger presses that accommodate paper sizes ranging from 19" × 25" (482.6 × 635 mm) to 55" × 78" (1397 × 1981.2 mm) allow printers to run larger jobs, such as posters or book signatures, or gang several pieces on one sheet. Sheetfed presses generally work best for small- to mid-size press runs or when quality is critical.
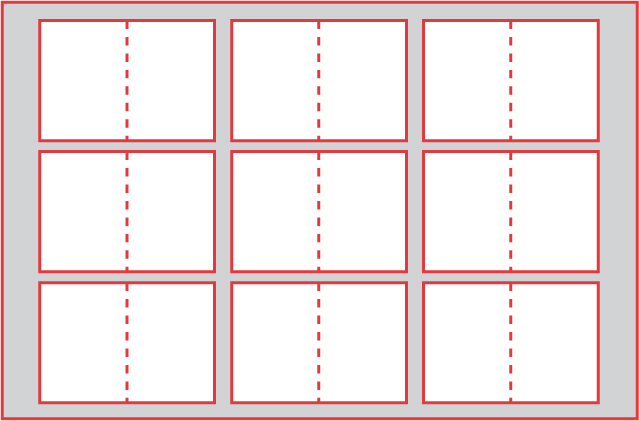
Printers will often gang several pieces on a single sheet, such as fitting nine 4 1/2" × 6 1/4" (114 × 159 mm) invitations on a 23" × 35" (584 × 889 mm) sheet of paper.
Web Offset: Paper going through a web press is fed from a roll and is cut into sheets after printing. Small-sized web presses that accommodate paper widths of up to 9 inches (228.6 mm) are used for printing business forms and other small pieces. Larger presses (called full web presses) that run rolls from 35 inches to 40 inches (889 to 1016 mm) wide are used for publications. Full web presses can print sixteen-page signatures on a trim size that is typically 23" × 35" (635 mm × 889 mm). Web presses are designed to print hundreds of impressions per minute and many thousands per hour and are suitable for high-volume publications such as newspapers, magazines, and catalogs. Many presses also come equipped with heating units to speed up ink drying time as well as folding and binding units to expedite production.

Web presses are categorized according to the size of the paper rolls they run. Small presses called form webs are used for business forms, while large presses called full webs are used for publications. In-between sizes include miniweb, half web, and three-quarter web presses.
CUTTING AND TRIMMING
Because most pressruns use paper slightly larger than the finished piece or gang several pieces on a single sheet, waste must be cut away and pieces cut apart. All straight line cuts are called trims. Trim lines are indicated by crop marks so that whoever is trimming the job will know where pieces needed to be cut. Trimming a job is included in the cost of printing, and is not the same as perforating, making die-cuts, drilling, or punching holes. These applications are performed at an additional charge. For more information on perforating, die-cuts, drilling and punching, see Finishing Techniques.
FINISHING TECHNIQUES
Finishing techniques are applied after a job is printed to create a special effect that can’t be achieved with ink. They also include special cuts and trims that are part of the design or applications that make a piece easy to fold, tear, or ready for binding.
Embossing: Paper is pressed between two molds called dies, typically made from magnesium or brass. The molding of the paper between the dies results in a raised impression. If an impression is molded so that it is lower than the paper’s surface, it is called a deboss. Embossing can be combined with a printed image or foil stamping to enhance the three-dimensional appearance of the image. An embossed impression made independent of a printed or foil-stamped image is called a blind emboss. Soft, uncoated papers generally take a better embossed impression than hard or smooth coated papers. Papers with a textured finish are often preferred because they render a smooth impression that contrasts favorably with the surrounding texture. Text and light to midweight cover stocks work best. Lightweight bonds and writing papers tend to be too thin to show off an emboss, whereas, heavier cover weight stocks can be too thick to be molded. Embossing is frequently used on brochure covers, stationery, business cards, and pocket folders.
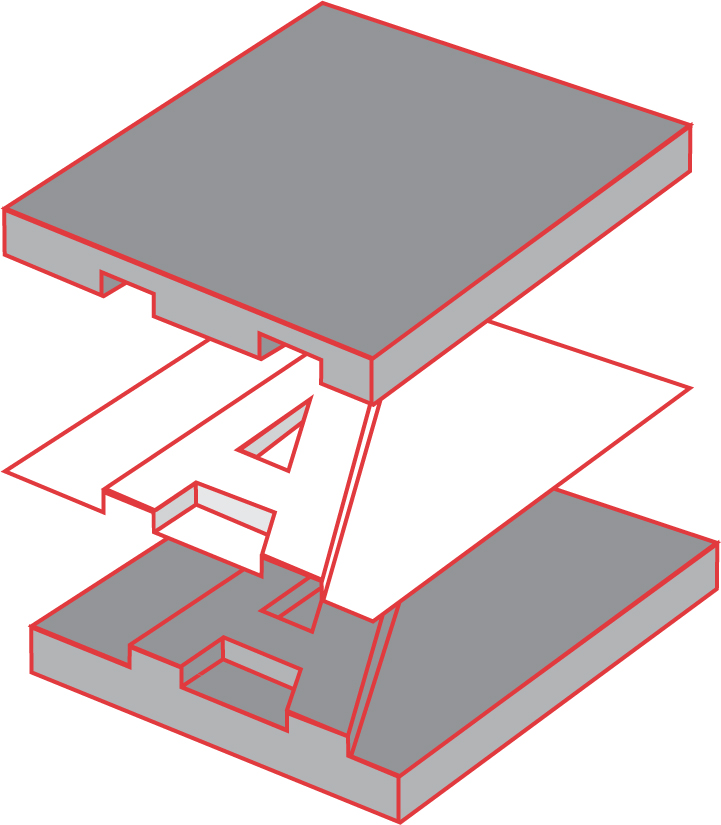
Embossing requires two matched dies (male and female counterparts). One of the dies is heated as the paper is pressed between, resulting in a raised impression.
Foil stamping: Paper is stamped with a hot die that presses a thin plastic film carrying colored pigment against the paper. Plastic film comes in more than 200 colors, including pearlized effects and metallics, as well as clear foil stamps that mimic the look of a varnish. Because the process can render a completely opaque image, foil stamping is often used to apply a light-colored image against a dark-colored paper. In addition to applications on any paper that can withstand heat, foil stamping is also suitable for pens and pencils, cloth book covers, vinyl binders, toys, and other nonpaper applications. When foil stamping is combined with embossing, it’s called foil embossing. The process involves applying foil first and then the emboss.
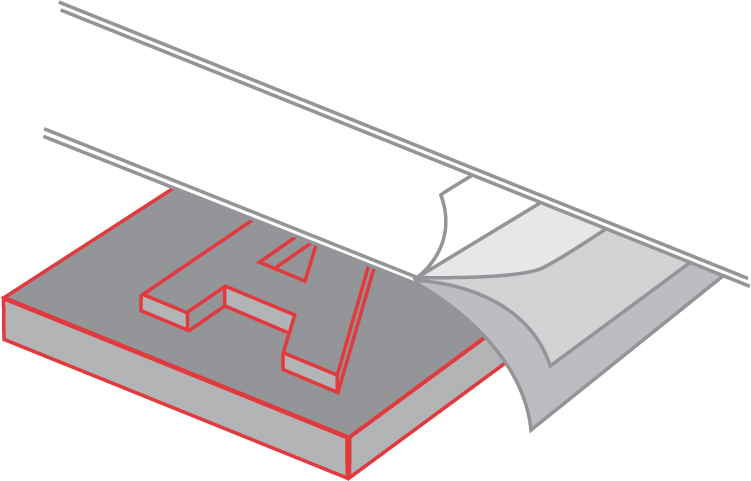
Foil stamping involves applying foil to paper with a heated die. The pigment bonds with the paper, rendering a smooth image.
Die-cutting: The process includes making cuts in a printed sheet in a configuration that will allow it to be used or assembled into a functional piece, such as a door hanger, pocket folder, or carton. Die-cutting also includes cuts that enhance a piece’s design appeal, such as die-cutting a holiday greeting card in the shape of a Christmas tree. Dies are typically made from bending metal strips with a sharpened edge into the desired shape and mounting them onto a wooden block. The metal strips, called rules, are higher than the wooden backing, creating a cutting edge that works much like a cookie cutter. Printers often keep a supply of standard dies for common items such as pocket folders and table tents. Cutting labels and decals from printed paper, but not its backing, is called kiss die cutting. Sheets printed this way allow the label or decal to be peeled away from the backing.
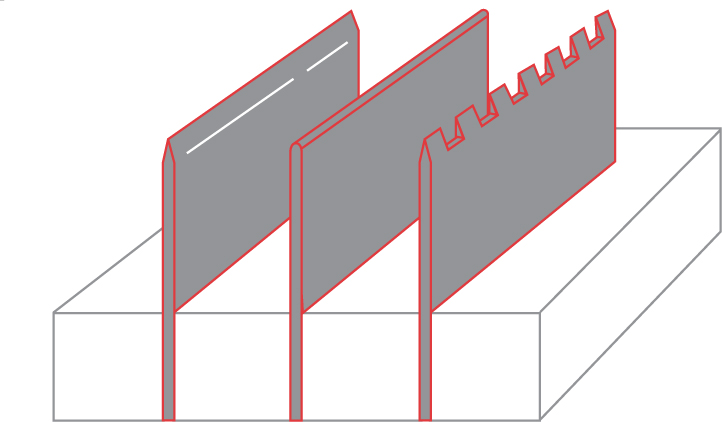
Shown, from left to right, are dies for cutting, scoring, and perforating.
Scoring: To facilitate folding, a crease is applied using the metal edge of either a rule or a wheel so that an embossed ridge on the paper is formed. Heavy text and cover stocks should always be scored. Scoring is especially important to prevent cracked ink on fold lines when using coated stocks with heavy ink coverage.
Perforating: Perforating involves punching a line of holes to make tearing easier. It can be done as part of the binding process to make signatures easier to fold before they are bound and trimmed as part of a publication or as a means of facilitating tear-offs on pieces that include response vehicles, such as business reply cards.
Drilling/punching: Pieces that are ring or post bound require holes ranging between 1/8" and 1/4". Commercial printers and binderies use a drill to make these holes according to size and placement specifications. Spiral and plastic comb binding require punching holes, a process that costs a bit more than drilling.
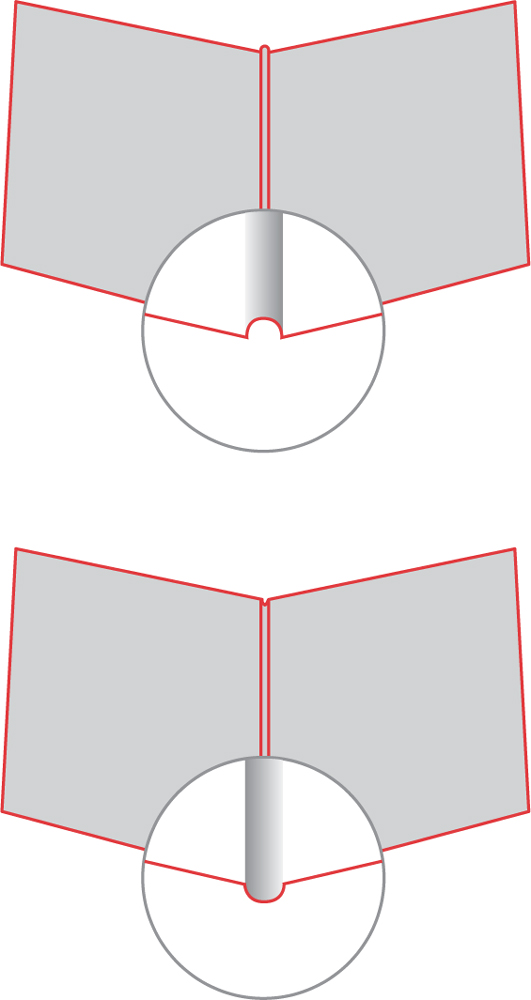
When a piece is scored, the fold should always be made with the ridge or hinge on the inside for minimum stretch.
OFFSET INKS
Most purchasers of printed products don’t give ink a second thought beyond specifying a color. Although it’s a good practice to let your printer choose an ink that’s appropriate for the paper (or other substrate) and function of the piece, it’s worthwhile to know how some inks perform as compared to others.
High gloss: Ink formulation includes a high content of varnish for maximum sheen. Most effective when used on coated and cast-coated stocks. Not appropriate for heat drying, which can reduce gloss.
Heat set: Quick-drying inks used in web offset. Ink solvents are vaporized as they pass through a heating chamber at the end of the press. The ink is then set as it passes through cooling rolls.
Metallic: Made from a mixture of metal dust and varnish, metallic inks have the greatest effect on coated paper. They have a tendency to rub off if the ink has been laid down thickly. Some metallics, such as copper, can also have a tendency to tarnish. An overlay of varnish can minimize these problems.
Fluorescent: More opaque and vibrant than standard inks, fluorescents can also be mixed with process inks to increase their vibrancy. Fluorescents don’t always retain their colorfastness as long as standard inks and may not be suitable for pieces with a long shelf life or those that will be exposed to sunlight.
Vegetable-based: Inks made either entirely from or from some percentage of vegetable oil rather than petroleum (e.g. cottonseed, linseed, soy, etc). Vegetable-based inks tend to release fewer VOCs (volatile organic compounds, see glossary). Vegetable-based inks are capable of performing just as well as an ink that is petroleum-based, however they may handle differently on press, and some printers may charge a premium for their use.
VARNISHES AND PROTECTIVE LIQUID COATINGS
Varnishes and other liquid coatings are applied to protect the inked surface of a piece or to enhance a design, either by dulling or applying a glossy finish to the surface. A range of protection and aesthetic possibilities exists, with each type of coating offering its own set of advantages. As a general rule, varnishes and liquid coatings work best on coated papers. They tend to be absorbed into uncoated papers, creating a mottled appearance.
Coatings also need to be compatible with the type of ink used. Metallics, and other pigments as well as other ingredients in the ink may present a problem. Be sure to let your printer know what type of coating or laminate will be used to ensure that a compatible ink is used for the project.
Spot varnish: A clear coating is applied on press or in line, just as another ink would be to isolated areas on a piece. Spot varnish costs no more than another ink color would cost. Spot varnish comes in glossy or dull finishes and can also be lightly tinted with other inks. Spot gloss varnish is often used to enhance photographs and other imagery by giving them a high sheen and richness similar to the effect achieved with the high-gloss paper used for photographic prints. In contrast, dull varnish is often applied only to areas of text on a glossy coated paper to prevent glare and make photographs and other imagery stand out. It offers little protection against scuffing, dirt, and spills but some protection against fingerprints. Spot varnish can also prevent flaking and rub-off when applied to metallic inks.
Aqueous coating: A glossy coating made from a mix of polymers and water that is often applied to magazine and brochure covers as a means of protection against scuffing, dirt, and water. Aqueous coatings are applied as a flood varnish, meaning that the entire sheet is covered, at the end of the pressrun. Aqueous coatings require a special coating unit that is usually installed at the end of the press, and they cost about twice as much as a spot varnish.
Ultraviolet or UV coating: An ultraviolet light-cured process that involves a plastic liquid, ultraviolet coatings offers more protection and a higher degree of gloss than aqueous coating. Some printers can apply ultraviolet coating in line, but it is most often applied as a separate operation, often by screen printing as either a flood or spot varnish or applied with a roller unit as a flood varnish. The roller-applied process is more economical for long runs, whereas, screen printing is more cost-effective for short runs. When applying UV coatings, use wax-free inks. Although UV coating is available in a dull finish, it is more expensive than gloss. The durable finish of ultraviolet coating is most often used on pocket folders, book covers and table tents. Because its hard plastic surface may crack at fold lines, care should be taken when scoring and folding UV-coated pieces.
Laminating offers the best protection of all methods, yielding an exceptionally strong surface that repels moisture that can even be washed. The process involves adhering a layer of polyester, polypropylene, or nylon film to one or both sides of the printed sheet. Laminates are available in thicknesses from 0.001 inch (0.0251 mm) to 0.010 inch (0.251 mm) in both gloss and dull finishes, as well as a satin finish that falls in between. Thinner films are more appropriate for book covers and packaging, whereas, thicker films are better suited for menus, displays, and name tags. Laminating costs more than varnishes and liquid coatings, with the exception of matte UV.
When selecting the most appropriate laminate for a project, keep the following considerations in mind:
Nylon laminates: These durable laminates are the most expensive, but their porosity helps prevent paper curl by allowing gasses and moisture to leave the underlying paper. Nylon laminates are recommended for lightweight substrates such as paperback covers and applications where metallic inks are involved.
Polyester laminates: Their hard surface and median price makes polyester laminates appropriate for case-bound books and situations where durability and longevity are important.
Polypropylene laminates: Laminates made of this material are often used on dust jackets and packaging. Although they are softer than other laminates and more likely to be scuffed and scratched, polypropylene laminates are the least expensive. Polypropylene laminates can also be applied to lightweight substrates and surfaces printed with metallic inks without fear of curling.
INSERTING EXTRAS AND/OR OVERSIZED PAGES
Throw-outs, gatefolds, tip-ins and tip-ons provide ways of inserting additional materials into publications.
Gatefolds: folded sheet of four panels that is bound into a publication. Panels fold into a spine with parallel folds. Used in publications to provide extra space (especially useful for panoramic vista images).
Throw-outs: half a gatefold where a folded sheet is bound into a publication that opens out to only 1 side. The throw-out sheet must be smaller than the actual publication so it can be nested when folded.
Tip-in: a single page wrapped around the central fold and glued along the binding edge.
Tip-on: a page or other element (such as a reply card or membership card) pasted into a publication. Can be located anywhere on the host page and may be temporary or permanent.
PROOFING METHODS
Proofs help designers and others know, before beginning press production, how a piece will look and feel when it has been printed and assembled. They also serve as a means of checking how a digital file will print and ensuring that type, imagery, and color will print as specified.
A broad range of proofing possibilities exists. Which method you choose depends largely on what aspect of a job is being checked. In many cases, one type of proof will be adequate in the early stages of a job, whereas, others will be more useful as the job progresses.
Paper dummy: A paper dummy is a nonprinted sample assembled to project specifications with the paper that has been specified for the job. Although paper dummies do not show how a job will look when printed, they are useful for showing how bulky a document will be and how much it will weigh, if mailing costs are a consideration. Paper dummies are useful when making paper choices for pocket folders, direct mail pieces, and all other types of publications.
Ink drawdowns: Provided by the ink supplier to the printer, ink drawdowns are used for determining how the ink and paper will interact before going on press. Generally prepared in 12" × 6" (304.8 × 152.4 mm) strips, drawdowns are often used to determine absorption rates on uncoated papers and for matching critical colors, such as a corporate colors, on different types of papers.
Bluelines: Photosensitive paper is combined and exposed with film negatives for a job to give a one-color (blue) representation of how the job will print. Bluelines work well for checking the placement of text and images, cropping and image size as well as crossovers, folds, and page sequencing. They are not suitable for checking color or image quality. They can only be generated when film negatives are produced as part of the job. Also called Dyluxes.
Analog color proofs: Analog color proofs involve overlays, made directly from film negatives that record each color on a separate sheet of clear polyester film. The films are taped or laminated together in register to give a representation much like a color print. Dyes for these proofs are matched to inks to simulate the finished, printed piece. Because they are made from the negatives that will print the final job, analog proofs have long been regarded as the most accurate means of determining imaging and color accuracy. Cromalin and Color Key are both brand names for this type of proofing system.
Digital proofs: Digital proofs range from simple black-and-white laser prints generated from a studio printer to sophisticated color proofs that simulate how a job will look when it is finally produced on press. Digital proofs are your only option if offset plates are generated directly from digital files without producing negatives—an option commercial printers are increasingly turning to as digital prepress technology becomes more sophisticated and color accuracy more reliable. Processes include prints generated by laser, thermal, dye sublimation, or ink-jet printers.