
Chapter 17: Going Serverless with Google App Engine
Container-based microservices is a very useful and modern approach that offers portability and flexibility by allowing you to migrate your applications seamlessly from one compute service to another with very little or no operational overhead and is available on Google Compute Engine (GCE), Google App Engine (GAE), Google Cloud Run, and Google Kubernetes Engine (GKE).
In this chapter, we turn our attention to Google App Engine (flexible), which is Google's longest serving and most mature serverless offering. The Google App Engine flexible environment does not offer the complex orchestration that Google Kubernetes Engine does, but if such orchestration is not required, then the Google App Engine flexible environment is the simplest, most mature, and cost-effective option available for running container-based microservices.
In the next chapter, we will look at a table that compares App Engine, Cloud Run, and Google Kubernetes deployments.
In this chapter, we will cover the following topics:
- Google App Engine
- Deploying containers to the App Engine flexible environment
- When to use Google App Engine
Technical requirements
The code files for this chapter are available here: https://github.com/PacktPublishing/Modernizing-Applications-with-Google-Cloud-Platform/tree/master/Chapter%2017.
Introducing Google App Engine
We have described Google App Engine as a serverless offering, but what do we mean by that? Serverless is a method of providing the runtime environment needed by an application without binding the application to a specific server infrastructure. The application only has access to the features provided by the environment, and we do not have to worry about patching or maintaining the underlying infrastructure. The application is automatically scaled out when demand increases and scaled back in when demand decreases.
Google App Engine is designed to host services that communicate on ports 80 or 443 using the HTTP(S) protocol, specifically, web applications. It also manages connectivity to Google Cloud SQL as it is quite a common pattern for web applications to connect to relational databases. There are two flavors of Google App Engine – Standard and Flexible. We will examine Standard first.
Google App Engine standard environment
The Google App Engine standard environment is based on out-of-the-box containers that have been pre-configured with popular runtime stacks for web applications. At the time of writing, the runtime stacks available are as follows:
- Python
- Java
- Node.js
- PHP
- Ruby
- Go
If the runtime stack for our application is a supported one, then the Google App Engine Standard Environment is a fantastic choice for running an application. However, if the runtime stack is not supported, then we need to use the Google App Engine flexible environment.
Google App Engine flexible environment
The Google App Engine flexible environment allows us to customize a container based on one of the runtime images for the various programming languages mentioned previously or provide our own custom container for a runtime stack not in the preceding list. The flexibility for the runtime provided by the Google App Engine flexible environment comes at a price. The price is mostly in terms of complexity, as we must create and maintain a custom container image. The other impacts are as follows:
- Deployment times are measured in minutes rather than seconds.
- Startup times are measured in minutes rather than seconds.
- The service cannot scale down to zero instances.
- Pricing is based on the usage of vCPU, memory, and persistent disks rather than instance hours.
Now that we have learned about Google App Engine, including the two flavors available, Standard and Flexible, we will learn how to make use of the Google App Engine flexible environment and deploy our application microservices.
Components of App Engine and the hierarchy of an application deployed on App Engine
An App Engine app is made up of a single application resource that consists of one or more microservices.
Each service can be configured to use different runtimes and to operate with different performance settings, meaning you can have a service with the runtime Go, a second service with the runtime Node.js, and a third service with runtime Python all part of the same single application.
Within each service, you deploy versions of that service. Each version then runs within one or more instances, depending on how much traffic you configured it to handle:

Figure 17.1 – App Engine hierarchy of an application
Deploying containers to the App Engine flexible environment
In this section, we will learn about what is needed to deploy an updated version of our banking application using the Google App Engine flexible environment.
Before deploying our microservices with the Google App Engine flexible environment, we need to make a few changes in our projects to account for the environment differences between Google App Engine and Google Kubernetes Engine.
Application configuration updates
To update our application configuration to be ready to deploy to the Google App Engine flexible environment, we need to make a few small changes to make sure we pick up the externalized configuration of our application.
The changes made to our application configuration are as follows:
- Firstly, in our user-rest and account-rest projects, we need to update the application.properties file to replace instances of GCP_GKE_*, such as the following:
spring.datasource.jdbcUrl = ${GCP_GKE_USER_DATASOURCE_URL}
spring.account-datasource.jdbcUrl = ${GCP_GKE_ACCOUNT_DATASOURCE_URL}
- The instances of GCP_GKE_* are replaced with GCP_*, as shown next:
spring.datasource.jdbcUrl = ${GCP_USER_DATASOURCE_URL}
spring.account-datasource.jdbcUrl = ${GCP_ACCOUNT_DATASOURCE_URL}
- Next, we need to add configuration to make use of the connectivity to Google Cloud SQL provided by Google App Engine rather than Google Cloud SQL Proxy:
spring.datasource.socketFactory = com.google.cloud.sql.mysql.SocketFactory
spring.datasource.cloudSqlInstance = ${GCP_USER_DATASOURCE_CLOUD_SQL_INSTANCE}
spring.account-datasource.socketFactory = com.google.cloud.sql.mysql.SocketFactory
spring.account-datasource.cloudSqlInstance = ${GCP_ACCOUNT_DATASOURCE_CLOUD_SQL_INSTANCE}
The previous code fragment declares that Spring Boot will use the SocketFactory method provided by Google to connect to our Google Cloud SQL instance. This is done twice, once for the default (user) data source, and once for the account data source. The names of the Cloud SQL instances are retrieved from Google Secret Manager, as indicated by the GCP_ prefix variable.
- Now we have updated the application.properties file in our user-rest and application-rest microservices to reflect the fact that Google App Engine manages connections to databases for us. Rather than using the Google Cloud SQL proxy, we can move on to the frontend microservice.
- A requirement for custom containers in Google App Engine (flexible) is for them to listen on port 8080 for HTTP traffic. The user-rest and account-rest microservices already expose port 8080, but until now the front-end microservice has been listening on port 80.
- To change front-end to listen on and expose port 8080, we need to create a file called default.conf as follows:
server {
listen 8080;
server_name app.banking.jasonmarston.me.uk;
location / {
root /usr/share/nginx/html;
index index.html;
}
}
- The preceding configuration instructs Nginx to listen on port 8080 for the hostname app.banking.jasonmarston.me.uk and serve up static content from the /usr/share/nginx/html folder.
- Next, we need to apply the preceding configuration file to our container and change the port exposed to be port 8080:
FROM nginx:1.17.10-alpine
COPY WebContent /usr/share/nginx/html
COPY default.conf /etc/nginx/conf.d/default.conf
EXPOSE 8080
- The previous Dockerfile copies our default.conf file into the container image at the location where Nginx expects to find a default configuration and exposes port 8080 for the container.
The changes to our front-end, user-rest, and account-rest projects can be found in the Chapter 11 folder of the GitHub repository for the book: https://github.com/PacktPublishing/Modernizing-Applications-with-Google-Cloud-Platform/tree/master/Chapter%2017.
- To action these changes, copy the Chapter 11 folder into our local Git repository folder, and then add, commit, and push the updates to our Google Cloud source repository.
Now that we have completed the configuration changes to our application, the next step is to deploy the appengine service by updating the app.yaml file, which acts as a deployment descriptor for a specific appengine service version. App Engine also provides an option to serve the application on a custom domain in addition to the preconfigured appspot domain. This is done using a routing file called a dispatch.yaml file, which configures routing to specific services based on a domain, which we will also cover in the following section.
Deployment configuration
There are various configuration files associated with Google App Engine apps and services deployed within those apps. The two configuration files used in this chapter are app.yaml, which is used to configure a specific microservice, and dispatch.yaml, which is used to configure the routing of HTTP(S) requests to microservices. This means that we will have one app.yaml file per microservice and one dispatch.yaml file for the application. The configuration files we will be dealing with for deployment can be found in the gae-deploy project in the Chapter 11 folder of the GitHub repository for the book: https://github.com/PacktPublishing/Modernizing-Applications-with-Google-Cloud-Platform/tree/master/Chapter%2017.
We will now examine the app.yaml file for our account microservice one fragment at a time:
runtime: custom
env: flex
service: account
In the preceding fragment, we have specified that we are using the Google App Engine flexible environment rather than Standard by providing flex as the value for env:. We are providing a custom runtime stack by specifying custom for runtime:, and we are calling the instance we will be deploying to account by providing account as the name for the service attribute:.
Next, we move on to the environment fragment:
env_variables:
BANKING_LOGGING_LEVEL: WARN
GOOGLE_CLOUD_PROJECT: bankingapplication
The previous environment fragment declares the environment variables that we could not transfer into being secrets handled by Google Secret Manager.
Next, we specify the resources for our instance:
resources:
cpu: 1
memory_gb: 1
The previous resources fragment declares that our instance requires 1 CPU and 1 GB of RAM.
Now we declare our autoscaling rules:
automatic_scaling:
min_num_instances: 1
max_num_instances: 10
cool_down_period_sec: 180
cpu_utilization:
target_utilization: 0.75
target_concurrent_requests: 100
The previous automatic scaling section specifies that we will have between 1 and 10 instances active at any time (inclusive), while there will be a 3-minute delay between scaling actions to prevent excessive scaling activity, and our target CPU utilization is 75%.
Next, we move on to health checks:
liveness_check:
path: "/healthcheck"
check_interval_sec: 30
timeout_sec: 4
failure_threshold: 2
success_threshold: 2
initial_delay_sec: 30
readiness_check:
path: "/healthcheck"
check_interval_sec: 5
timeout_sec: 5
failure_threshold: 5
success_threshold: 2
app_start_timeout_sec: 100
The previous fragment declares two health checks. First is a readiness check, which is used to register the instance with the load balancer when startup has completed and a successful HTTP status code is returned from the service. Second is the liveness check, which is used to move an instance in or out of the load balancer depending on the status.
The final fragment is for our connection to the database:
beta_settings:
cloud_sql_instances: bankingapplication:europe-west2:mysql-instance
The previous fragment declares the Cloud SQL instance our application will connect to. Note that this must be on a public endpoint rather than a private one. We have a similar app.yaml file for each of the microservices that make up our application.
Next, we will look at the dispatch.yaml file, which we use to configure routing to our microservices:
dispatch:
- url: "app.banking.jasonmarston.me.uk/"
service: default
- url: "app.banking.jasonmarston.me.uk/user/*"
service: user
- url: "app.banking.jasonmarston.me.uk/account"
service: account
- url: "app.banking.jasonmarston.me.uk/account/*"
service: account
In the previous file, we map the URLs to our microservices. Each of the rules maps a location under hostname app.banking.jasonmarston.me.uk to a specific microservice. This completes the configuration of our components and deployments for Google App Engine (flexible), so we will now move on to how to deploy these components and configurations.
Deployment prerequisites
To deploy our microservices in the Google App Engine flexible environment, there are a few things we need to set up. The first of these is setting the service account permissions for Google Cloud Build, as shown next:

Figure 17.2 – Cloud Build service account permissions
The next step is to grant permissions to our appengine service account to allow it to use Google Secret Manager. We do this by adding the following roles to our [email protected] account:
- Secret Manager Secret Accessor
- Secret Manager Viewer
These roles are shown next:

Figure 17.3 – App Engine service account roles
Lastly, we will create an application to host the microservices we are deploying:
- From the Navigation menu, click App Engine:

Figure 17.4 – Nav menu: App Engine
- On the App Engine page, click Create Application:

Figure 17.5 – Create Application
- Select a region (we chose europe-west2) and then click Create app:

Figure 17.6 – Selecting a region and creating an app
- Click Cancel:

Figure 17.7 – Canceling the optional step
- Review the success message:

Figure 17.8 – App Engine created
- From the Navigation menu, select App Engine > Settings:

Figure 17.9 – Nav menu: App Engine > Settings
- On the Settings page, select Custom domains and then click on the Add a custom domain button:

Figure 17.10 – Custom domains: Adding a custom domain
- Select a validated domain and then click Continue:

Figure 17.11 – Custom domains: Continue
- Provide a hostname (deleting any existing hostnames) and then click Save mappings:
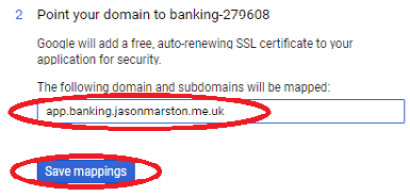
Figure 17.12 – Save mappings
- Click Continue:
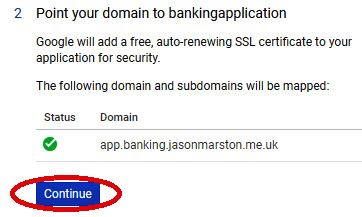
Figure 17.13 – Continue
- Update your DNS with your DNS provider and then click Done:

Figure 17.14 – Updating the DNS
We have updated the permissions for our Google Cloud Build service account and our Google App Engine service account. We have also created the application we will deploy our microservices to, and mapped the DNS hostname we will use for the application. We can now move on to setting up the automation of our deployment.
Automating deployment
Once again, we are declaring a build using a cloudBuild.yaml file. In this instance, we are using a cloud builder we have not used before. This is the cloud-sdk cloud builder. The cloud-sdk cloud builder provides up-to-date versions of the command-line tools for use with Google Cloud. These tools include gcloud, gsutil, and bq. We use this instead of the gcloud cloud builder as the version of the gcloud command-line tool is more up to date in the cloud-sdk cloud builder than in the gcloud cloud builder.
We will examine the cloudBuild.yaml file for deploying our application one step at a time, starting with the following fragment for front-end:
steps:
- name: 'gcr.io/google.com/cloudsdktool/cloud-sdk'
args:
- 'gcloud'
- 'app'
- 'deploy'
- '--image-url'
- 'gcr.io/bankingapplication/front-end:latest'
- 'front-end/app.yaml'
dir: 'gae-deploy'
The preceding fragment instructs Google Cloud Build to use the gcloud app deploy command to deploy our front-end microservice from the front-end image in Google Container Registry. It also applies the app.yaml configuration to the microservice as part of the deployment.
The next fragment deals with the user microservice:
- name: 'gcr.io/google.com/cloudsdktool/cloud-sdk'
args:
- 'gcloud'
- 'app'
- 'deploy'
- '--image-url'
- 'gcr.io/bankingapplication/user-rest:latest'
- 'user/app.yaml'
dir: 'gae-deploy'
The preceding fragment instructs Google Cloud Build to use the gcloud app deploy command to deploy our user microservice from the user-rest image in Google Container Registry. It also applies the app.yaml configuration to the microservice as part of the deployment.
The next fragment deals with the account microservice:
- name: 'gcr.io/google.com/cloudsdktool/cloud-sdk'
args:
- 'gcloud'
- 'app'
- 'deploy'
- '--image-url'
- 'gcr.io/bankingapplication/account-rest:latest'
- 'account/app.yaml'
dir: 'gae-deploy'
The preceding fragment instructs Google Cloud Build to use the gcloud app deploy command to deploy our account microservice from the account-rest image in Google Container Registry. It also applies the app.yaml configuration to the microservice as part of the deployment.
Now that we have declared steps for each of our microservices, our build configuration needs a step for the routing in our application, as shown next:
- name: 'gcr.io/google.com/cloudsdktool/cloud-sdk'
args:
- 'gcloud'
- 'app'
- 'deploy'
- 'dispatch.yaml'
dir: 'gae-deploy'
timeout: 1800s
The preceding fragment instructs Google Cloud Build to use the gcloud app deploy command to apply the dispatch.yaml configuration to the application in order to route HTTP requests to the correct microservice. The final line updates the timeout to be 30 minutes, since deployment to Google App Engine (flexible) is a time-consuming process.
Our next step is to copy the Chapter 11 folder into our local Git repository folder, and then add, commit, and push the updates to our Google Cloud source repository.
Now that all the configuration for our application is in our Google Cloud source repository, we can create a Cloud Build trigger to execute the build defined by the preceding cloudBuild.yaml file. Once this trigger has been created, we can trigger it and then wait a while (approximately 20 to 25 minutes) for the deployment to complete.
Once the build has been completed successfully, we can test the application by using a web browser to access https://app.banking.jasonmarston.me.uk.
We will now look at when to choose Google App Engine for our microservices.
When to use Google App Engine
The choice between Google App Engine, Google Kubernetes Engine, and Google Cloud Run can be a tricky one and, in a professional environment, is often determined by company policies. If we have total freedom, it can still be a subjective choice. However, the following is some guidance to help with the decision-making process.
Consider using Google App Engine when the following criteria apply:
- The services are HTTP(S) based.
- The services are stateless.
- There is a small number of services.
- The services do not require complex orchestration.
- Google Cloud Run is not available in the region you wish to deploy to.
The previous guidance comes down to two major concerns. Are the microservices stateless web apps, and do we need to coordinate between them? If, based on the previous list of considerations, Google App Engine is not a good fit, then we need to consider Google Kubernetes Engine or Google Cloud Run.
That concludes our chapter on going serverless with the Google App Engine flexible environment. We will finish up with a brief review of the chapter.
Summary
In this chapter, we learned about Google App Engine in both of its flavors – Standard and Flexible. We looked at the changes needed to our microservices to allow them to run effectively in the Google App Engine flexible environment, and the configuration we would need to add for Google App Engine. We then learned how to automate the deployment and configuration of our microservices in a Google App Engine application. Finally, we learned some guidelines on how to decide whether the Google App Engine flexible environment is a good match for the application we wish to deploy.
In the next chapter, we will learn about Google Cloud Run and how to deploy and configure our application in the very latest serverless environment available in Google Cloud, thereby futureproofing our application deployment.