Manage Multiple Apple IDs
Working with iCloud, Apple devices, and Apple’s various stores and subscription offerings is easiest when you have a single Apple ID. But I’m not alone in having two for historical reasons, and many people have even more!
In this chapter, I talk about how to manage multiple Apple IDs in an efficient and consistent way.
Use Separate Accounts for Purchases and iCloud
Many of us who are long-time Apple ecosystem participants wound up with two Apple IDs, because at one point, Apple managed purchases separately from iCloud’s predecessors (like MobileMe). When Apple fully embraced the Apple ID approach, all our legacy accounts converted. Apple didn’t offer an opportunity to merge those accounts then and still hasn’t many years later.
Dealing with the duplication wasn’t as easy as shutting down one of the accounts. Purchases of permanently licensed digital goods—movies you bought (not rented), any apps, and non-subscription in-app purchases—are associated with an account. We couldn’t just abandon an account without also losing all that. Likewise, because the other account was often associated with a mac.com or me.com address we’d used for data or as an incoming address, we couldn’t abandon that one, either.
Apple originally didn’t design iOS to manage that split of accounts well. Fortunately, that improved many releases ago, and Apple now lets you easily log in to iCloud with one account and the iTunes and App Store with another.
In macOS, the Apple ID preference pane (Monterey) and Account Name settings pane (Ventura and later) shows both media and iCloud logins and associated information, even as iTunes was split into Music, Podcasts, and TV.
Use Two Apple IDs in iOS or iPadOS
When setting up an iOS or iPadOS device from scratch with two accounts:
Tap Settings > “Sign in to your device name.”
Enter the Apple ID and password you want to use for iCloud synchronization and other features. Confirm with a second factor if necessary.
Tap Settings > Account Name > Media & Purchases and then tap Sign Out on the menu that appears after you tapped Media & Purchases.
Log in with the Apple ID you associate with purchases, as in step 2.
If you’re not starting with a fresh device, first sign out from all the places you may be signed in to an Apple ID on your mobile hardware using instructions you can find in Migrate from One Apple ID to Another
Use Two Apple IDs in macOS
It’s easy to use multiple Apple IDs in macOS without too much fuss. Here’s how to do so with the most common apps and services.
Start at System Preferences > Apple ID (Monterey) or System Settings > Account Name (Ventura or later), where you type in your iCloud-oriented Apple ID, click Next, and follow steps to complete the login process.
Now, you can switch or login to your store accounts at Apple’s various services to another ID, or even use different Apple IDs at each store.
Pick an ID (or Several) for Media and Purchases
While you might think the Media & Purchases view would be a central point of management, it’s instead more like a summary of your accounts at various stores (Figure 49).
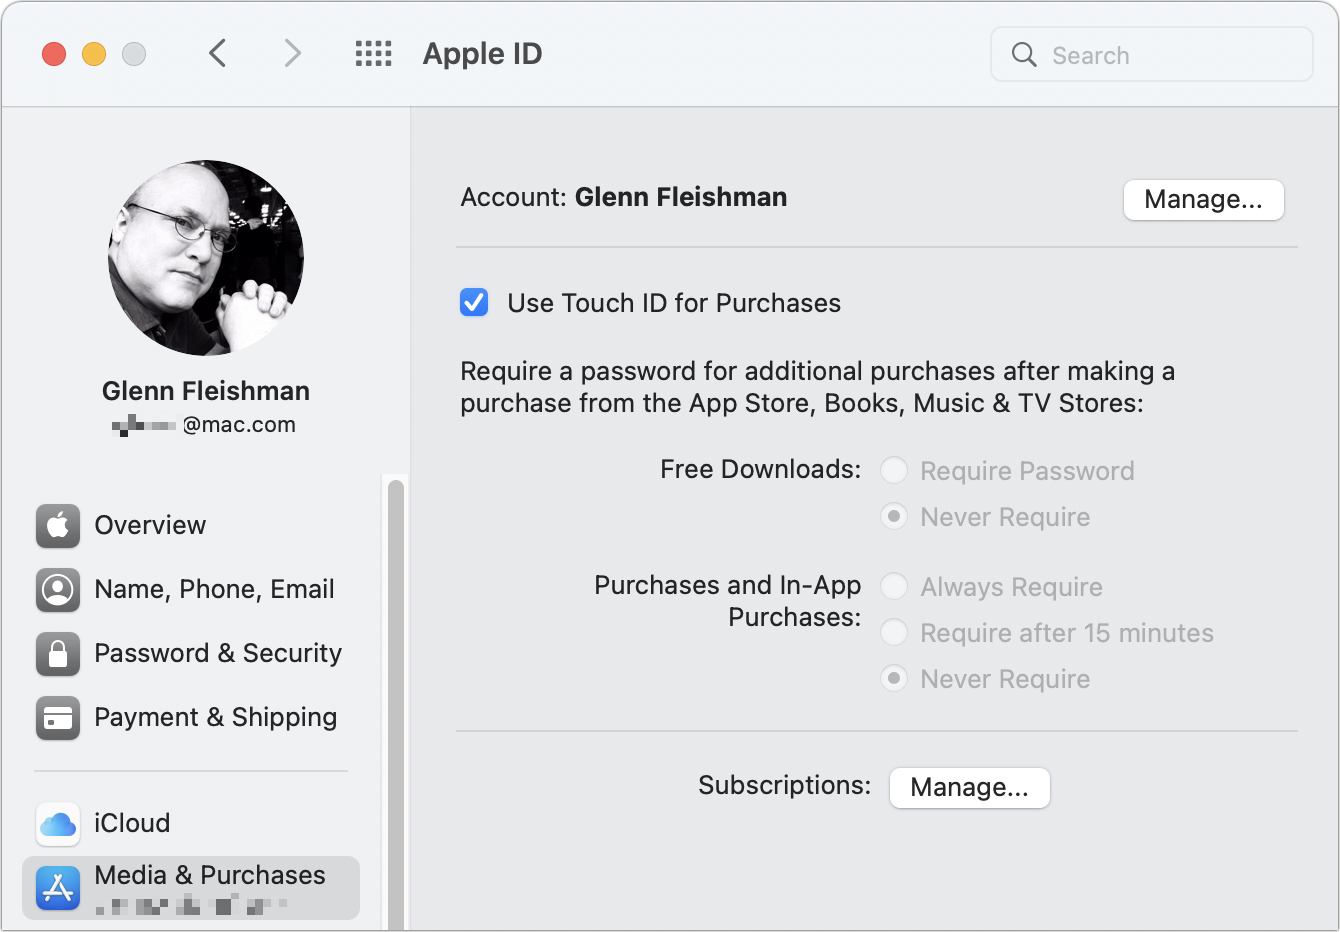
Click Manage to the right of your name at the top and it simply opens the Mac App Store and shows your account page. To change the account used by App Store, Books, Music, and TV, you have to visit each app in turn.
In Monterey, once you change your account in any of these apps, a label under Media & Purchases appears. For a new installation of macOS in which you have logged in fresh to the various stores, it shows the Apple ID email address used for those logins. If you have two or more different logins at the stores, it changes to “X accounts” and the “Account:” item at top changes from plain text (as in Figure 49) to a pop-up menu (Figure 50).
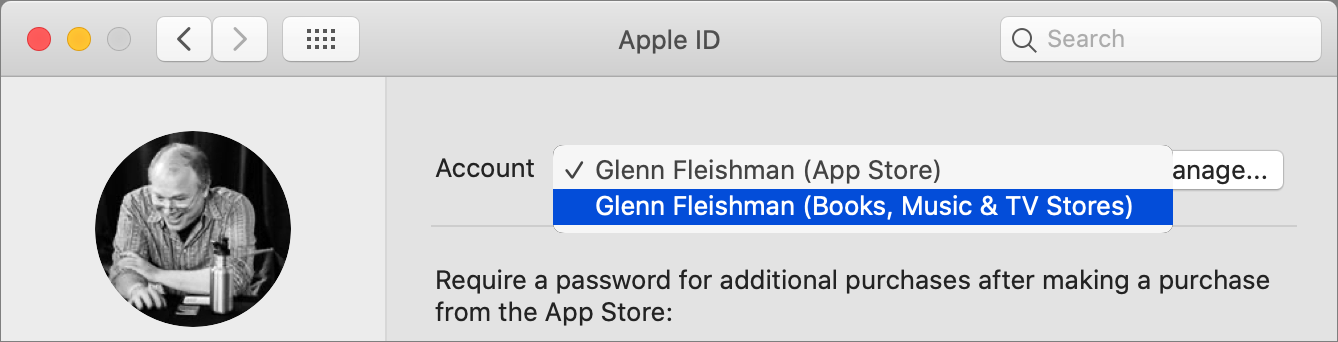
Apple reworked this starting in Ventura, as with many settings. Instead of using a popup menu, Ventura and Sonoma show at least one heading that describes what’s covered by the displayed Apple ID account by name or email address (Figure 51). I haven’t found any consistency: on one computer in Ventura, it showed App Stores, Books, and News under one heading and Music, Podcasts, and TV under another; on another Ventura machine, it had no heading; and my Macs and editor Joe Kissell’s only show a single heading with Sonoma.
Here’s how to change your login at the four stores featured in macOS:
App Store and the Books app: Go to Store > Sign In and enter the information for the account you want to use. If you’re already signed in with another account, choose Store > Sign Out first.
Music app and TV app: Choose Account > Sign In, and enter your purchase-oriented Apple ID, and follow steps to finish.
Change Your Messaging IDs
Your Apple ID settings don’t seem to have a connection with Messages and FaceTime after the initial iCloud setup. You can visit each of those apps to change the Apple ID account you use:
Messages (iMessage): Open Messages and choose Messages > Settings/Preferences > iMessage. Enter the Apple ID you want to associate with messages and click Next.
FaceTime: Open FaceTime and, when prompted, type in the Apple ID you want to associate.
With either app, if you’re already signed in with another account, go to the above settings section, click Sign Out, and enter the information for the account you want to use.
Work with Apple ID Across Countries
Apple and other companies can’t obtain uniform licensing for media or software across every country in which they do business. That means that some songs, movies, TV shows, apps, books, and subscriptions may not be available everywhere you live or in all the countries you visit.
As a result, the country associated with an Apple ID can limit access to media or apps you’ve purchased or rented depending on what country you’re in when you try to access it. This can also come up if you want to make new purchases while abroad.
If you’re moving permanently from one country to another (or moving for an extended period), you can change the country associated with your Apple ID.
However, some people—especially within Europe and among other closely located nations—may work in one country and live in another, or even own homes or routinely travel among two or more countries. In that case, you may need to maintain separate Apple IDs, each associated with a billing address and account in each country.
Change the Country for Your Apple ID
Apple offers an excellent support page for users who want to switch the country associated with their Apple ID, and I don’t want to recapitulate all that.
Let me just highlight critical points:
You have to have a payment method that’s billed within the country you’re changing your account to.
Everything associated with your current account has to be wound up: subscriptions must be canceled and outstanding credit received.
Everything has to wind down, too. So movie rentals have to reach the end of the rental period or watching period, all subscriptions have to reach their natural end (tricky with yearly subscriptions if the end is far away), pre-orders must be fulfilled (though they may be canceled), and everything in a Season Pass delivered.
If you’ve got that in the bag, you’re ready to follow Apple’s instructions, which work in iOS, iPadOS, macOS, and on the Apple ID website.
If you don’t have a payment method associated with the country you’re moving to, Apple recommends waiting until you set that up before creating a new Apple ID to use there. Follow advice in the next section.
Maintain Apple IDs for Different Countries
One way to avoid some of the Apple ID problems with switching countries is to create a separate purchasing account for every country in which you routinely spend time if you typically do so for more than three months. (I go into the reasons later.)
For each account, you will need a valid billing method that has an address in that country. That could be difficult (or impossible) if you don’t reside for reasonably long periods of time in a country and have a fixed address there you can use. (Banks and credit cards require some assurance you’re not trying to pull a fast one.)
If you can meet this requirement, however, having country-specific accounts makes it possible for you to switch the Music, App Store, and other purchase or subscription logins in iOS, iPadOS, and macOS to the account corresponding to the country you’re in. When you switch, you can view content and use subscriptions purchased with that account, as well as make new purchases or downloads.
There’s one big proviso: Apple may restrict a given device from switching among Apple IDs for 90 days after you use certain iTunes features on that device, which includes downloading and playing movies, music, and TV shows, logging in to Apple Music, or downloading past purchases in any store.
All media-related software and playback on a given device gets locked. Devices include anything running iOS, iPadOS, and macOS, as well as a Windows PC or Android device using Apple software for media playback or subscriptions.
Apple offers more details about associations and the 90-day limit on a support page. Apple TV appears exempt from this, perhaps because Apple expects people may travel with them, and because they’re a piece of hardware with a dedicated purpose.
Manage Two iCloud Accounts
Apple supports a little-known feature in iOS, iPadOS, and macOS: a primary and secondary account for iCloud services. You have to log in to these Apple IDs in sequence, with the primary first and then using a method to add the secondary.
This can be useful when you want to share contact and other information with someone, but also want to maintain a separate Apple ID with your own iCloud and other information associated. For example, spouses who each have their own set of contacts, but who share many contacts in common, might use a separate Apple ID solely for the purpose of sharing mutual contacts. This allows them to ensure that any changes either person makes are visible to both.
Manage Two iCloud Accounts in iOS or iPadOS
With two iCloud accounts in iOS or iPadOS, the second account can sync only email, contacts, calendars, reminders, and notes.
After making sure you’re signed in to your primary iCloud account in Settings, add a secondary account with these steps:
Open Settings > Passwords & Accounts.
Tap Add Account.
Tap iCloud and follow the prompts.
Manage Two iCloud Accounts in macOS
While you can always set up a separate iCloud account within each macOS account, Apple also lets you have additional iCloud accounts associated with each Mac user. You can have a secondary and subsequent accounts that work only for email, contacts, calendars, reminders, and notes.
First, make sure you’re signed in to your primary account in the Apple ID preference pane.
Next, start with these steps in Monterey:
Open System Preferences > Internet Accounts.
If any account is selected at left, ⌘-click the entry to de-select it.
Click the iCloud logo in the top-right corner.
In Ventura or later, follow these steps:
Open System Settings > Internet Accounts.
Click Add Account.
Click the iCloud logo at top.
In all the above versions, enter your secondary (or tertiary or beyond) Apple ID and click Next. Follow the remaining prompts, and pick which features to sync or access.