Chapter 9. Role-Based Administration and Reporting
In This Chapter
![]() How Role-Based Administration and Reporting Work
How Role-Based Administration and Reporting Work
![]() Demonstrating Creating an RBA Report
Demonstrating Creating an RBA Report
Role-based administration (RBA), first introduced with Configuration Manager (ConfigMgr) 2012, enables you to restrict who can administer specific features and who can access, view, or deploy to a collection. Restricted access to collections means that a ConfigMgr administrator might only be allowed to see a particular set of computers or users. Starting with ConfigMgr 2012 R2, reports also have the ability to leverage RBA.
You used RBA in Chapter 2, “Installing and Configuring Configuration Manager Reporting,” to create a security role for a software updates report. You also used RBA with two collections (All Workstations and All Servers) to restrict users in Active Directory (AD) security groups (CM16 Report Reader - Software Updates - Server and CM16 Report Reader - Software Updates - Workstation) to see only their respective devices. You accomplished this by creating a security role to view software updates and then restricting that role to see only members of the All Workstations collection. In Chapter 2 you also learned about creating a second ConfigMgr security group to view members of the All Servers collection with an AD security group. RBA can be a powerful tool for limiting access in ConfigMgr.
In order to leverage RBA within your reports, you need to make several changes to your query, report prompts, and the report itself. This chapter steps through the details of converting a query to be RBA compliant and adjusting report prompts and reports to ensure that RBA is used. It also includes tips on how to avoid the most common mistakes for both SQL Server Data Tools 2014 Business Intelligence (SSDT-BI) for Visual Studio 2013 and the SQL Server Reporting Services (SSRS) website, and it discusses performance of RBA queries, best practices, and tips to improve performance.
How Role-Based Administration and Reporting Work
Before converting a SQL query so that it leverages RBA, let’s discuss how SSRS reporting and RBA work together. Here’s what the process looks like:
1. As with non-RBA reports, a user browses to the SSRS site http://<SSRS servername>/Reports, which automatically forwards to http://<SSRS servername>/Reports/Pages/Folder.aspx.
2. The user is presented with folders to which he has access (as shown in Figure 9.1). What the user doesn’t see at this point is that in the background he is automatically logging onto the SSRS server.

Tip: Automatic logon to SSRS
The automatic logon to the SSRS site is controlled by a security setting in the browser. If you are forced to logon each time you visit the SSRS site, you can adjust this setting. For more details on this and other settings, see the “RBA Tips and Troubleshooting” section, later in this chapter.
3. Once the user selects a report, two hidden cascading prompts execute before showing the user any additional prompts:
![]() The first prompt, UserTokenSIDs, gathers the report user’s name and domain and passes these details to a ConfigMgr report server DLL, SrsResources.dll, which in turn converts the information into a list of security identifiers (SIDs).
The first prompt, UserTokenSIDs, gathers the report user’s name and domain and passes these details to a ConfigMgr report server DLL, SrsResources.dll, which in turn converts the information into a list of security identifiers (SIDs).
![]() The second prompt, UserSIDs, compares the list of SIDs to the list of security groups and users with access to ConfigMgr. This information is used to limit a user’s access within SSRS.
The second prompt, UserSIDs, compares the list of SIDs to the list of security groups and users with access to ConfigMgr. This information is used to limit a user’s access within SSRS.
4. Once the UserSIDs details are collected, this information is used by each query to limit access to what that user can see in SSRS reporting. The only information returned as part of the query is what the user has access to in the console.
5. From this point on, SSRS runs much like any other report without ConfigMgr RBA.
Using SQL Queries with RBA
The following sections break down the discussion of SQL queries into two areas: converting a SQL query to a ConfigMgr RBA SQL query and testing a ConfigMgr RBA SQL query.
Converting a SQL Query to a ConfigMgr RBA SQL Query
As discussed in Chapter 4, “Transact-SQL Primer,” and Chapter 7, “Intermediate Reporting Concepts,” you should always start with a query and build on it to create the report you want. You need to follow this guideline when creating RBA queries.
Chapter 3, “Understanding Configuration Manager Data,” discussed the SQL views used to create ConfigMgr queries. Since SQL views have no automatic method of filtering data based on parameters, ConfigMgr creates parallel table-value functions for each of the SQL views that can be using in ConfigMgr reporting. This means the user security identifier (SID) information can be used to limit what information a user can see based on his or her SIDs. This is also exactly the same data that the user would see in the ConfigMgr console.
The RBA functions all have names related to the SQL view, with the v_ in the SQL view being replaced with fn_rbac_, and (@UserSIDs) appended to the end of a SQL view name. For example, to convert v_R_System to its RBA function name, first remove the v_ and replace it with fn_rbac_ and then append (@UserSIDs), to come up with fn_rbac_R_System(@UserSIDs).
Table 9.1 through Table 9.8 repeat the view information from tables in Chapter 3 but now convert those views to their RBA counterparts. Please see the descriptions in Chapter 3 for what each SQL view and corresponding RBA function does.


To convert a standard query to RBA, you need only change the FROM section. For example, Listing 9.1 shows Listing 3.5 in Chapter 3 modified to an RBA query. Note the use of RBA functions instead of SQL views.
LISTING 9.1 Converted Software Update Sample Query
SELECT distinct
CS.Name0,
CS.UserName0,
CASE
when (sum(case when UCS.status=2 then 1 else 0 end))>0
then ('Needs '+(cast(sum(case when UCS.status=2 then 1 else 0 end)
as varchar(10))+ ' Patches'))
else 'Good Client'
end as 'Status',
WS.lasthwscan as 'Last HW scan'
FROM
fn_rbac_UpdateComplianceStatus(@UserSIDs) as UCS
LEFT OUTER JOIN fn_rbac_GS_COMPUTER_SYSTEM(@UserSIDs) as CS
on CS.ResourceID = UCS.ResourceID
JOIN fn_rbac_CICategories_All(@UserSIDs) as catall2
on catall2.CI_ID = UCS.CI_ID
JOIN fn_rbac_CategoryInfo(1033,@UserSIDs) as catinfo2
on catall2.CategoryInstance_UniqueID = catinfo2.CategoryInstance_UniqueID
and catinfo2.CategoryTypeName = 'UpdateClassification'
LEFT JOIN fn_rbac_GS_WORKSTATION_STATUS(@UserSIDs) as WS
on ws.resourceid = CS.ResourceID
LEFT JOIN fn_rbac_FullCollectionMembership(@UserSIDs) as FCM
on FCM.ResourceID = CS.ResourceID
WHERE
UCS.Status = '2'
and FCM.CollectionID = 'SMS00001'
GROUP BY
CS.Name0,
CS.UserName0,
WS.lasthwscan,
FCM.CollectionID
ORDER BY
CS.Name0,
CS.UserName0
Note: Hardcoding the Language Code
As previously identified in Table 9.5, the fn_rbac_CategoryInfo(@lcid, @UserSIDs) function takes an additional field for language code. This can be hardcoded to English by typing 1033, as shown in Listing 9.1.
Testing a ConfigMgr RBA SQL Query
After you convert a query to be RBA compliant, the authors recommend that you test it in SQL Server Management Studio before importing it into SSDT-BI. This allows you to ensure that the query results and the performance of the query are working in a manner acceptable to you. In addition, it is easier to troubleshoot the query in SQL Server Management Studio than in SSDT-BI. However, if RBA queries use UserSID details, how do you determine what UserSIDs to use to test those queries? To help answer this question, the authors provide a report you can utilize that displays this information. Follow these steps to use the report:
1. Download www.enhansoft.com/downloads/cm12/siddetails.zip from the Enhansoft website.
2. Upload the SIDDetails RDL from the zip file to your ConfigMgr SSRS site. Chapter 8, “SSRS Reporting Features,” provides information on how to do this.
3. Using the user account with which you want to test your RBA query, browse to your SSRS site and view the SID Details report. Figure 9.2 shows an example of this report.

4. Copy the CM12 user SIDs text from the report.
5. Using the RBA query in Listing 9.1, add and define the @UserSIDs as a varchar(max) variable to the query. The final result should look similar to Listing 9.2.
Tip: CollectionID and SMS00001
Generally, when you create an RBA security role, you apply that security role to a group or user and limit the group’s or user’s access to a particular collection of computers or users. In Listing 9.2, SMS00001 is the CollectionID for the All Systems collection, and CM600016 is a custom-created collection used to enable a user to view only computers with that particular collection. If a user does not have access to a collection such as All Systems, as in Listing 9.1, he does not see any results, so you should change to the CollectionID to a collection to which that user has access—for example, CM600016 in Listing 9.2—or, better yet, turn this hardcoded CollectionID into an RBA prompt.
LISTING 9.2 RBA Software Update Sample Query
Declare @UserSIDs as varchar(Max) =
'16777219'
SELECT distinct
CS.Name0,
CS.UserName0,
CASE
when (sum(case when UCS.status=2 then 1 else 0 end))>0
then ('Needs '+(cast(sum(case when UCS.status=2 then 1 else 0 end)
as varchar(10))+ ' Patches'))
else 'Good Client'
end as 'Status',
WS.lasthwscan as 'Last HW scan'
FROM
fn_rbac_UpdateComplianceStatus(@UserSIDs) as UCS
LEFT OUTER JOIN fn_rbac_GS_COMPUTER_SYSTEM(@UserSIDs) as CS
on CS.ResourceID = UCS.ResourceID
JOIN fn_rbac_CICategories_All(@UserSIDs) as catall2
on catall2.CI_ID = UCS.CI_ID
JOIN fn_rbac_CategoryInfo(1033,@UserSIDs) as catinfo2
on catall2.CategoryInstance_UniqueID = catinfo2.CategoryInstance_UniqueID
and catinfo2.CategoryTypeName = 'UpdateClassification'
LEFT JOIN fn_rbac_GS_WORKSTATION_STATUS(@UserSIDs) as WS
on ws.resourceid = CS.ResourceID
LEFT JOIN fn_rbac_FullCollectionMembership(@UserSIDs) as FCM
on FCM.ResourceID = CS.ResourceID
WHERE
UCS.Status = '2'
and FCM.CollectionID = 'CM600016'
GROUP BY
CS.Name0,
CS.UserName0,
WS.lasthwscan,
FCM.CollectionID
ORDER BY
CS.Name0,
CS.UserName0
When you execute this query in SQL Server Management Studio, you see all the computers to which this user and his security group have access. Figure 9.3 shows sample results.

Tip: Changing @UserSIDS to Disabled
To confirm that a query works correctly regardless of which user executes it or has object access, change the @UserSIDs variable to 'Disabled'. This tells RBA queries to return all information and not to filter on what the user should see in the results.
Declare @UserSIDs as varchar(Max) = 'Disabled'
Using Reports and RBA
So far in this chapter you have learned how to convert a standard query to a ConfigMgr RBA query. This section completes the process, showing you how to update the Patch Compliance Progression report from Chapter 6 to be a RBA report. Once the RBA report is complete, you can use the ConfigMgr security roles created in Chapter 2 to limit the computers about which the report will provide information.
Updating SSDT-BI for RBA
Earlier, the “How Role-Based Administration and Reporting Work” section of this chapter discussed how the user name is gathered by a built-in SSRS function as part of the report execution. The user name is then passed to a ConfigMgr DLL called SrsResources.dll. In order to make use of this DLL in SSDT-BI, you first need to copy it to a workstation that has SSDT-BI installed. Based on the version of SSDT-BI or SQL Server Business Intelligence Development Studio (BIDS) being used, the DLL must be copied to the correct location in order for SSDT-BI or BIDS to leverage it for report previews.
The SrsResources.dll file is located at the root of your ConfigMgr reporting point folder. The default location is %ProgramFiles%SMS_SRSRP.
After locating the SrsResources.dll, copy the DLL to the appropriate folder location. Table 9.9 provides details.

Now edit RSPreviewPolicy.config within the PrivateAssemblies folder and add a CodeGroup block (provided in Listing 9.3 and available as online content as CodeGroup.txt; see Appendix C, “Available Online”) at the top of the CodeGroup section, as shown in Figure 9.4.

LISTING 9.3 CodeGroup Entry for RSPreviewPolicy.Config
<CodeGroup
class="UnionCodeGroup"
version="1"
PermissionSetName="FullTrust"
Name="Microsoft ConfigMgr Reporting Code Assembly"
Description=
"Grants the ConfigMgr Reporting Code assembly full trust permission.">
<IMembershipCondition class="AllMembershipCondition" version="1" />
</CodeGroup>
Tip: Accessing a Protected Folder
Since the PrivateAssemblies folder is under the Program Files (x86) folder, and Program Files (x86) and all subfolders are considered protected folders, you must run Windows Notepad or your favorite text editor in elevated mode. When you do this, you can save the RSPreviewPolicy.Config file in the PrivateAssemblies folder.
This is a one-time set of tasks for each computer using SSDT-BI; you will not need to perform these tasks again.
Adding the DLL to a Report
After you add the SrsResources.dll file to SSDT-BI and “tie” it to a report, SSDT-BI can leverage it. Perform the following steps to reference the SrsResources.dll file within an existing report in an existing SSDT-BI project:
1. In SSDT-BI, select Report -> Report Properties, as shown in Figure 9.5.

2. In the Report Properties dialog, select the References node, as shown in Figure 9.6.

3. Click Add in the Add or remove assemblies section.
4. Click the ... button.
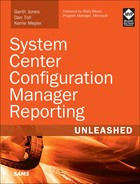
5. In the Add Reference dialog, click Browse and locate the SrsResources.dll file, as shown in Figure 9.7. Click OK twice to return to Report Designer.
Adding an RBA Dataset
As indicated in step 3 of the report-processing procedure in the “How Role-Based Administration and Reporting Work” section of this chapter, the ConfigMgr UserSID is queried from the ConfigMgr database. To access the database, you need to create a dataset. The results from this dataset are used to populate the UserSIDs prompt variable.
Follow these steps to create a new dataset:
1. Right-click the Dataset node in the Report Data section in SSDT-BI and select Add Dataset, as shown in Figure 9.8.

2. In the Dataset Properties dialog, perform the following actions (see Figure 9.9) and then click OK:
![]() Change the dataset name to DataSetAdminID.
Change the dataset name to DataSetAdminID.
![]() Select Use a dataset embedded in my report.
Select Use a dataset embedded in my report.
![]() Select the existing data source from the dropdown menu.
Select the existing data source from the dropdown menu.
![]() Paste the text from Listing 9.4 into the Query section.
Paste the text from Listing 9.4 into the Query section.

LISTING 9.4 Query to determine ConfigMgr UserSIDs
SELECT dbo.fn_rbac_GetAdminIDsfromUserSIDs(@UserTokenSIDs)
as UserSIDs
With these steps complete, there should be two datasets within your report. Your dataset should look similar to Figure 9.10—one for your main query and the second to query the UserSIDs details.

Adding RBA Prompts to a Report
The “How Role-Based Administration and Reporting Work” section of this chapter mentioned that there are two hidden prompts in the RBA report execution process. This section discusses how to add or update these two hidden prompts. Perform the following steps:
1. In the Report Data section in SSDT-BI, expand the Parameters node. The DataSetAdminID dataset created in the previous section should be listed, as shown in Figure 9.11.

2. Right-click UserTokenSIDs and select Parameter Properties, as shown in Figure 9.12.

3. In the General tab of the Report Parameter Properties dialog, change the Select parameter visibility to Internal, as shown in Figure 9.13.

4. Select the Default Values node, select the Specify values radio button, click Add, and paste the following text into the Value area (as shown in Figure 9.14):
=SrsResources.UserIdentity.GetUserSIDs(User!UserID)

Click OK.
5. With the first prompt now updated, create a second prompt as described in Chapter 7. As you create this new prompt, do the following:
![]() Name the prompt UserSIDs.
Name the prompt UserSIDs.
![]() Set the visibility to Internal.
Set the visibility to Internal.
![]() On the Default values node, select Get values from a query.
On the Default values node, select Get values from a query.
![]() Select DataSetAdminID for the dataset.
Select DataSetAdminID for the dataset.
![]() Select UserSIDs for the Value field.
Select UserSIDs for the Value field.
The Default node should look like the one in Figure 9.15.

Now that you have created an RBA report, you can preview it in SSDT-BI, as shown in Figure 9.16.

Tip: Creating RBA Templates
Use this RBA report to create three RBA templates (8.5×11, 11×8.5, and 14×8.5). This will save you time and effort later, as you will not have to perform these tasks on new reports.
RBA Tips and Troubleshooting
As with many other topics, the authors have tips and troubleshooting information for RBA. RBA reporting can be broken down into several sections: RBA role configuration within the ConfigMgr console, SQL queries, and SSRS reports. This book is not primarily about RBA role configurations, although Chapter 2 discussed creating a ConfigMgr RBA role to limit access to software update reports for the All Workstations collection. The following sections discuss RBA SQL query performance tips and troubleshooting, followed by SSRS report tips and troubleshooting.
RBA SQL Query Performance
Because RBA queries use table-value functions in their execution, there is additional overhead when running these queries against your ConfigMgr database. In many cases, this overhead is not very noticeable when the query is executed; however, particularly with software update queries, the overhead can be considerable. Notice in Figure 9.17 the execution times of 2 seconds (right arrow) for a non-RBA query and 32 seconds (left arrow) for the second query, which is an RBA query. The larger the environment, the longer both of these queries will take to run. This is one of the reasons you should test your queries in SQL Server Management Studio prior to creating a report. There are other reasons for executing your query in SQL Server Management Studio as well:
![]() You can check for syntax errors.
You can check for syntax errors.
![]() You can confirm that the query produces the expected results.
You can confirm that the query produces the expected results.
![]() SQL Server Management Studio is easier to use for query design than SSDT-BI.
SQL Server Management Studio is easier to use for query design than SSDT-BI.

Recall that when writing RBA reports and queries, you should always use the RBA functions to ensure that the user sees only the information that he should see—whether that be computer inventory or ConfigMgr items such as software update groups.
Chapter 2 discussed how to create a single security role to allow access to all software update information and how to apply that role to two ConfigMgr collections: All Workstations and All Servers. Review Listing 9.2 and notice that all SQL views have been changed to their corresponding RBA functions. You may also notice that there are a number of RBA functions that redundantly filter RBA results. For example, the following list of RBA functions controls what computers a user can see:
![]()
fn_rbac_UpdateComplianceStatus(@UserSIDs)
![]()
fn_rbac_GS_COMPUTER_SYSTEM(@UserSIDs)
![]()
fn_rbac_GS_WORKSTATION_STATUS(@UserSIDs)
![]()
fn_rbac_FullCollectionMembership(@UserSIDs)
Say that you mixed both RBA functions and SQL views to reduce this overhead by allowing only one RBA function per ConfigMgr object type—in this case, computer and software updates, as per Listing 9.5. Figure 9.18 shows that the execution time drops to 12 seconds (left arrow) when using Listing 9.5 but does not follow the guidelines listed earlier in this section for writing RBA queries.

LISTING 9.5 Mixed RBA Software Update Sample Query
SELECT distinct
CS.Name0,
CS.UserName0,
CASE
when (sum(case when UCS.status=2 then 1 else 0 end))>0
then ('Needs '+(cast(sum(case when UCS.status=2 then 1 else 0 end)
as varchar(10))+ ' Patches'))
else 'Good Client'
end as 'Status',
WS.lasthwscan as 'Last HW scan'
FROM
fn_rbac_UpdateComplianceStatus(@UserSIDs) as UCS
LEFT OUTER JOIN v_GS_COMPUTER_SYSTEM as CS
on CS.ResourceID = UCS.ResourceID
JOIN fn_rbac_CICategories_All(@UserSIDs) as catall2
on catall2.CI_ID = UCS.CI_ID
JOIN v_CategoryInfo as catinfo2
on catall2.CategoryInstance_UniqueID = catinfo2.CategoryInstance_UniqueID
and catinfo2.CategoryTypeName = 'UpdateClassification'
LEFT JOIN v_GS_WORKSTATION_STATUS as WS
on ws.resourceid = CS.ResourceID
LEFT JOIN v_FullCollectionMembership as FCM
on FCM.ResourceID = CS.ResourceID
WHERE
UCS.Status = '2'
and FCM.CollectionID = 'CM600016'
GROUP BY
CS.Name0,
CS.UserName0,
WS.lasthwscan,
FCM.CollectionID
ORDER BY
CS.Name0,
CS.UserName0
Because RBA groups and users are limited to collections, consider whether a collection parameter was added to the report to allow a CollectionID to be selected from a prompt. The collection prompt shown in Listing 9.6 does not contain the necessary RBA functions. However, Listing 9.7 has been converted to an RBA query, removing the need for RBA limiting on computer devices in the main query.
Refer to Chapter 7 for more details on how to add a prompt to the query. Listing 9.6 provides an alphabetical list of all collection names and their collection IDs, regardless of the user’s RBA scoping.
LISTING 9.6 Query for All Collection Names and IDs
SELECT
Col.Name,
Col.CollectionID
FROM
v_Collection Col
ORDER BY
Col.Name
Listing 9.7 provides a sorted list of all collection names and their collection IDs, limiting the returned collections based on the user’s RBA scoping.
LISTING 9.7 RBA Query for Collection Names and IDs
SELECT
Col.Name,
Col.CollectionID
FROM
fn_rbac_Collection(@UserSIDs) Col
ORDER BY
Col.Name
Given that it is extremely rare to scope the software updates a user can see, if scoping what software updates a user can see is not necessary, you could remove the RBA on those ConfigMgr items as well. Ultimately, this would bring you back to Listing 3.5 from Chapter 3 with a prompt to enter a collection; the updated version of this is shown in Listing 9.8. This prompt limits the collections the user could see using RBA, and it changes the execution time in that query from 32 seconds to 2 seconds.
LISTING 9.8 Software Update Sample Query
SELECT DISTINCT
CS.Name0,
CS.UserName0,
case
when (sum(case when UCS.status=2 then 1 else 0 end))>0
then ('Needs '+(cast(sum(case when UCS.status=2 then 1 else 0 end)
as varchar(10))+ ' Patches'))
else 'Good Client'
end as 'Status',
ws.lasthwscan as 'Last HW scan'
FROM
dbo.v_UpdateComplianceStatus as UCS
LEFT OUTER JOIN dbo.v_GS_COMPUTER_SYSTEM as CS
on CS.ResourceID = UCS.ResourceID
INNER JOIN v_CICategories_All as catall2
on catall2.CI_ID = UCS.CI_ID
INNER JOIN v_CategoryInfo as catinfo2
on catall2.CategoryInstance_UniqueID = catinfo2.CategoryInstance_UniqueID
and catinfo2.CategoryTypeName = 'UpdateClassification'
LEFT OUTER JOIN v_gs_workstation_status as ws
on ws.resourceid = CS.ResourceID
LEFT OUTER JOIN dbo.v_FullCollectionMembership as FCM
on FCM.ResourceID = CS.ResourceID
WHERE
UCS.Status = '2'
and FCM.CollectionID = @Coll
GROUP BY
CS.Name0,
CS.UserName0,
ws.lasthwscan,
FCM.CollectionID
ORDER BY
CS.Name0,
CS.UserName0
With the RBA query moved to the collection prompt, what is the effect on the execution time of the non-RBA collection prompt (Listing 9.6) versus using an RBA collection prompt (Listing 9.7)? This is one of those cases where the overhead would be unnoticed, as shown in Figure 9.19. In both cases, the query is so fast in SQL Server Management Studio that the results indicate that it took 0 seconds to complete!

FIGURE 9.19 Execution times for Listings 9.6 and 9.7.
By testing your RBA queries within SQL Server Management Studio and understanding how RBA functions, you can adjust your queries to be efficient without sacrificing or limiting how RBA was intended to work.
Troubleshooting and Errors
One of the most common issues you will see when viewing reports in SSRS is being prompted for a user name and password every time you access the ConfigMgr reporting site (see Figure 9.20). The steps to correct this issue vary from browser to browser; use the instructions in the section appropriate for your browser.

Automatically Logging In to SSRS in Internet Explorer
To automatically log in to SSRS using Internet Explorer, perform the following steps on each computer that accesses the SSRS website:
1. Open Internet Explorer and access Tools -> Internet Options.
2. Under Internet Options, select the Security tab.
3. Select Local intranet -> Custom Level.
4. Locate User Authentication -> Logon and select Automatic logon only in Intranet zone (see Figure 9.21). Click OK twice to return to Internet Explorer, accepting any warning message that arise.

Automatically Logging In to SSRS in Firefox
To automatically log in to SSRS using the Firefox browser, perform the following steps on each computer that accesses the SSRS website:
1. Open Firefox, type about:config in the address bar, and press Enter.
2. Enter network.automatic-ntlm-auth.trusted-uri in the search dialog.
3. Double-click the network.automatic-ntlm-auth.trusted-uris preference name.
4. In the Enter string value dialog, enter both the NetBIOS and FQDN URLs for your SSRS server, as a comma-separated list (see Figure 9.22).

Automatically Logging In to SSRS in Chrome and Yandex
To automatically log in to SSRS using Chrome and Yandex browsers, the steps are the same. Perform the following steps on each computer that accesses the SSRS website using one of these browsers:
1. Open the browser and select the menu icon then Settings. Then, do one of the following, depending on the browser:
![]() Click the Show advanced settings link (in Chrome).
Click the Show advanced settings link (in Chrome).
![]() Select the Show advanced settings check box (in Yandex).
Select the Show advanced settings check box (in Yandex).
2. Locate the Network section and click the Change proxy settings button.
3. On the Internet Properties page, selected the Security tab.
Note: About Changing Internet Properties
Note that the Internet Properties page is actually part of Internet Explorer settings, and therefore any changes you make within the Internet Properties page will affect Chrome, Opera, Yandex, and Internet Explorer.
4. Select the Local intranet zone and then click Custom Level.
5. Locate User Authentication -> Logon and select Automatic logon only in Intranet zone. Click OK twice to return to your browser, accepting any warning message that arise.
Automatically Logging In to SSRS in Opera
Opera browsers use Internet Explorer settings for automated logon settings. Perform the following steps on each computer that accesses the SSRS website using the Opera browser:
1. Open Opera, select the Opera menu, and then select Settings.
2. Locate the Network section and click Change proxy settings.
3. On the Internet Properties page, select the Security tab.
4. Select the Local intranet zone and then click Custom Level.
5. Locate User Authentication -> Logon and select Automatic logon only in Intranet zone. Click OK twice to return to Opera, accepting any warning message that arises.
Real World: Using Group Policy Objects
For many of the browsers discussed, you can set the automatic logon setting by using a Group Policy Object (GPO) instead of performing these steps on each computer.
Resolving the Error Request for the permission of type 'System.Security.Permissions.SecurityPermission
If you receive an error message similar to this, it likely means that you have not added CodeGroup to the RSPreviewPolicy.config found within in the PrivateAssemblies folder:
An error occurred during local report processing. The DefaultValue expression for
the report 'UserTokenSIDs' contains an error: Request for the permission of type
'System.Security.Premissions.SecurityPermission, mscorlib, Version=4.0.0.0,
Culture=neutral, PublicKeyToken=b77a5c561934e089' failed.
See the “Updating SSDT-BI for RBA” section of this chapter for more details.
Resolving the Error ‘SrsResources’ is not declared
When you receive an error message similar to this one, it means that you have not added SRSResource.dll to the report:
An error occurred during the local report processing.
The definition of the report '/Patch Compliance Progression' is invalid.
The Value expression for the report parameter 'UserTokenSIDs' contains an error:
[BC30451] 'SrsResources' is not declared. It may be inaccessible due to its
protection level.
To resolve this error, see the “Adding the DLL to a Report” section of this chapter.
Resolving the Error The system cannot find the file specified
The following error message means that the SRSResouce.dll file is missing from the computer that is running the report:
An error occurred during the local report processing.
The definition of the report '/Patch Compliance Progression' is invalid.
Error while loading code module: 'SrsResources, Version=5.0.0.0, Culture=neutral,
PublicKeyToken=31bf3856ad364e35'. Details: Could not load file or assembly
'SrsResources, Version=5.0.0.0, Culture=neutral,
PublicKeyToken=31bf3856ad364e35' or one of its dependencies.
The system cannot find the file specified.
To resolve this error, see the “Updating SSDT-BI for RBA” section of this chapter.
Getting a Blank SSRS Report
With SQL Server 2012 and earlier versions of SQL Server, you may receive a blank page, as shown in Figure 9.23, when using a browser like Chrome. If this happens to you, after executing the report, perform the following steps to resolve this issue:
1. Locate ReportingServices.js. This is generally found under %Program Files%Microsoft SQL ServerMSRS11.MSSQLSERVERReporting ServicesReportManagerjs.
2. Back up ReportingServices.js.
3. Run Windows Notepad or your favorite text editor in elevated mode. Based on your version of SQL, append the appropriate function to the ReportServices.js file. Listings 9.9, 9.10, and 9.11 show the fixes for SQL 2012, 2008 R2, and 2008, respectively.
4. Restart the SSRS service to reload the updated ReportingServices.js file.

Use the SQL 2012 pageLoad function (see Listing 9.9) to correct a blank page being displayed on browsers such as Chrome.
LISTING 9.9 pageLoad Function for SQL 2012
Function pageLoad() {
var element = document.getElementById("ctl32_ctl09");
if (element)
{
element.style.overflow = "visible";
} }
The pageLoad function for SQL 2008 R2 (see Listing 9.10) is used to correct a blank page being displayed on browsers such as Chrome.
LISTING 9.10 pageLoad Function for SQL 2008 R2
Function pageLoad() {
var element = document.getElementById("ctl31_ctl09");
if (element)
{
element.style.overflow = "visible";
} }
To correct the blank page issue with browser such as Chrome, using SQL 2008 SSRS, use the pageLoad function shown in Listing 9.11.
LISTING 9.11 pageLoad Function for SQL 2008
Function pageLoad() {
var element = document.getElementById("ctl31_ctl10");
if (element)
{
element.style.overflow = "visible";
} }
Once the pageLoad function is added to ReportingServices.js, the SSRS report displays normally in Chrome and other browsers, as shown in Figure 9.24.

Demonstrating Creating an RBA Report
The purpose of this demonstration is to become familiar with converting a SQL query to RBA table-value functions and testing it in SQL Server Management Studio. You will also learn how to update the query and RDL within an existing report using SSDT-BI.
Converting the Patch Compliance Progression Query to an RBA Query and Testing It
Following the information in the “Converting a SQL Query to a ConfigMgr RBA SQL Query” section of this chapter, make the required modifications to the Patch Compliance Progression query. As part of this process, you should do the following:
![]() Within SQL Server Management Studio, add a Declare and Set @UserSIDs variable.
Within SQL Server Management Studio, add a Declare and Set @UserSIDs variable.
![]() Modify the query to change the SQL views to RBA table-value functions.
Modify the query to change the SQL views to RBA table-value functions.
Execute the query and save it for the next step.
Tip: Declare and Set Statements
Remember that the DECLARE and SET statements are used in SQL Server Management Studio only to test a query. They are not needed in the dataset query. If left within that query, incorrect results will be returned to RBA users.
Converting the Patch Compliance Progression Report to an RBA Report
Following the instructions in the “Using Reports and RBA” section of this chapter, make the required modifications to SSDT-BI and the Patch Compliance Progression report. As part of this process, you should do the following:
![]() Update SSDT-BI to include the SrsResources.dll file.
Update SSDT-BI to include the SrsResources.dll file.
![]() Add the
Add the CodeGroup entry to RSPreviewPolicy.Config.
![]() Make a copy of the Patch Compliance Progression report and name it Patch Compliance Progression RBA.rdl.
Make a copy of the Patch Compliance Progression report and name it Patch Compliance Progression RBA.rdl.
![]() Add the assembly reference to the RDL.
Add the assembly reference to the RDL.
![]() Using the converted query, update the main dataset.
Using the converted query, update the main dataset.
![]() Add a dataset for DataSetAdminID.
Add a dataset for DataSetAdminID.
![]() Update and add prompts used by RBA.
Update and add prompts used by RBA.
When you have finished these steps, preview the report and confirm that all settings and features are functioning properly, as described in this section.
Converting the Computer Hardware Information Query to an RBA Query and Testing It
Extract the SQL query from the Computer Hardware Information Chart.rdl created in Chapter 7 and update the SQL view to the RBA table-value functions. As part of this process, you should do the following:
![]() In SQL Server Management Studio, add a Declare and Set @UserSIDs variable.
In SQL Server Management Studio, add a Declare and Set @UserSIDs variable.
![]() Modify the query to change the SQL views to RBA table-value functions.
Modify the query to change the SQL views to RBA table-value functions.
Execute the query and save it for the next demonstration.
Adding a Chart to the Computer Hardware Information Report
Make a copy of the Computer Hardware Information report, created in Chapter 6, and name this copy Computer Hardware Information RBA.rdl. Modify the new RBA report as follows:
![]() Add the assembly reference to the RDL.
Add the assembly reference to the RDL.
![]() Using the converted query from the previous demonstration, update the main dataset.
Using the converted query from the previous demonstration, update the main dataset.
![]() Add a dataset for DataSetAdminID.
Add a dataset for DataSetAdminID.
![]() Update and add prompts used by RBA.
Update and add prompts used by RBA.
When you have finished these steps, preview the report and confirm that all settings and features are functioning properly, as described in this section.
Summary
This chapter has presented an overview of how ConfigMgr RBA reporting works. It has examined a normal SQL query and reports covered in previous chapters and shown you how to enhance the reports so they can be used with the RBA feature of ConfigMgr and SSRS. This chapter has also described the steps and naming conventions necessary for converting a standard SQL query to RBA table-value functions.
The chapter has also discussed the one-time configuration of SSDT-BI to add the SRSResource.dll and CodeGroup block. If these steps are not performed on a computer with SSDT-BI, an RBA report cannot be previewed on that system.
The last part of the chapter has described advanced RBA tips and troubleshooting techniques, including RBA query performance tips to show how an understanding of RBA can reduce the execution time for an RBA query. This allows you to make an RBA query as efficient as possible without removing RBA. This chapter has also discussed some common errors and how to resolve them. In addition, you have updated the demonstration reports to allow the RBA feature to limit the user’s ability to see information.