
IN THIS CHAPTER
Is Operating System Deployment (OSD) the “killer app” of Configuration Manager (ConfigMgr) 2007? That depends on the specific challenges in your environment; but eventually, you will have to implement Windows Vista, Windows 7, or deploy a new batch of hardware—and then you will be glad to have OSD at your disposal.
Unlike many competitive products and the OSD Feature Pack for Systems Management Server (SMS) 2003, OSD in ConfigMgr 2007 is far more than a limited imaging solution. OSD provides a framework and a set of tools that fully automates system deployment and provisioning. It enables hardware-agnostic system images; and because OSD is part of a capable system management product, system deployment and configuration do not necessarily stop with the image itself. Using OSD minimizes and potentially eliminates image sprawl in an environment.
The main differentiator for OSD in ConfigMgr 2007 is its automation of the entire deployment process. OSD automates deployment of system images and additionally automates creating the image. Typically, most system images are manually created using a paper-based checklist. This process is time-consuming, error-prone, and subject to the interpretation and whim of the technician creating the image—factors preventing the process from being 100% reproducible or reliable. OSD eliminates these problems.
This chapter begins by introducing many of the tools used by OSD. Although a number of these tools are transparently incorporated into OSD, others require some administrative knowledge and manipulation. After discussing exactly what OSD is and what you can do with it, the chapter launches into a walk-through of each of the OSD relevant nodes in the ConfigMgr console.
At its heart, OSD is an open-ended framework for deploying Windows operating systems. With some creativity, you can take it well beyond what Microsoft ever intended and what might be imagined. This chapter provides a considerable amount of information on how to best utilize OSD, but it cannot cover every detail or chase every rabbit hole. However, it presents information that is relevant for nearly every situation and offers a considerable amount of experienced-based knowledge.
Although it is completely integrated into ConfigMgr, OSD uses and takes advantage of multiple separate tools. Knowing how OSD uses these tools and each tool’s function is beneficial when setting up a deployment and troubleshooting problems. Microsoft also provides complementary tools that can enhance your deployment experience. The following sections discuss a number of these tools.
Sysprep, short for System Preparation, is one of the primary tools used for unattended setup of all flavors of Windows. Essentially, when used for imaging, Sysprep removes the unique Security Identifiers (SIDs) specific to a particular installation of Windows. Sysprep then configures the installation to run a brief, GUI-based, mini-setup when the system restarts. This mini-setup provides the following benefits:
• Generates new and unique SIDs for the system
• Enables the input of a new Windows product key
• Reruns the plug-and-play hardware detection
• Reruns the driver installation process
OSD fully automates the mini-setup process with a configuration file. The name of the file varies based on the version of Windows used:
• Sysprep.inf for Windows XP
• Unattend.xml for Windows Vista
OSD either builds the appropriate file on-the-fly or uses one supplied to it, inserting the information automatically into the Sysprep configuration file. This information includes the product key, organization name, networking information, and domain credentials. Incorporating this functionality adds to OSD’s flexibility by eliminating the need to maintain multiple sysprep files supporting multiple deployment scenarios.
Each version of Windows has its own specific version of Sysprep. For versions of Windows before Vista, you must make Sysprep available to the setup process separately by creating a package or placing the files in %SystemRoot%sysprep. You can find these files in the deploy.cab compressed file located in the Support folder on the installation media, or you can download them from the Microsoft download site, www.microsoft.com/downloads.
For Windows Vista and later, the sysprep files come with the operating system and are located in %windir%System32.
The User State Migration Tool (USMT) is an extensive tool, deserving its own dedicated chapter if not an entire book! In short, USMT searches a system for all user data and settings, packaging them into a single archive file. You can then import this archive onto another system, restoring the user data and settings. USMT’s default configuration captures all known Microsoft-centric settings and data, such as wallpaper, color scheme, Microsoft Office documents, favorites, and all files in the My Documents folder. You can customize these defaults based upon the requirements of your environment. Microsoft provides further documentation on USMT at http://technet.microsoft.com/en-us/library/cc722032.aspx.
The information USMT captures from a source system is highly customizable by modifying or creating a series of eXtensible Markup Language (XML) configuration files. These XML configuration files describe the files, folders, and Registry entries that USMT captures; you can either specify exact filenames and Registry locations, or perform wildcard searches to locate data or settings in these XML configuration files. USMT then uses these configuration files to capture all specified data and settings and put them into an archive for later use in restoring to a destination system.
The Microsoft Deployment Toolkit (MDT) is a separate, yet complementary, set of tools for OSD. The MDT is available in one of two ways:
• As a completely stand-alone solution for deploying operating systems in a similar manner to OSD
• As an add-on to OSD
The Microsoft Solution Accelerator team developed the MDT, and MDT 2008 is the latest revision of the Business Desktop Deployment (BDD) Toolkit.
When installed as a complementary tool to ConfigMgr, the MDT provides a wizard that helps create the multiple packages required for OSD. It adds ten new tasks available for task sequences (the “Task Sequences” section in this chapter discusses task sequences), and adds a Preboot eXecution Environment (PXE) filter supporting unknown computers when deploying an image. The MDT is not required for ConfigMgr OSD but is a potentially valuable addition.
The Windows Automated Installation Kit (WAIK) installs as part of your ConfigMgr installation and is available as a separate download from Microsoft. The version you use depends on the version of ConfigMgr you run:
• Version 1.0— Installed with ConfigMgr 2007 RTM (Release to Manufacturing)
• Version 1.1— Installed with ConfigMgr 2007 Service Pack (SP) 1
The primary difference between the two versions is that Microsoft updated the Windows PE (Windows Preinstallation Environment) boot images to Windows PE 2.1.
The WAIK is a set of tools designed to automate a Windows installation. ConfigMgr 2007 automatically uses some of the WAIK tools such as Sysprep and ImageX during the deployment process. The WAIK also includes user guides on how to use these tools, reference documents on the various unattended setup files, and Windows PE. Chapter 11, “Related Technologies and References,” introduced WAIK.
Using OSD fully automates and completely integrates the many details of using the tools in the WAIK. You can also manipulate images outside of OSD using WAIK tools; this was not allowed in earlier versions of OSD.
ImageX is a stand-alone tool that creates and deploys Windows Image Format (WIM) files from a Windows volume; because the tool is completely integrated into ConfigMgr, you do not need to install additional software. ImageX is also part of the WAIK and can be installed and used separately by installing the WAIK. Because of the tight integration, you can seamlessly use images created using ImageX outside of ConfigMgr in OSD; the opposite is also true.
Additionally, ImageX can “mount” previously created WIM files for read or read/write access. This allows you to access the files and folders stored in a WIM using a previously existing empty folder on the system. You can then add or modify files using Windows Explorer or any other tool, just as if they are part of the host system.
WIM files are the next generation of Microsoft’s proprietary archive Cabinet files (often referred to as .CAB files). Using WIMs adds the ability to store metadata about the files and directories it contains; this capability allows you to restore a complete volume. Here are the advantages WIMs have over alternative, sector, or bit-based imaging tools:
• File system independent— You can capture WIMs from or deploy them to either NTFS (NT File System)- or FAT (File Allocation Table)-based file systems.
• Volume size independent— WIMs do not store any information about the volume from which they are captured. You can deploy WIMs if enough room is available on the destination volume.
• Processor architecture independent— ImageX works identically on x86, x64, and Itanium processors. The WIMs created on each are the same format and interchangeable.
• File-based compression— Files are independently compressed inside the WIM; this often leads to better compression ratios than bit-based images.
• Multiple images in one file— Multiple distinct volume images can be contained in a single WIM file.
• Single instancing of files— Multiple identical files are stored only one time. This leads to huge space gains when a WIM contains multiple images.
• Nondestructive image application— Images can be applied to a volume without destroying existing files and data.
The WIM file has proven to be so useful and versatile that Microsoft chose to drop the previous method of installing Windows with a file copy and instead uses a WIM file! Installation media for Vista and Windows 2008 contain single WIM files, taking advantage of all the items listed in this section.
The System Image Manager (SIM) is part of the WAIK tools. SIM is a new GUI tool that builds unattended answer files for Windows Vista and Windows Server 2008. Instead of having to worry about the syntax of the answer file (particularly because the Vista/2008 answer file is now stored in XML), this tool graphically presents all available options and generates the unattend.xml file for you. This same file format is utilized for Sysprep equivalent files (sysprep.inf in Windows XP) used by the mini-setup to complete the setup of a Vista system when Sysprep is used.
SIM also allows you to service a Vista WIM file by adding drivers and published updates from Microsoft.
The Windows Preinstallation Environment is a mini-operating system currently based on Windows Vista. It includes support for networking, Windows Management Instrumentation (WMI), VBScript, batch files, and database access. Most things that run on a full-blown Vista system also run in Windows PE. The advantage of PE is that it is much smaller than the full-blown OS (typically around 100MB), and runs from a read-only disk. This makes PE suitable for booting from a CD/DVD, or over the network using PXE. OSD uses Windows PE as a boot environment, ensuring the native operating system will not interfere with the deployment process.
Many competitive imaging products traditionally used a DOS-based operating system for their boot environment. Using a DOS-based OS leads to several issues:
• Most hardware vendors no longer create or distribute DOS network drivers.
• DOS does not natively support advanced scripting languages, such as VBScript or Jscript.
These two factors greatly limit what you can accomplish during a DOS-based deployment. In contrast, Windows PE not only uses all Windows-based network drivers but also uses scripting languages, such as VBScript or JScript.
As with most things Microsoft, there are multiple paths to the same destination, none of them specifically wrong or right. For example, if you want to lock your screen—always a good idea when you step away from your desk—there are a number of ways you can accomplish this:
• Simultaneously press the Windows key and L.
• Press Ctrl-Alt-Del and select Lock this computer.
• Create a desktop shortcut with the command line RUNDLL32 USER32.DLL,LockWorkStation.
OSD includes similar flexibility, allowing disparate organizations to use the same tool differently to meet their needs. Nearly every step of the process is customizable, and you can tailor it as necessary. Although this flexibility sometimes leads to uncertainty and conflicting opinions as to the best way to get things done, ultimately the only thing that matters is if it works for you and fits your organization’s goals and requirements.
Having discussed tools used by OSD, the next section covers OSD itself.
Here are the three main scenarios for operating system deployment, and OSD addresses all three:
The next sections describe these scenarios.
The new system scenario is the easiest to deal with because you do not have to worry about user state—a user’s state includes all the data, documents, and configuration of the system and applications that are unique to that user. This scenario simply involves wiping a system, whether it is straight from the vendor or previously used inside your organization, and deploying the image and applications to it.
An in-place migration is one where the system is currently in use but needs to have its operating system reloaded. This reload can be the result of a variety of reasons:
• An upgrade such as Windows XP to Windows Vista.
• The current operating system installation is broken beyond repair.
• The operating system installation does not meet current standards.
After a process is in place to quickly rebuild systems using OSD, organizations typically choose to re-image a system when the helpdesk spends a set amount of time troubleshooting without resolving an issue. This approach provides a way to decrease those helpdesk costs spent on fixing operating systems.
A side-by-side migration usually occurs as the result of a hardware refresh. In this scenario, a new system physically replaces a user’s system and might involve an operating system switch. Both in-place and side-by-side migration scenarios add the complexity of user state migration.
The core building block, which OSD builds on, is an image of a fully installed reference Windows system. Reference systems are systems used to build baseline images for deployment to the rest of the systems in the organization. Because hardware differences between a reference system and target deployment systems can cause issues, you must often use multiple reference systems to model your environment and thus create multiple images.
Enabling creation and deployment of this image is what OSD focuses on. However, OSD cannot automate the actual choice or definition of what goes into an image because this is not a technical decision.
A general definition of an image is a single file that stores all the files and information for a specific disk drive volume on a computer system. This file is portable and can be copied or deployed to a destination system.
Deploying the image file creates an exact duplicate of the original source volume. This allows you to easily copy the content of a disk drive volume containing an operating system, installed applications, and customizations to multiple other destination systems. In effect, the image clones the source system and allows rapid deployment of an operating system on a large scale. The process of copying the image to multiple machines is much quicker than doing a native Windows install and requires little manual intervention relative to a full Windows installation that includes applications and other miscellaneous configurations.
A prerequisite to the imaging process is inventorying all software and hardware in your organization. This helps ensure you take into account all possible variations—you must know all the possibilities to create the best possible images.
A question often asked is whether to include applications in the image and which ones. Do you include Microsoft Office? Microsoft Silverlight? Questions like these abound and fuel the continuing debate between using a thick or a thin image. The distinction between thick and thin images is somewhat subjective, so let’s start with some simplistic definitions:
• Thick image— An image including the OS, OS updates and patches, miscellaneous components, drivers and applications
• Thin image— An image containing the OS with only a minimal set of updates and patches
Conventional wisdom is that a thin image is the better choice—why is this the case? A thin image is easier to maintain; it contains a minimal set of components and thus a smaller set of components that require updates. Like many theories, this one sounds great, but reality gets in its way; because you want to automate maintenance of images, this should be a minor concern.
Offline Image Maintenance
If you forget to add something in an image or need to add something simple to an image without having to create it again, never fear, ImageX is here.
Using ImageX, you can mount a WIM image file into an empty folder using the command imagex /mountrw <image_path> <image index> <mount path>, where the mount path is an empty folder. This loads an image to that empty folder, where you can access the entire file system contained in the image file as if it were part of the file system of the host operating system.
For example, if you have a WIM file called XPSP3.wim at the root of your C: Drive, you can load that WIM file to an empty folder on your C: drive named mount with the following command:
imagex /mountrw c:XPSP3.wim 1 c:mount
This mounts the image in a read-write mode; if you want to mount the image in a read-only mode, use /mount instead of /mountrw. Now you can open either Windows Explorer or a command prompt and manipulate the contents of the WIM file by navigating to C:Mount. Figure 19.1 shows a folder listing of a sample captured Vista WIM file mounted in this fashion.

For example, you can add a bitmap file to the Windows folder (accessed at c:mountwindows) or add a ReadMe.txt file to the All Users desktop (accessed at c:mountDocuments and SettingsAll UsersDesktop). You can make changes to the default user’s Registry hive using reg.exe (see http://technet.microsoft.com/en-us/library/bb490984.aspx for a complete list of the reg.exe syntax). The following example shows setting the wallpaper for the default user:
- Load the default user’s Registry hive: reg.exe load HKUMount c:mountDocuments and SettingsDefault User tuser.dat.
- Modify the desired setting: reg.exe add HKUMountControl PanelDesktop /v Wallpaper /t REG_SZ /d %SystemRoot%CompanyLogo.bmp.
- Unload the Registry hive: reg.exe unload HKUMount.
If you mount a Windows Vista WIM, you can also use the Windows SIM and Windows Package Manager from the WAIK to manipulate the image further, including performing the following tasks:
• Adding drivers
• Adding language packs
• Adding or removing packages such as security updates or service packs
Microsoft discusses each of these methods in detail at http://technet.microsoft.com/en-us/library/cc732695.aspx.
To save changes that you make to a file system contained in the WIM file using this mounting method, use the following command: imagex /unmount /commit c:mount. Note the /commit option in the command line; without this option, no changes made to the mounted WIM are saved.
The WAIK must actually be installed on the host system to use ImageX to mount images. You cannot simply copy the ImageX executable to a system and use it to mount an image.
Here are several goals for the deployment images:
• Hardware agnostic— Few organizations can actually standardize on a single hardware system for all their desktops, so this goal should be obvious. What might not be as readily obvious is that it is achievable! The main obstacles to this goal are drivers and the Hardware Abstraction Layer (HAL) in Windows XP. Windows Vista (and Windows 7) change the way mass-storage drivers are handled and automatically change HALs as needed, so these concerns are no longer valid for the newer operating systems.
• Universal— Images should be a baseline for all deployments in an organization; they should contain the greatest common denominator of all the desktop needs in an organization. If not everyone requires a specific application, component, driver, and so on, it should not go into the image—you want to layer it on after deploying the image. This simple but important goal greatly affects your success with OSD. Creating an optimal universal baseline relies on your knowledge of the hardware and software in use at your organization and the accuracy of your inventory.
• Deployment speed— Although not as important as the previous goals, deployment speed is still a valid goal and becomes important if the network is not as fast as it should be or a wide area network (WAN) is involved. Applications and components included in an image only slightly increase the time it takes to deploy a system, because they are already installed and do not have to be pulled across the network separately. Applications and components layered on after the deployment might increase overall deployment time significantly because they are pulled over the network. Typically, installations include some files not even installed on the system, such as setup.exe or alternate language resource files (in the form of Dynamic Link Libraries or DLLs), which are installed only on systems supporting those languages. This can have a greater impact than is first realized.
• Ease of maintenance— In traditional, image-only deployment systems, ease of maintenance is typically the most important factor. Creating and updating images is often an intensive and lengthy manual process. Images created for these systems are typically thinner, to avoid putting in any components that might need updating. This ultimately increases overall deployment time and can increase the complexity of the deployment. ConfigMgr automates creating images, greatly easing this burden and freeing you from making decisions about your images that are based solely on maintaining the images.
An additional consideration is whether you can install an application generically or have its internal unique identifiers stripped. Sysprep does this for Windows, and OSD properly prepares the ConfigMgr Client if installed, but you must also think about the applications in the image. Some centrally managed antivirus products have trouble when installed in an image; they customize themselves to the specific system they are installed on and do not behave well when copied to another system as part of an image. This is something to verify with the vendors of the products you plan to incorporate into the image and is an area you should test.
Ultimately, thin versus thick is a moot argument. Every deployment image will probably be somewhere in the middle, and what is right for one organization might not be right for another. Having a thin image, just for the sake of having a thin image, should not be a primary goal. Maintaining images, if it is automated and done correctly, is a minor concern.
Sometimes, hardware differences between references systems can cause problems. If you create the image properly, it can truly be hardware-agnostic. This task is sometimes more difficult in Windows XP than Windows Vista because of HAL issues and SATA (Serial Advanced Technology Attachment) drivers, but it is not impossible. To implement OSD successfully, you should derive a full inventory of all hardware used in the targeted environment. From this inventory, it can be determined if any anomalies exist, if all the drivers are still available from the manufacturer, or if all the systems meet the minimum requirements for the operating system you deploy.
When deploying Windows XP and Windows Server 2003, different HAL types are potentially the biggest obstacle to creating a hardware agnostic image. Here are the six HAL types available:
• ACPI Multiprocessor PC
• ACPI Uniprocessor PC
• Advanced Configuration and Power Interface (ACPI) PC
• MPS Multiprocessor PC
• MPS Uniprocessor PC
• Standard PC
The non-ACPI HALs in the preceding list are legacy types and normally needed only for very old hardware. Based on your hardware inventory, you probably can rule out their use completely.
Tip
The Microsoft TechNet article “Identifying Hardware That Impacts Image-based Installations” (http://technet2.microsoft.com/windowsserver/en/library/942aaa8c-016f-4724-9a0f-04871abadd1a1033.mspx?mfr=true) describes how to identify what HAL a running system uses. Briefly, you must inspect the properties of the hal.dll file located in %systemroot%system32 and compare the file details to the chart in the article.
You can identify the exact HAL in a captured image by right-clicking the image in ConfigMgr and choosing Properties. In the resulting dialog box, choose the Images tab at the top; see Figure 19.2 for an example.

Eliminating legacy hardware typically leaves the three ACPI HAL types that follow three rules for imaging:
• Images created with ACPI Uniprocessor PC HAL— You can deploy these images to hardware requiring either ACPI Uniprocessor or ACPI Multiprocessor HALs.
• Images created with ACPI Multiprocessor PC HAL— You can deploy these images to hardware requiring either ACPI Uniprocessor or ACPI Multiprocessor HALs.
• Images created using the Advanced Configuration and Power Interface (ACPI) PC HAL type— You cannot use these images on systems requiring either of the other two HAL types. Luckily, hardware requiring this HAL type is outdated and no longer common.
This means you have to create only one image to support all your systems because they all require either ACPI Uniprocessor or ACPI Multiprocessor HALs. If through trial and error or through your hardware inventory you discover that another HAL type is in use, the only currently supported method of deploying images is to create multiple images, each containing a different HAL.
Mass storage drivers present a similar challenge; because they are essential to booting a system, they are referred to as boot critical. Neither Windows XP nor Windows Server 2003 includes a huge variety of the modern boot critical drivers; this includes a lack of SATA drivers, which are becoming more and more popular. You add boot-critical drivers to Windows XP and Windows Server 2003 in a different way than all other hardware drivers; you see this when manually installing a system requiring a boot-critical driver because you need to push F6 to install the driver during the blue screen pre-installation phase. OSD gracefully handles this situation with little overhead or extra work. Some trial and error testing may be involved, though.
Both Windows Vista and Windows Server 2008 include the most popular SATA drivers out of the box. If you do encounter a drive controller requiring a driver not included out of the box, you can load the driver the same way as other hardware drivers—this is due to an architectural change made by Microsoft in the handling of boot critical drivers in Windows Vista and Server 2008.
Although creating multiple images initially sounds like a hassle, it should not be. If you have properly automated your image build process using a Build and Capture task sequence (discussed in the “Task Sequences” section in this chapter), creating the multiple images is as simple as running that sequence on a system supporting each type of HAL in your inventory. The task sequence is automated, so the images will be identical except for the HAL type that they contain.
In addition, using the magic that is ImageX, these images can be merged into a single file using the /append option: imagex /append <image_path
> <image_file
> <"image_name
"> [<"description
">]. Because of the single instancing of WIM images, the resulting WIM file contains only one copy of each file in common between the images (which will be every file except one, the hal.dll). The result is that the WIM file will be only slightly larger than maintaining separate WIM files for each version.
The only real pain point with this solution is finding a reference system for each type of HAL. Because most of these HALs are legacy and only used on aging or outdated hardware, chances are that you do not have any in your lab and must be creative in procuring one from an active user.
Site systems, introduced in Chapter 2, “Configuration Manager 2007 Overview,” divide the functionality and workload of the various ConfigMgr tasks. OSD, being part of ConfigMgr, also utilizes site systems. Aside from a DP and the ever-present MP, there are also two optional site system roles used by OSD: a PXE service point and a state migration point. DPs serve the same role for OSD that they do in software distribution: to deliver software packages to client systems and are required for OSD to work properly. A site MP is also required to facilitate communication between clients and ConfigMgr, although this chapter does not discuss it because this functionality is not specific to OSD.
The next sections discuss the use of these site systems with OSD.
Distribution points provide clients with all packages defined for use in ConfigMgr. This includes packages specific to OSD including drivers, applications, images, and operating system installs. These packages must be made available on distribution points just like any software distribution package.
Multicasting is a new feature provided by Windows Deployment Services (WDS) in Windows Server 2008; ConfigMgr 2007 Release 2 (R2) can take advantage of multicasting if the DP is installed on a Windows Server 2008 system with the WDS role also installed. Multicasting enables transporting a single stream of data over a network. Clients can then subscribe to this stream of data. The main advantage of multicasting over the traditional unicast model is this single stream of data for multiple destination systems. Unicast communication requires a separate stream of data for every client system.
In addition to WDS, you must install Internet Information Services (IIS) on the site system, including Internet Server Application Program Interface (ISAPI) extensions and IIS 6 management compatibility. Multicasting also requires support and configuration from the network infrastructure; this is beyond the scope of this book and highly dependent on the equipment used in your environment.
A downside for many multicast implementations for image deployment is that you must manually coordinate the start of the data stream. All client systems that you want to receive the stream must be waiting for the stream prior to it being sent. With WDS multicasting in Windows Server 2008, Microsoft implemented a catch-up feature. This enables clients that join a stream midway through to continue to receive the entire stream. WDS tracks when clients join the image stream and replays the stream until all clients subscribed to the stream have received the entire image.
Multicasting is used only for image deployment in OSD; it is not used for any type of package delivery including driver, application, or operating system install. If you plan to use multicasting heavily, this might affect the decisions you make about what to put into the actual image. It might make more sense to make the image fatter to improve distribution times by using multicasting.
To enable and configure multicasting, perform the following steps:
- Install ConfigMgr 2007 R2. (See Chapter 8, “Installing Configuration Manager 2007,” for additional information.)
- In the ConfigMgr console, navigate to Site Management -> <Site Code> <Site Name> -> Site Systems -> <Site System> where <Site System> is the name of the system with a distribution point installed.
- In the results pane, right-click the ConfigMgr distribution point; then select Properties. The ConfigMgr distribution point Properties dialog box opens.
-
Click the Multicast tab (shown in Figure 19.3), and select the Enable multicast check box. You can configure the following from this tab:
• Specify the account to connect to the database— As the text implies, you can specify an alternate account to use to connect to the site database if the Local System account cannot be used.
• Multicast Address— This allows you to specify a specific multicast address according to Request for Comment (RFC) 3171 (http://www.ietf.org/rfc/rfc3171.txt) or obtain one from a DHCP server.
• UDP Port Range— Specify which User Datagram Protocol (UDP) ports to use for multicasting.
• Enable scheduled multicast— Scheduled multicast configures a multicast session to wait for a specific number of clients to join a session or a number of minutes to wait before starting a session. This allows you to coordinate the client systems and ensure they are all online and available before the session starts. The use of the catch-up feature described in the “Utilizing Multicasting” section reduces the importance of this functionality, but it is still available.
• Transfer rate— This setting optimizes the performance of the multicast data stream for the selected network type.
• Maximum clients— This caps the number of clients that this distribution point serves using multicast. This number is cumulative across all multicast sessions.

PXE service points enable the distribution of OSD boot images to clients via PXE (see the “Boot Images” section later in this chapter for details regarding boot images). PXE service points are actually dependent on an installation of WDS; a PXE service point essentially just takes over control of WDS. You can install WDS on Windows Server 2003 and Windows Server 2008 only, and it does not need to be collocated with any other site roles. WDS in Windows Server 2008 adds the ability to multicast images over a network enabled for multicast.
• To install WDS in Windows Server 2003, use Add/Remove Windows Components from the Add/Remove Programs applet in the Control Panel—WDS is listed near the bottom. WDS in Windows Server 2003 actually has multiple modes to support legacy Remote Installation Service (RIS) images; ensure you install WDS in mixed or native mode to support WIM based images.
• To install WDS in Windows Server 2008, use the Add Roles functionality of Server Manager. WDS is typically the last listed role and offers two subservices: Deployment Server and Transport Server. You should select both of these.
You do not need to configure WDS in any way after installing it. ConfigMgr seizes control over WDS after you install the PXE Service Point. If you do configure WDS, conflicts often arise and cause you endless hours of troubleshooting.
Adding a PXE Service Point role to a site system is similar to adding any ConfigMgr role to any other site system. Perform the following steps:
-
In the ConfigMgr console, start by navigating to Site Database -> Site Management -> <Site Code> <Site Name> -> Site Settings -> Site Systems.
• If the system running WDS is not currently a site system, right-click Site Systems; then choose New -> Server. This launches the New Site System Server Wizard. Enter the name of the site system and the intranet accessible fully qualified domain name (FQDN) of the WDS server.
• If the WDS server already is a ConfigMgr site system, right-click the server and choose New Roles. This launches the New Site Role Wizard which looks and acts exactly like the New Site System Server Wizard, except that the wizard has already filled in the site system name and intranet FQDN for you.
- On the System Role Selection page, choose PXE service point.
- Note the information given in the PXE Service Point Configuration dialog box, as shown in Figure 19.4, and click Yes.
-
On the PXE – General wizard page, you have the following choices:
• Allow this PXE service point to respond to incoming PXE requests— This first check box does exactly what it says, enables or disables PXE booting.
• Enable unknown computer support— This option only exists if you have installed ConfigMgr 2007 R2. It enables exactly what the name implies. The “Unknown Computer Support” section describes this capability in more detail.
• Require a password for computer to boot to PXE— This check box requires entering a password during the PXE boot process on the client. If enabled, you must also enter a password.
• Interfaces— On a multihomed system, this section allows you to limit which interfaces listen for PXE boot requests.
• Specify the PXE server response delay— This setting determines how long to wait before responding to PXE boot requests. The setting might help in situations where multiple PXE servers exist on the same subnet.
- On the PXE – Database wizard page, you can choose an alternate account to use to connect to the site database and a certificate to provide mutual authentication during the OSD process. If your ConfigMgr site is not in native mode, the wizard automatically generates a self-signed certificate. If in native mode, you must supply a single certificate that all PXE booted clients can use. See the “Native Mode” section in this chapter for further details.

To review or change any of these settings after you install the PXE Service Point, navigate to Site Management -> <Site Code> <Site Name> -> Site Systems -> <Site System> in the ConfigMgr console, right-click ConfigMgr PXE service point in the right pane, and choose Properties.
PXE service points also become pseudo distribution points, listed alongside all other distribution points when copying packages. You can tell the difference between standard DPs and PXE service points by the addition of “SMSPXEIMAGES$” to the name of the PXE service point as listed in distribution point selection list boxes. You should distribute boot images to PXE service points only because this is the only type of image provided by PXE service points with ConfigMgr OSD.
Tip
Make 32-Bit and 64-Bit Images Available
You should make both a 32-bit and 64-bit boot image available from the PXE distribution point. This enables WDS to deliver boot images to systems with either architecture. The properties of a task sequence determine the actual boot image regardless of the physical architecture of the target system; however, if the target system is a 64-bit system and a 64-bit boot image is not available, the PXE boot will not succeed.
For a complete discussion of troubleshooting WDS and PXE service points, see http://blogs.technet.com/smsandmom/archive/2008/09/17/configmgr-2007-troubleshooting-pxe-service-point-issues-and-wds-service-not-starting.aspx.
The other optional site system role is the state migration point. These site systems store user state data captured from a system. A complete discussion of User State Migration is in the “User State Migration” section in this chapter.
State migration points are simply shared folders on a designated site system. Multiple state migration points are allowed in a site to provide some load balancing and better availability based on connectivity. State migration points are required only if you make use of state migration tasks, described in the “Tasks” section. These tasks automatically contact a state migration point to store and retrieve user state data.
Adding a state migration point to a site system is similar to adding any ConfigMgr role to any other site system. Perform the following steps:
-
In the ConfigMgr console, start by navigating to Site Database -> Site Management -> <Site Code> <Site Name> -> Site Settings -> Site Systems.
• If the system is not currently a site system, right-click Site Systems; then choose New -> Server. This launches the New Site System Server Wizard. Enter the name of the site system and the intranet accessible FQDN of the server.
• If the system already is a ConfigMgr site system, right-click the system and choose New Roles. This launches the New Site Role Wizard, which looks and acts exactly like the New Site System Server Wizard, except that the wizard has already filled in the site system name and intranet FQDN for you.
- On the System Role Selection page, choose State migration point.
-
On the State Migration Point Wizard page, you have the following choices:
• Folders— This list box allows you to designate specific folders on the site system to use. You must specify a specific local path, the maximum number of clients to serve, and the minimum amount of free space on the drive hosting the folder to consider the state migration point healthy.
• Deletion policy— In this section you specify how long to save user state on a state migration point after it is restored.
• Restore-only mode— This mode prevents this state migration point accepting new user state but allows retrieval of previously saved user state data.
To review or change any of these settings after you install the state migration point, navigate to Site Management -> <Site Code> <Site Name> -> Site Systems -> <Site System> in the ConfigMgr console, right-click ConfigMgr state migration point in the right pane, and choose Properties.
From the perspective of a client system involved in OSD, Windows PE is the initial engine of the entire process, making its delivery to a client system critical. Windows PE is contained in the boot images and delivered to a client system in one of three ways:
The next sections discuss these delivery methods.
PXE booting is typically used for bare-metal or new hardware installations when the system does not have a ConfigMgr client agent installed. Using PXE booting requires meeting the following list of criteria:
• A DHCP server must be available for use.
• The network must allow the PXE broadcast packets to reach the PXE server. PXE and DHCP use BOOTP (Bootstrap Protocol), which is a broadcast based protocol. Layer 3 network devices do not pass broadcast traffic by default; the PXE server must be on the same network segment as the client attempting to PXE boot, or you must configure the Layer 3 network devices to forward the broadcasts to the PXE server.
Most organizations already have BOOTP broadcasts forwarded on their Layer 3 devices to support DHCP; configuring them to forward BOOTP broadcasts to support PXE is a nearly identical process with the only difference being a different destination server.
• You must install the boot images on the PXE distribution point. This is a commonly forgotten and misunderstood step. When you add a PXE service point to your hierarchy, ConfigMgr takes over the installation of WDS on the PXE service point system. When installed, the PXE service point then registers an additional PXE-based distribution point, listed along with the other DPs in the hierarchy.
Typically, you use removable media for bare-metal installation of new hardware where PXE booting is not feasible. This includes the following situations:
• Over a WAN because the network will not forward the PXE broadcasts.
• Unavailable because the target system does not support it. (It has been a long time since network cards did not support network boot using PXE, but it is possible.)
• When you want to be absolutely certain that a system does not connect to the network prior to being fully loaded and fully patched to a designated baseline.
• The target system is in a protected subnet such as a DMZ (demilitarized zone, also referred to as a perimeter network) and cannot communicate back to the site system.
You can create images for removable media by right-clicking a task sequence and choosing Create Task Sequence Media. This launches the straightforward Task Sequence Media Wizard, allowing you to choose which type of media to create. You can burn the resulting image to a CD or DVD or place it on a bootable USB device.
You can create three types of task sequence media:
• Stand-alone— Creates a self-contained image that contains Windows PE and all the packages and information specific to a task sequence—except for software updates. Using stand-alone media allows you to run a task sequence on a target system without connectivity to a ConfigMgr site system.
When you create a stand-alone image, the system prompts for a distribution point from which to copy packages. You can set task sequence variables specific to this media image, allowing you to customize the task sequence while knowing that it will not connect to the site server during installation.
The system also prompts you to choose a media size during the creation of the image: 650MB (CD), 4.6GB (DVD), or 8.5GB (DL-DVD). Depending on the size of packages included in the task sequence, there may be multiple images created; choosing the CD image size of 650MB guarantees multiple images. When you boot a system to stand-alone media, it acts as if the task sequence used to create the media was advertised to the system with a mandatory advertisement.
• Bootable— Creates a burnable image of the chosen boot image. This allows the target system to boot into Windows PE as if you delivered the Windows PE image using PXE. You can also initiate the task sequence in a bootable media image from within Windows using the autorun feature of the image. This allows the bootable image to behave as if delivered using a ConfigMgr software distribution.
A new ConfigMgr R2 option in the Task Sequence Media Wizard relevant to bootable media is to enable unknown computer support. This enables the new unknown computer support functionality of R2, as described in the “Using Unknown System Resources in R2” section in this chapter.
• Capture— Creates a CD that allows you to capture a reference system outside of a task sequence; the image is not bootable, and you must initiate it from within an installed operating system using the Autoplay function.
The capture media option launches a wizard that copies Windows PE to a hidden, bootable, file-based partition. It syspreps the system and then reboots into Windows PE where it captures an image of the system. Note that the proper sysprep files must already exist on the target system. The wizard also prompts for a target location, filename, and credentials. Figure 19.5 shows the first screen of the Image Capture Wizard.

The capture media can be useful in a variety of circumstances, such as if you already have a perfect reference system or a perfect process for creating the reference system. Another use of the capture media would be to import an image from a competitive imaging system; you would first deploy the image to a suitable reference system and then recapture it into a WIM format using the image capture media.
The final method of delivering Windows PE is through ConfigMgr itself! If a system already has a ConfigMgr client agent installed and an OSD task sequence is advertised to the client and initiated, ConfigMgr downloads the boot image containing Windows PE to a special pseudo-partition on the hard drive. This pseudo-partition is then set to be the active partition. An automatic reboot is initiated, and the system is booted into the Windows PE image contained in the active pseudo-partition.
The “Task Sequence Targeting” section discusses advertisements further.
Each of the methods just described in the previous sections causes the target system to boot into a boot image containing Windows PE. When in Windows PE, an advertised task sequence is initiated or continued. (The “Task Sequence Targeting” section later in this chapter discusses advertising a task sequence.) The primary reason for using Windows PE is to perform those tasks on the system you cannot perform while the host operating system runs, such as deploying or capturing an image. Windows PE is a robust environment that supports most things available in Windows Vista, including advanced techniques and tools such as scripting and plug-and-play driver detection.
Network access is critical to the success of the task sequence in Windows PE (except for the stand-alone media option). For Windows PE to connect to the network, it must have the proper network drivers installed. OSD uses Windows PE 2.0 (ConfigMgr 2007 RTM) or Windows PE 2.1 (ConfigMgr 2007 Service Pack 1); both versions are based on Windows Vista and use Windows Vista drivers. Integrating new drivers into the boot images is straightforward, and you can accomplish this in several different ways:
• The Import Driver Wizard includes a page allowing you to add drivers to selected boot images.
• You can right-click an already imported driver and choose Add to Boot Image from the context menu.
• The properties of each boot image include a Windows PE page, which contains a list box for drivers. You can click the starburst button at the top to add drivers, as shown in Figure 19.6.

This last method is difficult to use because it only lists simple driver names and not versions or other identifying information.
The Computer Associations node under Operating System Deployment in the ConfigMgr console contains mappings used for User State Migration. These organize the migration of user state and settings from a source to destination computer. The mappings specify source and target systems identified by Media Access Control (MAC) address and the type of migration. There are two types of migrations:
• In-place (which has the same source and destination MAC addresses)
The mapping entries also record the date that state data was captured and restored, the location where state data is stored, and the encryption key for the state data.
For side-by-side migrations, you manually create computer associations. Right-click Computer Association (Site Management -> Computer Management -> Operating System Deployment -> Computer Associations) and choose New -> Computer Association to launch the New Computer Association dialog box, shown in Figure 19.7. This dialog allows you to specify the source and destination computer. You can use the User Accounts tab to specifically limit which profiles are captured. You must create a side-by-side computer association manually before an applicable task sequence is run on a system. If one does not exist, ConfigMgr automatically creates an in-place computer association.

After creating an association, you can right-click it to view the following information:
• Source Computer Properties
• Destination Computer Properties
• User Accounts
• Recovery Information
The next sections discuss recovering previously captured user data and importing computers previously unknown to Configuration Manager.
To recover previously captured user data manually, you must first extract the encryption key and the user state store location from the computer association. These display by selecting View Recovery Information from the context menu of an association used to capture data, as shown in Figure 19.8. You can then pass the key and the state location on a command line to USMT using the /decrypt option. Sample syntax would be

Miguser.xml, migapp.xml, and migsys.xml are the xml configuration files used to capture the state.
If you want to use a new system as a reference computer or deploy an image to a new system using PXE that does not have a client agent on it, you must make the system known to ConfigMgr; this capability is known as unknown computer support. You can do this using a computer association or the MDT, or with the unknown system resources functionality available in R2.
When PXE or a boot disk initiates a deployment, the MAC address or System Management BIOS (SMBIOS) GUID is passed to ConfigMgr. To allow ConfigMgr to respond to an unknown system, create a new system resource specifying either the MAC address or SMBIOS GUID of the unknown system. You do this, in the ConfigMgr console in the Operating System Deployment node, by right-clicking Computer Association and choosing Import Computer Information to launch the Import Computer Information Wizard. The wizard allows you to add a single or multiple computers:
• To add a single computer, choose Import single computer from the first page of the wizard. The next page is the Single Computer page, shown in Figure 19.9. Enter the desired computer name and either the MAC address or SMBIOS GUID of the new system. You can obtain this information when PXE booting a system from the PXE boot screen or by checking the smspxe.log. You can also get this information shipped to you by the computer manufacturer when it sends you the hardware. (Although ConfigMgr administrators often don’t see the shipment manifest.)

Tip
Locating the smspxe.log
If the PXE deployment point is on a site server, the smspxe.log is located in %ProgramFiles%SMS_CCMLogs; otherwise, you can find it in %windir%system32ccmlogs.
You can also specify a source computer to import user and system state settings from; this creates a computer association with the specified computer as the source and the new system as the target.
• Importing computers one at a time can be time-consuming; alternatively, you can import multiple computers at once using a file formatted with comma-separated values (CSV). You can create this file with Microsoft Excel, Notepad, or any other text editor and save the file using plain text format. The file must contain the desired names of the systems and either their MAC addresses or SMBIOS GUIDs, comma-separated. Optionally, you can specify the source computer for user and system state migration.
To import multiple computers, choose the Import computers using a file option from the Import Computer Information Wizard. The wizard prompts you for the CSV file to use and allows you to map the data in the file to the correct columns.
The last page of the wizard is the same whether you import a single or multiple computers: You can choose to add the new systems to the All Systems collection or to one that you specify. You should choose to import the new systems into one of your OSD collections so that the appropriate task sequence-based advertisements also apply to your new systems.
Tip
SMBIOS GUID
The way most PXE boot screens display the GUID does not correspond to the way ConfigMgr expects it; the GUID is the same but displayed differently. The result is ConfigMgr will not find the system, causing the task sequence to be unavailable or the PXE boot to fail. If you choose to use SMBIOS GUIDs, the best place to get them is from the smspxe.log on the PXE service point.
The MDT offers an alternative way to handle unknown systems when PXE booting; it installs a VBScript-based PXE filter that automatically creates a resource in ConfigMgr for systems that do not already have one. This resource is identical to that created with the method just described in the “Using Computer Associations” section.
ConfigMgr 2007 R2 introduces a new method to handle unknown systems: an unknown system resource. You can place this resource in collections using direct membership rules like any other resource in ConfigMgr. ConfigMgr then applies advertisements applicable to this resource to any unknown systems encountered. There are actually two unknown system resources:
• One for x64
• One for x86
In addition to these two new resources, ConfigMgr creates a new collection, called All Unknown Computers. These two resources are initially members of this collection, so you can use it to target OSD deployments.
Unknown computer support in R2 is enabled by checking a check box on the ConfigMgr PXE service point properties dialog box as described in the “PXE Service Point” section in this chapter. You can also enable unknown computer support for removable boot media by checking the Enable unknown computer support check box on the security page of the Task Sequence Media Wizard.
Note
Unprovisioned Computers
Installing ConfigMgr 2007 R2 also adds a new node to the Operating System Deployment subtree in the ConfigMgr console, called Unprovisioned Computers. When ConfigMgr begins an OSD deployment to an unknown computer, it creates a new system resource for the new unknown computer and assigns it a unique identifier. When the deployment finishes successfully, the resource is removed from the Unprovisioned Computers node. If the deployment fails, the resource remains in this node.
In general, the resources in this node are informational only and used to track deployments to previously unknown computers using the new unknown computer resources.
Deployments are based off imported Windows source files or a captured image. You import the source files for Windows into ConfigMgr to create an Operating System Install Package or import a captured image to create an Image Package.
Operating System Install Packages are typically used only to automate creating images and cause the target system to go through a full Windows installation. You create images from a sample reference system as discussed in the “Imaging Goals” section in this chapter. Install and configure this reference system based upon the goals also outlined in the “Imaging Goals” section and the needs of your organization. ConfigMgr is about automation, and OSD is about automating the entire process of deploying a system.
The intent is to automate image creation completely, ensuring the process is repeatable and requires little or no manual intervention. The image you create can make or break the entire process, and this image greatly depends upon the system where you build it.
The reference computer, unlike the software you load on it, should be the least common denominator in your organization. The best system to choose is one that requires no additional third-party drivers (or only one or two at the most); this has become more difficult with Windows XP because its built-in set of drivers are aging but should not be an issue with Vista.
The easiest and recommended way to create an image is to use a ConfigMgr task sequence, built using the Build and capture a reference operating system image option available with the New Task Sequence Wizard. The next sections discuss these steps.
There are a series of things to prepare before creating and using the task sequence. Perform the following tasks:
-
Create an Operating System Install Package. You can use this package to perform a full automated installation of the operating system to the reference system using the source files provided, and it is based upon the source files from a Windows CD (XP or Server 2003) or DVD (Vista or Server 2008). Generally, it is best to use installation media that has the latest service packs slipstreamed into it or manually integrate the latest service pack into the source files. Additionally, you can integrate most XP patches directly into the XP source files, eliminating or reducing the need to install them during the deployment process.
Unfortunately, there is no supported way to slipstream Vista SP 1 or SP 2 into the WIM distributed on the RTM Vista DVD. You must either obtain a DVD from Microsoft containing Vista with the desired service pack already integrated or deploy the service pack as part of the post installation process.
As with all software packages in ConfigMgr, deploy the resulting package or image to the applicable distribution points using the New Package Wizard; because these packages and images tend to be quite large, you should plan accordingly to minimize any impact on the network. Also, allow the appropriate amount of time for these to actually be copied to the proper distribution points before trying to use them.
- Import drivers and create driver packages. The “Image Deployment” section covers drivers in detail.
- Create software distribution packages. The basic Build and Capture task sequence requires several packages, along with some optional ones. The New Task Sequence Wizard prompts you for each of the package types.
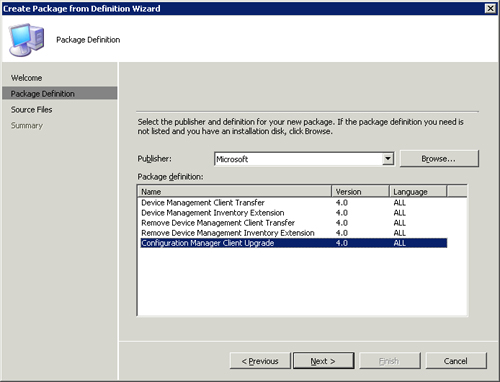
The first required package is for the ConfigMgr client. Create this package with the Package from Definition Wizard, using the Configuration Manager Client Upgrade package definition, as highlighted in Figure 19.10. Set the package to Always obtain files from a source directory. The source files for this package are located at \<Site Server>SMS_<Site Code>client.
Figure 19.10. Choosing the Configuration Manager Client Upgrade definition in the Create Package from Definition Wizard
The second required package is actually for Windows XP/2003 only. This package is for the sysprep files; no programs are necessary. Sysprep is included as part of Windows Vista and Windows Server 2008, and thus a separate package is not necessary to deploy these two operating systems.
Optional packages include any baseline software deployment packages that you want to include in your image and one for your unattended setup files. Here are the unattended setup files:
• Unattend.txt and/or sysprep.inf for Windows XP/Windows Server 2003
• Unattend.xml for Windows Vista/Windows Server 2008
OSD modifies these setup files to include configuration items specified in the task sequence including the product key, username, organization, time zone, domain or workgroup to join, Administrator password, and licensing mode. If you do not supply a package with unattended setup files, ConfigMgr builds them on-the-fly using default settings and settings configured in the task sequence. Packages used for unattended setup files or Sysprep should not have any programs defined in them. These packages are strictly used to make the files available for OSD’s use during the deployment.
When the packages are in place, you can launch the New Task Sequence Wizard from the Task Sequences context menu and create a Build and Capture task sequence. The wizard prompts for the following information:
• Task Sequence Name— This is purely aesthetic.
• Boot image— The boot image is the WinPE image, which delivers the task sequence.
• Operating System Installation Package— Previously created package containing the OS source files.
• Product key— Not required if using Vista because this can be supplied after the installation is complete using a KMS (Key Management Service) or manually.
• Administrator Account Status— You can set the local Administrator account to be disabled by default.
• Join a workgroup or domain— If you choose a domain, you must supply credentials. For a typical build and capture sequence, this must be set to workgroup because Sysprep will fail on a domain joined system.
• Configuration Manager client package— This is the ConfigMgr client package previously created.
• Software updates installation— Specify all, mandatory only, or none.
• Software deployment packages— Packages to include in the image.
• Sysprep package— Sysprep is not required on Vista and Server 2008.
• Image Properties— These are descriptors of the task sequence including the creator of the package, its version, and a description.
• Image Destination— The Universal Naming Convention (UNC) path and filename to the image you create. You must supply credentials for an account capable of writing to the UNC path.
Be aware that this path and filename are static; if you run the same capture task sequence multiple times, it overwrites the same image file. This might be the desired result and should be taken into account.
After creating the task sequence, you can modify it by right-clicking and choosing Edit. It is always a good practice to open the task sequence to verify all steps were created automatically, enter any other optional information, and change the default settings as appropriate. Some things that typically are changed or added include the time zone, the disk format type (by default a full format of the destination volume is performed) and the addition of the unattended files package.
Formatting the Destination Volume
Leaving the disk format type as the default full format can add significant time to deploying the image. A full format of a typical 80GB hard drive takes around 10 minutes. If you have systems with larger drives, this time is increased. To change the format type to Quick, edit the Partition Disk 0 task in the task sequence. Update the volume properties at the bottom of the dialog box by highlighting the Default (Primary) volume and clicking the properties button. From the resulting dialog box, enable the Quick format check box and click OK (see Figure 19.11).

The result of these processes is a baseline image containing an operating system, applications, and customizations you can deploy to any system and layer on top of with further applications and customizations. If set up properly, the image creation process on average-performing hardware should take around an hour for XP/2003 and about 90 minutes for Vista/2008; it will also be completely automated other than turning the reference system on—although this could also be automated using Wake On LAN. Modifying the image in the future is just a matter of updating the task sequence and kicking it off again. This process minimizes the hands-on time involved to create or update your images and ensures that multiple image builds are consistent with each other—making this a completely repeatable process.
It is also possible to create and capture an image manually. The downside to this is it is labor-intensive and prone to human error; the upside is that building the system does not require you to predefine and automate every detail. It also sidesteps some issues involving poorly packaged drivers or applications that are difficult or impossible to install in a silent or automated fashion. Manually configuring a reference system is well beyond the scope of this chapter or book and left to the expertise of the reader.
The best way to capture the system to an image is to use an image capture CD and the following steps:
-
Install Windows—Manually install Windows, updates, and any desired applications and drivers, and apply every last tweak to a reference system. The system should also conform to the following rules:
• Not joined to a domain.
• Does not have the ConfigMgr client installed. This is not a strict requirement but is a best practice.
• Has a blank local Administrator password.
• Windows XP systems require a folder named sysprep in the root of the system partition with the appropriate versions of sysprep.exe and setupcl.exe. You can also include a sysprep.inf file in the folder, but this is not required because you can inject one later or ConfigMgr builds one for you during deployment.
- Create the capture media—Right-click the Task Sequences node under Operating System Deployment in the ConfigMgr console and choose Create Task Sequence Media. This launches the Task Sequence Media Wizard, shown in Figure 19.12, which creates either a bootable USB drive or ISO image (which you can burn to CD or DVD) from a boot image.
- Run Capture—Insert the capture media into the reference system and from within Windows; autorun the media to initiate the capture wizard. The wizard checks for the existence of the sysprep folder and files and then prompts you for a UNC path to create the image at and credentials to access the UNC.

It is also possible to boot into a custom version of Windows PE and manually initiate ImageX:
- Create a bootable Windows PE Image—See Microsoft’s walk-through at http://technet.microsoft.com/en-us/library/cc766385.aspx for complete details. Be sure to include ImageX in the image.
- Install Windows—Install Windows according to the Install Windows step (step 1) in the previous procedure.
-
Sysprep Windows—Run Sysprep from the command line with the following options:
sysprep –mini –quiet –reseal –reboot. - Boot PE—Boot the reference system into Windows PE using the image you created.
-
Map Network Drive—From the PE command line, map a drive letter to the destination share, for example,
net use Z: \<computer><share>and enter the proper credentials when prompted. -
Run ImageX—From the same PE command prompt, run ImageX to capture the image using the following syntax:
imagex /capture [image_path] [image_file] ["name"] <"description">, for example,imagex /capture c: z:MyImage.wim "My Image Name".
Either method creates a WIM file containing an image of your reference system, which is fully compatible and usable by OSD, which also supports images created for use with WDS because they share the same WIM format. OSD does not support RIS images.
Deploying an image is similar in nature to building and capturing one. You start by creating a new task sequence using the New Task Sequence Wizard. Instead of choosing Build and capture a reference operating system image, choose Install an existing image package from the New Task Sequence Wizard. The resulting task sequence contains steps for capturing the current user state, restarting the system in Windows PE, preparing the system, deploying an image, deploying additional applications, and finally restoring user data. Figure 19.13 shows the task sequence produced by running the wizard.

As with the build and capture choice from the New Task Sequence Wizard, there are a series of prerequisite items to create and set up before the wizard can complete successfully.
-
Create an Operating System Image. The deployment uses a WIM file that contains a Syspreped operating system image. This WIM file is one that was previously captured and imported. Simply right-click Operating System Images and choose New to start the New Image Wizard.
Tip
Using WIM Files
Do not use a WIM file directly from a Vista or Windows Server 2008 DVD without first deploying and capturing it as a new image using a Build and Capture task sequence. These WIMs are designed to be used only with the accompanying setup programs. If used directly, among other things, the default Vista WIM image installs to the D: drive instead of the typical C: drive.
-
Create software distribution packages. The only package the basic Image Deployment task sequence requires is the ConfigMgr Client package, which you should have already created when creating the Build and Capture task sequence.
If you use this task sequence to capture or restore user state using the built-in user state related tasks, you need a package containing the USMT files. The best way to create the user state migration tools package is to install USMT on the site system and specify the installation path as the source path for the package, typically %ProgramFiles%USMT301 for USMT version 3.01. The package does not need programs (nor does the ConfigMgr package); it simply makes the files available for use by the task sequence.
Note
Versions of USMT
Microsoft provides both 64-bit and 32-bit versions of USMT for download and installation. To avoid creating multiple task sequences or adding other complexities to a single task sequence, use the 32-bit version of USMT even if you deploy to or capture from 64-bit Windows systems. The tools perform the exact same task, and the 32-bit version runs on 64-bit Windows; however, the reverse is not true.
One other twist is that the 32-bit version does not install on 64-bit Windows, so if your site systems run on 64-bit Windows, install the 32-bit version on an available 32-bit system and copy the entire USMT301 program files folder to your source repository to create the package.
As with the Build and Capture task sequence, optional packages include software distribution packages and a package for the unattended setup files. Software distribution packages in Image Deployment task sequences are delivered after the image is applied to the system. This includes any applications not part of the common baseline of applications already included in the image, or updates or customizations to applications included in the baseline image.
Because Windows is already installed, the only unattended setup file that can be used is a sysprep.inf for Windows XP or unattend.xml for Windows Vista. This file, if present in the package specified, is updated to include the information specified in the task sequence (product key, time zone, domain, and so on) and used for the mini-setup process.
The New Task Sequence Wizard prompts you for each of the package types except for the unattended files package; edit the task sequence to add this package after the wizard completes.
- Import drivers and create driver packages. Although not strictly required, adding drivers to a deployment is highly desirable and is the primary method to make your images hardware agnostic. The upcoming “Drivers” section covers drivers in detail.
You can now launch the New Task Sequence Wizard using the Task Sequences context menu and create an Image Deployment task sequence. The wizard prompts for the following information.
• Task Sequence Name— This entry is purely aesthetic.
• Boot image— This is the WinPE image used to deliver the task sequence.
• Operating System Image— This is the previously captured operating system image.
• Product key— Not required if using Vista because you can supply this after the installation completes using a KMS or manually.
• Administrator Account Status— You can set the local Administrator account as disabled by default.
• Join a workgroup or domain— If you specify a domain, you must supply credentials.
• Software distribution client package— This is the ConfigMgr Client installation package previously created.
• User state migration options— These include whether to capture user state and the package that contains the USMT files, and whether to capture current network and Windows settings.
• Software updates installation— Options are all, mandatory only, or none.
• Software deployment packages— Packages to layer on top of those already included in the image.
After the wizard creates the task sequence, you want to edit the task sequence to ensure it fits your needs. Typically, the first thing to change (as with the Build and Capture task sequence previously covered in the “Creating the Task Sequence” section) is the format type for the partition. In addition, if you want to use an XP-only unattended sysprep.inf file, you should edit the Apply Operating System task to specify which package contains this file.
Depending on a few factors such as destination hardware speed, network speed, image size, user state size, and application installation time, it can take from 10 to 60 minutes (or potentially longer) to deploy an image and have a system up and running ready for the end user. This of course happens in an efficient, zero or limited touch manner.
“Where’s my data?” “Where’s the spreadsheet I worked 20 hours on for the CEO?” “Where’s my irreplaceable wallpaper of my darling grandson Johnny hitting the game-winning homerun?” These are the last questions any helpdesk technician or system administrator wants to hear, especially right after a migration.
User data is the reason that we all exist, and we want to handle it with special care. Adding users’ settings to their data gives us the users’ state. A major goal in any system migration is to prevent users from losing any productive time because they do not have or cannot find their data. Although it is definitely a best practice to have users store their data in a central location, such as a server-based file share or a SharePoint site, this might not be possible for a variety of reasons because your organization might not enforce a centralized storage model. Additionally, central data storage schemes tend to overlook things such as wallpaper, Outlook settings and configuration, and desktop shortcuts, letting these remain local to each system. When performing a migration, you want to capture and restore the users’ state to their new system as seamlessly as possible.
In Configuration Manager 2007, the data archive produced by USMT can be stored locally, useful (but not required) for an in-place migration, or stored on a state migration point. The main benefits of local storage are that it minimizes network traffic and eliminates the need for server-based storage. This allows potentially quicker migrations and indefinite storage of the data archive.
However, in the case of a side-by-side migration, you must use the state migration point. This is essentially a secure file share for storing the USMT-produced archive. ConfigMgr encrypts and tags archives placed here for a specific destination system, using a computer association. If you did not create a computer association before running USMT, USMT creates it specifying the same destination and source systems. ConfigMgr automatically purges the archives placed on a state migration point, based on the settings of the state migration point.
Tip
Capturing User State
You cannot capture user or system state from a system if you boot the system from PXE or directly from bootable media. Both of these methods boot the system directly into Windows PE and not into the existing operating system. This means USMT cannot gather the existing state of the system and its users. The next version of USMT, dubbed USMT 2010, is slated to have this capability, but for now, you must make do without.
The best part about state migration in ConfigMgr is that it is simple and straightforward to set up. The only overhead truly incurred by state migration is storage space, and this is automatically maintained and cleaned. By default, the built-in wizard to create Image Deployment task sequences adds the steps to provision space on the state migration point, capturing user state data and transferring it to the state migration point. It also adds the necessary tasks to retrieve the state from the state migration point and apply it to the destination system.
This default behavior is perfect for an in-place migration and works for a side-by-side migration with several small additions:
• Create a computer association to specify the source and destination systems by choosing New -> Computer Association from the Computer Association context-menu.
If no association exists when storage is provisioned from the state migration point, a computer association is created with the same source and destination as the system being imaged—this is the desired scenario for an in-place migration. Alternatively, for a side-by-side migration, you must manually create a computer association before capturing the user state data; this computer association configures a pre-existing source system and a new or different destination system.
• You also create a new task sequence to capture the user state data. You can create this abbreviated task sequence using the New Task Sequence Wizard, choosing to create either a custom task sequence or an Install an existing image package task sequence, and deleting everything except the three relevant capture state tasks.
Here are the four tasks associated with user state:
• Request State Store
• Release State Store
• Capture User State
• Restore User State
The Request State Store and Release State Store are always used, regardless of whether you capture or restore the user state. These tasks deal with the storage space on the state migration point where the user state data is stored.
The Release State Store task has no options, and the main option for the Request State Store task is determining whether user state is retrieved or stored. This task also either creates or retrieves the encryption key that protects the user state data; the encryption key is stored along with and is specific to a single computer association. As stated earlier in this section, this computer association is created automatically with the same source and destination system if the association does not already exist during a user state capture. If you perform a user state restoration and no computer association exists, the user state tasks are gracefully skipped.
The Capture User State and Restore User State tasks do exactly as their names imply. The two main configuration options for both of these tasks are a required package containing the USMT files and an optional package containing the custom USMT configuration files. Neither package requires any program files because they both just make the necessary files available for ConfigMgr to use. The “Image Deployment” section in this chapter describes creating the USMT tools package.
Task sequences are the core driver for any OSD operation. They consist of a series of customizable tasks or sequentially performed steps. ConfigMgr 2007 advertises task sequences to a collection in a similar fashion to software distribution packages. Many task types are built into ConfigMgr, and the Microsoft Deployment Toolkit adds a handful of useful tasks as well. Additionally, you can create your own tasks using the SDK if you cannot find one that fits your needs.
The New Task Sequence Wizard, available from the context menu of the Task Sequences node, quickly builds one of two default task sequence types or a custom task sequence:
• Build and Capture
• Deploy an Image
These two task sequence types take care of a majority of the scenarios in OSD; however, task sequences are flexible and not limited to what is produced by default. The task sequence editor allows easy customization of the task sequences; you can tailor sequences to the specific OSD needs of an organization—and with a little imagination, software deployment.
The wizard also presents the option to build a custom task sequence; task sequences built using the custom option are initially blank. Figure 19.14 shows the first screen of the New Task Sequence Wizard.
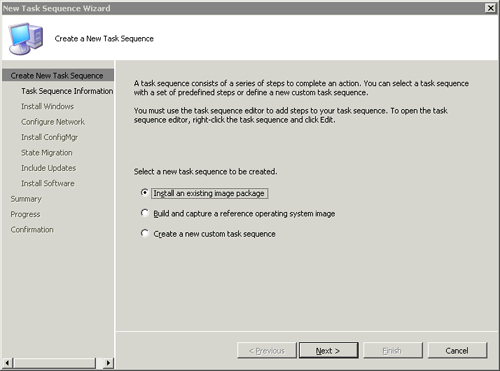
The wizard guides you through creating one of the two sequence types: Build and Capture or Image Deployment, discussed in detail in the sections “Image Creation and Capture” and “Image Deployment.” To edit a task sequence, right-click it and choose Edit; choosing Properties from the context-menu results in the Properties dialog box of the task sequence and not the task sequence editor. Adding a task is simply a matter of choosing the Add drop-down menu, choosing a task category, and then selecting the task. Each task is customizable and has its own configurable parameters.
Note that the capture media type discussed in the “Removable Media” and the “Manual Image Creation” sections is also a task sequence, but you cannot directly view or edit it. It is predefined and embedded in ConfigMgr and only available when you actually create the capture media.
Tasks and task sequences are similar to a macro-based programming language or a storyboard where you put together high-level steps and instructions using a graphical tool, without having to know or learn the syntax of the underlying language to take advantage of it fully. Additionally, third parties can add, and have added, tasks extending this pseudo-macro language enhancing what you can do with task sequences.
A major advantage that task sequences have over the traditional software delivery mechanism used in Systems Management Server and now ConfigMgr is that they maintain a state between steps. This state is embodied in a series of built-in variables and custom variables that survive reboots, allowing you to pass data or configuration items from one step to the next. In fact, the task that the task sequence is currently executing is also part of the task sequence’s state. Variables are encrypted for security when transmitted between ConfigMgr and the target system.
Here are the three types of variables available:
• Action— Specify parameters for specific tasks. Nearly all are directly editable using the task sequence editor.
• Custom— Simple name and value pairs that you can define as you see fit.
• Built-in— Mostly read-only, start with an underscore, are generated automatically by the task sequence, and generally describe the environment where the task sequence executes.
The full list of task sequence action and built-in variables is available at http://technet.microsoft.com/en-us/library/bb632442.aspx. Action variables and custom variables can be set in a number of ways:
• Using a Set Task Sequence Variable task.
• Statically assigning them to a specific computer resource.
• Statically assigning them to a collection.
• Using the Microsoft.SMS.TSEnvironment COM object in a script or other COM compliant language. See http://msdn.microsoft.com/en-us/library/cc145669.aspx for more information on using this COM object.
• Leaving the value of a collection or computer variable blank (new with ConfigMgr 2007 R2). The built-in task sequence UI prompts the user for values for these empty variables. See http://myitforum.com/cs2/blogs/jsandys/archive/2008/12/04/blank-task-sequence-variables.aspx for a detailed description of this capability.
Task sequence variables set by a Set Task Variable task take precedence over computer-specific variables, which in turn take precedence over collection variables. Collection variables propagate down the site hierarchy with other collection settings. You can assign computer variables only at the site the computer is a member of, and they do not propagate up or down a site hierarchy.
You can use variables for the following tasks:
• Conditionally execute tasks. (See an example of this in the “Conditions and Groupings” section.)
• Perform string replacement in command lines. (See the example later in this section and Figure 19.15.)

• Provide task-specific parameter values. (See the example in this section and Figure 19.16.)

• Perform string replacement in unattended files. (See Ronni Pedersen’s article at http://myitforum.com/cs2/blogs/rpedersen/archive/2008/07/01/using-task-sequence-variables-to-customize-deployments.aspx for a detailed example.)
For string replacement and parameter values, surround the name of the variable with % symbols; for example for a variable named MyCustomVar, use %MyCustomVar%. The task sequence engine replaces this with the value of the variable. As an example, Figure 19.15 shows the Run Command Line task. This figure demonstrates adding an entry to the Registry that you can later utilize to track the deployment version used when creating the system. You can supply the actual version by a collection variable or a preceding Set Task Sequence Variable task.
Figure 19.16 shows an example of replacing a parameter in a task. This example shows how you can use multiple product keys in a deployment. You can supply the actual product key in a collection variable or a preceding Set Task Sequence Variable task.
The next section in this chapter gives an additional example of using custom variables.
You can apply conditions to the execution of a task allowing execution only when certain conditions exist or statements evaluate to true—for example, if the operating system type equals Windows XP. This makes task sequences flexible and allows you to build complex, multipurpose task sequences. Add conditions to a task by going to the Properties tab of a task and using the Add Condition drop-down button.
A condition evaluates to either true or false; if all listed conditions evaluate to true, the task executes normally. The task is skipped if any condition evaluates to false.
Conditions can be combined using If statements forming a master conditional statement. Master statements are a collection of substatements; they evaluate to either true or false based upon the logical evaluation of their substatements. There are three types of master statements—each type of evaluation affects how the master statement is evaluated:
• All child statements must be true.
• Any child statement is true.
• No child statements are true.
You can chain If statements to form complex logical statements. If statements in this context closely resemble the traditional logical operators and and or, and can be used in a similar way.
Conditions can be built based on the value of a task sequence variable, the operating system version, a file’s version or timestamp, a folder’s timestamp, a value from the Registry, a WMI Query, or installed software. One thing to be aware of is that conditions are evaluated at the point they are defined in the task sequence. What this means is that if you want to perform a task based on the state of the current operating system after the initial reboot of the system into Windows PE, you must set a conditional variable before the reboot and use that conditional variable to execute the desired task conditionally.
For example, perform the following steps to install Microsoft XML Notepad in an in-place migration, using a task that executes only if the software was installed previously on the system:
- Create a Set Task Variable task before the Restart in Windows PE task.
- Set a variable, such as InstallXMLNotepad, to true.
- Go to the Options tab of this task and add an Install Software condition; use the installation MSI for the product when prompted, XMLNotepad.msi in this case. Figure 19.17 shows the result.
- Highlight the Install “XML Notepad 2007-Per-system unattended” task in the task tree on the left to edit it; this task is shown partially chopped off in Figure 19.17. Change to the Options tab for this task and add a new Task Sequence Variable condition. Set this condition to check for the value of InstallXMLNotepad equal to True.

You can collect tasks into a hierarchy of groups. This allows tasks to be aesthetically organized, and also gives the flexibility of conditionally executing tasks in a group and discontinuing the execution of a group of tasks if one fails, without affecting the entire task sequence. You can add separate execution conditions to each group in the exact same way that you add them to an individual task.
ConfigMgr evaluates each task for its completion state; that is, whether it completed successfully and performs the following actions for an unsuccessful task:
• If a task does not complete successfully, the group containing the task is also set to unsuccessful, and ConfigMgr discontinues processing tasks in the group.
• If the task is not contained in a parent group, then the task sequence itself is set to unsuccessful and terminated.
You can override the default behavior using the Continue on Error option available on the Options tab of each task and group. If the Continue on Error option is set, ConfigMgr ignores the error state of the task or group and processing continues sequentially as if no error occurred. You can find an excellent example of grouping tasks together to control the flow of a task sequence and handling errors at http://blogs.msdn.com/steverac/archive/2008/07/15/capturing-logs-during-failed-task-sequence-execution.aspx.
Here are the six built-in categories of tasks:
Under each category is a set of tasks corresponding to that category. Each task is discussed briefly in the following sections. Note that some tasks must be combined with others and in a specific order for them to make sense—when this is required, it is noted in the discussion of that particular task.
You can disable each task independently using the Options tab; this allows you to disable tasks during troubleshooting.
Options under the General category (shown in Figure 19.18) include the following:

• Run Command Line— This task allows you to run any valid command line that you want in your task sequence, including batch files and VBScripts. If the files referenced in the command line do not exist on the target computer, you can specify a package containing those files. Additional options include specifying a working directory for the command line, and a timeout to ensure that a command does not continue executing if it falls into an infinite loop or becomes otherwise hung.
Because it is possible for multiple return codes to be considered as a successful execution of a given command line, there is an additional option on the Options tab, displayed in Figure 19.19, allowing you to configure numeric return values that should be considered a success. This field should contain integers separated by spaces. Note that only the first value listed can be negative. The typical success code of 0 is listed by default, along with 3010—denoting success with a reboot required.
Tip
DOS Commands
To use a DOS command such as md or copy, you must call the command as a parameter to the command interpreter cmd.exe, for example, cmd.exe /c md NewDirectory.
New in ConfigMgr 2007 R2 is the option to specify the user account that runs the command, which allows greater flexibility. Prior to R2, the command uses the security credentials of Local System.
• Install Software— With this task, you can call any program from any package that you defined as part of software distribution. (See Chapter 13, “Creating Packages,” and Chapter 14, “Distributing Packages,” for information on defining packages for software distribution.) The program must meet three distinct qualifications:
• It must run silently and not interact with the desktop.
• It must run with administrative privileges.
• It must not initiate a reboot; reboots can be handled within a task sequence if needed.
A caveat with program execution is that program dependencies are honored, but programs in the dependent chain are not automatically initiated. For example, if you configure program A to run program B with the Run Another Program First option, program A does not automatically run program B and fails to install unless program B already ran on the system (presumably using another task). This occurs because the Run Another Program First option sets up a dependency chain that is checked before a program is run. In this example, program A depends upon program B. During Software Distribution, this setting automatically causes ConfigMgr to run program B before program A. However, this does not happen with OSD; the dependencies for program A execution are not met, thus causing program A to fail when it executes.
An advanced use of this task is to install multiple applications based on the value of a series of task sequence variables. You must name the variables with a single base name and then append a three-digit, sequential numeric suffix (such as Software001, Software002, Software003, and so on). Each variable should contain a value matching the pattern PackageID:Program Name. A break in the sequence number stops the evaluation of the variables; for example, if you have Software001, Software002, and Software004 and omit Software003, execution of programs stops at Software002.
• Install Software Updates— This task allows you to incorporate software updates into an image, limiting the amount of time spent on updates after deploying the image. The task is also used to layer on updates not included in the image, allowing you to deploy fully patched systems. Updates used for this task are pulled directly from the ConfigMgr Software Updates facilities; these must be configured and performing properly and the ConfigMgr client installed on the target system prior to the task’s execution. You cannot use this task to pull updates from any other source.
There are two options available for this task:
• Install Mandatory Software Updates—These are those options advertised to a collection containing the resource with an installation deadline specified.
• Install All Software Updates—This installs all updates advertised to the collection where the task sequence is advertised.
• Join Domain or Workgroup— Joining a domain or workgroup is a required step during a Windows installation; this task allows you to configure this behavior. If you specify a domain name, you must also specify credentials capable of joining a system to the domain and an Organizational Unit (OU) to place the computer object.
Caution
Do Not Use a Domain User Account to Join a Domain in a Task
Note that by default all Domain Users can only join 10 computers to a domain (see Microsoft KB number 251335 for further details: http://support.microsoft.com/kb/251335). Because of the 10-computer limitation, ensure that the account used in the Join Domain or Workgroup task has higher privileges than a Domain User because that causes unexpected failures in the task sequence after it successfully runs 10 times.
You can use this task to join a system to a domain instead of using the domain join functionality of Windows setup configured using a sysprep.inf or unattend.xml. You can also use this task to unjoin a system from a domain before syspreping.
• Connect to Network Folder— With this task, you can map a drive letter to any shared folder using a UNC while specifying alternate credentials to make this connection. This drive letter is available in subsequent tasks to access resources available in that share.
One common use for this task is to map a drive later used by another task to copy the task sequence logs to that shared folder, and then use it for troubleshooting or tracking purposes. An excellent discussion of this specific troubleshooting step is at http://blogs.msdn.com/steverac/archive/2008/07/15/capturing-logs-during-failed-task-sequence-execution.aspx.
• Restart Computer— As its name clearly states, this task restarts the host computer where the task sequence is currently running. After the restart, the system can be set to boot either into the task sequence’s specified boot image or into the currently installed default operating system. You can specify a message to display on the screen, providing feedback to anyone observing the task sequence’s progress, along with a timeout allowing the observer to initiate the restart manually.
• Set Task Sequence Variable— Setting task sequence variables allows you to configure available OSD-specific deployment options, configure variable application deployments with the Install Software task category, or execute future tasks in the task sequence conditionally.
Conditions can be applied to this step so that the variable is set only when specific conditions exist; you can then configure a future task to be performed based on this variable being set. The “Conditions” section gives an example of this.
A number of configurations are possible under the Disks option (shown in Figure 19.20):

• Format and Partition Disks— This flexible task allows you to configure the partitioning and formatting of all disks in the target system and is a notable improvement over OSD in SMS 2003, which could only easily handle the C: drive. If you plan to handle multiple physical disks, each must have its own instance of this task. Configuration options include specifying the physical disk number and the type of disk to create
• A standard disk using a master boot record (MBR)
• A disk using a Globally Unique Identifier (GUID) partition table, known as a GPT
GPT disks are relatively new to Windows and not supported for boot disks, except on Itanium systems.
In addition to specifying which disk to use and its partitions, you can create individual volumes:
• Each volume can be set to a percent of total space on the disk or hard-coded to a specific size.
• The format type can be specified (NTFS, FAT32, or none).
• The partition can be set to be a boot partition.
By default, a full format of the volume takes place. A full format can add unnecessary time to the task sequence when a quick format is normally sufficient.
The last option for this task allows you to store the drive letter used in a task sequence variable. This allows you to reference files on this volume or use the file system on this volume in future tasks by referencing this task sequence variable.
• Convert Disk to Dynamic— This task converts a specified disk to a dynamic disk. The only configuration option for this task is to specify the disk number to convert.
• Enable BitLocker— Only applicable to systems running Windows Vista or later, this task enables BitLocker on a specified disk. BitLocker encrypts the contents of an entire disk at a low-level. Additional configuration options include the following:
• Where to store the startup key (Trusted Platform Module [TPM], USB drive, or both).
Choosing USB startup key storage requires attaching a USB drive to the system during the execution of the task sequence.
• Where to store the recovery key (Active Directory, or no storage).
• The final BitLocker configuration option chooses whether to wait for full encryption of the drive before the task sequence continues.
Depending on the current contents of the drive, this could be a lengthy process and greatly increase the running time of the task sequence. If you do not choose this option, drive encryption takes place dynamically in the background.
BitLocker requires two NTFS partitions: one for the system volume and one for the operating system volume. The system volume partition must be at least 1.5GB in size and set as the active partition. Create these partitions in a Format and Partition Disk task prior to executing the Enable BitLocker task in the task sequence.
• Disable BitLocker— The exact opposite of enabling BitLocker, this task simply disables BitLocker on a specified drive. Decrypting the drive contents is dynamic and in the background; the task sequence does not wait for completion of this activity before continuing.
A number of tasks are available under User State, displayed in Figure 19.21:

• Request State Store— The Request State Store task attempts to connect to a state migration point prior to capturing or restoring a user’s state data.
If there are multiple state migration points in an environment, the task uses the first one listed on the site’s management point with space available for the capture; for a site with multiple state migration points, each migration point is searched looking for the one with a computer association where the destination system is listed as a target.
You can specify the number of times to retry the connection and the delay between retries, and whether to capture or restore a user’s state. An additional option allows using the Network Access account rather than the Computer account for connecting to the state migration point.
This task creates a computer association if one does not already exist and the Request State Store task is configured to capture the user’s state; this created association lists the target system as both the source and destination, which is perfect for an in-place migration. If you do not want an in-place migration, you must manually create the computer association before the task sequence runs by using the Computer Associations node (Site Management -> Computer Management -> Operating System Deployment -> Computer Associations).
If the task is used to capture user state data, it creates an encryption key that stores the data securely; this key is stored with the computer association. If used to restore the user state data, this task retrieves the encryption key from the computer association.
The computer association also stores the exact path where the files are stored on the state migration point, and the times they were captured and restored. An additional option while creating a computer association is the ability to choose which user profiles to capture—either by using the User Accounts tab or by right-clicking an association after it is created and choosing Specify User Accounts. To recover captured user state data, see the discussion in the “Computer Associations” section in this chapter.
• Capture User State— This task initiates the use of USMT (described in the “User State Migration Tool” section) and captures the user state data using ScanState. A prerequisite for using this task is the existence of a software distribution package containing the files from an installation of USMT. In addition, you would use this task after successful execution of a Request State Store task configured to use for capturing user state.
Additional options for this task include the following:
• Using custom USMT configuration files
• Skipping EFS encrypted files
• Continuing without raising an error if some files cannot be captured
• Verbose logging
You can customize the options passed to ScanState by setting the OSDMigrateAdditionalCaptureOptions task sequence variable. It is also possible to use a Run Command Line task to invoke ScanState manually. Use a Set Task Sequence Variable task to set OSDStateStorePath to the value of _SMSTSUserStatePath and pass OSDStateStorePath to ScanState as the location of the state store; for example, cmd /c scanstate.exe %OSDStateStorePath
% /i:migapp.xml /i:miguser.xml /i:migsys.xml /ui:DOMAIN* /v:1 /l:c: emploadstate.log.
• Restore User State— This is the mirror task for Capture User State and has similar options: a USMT package must exist, specify if using nondefault configuration files, continuation without raising an error when files cannot be restored, and verbose logging.
The one option that is different from a Capture User State task is the addition of a password for migrated local accounts. The password for these accounts cannot be migrated even though their data might be, so you must supply a password to use for all the accounts. You must use this task after a Request State Store task configured for restoring user state.
You can customize the options passed to LoadState by setting the OSDMigrateAdditionalRestoreOptions task sequence variable. It is also possible to use a Run Command Line task to invoke LoadState manually, by using a Set Task Sequence Variable task. Set OSDStateStorePath to the value of SMSTSUserStatePath—the same as when manually invoking ScanState—and pass OSDStateStorePath to LoadState as the location of the state store; for example, cmd /c scanstate.exe %OSDStateStorePath
% /i:migapp.xml /i:miguser.xml /i:migsys.xml /ui:DOMAIN* /v:1 /l:c: emploadstate.log.
• Release State Store— This task has no options and must be preceded by a Request State Store task and either a Capture User State or a Restore User State task.
• If used with a successful Capture User State task, this task tells the state migration point that the capture was completely successful and is ready to restore. The state migration point then marks the user state data as read-only.
• If used with a successful Restore User State task, the task also communicates with the state migration point telling it that a successful restore took place. The state migration point then applies the configured retention settings on this data, allowing the storage space used by the data to be cleaned up.
Tasks in the Images category focus on capturing and deploying images, operating system configuration, Sysprep, and the ConfigMgr client agent. Figure 19.22 displays these tasks.

• Apply Operating System Image— This is the central task in any OSD task sequence and performs one of two things:
• It applies an operating system captured in an image to the target system from an operating system image. This is a destructive operation; OSD wipes the entire partition before delivering the image. You can preserve a single folder from being wiped by setting the _SMSTSUserStatePath task variable.
Tip
Storing User State Locally
To store user data on the local file system without using a state migration point, you must set two task sequence variables:
• _SMSTSUserStatePath
• OSDStateStorePath
_SMSTSUserStatePath must appear before the Apply Operating System Image task to prevent this path from being wiped during the image deployment. OSDStateStorePath actually controls where OSD stores user state data and must be set before executing any user state tasks; it needs to be set to the same path as, or a subfolder of, _SMSTSUserStatePath. To restore user state data from a locally source, set OSDStateStorePath to the correct local path before any user state tasks are executed.
• It installs an operating system on the target system using the original source files from an operating system install package.
The options for this task are to specify a package containing unattended setup files and select a destination—Next available formatted partition, Specific disk and partition, Specific logical drive letter, or Logical drive letter stored in a variable.
If you specify an unattended files package for Windows XP and deploy an image, you should specify a sysprep.inf file. If you deploy an XP setup, use an unattend.txt file. Vista uses the same file format regardless of the type of deployment. If you do not specify an unattended file, ConfigMgr uses an applicable default one.
If you need to create one (or more) of these unattended setup files, Microsoft has kindly provided a couple of tools to facilitate this, depending on the OS you are deploying:
• Windows XP—Setupmgr.exe for Windows XP is contained in the deploy.cab compressed file along with Sysprep. Also contained in deploy.cab is deploy.chm—a help file containing a complete reference to the valid schema and possible settings of the unattended setup files for Windows XP.
• Windows Vista—SIM for Windows Vista is part of the WAIK. A help file is also installed with the WAIK, Unattended Windows Setup Reference.chm, containing a comprehensive reference to the schema of Windows Vista setup files.
• Apply Data Image— This task uses a preexisting image listed as an operating system image and applies it to a data partition. The same options for specifying a destination for the Deploy Operating System task are available for the Apply Data Image task.
• Setup Windows and ConfigMgr—
This task initiates Windows setup for build and capture task sequences or reboots the computer into the deployed, Syspreped image for deployment task sequences. Once the OS setup is finished, it then installs the ConfigMgr client on the target system. The only prerequisite is the package containing the ConfigMgr client, which you must select for this task. Additional command-line options used to install the ConfigMgr client can also be specified, such as /mp and /native.
• Install Deployment Tools— The main job of this task is to make the sysprep files available to the task sequence. The task typically is used only in Build and Capture task sequences. If the operating system version installed is XP (or earlier), a package containing the sysprep files from the corresponding deploy.cab file must be specified. Sysprep is included in the installation of Vista, so this task does not need a separate package when installing Vista.
• Prepare ConfigMgr For Client— This task is required before capturing an operating system image from a target system. It prepares the ConfigMgr client agent to be part of an image by stripping it of any unique identifiers. There are no options for this task.
• Prepare Windows for Capture— This task runs the actual Sysprep on an installed operating system, stripping it of any uniqueness and preparing it for capture in an image. There are only two options available for this task:
• Automatically build mass storage driver list.
The build mass storage driver list option is equivalent to using the bmsd option with Sysprep; it is a rarely used advanced option.
• Do not reset activation flag.
The Do not reset activation flag option is equivalent to the activate option of Sysprep and is used only when you capture an image of an operating system that has already been activated. This option is also rarely used.
• Capture Operating System Image— This task captures an image of the installed operating system on the target system to a WIM file using ImageX. Two parameters are required:
• The first parameter is a filename for the destination WIM file. This filename needs to be fully qualified to include the destination UNC and can be on any accessible folder share; for example, \<servername>CapturesXPBaseline01.wim.
• The second parameter is an account and its associated password with permissions to write to the specified location.
Optional parameters are metadata to associate with the image including the creator, version, and description.
There are two driver-specific tasks, as shown in Figure 19.23. Both tasks inject drivers into an image or operating system during its deployment.

• Auto Apply Drivers— Using this task, you tell the task sequence to first run a plug-and-play check on the target system’s hardware generating a list of plug-and-play IDs; this check emulates the plug-and-play check that Windows setup performs.
The task compares the list of IDs to the driver catalog maintained by OSD; copying those best matched to the target system. In addition, the unattended setup file is modified to reference the copied drivers for usage during the full Windows setup or mini-setup on Syspreped images.
Options for this task include the following:
• Copying the best matched drivers
• Copying all compatible drivers and choosing the categories of the drivers to consider for matching
• Bypass checking of a signature on drivers on operating systems that allow it
• Apply Driver Package— Use this task to tell the task sequence to copy all the drivers in a particular driver package to a target system and update the unattended setup files with those drivers. The Apply Driver Package task skips the plug-and-play pre-check performed by the Auto Apply Drivers task and forces ConfigMgr to copy the specified drivers.
Using this task, you can deploy mass-storage drivers such as SATA drivers to Windows XP and Windows 2003. You would also use this task in cases where the plug-and-play pre-detection used by the Auto Apply Drivers task is not picking up the proper driver or the hardware is not yet attached to the system, as is the case for locally attached printers and scanners.
Options include choosing a particular package, choosing the specific mass-storage device driver to use from the package, and overriding the requirement to use signed drivers.
Tip
Using Mass Storage Drivers
The ConfigMgr development team chose a narrow definition of which driver classes are eligible for deployment as mass storage drivers, also known as boot critical device drivers. As a result, only drivers of the class SCSIAdapter can be considered for mass-storage devices. To use a device with the class hdc, you must edit the oemsetup.txt file and change the class from hdc to SCSIAdapter before you import the driver into ConfigMgr. This is actually a known oversight fixed in ConfigMgr 2007 Service Pack 1.
Settings tasks capture specific settings from a source system and restore them during an in-place migration or allow you to specify the specific settings during a side-by-side migration or new installation. Figure 19.24 shows available settings tasks.
• Capture Network Settings— This task, used for an in-place upgrade, captures the network settings of a source system before wiping the system. These settings are automatically migrated to the system after deploying the operating system and override any settings specified in an Apply Network Settings task. The two network settings that can be migrated are the domain and workgroup membership and the network adapter configuration. If neither option is selected, the task is benign.
• Capture Windows Settings— Similar to the Capture Network Settings task, this task captures specific Windows settings and migrates them during an in-place upgrade; these settings override any settings specified in an Apply Windows Settings task. The Windows settings that can be migrated are the computer name, username and organization name, and the time zone. If you do not select any options, this task does nothing.
• Apply Network Settings— This task sets network settings on a target system including joining a domain or workgroup and network adapter settings. If joining a domain, an account and password must be set that has privileges to join the domain. You can configure multiple network adapters individually; each can be set to use DHCP or a statically assigned Internet Protocol (IP) address. You can also specify static DNS and WINS settings and advanced filtering settings. Settings specified in this task are overridden by those captured using a Capture Network Settings task.
• Apply Windows Settings— This task sets specific Windows settings on the target system including username, organization name, product key, server licensing model, local administrator password, and time zone. Settings specified using this task are added to the unattended setup file in use. A product key is not required for Vista or Windows Server 2008 because these products automatically operate in an evaluation mode that does not require a product key for 30 days. Settings specified in the task are overridden by those captured using a Capture Windows Settings task.
The Run Command Line task is your ticket to infinite customization of a task sequence. It provides the ability to run any command already available in Windows or that you include in a package. Figure 19.15, displayed previously, is an example of how to update the Registry. You can also import a Registry file using regedit.exe, run a custom script, or install an otherwise annoying device driver from a vendor-supplied .exe.
Using a Run Command Line task, you can add a user interface that enables users to provide input into your task sequence. An excellent example of this is the OSDAppChooser, available at http://osdappchooser.codeplex.com.
Another example of using a custom executable from a Run Command Line task is presented by Hewlett Packard (HP) in “Deployment of HP ProLiant Servers Using System Center Configuration Manager 2007 White Paper,” available at http://h20392.www2.hp.com/portal/swdepot/displayProductInfo.do?productNumber=HPSCCMOSDWP. The document details the use of the SmartStart Scripting Toolkit to provision ProLiant server hardware automatically during a deployment. This includes things such as firmware upgrades, BIOS settings, and physical drive preparation.
The Microsoft Deployment Guys (http://blogs.technet.com/deploymentguys/default.aspx) present a handful of very useful scripts to run using a Run Command Line task. Many examples are geared toward the MDT, but are applicable to OSD with some minor tweaking in a few cases.
The possibilities are limited only by your resourcefulness and ability. With a little elbow grease and an example or two, you should be able to find or create a script or executable that automates anything and everything required by your deployment.
Task sequences are advertised to collections in a manner similar to software distribution packages. To create a task sequence advertisement, right-click the desired task sequence and select Advertise; this launches the New Advertisement Wizard (shown in Figure 19.25), which is nearly identical to the Software Distribution New Advertisement Wizard. Reinforcing their similarity is the fact that task sequences advertisements are actually stored under the Software Distribution -> Advertisements node in the ConfigMgr console.

The wizard steps you through the process of creating the advertisement by prompting you for the following information:
• Target collection
• Include subcollections
• Advertisement start time
• Advertisement expiration time
• Mandatory advertisements times
• Priority (for site-to-site task sequence distribution)
• Distribution point retrieval method; you can download content locally when needed, download all content before starting, access content directly
• Use remote distribution point when no local one is available
• Use an unprotected point when no protected one is available
• Display reminders
• Show task sequence progress
• Security
Tip
Multicasting and Distribution Points
If you use multicasting to deliver an image, be sure the distribution point retrieval method is set to download all content before starting the task sequence. Multicasting is not an on-demand delivery system and cannot be used with the option to access content directly from a distribution point, which essentially is on-demand.
A good approach is creating a set of collections with permanent advertisements. When you need to use a specific task sequence, you can just add the resource to the collection. For example, in a simple scenario where you plan to use a build and capture task sequence, such as a task sequence to deploy an image and a task sequence to capture user settings only, you can build a parent collection with three child collections named for the task sequence advertised to it, as displayed in Figure 19.26.
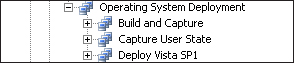
This technique works well for systems that have a ConfigMgr client agent on them already; you simply use a direct membership rule to add them to the collection. For those systems without a ConfigMgr agent, the “Unknown Computer Support” section discusses several approaches.
Using nonmandatory advertisements requires user intervention because a prompt appears forcing the choice of which task sequence, if any, to run. This might be desirable and is something to consider when designing your collections. To maintain the zero-touch approach, it is best to create one collection per task sequence and use mandatory assignments for each task sequence. If some user or technician intervention is acceptable, using nonmandatory assignments can simplify your collection hierarchy. A menu displays all task sequences available to a system, and the current operator of the system can choose which one to run.
You must create an advertisement for a task sequence regardless of which method you choose to deploy the task sequence: PXE, media, or ConfigMgr. If you use PXE and mandatory advertisements, subsequent PXE-based boots of the same system ignore the advertisement. If this is not desired and there is a need to rerun the advertisement, right-click the computer resource and select the Clear Last PXE Advertisement option. You can also do this for an entire collection.
Nothing is specifically built-in to assist in managing changes for task sequences, although there are several things you can do to avoid losing work:
• Always duplicate a task sequence for backup purposes after it is created, and any time you are about to edit. This is an easy and quick step you can perform by right-clicking any task sequence and clicking Duplicate. You can also set up a dedicated folder to move your duplicates into to avoid clutter.
• Export the task sequence from the ConfigMgr console by right-clicking it and choosing Export. This exports the task sequence to an XML file that you can enter into a source control system or just store in a file system. You can re-import exported task sequences by clicking on the Task Sequences node and choosing Import. Note that passwords and Windows product keys are stripped from the exported XML files.
Exporting task sequences to XML files is also an approach for copying a task sequence to an unconnected ConfigMgr site. You simply need to copy the exported XML file to a location accessible by the destination site and import it. Copying a task sequence to an unconnected site does add a few complexities though because task sequences depend on packages. The exported XML file contains references to packages and their IDs on the source site; these will, of course, not exist on the destination site and must be created. You also need to update the task sequence to reference the proper Package IDs and add in any necessary passwords and product keys.
For connected ConfigMgr sites, task sequences, like most other objects created in ConfigMgr, flow down a hierarchy of child sites. This allows you to create a master task sequence at a parent site for use at child sites. You must also ensure that the packages referenced in the task sequence are available to child sites.
The two default task sequence types, Build and Capture and Deployment, are useful when beginning your use of OSD and task sequences. However, do not lock yourself into the tasks the New Task Sequence Wizard places into these default task sequences. These two task sequences are just starting points for all but the most basic deployments. Remember that they are fully editable, allowing you to customize them as much or as little as you want. Ultimately, using these two task sequence types is not even required. You could start from a blank task sequence by choosing Custom in the New Task Sequence editor and start with a completely clean slate.
Interestingly enough, although task sequences are built for OSD, you can use them for software deployment or any other system configuration activity requiring multiple steps and possibly state maintenance during those steps. This gives rise to the scenario of allowing the activity to continue even after a reboot.
Many in-house or legacy applications require installing multiple packages or performing other configuration tasks in a specific sequence while also surviving a single or multiple intervening reboots. Repackaging these installations often proves challenging if not impossible because of their nature. Task sequences are a perfect way to accomplish the many steps involved in these types of installations.
Successful use of OSD, similar to using ConfigMgr in general, requires some time to become familiar with all the capabilities of the tool and the prerequisites for each step. When you know what each step in the process is for and the mechanics behind each step, proper setup and configuration becomes second nature. (A good reference book always helps, too.) The following sections discuss some items to verify in your environment, ConfigMgr setup, and configuration to try to prevent OSD issues.
When you set up your task sequences, ensure each package referenced in a task is available on a DP. For any package to be available for client use in ConfigMgr, you must install it properly on a distribution point that is accessible by the destination client. This includes installing packages for the boot images, operating system image, operating system install package, USMT, ConfigMgr client agent, Sysprep, unattended setup files, drives, and software. At the beginning of the execution of each task sequence, each package referenced in the task sequence is checked to ensure it is available to the client. If it is not available, the task sequence fails and terminates.
To determine quickly the packages required by a task sequence, select it in the console. The lower half of the pane displays two tabs—General and References. The References tab lists all the required packages, as shown in Figure 19.27.

True zero-touch deployments using PXE deployment and Windows PE might cause major problems. If users accidentally set network boot as their default boot option, their system might boot straight into Windows PE using PXE and begin deploying an image, wiping their system! Although this scenario assumes a few details (including the use of either Unknown Computer support in R2 or the MDT PXE filter), it is possible—and stories are floating around Microsoft of this situation coming to fruition and wiping an executive’s laptop! If you use PXE, make sure you limit it to a controlled subnet or put other measures in place to ensure this situation does not cause you to have to update your resume.
A mistake often made is adding Windows XP drivers to the boot images. This typically will not work because ConfigMgr 2007 uses a version of Windows PE based on Vista. In addition, there is generally no need to add drivers other than network drivers and sometimes mass-storage drivers to the boot images. The only critical functionality during the PE deployment phase is network and local drive access. The built-in Vista drivers handle everything else necessary including mouse, keyboard, video, and standard disk access.
If you previously used a desktop or laptop in your organization, you might need to resolve the conflicting hardware IDs. ConfigMgr builds unique hardware IDs for each system it manages based upon the installed hardware. ConfigMgr also assigns a random GUID to each managed resource when the resource is assigned to a site. The hardware ID does not change if a system is reloaded or reimaged, but ConfigMgr has no way of discerning your intentions with the system and does one of two things:
• Creates a new GUID and resource record
• Drops the resource into the Conflicting Records section
Chapter 12, “Client Management,” discusses resolving conflicting hardware IDs.
When a task sequence is about to begin, it verifies that all dependencies are accessible from an available distribution point. The task sequence will end if dependencies are not accessible:
• If you used a mandatory advertisement for the task sequence, the system simply reboots without warning (possibly causing an endless cycle with Windows PE starting and then rebooting).
• Nonmandatory task sequences display an error message and a 15-minute countdown before rebooting. As of SP 1, the error message does usually indicate which dependency is inaccessible.
Another way to determine which dependency is inaccessible is to review the smsts.log file (discussed later in the “Troubleshooting” section) on the target system.
A continual problem with Windows XP deployments is the dreaded Überbug. This Windows XP-only problem is the result of the new way Windows Vista partitions disks and a conflict with some system BIOSes. The Überbug causes a blue screen with the error code 0x000000ED, which appears after successfully deploying the image and completing mini-setup. Microsoft KB article 931760 (http://support.microsoft.com/kb/931760) describes two methods and a hotfix to fix this bug. The hotfix described in the article is only applicable to Windows XP with Service Pack 2 because it is included in Service Pack 3. You can let ConfigMgr automatically apply the registry fix described in the KB article in a task sequence by setting the OSDDiskpartBiosCompatibilityMode to True, using a Set Task Sequence Variable task, as shown in Figure 19.28. You must place this task before the Format and Partition task.

Always test, test, and test some more. Because there are so many different variables in a deployment process, some under your control and some not, you should test your deployments thoroughly. Here are some things you can do:
• Test each model of workstation, laptop, and server you plan to use.
• Test each time that you change a package or add a task to a task sequence.
• Test to ensure that USMT is functioning properly and as expected.
One of the nicest features of OSD in Configuration Manager 2007 is the driver catalog, which stores all applicable drivers for all identified hardware in an organization. The deployment process uses this catalog to identify which drivers to copy to a system. Entries are made to the unattended setup file in use, which effectively adds the drivers to the internal Windows driver catalog. When added to the internal driver catalog, the drivers copied to the system are available for the setup or mini-setup plug-and-play device detection, driver installation processes, and any new hardware additions made to the system.
Adding drivers to the catalog is a matter of right-clicking the Drivers node and selecting Import from the context menu, which launches the Import Driver Wizard that guides you through the process. As you must import drivers from a UNC path, it is a good idea to create a driver repository somewhere on your network to store all the driver files. ConfigMgr 2007 searches all subdirectories of the specified path for valid drivers; the list, displayed by the Import New Driver Wizard, allows you to choose the drivers to import. Figure 19.29 shows the Driver Details page of the wizard.

The Driver Details page of the wizard also allows you to assign the drivers to a specific category. Although you are free to create categories as you want, categories are an optional classification tool because drivers might be members of multiple categories. Categories can be used to version drivers or separate and classify them in some other logical way that makes sense for your organization. You can use categories in the Auto Apply Drivers task to filter those drivers considered for installation but without any other specific function within ConfigMgr.
All drivers must be stored in a driver package, regardless of the task type used to deploy them to a target system. You can create a new package during the Import New Driver Wizard or specify an existing one. These packages are identical to normal software distribution packages—they are containers for files that you must install onto a distribution point for use. One potentially confusing point is that you must specify a source folder when creating the driver package. Although this is equivalent to the source folder of a software distribution package, you do not populate the folder with source files because the Import Drivers Wizard does this. You can also add drivers to a driver package after importing drivers into the catalog by dragging and dropping them from the catalog to a specific package.
Tip
Check Share Permissions
ConfigMgr uses the Local System account of the system hosting the SMS provider to copy driver files to the source folder during the driver import process. Because you must specify a UNC path for the source files when creating the package with the wizard, ensure the share permissions allow the Local System account access if the share is local or the Computer account of the site system has access when the share is remote.
You can organize driver packages in any way that makes sense for your deployments. A recommended approach is to create a package for each PC model to which you deploy a system. Using separate packages allows you to use the Apply Driver Package task to force the use of all drivers for a specific model. Additionally, you should create a package for your Windows XP mass-storage (SATA) drivers and packages for any devices existing in your organization but not necessarily connected to the system during deployment. This includes direct-connected printers, biometric readers, card readers, or scanners.
Here are the two task types used to add drivers to a system during OSD deployment:
• Auto Apply Drivers— Smartly deploy drivers to a target system using a plug-and-play device detection. This plug-and-play detection is separate from the Windows plug-and-play device detection and enables the deployment process to inject only drivers that are applicable to the target system.
• Apply Driver Package— Inject drivers without any detection. The main uses for this task type are to force certain drivers onto a system because the OSD plug-and-play process is not properly detecting devices when you want to add drivers for devices either not connected to the system during deployment, or for Windows XP mass-storage device drivers.
These two task types were described previously in the “Drivers Category” section. The two task types are not mutually exclusive; you can mix-and-match multiple instances of each task type using different options to achieve your desired result.
Tip
Drivers Not Installing
A recent issue plaguing Windows XP SP 3 deployments involves drivers properly identified and copied to the destination system but not installed by the Windows XP minisetup process. To overcome this issue, add a custom Run Command Line task to the Deployment task sequence after the Setup Windows and ConfigMgr task with the following command line:
rundll32.exe Syssetup.dll,UpdatePnpDeviceDrivers
This command initiates a full Windows plug-and-play detection cycle that installs drivers for unknown devices if they are available.
Note that just because you added a driver into a deployment does not mean that Windows will use it. Windows goes through its own plug-and-play process to identify devices and then uses suitable drivers from its internal catalog; the internal catalog includes drivers you injected using one of the two task types. Insiders have described the Windows plug-and-play process as a black art. OSD attempts to replicate it as closely as possible, but there are many complicating factors, including parent-child relationships that hide child devices until the parent drivers are installed. Although the Auto Apply Drivers task works well most of the time, there are times where it simply will not identify and inject the proper driver. In these cases, you can add the problem driver to a driver package of its own and use a separate Apply Driver Package task to inject the driver for use by Windows.
Acquiring device drivers is typically a straightforward process: You visit the hardware vendor’s website and download those drivers listed for the hardware models of interest. Occasionally you will find the drivers are packaged in an installation program. Here are two options for these cases:
• Extract the driver files for the installation program. This is the best option but not always available because extracting them may be an undocumented or unsupported process.
• Create a software distribution package and install the drivers using a Software Install task. If you resort to this technique to install drivers, ensure you use the proper switches to install the drivers silently. You may also want to verify the drivers installed in this fashion are installed only on specific hardware models: Use a WMI query conditional on the task, such as the following example:
SELECT * FROM Win32_ComputerSystem WHERE Model like "%760%"
Use the ROOTCIMV2 WMI namespace for this query and replace the text in the quotes with the appropriate model number. Note that the percent sign indicates the wildcard in WMI Query Language (WQL) and represents zero or more of any character.
To quickly determine what the model attribute is on any system, run the following from a command prompt:
wmic computersystem get model
Because you want your image to be as generic as possible and include only those items existing on every system in your organization, you want to minimize additional third-party drivers in the image itself. Minimizing drivers limits the size of the image; however, it is completely unavoidable to include some drivers—particularly those distributed with the operating system and those required for the reference system itself. This is quite acceptable, and you should not worry too much about additional drivers; most drivers are relatively small, and Windows does not use or load them if they are not for a device currently installed.
There might be occasions when you want to force certain drivers into every image; for example, when users use locally attached devices such as printers, scanners, card readers, or biometric devices not attached to the system during its deployment. If this is the case, then you should make the same choice with these drivers as you do with software. Is the device going to connect to all (or nearly all) systems? If so, then it makes perfect sense to include it in the image. If not, then it should be layered on after the image is deployed using an Apply Driver Package task.
Another common concern voiced is that if you do not include a driver in the image, it will not be available to systems where you deploy the image. This particularly comes up as a concern for the built-in drivers. This is a false assumption. All drivers that come with Windows will still be part of the image unless you go through a lot of pain and effort to remove them.
Few, if any, organizations use the exact same desktop and laptop hardware for all their users. Although this is a desirable goal, it is unrealistic for most organizations because of many factors—the ever-changing model lineup delivered by hardware vendors, the diversity of user requirements, merges and acquisitions, hardware refresh cycles, and so on. Because of this, you end up with a wide range of hardware in your organization and many different drivers. As with software that is not ubiquitous throughout your organization, after deploying the image you need to layer on various drivers by using one of the two driver task types, described previously in the “Drivers Category” section of this chapter:
• Auto Apply Drivers
• Apply Driver Package
Driver management is an oft-discussed topic in the various forums on the Internet, including the main Microsoft Configuration Manager forums. Many different opinions exist on this topic and can be placed on a spectrum with “Control Freak” at one end and “Chaos” at the other:
• Control Freaks only use the Apply Driver Package tasks in combination with the WQL conditional presented in the “Drivers” section to ensure only specific drivers are deployed to systems in a controlled manner.
• Subscribers to the Chaos methodology use only an Auto Apply Drivers task and let chaos reign with driver deployment.
Although neither methodology is necessarily wrong, the reality is that most OSD deployments fall somewhere in the middle depending on the drivers and systems you are deploying. As long as it works for you and enables you to deploy your systems successfully, the methodology you adopt cannot be wrong. An excellent blog post reinforcing some of the information presented here is available at http://blogs.technet.com/deploymentguys/archive/2008/02/15/driver-management-part-1-configuration-manager.aspx.
Because OSD is part of ConfigMgr, deploying a system does not necessarily end after deploying the image. This allows a lot of flexibility in choosing what should and should not be part of an image. This was a major point of emphasis for Microsoft when building OSD into ConfigMgr 2007. Deploying an image is a relatively simple task; the true power of OSD is its capability to perform pre- and post-deployment tasks and allow you as the administrator to customize them for your environment.
For those organizations without a robust software deployment solution, the ability to include more things in the reference image or create multiple reference images might be the only way to deploy software and other customizations. ConfigMgr is a robust software deployment platform, letting you distribute software and other customizations in an automated and controllable way after deploying the image.
You can implement customizations in many different ways, including task sequence variables, static collection membership, and dynamic collection membership.
One of the mistakes often made when creating a reference image is to pack all the registry tweaks and customizations into the image. This is a manual process using .reg files or scripts. There are multiple problems with this approach:
• The customizations are not enforced in any way. Users can undo or change the customization.
• The customization does not uniformly apply to all systems in an organization, specifically those not deployed with OSD or those that might have a different image on them.
• Manual processes are subject to the skill and opinion of the person applying them.
• Script and .reg files are potentially difficult to maintain for those not familiar with them, and you cannot change them after deploying the image to a system.
Using group policies and preferences have none of the disadvantages just listed. By using the built-in policies or a customized ADM or ADMX file, you can change any Registry setting and enforce it uniformly across the organization, using the native Windows GUI policy editor.
Finding and correcting problems in OSD is similar to fixing issues elsewhere in ConfigMgr—look in the logs. The trick, as always, is to find the correct log. You can find a complete list of all OSD logs as part of the log file listing in Appendix A, “Configuration Manager Log Files,” and at http://technet.microsoft.com/en-us/library/bb932135.aspx. OSD has expanded on this by including robust status messages and the OSD home page, which summarizes available information.
The OSD home page is a good place to start reviewing and troubleshooting deployments; you access it by selecting the top-level Operating System Deployment node in the Configuration Manager console. The right pane displays a list of all OSD deployments, their status, and some valuable statistics including running, success, and failure counts. Selecting a specific advertisement in the list displays a summary graph to the right.
The bottom of this home page includes links to other sections of OSD, valuable Web reports, and links to topics in the help system.
Another valuable source of information is the Advertisement Status node under System Status in the ConfigMgr console. Each advertised task sequence has its own entry; these are no different from advertised software distribution entries. Perform these steps:
- In the ConfigMgr MMC, select System Status -> Advertisement Status.
- Drill-down all the way on the tree node and right-click the corresponding site node in the right detail pane.
- From the resulting context-menu, choose Show messages -> All.
- Each task in the task sequence has an entry along with other task sequence status messages. Unfortunately, if the target system does not yet have a ConfigMgr client agent installed, it cannot send status messages back to ConfigMgr. The system caches the messages until there is an installed agent.
After checking advertisement status, the next place to look is in the smsts.log on the target system. This log file lives in various places depending on the stage of the deployment, as listed in Table 19.1. the smsts.log file is a detailed log of every task sequence-related action that takes place on a target system. It usually indicates exactly why a task sequence fails.
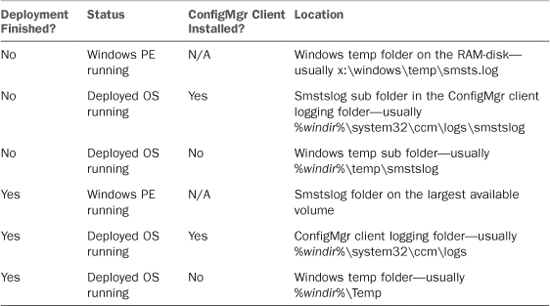
You might also want to check http://blogs.technet.com/inside_osd/archive/2007/12/13/troubleshooting-tips.aspx for additional information. Steve Rachui of Microsoft discusses an excellent method for copying the OSD log files, including smsts.log, at http://blogs.msdn.com/steverac/archive/2008/07/15/capturing-logs-during-failed-task-sequence-execution.aspx.
Running task sequences send status messages back to the server for each step in the task sequence. You can find the last 1,024 characters of stdout/stderr text from each action in these status messages. You can use this information to remotely diagnose a task sequence issue; this is particularly useful if an error occurred in Windows PE and the debug shell is not enabled. The report History – Specific task sequence advertisements run on a specific computer provides a list of these status messages for a specific advertisement and computer; you can open this report from the Reports node in the ConfigMgr console.
A highly recommended troubleshooting step is to enable command line support in Windows PE. When enabled, you can start a separate command line by pressing F8 while a target system is booted into Windows PE. From this command line, you can launch Windows Notepad to view the smsts.log file or otherwise inspect the target system. A common use of this command line is to run ipconfig /all to verify that network drivers have been loaded with proper configuration of IP-related network information. To enable command line support, edit the properties of your boot images by right-clicking them and selecting Edit. Go to the Windows PE tab and check the option to Enable command support, as highlighted in Figure 19.30.

It is possible for a user to intentionally or unintentionally press F8 during the process and gain access to the file system or subvert the process altogether. Because of this, Microsoft recommends that you disable command line support for production deployments.
OSD in a native mode ConfigMgr environment requires one additional certificate. Systems use this certificate when they are booted using PXE or physical media. It allows these systems to authenticate and securely communicate with the ConfigMgr site systems. You can share a single certificate for all OSD deployments; this certificate is used only during the deployment process and not actually installed on the target system.
The requirements for this certificate are as follows:
• The Enhanced Key Usage value must contain Client Authentication (1.3.6.1.5.5.7.3.2).
• The Subject Name or Subject Alternative Name field must be unique.
• The certificate must be stored in a Public Key Certificate Standard (PKCS #12) format file, which must also contain the private key.
• The maximum key length is 2,048 bits.
When you create a PXE service point or task sequence media, ConfigMgr prompts you to create a self-signed certificate or import a certificate. For a native mode site, you must choose to import a certificate and supply the password protecting the certificate file.
You can view imported certificates under the Site Management -> <Site Code> -> <Site Name> -> Site Settings -> Certificates in the Boot Media and PXE nodes. Only two options are available from the context menu of imported certificates: Block and Unblock.
In addition to the new certificate, you must also specify the Root Certificate Authority (CA) certificate to ConfigMgr. You do this on the Site Mode tab of the Site Properties configuration dialog by pressing the Specify Root CA Certificates button, as shown in Figure 19.31.

Although Microsoft supports both in-place upgrades and side-by-by-side migrations from SMS 2003 to Config 2007, you cannot directly transfer any work done in the OSD Feature Pack of SMS 2003. In fact, you must uninstall the OSD Feature Pack from SMS 2003 before you perform an upgrade. Here are some of the limitations:
• The upgrade process creates a new node named OSD FP Packages under the Operating System Deployment node in the ConfigMgr console, with all existing operating system feature pack packages placed under this new node. The node appears until you delete the existing operating system packages.
• You cannot create new advertisements in this node or distribute down-level feature pack operating system images to distribution points.
• Down-level image packages are not available as a choice when choosing an Operating System Image package in the Apply Operating System Image task, although existing advertisements and package deployments for down-level images are upgraded intact and still usable after the upgrade.
• Images created using the OSD Feature Pack are not compatible with OSD in ConfigMgr, and you cannot directly import them. Your only choice here is to re-create the image using one of the methods previously described in the “Operating System Install Packages and Image Packages” section. This could be as simple as deploying the legacy image and manually recapturing it using capture media. However, if the down-level image contains the SMS 2003 client, you should remove the client first.
For the long-term, you should definitely consider revamping your imaging process and use a full-fledged Build and Capture task sequence to create your image.
Is OSD the “killer app” of ConfigMgr? That is ultimately for you to decide based upon your needs. There is no doubt however, that OSD is a serious step up from OSD in SMS 2003 and over any competitive imaging product.
OSD gives you the power and flexibility to deploy server and workstation images regardless of the hardware that you have in your organization. It allows you prepare the hardware and layer on applications, drivers, and other customizations after deploying the image. Infinite customization allows it to fit your every need while also reducing the maintenance overhead involved with manually creating and maintaining multiple images.
The next section of this book moves into administering Configuration Manager 2007, with Chapter 20 discussing Configuration Manager security.