
IN THIS CHAPTER
Desired Configuration Management (DCM) is another exciting new feature of Configuration Manager (ConfigMgr) 2007. Using DCM enables you to monitor, report on, and take action regarding configuration of your managed systems. Unlike the Desired Configuration Monitoring feature pack for Systems Management Server (SMS) 2003, Microsoft has completely integrated DCM into ConfigMgr.
Note
Desired Configuration Management Is Not Desired Configuration Monitoring 2.0
Although the names and functionality are similar, DCM is a completely new component in Configuration Manager 2007. The SMS 2003 Desired Configuration Monitoring feature pack, authored outside Microsoft’s ConfigMgr team, uses the same engine as the popular and useful best-practices analyzers. Conversely, the ConfigMgr development team wrote DCM in its entirety, and it uses its own engine. Thus, the two components are not compatible.
Microsoft provides a conversion tool, converting from the older SMS feature pack to DCM in the ConfigMgr 2007 Toolkit, available at http://www.microsoft.com.downloads. Search for System Center Configuration Manager 2007 Toolkit.
DCM is written to handle four general scenarios that all Information Technology (IT) organizations deal with in one form or another:
• Regulatory compliance— Given the impact of new regulatory laws in the United States covering privacy and corporate responsibility, regulatory compliance is a key scenario for many IT organizations. Examples of these laws include the Sarbanes-Oxley (SOX) Act of 2002, the Gramm-Leach-Bliley Act (GLBA), and the Health Insurance Portability and Accountability Act (HIPAA).
Each of these regulations requires IT organizations to set specific security and privacy standards for corporate and user data, as well as for IT systems. The difficult part for IT occurs when trying to enforce and report on the enforcement of the standards set. Most IT organizations simply have no way to do so, and rely on ad-hoc custom scripts or tools that provide on-demand results. In addition, these laws are not technical in nature. This leads to the actual technical requirements to fulfill the standards being subject to interpretation and varying between organizations—SOX for you is not necessarily SOX for someone else.
Even if your organization is not subject to specific regulatory compliance laws, it should still be subject to internal policies and standards. Validating your infrastructure’s compliance against this internal governance is the same as validating it against governmental standards.
• Pre- and post-change verification— This scenario involves verifying the configuration of a system before and after planned changes. It is typically a good idea to verify you are only applying changes to systems in a specific state, that the planned changes occurred, and unintended changes did not take place.
• Configuration drift— Although obvious when pointed out to most IT administrators, typical IT organizations do not account for configuration drift or its implications on the state of the network.
Configuration drift starts the moment a system goes into production and is difficult to control. No matter how rigorously standard your build process is, as soon as multiple administrators begin logging in to a system to install applications, troubleshoot issues, “tweak” performance, or just make it look like they want it to, the system begins its drift from the standard. Over time, the drift for a particular system is unpredictable and has the potential to cause technical issues.
• Time to resolution— An overwhelming number of problems in the IT world are due to human error. These problems ultimately become the dreaded problem ticket that every on-call administrator loathes, particularly the one in the middle of the night or the one halfway through the fourth quarter of the Super Bowl, the American championship game in professional football. Stopping human error is all but impossible; however, identifying that human error quickly so that it can be resolved is the key to reducing the impact of such errors.
Individually or in combination, each of these scenarios places a burden on IT. There is little reward in successfully handling these scenarios, because they do not directly address or contribute to business objectives. These are typically considered the “un-fun” things in IT, and administrators do not look forward to addressing them.
Although DCM does not necessarily change the nature of these four scenarios, it goes a long way in making the scenarios more manageable and less time consuming, and integrating them into the existing process. This chapter explores the great potential of DCM, how to set it up, configure it, and use it to address these scenarios.
Desired Configuration Management setup is considerably simpler than other features of ConfigMgr because there is no formal site role. The client performs all processing and returns the results to the site server. This section discusses the quick setup of DCM and the rather straightforward configuration options available.
Prerequisites for DCM are client-side only:
• Clients must have the ConfigMgr 2007 Client agent installed
• Clients must have the .NET Framework 2.0 installed
To enable DCM, perform the following steps on the site server:
- Navigate to Site Database -> Site Management -> <Site Code> <Site Name> -> Site Settings -> Client Agents in the ConfigMgr console tree. The middle pane displays all the available client agents, including the Desired Configuration Management Client agent, as shown in Figure 16.1.
-
Right-click the Desired Configuration Management Client agent and choose Properties from the context menu, or simply double-click it to reveal the single-page Properties dialog box for this agent, displayed in Figure 16.2. This page has two options:
• The first option on this page is to enable DCM; it may already be checked depending on the option chosen during initial site installation. That’s all there is to actually enabling DCM—it is either on or off, based on this one little check box.
• The second option is to set the default evaluation schedule for assigned baselines (the “Configuration Baselines” section covers baselines in detail).
As with many other configurable schedules in ConfigMgr, you can choose to use a “simple” schedule that allows the client to determine exactly when the action occurs using a minimum interval. Alternately, you can set a “custom” schedule that defines exactly when to perform the action.
The schedule set here is only the default schedule for newly assigned baselines; you can set a separate schedule for each baseline after you create it.
- Once enabled on the server, the client DCM component will also be enabled on clients after the next policy refresh.


Amazingly, that is it as far as actually configuring the ConfigMgr site and server to use DCM. By itself, DCM will work properly, although it does not include a method to monitor the results. Consequently, you should also set up reporting as described in Chapter 18, “Reporting.” Of course, just turning DCM on and enabling reporting doesn’t tell DCM what to monitor or report on, so you will need to configure the settings and other discrete units of configuration you would like DCM to monitor and report on using configuration baselines and configuration items, as introduced in the next section. You will also want to refer to both Chapter 18 and the “Reporting” section of this chapter for information regarding DCM reports.
DCM operations in ConfigMgr are defined by two object types:
• Configuration items— Those constructs grouping the rules instructing DCM what to monitor and look for on systems
• Configuration baselines— Groupings of multiple configuration items
Instances of these two object types are often called configurations collectively because they define a specific system configuration.
Microsoft built DCM knowing that every IT environment is unique and that configuration standards and requirements in each IT environment are different. Thus, DCM gives you the tools to create configuration items and baselines from scratch according to your individual needs and wants. The built-in editor is straightforward and easy to use, allowing you to create simple to complex configuration items and anything in-between. The following two sections define the details of baselines and configuration items, and the “Console Authoring” section of this chapter discusses using the built-in editor to create and modify them.
Configuration items encapsulate the checks that DCM makes against a system to determine its compliance. Collectively, these checks are called evaluation criteria. To view or edit the configuration items present in a site, navigate to Site Database -> Computer Management -> Desired Configuration Management -> Configuration Items in the ConfigMgr navigation tree. There are four types of configuration items:
• Application— A configuration item of this type checks for the existence of an application and its associated settings. The application’s existence can be assumed, checked by Windows Installer detection, or determined by a custom script.
• Operating Systems— This type of configuration item checks for a specific operating system version and settings relevant to that version. The operating system version can be set by choosing from a drop down list of pre-configured operating systems or by directly setting the version values.
• Software Updates— These configuration items check the patch or update level of a system.
• General— You can use this open-ended configuration item type for any purpose.
Software update configuration items are a special type of configuration item, as they are not listed with the rest of the configuration items in the console and you cannot directly create them like the three other types. These are created when defining a baseline, with their only evaluation criteria the installation status of a specific software update chosen from the update repository. To use software update configuration items, the ConfigMgr Software Update feature, discussed in Chapter 15, “Patch Management,” must be properly configured and working not only to define the software update configuration item, but also to detect its installation status.
There are two property types used to represent the evaluation criteria implemented by a configuration item:
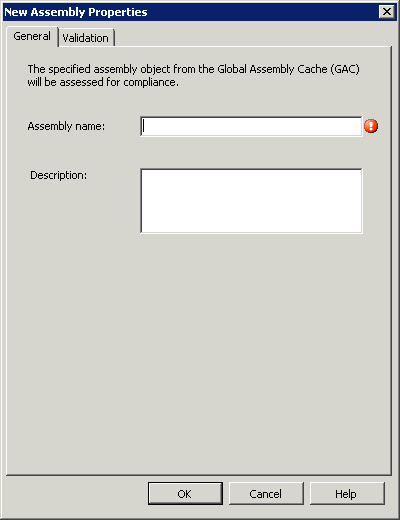
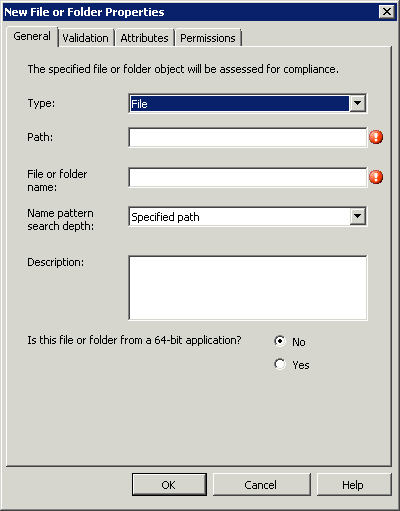
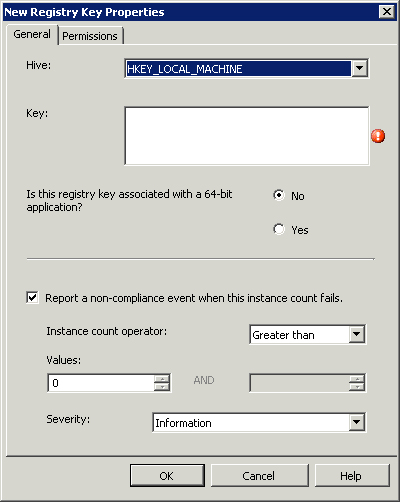
• Objects— Objects check for the existence of discrete entities including files, registry keys, and assemblies in the Global Assembly Cache (GAC), which is the machine-wide cache used to store assemblies designed for sharing by multiple applications on a system. Additionally, objects can also check for the existence of specific permissions on registry keys, files, and attributes on files.
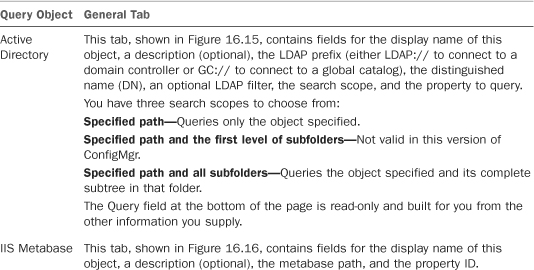
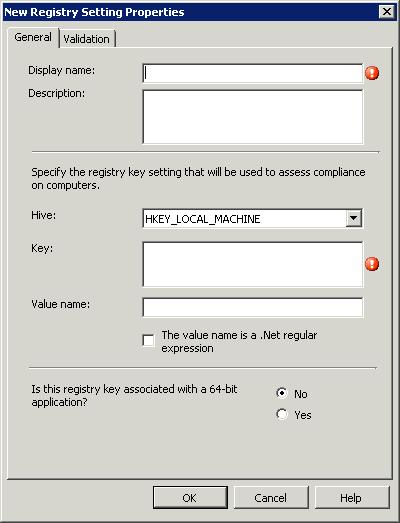
• Settings— These evaluate the return value of queries made against Active Directory, the Internet Information Services (IIS) metabase, the Windows Registry, SQL Server databases, the Windows Management Instrumentation (WMI) repository using WMI Query Language (WQL), or an eXtensible Markup Language (XML) file.
Settings can also use custom VBScript, JScript, or PowerShell scripts to determine compliance. In addition to validating specific values, settings can check the number of values returned from the query or script; referred to as the instance count of criteria validation.
Although not a perfect analogy, you can think of objects as “physical” or tangible items that the operating system uses and manipulates. Settings on the other hand describe how or with what parameters the operating system or an application goes about its many tasks.
Note
Using PowerShell Scripts
Unlike VBScript and JScript, PowerShell is not a core component on all versions of Windows. Thus if you use a PowerShell script, be sure that it is in fact installed on all of the systems where the configuration item will be applicable.
The validation of each criterion and instance count is configured individually to contribute to the compliance status of the configuration item as a whole. Each configuration item has four potential severity levels of non-compliance:
• Information—no Windows event message
• Information
• Warning
• Error
If any criterion fails, the configuration item as a whole is marked as non-compliant for that system. The highest severity level for any failed check, including instance count checks, is used as the severity level for the configuration item. Results of these checks are sent back to ConfigMgr for reporting. Each failed check also produces an event message in the Windows Application Event Log, except for the Information—no Windows event message level.
The combination of the Objects and Settings property types provide a wide range of criteria that DCM can check to determine compliance. The addition of custom scripts, often used with Microsoft sample baselines, gives DCM unlimited customizability and flexibility. The “Console Authoring” section includes a detailed discussion on creating and editing configuration items using the ConfigMgr console.
DCM can restrict the evaluation of application and general configuration items based on Windows platform applicability. This configuration checks for specific Windows platforms and prevents evaluating the configuration item on platforms not specified.
You can organize configuration items in several ways. This includes categories and hierarchies and combining them into baselines:
• Assigning categories— You can assign categories to configuration items (and baselines) to improve filtering and searching in the console and reports, but they ultimately serve no functional purpose. These categories cannot be exported or imported and only exist on the server. Four default categories are created at installation time:
• Client
• IT Infrastructure
• Line of Business
• Server
You can use these categories, delete them, or add new ones; no special functionality is associated with these categories.
• Creating hierarchies— You can organize configuration items into hierarchies by creating child configuration items. Child configuration items inherit all the evaluation criteria of their designated parent; these inherited criteria cannot be changed or removed in the child. You can add additional criterion, differentiating the child item from its parent.
One common use of child configuration items includes specialization of a more general configuration item. As an example, you may create a generic configuration item that checks for organizationwide security standards. You could then create child configuration items to check for the more rigorous security standards of the Accounting and Human Resource departments. This scenario prevents duplication and reduces effort when an organizationwide setting requires changing, because you only need to update the parent to update all the child configuration items. If you are familiar with object-oriented programming, then this concept is very similar to class specialization through inheritance.
• Combining CIs— You can combine configuration items into configuration baselines and then assign the configuration baselines to collections for evaluation. Configuration items can be part of multiple baselines, and multiple configuration items typically combine to create a baseline. The next section discusses baselines.
As stated earlier in the “Configurations” section, configuration baselines group configuration items together; the baselines are then assigned to collections for evaluation. Configuration items are assigned to baselines using rules. Each rule is a list of a specific type of configuration item. Rules available include the following:
• Operating system configuration items present and properly configured
• Application and general configuration items required and properly configured
• Optional application items that are properly configured
• Software updates present
• Application configuration items not present
In addition to the configuration item rules, an additional rule exists to include other baselines. This essentially groups the baselines together and combines their evaluation.
To create a new baseline, perform the following steps:
- Right-click Site Database -> Computer Management -> Desired Configuration Management -> Configuration Baselines in the ConfigMgr console navigation tree and select New Configuration Baseline. This launches the Create Configuration Baseline Wizard.
- The first page, the Identification page, allows you to specify a name for the baseline and choose a category.
-
The second page of the wizard, titled “Set Configuration Baseline Rules” (shown in Figure 16.3), allows you to define the rules previously introduced in this section. You set them by clicking the blue underlined hyperlinks. These launch one of three dialog boxes, depending on the rule you clicked:
• Choose Configuration Items
• Choose Configuration Baselines
• Add Software Updates
Each of these dialog boxes allows you to specify the object indicated by its name using sorting and filtering.

To modify an existing baseline, navigate to Site Database -> Computer Management -> Desired Configuration Management -> Configuration Baselines. Right-click the desired baseline in the Details pane and then choose Properties from the context menu. The baseline properties dialog box contains the following pages:
• General— Displays general metadata about the baseline, including creation and modification times. This page also allows you to set or remove categories from the baseline.
• Rules— Similar to the Set Configuration Baseline Rules page used during the creation of the baseline, this page displays the configuration items and baselines included and allows you to add more by clicking hyperlinks.
• Relationships— This page displays the names of other baselines that include the currently viewed baseline.
• Assignments— This page displays all collections to which the baseline is assigned. You also use the Assignments tab to modify and delete previously created assignments for the baseline.
• Security— This page displays the class and instance security rights for the baseline and is identical to every other security page in ConfigMgr.
You can also view information from all these tabs by selecting any baseline in the Details pane. This displays a Details pane at the bottom of the window with four tabs corresponding to those listed previously (with the exception of the Security tab). These tabs are view-only and offer a quick way to view the details of a baseline without opening the Properties dialog box.
In addition to using the Rules tab of a baseline’s Properties dialog box to add rules, you can select Add from the context menu of a baseline. This gives you a flyout menu (shown in Figure 16.4) with a choice for each of the rule types listed. Selecting one of these works the same as selecting a hyperlink under the Rules tab.

Assigning a baseline is what triggers its evaluation against a set of systems. Collections, being the standard targeting mechanism for ConfigMgr, are what baselines are assigned to. To assign a baseline to a collection, right-click it and then choose Assign to a Collection. This launches the Assign Configuration Baseline Wizard, as displayed in Figure 16.5. This wizard contains the following pages:
• Choose Baselines— Although you launch this wizard by clicking a single baseline, you can select additional baselines for assignment on this first page of the wizard.
• Choose Collection— Using this typical ConfigMgr page, you select which collection to assign the baselines to and whether or not to include subcollections.
• Set Schedule— This last page of the wizard includes two choices:
• Simple schedule
• Custom schedule
By default, the value is set according to the schedule chosen on the Desired Configuration Management Client agent, as described in the “Configuring Desired Configuration Management” section.

Using DCM, configuration baselines are assigned to ConfigMgr collections. The settings and values defined in each configuration item in a baseline are compared against the current configuration of the systems in the collection, according to the evaluation schedule for that baseline. The results of this comparison are returned to ConfigMgr, where you can run a variety of reports to determine how the systems fared on these comparison tests; this is also known as the compliance status of the system.
In addition to simply reporting on the compliance status of systems and collections, you can build collections using this same data to create remediation mechanisms. Because automatic remediation of discrepancies is not a function of DCM, you must implement some other mechanism to correct the configuration of systems. The synergistic functions of ConfigMgr 2007 allow you to create software distribution packages and programs to make these corrections.
As an example, if you create and assign a baseline that checks for the existence of an antivirus product on every workstation in a collection, any systems that fail this check are deemed noncompliant. Typically, an organization reporting the noncompliant status of systems will want to correct those as soon as possible. The approach then is to create a new collection that queries the compliance status of systems against this baseline, and use a software distribution package to install the preferred antivirus product and assign the package to the collection. The “Remediation” section later in this chapter presents an example of this. For complete details of software distribution, see Chapter 14, “Distributing Packages.”
Microsoft understands there are many similarities and common requirements between IT organizations, and has released a large number of configuration baselines to use as a starting point, as a reference, or as complete solutions. These baselines are encapsulated in configuration packs (CPs). Analogous to management packs (MPs) in Operations Manager (OpsMgr), CPs are freely downloadable from Microsoft’s System Center Configuration Manager 2007 Configuration Pack Catalog at http://technet.microsoft.com/en-us/configmgr/cc462788.aspx. Types of available CPs include the following:
• Regulatory compliance— Configuration packs intended for regulatory compliance, such as SOX, HIPAA, and the European Union Data Protection Directive (EUDPD).
• Best practice— CPs based on best-practice configurations used by Microsoft’s internal IT department for major products such as Exchange, SQL Server, and Windows Server.
• Third-party software and hardware— As with the development of OpsMgr management packs, many third parties are starting to create and release CPs to help with your configuration enforcement efforts while using their products.
To import a baseline downloaded from the catalog, you must first extract it from the downloaded Microsoft Installer package. These installer packages do not actually install the configuration pack; they merely extract the necessary cabinet (.CAB) compressed file (similar to a self-extracting executable) to a folder of your choosing. Once this is extracted, perform the following steps to import the CP into ConfigMgr:
- Navigate to and expand Site Database -> Computer Management -> Desired Configuration Management in the ConfigMgr navigation tree.
- Right-click either Configuration Baselines or Configuration Items and choose Import Configuration Data. This launches the Import Configuration Data Wizard displayed in Figure 16.6.
-
Click Add to launch an Open dialog box. Find and select the CAB file for the CP you previously extracted and click Open.
You can add CABs from additional configuration packs by clicking Add again.
To remove a previously chosen CP, select it in the list box and choose Delete.
- Clicking Next takes you to a summary page listing the configuration items and baselines that will be imported.
- Finally, click Finish to import the chosen CPs.

Configuration items in imported CPs are locked, preventing you from modifying them in any way. Locked configuration items are displayed with a lock icon. To use one of these configuration items as a starting point, duplicate it by right-clicking it and choosing Duplicate from the resulting context menu. The duplicated configuration item will be fully editable. It is also recommended to duplicate an existing, known-good configuration item or baseline before editing it. (Known-good refers to an item that has already successfully worked in an environment.) Using this approach provides a solid rollback and baselining mechanism.
Although the CPs available from Microsoft’s Configuration Pack Catalog are quite useful, they do not cover every possibility and are somewhat generic at times. Eventually, you will want to create your own criteria by modifying the CPs provided by Microsoft, or creating your own to evaluate your systems. The next sections discuss this activity, known as authoring.
Customizing configuration baselines and items may be a full-time task, depending on the role set for DCM in an organization. The toolset included with ConfigMgr 2007 provides a rich environment for authoring these objects, although it is not the only way to author them. The following sections discuss how to go about authoring baselines and configuration items using the console as well as a few alternative methods.
The main purpose of the ConfigMgr console in DCM is to organize, assign, create, and edit configuration baselines and configuration items. The built-in toolset for these last two activities—creating and editing—is fairly complete; it allows you to define a wide range of evaluation criteria covering most of the scenarios needed.
To create a new configuration item, navigate to Site Database -> Computer Management -> Desired Configuration Management -> Configuration Baselines in the ConfigMgr console navigation tree and then select New. This results in a flyout menu where you can select to create one of the three creatable types of configuration items. The resulting Configuration Item Creation Wizards for all these types are similar to each other; each has the pages listed in Table 16.1.

Here are descriptions of the wizards:
• Identification— On this page, you set the name of the configuration item and assign any desired categories.
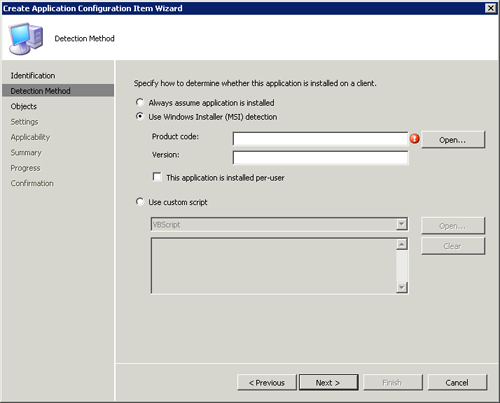
• Detection Method— This page, specific to only application configuration items and shown in Figure 16.7, allows you to configure how the installation of an application is detected. There are three methods:
• Assumption—When this method is selected, DCM simply assumes that the application is installed without a check. Choosing this option is essentially the equivalent of creating a general configuration item.
• Windows Installer (MSI) Detection—This method uses the list of products installed by Windows Installer to determine if an application is installed. If an application was not installed using an MSI, this method is not applicable.
Expected data for this method includes the Globally Unique Identifier (GUID) and the version number for the application. The easiest way to get this information is to click the Open button and select the MSI originally used to install the application. This automatically populates the fields. You can also instruct DCM that the installation was installed “per user” by checking the corresponding box shown in Figure 16.7. This check box is grayed out until you select Use Windows Installer (MSI) detection.
Note
Manually Determining a Product’s GUID
Although not always apparent, most software applications today are installed using an MSI. The MSIs are typically hidden inside of executables and are not directly accessible. During installation, the MSI is extracted from the executable to a temporary folder and then installed from that folder. The easiest way to determine the application’s GUID and version if the MSI is hidden in this way—or not readily available for any reason—is to use WMI, and the easiest way to query WMI is the WMI console (WMIC).
WMIC is part of every Windows installation and invoked from the command line. The September 2006 issue of TechNet contains an excellent article on WMIC, titled “Gathering WMI Data without Writing a Single Line of Code,” available at http://technet.microsoft.com/en-us/magazine/2006.09.wmidata.aspx.
Here’s an example of a WMIC command to query for the GUID and version of all Microsoft Live products:
![]()
This command outputs the product name, GUID, and version for every product that has Live in its name.
• Script—This method uses a custom script—VBScript, JScript, or PowerShell based—to detect the installation of an application. The script should return some text to indicate the successful detection of an installed application and no text to indicate failure. A simple example VBScript to detect the installation of the Internet Explorer Administration Kit 7 follows:

Note
Script Success
Scripts used in DCM are considered to be successful if they output anything to the standard output—often referred to as StdOut. The exact contents of the output are not evaluated; it’s just that something is output. Conversely, if nothing is output, the script is considered unsuccessful.
• Objects— On this page, displayed in Figure 16.8, you choose which objects to evaluate for compliance on a system. To add a check for an object, click New at the bottom of the page (circled in the figure) and choose the type you would like to check for from the pop-up menu. Objects are discussed in the “Objects” section of this chapter.

• Settings— Shown in Figure 16.9, you choose which settings to evaluate for compliance on a system. To add a check for a setting, click New at the bottom of the page and choose which type you would like to check for from the pop-up menu. The “Settings” section discusses possible settings.

• Applicability— Only available on general and application configuration items, this page (displayed in Figure 16.10) sets the Windows platforms for which the configuration item is applicable. If the Windows version does not match, the configuration item is not evaluated. The list of Windows platforms includes all ConfigMgr-supported platforms and is broken down by version, service pack, and hardware platform. You can specify All Windows platforms, or use the list to select one or multiple platforms, making the configuration item applicable to specific Windows platforms.

• Microsoft Windows Version— Shown in Figure 16.11, this page is only available to operating system configuration items, but is very similar in function to the Applicability page described in the previous bullet. The primary difference is you can only specify a single Windows version. You can choose a Windows version from the drop-down at the top of the page or explicitly define the Windows version using the text boxes. If you chose a version from the list box at the top, the text boxes for the version are automatically populated.

The primary evaluation criteria used in configuration items is defined using the Objects and Settings tabs. These are described in detail next.
As discussed earlier in the “Configuration Items” section, objects represent the existence of an assembly, a file or folder, or a Registry key. Each type of check has the definable properties listed in Table 16.2.

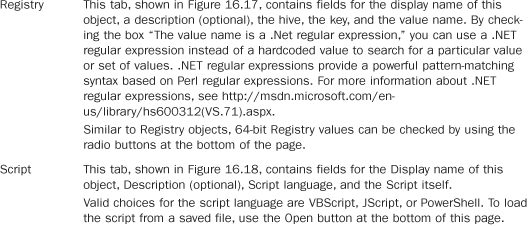
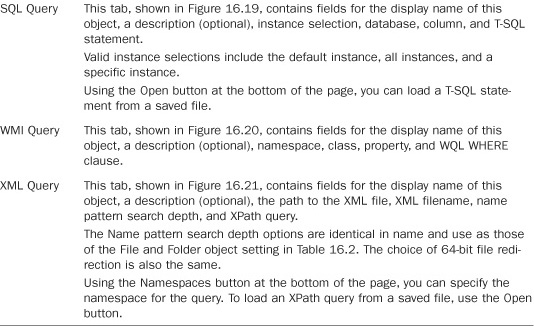
As discussed in the “Configuration Items” section, settings are the result of queries against Active Directory, the IIS metabase, the Windows Registry, SQL Server databases, WMI WQL, an XML file, or a custom script. Each of these query types has the configurable properties listed in Table 16.3.


Each object, other than the Registry object, has a validation tab; by using this tab, you specify the criteria for validating that the object exists. Add criteria in the top list box by clicking the New button. This results in a pop-up menu where you choose from one of the validation properties, as specified in Table 16.2. This opens the Configure Validation dialog box shown in Figure 16.22.
The Name field is a display name for the rule and the Description field is optional. The Setting/Property field is read-only and already filled in based on the selection you made on the New pop-up menu. You have nine operators to choose from for numbers, dates, and versions:
• Between
• Equals
• Greater than
• Greater than or equal to
• Less than
• Less than or equal to
• None of
• One of
String values have 13 possible operators:
• Equals
• Not equals
• One of
• Begins with
• Ends with
• Contains
• Matches
• All Of
• None Of
• Does not begin with
• Does not end with
• Does not contain
• Does not match
For One of, All of, or None of, the Value field can contain a comma-separated list of values. For the Between operator, the second Value field is added to the tab to specify the maximum value. Using Windows environment variables for values is not valid. The Expression field is read-only and built for you based on the choices you make in the tab.
At the bottom of the dialog box on the Validation tab, you set the severity associated with this check failing (also known as a noncompliance event); these are the same levels previously described in the “Configuration Items” section.
Similar to the object validation criteria, every setting also has a validation tab. The primary difference is that with settings, you are not validating the existence of the setting; you are validating the value of the setting and specifying the expected value or values against which to validate the setting. This means you do not choose from a predefined set of properties to validate against; instead, the validation criteria specified are compared against the setting itself as defined on the General tab. As an example, for a Registry setting, the validation criterion that you specify on the Validation tab evaluates the Registry value you specify on the General tab.
One additional property to set for validation criteria on settings is the data type. With objects, you choose from a predefined list of properties so DCM knows what the data type is. With settings, there is no way for DCM to predetermine the data type to decide how the value is compared to expected values. Possible data types include the following:
• String
• Integer
• Date/Time
• Floating Point
• Version
The choice of data type also affects the operators available for the validation criteria, as noted earlier in this section.
The final section at the bottom of the Validation page is wholly enabled or disabled by checking Report a non-compliance event when this instance count fails. This setting performs an additional validation check by counting the number of objects that match the criteria specified on the General tab, and it raises another noncompliance event if the count does not fall within the criteria specified.
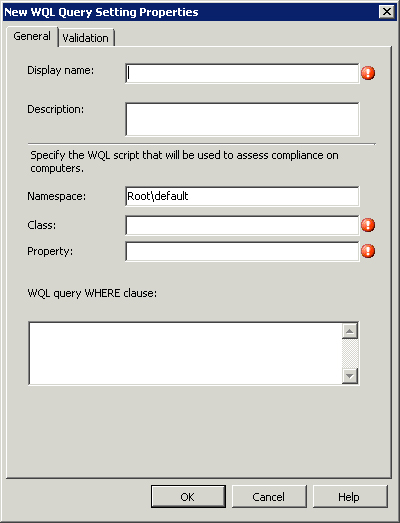
An example of this is definitely in order. Suppose that per organizational standard, each server must have at least two and no more than four SCSI drives, and these must be formatted with 512 bytes per sector. This is a check you will want in a DCM baseline. The following steps outline setting this up:
- Navigate to Site Database -> Computer Management -> Desired Configuration Management -> Configuration Items in the ConfigMgr console tree.
- Right-click the configuration item to add the check to and select Properties, or you can create a new one by right-clicking the Configuration Item in the tree and selecting New.
- Open the Settings tab.
- Click New near the bottom left of the tab and choose WQL Query from the pop-up menu.
-
On the General tab of the New WQL Query Settings Properties dialog box, fill in the criteria as follows (and as shown in Figure 16.23). This query returns a list of all the disk drives attached to the local system that are connected using a SCSI interface.
• Namespace—rootcimv2
• Class—Win32_DiskDrive
• Property—BytesPerSector
• WHERE clause—InterfaceType = ‘SCSI’.
- Open the Validation tab.
- Select Integer for the Data Type setting at the top.
- Choose New at the bottom left of the Details list.
-
Configure the Configure Validation dialog box as follows (and as shown in Figure 16.24):
• Name—Check for 512 Bytes Per Sector
• Operator—Equals
• Value—512
• Severity—Error
- Check the box labeled Report a non-compliance event when this instance count fails.
- Change the Instance count operator to Between and enter 2 and 4 in the Values boxes.
- Change the Severity to Error. Figure 16.25 displays the completed Validation tab.

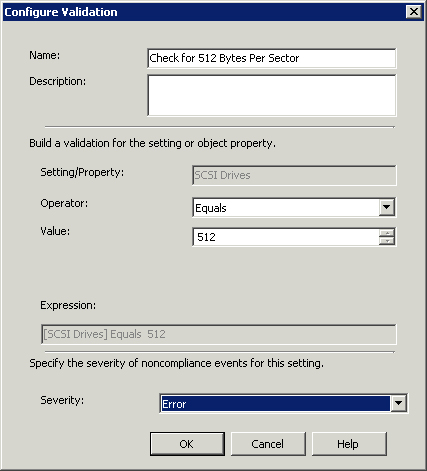

This criterion causes a noncompliance event, with a severity of Error raised according to the stated criteria in step 12.
The biggest challenge when creating custom configuration items is translating the business requirement or user interface–based setting into items DCM expects and can act on. The most common place to store and query settings from is the Windows Registry. Other locations include WMI, Active Directory, and SQL Server. DCM, using one of the object or setting types can evaluate all of these and more.
However, how do you determine where to look in the first place? Many resources can help you with this endeavor. First and foremost is experience with Windows. An intimate knowledge of the Registry and of where Windows stores values will make your task much easier. The ability to write custom scripts and use WMI will also help tremendously. As the old cliché goes, “There’s no substitute for experience.”
Of course, even an intimate knowledge of these things does not mean you know every single Registry key or WMI class available. For that, there is TechNet and the World Wide Web in general. A number of excellent books are also available on these subjects.
An excellent resource is the Microsoft-provided configuration packs. Microsoft has put a lot of work into creating them, and they provide great examples of how and where to find settings. Even if you do not actually intend to use them, it is still a good idea to download and install these CPs just to dissect them and use them as a reference. Many of the evaluation criteria are checked using custom scripts. You can easily copy these scripts and use them in your own configuration items as is or with simple modifications—it is usually much easier to modify someone else’s working script than create your own from scratch.
Registry Monitor (RegMon) and Process Monitor (ProcMon) are some of the greatest all-around Windows utilities available—these are available as free downloads from Microsoft’s Sysinternals site at http://technet.microsoft.com/en-us/sysinternals/default.aspx. (Note that the capabilities of RegMon are rolled into ProcMon and that RegMon does not run on Windows Vista or Windows 2008.) These tools monitor the Registry and record every change made to it, letting you identify the exact location of any modification occurring to a system. As an example, suppose you wanted to create an evaluation criteria to determine if Remote Desktop is disabled but don’t know where this setting is stored in the Registry. After starting ProcMon, simply make the change in the GUI, and the Registry change will be displayed in the ProcMon window. Detailed use of ProcMon is beyond the scope of this book but is straightforward. The help file provided with ProcMon is excellent and an in-depth, on-demand TechNet webcast titled “Advanced Windows Troubleshooting with Sysinternals Process Monitor” is available at http://www.microsoft.com/emea/spotlight/sessionh.aspx?videoid=346.
Profiling a current system is an obvious way to create new configuration items. This involves surveying a system’s current configuration and building configuration data from that configuration. Unfortunately, the built-in ConfigMgr toolset does not have this capability. You will have to resort to a third-party tool to get this functionality. One such tool, CP Studio from Silect Software, is discussed in the “Authoring with CP Studio” section of this chapter.
When editing baselines and configuration items, you can modify one of two parts—the administrative or informational part that does not play a role in evaluation, or the content criteria part that does play a role in evaluation. The properties that make up the administrative part include the following:
• Display name and description
• Categories
• Dependencies (not applicable to configuration items)
• Collection assignments (not applicable to configuration items)
• Auditing information, such as creation times
• Security rights
Only configuration items have a content version; properties that are part of the content include the following:
• The objects and settings assessed by clients
• The validation and validation criteria used during compliance evaluation
• The detection method used for application configuration items
• The applicability criteria for application and general configuration items
Both these parts have separate, independent version numbers that are tracked by ConfigMgr. These version numbers are incremented as you make changes to their respective properties; and it is important to distinguish between the two areas when reviewing the results of an evaluation. The version numbers are displayed in most reports.
A final step after creating a new baseline is to export it. Exporting the baseline gives you a way to share it with others, copy the baseline to a separate ConfigMgr site, edit it in its native Service Modeling Language (SML) format, and back up the baseline. Exporting the baseline creates a CAB file in the folder you specify and includes any contained configuration items. To export a baseline, right-click it and choose Export Configuration Data from the context menu.
Inside the CAB file of an exported baseline is an XML file for each configuration item and the baseline itself. You can actually create or edit these files outside of ConfigMgr, as discussed in the next section, “External Authoring.”
Configuration items and baselines are stored in the SML XML format. SML is an industry-standard language specification that provides a rich method for modeling complex IT systems and services—see http://technet.microsoft.com/en-us/manageability/bb738088.aspx for in-depth coverage of SML, including the SML schema. Not all criteria modeled in SML can actually be displayed or edited with the built-in DCM toolset. However, because SML is the native language of DCM, these criteria are still evaluated and reported on properly.
DCM Digest is another XML format that DCM can use to define configuration items and baselines. DCM Digest is a Microsoft-proprietary modeling language that is dedicated to DCM; complete details of DCM Digest, including the schema, are available in the “DesiredConfigurationManagement_DigestAuthoring.doc” Microsoft Word document in the ConfigMgr SDK (downloadable from http://www.microsoft.com/downloads/details.aspx?FamilyId=064A995F-EF13-4200-81AD-E3AF6218EDCC&displaylang=en_; you can also find the SDK by searching for ConfigMgr 2007 SDK at www.microsoft.com/downloads). ConfigMgr takes configuration data imported from DCM Digest, converts it, and stores it in the site database.
Authoring using one of these XML formats is beyond the scope of this book; please reference the links provided in this section for detailed information on this activity.
Note
Configuration Manager Toolkit
The Configuration Manager Toolkit, which is available for download at http://www.microsoft.com/downloads/details.aspx?FamilyID=948e477e-fd3b-4a09-9015-141683c7ad5f&DisplayLang=en (or search for Configuration Manager 2007 Toolkit at www.microsoft.com/downloads), includes three tools to help author outside of ConfigMgr:
• DCM Model Verification— Used to validate and test configuration items and baselines authored externally from the ConfigMgr console.
• DCM Digest Conversion— Used to convert existing SMS 2003 Desired Configuration Management Solution templates to Desired Configuration Management 2007 configuration items.
• DCM Substitution Variables— Used to author configuration items that use chained setting and object discovery. Substitution variables cannot be created or used by the ConfigMgr built-in toolset but are part of DCM Digest specification.
Why would anyone want to use SML or DCM Digest rather than the built-in editor? Here are several reasons:
• The ConfigMgr toolset cannot model every conceivable evaluation criteria. You may have to resort to one of these languages to implement the checks you want to implement.
• You may be comfortable working with XML. Working with XML gives you fine-grain control over the implementation of criteria and eliminates any abstraction present in the ConfigMgr console.
• Using an XML format provides the ability to create and edit configuration data outside of the console.
The responsibility for creating the configuration data may not lie with a user who has access or should have access to the ConfigMgr console. Although using an XML format is a bit more cumbersome, these types of users can author without being granted privileges within ConfigMgr.
The ability to author configuration data outside of the console definitely has some advantages, as discussed in the “External Authoring” section of this chapter. However, working directly with XML is fraught with issues and not an attractive option to most administrators or to individuals responsible for creating the baselines who may not even be technically inclined. This is where third-party products can be particularly useful; one particular product recommended by Microsoft and the authors of this book is Silect Software’s CP Studio (http://www.silect.com/).
CP Studio offers all the advantages of authoring configuration data outside the console without the requirement of needing to know XML. CP Studio also gives you the ability to create configuration data from an existing system using a profiling process that converts the current state of the system into a baseline. This profiling process enables you to configure a system to your organization’s exact standards and use CP Studio to create a baseline matching that configuration. After importing the created baseline into DCM, you can now verify that all your systems are identically configured with little effort.
CP Studio has three major features:
• Golden Master Creation Wizard— This wizard creates a configuration item from the current configuration of a specified system. The wizard prompts you to select which parts of the system to consider in creating the new baseline. The wizard cannot review every setting on a system because there are countless possibilities, but it does a very good job nonetheless. Figure 16.26 shows this wizard and the possible settings it can use to build the configuration item.

• Criteria Builder— Perhaps the lengthiest part of actually developing a configuration item using the ConfigMgr built-in toolset is jumping around to other tools to build and verify criteria. As an example, to create Registry key object or settings checks, you need to use regedit (or some other Registry editor); for WMI queries you need to use WBEMTest, the Microsoft WMI tools, WMIC (or another tool); and the same goes for each other type of possible criteria.
CP Studio includes built-in criteria builders and browsers for each type of criteria listed in Tables 16.2 and 16.3. Therefore, you do not have to use an external tool to browse for values or create criteria. The built-in criteria builders connect to the local system or remote systems and greatly speed the process. Figure 16.27 displays the WMI query builder.

• Baseline Testing— CP Studio has a built-in testing module that applies a selected baseline, on demand to the local or remote systems, which gives you instant results. This also greatly speeds the development life cycle of a baseline, because using the ConfigMgr toolset you first have to assign the baseline to a test collection, wait for the policy to be downloaded, and then manually log in to the system.
CP Studio does not enable you to build criteria that you cannot build with the ConfigMgr toolset. What it does, however, is offer a layer of abstraction that makes building the criteria easier and much quicker. With the addition of the testing module and Golden Master Creation Wizard, CP Studio can significantly reduce your development cycle for baselines and configuration items.
Building baselines and configuration items—using the built-in toolset, raw XML, or CP Studio—are technical tasks in DCM. Deciding how to use the baseline and configuration items best in your organization is more of a conceptual task that requires planning and forethought. The next section covers some strategies for doing so.
The actual functionality of DCM is relatively straightforward—create a baseline of settings and assign those to a set of systems. However, what do you do then? It really depends on what you are going to do with the data DCM provides.
What are your business goals for using DCM? Are you simply filling a check box for the auditors? Do you want to use reports to help in troubleshooting? Are you wanting to notify the on-call admin when something is amiss? Or do you want nonstandard configurations corrected? Each baseline you create may fulfill one or more of these goals; therefore, the first step for each baseline is to identify its purpose, the target audience, and the delivery method for results. These criteria will define what criteria to include in the baseline.
After you identify these requirements, you can then set out defining the evaluation criteria (as discussed previously in the “Console Authoring” section) and how you enable the target audience to consume the results of the baseline evaluation. The following sections discuss this last mile for the results after performing an evaluation.
Reporting is the only built-in way to view the results of DCM evaluation and the compliance status of your systems according to your baselines. A variety of reports is included out of the box to assist with this, including the following:
• Noncompliance details for a configuration item on a computer
• Compliance for a computer by baseline
• Summary compliance by configuration baseline
• Summary compliance by configuration item
• Summary compliance for a collection by computer
Baseline and configuration item evaluation is a completely client-side task. The results of this task are returned to the site using the new state message mechanism built in to ConfigMgr. State messages are asynchronous messages sent from the client to the management point to report information back to the site. State messages for DCM include XML attachments to report specific details about the evaluation of configuration baselines and items. ConfigMgr consolidates these state messages in the database and makes the results available to end users in reports. See Chapter 18 for an in-depth look at reporting in ConfigMgr. With the excellent flexibility of the built-in classic reporting and the new SQL Reporting Services (SRS) reporting, rich reporting is available through a web browser without giving any type of access to the console. This is great for middle and upper management or those annoying auditors who interrupt you every time they need to see this data.
Note
DCM Scenarios
Of the four scenarios DCM addresses (regulatory compliance, pre- and post-change verification, configuration drift, and time to resolution), only one is not clearly addressed by the reports included out of the box with ConfigMgr—and that is configuration drift. Results from every compliance scan are stored in the ConfigMgr database, so the data for a configuration drift report is indeed available.
However, because of the simplistic single query-based approach, it would be difficult, if not impossible, to use the legacy reporting component to actually create a configuration drift report. The new SRS-based reporting included with ConfigMgr 2007 R2 introduces the ability to create sophisticated and complex reports, including a configuration drift report. Implementation of this report (or set of reports) is left as an exercise for the reader (or a hint to the ConfigMgr development team).
Knowing is half the battle; therefore, reporting is also typically only half the battle. What you do with the information in a report is the other half. Actions can include alerting to make everyone aware of the issue and using an automated mechanism to correct the reported issues.
In addition to using the server-side reporting functionality in ConfigMgr, administrative users can also trigger client-side report generation. After you enable DCM in the console, as described in the “Configuring Desired Configuration Management” section of this chapter, a new tab is available in the ConfigMgr Control Panel applet on all clients, titled Configurations (shown in Figure 16.28). Each baseline assigned to the client is included in the list box. Using the Evaluate button at the bottom of the page, users can trigger the evaluation of selected baselines. Using the View Report button, administrative users can display a report showing the most current evaluation results of the selected baseline. A typical use of this on-demand reporting is for IT personnel to locally troubleshoot or remediate identified noncompliance issues.

DCM, like ConfigMgr as a whole, is not designed to be a real-time reporting or alerting system. However, it is perfectly reasonable to want the results of DCM to raise a real-time alert. The easiest way to accomplish this is in conjunction with Operations Manager.
Three of the four noncompliance severity levels for evaluation criteria drop events into a system’s application event log as well as reporting back to ConfigMgr (as discussed earlier in the “Configuration Items” section of this chapter). One of OpsMgr’s bread-and-butter functions is to skim the event logs of monitored systems. Thus, it is simply a matter of creating a monitor and alert in OpsMgr to look for specific noncompliant events reported by DCM. The steps to create such a monitor and alert are discussed in detail in System Center Operations Manager 2007 Unleashed (Sams, 2008).
If OpsMgr is not present in your environment, you could also utilize custom scripts, another product that skims the event logs, or the great new ability in Windows Server 2008 to perform an action in response to an event.
Simply knowing about an issue using an on-demand report or receiving an alert doesn’t help if the issue identified is causing a security hole or service interruptions for users—what you want is to fix the issue as quickly as possible without human intervention. As was briefly touched on in the “Configurations” section of this chapter, remediation refers to the process of correcting an issue identified, and auto-remediation is having the issue corrected in an automated manner. In both cases, DCM identifies the issue using a baseline assigned to a system in your organization.
The following example creates a ConfigMgr collection based on the noncompliant events raised by a baseline:
- Create a new collection by right-clicking Collections in the console tree (navigate to Site Database -> Computer Management -> Collections) and selecting New Collection from the resulting context menu.
- In the New Collection Wizard, name your new collection and add an optional comment. Click Next.
- On the Membership Rules page, click the new query rule button to create a new query membership rule.
- On the resulting Query Rule Properties page, name the query and click the button labeled Edit Query Statement.
- On the Query Statement Properties dialog box, click the Show Query Language button at the bottom.
- Paste the following query into the text box:
-
Replace
<BaselineName>with the name of the baseline or configuration item you want to remediate. - Click OK on the Query Statement Properties dialog box and OK again on the Query Rule Properties dialog box.
- Finish the New Query Wizard by clicking Next and then Finish.
- Finish the New Collection Wizard by clicking Next until the Finish button is enabled. Then click Finish.
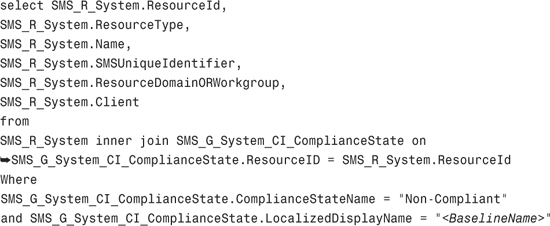
ConfigMgr populates this new collection with systems that have a noncompliant evaluation result from the specified baseline or configuration item.
You can modify the preceding criteria to query for the severity of the compliance failure by using the ComplianceStateName property of the SMS_G_System_CI_ComplianceState class. For complete details of this class, see http://msdn.microsoft.com/en-us/library/cc143662.aspx.
After creating the collection, you create a software distribution package that corrects the issue and assign that package to the collection. The package could be as simple as setting a Registry key to a correct value or reinstalling the antivirus software that an application administrator accidentally on purpose uninstalled. The actual actions performed by the package are up to you and should correct any noncompliant issues that the baseline can identify. Those systems failing the compliance checks in the baseline populate the collection, which assigns them to the package correcting the issue.
Note
Auto-remediation Capability
At first glance, the lack of a built-in auto-remediation capability in DCM may seem like a huge missing piece. However, the question to pose here is, Do you really want the configuration of your working, production systems automatically changed?
In most cases the answer is no, at least not without restrictions. Although group policy does indeed affect changes to systems, the extent of what DCM can check is far greater than group policy and the ramifications are therefore larger. Additionally, for those configuration items such as the existence of an antivirus product, using this approach may not always be straightforward to remediate.
Although the next version of DCM will hopefully include some built-in auto-remediation enablers, the lack of auto-remediation in the current version does not take away from its usefulness and power.
As with all automated systems, many assumptions are made about the environment where the system is functioning. When these assumptions no longer hold true, the system fails to operate as expected. DCM is an automated system and therefore operates on certain assumptions. When issues arise, troubleshooting is necessary to determine which assumption or assumptions are no longer true.
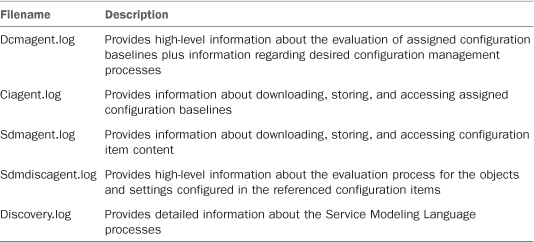
Troubleshooting DCM, like the rest of ConfigMgr, is largely a log file review exercise. Because DCM is a client activity, the logs for DCM processing are on the client in the client logs folder (%SystemRoot%System32CCMLogs on 32-bit systems and %SystemRoot%SysWOW64CCMLogs on 64-bit systems). Five log files are used by DCM to store activity; Table 16.4 describes these files.
In addition to troubleshooting DCM itself, you will often have to troubleshoot issues with the baselines and the configuration items they contain. Issues involving the ability for DCM to evaluate a baseline or configuration item are reported through the ConfigMgr status message reporting mechanism. To view these status messages, perform the following procedure:
- Navigate to Site Database -> System Status -> Status Message Queries in the ConfigMgr tree.
- In the resulting details pane on the right, right-click All Status Messages and select Show Messages.
- In the All Status Messages dialog box, enter the desired timeframe for which you would like to see status messages.
- Review the displayed messages looking for the message IDs listed in Table 16.5.

Using the message IDs listed in Table 16.5, you can narrow down issues DCM has when evaluating baselines and configuration items. These status messages also provide the ability to track and monitor the evaluation status of baselines in your site.
Note
.NET Framework
Not having the correct version of the .NET Framework installed on a client system can cause strange results that are difficult to troubleshoot. The lack of the .NET Framework can clearly be identified by the status messages returned by the client, but these are not always the first place you look to troubleshoot issues.
Information needed for DCM compliance scans often takes more than one client policy refresh cycle to be fully staged to the client. During this period, the status of the scan will not match your expectations for the result of the scan; this is to be expected and should not be cause for alarm or an extensive troubleshooting exercise. Patiently wait for an extra policy refresh cycle, and DCM will dutifully report its results in full.
It is often advantageous to trigger a DCM evaluation cycle on a remote system without interactively connecting to that system and initiating it from the Control Panel applet. The following code shows an example of how to trigger every applicable baseline on a remote system using VBScript:

This simple VBScript can easily be extended to connect to multiple systems or to allow the choice of which baseline to trigger an evaluation on.
DCM, with a little expertise, creativity, and hard work on your part, is an excellent tool that provides feedback about the configuration of Windows systems. It does this while seamlessly integrating with the rest of ConfigMgr, providing a “single pane of glass” to manage your systems from cradle to grave, top to bottom, and every other cliché you can think of (or the editor will allow). Just having the ability to provide consistent and timely compliance reports to auditors is always critical for any type of review. DCM does this and more.
The current DCM incarnation does have a few shortfalls, however. You can overcome some of these, such as external authoring and system profiling, through use of third-party tools. Others, such as auto-remediation, can be surmounted by using DCM in conjunction with the rest of ConfigMgr.
Even with these deficits, DCM efficiently fills a major blind spot in most organizations—configuration verification—without having to implement any additional enterprise tools. With the growing burden of IT audits and compliance regulations, DCM is a welcome addition to ConfigMgr and Microsoft System Center.