
IN THIS CHAPTER
One of the challenges of client/server administration is managing the software deployed to those systems. The ability to manage software includes
• Deploying software as required on workstations, servers, and Windows mobile devices;
• Updating existing software packages;
• Providing a comprehensive inventory of installed software packages;
• Removing software from systems where it does not belong.
These topics are discussed throughout the chapters of System Center Configuration Manager 2007 Unleashed. The first item in the list—software distribution—has been a core component of Systems Management Server (SMS) since Microsoft first released the product in 1994. This functionality has evolved over the various versions of SMS, and it continues as a core capability in Microsoft’s newest release of the software, System Center Configuration Manager (ConfigMgr) 2007. However, before deploying, updating, inventorying, or removing software, you will most likely need to package it for use by ConfigMgr. Software packaging is a core component of distributing software in ConfigMgr.
This chapter discusses how software packaging works in ConfigMgr 2007 and provides examples of how to package software with ConfigMgr. Chapter 14, “Distributing Packages,” continues the process by taking the packages created in this chapter and discussing their deployment.
In general, packages are used to install software on systems. You can also use packages to execute just a command on a system, without installing any software. If you go back far enough into the history of Windows systems, there was a time when the IT (Information Technology) staff simply used batch scripts and executable files to install software.
You may be thinking, “Why do I have to package software within ConfigMgr? I already have a software package (it may even be an MSI file). Why must I repackage it to distribute it in Configuration Manager 2007?” Realize that ConfigMgr is not so much packaging software as it is preparing software for distribution. The packages, programs, and advertisements in ConfigMgr are designed to utilize existing packaging, or work with unpackaged software applications by directly executing an EXE or other file type—much like you might see on a raw CD or DVD. The reason one packages software in ConfigMgr is that software companies design commercial software packages for manual installation by the individual purchasing the software, and the installation process expects users to respond to configuration questions. In contrast, ConfigMgr packages are typically used with unattended installations. With Configuration Manager, you are not really repackaging the application—you are using the existing software package to automate its usage by ConfigMgr.
As an example, if you install WinZip (available at www.winzip.com), its setup program asks questions regarding preferences to install the software on a particular system. When you automate the software installation process, a fully automated WinZip software package will not prompt users with questions about how they want something installed. Instead, you must determine in advance how to install the application on all your systems.
ConfigMgr is flexible in its options for deploying software packaging. ConfigMgr 2007 provides the ability to install on a per-system or per-user basis and can also prompt the user for information or provide fully silent software installations. Although Configuration Manager can provide installations designed for user interaction, its real power in this area is its ability to deploy software silently, without any user interaction required.
Advantages of ConfigMgr software packaging include the following:
• Automated deployment
• Consistency
• The capability to automate software removal
• Reusability
The next sections discuss these benefits.
Software deployments in Configuration Manager are typically designed for installation without user intervention, although ConfigMgr can deploy software requiring user intervention if that is necessary. Using an automated approach enables a quicker and more efficient software installation, and permits an unattended installation without the user logged in to the system. Automating software installation is one of the major benefits of using ConfigMgr to deploy software.
Automating a software deployment includes selecting installation options in advance. Using the WinZip installation as an illustration, there is a series of questions asked during setup—from accepting a license agreement to the location to install the program. WinZip also asks whether to use the classic or wizard interface.
Packaging software with Configuration Manager lets you define how to install the software such that it will be consistent throughout your environment. As an example, ConfigMgr-installed software will use a particular directory and a specific configuration. This makes it quicker to find the program, and easier for the users (and helpdesk personnel) because there is a consistent experience with the application regardless of the particular desktop.
Consistency in software deployments also increases the uniformity of data in the reports available with Configuration Manager 2007. ConfigMgr includes software inventory functionality and reports on your installed software. (Chapter 18, “Reporting,” describes the many reports available using Configuration Manager 2007.) Performing software deployments with ConfigMgr simplifies the process to provide a consistent version of that software throughout your organization. Without standard deployments, if you use software such as Adobe Reader and let users download and install it on their own, you may have several different versions to support.
Using ConfigMgr 2007 lets you choose which systems or users will receive what software. Configuration Manager automates software deployment to these specified groups of systems or users. This capability, known as targeting, helps you meet the particular deployment requirements of your organization. As an example, you can target one configuration for an application to one group and a different configuration of that application to another group. This targeted approach to deployment provides increased flexibility while maintaining the ability to deploy software in an automated method.
An often overlooked benefit of using ConfigMgr for software packaging is the ability to automate uninstalling those software packages. An instance where this would be beneficial is a software package with a specified timeframe of when it should be available and when it needs to be removed. This might be a software package licensed only for 1 year.
Another advantage to automated software removal is the ability to deal with unwanted software. If ConfigMgr, using its software inventory functionality, determines a nonsupported software package is residing on a system, you can define a process to uninstall that software. As an example, assume your organization does not permit installing peer-to-peer (P2P) file-sharing software on the network. The general approach to shutting down these types of software packages is to block them at the network level. If that is not viable, you can use ConfigMgr to automate the process of uninstalling these software packages when found on a system. You can remove the software by using a program in a software package that performs the removal. For applications installed using MSI files, software can be removed using a program defined in the MSI package. For those applications without a predefined software removal command line, you would need to create an uninstall program to uninstall the application. This also provides a good alternative approach to controlling P2P software, in addition to blocking those applications on the network layer.
Packages created with Configuration Manager are reusable. As an example, if you create a software package for a single location in a company, you can use that same package for other locations in the company—without having to deploy the software manually. You can also configure software packages for use with other ConfigMgr technologies such as Operating System Deployment (OSD). Chapter 19, “Operating System Deployment,” discusses OSD in more detail. At a high level, the OSD function deploys operating systems through ConfigMgr. You can also take software packages created with Configuration Manager to use in the post-deployment tasks of an OSD deployment.
Active Directory provides a significant amount of functionality through group policy, including the ability to distribute software. A commonly asked question by organizations using group policy for software deployment is, What are the benefits in using ConfigMgr for software distribution versus using group policy?
Several functions are more robust with ConfigMgr software distribution:
• More granular targeting— Group policy enables targeting software distribution to specific sites, domains, and Organizational Units (OUs). You can further target this software by filtering it to Active Directory security groups.
ConfigMgr can be even more granular in its targeting by using collections, which can also use queries. The “About Packages, Programs, Collections, Distribution Points, and Advertisements” section of this chapter discusses collections.
• Better tracking— Although group policy allows you to check software distributed with a variety of tools, including the RSoP (Resultant Set of Policy), tracking deployed software is somewhat limited. Using ConfigMgr, you can easily track the status of the software being deployed using either the system status within the ConfigMgr console (see Chapter 17, “Configuration Manager Queries,” for more information) or ConfigMgr’s integrated reporting components (discussed in Chapter 18.)
• Network impact— Group policy software distribution occurs at system startup or user logon, thus increasing the likelihood that multiple software packages are deployed within a site at the same time. ConfigMgr can schedule software for deployment in a variety of methods, and use BITS (Background Intelligent Transfer Service), fan-out distribution, and compression between sites. These capabilities minimize the impact of software distribution and reduce bandwidth requirements.
• Robust packaging options— Software distribution using group policy is generally restricted to MSI software packages. You can deploy non-MSI files with group policy, but they are deployed as voluntary applications—rather than mandatory software distributed to the user. ConfigMgr provides the ability to install any software format, including MSIs, EXE files, batch scripts, Visual Basic (VB) scripts, and others. You can even create a package that just executes a set of command lines.
If you currently use group policy to distribute software, how do you migrate to ConfigMgr for your software distribution requirements? The following steps are suggested:
- Package in ConfigMgr distribution format the software currently deployed through group policy. The majority of software deployed via GPOs uses an MSI file, which easily integrates with ConfigMgr (see the “Creating a Package” section for examples).
- Target the software, pushing it only to those systems or users that were targets of the GPO software distribution. (Targeting is accomplished using collections, discussed in the “About Packages, Programs, Collections, Distribution Points, and Advertisements” section of this chapter.)
- Once the functionality provided with GPO software distribution is available using ConfigMgr software distribution, shut down your GPO software distribution functionality.
Having discussed software packaging in ConfigMgr, compared it with software packaging outside ConfigMgr, and compared ConfigMgr software distribution with GPO-based software distribution, it is now time to begin delving into how ConfigMgr works. Let’s start with discussing some of the key terms and how these capabilities interact with each other. The next sections discuss packages, programs, collections, distribution points, and advertisements.
A software package consists of general information about the software to deploy, including the name, version, manufacturer, language, and where source files for the package are located (if that package has source files). Packages are created either from a package definition file (such as an MSI, SMS, or PDF file—discussed in more detail later in the “Creating a Package” section) or manually. Software packages within ConfigMgr are not actually a repackaging of the software packaged by a vendor. ConfigMgr will have the same source files used to install the software, but uses MSI files to auto-populate many of the questions required when creating packages and programs within ConfigMgr. You can also create software packages without using package definition files. ConfigMgr provides the ability to deploy executables, batch files, VBScript, JavaScript, and command files, among others. If you can execute it, you can design a package to deploy it!
A package optionally includes programs, which provide the specifics of how the software runs. The package also contains information about who can access it (security) and where it is distributed (distribution points).
ConfigMgr uses packages to distribute software, as well as to deploy changes to client configurations, such as Registry changes.
A package contains programs. These are commands specifying what should occur on a client when the package is received. A program can do just about anything—it can install software, distribute data, run antivirus software, or update the client configuration.
Each package must contain at least one program if the package will perform any action other than to provide a pointer to the source files. Most MSI files provide six default programs when used for software distribution, each allowing the package to run in different ways:
• Per-system attended— This installation causes a program to install, expects user interaction, and is run once for the system on which it is targeted to install.
• Per-system unattended— This installation causes a program to install that expects to run without user interaction and is run once for the system on which it is targeted to install.
• Per-system uninstall— This installation performs an uninstallation of the program, and is run once for the system on which it is targeted to uninstall.
• Per-user attended— This installation causes a program to install and expects user interaction, and is run once for the user for whom it is targeted to install.
• Per-user unattended— This installation causes a program to install without user interaction, and runs once for the user for whom it is targeted to install.
• Per-user uninstall— This installation performs an uninstallation of the program, and is run once for the user for whom it is targeted to uninstall.
Each program specifies the command-line used to run the program in the method described. As an example, a per-system unattended installation will include a switch to run the program without user intervention.
A collection represents resources within ConfigMgr. A collection is a logical grouping and can consist of computers, users, or security groups. Collections provide a target for ConfigMgr functions such as software distribution (see the sidebar on “Software Distribution with Collections Versus Group Policy” for additional information on the types of targeting available using collections in ConfigMgr). Collections can be either static (defined to specific resources) or dynamic (either built on a query you define or an existing query that comes prebuilt with ConfigMgr). The next two sections discuss these collection types.
You define static collections by manually adding a resource to a collection. An example of a static collection is a group of test workstations used to test software package deployments. As an example, the Test Workstations collection has TestWS1, TestWS2, and TestWS3 manually added to it. Static collections are useful when you need to define a limited number of systems or users to a collection and the membership in the collection does not change frequently. Membership is fixed (static) without manual changes.
You define dynamic collections by using a query-based membership in the collection. You can achieve the same result as with the Test Workstations static collection (see the previous section) by defining a rule to add any workstations to the collection using names starting with TestWS. This assumes that only test workstations are named with the test workstation naming convention (such as TestWS4). The benefit to a dynamic collection is it does not require manual changes to add resources to the collection. Let’s say you define a Test Workstations dynamic collection that adds all workstations starting with the name TestWS. If additional test workstations are created later, those new workstations will automatically become part of the Test Workstations collection.
A distribution point (DP) is a ConfigMgr server role where packages are stored for later distribution, making it similar in nature to a file share containing software used for installations. The location of distribution points can be significant in terms of network impact.
As an example, if you create a package to install Microsoft Office (which is a very large software package), you would not want it to install the software from a distribution point across a wide area network (WAN) link, due to the effect on network traffic across that link. Generally, you would prefer to use a local distribution point with access to the software you want to install. To help with WAN link utilization, ConfigMgr can use BITS to transfer large amounts of data across networks, including WAN links, as discussed in Chapter 5, “Network Design.” However, it is best to provide a local distribution point for any location where multiple clients will access software packages. BITS is only available for communication between the distribution point to the client. Branch distribution points only use SMB; they do not use BITS to communicate to the client.
You can arrange DPs in a manner to help simplify their management—an example of this is gathering all distribution points in the United States into a single group and those in Europe into another group. This capability gives ConfigMgr administrators the ability to group distribution points geographically or by department, or use any other method that enables easily adding or removing packages from large numbers of DPs in a timely manner.
You can configure distribution points to support various functions. One example is a protected distribution point, which allows ConfigMgr administrators to restrict which clients can connect to the DP from specified AD sites or subnets. Using protected distribution points ensures clients do not access content on a distribution point over a slow link.
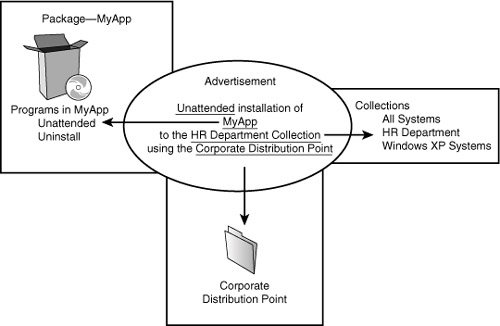
An advertisement ties these concepts together. An advertisement says to take a specific program within a package and make it available to a collection previously defined, and it specifies the distribution point(s) to use when deploying the program. Advertisements are either voluntary (they show as available for the user to install) or mandatory.
Consider a package containing multiple programs. That package is sent to a distribution point and advertised to a collection. Although this looks like a relatively complex way to distribute software, it is also a very powerful approach. Let’s break this down into a simple example of how these concepts work together.
You need to distribute an application called MyApp to the HR department this week. Perform the following steps:
- Create a package for the application and then create an unattended installation and (optionally, but recommended) an uninstallation program within the package.
-
Define a collection of the workstations used by the HR department personnel.
The users of the HR application are all located in the corporate office, which has a single distribution point used when distributing software from Configuration Manager.
- Create an advertisement that ties this all together. Figure 13.1 displays the advertisement. The advertisement ties the package and the program (MyApp unattended installation) to the collection (the HR workstations) and the distribution point used for installing the software (corporate distribution point).
Knowing how these concepts combine is critical for understanding how Configuration Manager deploys software. Chapter 14 provides additional information on how ConfigMgr distributes software.
Because the focus of this chapter is software packaging, the next sections walk through the steps to create a package in ConfigMgr and provide examples of the process.
Packages can come in many flavors:
• Packages that use a definition file.
You can create ConfigMgr packages either with a definition file or without. A definition file provides the answers to the majority of the questions required to create a package.
SMS 1.x definition files had an extension of PDF (Package Definition File). With SMS 2.0, you created the definitions in files using either a PDF or SMS (Systems Management Server) extension. Although these two types of definition files still exist, and you can use them with ConfigMgr to create a package, they are relatively uncommon now.
The package definition file most commonly used by ConfigMgr 2007 is the MSI file. The “OpsMgr Client” section of this chapter includes an example of using an MSI file.
• Packages that you can create without a definition file, discussed in detail in the “Forefront Client” section.
• A package that does not even need to have source files as part of the package.
This is often used when ConfigMgr is used to run a program already stored on the system, such as the automated uninstall of the ConfigMgr client.
Tip
Remotely Uninstall ConfigMgr Agent Using PsTools
If you are looking for a quick way to uninstall the Configuration Manager agent from a remote system, try this:
![]()
A successful result is shown here:
![]()
PsExec is part of the SysInternal PsTools, available for download at http://technet.microsoft.com/en-us/sysinternals/bb896649.aspx. These can be invaluable when performing actions on remote systems.
The goal remains the same, regardless of how it is achieved. ConfigMgr takes these different types of packages and integrates them to create Configuration Manager packages. To illustrate how this is accomplished, the next sections step through an example using a relatively simple package to deploy that’s utilized by many ConfigMgr installations—the Operations Manager (OpsMgr) 2007 client.
Operations Manager 2007 is another member of the System Center product family. It monitors the health of applications, servers, and services. OpsMgr requires an agent installation process, which can be accomplished using ConfigMgr. The next sections discuss this process.
Creating the ConfigMgr package for Operations Manager is straightforward and requires only a few steps:
-
Locate the installation files for the OpsMgr agent installation. These are the installation source files.
For this example, a share named source is on the D: drive of the Bluebonnet server with a subfolder named OpsMgr. The OpsMgr agent software was previously copied to this folder (D:sourceOpsMgr) from the OpsMgr installation media.
Note
Installation Source File Locations
Two different lines of thought exist for where installation files should be stored. The first is to store them on an existing network share such as a distributed file server (DFS) so they will be consistently located on the network, with only a single copy of the installation source files required. The second approach is to place copies of the files in a folder on the ConfigMgr server itself.
It is best to use a folder on the ConfigMgr site server because other individuals may rearrange and potentially remove files on a network share without realizing the impact on the ConfigMgr software packaging process. Using a dedicated folder prevents someone from inadvertently moving, changing, or deleting those installation files required for ConfigMgr.
- Within the Configuration Manager console, navigate to System Center Configuration Manager -> Site Database -> Computer Management -> Software Distribution -> Packages.
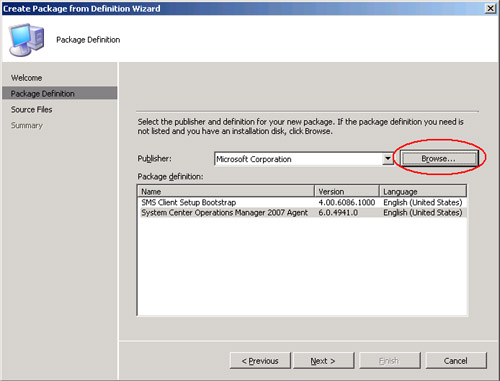
- Right-click Packages and choose New -> Package from Definition. This starts the Create Package from Definition Wizard shown in Figure 13.2. Click Next to continue.
- ConfigMgr displays the existing package definitions it is aware of (see Figure 13.3). Click the Browse button (circled in Figure 13.3) to locate the package definition file. For this example, create the package from a definition file by pointing it to MOMAgent.msi for the i386 version of the OpsMgr agent. This file was located on the ConfigMgr server in the d:sourceOpsMgragenti386 folder.
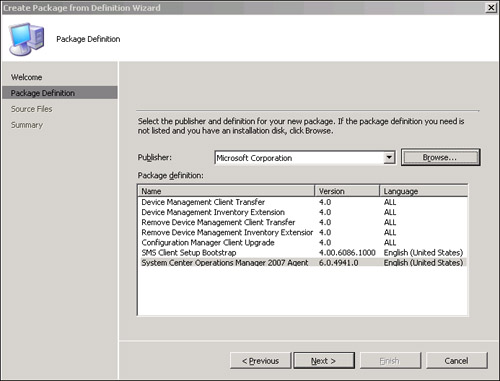
- After you select the MSI file, it appears on the screen previously shown in Figure 13.3, which now displays the System Center Operations Manager 2007 agent. Figure 13.4 shows this screen. Click Next to continue.
-
The next page of the wizard identifies three different ways you can manage source files:
• This package does not contain any source files— This may be useful in a configuration where ConfigMgr is running a program already stored on the system.
• Always obtain files from a source directory— This option is the one most commonly used.
• Create a compressed version of the source files— This may be useful when you need to decrease storage requirements.
Select the second option for this package—Always obtain files from a source directory—as shown in Figure 13.5. Click Next to continue.
Note
The Create Package from Definition Wizard includes a source files option to create a compressed version of the source files, as displayed in Figure 13.5. Compression is particularly helpful in environments where it is important to decrease storage requirements. Compressed packages are also useful for CD installs, because the source files may not be available after creating the package. It is important to note that compressed source files must be stored on NTFS file systems (not FAT).
You should not use compressed source files if the source files are likely to change or if there’s not a significant decrease in the size of the package from compressing it.
-
The wizard next verifies the location of the source files. This step appears if the option selected on the previous page of the wizard specified source files were part of the package—if the package did not contain any source files, this screen does not appear.
The wizard defaults to the option Local drive on site server, which is the location of the source files and folder where you chose the package definition file (in this case the MOMAgent.msi file specified in step 4 of this process). This is shown in Figure 13.6. Click Next to continue.
- The Summary page is the final screen of the Create Package from Definition Wizard (see Figure 13.7). It lists the options chosen to create the package. These include the name of the package, how to handle source files, and the location of the source directory. Click Finish to complete the Create Package from Definition Wizard.
- Using the information in the MSI file, the wizard now creates a set of installation options for the program, including Per-system attended, Per-system unattended, Per-system uninstall, Per-user attended, Per-user unattended, and Per-user uninstall, as displayed in Figure 13.8.


Using an MSI file for the package definition greatly simplifies the process of creating the OpsMgr package, because the MSI supplies the information that otherwise would have to be manually specified to Configuration Manager.
With the package created, the next step is configuring the program the package will use. In the case of the OpsMgr agent, this is the Per-system unattended program. The Per-system unattended program deploys the OpsMgr package on a per-system basis and runs without user intervention. Right-click the program (located in the Configuration Manager console -> Site Database -> Software Distribution -> Packages -> <name of the package that was created> (in this case Microsoft Corporation System Center Operations Manager 2007 Agent)) and open the Properties page.
Properties for each program include the following tabs:
Each of these tabs defines how the program will function. Let’s review the content of each, using the OpsMgr package as an example.
The General tab (shown in Figure 13.9) has a variety of fields automatically populated with information, based on the package definition file used to create the OpsMgr package:
• Name— The Name field is prepopulated and cannot be changed.
• Comment— This is the first field you can modify. This field is a 127-character text field, used to give a description of the program.
• Command line— This field is a text field that can have up to 255 characters. It provides the command line that installs the OpsMgr agent. For the OpsMgr agent installation, the field uses the following syntax:
MSIEXEC.exe /q ALLUSERS=2 /m MSIHATJB /I "MOMAgent.msi"
• Start in— An optional 127-character text field, this specifies either the absolute path to the program you are installing (such as c:install_filesprogram.exe) or the folder relative to the distribution point you are installing within (such as install_files). This defaulted to blank for the OpsMgr agent program.
• Run— This dropdown specifies whether the program will run normal, minimized, maximized, or hidden:
• Normal—This is the default mode, and means the program runs based on system and program defaults.
• Minimized—Running minimized shows the program only on the task bar during installation. The window exists on the task bar during the installation process; however, it is not the active window maximized on the user’s workstation.
• Maximized—This is a good configuration to use when installing programs that require user intervention. It’s also good for package testing.
• Hidden—This mode hides the program during installation, and is a good option for fully automated program deployments.
The OpsMgr program defaulted to the Normal configuration.
• After running— This field is a dropdown selection determining what will occur after the program completes. Here are the options:
• No action required—The OpsMgr agent defaulted to No action required, which means that no restart or logoff is required for the program (the case in the OpsMgr agent installation).
• Configuration Manager restarts computer—The option to have ConfigMgr restart the computer is useful when you’re deploying a program that requires a reboot but the reboot is not initiated as part of the program.
• Program restarts computer—Select this option if the program requires a reboot and the program actually performs the restart program.
• Configuration Manager logs user off—Use this option when the program installation requires the user not to be on the system.
It is important to note that both the ConfigMgr restarts computer and ConfigMgr logs user off options take place forcefully, after a grace period. This means that if either of these options is used, any applications running on the clients will not have the opportunity to save their data or state.
• Category— Category is a dropdown selection used to help find specific programs in ConfigMgr. This field defaulted to blank for the OpsMgr agent installation, but you can create a new category by typing in the text for the category’s name.

You will want to make several changes to the program’s configuration on the General tab for the OpsMgr agent installation. First, add a comment explaining what the program will do. Next, change the properties on the Per-system attended command line, as follows:
![]()
This syntax will install the MOMAgent.msi in quiet mode, save the MSI log file to a log named MOMinstall.log, and provide no configuration information to the client (because the agent configuration is discovered from Active Directory). Run the program as hidden, keep the After Running setting of No action required, and specify a Category setting of OpsMgr. Figure 13.10 displays these settings.

Now, move to the Requirements tab for the program. Figure 13.11 shows the default configuration for the OpsMgr program previously created using the package definition file.

The Requirements tab tells Configuration Manager the requirements for running the program:
• Estimated disk space— The estimated disk space required to run the program.
• Maximum allowed run time (minutes)— The amount of time the program is permitted to run.
• This program can run only on specified client platforms— If the program can only run on specified platforms, select the allowed platforms.
• Additional requirements— This is an optional field for specifying additional requirement information for users (up to 127 characters). Text will appear on client computers in Control Panel -> Run Advertised Programs.
The Estimated disk space setting defaults to 86MB when the package definition file for the OpsMgr agent is used. Although the actual amount of disk space may vary from the amount defined with the package definition file, the default can provide a good starting point. As an example, installations of the OpsMgr agent can require at least 154MB of disk space based on the management packs monitored on the agent system, so the setting here will be 200MB. Although there is a large difference between an 86MB estimate and a 200MB estimate, it is better to overestimate the required disk space ConfigMgr will check for—so when applications are distributed they do not fill the remainder of the disk space on the system. The Estimated disk space setting can be in KB, MB, or GB, and it defaults to Unknown for program installations.
The Maximum allowed run time (minutes) setting defines how long the program is expected to run. There can be considerable variation in how a program will run; this depends on the speed of the system ConfigMgr is installing it on, the size of the program, and the network connectivity between the system and the source files used for the installation. In this example, the setting defaulted to Unknown. However, based on previous installations of the OpsMgr agent, it should complete within 10 minutes. This option has direct impacts to configurations on both the Environment tab and the MOM Maintenance Mode tab (discussed later in this section) due to the addition of maintenance windows within ConfigMgr 2007. This is used to determine whether a package has the time to install before the maintenance window closes.
Two options are available for platforms on which ConfigMgr can run the program:
• This program can run on any platform— This is the default configuration and works well for programs that are not platform specific.
• This program can run only on specified client platforms— This type of installation is for client-specific platforms. As an example, the OpsMgr client actually has three different installation files based on the client platform (amd64, i386, ia64). In this situation, you would separately package each of the different program types and use this option to allow each program to run only on a specific client platform.
Note
Available Platforms to Run a Program On
The list of available platforms may not be up to date with current OS releases. An easy workaround for this is to create a collection of just the operating systems you want and target that collection.
Specifying that a program can run only on certain client platforms is only beneficial when a collection contains systems with multiple platforms. If an advertisement is targeted to a collection with only one platform and the program is restricted to only run on a specific client platform, this setting will be redundant.
For the OpsMgr agent, change the properties on the Requirements tab to set the estimated disk space to 200MB and the maximum allowed run time (in minutes) to 10. Also, specify that this program can only run on specified client platforms (that is, the x86 platforms this agent runs on), as shown in Figure 13.12.
Figure 13.12. Configuration changes on the Requirements tab of the OpsMgr agent installation program

The Environment tab for this program identifies when a program can run. Here are the options:
• Whether or not a user is logged on— This is the default configuration, and it works for the majority of installations.
• Only when a user is logged on— This installation type is used when the program ConfigMgr is installing needs to have the user logged in to install.
• Only when no user is logged on— The installation type will not install until the user logs out of the system.
The conditions under which a program can run directly tie into the Run mode options:
• Run with user’s rights— This is only available if the option “Only when a user is logged on” is chosen for when the program can be run.
• Run with administrative rights— This is the default option and is available in any of the three configurations that determine when a program can run. If you choose this option, a check box is available to allow users to interact with the program (Allow users to interact with this program). This setting causes advertisements to execute under the Local System account context.
Tip
Running Advertisements with Administrative Rights
At first glance, running an advertisement with administrative rights seems like a nobrainer. Using this approach, you can install the software regardless of what level of permissions are available to the user logged in to the system. However, this can cause some difficulties when installing a program that writes data to the Registry, or if the package tries to access files the account does not have rights to access. If this situation occurs, try running with the user’s rights instead. If that does not work, create two different programs—one that runs under the user access and allows access to the Registry, and a second that runs with administrative rights. Next, link the programs together with a Run this program first option. Sometimes this will require repackaging the application (see the “Repackaging” section of this chapter for details) to determine the portion of the application that requires administrator rights to install. Another option involves using the task sequencing engine to deploy packages that need to perform Registry edits or run something in the user’s context. This can be done by running a command line with a run as statement (this functionality is only available in ConfigMgr 2007 R2).
Use the Allow users to interact with this program option in those situations where the user needs to interact with the program. The option Allow users to interact with the program is also an excellent troubleshooting method to use when packages are not installing correctly. With this option selected, the user interface is visible to the user logged in to the system, and the user can interact with the program. As an example, you will choose this option if the program requires the user to make a selection or click a button. If a program runs without this option selected and the program requires user intervention, it waits for the user interaction (which will never occur) and will eventually time out when the maximum allowed runtime has occurred (defined on the Requirements tab of the program; if undefined, the program times out after 12 hours).
The Drive mode that the program runs under includes the following configurations:
• Runs with UNC name— This is the default setting, which runs the program using the UNC (Universal Naming Convention) name. As an example, \<smsserver>smspkge$DAL00004 would be the distribution point when you create a package for the DAL site and store it on the E: drive of the system. Chapter 14 provides more information regarding distribution points and where files are stored.
• Requires drive letter— The program requires a mapped drive to install, but allows ConfigMgr to use any available drive letter.
• Requires specific drive letter (example: Z):— The program requires mapping a specific drive letter for installation (if you choose this option, an additional box is provided for specifying the letter to be mapped). If the drive letter is not available on the client system, the program will not run.
• Reconnect to distribution point at logon— This last setting specifies that the client will reconnect to the ConfigMgr distribution point when logging in to the system. This option is only available if the program runs only when a user is logged on, with the user’s rights, and requires either a drive letter, or a specific drive letter (as an example, the drive letter Z).
For the OpsMgr agent, take the defaults, as displayed in Figure 13.13.

The Advanced tab for the program, shown in Figure 13.14, specifies a variety of configurations, such as whether other programs run prior to this one, whether this program is run once for the computer or for each user, where program notifications are suppressed, how disabled programs are handled on clients, and how the program integrates with install software task sequences.

• Run another program first— This is the first option available on the Advanced tab. These are program dependencies, and specifying this option causes another program to be run before this program runs. By default, the check box is cleared. As an example, there’s a software package that has several separate programs requiring installation before the package can be installed. This program has five levels of dependency—our original program will not run unless program #2 has run, and program #2 will not run unless program #3 has run, and so on.
If you choose this option, you must specify a package and a program. The option “Allow this program to be installed from the Install Software task sequence without being advertised” is relevant when discussing task sequences within ConfigMgr. Task sequences are a list of customizable tasks or steps sequentially performed. A task sequence can be advertised to a collection; as an example, a program can be advertised to a collection. Task sequences provide a more elegant solution for many situations, including those where multiple dependencies exist for a single program. Task sequences are discussed in more detail in Chapter 19.
If you specify the option to run another program first, the Always run this program first option is also available (defaults as unchecked). If this option is checked, the program it is dependent on will run regardless of whether it previously ran on the same system.
• When this program is assigned to a computer— This is a dropdown with two choices:
• Run once for the computer—This is the default setting.
• Run once for every user who logs in—This option causes the program to run for each user who logs in to the computer.
• Suppress program notifications— This option is a check box that is cleared by default. When checked, the option causes any notification area icons, messages, and countdown notifications to not display for the program. This is useful for programs that may be running when someone is using the system, if there is no requirement for notification that the program is running.
• Disable this program on computers where it is advertised— This check box determines how ConfigMgr will handle the program. The option defaults to unchecked, but if checked, it specifies that advertisements containing this program are disabled. When checked, this option also removes the program from the list of available programs that the user can run, and the program will not run on the systems where it is assigned.
This approach is useful when there is a need to temporarily halt a deployment because the change applies to all advertisements of the program, and the program is disabled when policies are retrieved by the client.
• Allow this program to be installed from the Install Software task sequence without being advertised— The final check box on the Advanced tab determines how the Install Software task sequence in OSD handles the program. The option is unchecked by default. You should check this option for any programs used within an OSD task sequence.
For the OpsMgr agent, accept the default configurations, shown in Figure 13.14.
The Windows Installer tab for the program provides installation source management. If the program requires repair or reinstallation, the MSI file automatically accesses the package files on a distribution point to reinstall or repair the program. This screen defaults to cleared, as displayed in Figure 13.15 for the OpsMgr package.

The available fields on the screen shown in Figure 13.15 are the Windows Installer product code and the Windows Installer file. You can define these by clicking the Import button and specifying the MSI file used for the program. Choosing the MSI file populates both of these fields.
For the OpsMgr agent, accept the default configurations as displayed in Figure 13.15.
The final tab determines the MOM maintenance mode configurations for the program. Two options are available on this tab, as displayed in Figure 13.16:
• Disable Operations Manager alerts while this program runs— Selecting this option places the computer in OpsMgr maintenance mode while the program is running. The duration of the maintenance mode is defined by the Maximum allowed run time (minutes) setting defined on the Requirements tab (refer to Figure 13.11). Unfortunately, this option does not actually perform the steps required to truly disable Operations Manager alerts while the program is running. The option pauses the OpsMgr health service, but it does not put everything into maintenance mode, meaning heartbeat alerts are still generated. This option defaults to unchecked.
• Generate Operations Manager alert if this program fails— If this option is checked, it creates an event in the application log containing the package name, program name, advertisement ID, advertisement comment, and failure code or Management Information Format (MIF) failure description. You can configure the application event to create an alert in MOM/Operations Manager that will alert on the situation. A good example of when to use this feature is for critical software deployments such as service pack (SP) packages. This option defaults to unchecked.

Using a package definition file provides a solid configuration for building the program required to install the OpsMgr agent. This is just one of the configurations completed with the Create Package from Definition Wizard, which also created the package that includes the program(s) previously discussed in the “Using the Create Package From Definition Wizard” section of this chapter. To see the properties of this package, right-click the package (located in the Configuration Manager console -> Site Database -> Software Distribution -> Packages) and go to the Properties page.
The package’s General tab displays the default settings created. These include the name, version, manufacturer, language, and comment for the package. Figure 13.17 shows an example of the General tab with the information populated from the package definition file.

Notice the other tabs that are part of the package properties. The Data Source tab in Figure 13.18 specifies where the files are located and shows their distribution method.

In this example, the OpsMgr package was created with uncompressed source files (see the option previously specified in Figure 13.5 to always obtain files from the source directory). You can change this setting after creating the package, and change the location of the source files using the Set button next to this field. Unchecking the option This package contains source files will gray out the remaining items on this tab. Alternatively, you can also choose to make this package use a compressed copy of the source directory, which grays out the option to update distribution points on a schedule.
If you check the option Always obtain files from the source directory, there is an option to update distribution points on a schedule. This option is useful for those software packages that you expect to update source files for on a regular basis. The option is configured by using the Schedule button and then configuring the start time (which defaults to the current date and time), the recurrence (none, weekly, monthly, custom interval) and how often it will recur (in days, hours or minutes). This option is seldom used, however.
Use the option Persist content in the client cache for recurring packages such as antivirus software. This option stores the program in the client cache for an indefinite period; however, this requires that the advertisement is configured to download and execute. The option is disabled by default. Use this option with care, because it decreases the amount of available client cache and could cause a package to fail to distribute if there is insufficient space to store that package.
The last option on this tab is Enable binary differential replication, which by default is disabled. If this option is checked, the package uses binary delta comparison for the source files. This means that ConfigMgr sends only the changed portions of the file, rather than the entire file.
Checking this option can significantly decrease bandwidth requirements when creating updates for large packages already sent to distribution points. However, using this option introduces additional complexity to replicating packages and debugging issues with package distribution. For more details on binary differential replication, refer to Chapter 5 and Chapter 14.
For the OpsMgr package, leave the defaults previously configured through the package definition file, displayed in Figure 13.18.
The Data Access tab (shown in Figure 13.19) specifies the shared folder location of the package when sent to a DP as well as the package update settings. The shared folder location section allows you to choose one of two options:
• Access the distribution folder through common ConfigMgr package share— This is the default configuration and specifies that packages are accessed through the SMSPKG x$ share (where x is the drive letter the distribution point is storing the data on). As an example, if you store a package on the E: drive of the Wildflower server, the package is accessed via the \WildflowerSMSPKGE$ share.
• Share the distribution folder— This option allows you to share the folder using a share name that you specify. The share name must be unique across all packages. Each time the package is updated or refreshed, the content of the folder (including files and subfolders) is deleted and re-created. If you created a share on the Wildflower site server for the custom application MyApp, the share name would be \WildflowerMyApp.
A variation of this option is specifying a share that includes the path, which might be under a shared path such as the name of the company’s custom applications. For MyApp, this would be stored under \WildflowerOdysseyMyApp if you specified the share name of OdysseyMyApp (it is best to create a top-level share specific to the organization to differentiate between custom and noncustom applications). These options to share the distribution folder under a nondefault name are useful if systems outside of ConfigMgr will access the share.
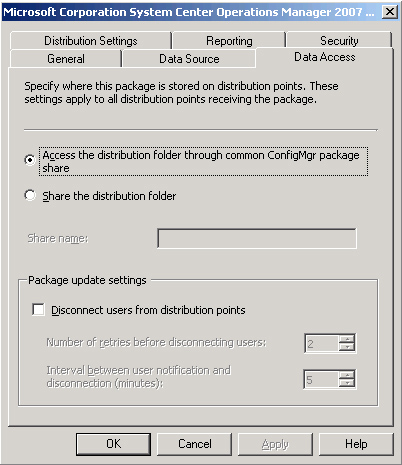
The Package update settings section of the Data Access tab specifies how ConfigMgr will handle access to distribution points when there are updates to the package data. If users are connected to the distribution points, there may be locked files or inconsistent results—some of the files may be updated but others not. By default, the option to disconnect users from distribution points is unchecked. If this option is checked, two additional configurations are required; these relate to the number of retries before users are disconnected and the interval between user notifications and disconnections. This option only affects standard distribution points (not branch distribution points).
• The number of retries before disconnecting users— This option specifies the number of times ConfigMgr will try to update the package source files before it disconnects users from the DP. This setting defaults to 2 and has an acceptable range of 0–99.
• The interval between user notification and disconnection (minutes)— The interval specifies the number of minutes ConfigMgr will wait after notifying users before disconnecting them from the distribution point. This setting defaults to 5 minutes and has an acceptable range of 0–59 minutes.
Note
Run Program from Distribution Point and Vista/Server 2008 Client Systems
If the program within the package has the option “Run the program from the distribution point” selected (defined in the advertisement on the Distribution Point tab, discussed in Chapter 14) and the clients are running Windows Vista or Windows Server 2008, those clients will not receive user notification.
For the OpsMgr package, keep the defaults configured through the package definition file, shown in Figure 13.19.
The Distribution Settings tab displayed in Figure 13.20 specifies the priority, preferred sender, and configurations for branch distribution points for the package.

• Sending priority— This has options of Low, Medium (default), and High. The setting determines the priority of the package when sending it to another site. ConfigMgr sends packages in priority order; if packages have identical priorities, ConfigMgr sends them in the order they were created. The Low priority option is good for packages not requiring quick distribution, such as nonmandatory packages infrequently installed. The High priority option is good for packages requiring distribution quickly, regardless of other packages available.
• Preferred sender— The Preferred sender dropdown specifies the type of sender used to send the package to other sites. The default setting is <No Preference>, which uses any available sender. Here are the other options available:
• Asynchronous RAS Sender
• Courier Sender
• ISDN RAS Sender
• Standard Sender
• SNA RAS Sender
• X25 RAS Sender
The default configuration will work for most situations, although a good example of when to change this is for large packages that you do not want to send over the network. For these types of packages, specifying the courier sender allows distribution without sending them across the network. Courier sender is not used to distribute packages unless you choose this option.
The Branch distribution point content settings section has two options:
• Automatically download content when packages are assigned to branch distribution points— This is the default setting. If you choose this option, a second check box is available: Make the package available on protected distribution points when requested by clients inside the protected boundaries. This specifies whether the package is available for download to a branch distribution point not already designated as a DP. Choosing this option means the local branch distribution point will download the package when a client requests the package. Once the content is available on the DP, the next client request will be able to download and run the content (this is only available for protected branch distribution points).
Tip
Branch Distribution Points and Automatically Downloaded Content
The first time a client requests software from the branch distribution point configured to automatically download content when packages are assigned to branch distribution points, an error message displays indicating the content is not available (assuming this is an advertisement that must be triggered manually). This error is normal and indicates the distribution point does not yet have the content. Attempting to run the software from the branch distribution point will set the flag on the branch distribution point to retrieve the content.
• Administrator manually copies the package to branch distribution points— This is the other option to distribute content, and it’s useful if you have your own replication mechanisms in place for branch distribution points (such as a scheduled off-hours Robocopy to the branch distribution point).
For the OpsMgr package, keep the defaults configured with the package definition file, shown in Figure 13.20.
The Reporting tab of the software package, displayed in Figure 13.21, specifies the configurations for the Management Information Format (MIF) configured for the package. The package’s MIF file is placed in the Windows folder; ConfigMgr can find the file and use the information in it to provide package success and failure information. Two options are available on this tab:
• Use package properties for status MIF matching—
This option specifies the settings used for the MIF filename (maximum 50 characters), name (maximum 50 characters), version (maximum 32 characters), and publisher (maximum 50 characters). This is the default option when you use a package definition file to create your software package (shown in Figure 13.21). The MIF filename is also integrated into the programs on the General tab in the command-line field using the /m parameter.
• Use these fields for status MIF matching— This is the default option when creating a new package without a definition file. If you choose this option, ConfigMgr uses the properties on the General tab for MIF file matching.

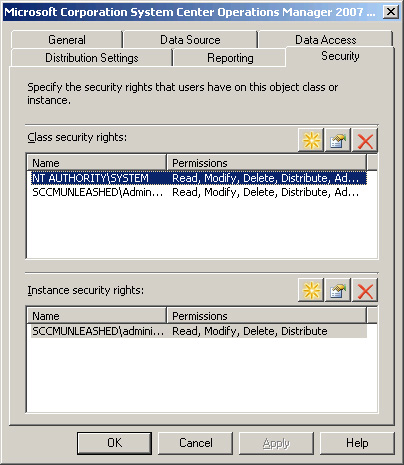
The last tab on the package properties is the Security tab. This tab defines the class and instance security for this package object. The top section shows the class security rights for the object and the bottom section shows the instance security rights. Each section has three buttons used to maintain entries in that section:
• Selecting the starburst button allows you to add security rights.
• The folder button edits the highlighted security rights.
• The red X button deletes the highlighted security rights.
Figure 13.22 shows the default security rights generated from the package definition file. Chapter 20, “Security and Delegation in Configuration Manager 2007,” discusses security.
After completing the program configuration, your next step is to distribute the package, which is discussed in Chapter 14.
Packaging the Operations Manager agent with a package definition file demonstrates many of the configurations used when manually creating a package and a program. Although using a package definition file (an MSI, PDF, or MIF file) is the recommended approach, what takes place when a package definition file is not available? Drawing on the information just used to create the OpsMgr package, the next section discusses the process for creating packages and programs manually, using the Forefront client as an example.
Microsoft Forefront Client Security provides unified virus and spyware protection for Windows platforms. There are several prerequisites prior to deploying the Forefront client. These include a properly installed and configured Forefront Client Security (FCS) management server, an FCS policy for the clients, a Windows update policy for the clients, and access to the Forefront client for packaging. Once these are in place, you can package the Forefront client.
The Forefront client source files are in the root folder of the FCS installation media. To make the location of these source files consistent, create a subfolder in the d:source folder called Forefront (d:source now contains OpsMgr and Forefront top-level folders). Copy the contents of the client folder from the installation media to the d:sourceForefront folder. With the source files in the correct location, begin creating the Forefront package.
Similar to when you created a package using a package definition file, open the Configuration Manager console and navigate to System Center Configuration Manager -> Site Database -> Computer Management -> Software Distribution -> Packages. Right-click Packages, and this time choose New -> Package. This starts the New Package Wizard. On the first page of the wizard (the General page), specify a variety of fields, each of which is your personal preference for the package. As long as the fields properly explain what the package is, the actual content is not critical. These fields include the following:
• Name— The name of the package. This example used Forefront Client Security Agent. To determine each of the fields for this package, right-click the program you are installing (clientsetup.exe, in this case) and work using the fields shown as program properties. For the name, you can choose a shortened version of the Description field shown in Figure 13.23.
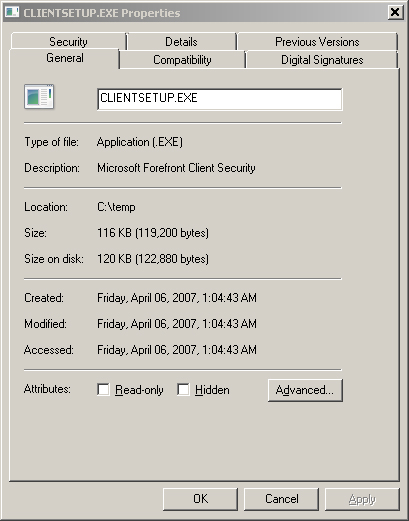
• Version— The version of the software package. For this example, the version is 1.0.1703.0 which is available on the Details tab for the Properties of the Forefront Client Security client. The General tab for this is shown in Figure 13.23.
• Manufacturer— Who created the software package. Specify Microsoft, shortened from the Company field shown in Figure 13.23.
• Language— The language of the package (English, in this case), which is a shortened version of the language information provided as a value for the Language item.
• Comment— Additional information on the package. For consistency with the existing OpsMgr package, specify the comment shown in Figure 13.24.
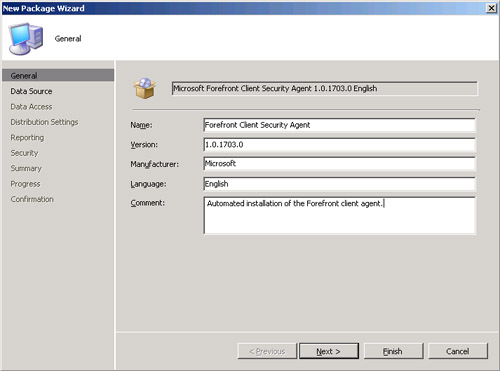
Figure 13.24 shows the full set of information specified for the package. Note that the manufacturer name is automatically prepended to the name, with the version and language added at the end, thus giving the full name of the program: Microsoft Forefront Client Security Agent 1.0.1703.0 English, as shown at the top of Figure 13.24 in the field next to the package icon.
Click Next to continue and now configure the data source for this package. Specify the source folder created earlier, which is the d:sourceForefront folder. Anticipating there will be regular updates to this package, configure the package to update distribution points on a schedule (daily in this case). Figure 13.25 displays this configuration.
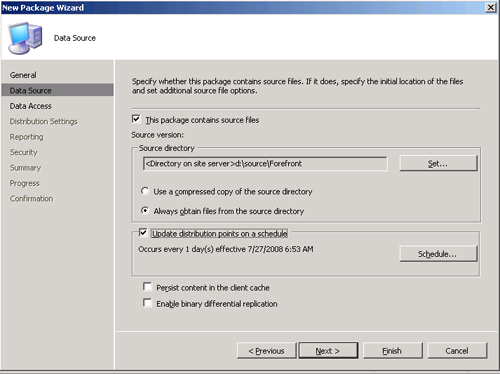
There are no additional fields in the wizard you need to alter from the defaults (Data Access, Distribution Settings, Reporting, Security, Summary) so click the Finish button on Figure 13.25 to bypass the remaining configuration pages. Click Next on the Summary page and click Close after creating the package.
The package is created, but without any programs for the package to run. To specify the program you want to create, open the Configuration Manager console and then navigate to System Center Configuration Manager -> Site Database -> Computer Management -> Software Distribution -> Packages -> Microsoft Forefront Client Security Agent 1.0.1703.0 English -> Programs. Right-click Programs and choose New -> Program to start the New Program Wizard. On the General screen, specify a name, comment, command line, and how the program will run. For this example, configure settings for the Forefront client as displayed in Figure 13.26.
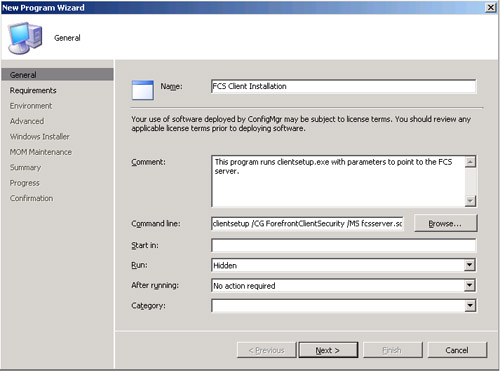
The Name and Comment fields can contain whatever text is appropriate, and do not require a specific set of text as long as they properly describe the program and its function.
However, the command line needs a very specific set of information. How do you know what to put into the command line field? There are two primary methods for determining the appropriate command-line information:
• The easiest method is opening the folder containing the installation program and running the program with /? after the command. As an example, Figure 13.27 shows the output from running clientsetup /?. The parameters shown here indicate the parameters necessary to specify when running the program. The command line shown in Figure 13.27 uses both the /CG and /MS parameters to install the Forefront client.

• Alternatively, you can find command-line information using the Internet to check commonly used sites, such as myITforum.com and AppDeploy.com, or just search for command-line parameters.
Figure 13.26 also shows the Run parameter set to Hidden, so the user will not see the program installing on his or her system. Keep the default “After running” selection of No action required. Click Next, and continue on to the Requirements screen.
On this page, set the estimated disk space to 350MB (based on the client requirements available at http://www.microsoft.com/forefront/clientsecurity/en/us/system-requirements.aspx). You will also want to specify the x86 platforms (this is further restricted, because for the XP platforms only Windows XP SP 2 is supported, and for the Windows 2000 platforms only Windows 2000 SP 4 is supported). Figure 13.28 displays this configuration. Click Next.

On the Environment screen, change the default configuration to run whether or not a user is logged on. Take the default configurations on the Advanced, Windows Installer, and MOM Maintenance screens. Click Finish to move to the Summary page and click Next to finish creating the program, then close the wizard.
At this point, you have created a package for the Forefront client and a program that runs an unattended installation of the program. The next step would be to specify the distribution points to use to distribute the software, but that discussion takes place in Chapter 14.
The majority of the packages needed for most organizations have existing package definition files, because most major packages now install from MSI files. For those packages that do not have package definition files but do have setup files, the Forefront client example illustrates that you can manually create packages by performing some additional steps. You can often install simple applications with a batch file or a script.
Tip
Site for Software Packaging and Deployment Guidance
A great place for general guidance on software deployment is the AppDeploy site (http://www.appdeploy.com). AppDeploy provides information on how to distribute software, including examples for Adobe Reader, Microsoft Office, and Visual Studio .NET. You now can deploy nearly all software using packages that run the various command-line configurations.
What do you do for the few applications that you cannot package using normal methods? There are some packages you cannot package using standard processes, but you can repackage them.
Software repackaging takes an existing application installation and converts it to an MSI package. You would take a snapshot of a system before and after installing the software on a system and then convert the results into the MSI package. Several tools are available to help with repackaging:
• The SMS Installer is a command-line tool used for repackaging, and has been available since Systems Management Server 2.0. This installer’s most recent update was the Windows Installer Step-Up utility (ISU), which converts packages to MSI formats. SMS Installer is still available for download at http://www.microsoft.com/technet/sms/20/downloads/tools/installer.mspx, but Microsoft has not updated it for ConfigMgr 2007. The most comprehensive source of information on the SMS Installer is Microsoft SMS Installer (Computing McGraw-Hill, 2000), written by Rod Trent from myITforum.com.
• Acresso Software’s AdminStudio Configuration Manager Editor provides repackaging for Configuration Manager 2007, converting applications to MSI format. A free download of this product is available at http://www.acresso.com/promolanding/7698.htm. The fully featured package includes the ability to create transforms (MST files), improved integration with ConfigMgr, and integration with the ConfigMgr Web console (available at http://www.myitforum.com/articles/19/view.asp?id=8662).
• Several other vendors provide repackaging options that may meet your requirements. For additional information on these vendors, go to the AppDeploy website (http://www.appdeploy.com/tools/browse.asp) and browse for repackagers.
However, there may be software you cannot even effectively repackage to create an MSI. Although this is not common, it can happen.
A coworker had a situation where OSD was being used to deploy a large number of operating system upgrades. The client had a Wireless Configured Privacy–based wireless configuration that needed to be deployed to all systems being upgraded. Testing determined no method existed that allowed either installing the WEP configuration or repackaging the WEP configuration. Faced with that situation, the best option was to use a scripted installation.
A scripted installation uses a tool such as AutoIT (available for download at http://www.autoitscript.com), which uses a simulated set of keystrokes, mouse movements, and Windows manipulation to automate tasks. These tasks are tested on a client workstation until they reliably perform the process they were designed to perform. The tasks are compiled into an executable that ConfigMgr can deploy as a software package. The software package requires the user be logged on and can interact with the package, because the scripted installation actually performs the installation through the user interface. Although it is not recommended as an approach for providing software installation, this is a good trick for those cases where no other software packaging approaches are viable.
Moving forward, Microsoft is wrapping its new direction for packaging around another Microsoft technology—SoftGrid—and its integration with Configuration Manager 2007.
On July 7, 2006, Microsoft completed the acquisition of a company called Softricity. Softricity provided an application virtualization solution that Microsoft has rebranded as Microsoft SoftGrid.
SoftGrid provides the ability to virtualize applications running on a desktop. The virtualized application does not install on the client system. These applications are streamed to the client, requiring only SoftGrid client installation to the client system. SoftGrid deployments exist in situations where the application cannot run on the standard client operating system, or where multiple versions of a single application need to exist on the same system but cannot due to conflicts.
Consider an environment that needs to run Microsoft Word 2003 and 2007 on the same client system. There are several ways to accomplish this:
• Have the users install the software locally on their system.
• Use ConfigMgr to deploy both software packages.
Each of these approaches includes dealing with any potential conflicts between the applications.
• Let SoftGrid virtualize the application.
This results in both applications packaged and available to the users, but not physically deployed to the client system. The client still sees the icons for each of the programs, and they run as if installed locally to the system—without actually going through the installation process.
SoftGrid runs applications in a siloed environment using virtualized versions of the operating system components, including the Registry, files, fonts, INI settings, COM configurations, embedded services, and environment variables. This siloed approach means that applications do not install directly into the client system. If the user were to open up the Registry on his or her workstation, there would not be any Registry settings for Microsoft Word, even though there is an icon for Word on the desktop and Word runs as if it was a locally installed application.
SoftGrid provides this functionality through a client- and server-based configuration. The SoftGrid architecture uses a SoftGrid Virtual Application Server for delivering applications, and it uses a client that installs on those systems that will have applications deployed.
SoftGrid-defined applications use a process called sequencing. Sequencing defines how a standard application will install and function as a virtualized application.
When using virtual applications with ConfigMgr, you must deploy both the ConfigMgr client and the App-V client to those client systems for the virtual applications to work on these systems.
Microsoft released the first Microsoft-branded version of the product formerly known as SoftGrid in 2008, naming it Microsoft Application Virtualization 4.5 (App-V 4.5 for short).
You can get App-V 4.5 several ways:
• Through the Microsoft Desktop Optimization Pack (MDOP) (http://www.microsoft.com/windows/enterprise/products/mdop.aspx)
• As part of Microsoft Application Virtualization for Terminal Services (http://www.microsoft.com/systemcenter/appv/terminalsvcs.mspx)
You can take applications sequenced using App-V 4.5 and deploy them as virtual applications with ConfigMgr 2007. Additional information on App-V 4.5 is available at http://www.microsoft.com/systemcenter/appv/default.mspx, and the App-V 4.5 FAQ is located at http://technet.microsoft.com/en-us/appvirtualization/cc664494.aspx.
When Microsoft added SoftGrid to its product line, the functionality crossings between SMS and SoftGrid were significant:
• One of the core functions of SMS was to deploy applications
• SoftGrid’s core function is to provide virtualized applications
Configuration Manager 2007 Release 2 (R2) provides integration between these two programs such that you can manage App-V virtualized applications from Configuration Manager 2007.
Although Microsoft Application Virtualization is integrated with ConfigMgr 2007 R2, ConfigMgr does not activate the application virtualization functionality by default. Several steps are required to add the Microsoft Application Virtualization components:
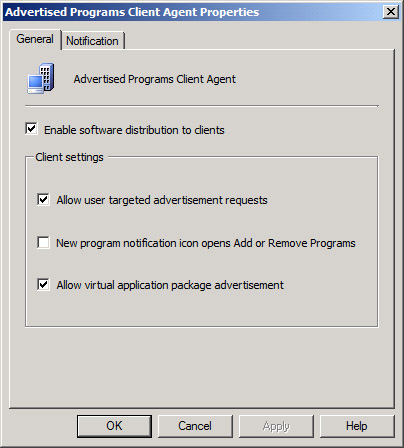
• Configure the Advertised Program Client agent to run virtual applications through the ConfigMgr console.
Navigate to -> Site Database -> Site Management <Site Code> <Site Name> -> Site Settings -> Client Agents -> Advertised Programs Client Agent. Right-click Advertised Programs Client Agent and then select Properties.
On the General tab, select the option Allow virtual application package advertisement. Figure 13.29 displays this configuration.
• Enable the Application Virtualization streaming server.
Open the ConfigMgr console -> Site Database -> Site Management <Site Code> <Site Name> -> Site Settings -> Site Systems. Then click the name of the server, right-click the ConfigMgr Distribution Point, and select Properties.
On the Virtual Applications tab, select Enable Virtual Application Streaming. See Figure 13.30 for this selection. Also verify that the distribution point supports HTTP requests (available in the properties of the distribution point on the General tab, under communication settings with the following option: Allow clients to transfer content from this distribution point using BITS, HTTP, and HTTPS).

After adding these components, you can import virtual application packages into Configuration Manager through the ConfigMgr console -> Computer Management -> Software Distribution -> Packages node.
The ability for Configuration Manager 2007 to integrate virtual applications greatly expands its functionality, because ConfigMgr can now deploy both installed and virtualized applications!
Prior to creating a virtual application in Configuration Manager 2007 R2, you must activate Application Virtualization, as discussed in the previous section. The second requirement is to have an application sequenced with App-V 4.5. The steps required to sequence a virtual application are outside of the scope of this book. The article at http://technet.microsoft.com/en-us/appvirtualization/cc843994.aspx, mentioned in the “Additional Readings on App-V” sidebar, is a good starting point for understanding virtual applications and sequencing.
Before creating the package, place the sequenced application on the site server. Perform the following steps:
- Store the sequenced application and the manifest.XML file in a unique folder structure. On the primary site server, create a folder (SoftGrid). Under that folder, create an additional folder (Adobe). Copy the sequenced application files, including the manifest.XML file, into this folder (Adobe, in this case).
- Create and share out a folder to be used later with the New Virtual Application Package Wizard. Create a folder called Adobe on the site server (this could be Bluebonnet in the SCCMUnleashed environment) under a folder called VirtualApps, and share it with permissions to allow everyone read-level access. Give ConfigMgr administrators full access.
When sequencing your next application, create a new folder under the SoftGrid folder for the new application (say, Microsoft Office) and then create a new folder under VirtualApps for the new application as well. This approach provides a consistent way to locate the various shared folders under the VirtualApps top-level folder.
After storing the sequenced application in one folder, and creating and sharing a destination folder, you are ready to start the wizard to create the virtual application! Perform the following steps:
- Open the ConfigMgr console -> Computer Management -> Software Distribution -> Packages. Right-click Packages and choose New -> Virtual Application Package to start the New Virtual Application Package Wizard.
-
This wizard looks for the files created when the Microsoft Application Virtualization Sequencer sequences an application. The wizard starts with defining the package source information. For this example, specify the Adobe_Reader_Adobe_9_MNT_manifest.xml file stored in the e:SoftGridAdobe folder structure, as displayed in Figure 13.31.
Tip
Each Sequenced Application Requires Its Own Folder
During initial testing, a single folder stored each of the sequenced applications (the e:softgrid folder). It was determined that if you attempt to store multiple sequenced applications in the same folder, the New Virtual Application Package Wizard will fail with an error that there are multiple sequenced applications in the same folder, and the wizard will not continue. You will want to create the unique folder structure for each application discussed at the beginning of the “Preparing a Sequenced Application for Packaging” section.
- The next screen provides the general settings for the new virtual application. The Name field prepopulates based on the manifest.XML file. Specify the version, manufacturer, and language, and leave the Comment field blank for this example, as shown in Figure 13.32. The option “Remove this package from clients when it is no longer advertised” is checked so that the package is removed if it is not advertised.
- The Data Source screen is next. Here, you will specify the data source configuration for the Adobe Reader virtual application. The destination directory is the empty folder previously shared, specified with the UNC path (\bluebonnetadobe) as displayed in Figure 13.33. The package source and destination directories cannot use the same folder. These folders can exist on the same server and the same drive, just not the same folder.
- Specify the Security settings associated with the new virtual application. The default security rights shown in Figure 13.34 should be sufficient.
- The wizard process completes through the Summary page, which shows the information defined for this new virtual application. The Progress screen shows the state of the virtual application as it is created, and the Confirmation screen shows the success (or failure) of the virtual application creation process. Figure 13.35 displays the successful creation of the Adobe Reader virtual application.
- Configuration Manager lists virtual applications in the same folder structure as nonvirtual applications (Computer Management -> Software Distribution -> Packages). Figure 13.36 shows an example of a regular packaged application (the ACME Service Pack) and a virtual application (the Adobe Reader just created).


The integration of virtual application packaging into ConfigMgr 2007 R2 is a large step forward in providing a single platform to package and deploy software, regardless of whether it is deployed as a software package or a virtual application.
Tip
Prepackaged Virtual Applications Available for Download
The website http://www.instantapp.net has a number of applications prepackaged as App-V-enabled applications that are freely downloadable and instantly usable. These applications not only provide functional virtual applications without sequencing them, but also provide a great way to validate your ConfigMgr environment’s ability to distribute virtual applications prior to testing your own virtual applications.
Several common issues may occur when creating software packages in Configuration Manager. These relate to issues in understanding the options available within ConfigMgr and when testing software packages.
One key consideration when developing software packages in Configuration Manager are the options available when creating a package and a program. These options—such as the ability to require another package to install prior to installation, placing restrictions on the program such as the platforms it installs on, and how much free space is required for the program to install—provide increased capabilities when packaging software with ConfigMgr.
In order for you to understand these options better, the chapter includes details in the “OpsMgr Client” and “Forefront Client” sections on all available package and program configurations.
The most commonly overlooked method of avoiding issues with ConfigMgr packaging is to test for as many contingencies as possible. If you are creating a software package to deploy to 1,000 workstations, you almost certainly will run into unexpected configurations. Effective testing processes can limit the risks of program failures or unexpected complications.
To test software packages, you need a testing lab (also discussed in Chapter 7, “Testing and Stabilizing”). This lab includes computers representative of those systems to which you will deploy the software package. However, it is often very difficult to get nonproduction versions of actual systems for testing purposes.
One method to address this requirement is to use a virtual lab environment for software package testing. With a product such as Hyper-V or VMware, you can run multiple computers without requiring an entire lab of physical hardware. One of the major benefits of a virtual environment is the ability to return a computer quickly to an earlier configuration. This capability makes it easy to roll an operating system back to its previous state (prior to deploying the software package). This is beneficial when testing software packages, as they often need to go through multiple testing iterations. Although you can build computers in the virtual environment from standard images, a more representative approach would be to actually perform a physical-to-virtual (P2V) translation of existing desktops in your environment, and then change the computer’s security identifier (SID) and name. Virtual lab environments also have the benefit of a smaller physical footprint, so less hardware is required for creating the lab.
Alternatively, physical lab environments provide real examples of those computers where you would deploy the package. In some cases, only a physical lab environment will identify issues such as a driver conflict existing between the software package and a set of computers running on a specific hardware platform. Your physical lab computers should be actual production systems taken from the groups where you are deploying software packages, and should represent the types of hardware that exist in your environment.
The authors’ recommended approach to creating a lab environment is a hybrid between a physical lab and a virtual lab. Using some of both types of systems minimizes the number of systems required, while providing many of the benefits of a physical lab.
Another important factor to consider when testing software packages is what exactly to test. You should create a set of tests identifying the types of conditions to test before releasing the package. Here are some examples of this:
• Installing the software package where there is not enough disk space
• Deploying to an unsupported platform
• Deploying where the program is already installed
• Deploying with other software packages installed that may cause conflicts
The exact set of tests will vary depending on your package, but identifying potential failure conditions ahead of time and testing for those conditions significantly increase the likelihood of creating a functional software package.
This chapter discussed the various methods available for deploying software in a Windows environment and explained the benefits of using Configuration Manager to deploy software. It described how various components in ConfigMgr come together to provide a software deployment solution, and it provided examples for how to create packages in ConfigMgr both with and without a package definition file. The chapter also discussed programs and packages and available configuration options, as well as tips for avoiding common issues when creating packages. The chapter concluded with a discussion of Microsoft’s direction for packaging in ConfigMgr, and tips for avoiding common ConfigMgr packaging issues. The next chapter will use these software packaging concepts in discussing how to deploy software with Configuration Manager 2007.