
Chapter 2. Core Storm concepts
- Core Storm concepts and terminology
- Basic code for your first Storm project
The core concepts in Storm are simple once you understand them, but this understanding can be hard to come by. Encountering a description of “executors” and “tasks” on your first day can be hard to understand. There are just too many concepts you need to hold in your head at one time. In this book, we’ll introduce concepts in a progressive fashion and try to minimize the number of concepts you need to think about at one time. This approach will often mean that an explanation isn’t entirely “true,” but it’ll be accurate enough at that point in your journey. As you slowly pick up on different pieces of the puzzle, we’ll point out where our earlier definitions can be expanded on.
2.1. Problem definition: GitHub commit count dashboard
Let’s begin by doing work in a domain that should be familiar: source control in GitHub. Most developers are familiar with GitHub, having used it for a personal project, for work, or for interacting with other open source projects.
Let’s say we want to implement a dashboard that shows a running count of the most active developers against any repository. This count has some real-time requirements in that it must be updated immediately after any change is made to the repository. The dashboard being requested by GitHub may look something like figure 2.1.
Figure 2.1. Mock-up of dashboard for a running count of changes made to a repository

The dashboard is quite simple. It contains a listing of the email of every developer who has made a commit to the repository along with a running total of the number of commits each has made. Before we dive into how we’d design a solution with Storm, let’s break down the problem a bit further in terms of the data that’ll be used.
2.1.1. Data: starting and ending points
For our scenario, we’ll say GitHub provides a live feed of commits being made to any repository. Each commit comes into the feed as a single string that contains the commit ID, followed by a space, followed by the email of the developer who made the commit. The following listing shows a sampling of 10 individual commits in the feed.
Listing 2.1. Sample commit data for the GitHub commit feed
b20ea50 [email protected]
064874b [email protected]
28e4f8e [email protected]
9a3e07f [email protected]
cbb9cd1 [email protected]
0f663d2 [email protected]
0a4b984 [email protected]
1915ca4 [email protected]
This feed gives us a starting point for our data. We’ll need to go from this live feed to a UI displaying a running count of commits per email address. For the sake of simplicity, let’s say all we need to do is maintain an in-memory map with email address as the key and number of commits as the value. The map may look something like this in code:
Map<String, Integer> countsByEmail = new HashMap<String, Integer>();
Now that we’ve defined the data, the next step is to define the steps we need to take to make sure our in-memory map correctly reflects the commit data.
2.1.2. Breaking down the problem
We know we want to go from a feed of commit messages to an in-memory map of emails/commit counts, but we haven’t defined how to get there. At this point, breaking down the problem into a series of smaller steps helps. We define these steps in terms of components that accept input, perform a calculation on that input, and produce some output. The steps should provide a way to get from our starting point to our desired ending point. We’ve come up with the following components for this problem:
- A component that reads from the live feed of commits and produces a single commit message
- A component that accepts a single commit message, extracts the developer’s email from that commit, and produces an email
- A component that accepts the developer’s email and updates an in-memory map where the key is the email and the value is the number of commits for that email
In this chapter we break down the problem into several components. In the next chapter, we’ll go over how to think about mapping a problem onto the Storm domain in much greater detail. But before we get ahead of ourselves, take a look at figure 2.2, which illustrates the components, the input they accept, and the output they produce.
Figure 2.2. The commit count problem broken down into a series of steps with defined inputs and outputs

Figure 2.2 shows our basic solution for going from a live feed of commits to something that stores the commit counts for each email. We have three components, each with a singular purpose. Now that we have a well-formed idea of how we want to solve this problem, let’s frame our solution within the context of Storm.
2.2. Basic Storm concepts
To help you understand the core concepts in Storm, we’ll go over the common terminology used in Storm. We’ll do this within the context of our sample design. Let’s begin with the most basic component in Storm: the topology.
2.2.1. Topology
Let’s take a step back from our example in order to understand what a topology is. Think of a simple linear graph with some nodes connected by directed edges. Now imagine that each one of those nodes represents a single process or computation and each edge represents the result of one computation being passed as input to the next computation. Figure 2.3 illustrates this more clearly.
Figure 2.3. A topology is a graph with nodes representing computations and edges representing results of computations.

A Storm topology is a graph of computation where the nodes represent some individual computations and the edges represent the data being passed between nodes. We then feed data into this graph of computation in order to achieve some goal. What does this mean exactly? Let’s go back to our dashboard example to show you what we’re talking about.
Looking at the modular breakdown of our problem, we’re able to identify each of the components from our definition of a topology. Figure 2.4 illustrates this correlation; there’s a lot to take in here, so take your time.
Figure 2.4. Design mapped to the definition of a Storm topology

Each concept we mentioned in the definition of a topology can be found in our design. The actual topology consists of the nodes and edges. This topology is then driven by the continuous live feed of commits. Our design fits quite well within the framework of Storm. Now that you understand what a topology is, we’ll dive into the individual components that make up a topology.
2.2.2. Tuple
The nodes in our topology send data between one another in the form of tuples. A tuple is an ordered list of values, where each value is assigned a name. A node can create and then (optionally) send tuples to any number of nodes in the graph. The process of sending a tuple to be handled by any number of nodes is called emitting a tuple.
It’s important to note that just because each value in a tuple has a name, doesn’t mean a tuple is a list of name-value pairs. A list of name-value pairs implies there may be a map behind the scenes and that the name is actually a part of the tuple. Neither of these statements is true. A tuple is an ordered list of values and Storm provides mechanisms for assigning names to the values within this list; we’ll get into how these names are assigned later in this chapter.
When we display tuples in figures throughout the rest of the book, the names associated with the values are important, so we’ve settled on a convention that includes both the name and value (figure 2.5).
Figure 2.5. Format for displaying tuples in figures throughout the book

With the standard format for displaying tuples in hand, let’s identify the two types of tuples in our topology:
- The commit message containing the commit ID and developer email
- The developer email
We need to assign each of these a name, so we’ll go with “commit” and “email” for now (more details on how this is done in code later). Figure 2.6 provides an illustration of where the tuples are flowing in our topology.
Figure 2.6. Two types of tuples in the topology: one for the commit message and another for the email

The types of the values within a tuple are dynamic and don’t need to be declared. But Storm does need to know how to serialize these values so it can send the tuple between nodes in the topology. Storm already knows how to serialize primitive types but will require custom serializers for any custom type you define and can fall back to standard Java serialization when a custom serializer isn’t present.
We’ll get to the code for all of this soon, but for now the important thing is to understand the terminology and relationships between concepts. With an understanding of tuples in hand, we can move on to the core abstraction in Storm: the stream.
2.2.3. Stream
According to the Storm wiki, a stream is an “unbounded sequence of tuples.” This is a great explanation of what a stream is, with maybe one addition. A stream is an unbounded sequence of tuples between two nodes in the topology. A topology can contain any number of streams. Other than the very first node in the topology that reads from the data feed, nodes can accept one or more streams as input. Nodes will then normally perform some computation or transformation on the input tuples and emit new tuples, thus creating a new output stream. These output streams then act as input streams for other nodes, and so on.
There are two streams in our GitHub commit count topology. The first stream starts with the node that continuously reads commits from a feed. This node emits a tuple with the commit to another node that extracts the email. The second stream starts with the node that extracts the email from the commit. This node transforms its input stream (containing commits) by emitting a new stream containing only emails. The resulting output stream serves as input into the node that updates the in-memory map. You can see these streams in figure 2.7.
Figure 2.7. Identifying the two streams in our topology

Our Storm GitHub scenario is an example of a simple chained stream (multiple streams chained together).
Complex streams
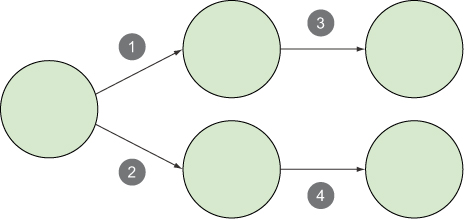
Streams may not always be as straightforward as those in our topology. Take the example in figure 2.8. This figure shows a topology with four different streams. The first node emits a tuple that’s consumed by two different nodes; this results in two separate streams. Each of those nodes then emits tuples to their own new output stream.
Figure 2.8. Topology with four streams
The combinations are endless with regard to the number of streams that may be created, split, and then joined again. The examples later in this book will delve into the more complex chains of streams and why it’s beneficial to design a topology in such a way. For now, we’ll continue with our straightforward example and move on to the source of a stream for a topology.
2.2.4. Spout
A spout is the source of a stream in the topology. Spouts normally read data from an external data source and emit tuples into the topology. Spouts can listen to message queues for incoming messages, listen to a database for changes, or listen to any other source of a feed of data. In our example, the spout is listening to the real-time feed of commits being made to the Storm repository (figure 2.9).
Figure 2.9. A spout reads from the feed of commit messages.

Spouts don’t perform any processing; they simply act as a source of streams, reading from a data source and emitting tuples to the next type of node in a topology: the bolt.
2.2.5. Bolt
Unlike a spout, whose sole purpose is to listen to a stream of data, a bolt accepts a tuple from its input stream, performs some computation or transformation—filtering, aggregation, or a join, perhaps—on that tuple, and then optionally emits a new tuple (or tuples) to its output stream(s).
The bolts in our example are as follows:
- A bolt that extracts the developer’s email from the commit— This bolt accepts a tuple containing a commit with a commit ID and email from its input stream. It transforms that input stream and emits a new tuple containing only the email address to its output stream.
- A bolt that updates the map of emails to commit counts— This bolt accepts a tuple containing an email address from its input stream. Because this bolt updates an in-memory map and doesn’t emit a new tuple, it doesn’t produce an output stream.
Both of these bolts are shown in figure 2.10.
Figure 2.10. Bolts perform processing on the commit messages and associated emails within those messages.

The bolts in our example are extremely simple. As you move along in the book, you’ll create bolts that do much more complex transformations, sometimes even reading from multiple input streams and producing multiple output streams. We’re getting ahead of ourselves here, though. First you need to understand how bolts and spouts work in practice.
How Bolts and Spouts Work Under the Covers
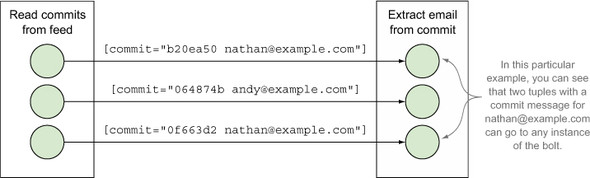
In figures 2.9 and 2.10, both the spout and bolts were shown as single components. This is true from a logical standpoint. But when it comes to how spouts and bolts work in reality, there’s a little more to it. In a running topology, there are normally numerous instances of each type of spout/bolt performing computations in parallel. See figure 2.11, where the bolt for extracting the email from the commit and the bolt for updating the email count are each running across three different instances. Notice how a single instance of one bolt is emitting a tuple to a single instance of another bolt.
Figure 2.11. There are normally multiple instances of a particular bolt emitting tuples to multiple instances of another bolt.
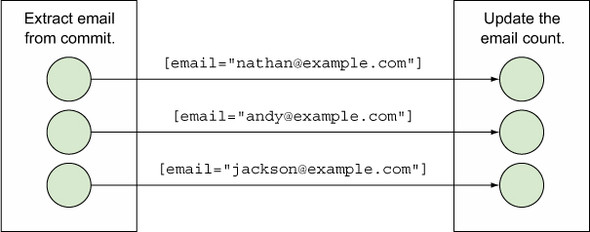
Figure 2.11 shows just one possible scenario of how the tuples would be sent between instances of the two bolts. In reality, the picture is more like figure 2.12, where each bolt instance on the left is emitting tuples to several different bolt instances on the right.
Figure 2.12. Individual instances of a bolt can emit to any number of instances of another bolt.

Understanding the breakdown of spout and bolt instances is extremely important, so let’s pause for a moment and summarize what you know before diving into our final concept:
- A topology consists of nodes and edges.
- Nodes represent either spouts or bolts.
- Edges represent streams of tuples between these spouts and bolts.
- A tuple is an ordered list of values, where each value is assigned a name.
- A stream is an unbounded sequence of tuples between a spout and a bolt or between two bolts.
- A spout is the source of a stream in a topology, usually listening to some sort of live feed of data.
- A bolt accepts a stream of tuples from a spout or another bolt, typically performing some sort of computation or transformation on these input tuples. The bolt can then optionally emit new tuples that serve as the input stream to another bolt in the topology.
- Each spout and bolt will have one or many individual instances that perform all of this processing in parallel.
That’s quite a bit of material, so be sure to let this sink in before you move on. Ready? Good. Before we get into actual code, let’s tackle one more important concept: stream grouping.
2.2.6. Stream grouping
You know by now that a stream is an unbounded sequence of tuples between a spout and bolt or two bolts. A stream grouping defines how the tuples are sent between instances of those spouts and bolts. What do we mean by this? Let’s take a step back and look at our commit count topology. We have two streams in our GitHub commit count topology. Each of these streams will have their own stream grouping defined, telling Storm how to send individual tuples between instances of the spout and bolts (figure 2.13).
Figure 2.13. Each stream in the topology will have its own stream grouping.

Storm comes with several stream groupings out of the box. We’ll cover most of these throughout this book, starting with the two most common groupings in this chapter: the shuffle grouping and fields grouping.
Shuffle grouping
The stream between our spout and first bolt uses a shuffle grouping. A shuffle grouping is a type of stream grouping where tuples are emitted to instances of bolts at random, as shown in figure 2.14.
Figure 2.14. Using a shuffle grouping between our spout and first bolt
In this example, we don’t care how tuples are passed to the instances of our bolts, so we choose the shuffle grouping to distribute tuples at random. Using a shuffle grouping will guarantee that each bolt instance should receive a relatively equal number of tuples, thus spreading the load across all bolt instances. Shuffle grouping assignment is done randomly rather than round robin so exact equality of distribution isn’t guaranteed.
This grouping is useful in many basic cases where you don’t have special requirements about how your data is passed to bolts. But sometimes you have scenarios where sending tuples to random bolt instances won’t work based on your requirements—as in the case of our scenario for sending tuples between the bolt that extracts the email and the bolt that updates the email. We’ll need a different type of stream grouping for this.
Fields grouping
The stream between the bolt that extracts the email and the bolt that updates the email will need to use a fields grouping. A fields grouping ensures that tuples with the same value for a particular field name are always emitted to the same instance of a bolt. To understand why a fields grouping is necessary for our second stream, let’s look at the consequences of using an in-memory map to track the number of commits per email.
Each bolt instance will have its own map for the email/commit count pairs, so it’s necessary that the same email go to the same bolt instance in order for the count for each email to be accurate across all bolt instances. A fields grouping provides exactly this (figure 2.15).
Figure 2.15. Use a fields grouping for the bolt that will have a separate in-memory map for each bolt instance.

In this example, the decision to use an in-memory map for the email count implementation resulted in the need for a fields grouping. We could’ve used a resource that was shared across bolt instances and eliminated that need. We’ll explore design and implementation considerations like this one in chapter 3 and beyond, but for now let’s shift our focus to the code that we’ll need to get our topology up and running.
2.3. Implementing a GitHub commit count dashboard in Storm
Now that we’ve covered all the important concepts in Storm, it’s time to get into writing the code for our topology. This section will start with the code for the individual spout and bolts and introduce the relevant Storm interfaces and classes. Some of these interfaces and classes you’ll use directly and some you won’t; regardless, understanding the overall Storm API hierarchy will give you a fuller understanding of your topology and associated code.
After we’ve introduced the code for the spout and bolts, we’ll go over the code required for putting it all together. If you remember from our earlier discussion, our topology contains streams and stream groupings. The code for the spout and bolts is only part of the picture—you still need to define where and how tuples are emitted between components in the topology. In our discussion of the code needed for building the topology, you’ll encounter some of Storm’s configuration options, most of which will be covered in greater detail later in the book.
Finally, after we’ve wired everything up by defining the streams and stream groupings in the topology, we’ll show you how to run your topology locally, allowing you to test whether everything works as expected. But before we dive into all this code, let’s set you up with a basic Storm project.
2.3.1. Setting up a Storm project
The easiest way to get the Storm JARs on your classpath for development is to use Apache Maven.
Note
You can find other ways to set up Storm at http://storm.apache.org/documentation/Creating-a-new-Storm-project.html, but Maven is by far the simplest. Check out http://maven.apache.org/ for information on Maven.
Add the code shown in the next listing to your project’s pom.xml file.
Listing 2.2. pom.xml

Once you’ve made these additions to your pom.xml file, you should have all the necessary dependencies for writing code and running Storm topologies locally on your development machine.
2.3.2. Implementing the spout
Because the spout is where data enters a topology, this is where we’ll begin our coding. Before diving into the details, let’s examine the general interface and class structure within Storm for the spout. Figure 2.16 explains this class hierarchy.
Figure 2.16. Storm’s class hierarchy for the spout

In this design, the spout listens to a live feed of commits being made to a particular GitHub project using the GitHub API and emits tuples, each containing an entire commit message, as shown in figure 2.17.
Figure 2.17. The spout listens to the feed of commit messages and emits a tuple for each commit message.

Setting up a spout to listen to a live feed requires a bit of work that we feel is a distraction from understanding the basic code. Because of this, we’re going to cheat and simulate a live feed by having our spout continuously read from a file of commit messages, emitting a tuple for each line in the file. Don’t worry; in later chapters we’ll wire up spouts to live feeds, but for now our focus is on the basics. The file changelog.txt will live next to the class for our spout and contain a list of commit messages in the expected format (shown in the following listing).
Listing 2.3. An excerpt from our simple data source: changelog.txt
b20ea50 [email protected]
064874b [email protected]
28e4f8e [email protected]
9a3e07f [email protected]
cbb9cd1 [email protected]
0f663d2 [email protected]
0a4b984 [email protected]
1915ca4 [email protected]
Once we’ve defined the source of our data, we can move to the spout implementation, as shown in the next listing.
Listing 2.4. CommitFeedListener.java
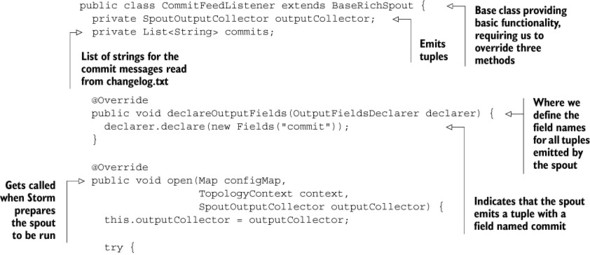
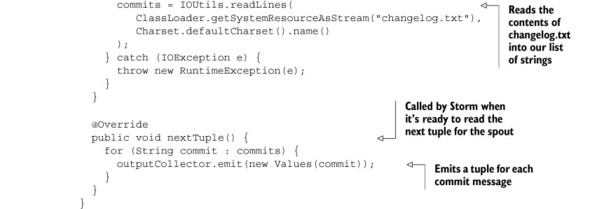
Quite a bit is going on with our spout. We start by extending BaseRichSpout, which gives us three methods that need to be overridden. The first of these methods is declareOutputFields. Remember earlier in the chapter when we said we’d discuss how Storm assigns names to tuples? Well, here we are. The declareOutputFields method is where we define the names for the values in tuples being emitted by this spout. Defining names for emitted tuple values is done with the Fields class, whose constructor accepts multiple strings; each string is the name of a value in an emitted tuple. The order of the names in the Fields constructor must match the order of the values emitted in the tuple via the Values class. Because the tuple emitted by our spout contains a single value, we have a single argument, commit, passed into Fields.
The next method we need to override is open; this is where we read the contents of changelog.txt into our list of strings. If we’re writing code for a spout that deals with a live data source, such as a message queue, this is where we’d put the code for connecting to that data source. You’ll see more on this beginning in chapter 3.
The final method we need to override is nextTuple. This is the method Storm calls when it’s ready for the spout to read and emit a new tuple and is usually invoked periodically as determined by Storm. In our example we’re emitting a new tuple for each value in our list every time nextTuple is called, but for something that reads from a live data source, such as a message queue, a new tuple will only be emitted if a new piece of data is available.
You’ll also notice a class called SpoutOutputCollector. Output collectors are something you’ll see quite a bit for both spouts and bolts. They’re responsible for emitting and failing tuples.
Now that we know how our spout obtains commit messages from our data source and emits new tuples for each commit message, we need to implement the code that transforms these commit messages into a map of emails to commit counts.
2.3.3. Implementing the bolts
We’ve implemented the spout that serves as the source of a stream, so now it’s time to move on to the bolts. Figure 2.18 explains the general interface and class structure within Storm for bolts.
Figure 2.18. Storm’s class hierarchy for the bolt

You’ll notice in figure 2.18 that the class hierarchy for a bolt is a little more complex than that of a spout. The reason is that Storm has additional classes for bolts that have incredibly simple implementations (IBasicBolt/BaseBasicBolt). These take over the responsibilities usually accessible to a developer with IRichBolt, so it makes simpler bolt implementations more concise. The simplicity of IBasic-Bolt does come at the cost of taking away some of the fluency of the rich feature set made accessible through IRichBolt. We’ll cover the differences between BaseRichBolt and Base-BasicBolt and explain when to use either in more detail in chapter 4. In this chapter, we’ll use BaseBasicBolt because the bolt implementations are quite straightforward.
To revisit our design, remember that we have two bolts in our topology (see figure 2.19). One bolt accepts a tuple containing the full commit message, extracts the email from the commit message, and emits a tuple containing the email. The second bolt maintains an in-memory map of emails to commit counts.
Figure 2.19. The two bolts in our topology: the first bolt extracts the email from the commit message and the second bolt maintains an in-memory map of emails to commit counts.

Let’s take a look at the code for these bolts, starting with EmailExtractor.java in the next listing.
Listing 2.5. EmailExtractor.java

The implementation for EmailExtractor.java is quite small, which is the main reason we decided to extend BaseBasicBolt. If you look a little deeper into the code, you’ll notice some similarities to our spout code, namely the manner in which we declare the names for the values in tuples emitted by this bolt. Here we’ve defined a single field with a name of email.
As far as the bolt’s execute method is concerned, all we’re doing is splitting the string on the whitespace in order to obtain the email and emitting a new tuple with that email. Remember the output collector we mentioned in the previous spout implementation? We have something similar here with BasicOutputCollector, which emits this tuple, sending it to the next bolt in the topology, the email counter.
The code in the email counter is similar in structure to EmailExtractor.java but with a little more setup and implementation, as shown in the next listing.
Listing 2.6. EmailCounter.java


Again, we’ve decided to extend BaseBasicBolt. Even though EmailCounter.java is more complex than EmailExtractor.java, we can still get away with the functionality accessible by BaseBasicBolt. One difference you’ll notice is that we’ve overridden the prepare method. This method gets called as Storm prepares the bolt before execution and is the method where we’d perform any setup for our bolt. In our case, this means instantiating the in-memory map.
Speaking of the in-memory map, you’ll notice this is a private member variable that’s specific to a single instance of this bolt. This should ring a bell, as it’s something we mentioned in section 2.2.6, and it’s why we were forced to use a fields grouping for the stream between our two bolts.
So here we are; we have code for our spout and two bolts. What’s next? We need to somehow tell Storm where the streams are and identify the stream groupings for each of those streams. And we imagine you’re eager to run this topology and see it in action. Here’s where wiring everything together comes into play.
2.3.4. Wiring everything together to form the topology
Our spout and bolt implementations aren’t useful on their own. We need to build up the topology, defining the streams and stream groupings between the spout and bolts. After that, we’d like to be able to run a test to make sure it all works as expected. Storm provides all the classes you need to do this. These classes include the following:
- TopologyBuilder— This class is used to piece together spouts and bolts, defining the streams and stream groupings between them.
- Config— This class is used for defining topology-level configuration.
- StormTopology— This class is what TopologyBuilder builds and is what’s submitted to the cluster to be run.
- LocalCluster— This class simulates a Storm cluster in-process on our local machine, allowing us to easily run our topologies for testing purposes.
With a basic understanding of these classes, we’ll build our topology and submit it to a local cluster, as seen in the next listing.
Listing 2.7. LocalTopologyRunner.java
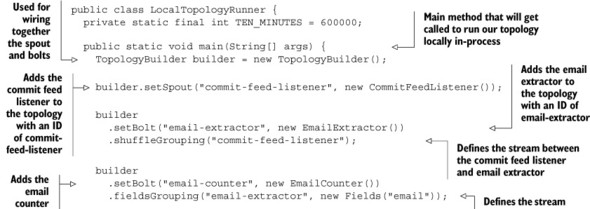

You can think of the main method as being split into three sections. The first is where we build the topology and tell Storm where the streams are and identify the stream groupings for each of these streams. The next part is creating the configuration. In our example, we’ve turned on debug logging. Many more configuration options are available that we’ll cover later in this book. The final part is where we submit both the configuration and built topology to the local cluster to be run. Here we run the local cluster for 10 minutes, continuously emitting tuples for each commit message in our changelog.txt file. This should provide plenty of activity within our topology.
If we were to run the main method of LocalTopologyRunner.java via java -jar, we would see debug log messages flying by in the console showing tuples being emitted by our spout and processed by our bolts. And there you have it; you’ve built your first topology! With the basics covered, we still need to address some of the topics we alluded to in this chapter. We’ll start with addressing some good topology design practices to follow in chapter 3.
2.4. Summary
In this chapter, you learned that
- A topology is a graph where the nodes represent a single process or computation and the edges represent the result of one computation being passed as the input to another computation.
- A tuple is an ordered list of values where each value in the list is assigned a name. A tuple represents the data passed between two components.
- The flow of tuples between two components is called a stream.
- Spouts act as the source of a stream; their sole purpose is to read data from a source and emit tuples to its output stream.
- Bolts are where the core logic in a topology exists, performing operations such as filters, aggregations, joins, and talking to databases.
- Both spouts and bolts (called components) execute as one or more individual instances, emitting tuples to other instances of bolts.
- The manner in which tuples flow between individual instances of components is defined with a stream grouping.
- Implementing the code for your spouts and bolts is only part of the picture; you still need to wire them together and define the streams and stream groupings.
- Running a topology in local mode is the quickest way to test that your topology is working.