Day 3: It’s All a Game
When I was in high school, I made extra spending money by writing games. We basically painted one screen after another in a loop, and the game went as fast as your hardware. The more complex the game, the slower it ran. These days, writing a game using conventional technologies is much tougher. The processors are much faster, so you need to spend more time dealing with timing and state. I quit writing games when I was in college. It just got too hard to crank out a game in an afternoon.
Until now. The game I wrote for this chapter is the first I’ve written in 20 years. The experience has been incredibly rewarding. The flow of this section is going to be a little different than most of the others in this book. I’m going to show you what a game skeleton looks like, we’ll invent a game concept, and then we’ll work through one giant example, about 150 lines long, piece by piece. When we’re done, you will have a working game that you can customize. Hopefully, Elm will spark a new wave of game designers.
First things first, though. We need to start with a basic shell.
Describing a Skeleton
You’ve already seen how animation, user input, and graphics display work in Elm, so you probably know at least a little about what a game will look like. The basic strategy will be to build one time slice of the game. Then, we’ll work on moving the game from one time slice to the next, based on user input. Using that strategy, all basic games will have the same basic components:
-
A model—We’ll build a data model of the game, including the user inputs and all data elements, player or computer controlled.
-
A signal—The signal will combine the game state with user input signals and time.
-
Step logic—We’ll build a step function that will move the game to the next state based on the previous game state and the user inputs.
-
Display logic—We won’t worry about animation. We’ll worry only about showing our game state, at a point frozen in time.
Keep in mind that all games have to do this work. It’s just harder to express games in many other languages because the abstractions are not as clean. Let’s take a look at a basic skeleton of our game, without any specifics attached.
Defining the Model
Here’s the skeleton in code. As with most games in Elm, I’ve based the initial design on Evan’s excellent game skeleton.[61] It’s a free, open source project that you can use to get started. Alternatively, you can check out the many game examples at the Elm language site.[62] Let’s check out my revised skeleton, piece by piece.
| elm/skeleton.elm | |
| | module SomeGame where... |
| | |
| | type Input = { ... } |
| | type Player = { ... } |
| | type Game = { player:Player, ... } |
First, we model the game. Elm games are modules. Inside these you build a model of your game with simple data types. You can combine those simple types into higher level types. Generally, your model will represent the player, other computer-controlled elements, game state, and user inputs at one point in time. You’re looking to collect everything you will need when it comes time to display the game, or to transition from one slice of time to the next.
Looping with Signals and foldp
Next, define a couple of signals. One will grab the user inputs we need, and the other will build each time slice based on the last one. As you can imagine, we’ll use lift for the input and foldp to move from one slice to the next.
| elm/skeleton.elm | |
| | delta = inSeconds <~ fps n |
| | input = sampleOn delta (...) |
| | main = lift display gameState |
| | gameState = foldp stepGame initialGameState input |
delta is a signal (using the operator equivalent of lift, <~) that represents one slice of time. fps is a signal that means “frames per second.” We’re left with a signal that regularly updates every n seconds. Just like that, Elm has taken over the sensitive game timing so our math can focus on one point in time.
We then build another signal based on that one called input, which will capture all of the user input we need. gameState is a signal that builds the next state of the game based on user inputs and the previous game state. foldp is the perfect choice to do this work because it allows us to use the previous state in our definition of the next game.
main, then, needs only animate the game. That’s easy since we can lift the gameState signal onto display. This code has a lot going on. Feel free to spend a little time with it to make sure you understand what’s going on.
Stepping and Displaying the Game
Of course, stepping from one state to the next and displaying our game are the essence of our game and should command most of our attention. In Elm, they do. Further, both stepGame and display are simple functions that operate on one flat slice of time. We don’t have to worry about input and output beyond its state at any instance of time. The framework lets us represent what is often the most difficult part of the game with a trivial four lines of code. Fantastic!
Describing Language Head
Before we start to code, we need to know one more thing. What are the rules of the game?
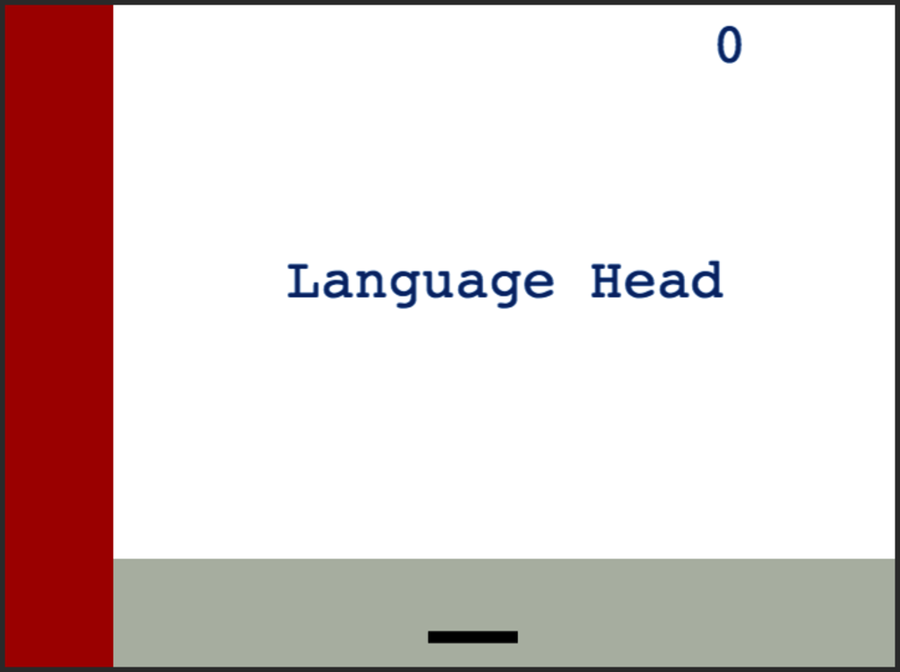
A strange language deserves an equally twisted game. We’re going to build a game called Language Head. The object of the game is to bounce some balls across the screen, without letting each hit the ground. When a ball hits the ground, the game ends. The player scores by staying alive and successfully getting a ball across the screen with a paddle they’ll move with their mouse. There’s a black line for a paddle on the bottom, a score on the upper right, and a primitive background, including a red rectangle representing a building on the left, and a gray area that will be our road on the bottom.
There’s a twist. We’re going to put the pictures of people on each ball, and call them heads. We’ll drop more and more of them as the game goes on.
I’m going to break protocol for this chapter. Rather than work on this project iteratively, I’m going to tell you about each part of the completed game. Then, we’ll talk about how to run the program, and you can take a well-earned break to play the game. Some of the parts will be a little long, but that’s OK. We’ll carve those long examples into shorter sections so you’ll be able to see what’s going on.
Modeling Language Head
Let’s look at the first code section: the module definition and imports.
| elm/game/languageHeads.elm | |
| | module LanguageHead where |
| | |
| | import Keyboard |
| | import Mouse |
| | import Random |
| | import Text |
Longer Elm programs are broken down into modules. This module is called LanguageHead. We need mouse input for the paddle and keyboard input to capture the spacebar to start the game. We will also need a random signal to choose which head to present. All of the code for this whole game is in a single module.
Let’s take a look at the data models.
| elm/game/languageHeads.elm | |
| ① | data State = Play | Pause | GameOver |
| | |
| | type Input = { space:Bool, x:Int, delta:Time, rand:Int } |
| | type Head = { x:Float, y:Float, vx:Float, vy:Float } |
| | type Player = { x:Float, score:Int } |
| | type Game = { state:State, heads:[Head], player:Player } |
| | |
| ② | defaultHead n = {x=100.0, y=75, vx=60, vy=0.0, img=headImage n } |
| | defaultGame = { state = Pause, |
| | heads = [], |
| | player = {x=0.0, score=0} } |
| | |
| | headImage n = |
| | if | n == 0 -> "/img/brucetate.png" |
| | | n == 1 -> "/img/davethomas.png" |
| | | n == 2 -> "/img/evanczaplicki.png" |
| | | n == 3 -> "/img/joearmstrong.png" |
| | | n == 4 -> "/img/josevalim.png" |
| | | otherwise -> "" |
| | bottom = 550 |
This listing defines data types that describe our world. We first define data types, and then we declare some data that will come in handy when we introduce new data to the game. Let’s look at it piece by piece.
- ①
-
In short, we have an overarching Game model that contains the game State, user Input, all of the Heads, and the Player. The State is a primitive data type with the states we’ll need: Play, Pause, and GameOver. The game will behave differently in each of these states.
The Player and Game types are pretty simple, but the Head type needs a little more explanation. We need to save not just the x and y coordinates (these are on a 800×600 grid, with the origin anchored on the top left), but also the velocity that the heads are moving across both dimensions. The y velocity will change over time to simulate gravity, flipping when any head bounces. We’ll need this velocity as we step the game. We will also assign a random head image in img.
- ②
-
In this section, we’re done with types. We are building functions to return actual data for the initial state. defaultGame is simple as expected, but the heads have to have more logic built in because we are going to move them around. We define a default head. We include its starting coordinates, and set the vx to a constant. Ignoring the laws of physics, our heads will keep a constant x velocity (vx) because I am not smart enough to calculate wind resistance across the wide variety of hairstyles our heads could have. I’m looking at you, Evan. Our vy values start with a velocity of zero, but that will pick up once our artificial gravity kicks in.
Now that we’ve defined the model, it’s time to define the signals that will drive our game.
Building the Game Signals
In this section, we handle all of the timing, the different user input states, the speed of the game, and the details that hold the application together from frame to frame. It’s also the shortest section of our entire example. You can probably see where this is, um, headed. Elm is going to handle these details through signals. We’ll just need to provide a little glue.
| elm/game/languageHeads.elm | |
| | secsPerFrame = 1.0 / 50.0 |
| | delta = inSeconds <~ fps 50 |
| | |
| | input = sampleOn delta (Input <~ Keyboard.space |
| | ~ Mouse.x |
| | ~ delta |
| | ~ Random.range 0 4 (every secsPerFrame)) |
| | |
| | main = lift display gameState |
| | |
| | gameState = foldp stepGame defaultGame input |
We first set the speed of the game. We define a function called secsPerFrame to return the size of each time slice. Next, we build a delta signal that updates 50 times per second. The <~ operator is shorthand for lift, so you could write inSeconds <~ fps 50 as lift inSeconds (fps 50). That means we’re just going to get a float representing the number of seconds that have actually passed.
Next, we build our input signal. You’ll see a new operator, the ~. (f <~ a ~ b) is equivalent to (lift2 f a b). Think of the squiggly arrow as signals flowing into the function. Using that operator, we pick off the various elements of the Input type, whether the spacebar is pressed, the x position of the mouse, and the total amount of time that’s passed in this slice. We’ll sample 50 times a second, based on the delta signal.
Finally, all that remains is to build our foldp loop. This recursive loop will build each successive Game based on the previous Game slice and user inputs. You can see that we’re following the skeleton quite closely. The bulk of the code manages the creative side of the game, stepping and displaying each element. Herd on, Babe!
Stepping the Game
The trickiest part of this game is to manage all of the moving parts. We’ll break this process into three major parts:
-
Stepping the game when we’re in Play mode—In this mode, we’ll have to move the player’s score and paddle. We’ll also have to check to see if the game is over, and we’ll need to move the heads around a bit.
-
Stepping the game when we’re in Pause mode—In this mode, the player has not yet started the game. We’ll allow them to move the paddle and also to press the spacebar. Otherwise, there’s not much work to do.
-
Stepping the game in GameOver mode—We’ll want to preserve the score, and we’ll want to reset the player right before we restart the game. Otherwise, this mode is identical to the Pause mode.
There’s a lot going on here, but the code is remarkably concise because we don’t have to worry about timing, animation, or managing user input.
| elm/game/languageHeads.elm | |
| ① | stepGame input game = |
| | case game.state of |
| | Play -> stepGamePlay input game |
| | Pause -> stepGamePaused input game |
| | GameOver -> stepGameFinished input game |
| | |
| ② | stepGamePlay {space, x, delta, rand} ({state, heads, player} as game) = |
| | { game | state <- stepGameOver x heads |
| | , heads <- stepHeads heads delta x player.score rand |
| | , player <- stepPlayer player x heads } |
| | |
| | stepGameOver x heads = |
| | if allHeadsSafe (toFloat x) heads then Play else GameOver |
| | |
| | allHeadsSafe x heads = |
| | all (headSafe x) heads |
| | |
| | headSafe x head = |
| | head.y < bottom || abs (head.x - x) < 50 |
- ①
-
Though we break it down into several different functions, stepGame is just a function. We take the input and game data types. We use case to branch on game.state, calling a function to step each possible game state.
- ②
-
The first such function is stepGamePlay, which steps the game in Play mode. We update the game structure, calling a function to build each element of the game structure. stepGameOver will tell us if a head has crashed, stepHeads will manage any changes in the heads, and stepPlayer will handle changes in the paddle position and score.
The game is over when we experience a cranial catastrophe, meaning one head reached the bottom without a paddle. stepGameOver, then, is easy to write. We call a function called allHeadsSafe to see if any heads have reached the bottom without a paddle. That function will be true if headSafe head is true for every head in heads. headSafe needs only check to see if a single head has reached the bottom without the paddle close by (abs (head.x - x) < 50).
Now, we know enough to tell whether the heads are safe, so we can successfully transition to GameOver at the right time. Note that we don’t care about any animation—we just check to see if all heads are safe at this point in time.
The next step is to move the heads according to the rules of the game. There are several steps to that process:
| elm/game/languageHeads.elm | |
| ① | stepHeads heads delta x score rand = |
| | spawnHead score heads rand |
| | |> bounceHeads |
| | |> removeComplete |
| | |> moveHeads delta |
| | |
| ② | spawnHead score heads rand = |
| | let addHead = length heads < (score // 5000 + 1) |
| | && all (head -> head.x > 107.0) heads in |
| | if addHead then defaultHead rand :: heads else heads |
| | |
| ③ | bounceHeads heads = map bounce heads |
| | |
| | bounce head = |
| | { head | vy <- if head.y > bottom && head.vy > 0 |
| | then -head.vy * 0.95 |
| | else head.vy } |
| | |
| ④ | removeComplete heads = filter (x -> not (complete x)) heads |
| | |
| | complete {x} = x > 750 |
| | |
| ⑤ | moveHeads delta heads = map moveHead heads |
| | |
| | moveHead ({x, y, vx, vy} as head) = |
| | { head | x <- x + vx * secsPerFrame |
| | , y <- y + vy * secsPerFrame |
| | , vy <- vy + secsPerFrame * 400 } |
- ①
-
The stepHeads function needs several arguments to do the entire job. The whole function is a function pipe, rolling the result of each function into the next. The result is a clear, concise representation of the data. We need to add heads when it’s time with spawnHeads, bounce the heads when they reach the bottom with bounceHeads, remove heads that reach the right side of the window with removeComplete, and move the heads according to the rules of the game with moveHeads.
- ②
-
We’ll need to make sure the game has enough heads. addHead is a formula based on the score that determines how many heads are on the display. We add a head if there are not enough heads yet.
- ③
-
Heads bounce when they get to the bottom, if they haven’t already bounced. To bounce a head, we just make vy, the y velocity, negative if it’s on the bottom. We also multiply by 0.95 when we bounce, so each bounce doesn’t go quite as high as the last. It’s a nice touch that looks a little more realistic.
- ④
-
We remove all heads that are complete. A head is complete once it’s reached the right-hand side, or head.x > 750.
- ⑤
-
Each head has to move. We move the head in each direction based on the velocity per second, times the length of one time slice. We also adjust the y velocity to build in our gravity.
That’s all there is to the head movement. We just adjust the next head list based on the previous list and the rules of the game. Next, we’ll step the player data. We’ll need to update the score and the paddle position.
| elm/game/languageHeads.elm | |
| ① | stepPlayer player mouseX heads = |
| | { player | score <- stepScore player heads |
| | , x <- toFloat mouseX } |
| | |
| ② | stepScore player heads = |
| | player.score + |
| | 1 + |
| | 1000 * (length (filter complete heads)) |
- ①
-
Stepping the Player is comically simple. We just return a new player with the stepped score, and we capture the mouse position as a float. The float conversion will make it easier to display the paddle later.
- ②
-
Our scoring system is simple. We give the player a point for each time slice and 1000 points for getting a head across the screen.
That’s all for stepping the player. That was almost too easy. Let’s finish up stepGame next. We can write the functions that step the game when it’s in the Pause and GameOver states.
| elm/game/languageHeads.elm | |
| ① | stepGamePaused {space, x, delta} ({state, heads, player} as game) = |
| | { game | state <- stepState space state |
| | , player <- { player | x <- toFloat x } } |
| | |
| ② | stepGameFinished {space, x, delta} ({state, heads, player} as game) = |
| | if space then defaultGame |
| | else { game | state <- GameOver |
| | , player <- { player | x <- toFloat x } } |
| | |
| ③ | stepState space state = if space then Play else state |
- ①
-
A game in the Pause state will need to step the state based on the space bar so players can start the game, and also update the paddle position so the player can move the paddle even if the game is paused.
- ②
-
A game in the Finished state needs to reset to a defaultGame when the user presses the spacebar, or just replace the player’s mouse position.
- ③
-
Stepping the state involves simply transitions to Play when space is true.
Let’s review what happened here. We used signals to allow us to grab the current user inputs we needed: the size of our time slice, the mouse x position, and whether the spacebar was pressed. We packaged those up in an Input data type. Then, we passed that input and the Game record we produced in the previous time slice into stepGame. Based on that data and the rules of the game, we built a new Game record.
Next, we can display the Game record and then we can let the heads fly.
Displaying the Game
We’re going to use many of the same techniques you learned in Day 2 to display the Game record we produced in Day 1. The code looks a lot like you’d see in any graphics library:
| elm/game/languageHeads.elm | |
| ① | display ({state, heads, player} as game) = |
| | let (w, h) = (800, 600) |
| | in collage w h |
| | ([ drawRoad w h |
| | , drawBuilding w h |
| | , drawPaddle w h player.x |
| | , drawScore w h player |
| | , drawMessage w h state] ++ |
| | (drawHeads w h heads)) |
| | |
| ② | drawRoad w h = |
| | filled gray (rect (toFloat w) 100) |
| | |> moveY (-(half h) + 50) |
| | |
| | drawBuilding w h = |
| | filled red (rect 100 (toFloat h)) |
| | |> moveX (-(half w) + 50) |
| | |
| ③ | drawHeads w h heads = map (drawHead w h) heads |
| | |
| | drawHead w h head = |
| | let x = half w - head.x |
| | y = half h - head.y |
| | src = head.img |
| | in toForm (image 75 75 src) |
| | |> move (-x, y) |
| | |> rotate (degrees (x * 2 - 100)) |
| | |
| ④ | drawPaddle w h x = |
| | filled black (rect 80 10) |
| | |> moveX (x + 10 - half w) |
| | |> moveY (-(half h - 30)) |
| | |
| | half x = toFloat x / 2 |
| | |
| ⑤ | drawScore w h player = |
| | toForm (fullScore player) |
| | |> move (half w - 150, half h - 40) |
| | |
| | fullScore player = txt (Text.height 50) (show player.score) |
| | |
| | txt f = leftAligned << f << monospace << Text.color blue << toText |
| | |
| ⑥ | drawMessage w h state = |
| | toForm (txt (Text.height 50) (stateMessage state)) |
| | |> move (50, 50) |
| | |
| | stateMessage state = |
| | if state == GameOver then "Game Over" else "Language Head" |
- ①
-
First, we write the main display function. This function draws a collage with parts we build in other functions. We’ll draw the building on the left, the road on the bottom, the paddle, the score, a message, and all of the heads. To keep this code short, we are hard-coding the display size to 800 by 600, but it’s possible to use lift2 to use both the Window.dimensions signal and the gameState signal at the same time.
The collage takes forms that originate in the center of the canvas. You’ll move each element to where you want it after you create it.
- ②
-
The background elements are simple. The building is just a vertical rectangle that we move to the left, and the road is a horizontal rectangle that we move down.
- ③
-
The drawHeads function just maps the drawHead function onto the heads list. Remember, collages take shapes called forms. Since heads are images, we need to reference the head’s source image (you’ll have to copy them from the book’s source code), and convert that image to a form. Then, we do a little math to make sure the heads move to the right form on the page. A collage anchors the origin at the bottom left, so we do need to reverse the y position. Also, since the heads are initially drawn in the center of the canvas, we need to adjust for that with our move function. For good measure, we rotate the head based on the x coordinate. I hope Joe doesn’t get too dizzy.
- ④
-
Paddles are just rectangles, moved to the bottom of the canvas, and adjusted for the Mouse.x position and the central location on the page.
- ⑤
-
Working with text in Elm is a little tricky. We have a couple of conversions to do. We need to make sure we’re working with text elements, and we need to convert those to forms. I’m not going to go into too much detail here, because it deals with many data types we’ve not yet introduced. At a high level, these functions convert strings to text objects with the font, color, and size that we want. Then, they translate that text into forms that will work in our collage.
- ⑥
-
The last element to display is a message for the game. We’ll show either the string "Language Head" or the string "Game Over", based on the game state.
And that’s all there is to it! To start the game, put your source code in a game directory. Also in that directory, put an img directory with all of the head images you referenced in the source. If you’d like to use our heads, you can copy them from the book’s source code (see the Online Resources section of the Preface). Finally, navigate to your game directory and start your local Elm server, like this:
| | > elm-reactor |
| | Elm Reactor 0.1, backed by version 0.13 of the compiler. |
| | Listening on http://localhost:8000/ |
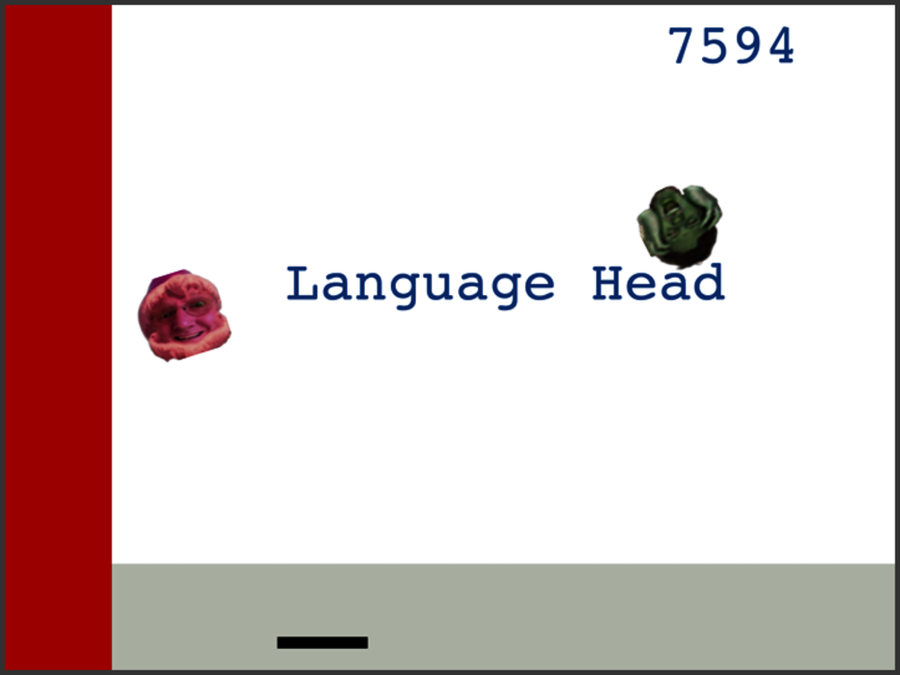
Then press the spacebar to start the game! You’ll see something like this image.
There you have it. We wrote a full game in fewer than 150 lines of code. The design also allows us to add many different bells and whistles without customary callbacks and the hallmark complexities of JavaScript approaches.
What We Learned in Day 3
Day 3 showed a single extended example of using Elm to build a game. We chose this problem because it wraps up many of the most demanding problems in user interface design. This example includes interacting with the mouse and keyboard; working with text and images; using animation, including simulated gravity; image presentation and manipulation; and more. By shaping the game with signals and functions, Elm allowed us to live in the realm of functions.
Elm’s structure let us simplify the most sophisticated problems, like the interplay between objects on the screen, scoring, and our simulated physics. If Elm can handle games with such grace and dexterity, other user interface problems should be a breeze.
Your Turn
Find…
-
Evan’s excellent blog post on the implementation of Pong in Elm
-
Game contributions from the Elm community
-
More about dealing with Text on HTML pages in Elm
Do (Easy):
-
Provide another message that asks the user to press the spacebar to start.
-
Make the heads bounce more times as they cross the screen.
-
Make the road look more like a road and the building look more like a building.
Do (Medium):
-
Add some random elements to when heads get added so that all of the games are no longer the same.
-
Make the game choose a random head from a list of graphics.
-
Don’t allow another head to be added too closely to an existing head.
-
Show a different kind of head when one reaches the bottom.
Do (Hard):
-
As written, the game allows heads to be added so that they reach the bottom at potentially the same time. Prevent this from happening.
-
Add other features that show up at different score increments. For example, bounce the heads up in the air, wherever they are, when the user presses a key. This will let the user survive when two heads reach the bottom at the same time.
-
Give the user three lives. Add additional lives when the user hits a certain score.
-
Provide a better formula for when to add additional heads.
-
Add heads at predetermined spacings.
-
Add another paddle users could move with the A and D keys, or arrow keys. Two paddles and more heads!