Day 2: Taming Callbacks
In Day 2, we’re going to build the skills necessary to attack the most sophisticated of user interface problems: building a game. We’re going to learn to handle user input and output, the most difficult concepts for functional languages. We’ll also learn to display images. You’ll find that Elm is a natural language for doing so.
As a wanna-be browser language, Elm has a big disadvantage. It’s not JavaScript. You’ll need to rely on another layer in the browser to compile Elm to JavaScript. But Elm also has a huge advantage.
It’s not JavaScript.
If you want to herd sheep like a sheep dog, you don’t necessarily have to be a dog. You just have to herd sheep.
Before we get rolling, let’s spend some time with Evan Czaplicki, creator of Elm. He’ll help us understand the motivations behind the language.
- Us:
-
Why did you create Elm?
- Czaplicki:
-
I was extremely frustrated by HTML and CSS. Basic things like centering, or even worse vertical centering, were shockingly difficult. I kept finding five ways to do the same thing, each with its own set of weaknesses and corner cases. I wanted reusable styles and components. I was going to use the same sidebar on every page and there just was not a way. It makes sense why these things were hard in a language originally designed for text markup, but I felt that there had to be a more declarative and more pleasant way. So my goal was to create a better way to do GUI programming. I wanted to write front-end code that I was proud of.
- Us:
-
So why choose a functional language?
- Czaplicki:
-
I wanted to show that functional programming can be great for real problems. Many functional folks have a way of saying extremely interesting and useful things in a totally inaccessible and impractical way, and I wanted to fix this. I wanted to prove that functional programming actually helps you write nicer code. Elm’s focus on examples, quick visual feedback, and shockingly short code are all meant to prove that purely functional GUIs are a good idea.
- Us:
-
What were your main influences?
- Czaplicki:
-
Haskell has been a big influence, but so have OCaml, SML, and F#. Syntax is very much like Haskell, though semantics are often closer to OCaml. I tend to say “Elm is an ML-family language” to get at the shared heritage of all these languages.
Stephen Chong and Greg Morrisett are my major influences in how I think about programming languages. With that foundation, I try to do a literature review for any new feature and end up looking at all sorts of languages. For example, Java and Python were extremely helpful for Elm’s docs format, and Clojure and Scala are great resources on how to present a compile-to-VM language to people new to functional programming. The full list is quite long by now!
- Us:
-
What is the philosophy of the language?
- Czaplicki:
-
Balance simplicity and expressiveness. Introduce only the minimal set of features to make GUI programming a great experience. Static types, functional programming, and reactive programming are extremely important tools for writing short and reliable code, but it is a lot to learn all at once.
Not only does Elm need to make these things simple and accessible, it needs to make their value immediately obvious. Elm is not about being theoretically better, it is about being demonstrably better.
- Us:
-
What is your favorite language feature?
- Czaplicki:
-
I really love Elm’s extensible records. This feature is based on Daan Leijen’s ideas from Extensible Records with Scoped Labels, and because I was not involved in the theory work, it is something that delights me by balancing expressiveness and simplicity so beautifully. This is the kind of balance I hope to achieve when I design features.
Elm was built from the ground up to handle the most difficult aspects of user interface development. As you work through Day 2, look for ways that this new language helps you herd all of the elements of a great design into a coherent application.
Grappling with Callback Hell
Whether you’re building a business application with user interface controls or a game, you need to be able to react to events. In fact, everything you do is a reaction to some event. The typical JavaScript program relies on sending events through callback functions, making programs much more responsive but at a cost. They’re much too hard to read. Here’s a typical example using the JQuery library with JavaScript that lets you grab the mouse position:
| | $(document).ready(function () { |
| | var position = {'x': 0, 'y': 0}; |
| | $(document).bind('mousemove', function(event) { |
| | position = {'x': event.pageX, 'y': event.pageY}; |
| | }); |
| | |
| | setInterval(function () { |
| | // custom position code |
| | }, seconds * 1000); |
| | }); |
Understanding that code takes a little experience. When the page loads, we get a ready callback. At that time, we bind the mousemove event to a function that sets a position variable. Then, at specific intervals, we have another callback function that uses position. Notice that our code binds anonymous functions to events. Said another way, we’re putting JavaScript in charge of the code’s organization. We call this inside-out programming strategy inversion of control.
For a feature so trivial, that code is much too complex, but it’s a trade-off. We get better responsiveness since this program will change the mouse position every time the user moves the mouse. We trade away simplicity. The problem is that we really need both.
Avoiding Callbacks with Lifts and Signals
In Elm, we don’t give up simplicity to get responsiveness. Instead of inversion of control, we’ll use signals and a function called lift. A signal is a function representing a value that varies over time. The lift function applies a function to the value of a signal each time the signal updates. Let’s try it out.
These programs will allow us to see how Elm handles user interaction without callbacks. For this part of the chapter, we’ll use the Elm online editor[59] to try interactive programs without having to fire up your own server. You’ll type code on the left, and see the results on the right. Let’s start with a simple function to pick up the user’s mouse position:
| | import Mouse |
| | |
| | main = lift asText Mouse.position |
Next, click the compile button. You’ll see output that looks like this:
| | (29, 162) |
That’s much simpler. We import the Mouse module, and then declare the main function.
Conceptually, lift applies a function to a signal. Let’s say the function is f, and the signal represents the value x that varies over time. Each time the signal updates, Elm will call f(x).
In the previous code, the Mouse.position signal returns a tuple containing the mouse position. Our function is asText, which converts to text. Mouse.position will “fire” whenever the mouse moves, and lift will call asText with the new mouse position. Interestingly, the result is a new signal! Rather than a callback, you have straight composition of functions. The result is revolutionary.
Looking at the bottom of the window, you can see that main is actually a signal—one that we display on the screen. That means Elm will update the window whenever the mouse position moves.
There are no callbacks, and no inversion of control. We just use a signal, convert to text, and lift the present value when the signal changes. Let’s try another one. Let’s use the count function, which counts the number of times a signal updates. Add count before the signal, and wrap it in parentheses, like this:
| | import Mouse |
| | |
| | main = lift asText (count Mouse.position) |
Navigate to the window on the right, move the mouse, and you’ll see a number that quickly counts mouse moves:
| | 246 |
We can simply change the signal to count mouse clicks:
| | import Mouse |
| | |
| | main = lift asText (count Mouse.clicks) |
In this case, the count function counts the number of signal updates, which are mouse clicks. You can start to see how we can write code that respects the rules of functional programming, but is still reactive and easy to understand. Let’s see how keyboard signals would work:
| | import Keyboard |
| | |
| | main = lift asText Keyboard.arrows |
Compile it, click on the right-hand window, and press the up and right arrows. You’ll see:
| | { x = 1, y = -1 } |
You can intuitively see exactly what’s going on. lift updates the text when the signal changes, so we get a clean program that tells us the state of the arrow keys, in a form that we can easily use. Since we can compose with functions, we can get more sophisticated.
Combining Signals
Most user interfaces use more than one signal at once. For example:
-
Find out where a user clicked
-
Scroll based on window size and mouse position
-
Find the value of input fields when the user clicks a mouse
-
Drag and drop items
These problems are all combinations of signals. For more advanced applications, a simple lift is not enough. Several other functions help us combine signals in more sophisticated ways. One of the most common user interface problems is to find where a user clicks.
Let’s use the function sampleOn. That function allows us to sample one signal when another updates, like this:
| | import Mouse |
| | |
| | clickPosition = sampleOn Mouse.clicks Mouse.position |
| | main = lift asText clickPosition |
We build two signals, clickPosition and main. First, we create a signal with sampleOn. When the Mouse.Clicks signal updates, we’ll sample the most recent Mouse.position. The result is a new signal that returns a mouse position and changes whenever the user clicks a mouse. Next, we simply build our main signal. We lift asText onto our clickPosition signal. Simple. We can sample input controls in the same way.
Or, let’s say you’re implementing scrolling with a scroll bar. You need to find out how far down a page the mouse is, like this:
| | import Mouse |
| | import Window |
| | |
| | div x y = asText ((toFloat x) / (toFloat y)) |
| | main = lift2 (div) Mouse.y Window.height |
Run it and scroll on the right-hand side to get something like this:
| | 0.42973977695167286 |
This example uses lift2. Like lift, this function lifts functions onto signals, but uses two signals and two-argument functions.
First, to simplify type conversions, we create a version of division that takes integers and returns text. Next, we use lift2 to lift div onto two signals, Mouse.y and Window.height. Think about what a similar JavaScript program would look like. It doesn’t take too many examples to see Evan’s vision. Monitoring user inputs is a functional job.
Maintaining State
Let’s use these same principles to produce an interactive experience. We’ll work with an entry field, and update another part of the page. In functional languages like Elm, you have to learn tricks to handle state. We’ve seen how signals can help access things like the mouse position that changes over time, and how we use recursion to process lists. We manage state by the way we structure our functions. The fold functions, which you might know from Lisp or Haskell, are a good example. They take a two-argument function, an initial value, and a list. Here’s an example of foldl in Elm:
| | > foldl (+) 0 [1, 2, 3] |
| | 6 : number |
Here’s what happens at each step:
-
fold (+) 0 [1, 2, 3]. fold takes the initial value of the list, 1, and the accumulator, 0, and adds them together, returning 1, and uses that number, with the remainder of the list, calling fold again.
-
fold (+) 1 [2, 3]. Elm takes the leftmost value of the list, 2, and the accumulator, 1, and passes those to the (+) function, returning 3.
-
fold (+) 3 [3]. We call (+) with the accumulator 3 and the leftmost list element of 3, returning 6, and we’re done.
Elm will let you fold from the left (foldl) or fold from the right (foldr). You might also want to fold a signal from the past, folding in the results of a signal. Elm provides the function foldp for that purpose, meaning fold from the past. Let’s say we want to call a signal every time an arrow key is pressed. We want to count up with the right arrow or count down with the left arrow. foldp takes a function, an initial value, and a signal to solve that problem.
Here’s the signal you can use:
| | import Keyboard |
| | |
| | main = lift asText Keyboard.arrows |
Press the left arrow, and you’ll get { x = -1, y = 0 }; press the right arrow for { x = 1, y = 0 }. Now, we just need to accumulate state. We can use foldp, like this:
| | import Keyboard |
| | |
| | main = lift asText (foldp (dir presses -> presses + dir.x) 0 Keyboard.arrows) |
Now, we create one signal with foldp. That signal adds the accumulator, called presses, to the x value from the signal of Keyboard.arrows. We can then lift that value onto the asText function. Now, when you run the application, you’ll get a running total of presses. The left decrements the count, and the right increments the count.
Believe it or not, foldp is the foundation of our game, as you’ll see on Day 3.
Working with Text Input
Functional languages are great at transforming text. Elm is excellent for capturing text too. Here’s an example that takes some input, manipulates it, and puts it on the screen:
| ① | import String |
| | import Graphics.Input as Input |
| | import Graphics.Input.Field as Field |
| | |
| ② | content = Input.input Field.noContent |
| | |
| ③ | shout text = String.toUpper text |
| | whisper text = String.toLower text |
| | echo text = (shout text) ++ " " ++ (whisper text) |
| | |
| ④ | scene fieldContent = |
| | flow down |
| | [ Field.field Field.defaultStyle content.handle identity "Speak" fieldContent |
| | , plainText (echo fieldContent.string) |
| | ] |
| | |
| ⑤ | main = lift scene content.signal |
Let’s break that down.
- ①
-
We import the libraries we’ll need. String allows us to do string manipulation, and Graphics.Input gives us access to input fields.
- ②
-
Next, we define a function to return an Input record, passing in the initial field content. We’ll use Input records. This API will allow us to create records, which will let us access all of the data, signals, and functions we need.
- ③
-
Next, we define a couple of simple functions for working with text, the shout and whisper functions. We use those to build an echo function to transform the text. These functions know nothing about user interfaces. They just work on raw String data.
- ④
-
The next task is to build our layout, called scene. We use the flow function to specify our form, which will flow from the top down. Our form has two lines: a field and some text.
The field is an input control, expressed as the record that’s returned by our content function. We pass in some configuration options defining the style, a handler from the input record, an id, a placeholder value, and a signal.
The next element of our layout is a line of text. We express the text as a signal that we create with the plainText function. Whenever fieldContent updates, our signal will fire and show the contents passed through our echo function.
- ⑤
-
Finally, we create one last signal by lifting our content.signal onto scene. The signal will fire each time the user updates the entry field.
Whew. That’s a lot of code packed into a short example. It may seem a little alien at first, but Elm’s worldview is the perfect complement to web front-end programming. Each user interface is just a stream of transformed user inputs. Now that we’ve seen how text works, let’s look at one more concept we’re going to need for our game. Instead of working with text, we will draw shapes based on user input.
Drawing Shapes
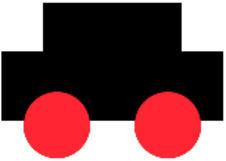
In Elm, we can draw on the canvas with a full graphics library. We start with a collage with set dimensions, and then build shapes. We can transform the shapes by moving, scaling, or rotating them.
The figure shows a simple car. We’ll describe it in terms of functions. As you’d expect, we’ll use a combination of data structures and functions to do what we want.
| elm/car.elm | |
| | carBottom = filled black (rect 160 50) |
| | carTop = filled black (rect 100 60) |
| | tire = filled red (circle 24) |
| | |
| | main = collage 300 300 |
| | [ carBottom |
| | , carTop |> moveY 30 |
| | , tire |> move (-40, -28) |
| | , tire |> move ( 40, -28) ] |
First, we define a few basic shapes. We’ll define the basic dimensions of the shapes, and by default they’ll show up in the middle of the canvas. main is just a collage, which takes a width, a height, and a list of shapes, called forms in Elm. Each element of the list is just a shape. For example, carTop |> moveY 30 is just a rectangle moved 30 pixels vertically.
In this particular example, the figure is static. With Elm, animating that figure is nearly trivial. Say we have a rectangle with a form that looks like this:
| | filled black (rect 80 10) |
When we build our game on Day 3, we’ll need a paddle. We can animate the paddle by lifting Mouse.x onto the function that draws this paddle, like this:
| elm/paddle.elm | |
| | import Mouse |
| | import Window |
| | |
| | drawPaddle w h x = |
| | filled black (rect 80 10) |
| | |> moveX (toFloat x - toFloat w / 2) |
| | |> moveY (toFloat h * -0.45) |
| | |
| | display (w, h) x = collage w h |
| | [ drawPaddle w h x ] |
| | |
| | main = lift2 display Window.dimensions Mouse.x |
Boom! Just like that, we have animation. We don’t have to worry about drawing the paddle over time, or remember the previous location of the paddle. Instead, we just worry about drawing the paddle right now, and letting the user input determine where to move it. Now, you have all of the foundation you’ll need to complete a game in Day 3. Let’s recap.
What We Learned in Day 2
In Day 2, you learned about Elm’s primary purpose. Previous languages focused on callbacks or simply single-threaded code to create programs that respond to users. The cost was complexity or unresponsive interfaces. Functional programming languages have traditionally struggled with user interfaces because processing user input often involved changing state.
Elm solves both problems with signals, which are functions that represent values that change over time. By viewing user input as functions rather than data, the same beautiful functional programming techniques that express complex computations can be brought to bear on complex user interfaces.
We learned to transform signals by lifting functions onto them with lift and lift2. Each time, the result is a new signal. We also used other functions to combine signals and functions such as foldp, which maintains a running accumulator, and sampleOn, which determines exactly when we sample.
Finally, we displayed some text and graphics. We also lifted a display function to move a paddle, which will come in handy when we work on our game.
Your Turn
Use the online editor[60] to solve these problems interactively.
Find…
-
Examples of different signals available in Elm
-
The relationship between lift and signals
-
A signal that fires every second
Do (Easy):
-
Write a signal to display the current mouse position, including whether a mouse button is pressed.
-
Write a signal to display the y value of the mouse when the button is pressed.
Do (Medium):
-
Use lift and signals to draw your own picture at the current mouse position. Change the picture when a mouse button is pressed.
-
Write a program that counts up, from zero, with one count per second.
Do (Hard):
-
Use foldp to make the car move from left to right, and then right to left, across the bottom of the screen.
-
Make the car move faster when the mouse is farther to the right, and slower when the mouse is farther to the left.
That’s it for Day 2. Tomorrow, you’re going to combine everything we’ve learned so far to write a game. We’re going to go far beyond pong in this one, so fasten your seatbelt.