Chapter 11. Refactoring
- Organizing, implementing, and refactoring a project pivot
- Using the async library in Sails
- Customizing built-in responses
- Adding a password-recovery system
It’s been several months since we delivered the last version of Brushfire to Chad. We thought we’d begin work on the next phase of content management: associating users with the videos they added. But when Chad arrived at our offices, plans had changed. Chad was anxious to give us some good news and some bad news. The bad news was his investor/mom was again shaken by the lack of cat videos on Brushfire. She could not “in good conscience” continue to subsidize the proliferation of “videos without cats.” We explained to Chad that although we could associate users with the videos they added, thereby identifying violations of his mom’s Terms of Service, we could not manufacture exclusive interest in cats. He understood and added, “None of that mattered when compared to the other exciting development.”
Chad’s good news was the spectacular growth in traffic generated by do-it-yourself (DIY) videos on Brushfire during our hiatus. Brushfire users were adding their favorite how-to YouTube videos at a phenomenal rate. Bottom line, he said, “The market had spoken,” and he would take the last of his mom’s investment and pivot once again.
Definition
A pivot is a change in product direction and features. Chad started this project as a way to aggregate YouTube videos. Based on his mom’s influence, Brushfire pivoted to a cat video site. So this was Chad’s second pivot of Brushfire.
Chad’s last bit of news was that he managed to obtain some new investors who don’t share his DNA.
In chapters 6–10, we went on a journey to achieve the design and implementation of an identity, personalization, authorization, and access control system. Along the way you learned a lot about Sails. With this pivot, we’ll set out on another journey in chapters 11–15. By the end of the journey, we’ll have a fully realized version of Brushfire deployed into the wild. We’ll also be exploring many more features of Sails.
In this chapter, we’ll differentiate between pivots based on market forces versus a lack of frontend decision making. We’ll take a systematic approach to identify requirements based on the needs of the client and how that translates to the needs of the frontend and backend. We’ll also cover best practices for refactoring when changes are unavoidable, as well as some tricks you can use to make your applications easier to maintain.
Definition
Code refactoring is a process in which you take existing code and restructure it. This is done for a variety of reasons including organization, readability, and an overall reduction in the complexity.
Finally, we’ll explore Sails custom responses as well as build out an initial requirement of the new Brushfire—user-initiated password resets.
Brushfire has an expanded number of models to support the new requirements. In chapter 12, we’ll introduce associations, which are a way of organizing and accessing multiple models. In chapter 13, we’ll take what you’ve learned and implement additional core features to Brushfire, including the ability to rate content, follow users, and search and browse tutorials. In chapter 14, we’ll add chat to Brushfire, which will allow you to thoroughly explore WebSockets integration with Sails. Finally, in chapter 15, we’ll address security and testing and ultimately deploy Brushfire into the wild. You have a lot to learn, so let’s get started.
11.1. Maintaining your sanity when requirements change
The client pivot is a very common scenario. But you want to distinguish a pivot based on market feedback versus a pivot based on a lack of frontend decision making. You know you have a pivot based on a lack of frontend decision making when you hear either of these comments:
- “You know, after looking at this <insert feature> implemented, what I really want is....” This response is endemic when there’s a lack of frontend wireframes that show what a feature will look like.
- “I didn’t know you needed me to respond with the username. It’s going to take some time to change the backend to make that kind of response.” This response indicates a lack of wireframes to identify requests and the requirements of those requests.
A market-based pivot involves user-driven feature changes that aren’t always predictable. A pivot based on a lack of frontend decision making, however, is highly predictable and preventable. What do we mean by a lack of frontend decision making? At this point, we can’t imagine implementing a backend without first examining the front-end for requests and requirements of those requests. This examination leads to decisions on how to design the backend to meet the requirements of the frontend. It also results in deciding what the application will look like and how it will function before fully implementing the backend. Making these decisions isn’t easy because choosing to do one thing means that we’re choosing not to do another thing.
Without getting into behavioral psychology, a field we’re completely unqualified to address, we’ve determined that developers (us included) like the infinite possibilities of coding. And given an opportunity, developers will spend eternity examining each of those infinite possibilities because it’s easier to do that than to make decisions. Barry Schwartz, author of The Paradox of Choice, claims that too many options make it difficult to make any choice at all. And that’s why having a clearly defined frontend to guide our choices is so valuable.
Before we can design the frontend, we need to get our client’s requirements. So, let’s do that next.
11.1.1. Obtaining and revising requirements
When Chad was able to calm down from his excitement, he began to explain some of the similar feature requests he received from many Brushfire users. With all due respect to Chad’s mom, no one wanted cat videos. They did ask that Brushfire be enhanced so that they could add YouTube videos around a particular subject matter they called tutorials. For example, one user wanted to aggregate his individual YouTube videos into a JavaScript closure tutorial. Others wanted to aggregate videos about house-training a puppy, makeup techniques, and even how to distill homemade whiskey. They also wanted the ability to rate and search for tutorials as well as follow their favorite tutorial creators. Finally, they wanted to be able to leave messages about a particular video and chat in real time if someone else was watching the same video. As a complete aside, Chad pleaded with us to add a way for users to reset their own passwords. He said this feature alone would reduce his inbox “by at least 80%.” How do we effectively create a plan based on this new information?
11.1.2. Organizing views into five categories
We’re already well equipped to handle the pivot. In chapters 3 and 4, we started a process of examining wireframes to guide our backend development we called a frontend-first approach.
Note
We take a very broad view of wireframes. They can include anything from a mockup to working frontend assets. Our personal choices of tools for mockups include combining the contents of Keynote, Google Docs, and Photoshop.
Based on the pivot requirements, we’ve divided Brushfire views and their wireframes into five categories in table 11.1.
Table 11.1. The five categories of views in Brushfire
|
Category |
Description |
Views |
|---|---|---|
| Navigation bar | The overall top bar navigation has states that dictate how the markup is displayed. | navigation.ejs signin.ejs signup.ejs signout.ejs |
| Search, browse, and administration | Brushfire includes a search view, browse view, and our existing administration view. | homepage.ejs browse-tutorials-list.ejs administration.ejs |
| Profile | The user profile takes on a new level of importance in the way users can find content created by other users. | profile.ejs profile-followers.ejs profile-following.ejs edit-profile.ejs |
| Tutorial and video | Tutorials aggregate one or more videos. | tutorials-detail.ejs tutorials-detail-new.ejs tutorials-detail-edit.ejs show-video.ejs tutorials-detail-video-new.ejs tutorials-detail-video-edit.ejs |
| Other | A catchall for all other views. | layout.ejs restore-profile.ejs password-recovery-email.ejs password-recovery-email-send.ejs password-reset.ejs |
Some of the views within each of these categories can display different content based on the condition of the user-agent, including
- The authenticated state
- Whether the authenticated user-agent is the designated owner of a tutorial or profile
- Whether the authenticated user-agent is designated as an admin
Let’s examine some of the category’s wireframes to identify their requests and request requirements, as well as how to manage displaying content based on the condition of the user-agent. Although we’ll review only a portion of the wireframes and requirements in this chapter, you can access all of them via the chapter 11 hub here: http://sailsinaction.github.io/chapter-11/.
11.1.3. Obtaining the example materials for this chapter
Before we look at the wireframes, you need to get the assets for the remainder of the book. As we said earlier, this pivot will encompass the remaining five chapters of Sails.js in Action. Therefore, the repo that contains the starting assets for these remaining chapters is vast. We encourage you to take a tour of the new assets, but don’t get overwhelmed. We’ll go over every inch of the project in the coming chapters. The chapter repo can be cloned directly here: https://github.com/sailsinaction/brushfire-ch11-start. After cloning the repo, install the Node module dependencies via npm install.
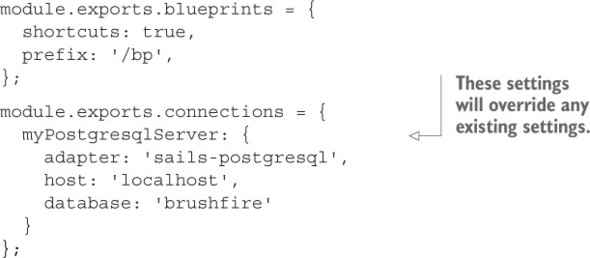
First, you added a local.js file in chapter 6 to hold the Google API key you were using in the bootstrap.js file to seed YouTube videos. You no longer need to seed YouTube videos and therefore don’t need to configure the API key in the local.js file. But there are several configuration parameters you’ll want to aggregate in a local.js file. In Sublime, create brushfire/config/local.js, and add the following code.
Example 11.1. Adding to the local.js file
Note
If you’re using different credentials for your PostgreSQL database, you can simply copy the database credentials from your brushfire/config/local.js file from your chapter 10 repo.
As it turns out, using blueprint shortcut routes to access the underlying database records can be extremely helpful. So we’ve decided to bring blueprint shortcut routes back during development. But to protect any of your existing or future routes, we’ve namespaced the blueprint shortcut routes using the prefix /bp. To use a shortcut, you’ll need to preface the URL with /bp.
Definition
Namespacing is a technique to avoid collisions of similarly named things, in this case route names. By adding the prefix /bp, you’ll avoid colliding with paths of routes with the same name.
We’ve also modified the way our models connect to PostgreSQL. Up to this point we were using PostgreSQL strictly for the user model by assigning the connection property in the user model itself. We’ve removed the connection from the user model and instead included it in brushfire/config/model.js. This makes the myPostgresql-Server connection the default connection for all models. If we had a requirement for a particular model to use a different connection, then we could specify the connection directly in that model file so that it would override the default connection in brushfire/config/model.js. But we don’t have that as a requirement. Let’s see this in action. Restart Sails via sails lift and navigate your browser to localhost:1337/bp/user/find. You should see the two user accounts that are created using the bootstrap.js file.
11.1.4. Refactoring navigation
We now have a requirement to incorporate tutorials into Brushfire. We also have a requirement to allow all users to access user profiles. Finally, we have a requirement to add standalone signup and sign-in pages. These requirements make new demands of the navigation view to display different markup based on the condition of the user–agent, as illustrated in figure 11.1.
Figure 11.1. The navigation markup has five basic states based on the conditions of the user-agent: unauthenticated  , authenticated without the add tutorial button displayed
  , authenticated with the add-tutorial button displayed
  , authenticated and an admin
  , and authenticated and an admin with the add tutorial button displayed
  .
.

The display of the administration link will remain unchanged. What has changed is the way in which Sign Up and Sign In now function. Based on Chad’s requirements, we’ve created two new wireframes that coincide with standalone views for the sign-in and signup pages. Links to each page are now on the navigation bar when the user-agent is unauthenticated, as depicted in figure 11.2.
Figure 11.2. Sign In and Sign Up now have standalone views.

When the user-agent is authenticated, there’s a drop-down to navigate to the user profile or to log out, as illustrated in figure 11.3.
Figure 11.3. The navigation bar adds a drop-down when the user-agent is authenticated to allow access to the user profile and the ability to log out.

We’ve also added a brushfire/views/logout.ejs view that you’ll use later to provide functionality if a GET request to /logout is made. These changes to the assets are reflected in the frontend markup you cloned earlier. You’ll also see a new button on the navigation bar named add tutorial. A user must be authenticated to add a tutorial. There are situations where you don’t want an authenticated user-agent to be able to add a tutorial. For example, if a user is editing a tutorial, then you want to hide the display of the add-tutorial button from the navigation bar. Therefore, we added some logic to the partial view brushfire/views/navigation.ejs to handle a new local property, showAddTutorialButton, shown in listing 11.2.
Example 11.2. Handling the display of the add-tutorial button in the navigation bar

By checking whether the property is defined via the typeof operator, you have the option of passing it via a local or not. If you don’t pass the local, then the button won’t be displayed. The following listing shows how to change the home action to also pass a value for showAddTutorialButton so that it’s displayed when the homepage is rendered.
Example 11.3. Passing the showAddTutorialButton property via a local in the view

We’ve documented all the requests and request requirements for Brushfire in an online API Reference that can be found at Error! Hyperlink reference not valid.//mng.bz/apXw. Navigate your browser to that link and look at the requirements for the Signup form, which are similar to the display in figure 11.4.
Figure 11.4. The API Reference documents each request’s friendly name , description , incoming parameters (if any) , view (if any) , locals , method and URL path  , controller and action
  , response type
  , and frontend controller (if any)
  .
.

The Brushfire API Reference contains the inputs and exits of each request shown in the wireframes, similar to figure 11.5.
Figure 11.5. The wireframes contain documentation for the attributes and requests of each view.

We used the wireframes for each view to create the API Reference documentation and the documentation to create a working frontend with partially implemented endpoints. We say partially implemented because we won’t integrate actions using real data until chapter 12. For now, we’ll simulate records using arrays of dictionaries for lists and individual dictionaries for particular records. Speaking of models, the pivot will involve the use of a feature of Waterline we haven’t covered yet: associations. We’ll explain associations in detail in chapters 12 and 13. For now, know that associations will provide some helpful functionality to manage the relationships between related models: users, tutorials, videos, and ratings. You may have noticed that the API Reference documentation for the login request also contains a Responses section, as shown in figure 11.6.
Figure 11.6. The login request has three different response codes if the user-agent is deleted , banned , or successful .

This is where you can document requests that have different responses based on different response status codes. Next, let’s look at the search, browse, and administration views.
11.1.5. Refactoring views
Users want the ability to search and browse for the tutorials created within Brushfire. So we transformed the homepage into a search page, as shown in figure 11.7.
Figure 11.7. The post-pivot home/search page

We’ll implement search in chapter 13 where we’ll use the home/search page to capture searchCriteria to use as criteria for a query of the tutorial model. It’s important to note that the content of the homepage doesn’t change based on the condition of the user-agent. For example, the homepage doesn’t change whether the user-agent is authenticated or not. We also have a requirement that users have the ability to browse tutorials. We created a wireframe for the browse-tutorials page shown in figure 11.8.
Figure 11.8. The browse-tutorials page

Like the homepage, the browse-tutorials page doesn’t display different content based on the condition of the user-agent. Finally, we created a wireframe for the User Administration page in figure 11.9, but the functionality of this page hasn’t changed from previous earlier versions of Brushfire.
Figure 11.9. The User Administration page

Now let’s move to the profile category of views.
11.2. Custom routing and error pages
Before the pivot, a profile could be viewed only if the user was authenticated in Brushfire. We used req.session.userId as criteria for a query of the user model to find the user record with the email, gravatarURL, and admin attributes to display the profile. Because we were using the req.session.userId property to determine which profile to display, only the profile of the authenticated user could be displayed. Chad’s new requirements provide for a profile that can be viewed with or without authentication, including users other than the profile owner. This will enable Brushfire users to explore tutorials created by other Brushfire users via their profile page. Brushfire users also want the ability to follow users they like as well as other followers of the user. The profile page will therefore be expanded to three different views:
- A profile with tutorials view
- A profile with followers view
- A profile with those being followed view
Let’s look at each view and its requests and request requirements. The first view is the profile page, shown in figure 11.10.
Figure 11.10. The profile page with tutorials

The second view is the profile-following page, shown in figure 11.11. The final view is the profile-followers page, shown in figure 11.12.
Figure 11.11. The profile page with users followed

Figure 11.12. The profile page with users following

The profile link on the navigation bar now displays the username related to the current session’s userId property instead of the email address. We did this for both privacy and continuity, because the path of the route that links to the profile in the navigation bar now uses /:username. We’ll discuss the impact of using a variable, also referred to as a slug, in the next section.
Definition
Slug is shorthand for a generated URL that distinguishes between endpoints using a string.
Open brushfire/api/controllers/PageController.js in Sublime and see how to distinguish between profile owners in the profile action, similar to the next listing.
Example 11.4. The profile action of the page controller

You’ll either pass the isMe property set to true to the me dictionary, which will enable the user-agent to modify the profile, or pass the locals without it, allowing the user to view but not modify the profile.
11.2.1. The impact of variables in routes
The new profile route, and specifically the path /:username (a.k.a. a slug) presents an opportunity to address some issues related to the use of variables in a route’s path. In Sublime, open brushfire/config/routes.js, which is similar to the following listing.
Example 11.5. The explicit routes of Brushfire
...
 /*************************************************************
  * JSON API Endpoints                                        *
  *************************************************************/

  'PUT /login': 'UserController.login',
  'POST /logout': 'UserController.logout',
  'GET /logout': 'PageController.logout',
  ...
  /*************************************************************
  * Server Rendered HTML Page Endpoints                        *
  **************************************************************/
  ...
  'GET /:username': 'PageController.profile'
}
Before we discuss the impact of using /:username, let’s look at some overall organization changes we’ve made to brushfire/config/routes.js. We’ve aggregated the explicit routes into two general groups: JSON API endpoints and server-rendered HTML page endpoints. For added organization, we’ve also associated related resources together within each of these groups. For example, routes related to the user resource are placed together. But what’s the impact of the order of routes?
From previous chapters, you know that the routes contained in brushfire/config/routes.js are considered explicit or custom routes. The Sails router looks to match an incoming request to explicit routes before trying to match the request to the other types of Sails routes like blueprint routes, asset routes, and the /csrfToken route. Routes are matched by the Sails router in the order in which they’re placed in the brushfire/config/routes.js file. If a variable like :username isn’t specified in the path of a route, then the order chosen for routes can be purely based on your organizational aesthetic. But if you include a variable like :username in your path, the order becomes important.
For example, the path /:username will be triggered on any combination of characters after the initial slash (/). Therefore, any routes after /:username whose path contains a single segment will never be triggered.
Definition
A segment consists of a slash (/) and one or more alphanumeric characters. For example, the following path contains two segments: /tutorials/:id.
When using variables in a route’s path, place the route with the variable below any other routes with the same number of segments. Figure 11.13 illustrates how this works.
Figure 11.13. The first example illustrates the impact of the route order on other single-segment routes when using the :username variable. A GET request to /logout would be matched with the GET /:username route, which isn’t the intended result. In the second example , we placed the GET /:username route below the route to the GET /logout route. The GET request to /logout was matched with the route that contained the GET /logout path, which is what was intended. Note that the two-segment route to GET /profile/edit was unaffected.

If you don’t place routes with the same number of segments below the route with a variable like :username, those routes will never be matched by the Sails router. There’s one other issue with /:username. Start Sails via sails lift and navigate your browser to localhost:1337/favicon.ico. Open the browser’s console window, and you should see that Sails responded with a 404 Not Found status.
Note
You get bonus points if you also recognized that the Sails 404 response page wasn’t rendered. We’ll deal with that issue in the next section.
Sails provides a favicon.ico file in the root of brushfire/assets/ folder. As you learned in chapter 3, the assets folder performs like the web root of a web server. Any file in that folder automatically has a built-in asset route. If the file has a recognized type, it will be rendered by the browser. So navigating to localhost:1337/favicon.ico should result in the browser rendering the favicon.ico file. The issue is that localhost:1337/favicon.ico is being superseded by /:username. You can easily fix this by using the skipAssets property in the route’s configuration. Head back to Sublime and open brushfire/config/routes.js, and make the following changes to /:username.
Example 11.6. Adding the skipAssets property to a route

After adding the skipAssets property to the route configuration, any file in the root of brushfire/assets will no longer be superseded by /:username. Restart Sails using sails lift and navigate your browser to localhost:1337/favicon.ico. You should now see the Sails favicon displayed. But why wasn’t the Sails 404 response page displayed earlier when the favicon.ico file couldn’t be found? You’ll fix that in the next section.
11.2.2. Customizing Sails’ built-in response pages
Earlier, the Sails 404 response page wasn’t displayed when we made a GET request to localhost:1337/favicon.ico. The page didn’t get displayed because the me dictionary wasn’t sent as a local to the view. When the 404 page was rendered, the layout file added the navigation markup in brushfire/views/partials/navigation.ejs. That navigation view attempted to use a property named me, and because it didn’t exist, an error was generated. But where did this error come from? It came from the notFound.js response. Let’s back up for a moment. Sails provides a convenient way of handling common response types like Bad Request (400), Forbidden (403), and Not Found (404) with custom code for each response: badRequest.js, forbidden.js, notFound.js, and so on. The source code for these responses can be found in the brushfire/api/responses/ folder. Some of the responses also have corresponding views that are sent as the response if the requesting user-agent doesn’t require JSON.
Note
Each response tries to guess whether the user-agent requires JSON. For example, if the request is an AJAX request, you can assume that the request wants JSON.
For example, forbidden.js uses brushfire/views/403.ejs, notFound.js uses brushfire/views/404.ejs, and serverError.js uses brushfire/views/500.ejs. In our current situation, the code that renders the not-found response in the 404.ejs view is in brushfire/api/responses/notFound.js. Let’s again take a look at the 404 response generated but this time using a different example.
Restart Sails using sails lift and navigate your browser to localhost:1337/irlIs-Old. The Sails router matches a GET request to /irlIsOld with the route containing the path GET /:username and executes the profile action of the page controller. The resulting 404 error in the terminal window should look similar to the next listing.
Example 11.7. A 404 error related to the 404.ejs response
warn: res.notFound() :: When attempting to render error page view, an erroroccurred (sending JSON instead). Details: ReferenceError:
It looks like the brushfire/views/partials/navigation.ejs view was looking for a me local that doesn’t exist. You can confirm that no locals were sent by looking at the profile action of the page controller that’s executing the res.notFound() response. In Sublime, open brushfire/api/controllers/PageController.js, and locate return res.notFound() in the profile action, as shown here.
Example 11.8. The notFound response of the profile action

After the GET request to /irlIsOld is made, the :username parameter irlIsOld is used as criteria by a User.findOne() model method in the profile action to find a user. There’s no user record with irlIsOld as a username, so brushfire/api/ responses/notFound.js is executed via return res.notFound(). Let’s see what happens when res.notFound() is executed, as illustrated in figure 11.14.
Figure 11.14. The notFound.js response

The notFound.js response method expects locals ![]() as the first argument and a view
as the first argument and a view ![]() as the second argument. In this case, you didn’t pass any locals or a view. The code in
as the second argument. In this case, you didn’t pass any locals or a view. The code in ![]() logs errors and prevents locals from being sent if you’re in a production environment, and it can be ignored for now. If you were making an AJAX request
logs errors and prevents locals from being sent if you’re in a production environment, and it can be ignored for now. If you were making an AJAX request
![]() , the response would return early, passing any locals as JSON. You’re not making an AJAX request in this case. If a second argument was passed as a view, the response would check
if the argument is a string
, the response would return early, passing any locals as JSON. You’re not making an AJAX request in this case. If a second argument was passed as a view, the response would check
if the argument is a string ![]() . If it is, you’ll attempt to add a view property to the options dictionary and assign its value to the new options.view property. Once again, you didn’t pass in any view to the response. Here’s the important part: the response
. If it is, you’ll attempt to add a view property to the options dictionary and assign its value to the new options.view property. Once again, you didn’t pass in any view to the response. Here’s the important part: the response ![]() will try to render the default view, 404, with any locals sent as the first argument. The response will handle any errors
will try to render the default view, 404, with any locals sent as the first argument. The response will handle any errors ![]() and then render the view
and then render the view ![]() .
.
When the 404.ejs view is rendered, it tries to render brushfire/views/partials/navigation.ejs because it’s part of the layout.ejs view, which expects a me property that doesn’t exist, and so you get an error. To resolve this, you could pass me as an argument to notFound({me: null}), but locals would now have the signature data.me instead of what the view is expecting: me. This also wouldn’t handle your authenticated state. The best solution is to alter notFound.js to take a detour before it renders the view. You’ll check whether the user-agent is authenticated via req.session.userId. If the user-agent isn’t authenticated, you’ll pass a me dictionary that’s null. If the user-agent is authenticated, you’ll find that user and pass a me dictionary that contains the found email, username, gravatarURL, and admin properties. Making these changes to the response will also provide an opportunity to demonstrate how to incorporate asynchronous detours in existing source code.
Your first option is to copy all the existing response code for both cases: the unauthenticated state and the authenticated state. This would result in duplicative code and a rather inelegant solution. If you’d like to see the source code for this solution in all its ugliness, check out the gist at Error! Hyperlink reference not valid.//mng.bz/6nLw. A second approach, found in the next listing, isn’t perfect, but it allows you to take your detour without adding duplicative code.
Example 11.9. Creating an asynchronous detour in the notFound response


Here, you move the actual rendering of the 404.ejs view into a function named afterwards(err,loggedInUser). The User.findOne() model method will execute first, and then your afterwards method will execute, passing in the results of your User.findOne() query. This isn’t a bad option, but you can do even better.
The next approach may look strange at first, but we promise that after you’ve gone through it a few times, you’ll be transformed into an asynchronous virtuoso.
Example 11.10. Using an asynchronous IIFE detour in the notFound response


You first declare an immediately invoked function expression (IIFE). This function will check for the authenticated state of the user-agent and execute the User.findOne() model method if the user-agent is authenticated. The results of those checks are passed in as arguments to the IIFE. The advantage here is that you accomplish the same result as the last option with what we feel is a much more intuitive flow.
Definition
An IIFE is a function that’s both declared and executed at the same time.
What about the other responses that have views, like forbidden.js and serverError.js? These error pages shouldn’t show up in the normal course of using the application. Therefore, we’ve chosen to remove the layout and the navigation partial from serverError.js and forbidden.js. We removed the layout by passing in the layout property and assigning it to false in each response of your cloned repository, similar to the following listing.
Example 11.11. Removing the layout in serverError.js and forbidden.js

Let’s move on to the tutorial and video views in the next section.
11.3. Adjusting access control rules
By far, the tutorial and video views are the largest additions to Brushfire functionality. Recall that users want the ability to aggregate YouTube videos into a collection called Tutorials. They want to be able to rate the tutorials, chat with other users who happen to be watching a particular tutorial, and post chat messages. Based on these requirements, we created wireframes that encompass the functionality for each view, including these:
- tutorials-detail.ejs— Used as the main page for a tutorial
- tutorials-detail-new.ejs— Used when creating a new tutorial
- tutorials-detail-edit.ejs— Used when editing an existing tutorial
- show-video.ejs— Used when viewing a video
- tutorials-detail-video-new.ejs— Used when creating a new video
- tutorials-detail-video-edit.ejs— Used when editing an existing video
In addition to creating the wireframes, we documented the requirements for each request in the API reference.
11.3.1. Customizing a view based on edit permissions
The tutorials-detail page has three different wireframe states depending on the user-agent’s condition:
- Unauthenticated user-agent
- Authenticated user-agent but not the owner of the tutorial
- Both an authenticated user-agent and the owner of the tutorial
Figure 11.15 shows the model and attributes for each state of the view.
Figure 11.15. The model and attribute for each view are shown if they’re not duplicated in the user-agent authenticated and tutorial-owner
views . Therefore, all the attributes in the unauthenticated view are referenced in . Notice that some of the attributes use the term calc for “calculated value.” The value isn't stored as displayed but instead calculated in an action.

Next, let’s look at the requests for each state of the view in figure 11.16.
Figure 11.16. All the requests for each view are shown based on the state of the user-agent.

To control the contents of the view based on the user-agent’s state, you’ll employ a combination of the me dictionary you’ve been using and a new me.isMe property, which, if true, indicates that the user-agent is authenticated as the creator of the tutorial. As shown in figure 11.16, when a user-agent is not authenticated, a read-only view of the tutorial detail page is displayed ![]() . In this state, the page contains two requests. One request links the tutorial back to its owner, and the other request loads
a video record into the video player page.
. In this state, the page contains two requests. One request links the tutorial back to its owner, and the other request loads
a video record into the video player page. ![]() When a user-agent is authenticated but isn’t the owner of the tutorial, a read-only version of the page is again displayed
but with an added myRating request, similar to figure 11.17.
When a user-agent is authenticated but isn’t the owner of the tutorial, a read-only version of the page is again displayed
but with an added myRating request, similar to figure 11.17.
Figure 11.17. This tutorial was created by the user sailsinaction, but it’s being viewed by the user nikolatesla. Therefore, nikolatesla can rate and view the tutorial but not edit it.

Finally, ![]() when a user-agent is both authenticated and the owner of the tutorial, UI elements to edit, delete, and otherwise alter the
tutorial and video are displayed, similar to figure 11.18.
when a user-agent is both authenticated and the owner of the tutorial, UI elements to edit, delete, and otherwise alter the
tutorial and video are displayed, similar to figure 11.18.
Figure 11.18. A user-agent who is both authenticated and the owner of the tutorial adds an additional request to modify the tutorial and video. Note that an owner of a tutorial can’t rate their own tutorial.

So the display of additional requests is controlled via an isMe local in the tutorials-detail action of brushfire/api/controllers/PageController.js, similar to the following.
Example 11.12. The isMe property in the tutorials-detail action of the page controller

If the user-agent is authenticated, you look up the user by the session’s userId. You then compare the returned username property of that found user with the tutorial record’s owner. If the two properties are equal, the isMe property is set to true and passed on as a local to the view. Markup in the view is displayed depending on the value of me.isMe. We’ll look at the wireframes for the other views related to the tutorial and video as we implement each feature in coming chapters. If you’re curious, you can review the requirements of all the wireframes in the API Reference and see all the wireframes in the chapter 11 hub located here: http://sailsinaction.github.io/chapter-11/.
11.4. Patterns and best practices
Application development is a constantly evolving process of solving problems and then editing and refining the solutions. Certain times, however, are better than others for refining your code. The pivot is one of those opportunities to reflect on the current code base and make changes before embarking on new features. One of the first tasks you should consider is removing code that’s no longer used in the project. For example, in chapter 3 we began working on the frontend as a single-page application (SPA) and later transitioned to a hybrid combination of using server-rendered views and a frontend framework like Angular. We were able to remove a lot of unused templates and code. As you review the repo, you’ll see that we were able to trim quite a bit of unused source code from the project. In this chapter, we’ll also do some actual refactoring of our source.
11.4.1. Refactoring repetitive action names
As your application grows, you’ll start to notice things that annoy you. One of these things is your naming choices. For example, when we started Brushfire we wanted to be descriptive in our page controller, so we prefixed each action with the word show and added the word Page on the end (for example, showHomePage, showProfile-Page). What began as a well-intended naming structure has now become a distraction, making the actions more difficult to read. To remedy this, we removed show and Page from each action name. This, of course, required us to check our action name changes in explicit routes found in the brushfire/config/routes.js file as well as changes to action names in policies via brushfire/config/policies.js. As you review the new repo, you’ll see these and other naming enhancements to the Brushfire project.
11.4.2. Using folders to organize views
Sometimes it makes sense to go back and aggregate views into folders for better organization. Let’s look at an example relating to the password-recovery system to aggregate some views. We decided to organize all the views related to password recovery in a views subfolder named password-recovery. The following listing illustrates the way you reference the path to a view in res.view().
Example 11.13. Referencing a path to a view in Sails
...
passwordRecoveryEmail: function(req, res) {
  return res.view('./password-recovery/password-recovery-email', {
    me: null
  });
},
...
Now that you know how to access views in subfolders from res.view(), we’ll leave it up to you to determine how best to organize other related views based on your future requirements.
11.4.3. Refactoring EJS views and client-side templates
We’ve settled on a hybrid approach to creating frontend views that combines EJS tags with Angular controllers and directives. But how do you know when to use either approach? As a general rule, if the current elements on a page won’t change between a page refresh, we’ll use EJS. For example, in brushfire/views/partials/navigation.ejs, none of the elements—nav links, gravatarURL, and so on—change between a page refresh, so we refactored using if statements within EJS tags instead of using Angular ng-hide and ng-show directives. But if an element will change between page refreshes, we’ll use Angular. As you’ll see shortly, the search form on the homepage displays a results list before the page itself is refreshed.
Note
As always, when we say to use Angular, we mean you can use whatever frontend JavaScript framework you prefer.
Another factor that influences the use of EJS tags versus Angular is search engine optimization (SEO). Generally, a page whose content is already rendered versus one that must be rendered on the frontend after the page is loaded will achieve better search engine results. Search engines are improving their ability to derive content from JavaScript, but we’ve found that if it’s important for a page to be incorporated by a search engine, then you should use EJS tags and server-rendered views instead.
Any interaction with the user that involves responding to click events will also require some form of frontend JavaScript such as Angular’s ng-click directive. Form validation is also made easier using a frontend JavaScript framework like Angular. The same holds true for form management in general. For example, using a combination of ng-submit and ng-model makes form submission easier to accomplish than harvesting form elements manually. Finally, loading states benefit from frontend JavaScript because of the ease of configuring them.
The biggest consideration when combining these two approaches, however, is how you transfer backend data to the frontend. Recall that there are three ways to get backend data to your frontend in Brushfire:
- You can send locals to an EJS view and use EJS tags to render the locals on the page.
- You can append locals to the browser’s window dictionary and make them accessible in an Angular controller via assignment to the $scope dictionary.
- You can make an AJAX request to a backend endpoint and assign the results to the Angular $scope dictionary.
The first two options are necessary when the frontend framework requires access to the data between a page refresh. For example, because the navigation bar doesn’t change between a page refresh, you can simply send the me dictionary as a local to the view. This avoids the need to grab the values of me from the window dictionary and place them into a frontend controller and then into the page via Angular. As you review the new Brushfire repo, you’ll see that we incorporated all these general principles in our decisions of when to use EJS and Angular in the project.
11.4.4. Using async.each()
Because users aren’t bashful about adding videos as part of tutorials, we no longer need to seed YouTube videos in the bootstrap. But in order to do adequate testing, we need to create multiple test users. So we’ve refactored the bootstrap to use the popular async library. async is an npm module that provides functions for working with asynchronous JavaScript. Here, we use asynchronous methods to build up our test users. We need a way to coalesce the results of each method that won’t produce issues because we don’t know when each method will return. In Sublime, open brushfire/config/bootstrap.js to see the changes similar to the following listing.
Example 11.14. Refactoring the bootstrap.js file


async.each() provides a callback named next as an added argument to the iterator. This provides a way for you to tell async when you’ve finished with each iteration. After all iterations have been successfully completed or you get an error, the afterwards method is executed, either returning bootstrap’s cb—or callback—with an error, or simply cb if the iterations were successful. It’s important to distinguish the bootstrap cb from async’s next callback. You can think of both callbacks as a way of telling either async or the bootstrap when you’ve finished. Therefore, you wouldn’t use cb within the async.each()method because that’s a different scope and time than the bootstrap method. You can name the callback methods whatever you want. By convention, we use cb() for the bootstrap file and next() for async.each().
11.4.5. Adding new features
Based on user feedback, Chad asked us to implement ratings on tutorials. He said, “Let users rate tutorials up to five stars.” This seems like an innocuous request. But when you don’t lock down what ratings really means, you can quickly get in a quagmire:
- Can an unauthenticated user rate a tutorial?
- Can an owner of a tutorial rate their own tutorial?
- What does the UI do, if anything, to let a user who has already rated this tutorial know that they’ve already rated it?
- What does the UI do, if anything, to let a user who has already rated this tutorial know that, after choosing a new rating, they’ve updated their previous rating?
- How do you differentiate in the UI an average of many users’ ratings and a particular user’s rating?
As you can see, there’s a bit more involved with defining the requirements of the rating feature. After some additional discussions, Chad agreed on the following more-specific requirements:
- There will be two ratings: an overall rating and a myRating. Whether a particular view displays one or both of the ratings will depend on the requirements of that view.
- A user-agent must be authenticated in order to rate a tutorial. Therefore, the myRating won’t be displayed if the user-agent isn’t authenticated.
- A user-agent can change their vote at will.
- When a user-agent hasn’t yet rated a tutorial, the myRating will have empty stars. When a user-agent successfully rates a tutorial, a toastr message will be displayed.
Our point here is to never underestimate the need to fully document a feature because even a seemingly simple one can quickly become complex.
11.5. In depth: adding a password-recovery flow
Chad has been inundated with emails from Brushfire users who forgot their passwords. To address this, we’ll create a password-recovery flow into Brushfire. This will allow users to reset their passwords.
11.5.1. Understanding how password recovery works
A typical password-recovery system allows the user to request a password reset in the event they can’t remember their existing password. The system sends an email to the address used when signing up for an account. We’ll use a popular service called Mailgun that allows us to send email programmatically. A reset link is then attached to the email that provides a one-time-use token to reset the password. Figure 11.19 illustrates the flow of the recovery system.
Figure 11.19. A password-recovery system has several components including a form that captures the email address used when creating the account, an action that generates a one-time token and the email and responds with an email-sent form , and the password-reset form with the reset password action .

The password-recovery system starts with a GET request to /password-recovery-email from the sign-in page. This triggers the passwordRecoveryEmail action, as shown in the next listing, of the page controller that you set up in the repo you cloned at the beginning of the chapter.
Example 11.15. The passwordRecoveryEmail action
passwordRecoveryEmail: function(req, res) {
  return res.view('./password-recovery/password-recovery-email', {
    me: null
  });
},
The user supplies the email address they provided when originally signing up for Brushfire. Clicking the Send Password Recovery Email button triggers the generateRecoveryEmail action of the user controller, similar to this.
Example 11.16. The generateRecoveryEmail action


We already reviewed most of the mechanics of how this action works in previous chapters. There are a few new details. For example, we’re using two new machines: one to generate a random string—machinepack-strings—and one to send email—machinepack-mailgun.sendPlainTextEmail.
The Mailgun service requires an API key and domain, which you’ll obtain and configure in brushfire/config/local.js in the next section. For now, know that the local.js file places the properties on a global Sails dictionary that you access in this action. The result of the generateRecoveryEmail action is that an email is sent to the user’s email address with a link that (when clicked) makes a GET request to /password-reset-form/:passwordRecoveryToken, passing the passwordRecoveryToken as a parameter. The frontend passwordRecoveryPageController redirects the user-agent to a password-recovery-email-sent page via a GET request to /password-recovery-email-sent. When the user clicks the link in the email message, a GET request to /password-reset-form/:passwordRecoveryToken is made that triggers the passwordReset action of the page controller, which renders the password-reset view. This view contains a form for the user to provide a new password. When the user clicks the Reset Password button, a PUT request to /user/reset-password is made, which triggers the resetPassword action of the user controller, similar to the following listing.
Example 11.17. The resetPassword action

The functionality in this action should look familiar from previous chapters. You use _.isString() for secondary validation instead of _.isDefined(). This gives you the advantage of checking for both a value as well as whether that value is a string in one method. Also recall that the User.update() method of the model returns an array of dictionaries and not a single dictionary. If everything is successful, the frontend redirects the user-agent to the profile page via a GET request to /:username.
11.5.2. Sending emails
Mailgun is a commercial service that provides APIs that allow you to send email programmatically. In order to use the service, you need credentials, and in this section we’ll show you how to store and incorporate your credentials using the local.js file. You’re not limited to using Mailgun for sending emails. Create a free account by navigating your browser to http://mailgun.com. You’ll want to select the free account that allows for up to 10,000 emails per month. Once you’ve created your account, you’ll need to collect two values: your domain and your API key. In Sublime, open brushfire/config/local.js, and add the following code with your credentials.
Example 11.18. Adding mailgun credentials to local.js
...
module.exports.mailgun =  {
  apiKey: 'ADD YOUR API KEY',
  domain: 'ADD YOUR DOMAIN',
  baseUrl: 'http://localhost:1337'
};
...
Your password-recovery system is now ready to start sending emails and resetting passwords.
11.6. Summary
- Proper attention to detail on frontend mockups, requirements, and decision making should limit pivots to those based on market feedback.
- Refactoring is a process in which existing code is restructured to increase organization and readability and produce an overall reduction in complexity.
- Using variables in custom routes requires added emphasis on the route’s order in brushfire/config/routes.js.
- Third-party services like Mailgun can send emails on Sails’ behalf to fulfill an essential component of a password-recovery system.