Chapter 13. Ratings, followers, and search
- Creating a rating system for tutorials
- Understanding follower/following associations
- Building search into Brushfire
- Incorporating pagination for tutorials and a sorting mechanism for videos
You’re now well into your post-pivot journey that started in chapter 11. In chapter 12, you learned how to establish relationships between models using embedded values and Waterline associations. In this chapter, you’ll build on that knowledge to implement other requirements of Brushfire, including adding videos, rating content, following users, searching, and more. We’ll end with a review of policies and restrictions in actions that manage access to various features. So let’s get started.
13.1. Obtaining the example materials for this chapter
If you followed along in chapter 12 with an existing project, you can continue to use that project in this chapter. If, however, you want to start from this chapter and move forward, clone the following repo: https://github.com/sailsinaction/brushfire-ch12-end. After cloning the repo, install the Node module dependencies via npm install. You’ll also want to add the local.js file you created in chapter 11. In Sublime, create a new file in brushfire/config/local.js, and add the following code.
Example 13.1. Adding to the local.js file
module.exports.blueprints = {
  shortcuts: true,
  prefix: '/bp',
};

module.exports.connections = {
  myPostgresqlServer: {
    adapter: 'sails-postgresql',
    host: 'localhost',
    database: 'brushfire'
  }
};

module.exports.mailgun =  {
  apiKey: 'ADD YOUR MAILGUN API KEY HERE',
  domain: 'ADD YOUR MAILGUN DOMAIN HERE',
  baseUrl: 'http://localhost:1337'
};
13.2. Incorporating ratings
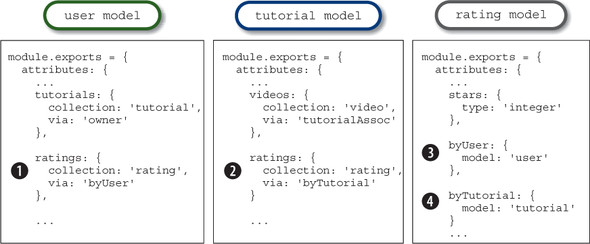
Chad impressed on us that early adopters of Brushfire wanted the ability to rate tutorials in order to differentiate between content. Users who are authenticated and are not the owner of a tutorial may rate a tutorial from the tutorials-detail page. The average of the ratings is displayed on that page as well as other pages, including search, browse, profile, and add-video. You’ve already set up the association configuration among the user, tutorial, and rating models, similar to figure 13.1.
Figure 13.1. The user model has a ratings association attribute  configured as a collection with the rating model that uses via. The tutorial model has a ratings association attribute
  configured as a collection with the rating model that uses via. The rating model has a byUser association attribute
  configured as a model with the user. The rating model also has a byTutorial association attribute
  configured as a model with the tutorial.
A quick look at the tutorials-detail page in the Brushfire API Reference reveals that the frontend is expecting a tutorial dictionary that contains averageRating and myRating attributes. We’ve chosen to not store these values as attributes in models and instead calculate each value using the stars attribute from the rating model.
13.2.1. Calculating averages
You need to add the necessary code to calculate the average ratings for a found tutorial. In Sublime, open brushfire/api/controllers/PageController.js, and add the following changes to the tutorialDetail action.
Example 13.2. Adding populate and rating query to the tutorialDetail action

You now have all the ratings for the tutorial that you’ll use to calculate the average-Rating. You also have a rating, if any, for the currently authenticated user. You need to check whether the current tutorial being rated has been rated before by this authenticated user-agent. If it has, you’ll pass it to the view as myRating through locals. In Sublime, continue adding the following code to the tutorialDetail action.
Example 13.3. Computing the averageRating value in the tutorialDetail action


The bootstrap provides you with two test ratings: one from franksinatra (Frank was a bit stingy giving a rating of three stars) and one from nikolatesla, who gave a rating of three stars to the Crockford tutorial. Restart Sails using sails lift, log in as nikolatesla, and navigate your browser to localhost:1337/tutorials/1. You should see something similar to figure 13.2.
Figure 13.2. The tutorials-detail page now displays the correct average rating and a rating for the currently authenticated user-agent , if any. In this case, the nikolatesla test user has provided a rating of three stars.

When the user rates the tutorial by clicking the stars next to myRating or clicks the Change button if a rating has already been given, the rate-tutorial request is triggered. You’ll implement that endpoint in the next section.
13.2.2. Adding a new rating
Let’s implement the rate-tutorial request defined in the API Reference as “Create or update rating for a tutorial using the session of the user-agent and respond with the average rating for the tutorial.” The rate-tutorial endpoint has two incoming parameters: the tutorial id and the number of stars provided for the tutorial rating. You’ll use both parameters to fulfill the requirements of the endpoint. In Sublime, open brushfire/api/controllers/TutorialController.js, and add the following code to the rateTutorial action.
Example 13.4. Implementing the rateTutorial action—the initial queries


You’ll first query for the currently logged-in user-agent, the tutorial being rated, and any rating by the currently logged-in user-agent for this tutorial. Notice that you don’t use the Rating.find() model method and then iterate through the array of dictionaries to find a matching rating. Instead, you use an IN query that specifies multiple criteria in the query. This eliminates the need for iterating through returned ratings results from the query. If a rating exists, you’ll update the existing rating in Sublime with the following code.
Example 13.5. Implementing the rateTutorial action—updating an existing rating


You’ll update the individual number of stars in the rating model. Because the average number of stars is calculated and not stored, you need to first get all the ratings for the tutorial and then calculate the average by iterating over them. Next, if no rating exists, you’ll create a new one in Sublime with the following code.
Example 13.6. Implementing the rateTutorial action—creating a new rating


You’ve now repeated the calculation of the average rating code in three different places. Let’s refactor the averaging code to a service that can be executed from multiple places. In Sublime, create a new file at brushfire/api/services/MathService.js, and add the following code.
Example 13.7. The MathService
module.exports = {

  calculateAverage: function (options) {

    var sumTutorialRatings = 0;

    _.each(options.ratings, function(rating){
      sumTutorialRatings = sumTutorialRatings + rating.stars;
    });

    var averageRating = sumTutorialRatings / options.ratings.length;

    return averageRating;
  }
};
Refactoring the rateTutorial action code to execute the service is simple. In Sublime, open brushfire/api/controllers/TutorialController.js, and replace the code that does the averaging (in two places) with the service in the rateTutorial action, similar to the next listing.
Example 13.8. The refactored rateTutorial action
...
return res.json({
  averageRating: MathService.calculateAverage({ratings:

   foundTutorialAfterUpdate.ratings})
});
...
foundTutorialAfterUpdate.ratings})
});
...
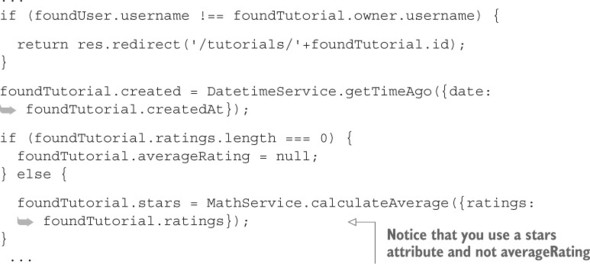
Let’s also update the tutorialDetail action of the page controller to take advantage of the service. In Sublime, open brushfire/api/controllers/PageController.js, and exchange the following service for the existing averaging code, similar to this.
Example 13.9. The tutorialDetail action after refactoring
...
if (foundTutorial.ratings.length === 0) {
  foundTutorial.averageRating = null;
} else {

  foundTutorial.averageRating =
   MathService.calculateAverage({ratings: foundTutorial.ratings});
}
...
13.3. Implementing videos
Before you can move on to building features like followers and search, you need to finish the last set of tasks left over from the pivot. Now that you’re a master of associations, this will be a breeze!
You still need to implement the video functionality to Brushfire. Recall that a tutorial can contain YouTube video links. Figure 13.3 depicts the association between the video and tutorial model associations that are similar to the configuration you set up between the user and tutorial models.
Figure 13.3. The tutorial model has a videos association attribute configured as a collection with the video model that uses via. The video model has a tutorialAssoc association attribute configured as a model with the tutorial model.

A tutorial record can have multiple videos, and a video record can have one tutorial.
13.3.1. The Create-video form
The create-video page is currently using a simulated dictionary you added when you cloned the project in chapter 11. This simulated dictionary also contains the title, description, owner, id, created, totalTime, and stars attributes in the format the frontend expects. In this section, you’ll replace the simulated dictionary with a combination of queries and transformations to achieve the simulated results with real data. Let’s look at the wireframe for the attributes you need to retrieve and format for the create-video page in figure 13.4.
Figure 13.4. The create-video page displays attributes from the user, tutorial, and rating models.

Similar to the tutorial-detail page, the create-video page needs attributes from all four models. You’ll transform, calculate, and format all the values for dictionary properties similar to figure 13.5.
Figure 13.5. The frontend expects these attribute formats in the create-video page.

To get started, open brushfire/api/controllers/PageController.js in Sublime, and add the following code to the newVideo action.
Example 13.10. The initial queries of the newVideo action


Next, you’ll use your previously created MathService to format the createdAt date and calculate the average rating. In Sublime, add the following code.
Example 13.11. Formatting the createdAt date and calculating the average rating
Similar to the way you’re calculating the average rating, you’ll calculate the totalTime attribute in the action. The Brushfire API Reference indicates that the totalTime attribute is the total length of all videos. There’s a variety of ways you could store and calculate this value. You’re opting to store the total lengthInSeconds of each video as an attribute of the video model. You’ll then use that attribute to calculate and later format the various video length formatting requirements of the frontend. Because you need to do the calculation and formatting in more than three Brushfire locations, you already added the method getHoursMinutesSeconds to the existing DateTimeService. Take a look by opening brushfire/api/services/DateTimeService.js in Sublime, which should yield code similar to the following listing.
Example 13.12. The getHoursMinutesSeconds method of the DateTimeService

Now that you have the service, let’s use it to complete the newVideo action. In Sublime, open brushfire/api/controllers/PageController.js, and add the following code.
Example 13.13. Using getHoursMinutesSeconds to calculate totalTime


You’ll also need that same bit of code in the tutorials-detail page. In Sublime, open brushfire/api/controllers/PageController.js, and add the following code to the tutorial-Detail action.
Example 13.14. Calculating the tutorial length in the tutorialDetail action
... foundTutorial.averageRating =
You might be wondering how the total was calculated when you haven’t created any videos yet: bootstrap created tutorials and videos including lengthInSeconds as well as a rating. Next, let’s move to actually adding a video with its attributes.
13.3.2. Review: adding a record to a collection association
Adding a video to the model is easy. First, look at the create-video page attributes in figure 13.6.
Figure 13.6. The create-video page has some properties you’ll store in the video model, like title and src, and some properties that you’ll use to calculate the lengthInSeconds on the backend, like hours, minutes, and seconds.

In Sublime, open brushfire/api/controllers/TutorialController.js, and add the following code to the addVideo action.
Example 13.15. Creating a video record


Because you use a collection association with the via property, you need only update the reference to the record in one place. The easiest choice is to set the tutorial-Assoc attribute of the video model to the current tutorial id. You could have used the .add() method within the tutorial model, but this would have required an added step to execute .save(). Also, notice that you’re converting hours, minutes, and seconds of the video into total seconds and then assigning the total seconds to lengthInSeconds.
13.3.3. Editing video details
Updating a video uses very similar code to creating a video. We suggest you review the requirements in the Brushfire API Reference under “Edit video page” and “Edit video metadata.” To implement the edit-video page endpoint, open brushfire/api/controllers/PageController.js in Sublime, and add the code to the editVideo action from this gist: http://mng.bz/m828. To implement the edit-video metadata endpoint, open brushfire/api/controllers/TutorialController.js in Sublime, and add the code to the updateVideo action from this gist: http://mng.bz/tB0B.
13.3.4. Managing the sort order of videos using an embedded array
In chapter 12, we pointed out that although issues exist when embedding records to create relationships between models, there are situations where embedding a value or group of values would be advantageous in a model. In fact, embedded values or groups of values work as long as the embedded value doesn’t need to be queried outside the context of the model where it’s embedded. Managing the sort order of videos in tutorial records is a good example of using an embedded array in a model. First, you added a videoOrder attribute as JSON to the video model similar to the following listing.
Example 13.16. Configuring the videoOrder attribute in the model
...
 videoOrder: {
   type: 'json'
 },
...
You want to be able to add videos to a tutorial and then reorder the videos up and down. The createTutorial, addVideo, tutorialDetail, reorderVideoUp, and reorder-VideoDown endpoints are affected by managing the video sort order. You’ll use the embedded array to cache the sort order of video ids. The sorting process will include the tasks in table 13.1.
Table 13.1. Tasks related to the video order
|
Action |
Task |
|---|---|
| createTutorial | When a tutorial is created, set the videoOrder property to an empty array. |
| addVideo | When a video is created, push the video id to the videoOrder embedded array. |
| tutorialDetail | When the tutorials-detail page is rendered, use the videoOrder embedded array to sort the videos. |
| reorderVideoUp | When the up arrow is clicked, move the video id up one element in the array. |
| reorderVideoDown | When the down arrow is clicked, move the video id down one element in the array. |
Let’s implement each of these tasks. First is the createTutorial action of the tutorial controller. In Sublime, open brushfire/api/controllers/TutorialController.js, and set the videoOrder property to an empty array in the createTutorial action, similar to this.
Example 13.17. Setting the videoOrder property in the createTutorial action

Next, you’ll add the video id to the tutorial.videoOrder array when a new video is created. Head back to brushfire/api/controllers/TutorialController.js in Sublime, and add the following code.
Example 13.18. Adding a video id to the tutorial.videoOrder array

Now that you’ve added the video id to the array, you’ll use it to calculate the sort order when the tutorial detail page is rendered. In Sublime, open brushfire/api/controllers/PageController.js, and add the following code to the tutorialDetail action.
Example 13.19. Adding the sorting code to the tutorialDetail action

Here’s how it works. Let’s say tutorial.videoOrder has three video ids, [4, 3, 5], and tutorial.videos is [{id: 5}, {id: 4}, {id: 3}]. After iterating through _.sortBy, the tutorial.videos array is transformed into [{id: 4}, {id: 3}, {id: 5}]. Now, let’s enable the user to reorder the videos from the tutorials-detail page. When a tutorial contains more than one video, the user can click an up or down arrow to adjust the sort order, similar to figure 13.7.
Figure 13.7. Users can reorder the videos using the up and down sort order buttons B.

Let’s enable the up button first. In Sublime, open brushfire/api/controllers/video/ VideoController.js, and add the following code to the reorderVideoUp action.
Example 13.20. Moving a video up in the sort order


You’ll use similar code to move a video down in the sort order. Return to brushfire/api/controllers/video/VideoController.js, and add the following code to the reorderVideoDown action.
Example 13.21. Moving a video down in the sort order


13.3.5. Integrating a video player
Each video is displayed in a list on the tutorials-detail page. When the user selects a video, the video player page will be displayed, similar to figure 13.8. Let’s implement this.
Figure 13.8. The video player page

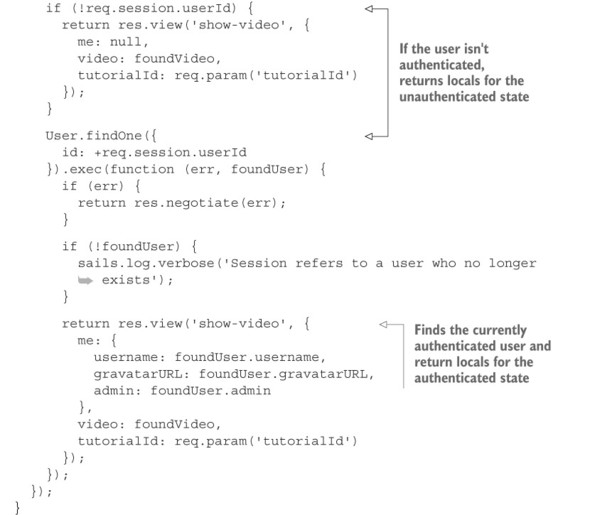
The video player contains the YouTube video in an iframe, a Back button to the tutorial, and a chat interface that you’ll implement in chapter 14. The API Reference reveals the endpoint has two incoming parameters, tutorialID and the id of the video record, as well as an authenticated response and an unauthenticated response. In Sublime, open brushfire/api/controller/PageController.js, and add the following code to the showVideo action.
Example 13.22. Implementing the showVideo endpoint

13.3.6. Cascading delete
When a tutorial is deleted, it’s important to also remove any associated videos and ratings. In Sublime, open brushfire/api/controllers/TutorialController.js, and add the following code to the deleteTutorial action.
Example 13.23. Deleting a tutorial in the deleteTutorial action


After retrieving the tutorial and populating the owner, ratings, and videos associations, you’ll use the .pluck() method to return an array of video and rating ids. You’ll then use those arrays to destroy the associated records.
13.3.7. Removing a record from a collection
You also need to enable the frontend request to delete a video. In Sublime, open brushfire/api/controllers/TutorialController.js, and add the following code to the removeVideo action.
Example 13.24. Deleting a video in the removeVideo action


13.4. Implementing support for followers
Part of the Brushfire post-pivot feature requests was to give users the ability to follow other users and the tutorials they created. Therefore, you need a way to associate users with each other. Sails makes it simple to configure this type of relationship. In the user model, you already created two association attributes, followers and following-, from the repo you originally cloned in chapter 11. Take a look at the model configuration in Sublime by opening brushfire/api/models/User.js, similar to the following listing.
Example 13.25. Configured followers and following attributes in the user model
...
// Who is following me?
followers: {
  collection: 'user',
  via: 'following'
},

// Who am I following?
following: {
  collection: 'user',
  via: 'followers'
},
...
That’s it. The user model now has attributes that will track followers and following users. The two association attributes point to each other as a collection using the via parameter.
13.4.1. The follow and unfollow endpoints
An authenticated user-agent may follow or unfollow a user by clicking the Follow Me or Unfollow Me button, as illustrated in figure 13.9.
Figure 13.9. The Follow Me and Unfollow Me buttons on the user profile toggle whether the user is following another user.

The follow action was added to the assets of the project you cloned back in chapter 11. Let’s take a look. In Sublime, open brushfire/api/controllers/UserController.js, and review the follow action code, which is similar to the next listing.
Example 13.26. Reviewing the follow action of the user controller


When an authenticated user clicks the Follow Me button, their user id is added to the profile owner’s following attribute. Later, when you populate the profile owner’s following attribute, you get an array of dictionaries of users who are following this profile owner. The unfollow input is identical except you use the .remove() method instead of the .add() method.
13.4.2. Displaying a user’s followers on their profile
The follower/following relationship is manifest in the three user profile page configurations—tutorial, following, and followers—similar to figure 13.10.
Figure 13.10. The three profile page configurations in authenticated and unauthenticated states

Let’s first implement the profile page with tutorials. In Sublime, open brushfire/ api/controllers/PageController.js, and add the following code to the profile action.
Example 13.27. Initial queries for the user profile page with tutorials

Note
If you’re adding the code via the online gist, listings 13.27, 13.28, 13.29, and 13.30 are excerpts of the same gist.
Notice that you’re using where and sort in the query criteria. It’s a best practice to use the where clause any time you want to also include query options sort, limit, and/or skip. If the where clause is excluded, the entire dictionary is treated as where criteria. After completing the initial queries, you’ll iterate through each tutorial, making transformations similar to those you made in previous actions. Head back to Sublime, and add the code in the next listing.
Example 13.28. Transforming each tutorial’s attributes


If the user isn’t authenticated, you’ll send back counts for the profile owner’s followers, following, and tutorials as well as an array of tutorial dictionaries. From Sublime, add the code in this listing.
Example 13.29. Responding to the unauthenticated state of the profile endpoint
...
if (!req.session.userId) {

  return res.view('profile', {
    me: null,
    username: foundUser.username,
    gravatarURL: foundUser.gravatarURL,
    frontEnd: {
      numOfTutorials: foundTutorials.length,
      numOfFollowers: foundUser.followers.length,
      numOfFollowing: foundUser.following.length
    },

    tutorials: foundTutorials
  });
}
...
Finally, if the user-agent is authenticated, you’ll respond with the owner’s followers, following, and tutorials, as well as an array of tutorial dictionaries. In Sublime, add the following code.
Example 13.30. Responding to the authenticated state of the profile endpoint


When the user-agent is authenticated, you’ll find their user dictionary, which also contains their id. From there we’ll look in the owner’s followers to determine whether the user-agent is a follower—their user id is in the profile owner’s follower’s array. If it is, you set followedByLoggedInUser to true. You’ll also check whether the user is the profile owner and set the me.isMe property accordingly.
There are two other profile actions: profileFollower and profileFollowing. These actions use code similar to the profile action, but they don’t require the formatting of the tutorials. Replace the current profileFollower and profileFollowing actions from the following gist: http://mng.bz/94Ms. Once this is implemented, you’ll have all three configurations of the profile page.
13.5. Search
Advanced search with support for indexing is beyond the scope of this book. But it’s not that bad! For example, GitHub uses a special database called Elasticsearch to allow users to search code files, issues, and repos. You can integrate this technology in your own app in a matter of days or even hours. But here we’ll show a simpler approach: instead of relying on a third-party tool, you’ll simply use the ORM. Specifically, you’ll support searching tutorials based on their title and/or description, similar to figure 13.11.
Figure 13.11. The search page has two different requests to the search-result endpoint that uses searchCriteria as an incoming parameter.

Both the Search and Search More Tutorials buttons trigger the searchTutorials action of the TutorialController. The searchTutorials action also uses the limit and skip query options to manage pagination.
13.5.1. Paginating search results
You want the search results to display a maximum of 10 results. Thereafter, you’ll paginate in lots of 10 tutorials per page. In Sublime, open brushfire/api/controllers/ TutorialController.js and, add the following code to the searchTutorials action.
Example 13.31. Implementing the searchTutorials action—the search criteria


Note
For details about other query options for .find(), .findOne(), .create(), .update(), .destroy(), .findOrCreate, or .count(), see http://mng.bz/lrxo.
Next, you’ll format the results of the search. In Sublime, add the following code.
Example 13.32. Implementing the searchTutorials action—formatting the search results


13.5.2. General pagination
When the user clicks the Browse button on the navigation toolbar, you want to display a maximum of 10 tutorials on a page. Thereafter, you’ll paginate in 10 tutorials per page. Figure 13.12 illustrates the tutorials for an initial browsing page.
Figure 13.12. The browse-tutorial page contains a browse-results endpoint trigger by the Show More Tutorials button.

The browseTutorials action is almost identical to the searchTutorials action except for the criteria in the .find() method. We’ve provided the source code for the browseTutorials action in the following gist: http://mng.bz/tGPS.
13.6. Summary
- The rating model uses a model association relationship to the user and tutorial models. The user and tutorial models use a collection association relationship with via to the rating model.
- As a general rule, code that’s repeated in three different actions should be refactored into a service.
- Use an embedded array attribute to manage the sort order because the array won’t be queried outside the tutorial model.
- A following/follower relationship can be created by adding two collection association attributes in the same model with via.