Chapter 5. Custom backend code
- Setting up the initial state of your application
- Introduction to custom asynchronous code in Sails
- Counting the number of records in your database
- Creating a new record in your database
- Accessing a third-party API
Almost every commercial web application requires some way to run custom code “on lift,” before it begins listening for requests. This usually involves creating seed data, like admin user accounts. As we introduce custom backend code in this chapter, we’ll show how to use the config/bootstrap.js file to set up the data your application needs at startup.
Next, we’ll provide an introduction to communicating with third-party APIs. Specifically, we’ll show how to install open source packages from npm, and then take advantage of that preexisting code in your app (without having to write it yourself by hand!). In this chapter, we’ll demonstrate how to use Node machines—reusable helper functions with standardized arguments, errors, and return values—but the concepts you learn here apply for any open source package on npm.
Finally, in the process, we’ll explore some of the patterns (and anti-patterns) to look out for when writing custom logic for your Sails application, particularly as they relate to marshaling data and handling errors in synchronous versus asynchronous code.
5.1. Chad has a new investor
We just finished a phone meeting with Chad. He told us how he took what we built so far, called it a prototype, and spent a few weeks showing it to some investors. And, luckily, he found one individual who believed in his vision so much that she was willing to invest. She was on the call, actually, and introduced herself as Barbara. In just a few short minutes, before Chad could say another word, she’d already won us over. Besides being a very intelligent woman and sharing our love for technology, Barbara is Chad’s mother. She keeps Chad on his toes, and it’s clear that she knows how to get results.
So when our new investor told us that she believes cat videos are the next social media frontier and insisted that the application devote itself to user-curated cat videos, we nodded and took notes:
- Cat videos: the final frontier.
- Cats: content producers? Or content consumers?
- No one (person or cat) is going to use a video app without any cat videos.
Barbara brought up some important concerns about our lack of content. As it stands, all of Brushfire’s videos have to be entered by hand. Barbara called this the common “chicken versus egg” problem with new applications. Brushfire needs users to create content, but it also needs content to attract users. To overcome this issue, we must find a way to seed the database with content—in this case, with cat videos.
5.1.1. Converting requirements into development tasks
Inspired by Barbara’s advice, we met with Chad and worked out some requirements. Table 5.1 is the result of our discussion.
Table 5.1. Translating new requirements Into actionable solutions
|
Requirement |
Solution |
|---|---|
| Get cat videos into the system somehow without requiring users to enter them by hand. | Write some code in the config/bootstrap.js file that will be executed every time the Sails server lifts (via sails lift). |
| Check if there are any videos in the Brushfire database. | Use the Video.count() model method to determine how many records exist in the video model. |
| Search YouTube for popular cat videos and use those to seed the list of videos displayed on Brushfire. | Install an npm package called machinepack-youtube and use one of its methods (a.k.a. machines) to communicate with the YouTube API and search for cat videos. Then, use another model method, Video.create(), to create a new record in the database for each one of the results from YouTube. We might need to mess with the data a bit. |
Now that we have our requirements and a plan for implementing them, let’s get started.
5.2. Running code on lift
In chapter 4, you ran backend code by sending requests to your backend, which matched built-in blueprint routes and triggered blueprint actions. Because you were using blueprint actions, you didn’t have to write this code yourself, but you could have. Whether blueprint or custom, controller actions run when an incoming request is received. In other words, the execution context, or habitat, of any controller action is the request. But in this chapter, you’ll explore a slightly different habitat: raw Sails. The code you write in this chapter won’t have access to a request, but it will still have access to other features of Sails, like model methods. And instead of running code whenever a particular type of HTTP or socket request is received, you’ll trigger the execution of custom code when starting Sails via sails lift. To do this, you’ll modify a special function in Sails’ configuration called the bootstrap.
Caution
Be careful not to confuse the Sails bootstrap function with the popular Bootstrap CSS framework. The Bootstrap CSS framework is a set of conventions and reusable stylesheets. The bootstrap function in Sails is where you can put custom code if you want it to run when the Sails server lifts.
So far, you’ve relied on built-in features in Sails, such as blueprint actions, for backend functionality. You haven’t needed to write any custom backend JavaScript code yet. But that’s all about to change. You’ll still use many existing helpers and utilities provided by Sails, npm, and Node.js itself, but from here on out, it will be up to you to create your own custom code to fulfill tasks. As an implementer and not simply a user of code, you’ll have the added responsibility of maintaining execution flow. Because Node.js is asynchronous, that can sometimes feel a bit different than in other languages like PHP or Java. Luckily, because Node.js uses JavaScript, you already have a big head start.
5.2.1. Using bootstrap.js
To better understand how the bootstrap function works, let’s add some code to the bootstrap.js file and take it for a spin. Open config/boostrap.js in Sublime and add the following code.
Example 5.1. A first look at the bootstrap function

Now, start your app using sails lift, and after a second or two, you should see the message Hello World! appear in the terminal window. What did you just do here? Figure 5.1 illustrates what happened when you started the Sails server.
Figure 5.1. After you started the Sails server, the bootstrap.js file was executed, in which your code logged Hello World! to the terminal. Then, you passed control back to Sails by calling cb(). At that point, Sails went about its business, completing the process of lifting the server.

After you ran sails lift ![]() but before Sails started listening for incoming requests, Sails loaded the bootstrap.js file
but before Sails started listening for incoming requests, Sails loaded the bootstrap.js file ![]() and executed your custom code. This bit worked just like JavaScript in the browser, except console.log() wrote a message to the terminal because this is backend code. In a blocking language like PHP or Java, that would be it!
But because Node.js is nonblocking, many library functions are asynchronous. Because of this, the bootstrap function is itself asynchronous—which means that it provides a callback. Instead of returning from the bootstrap function, you invoke the callback
function, cb(), to return control to Sails
and executed your custom code. This bit worked just like JavaScript in the browser, except console.log() wrote a message to the terminal because this is backend code. In a blocking language like PHP or Java, that would be it!
But because Node.js is nonblocking, many library functions are asynchronous. Because of this, the bootstrap function is itself asynchronous—which means that it provides a callback. Instead of returning from the bootstrap function, you invoke the callback
function, cb(), to return control to Sails ![]() .
.
Note
Whenever you implement an asynchronous function, it’s critical that you explicitly call the provided callback, also known as an outlet. Otherwise, you’ll never pass control back to whatever called your asynchronous function in the first place! In the case of the function defined in bootstrap.js, if you forgot to call the callback, then the Sails server would never start. Instead, it would hang until it eventually timed out and produced an error, telling you “The bootstrap function is taking too long.”
Now that you’ve dipped your toe into implementing an asynchronous function, you’re ready to write some more-meaningful backend code for the bootstrap function. You’ll start off by using model methods to look up information from the database.
5.3. A deeper understanding of model methods
After looking at the requirements we put together at the beginning of the chapter, you see that your next task is to determine whether any existing records exist in the video model. To do this you’ll use a model method: .count(). Because you’re interested in counting the number of videos, as opposed to partridges, golden rings, or any other nouns that might be represented by tables in your database, you’ll access .count() as a method of the video model, by calling Video.count().
Remember back in chapter 4, when you ran sails generate video from the command line? You saw how this created a model definition file in brushfire/api/models/, and you witnessed the effect that it had on the blueprint API. But there was another handy side effect: when you lift your app, Sails builds a JavaScript dictionary called Video and exposes it as a global variable.
This gives you automatic access to Video from anywhere in your app, including the bootstrap.js file. So let’s use it!
Note
Besides Video.count(), the Video dictionary provides a smorgasbord of other methods for fetching, analyzing, and manipulating the videos stored in your database. We’ll look at another one of those, Video.create(), later in this chapter.
5.3.1. Using the Video.count() model method
Unsurprisingly, the Video.count() method returns the number of records in the video model. You need to figure out whether there are any videos already in the database, so you can just count the records. If the number is greater than zero, then you know you already have at least one video. So let’s take that for a spin. Open brushfire/config/bootstrap.js in Sublime and add the following code.
Example 5.2. Count the records in the video model


Stop Sails using Ctrl-C and restart it using sails lift. If you have existing records in the video model, your custom code in the bootstrap will execute and log the number of existing video records. Otherwise, if no existing video records exist, it will log a message saying so. Either way, it returns control to Sails so it can finish the lifting process, as shown in figure 5.2.
Figure 5.2. The .count() method calculates the number of records in the video model, and then, depending on the result, your code logs the appropriate message. Either way, you pass control back to Sails and it finishes lifting your app.

Now that you know how to check whether the video model contains any records, you can move on to the next requirement: programmatically searching YouTube for cat videos.
5.4. Introducing machinepacks
In chapter 1, you learned about npm packages as a way to take advantage of reusable open source code. This works well, but there’s an even easier way. For many years, when you wanted to access a third-party API from Sails, you had the following choices:
- If the third-party API was hosted, you could look up the documentation and access it using an HTTP library like www.npmjs.com/package/request.
- You could copy and paste some code from a tutorial.
- You could search for an existing npm package and learn how to use it from its README file. Then, if you trusted it enough and understood the documentation, you could make it a dependency of your project and access it via require.
All these strategies are viable, but they can be problematic. For one thing, there are unavoidable differences in the way that various third-party APIs work. But what causes more confusion for many developers is that even among different npm packages for the same API, usage can vary dramatically. Machinepacks and the machine specification were designed specifically to overcome these inconsistencies.
The machine specification is a set of conventions for writing JavaScript functions, with a particular emphasis on open source distribution. These standardized JavaScript functions, called machines, are designed to make it easier to write code in Node.js.
Every machine provides a terse verb phrase (fewer than 140 characters) that describes its purpose—whether it’s sending an email, translating a text file, or fetching a web page. It declares inputs, which tell you what arguments you need to pass in. And it declares exits, which serve two major purposes: to tell you what (if any) type of return value you can expect and to give you an easy way to handle certain exceptions or edge cases that might possibly arise.
Note
The declarative nature of machines makes them self-documenting, easy to understand, and, most important, consistent and easy to use, no matter the use case.
Machines are packaged together in machinepacks, which are a way of packaging up and publishing related machines. You’ll start by using a package called machinepack-youtube, which will allow you to interact with the YouTube API.
5.4.1. Finding a package to work with the YouTube API
You know you need to access the YouTube API to search for cat videos. But where should you start? Like most things in life, you can Google it. Search for “youtube machinepack” or just navigate your browser to http://node-machine.org/machinepacks.
Node-Machine.org is a documentation site maintained by the Sails.js team. Any time a new open source machinepack (or a new version of an existing pack) is published to the npm registry, Node-Machine.org updates the documentation page for each of the methods (a.k.a. machines) in that pack. Each page includes metadata about what a particular machine does, the inputs it expects, the exit callbacks it knows how to handle, and sample code you can copy and paste into your app.
Here, you’ll find a list of available machinepacks. Use Cmd-F, or scroll down until you find YouTube, as shown in figure 5.3.
Figure 5.3. The page for machinepack-youtube provides a list of methods, called machines. In this case, all the machines are related to the YouTube API.

Reviewing the list of machines, you’ll see one that looks particularly promising: .searchVideos(). This machine claims to list YouTube videos that match a specified search query. That sounds pretty good, particularly if you were to send in a search query like “cats.” Get more details by selecting .searchVideos() from the Machines list.
The main page for .searchVideos() on Node-Machine.org, shown in figure 5.4, provides an extensive description of the machine including example code ![]() , available, required, and optional inputs and their types
, available, required, and optional inputs and their types ![]() , and what to expect as a result of executing the machine, also known as exits
, and what to expect as a result of executing the machine, also known as exits ![]() . Before you can use .searchVideos() or machinepack-youtube, you need to install it into your project.
. Before you can use .searchVideos() or machinepack-youtube, you need to install it into your project.
Figure 5.4. The .searchVideos() machine page includes example code that you can copy and paste into your own project, the inputs expected by the machine, including their data types and whether they’re required or optional, and what you can expect when the machine exits.

5.4.2. Installing a machinepack
The machinepack-youtube package is installed exactly as you installed the sails-generate-static package in chapter 3. From the terminal window, type
~/brushfire $ npm install machinepack-youtube --save
Note
The instructions in this section will install machinepack-youtube into your project’s local dependencies in brushfire/node_modules/ (as opposed to installing it as a global dependency as you initially did with Sails).
By running npm install machinepack-youtube, you tell the local npm command-line tool to download source files for this package and install them as a local dependency in /brushfire/node_modules/. And because you added the -- flag, the dependency is also recorded in /brushfire/package.json. This is so that the next time you run npm install by itself to install all dependencies of your project, the proper version of machinepack-youtube will be installed automatically. But where do the source files for machinepack-youtube come from? The files are published and stored in the npm registry, as visualized by http://npmjs.com. Let’s take a quick look at the npm registry.
5.4.3. Exploring npm
The npmjs registry contains literally hundreds of thousands of modules. Navigate your browser to www.npmjs.com/package/machinepack-youtube. You should see the main page for machinepack-youtube, similar to figure 5.5.
Figure 5.5. The main page for machinepack-youtube on the npmjs registry

What’s the difference between node-machine.org and npmjs.com? The npm registry is where you get the actual machinepack-youtube source files, whereas nodemachine.org is the place for documentation on how to use them.
Note
In this book, we’ll be users (not implementers) of npm packages. For information about how to build your own npm package, visit http://node-machine.org.
Now that you understand the mechanics, let’s take the .searchVideos() machine for a spin.
5.4.4. Using machines
You’ll recall that your plan is to seed the video model with cat videos from YouTube. Now that you’ve installed a dependency that will allow you to do that easily, you’re ready to use it in your code. Importing a machinepack is no different than using require() to import any other Node module.
In listing 5.3, you open brushfire/config/bootstrap.js in Sublime and paste the example code from node-machine.org into the callback from the .count() method.
Note
In subsequent examples, you’ll pull the require() call up at the very top of the file, instead of calling it inline. This isn’t strictly necessary for performance reasons, because Node.js caches the result from require() calls, but it does make it much easier to see what dependencies a particular file is using.
Example 5.3. Using .searchVideos() in the bootstrap function


By assigning the result of calling require() in a variable (YouTube) ![]() , you have access to all the methods (machines) of machinepack-youtube from any of your code in this file. When your app lifts and runs the bootstrap, your .searchVideos()
, you have access to all the methods (machines) of machinepack-youtube from any of your code in this file. When your app lifts and runs the bootstrap, your .searchVideos() ![]() instruction will run. Under the covers, it calls out to the YouTube API and waits for a result. When it finishes, one of
your two different callbacks will run. You’ll either log errors
instruction will run. Under the covers, it calls out to the YouTube API and waits for a result. When it finishes, one of
your two different callbacks will run. You’ll either log errors ![]() or log your output
or log your output ![]() .
.
But there’s a bug in your code! Restart Sails via sails lift. Depending on whether records in your video model exist, the terminal window will display either the number of records that exist or an error similar to figure 5.6.
Figure 5.6. The terminal window might display the number of existing records in the video model. But if no records exist, you’ll see this error because of a bug in the example code.

You’ll come back to fix this bug a bit later in the chapter. But first, let’s make sure you can consistently reproduce the error.
If you’ve created a few videos using blueprints, then you might have existing records in your video model. To reproduce this error, you need a way to remove all of these existing records. In chapter 4, we showed how to use shortcut blueprints to destroy records individually from the URL bar. But if you have a lot of records, that can get annoying. Fortunately, there are a couple of easier ways to do this: in the Sails REPL (sails console), or simply by wiping the database altogether. For now, because you’re still using the default disk database, you’ll wipe all of the data that’s been created so far. Pop over to the terminal, and from the root of your project, type
~/brushfire $ rm –rf .tmp/localDiskDb.db
That’s it! Any data that has been created so far is gone. And thanks to Sails’ auto-migrations, the next time you lift Sails, an empty database will be re-created.
Note
We’ll go into more detail about how Sails interacts with databases in the next chapter. For now, just know that the localDisk.db file is where the data for your default, development-only database resides. And any time you delete it, Sails will just create a new empty localDisk.db file the next time you run sails lift.
Now, with no records, when you restart Sails with sails lift and the bootstrap function runs, it triggers your .searchVideos() instruction. If you’re following along, your database should be in the same state as ours, so you should definitely see the error we showed earlier back in figure 5.6.
The problem here is that your .searchVideos() instruction (the code that calls the .searchVideos() machine) isn’t configured properly. Even though machines are standardized, every machine expects a particular set of inputs. As in any code, if the argument for a particular machine input isn’t provided correctly, weird things can happen. We’ll take a closer look at machine inputs in the next section.
5.4.5. Understanding machine inputs
Node-Machine.org provides detailed information about the inputs expected by each machine. This information includes what type of data each input accepts, whether the input is required or optional, and an example.
Definition
The inputs of a function or machine are its hypothetical expectations. For example, the searchVideos() machine has an input named query. Arguments (also known as input values or options) are the actual values that you pass into an instruction (a particular occurrence of a function or machine) in your code. In bootstrap.js, you’re currently passing in the string “grumpy cat” as your argument for the query input.
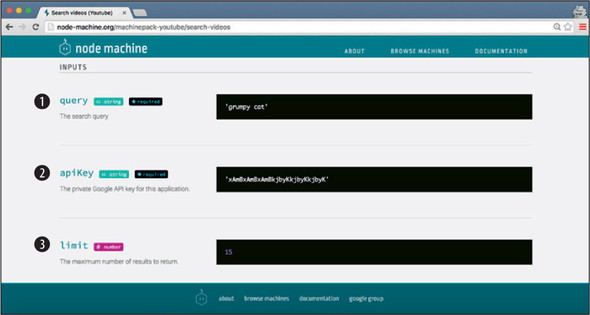
The searchVideos() machine expects you to pass in a search query (like “grumpy cat”) and a Google apiKey, as shown in figure 5.7. You already know that you’ll be searching for cat-related videos; that part is easy. You’ll have to try a couple of different queries to see what returns the best results. You will, however, need to figure out how to obtain your own Google API key.
Figure 5.7. The .searchVideos() machine takes three inputs: the query to use when searching YouTube  , a Google developer API key
  , and an optional limit on how many videos to return
  .
.
Most APIs require some type of authentication to monitor usage, prevent abuse, and enforce rate limits. For example, if you exceed 300 lookups per hour, a Google representative might send you an email to ask you how you like the YouTube API and maybe even ask you to pay them some money. This is called a soft limit. But if you exceed 500 lookups in a single hour, you might get shut out entirely for a couple of hours (a hard limit). Finally, if you send way too many requests, and you don’t get your act together and respond to Google’s email, you could eventually be banned from the YouTube API altogether. Be sure to use a current email address when you sign up for developer APIs and check it frequently when you deploy your app in production!
Let’s take a look at how to obtain an API key for the YouTube API. Although Google’s exact user interface and steps change frequently, the basic principle is always more or less the same. For the sake of demonstration, here’s how it works as of August 2016:
- Create a Google account.
- Navigate your browser to https://console.developers.google.com/.
- Create a project.
- Navigate to enable APIs.
- Navigate to the Credentials portion of your new project to access the API key.
- Click Create Credentials. Then, click Server Key, provide a name for the key, and click Create.
Voila! You should see an API key similar to the one shown in figure 5.8. Go ahead and select it and copy it to your clipboard, because you’ll use it in your code momentarily. But leave this tab open, because you’re not quite finished yet.
Figure 5.8. Your shiny new API key is displayed after completing the key-creation process in the Google Developers Console.

You’re almost there, but there’s one more important step in Google’s setup ritual. Even though you now have your Google API key, if you were to try to use it to search for cat videos, Google’s servers would simply laugh, slap their knees, and respond with an error. Presumably, this is because Google has so many different products, each with its own developer API, that they track them separately. But whatever the reason, that means you still need to enable the YouTube API in Google’s dashboard. To do that, navigate to the overview page and click the YouTube Data API link. At the top of the page, you should see a button titled Enable. Take a deep breath, put your feet up, and click this button.
Note
The sort of setup flow described here varies between API providers, and it isn’t always the most intuitive process. You’ll probably encounter different names and styles of API keys. Sometimes they’re called tokens, codes, or secrets, and occasionally you’ll need to copy and paste two (or even three!) different strings. For some legacy APIs, you might need to call the company and speak to a representative. When in doubt, refer to the information on Node-Machine.org or check out the company’s developer documentation.
If you’re following along on your computer, congratulations! You just obtained a real Google API key and enabled access to the YouTube API. Now you can use that API key from your code in bootstrap.js, where you’ll pass it in to the .searchVideos() machine. But just pasting it in there would be kind of messy. So, instead, let’s look at a way you can store your new API key and any future credentials in one centralized location in the code base.
5.4.6. Setting your own custom configuration in local.js
You could have just pasted your API key inline in the bootstrap.js file. But there’s a better way: custom configuration. Sails provides built-in support for creating your own custom, app-specific configuration settings, using the same mechanism that it uses internally.
As you might expect, the files in brushfire/config/ contain settings for various parts of Sails. When Sails starts, these configuration files are merged into one big dictionary called sails.config. For the most part, the actual names given to each file don’t matter—they’re purely organizational.
One notable exception is local.js, a configuration file with special meaning. This file is designed for use in development, and it has two useful properties: First, any configuration you provide in brushfire/config/local.js takes precedence over the rest of the configuration files in your app. Second, this file is explicitly excluded from version control by the default .gitignore file that was created when you first generated your new Sails app. This ensures that only people you explicitly share it with have access to the contents of local.js. If anyone with ill intentions gets access to your Google API key, they can use it to masquerade as you—or even to disrupt your application.
Definition
.gitignore is just a hidden file at the top level of your project directory. Its job is to specify a set of paths that Git should ignore, meaning that they’re not subject to version control. This is useful as a safeguard, because it prevents you from inadvertently uploading sensitive information to a remote repo like GitHub. It’s also handy for making your development tools more efficient for everyone on your team. For example, the default .gitignore file in every new Sails app also ignores the brushfire/.tmp/ folder, because there’s no reason to waste your time and bandwidth uploading a bunch of duplicate code every time you run git push.
Now, add your Google API key to the local.js file. In Sublime, create brushfire/config/local.js and add the following code. Be sure to paste in your own Google API key.
Example 5.4. Adding to the local.js file
module.exports.google = {
  apiKey: 'PLACE YOUR GOOGLE API KEY HERE'
}
Because you exported google, you’ll be able to access this dictionary as sails.config.google from anywhere in your application. Now, you need to change your code in bootstrap.js to grab the configured API key and pass it to .searchVideos().
5.4.7. Using custom configuration in your code
Instead of pasting your API key directly into bootstrap.js, you’ll set it using Sails’ built-in support for custom, app-specific configuration. You configured the API key using the local.js file, but you could have done it any number of other ways: in a command-line option, in an environment variable, or in a different configuration file. But you still haven’t seen how to actually use that custom configuration setting in your code. Let’s begin.
We’ve often been asked, “Why not just use environment variables?” And the short answer is “Sure, why not!” You can write code in your Sails app that accesses the Node process’s environment variables. But that approach tends to be less maintainable.
If, on the other hand, you build your app to expect custom configuration settings, you’ll be able to set them in any of the myriad ways you can set the built-in configuration provided by Sails—including environment variables. Plus, by using Sails’ conventional approach, you help everyone on your team know what to expect, even across different apps.
Open brushfire/config/bootstrap.js in Sublime, call searchVideos(), and plug in the configured API key shown here.
Example 5.5. Using custom configuration


Here’s an extra-credit question: What would happen if you started the Sails server now? If you’re thinking that Sails would refuse to lift because there’s a bug in your code, then you’re right! Take a close look at the code in listing 5.5. Notice that you don’t call your own cb() (the callback from the bootstrap function) in either success or error. Remember, the bootstrap function in Sails is asynchronous, so you have to call its callback when you’ve finished. Now that you’re using asynchronous functions (Video.count() and YouTube.searchVideos()), you aren’t finished until the last of their callbacks fire.
If that doesn’t quite make sense yet, don’t worry. We’ll show more examples of asynchronous flow control again and again throughout the rest of the book. To start with, let’s take a closer look at machine exits.
5.4.8. Understanding machine exits
Exits are declarations of all of the possible outcomes of executing some code. If you’re familiar with a strongly typed language like Java, this might sound familiar. Machines in JavaScript declare exits for the same reasons that methods in Java declare the exceptions they might throw and the type of data they return, if any. The success exit of a machine is the normal scenario—the scenario where everything works and it returns normally. The error exit of a machine is a sort of catchall. It means something went wrong—whether it was the caller passing in invalid data or an unhandled exception in the implementation of the machine.
Every machine has a success exit and an error exit, and in many cases, these are the only exits that a machine exposes. As you can see in figure 5.9, the .searchVideos() machine has only these two exits: success and error.
Figure 5.9. Node-Machine.org provides details about the exits of each machine in every open source machinepack on npm.

On closer examination, you can see that the success exit provides an example of the data you’ll get back from the machine. In this case, you’ll get an array of dictionaries, each of which contains five properties: id, url, title, description, and publishedAt.
Note
Machines use a special syntax called RTTC exemplar notation to represent data types. This ensures that every input and exit provides some sort of example, instead of just stating the expected or guaranteed data type. In most cases, reading exemplar notation is obvious. But if you encounter syntax you’re not sure about, see http://github.com/node-machine/rttc for details.
Now that you know the potential exits for the .searchVideos() machine and you’re aware of what data you can expect, you can apply that knowledge in your code.
5.4.9. Using callbacks
You’ll first want to handle the error exit. Most of the time, this involves passing through the error to your outlet (the bootstrap function’s callback, cb()). To handle the success exit, you’ll log the result to the console and then pass control back to Sails by calling your outlet with no arguments. Open brushfire/config/bootstrap.js in Sublime and add the following to the machine exit.
Example 5.6. Handling the exits for the .searchVideos machine

Next, restart Sails using sails lift. If Video.count() doesn’t find any existing records, then the .searchVideos() machine will run and return a list of videos from the YouTube API. Head over to the terminal window, and you should see that it logged an array of 15 YouTube cat videos similar to the next listing.
Example 5.7. The foundVideos from the .searchVideos() machine
[
  {
    id: 'INscMGmhmX4',
    url: 'https://youtube.com/watch?v=INscMGmhmX4',
    title: 'The Original Grumpy Cat!',
    description: 'http://grumpycats.com http://twitter.com/realgrumpycat
     http://facebook.com/theofficialgrumpycat
     http://instagram.com/realgrumpycat ...',
    publishedAt: '2012-09-25T14:36:51.000Z'
  },
  {
    id: 'qc5PgtdcUBU',
    url: 'https://youtube.com/watch?v=qc5PgtdcUBU',
    title: 'Happiness Finds Grumpy Cat',
    description: 'Grumpy Cat will do anything to avoid Happiness. Friskies
     Grumpy Cat Variety Pack, available at PetSmart stores. Go get it!
     Subscribe to the Friskies YouTube ...',
    publishedAt: '2015-08-04T18:00:19.000Z'
  }
},
...
http://facebook.com/theofficialgrumpycat
http://instagram.com/realgrumpycat ...',
publishedAt: '2012-09-25T14:36:51.000Z'
},
{
id: 'qc5PgtdcUBU',
url: 'https://youtube.com/watch?v=qc5PgtdcUBU',
title: 'Happiness Finds Grumpy Cat',
description: 'Grumpy Cat will do anything to avoid Happiness. Friskies
Grumpy Cat Variety Pack, available at PetSmart stores. Go get it!
Subscribe to the Friskies YouTube ...',
publishedAt: '2015-08-04T18:00:19.000Z'
}
},
...
You could save this fresh video data in your model right now. But the format of the data doesn’t quite match what your frontend is expecting. The frontend expects an array of dictionaries with src and title properties. But YouTube uses url instead of src—plus, there are a bunch of extra properties that you don’t need right now. You’ll fix that by marshaling the data in the next section.
5.4.10. Marshaling data
Figure 5.10 compares the data received from running the .searchVideos() machine compared to the format the frontend is expecting.
Figure 5.10. The data returned by the YouTube API is not in the format that the frontend requires .

The differences are minor, but unless the data is exactly the same, your frontend won’t work. Luckily, Sails and Node.js use JavaScript, a language you’re already familiar with. You can write code to transform the data from YouTube into the exact format your frontend is expecting. This way, your frontend doesn’t need to change.
You already used the Lodash library on the frontend in chapter 3. The methods in Lodash are so useful that, by default, Sails exposes the library as a global variable automatically.
Tip
Like all global variables exposed by Sails, the library can be disabled. This usually only comes up if you want to use a specific version of Lodash different from the one used by Sails.
Let’s use Lodash to marshal the data from YouTube. From Sublime, open brushfire/config/bootstrap.js, and add the following code within the success callback of the .searchVideos() machine.
Example 5.8. Marshaling the returned data from the .searchVideos() machine

The title property can remain as is because it conforms to what the frontend expects. Next, you’ll add the src property, combining a base URL with the id. You’ll then remove description, publishedAt, id, and url. Once again, make sure you don’t have any records in the video model. Restart Sails using sails lift. Returning to the terminal window, you should see the transformed records displayed in the console. An example of one of the transformed records is included in the following listing.
Example 5.9. The transformed foundVideo records
[
  {
    title: 'The Original Grumpy Cat!',
    src: 'https://www.youtube.com/embed/INscMGmhmX4' },
  {
    title: 'Happiness Finds Grumpy Cat',
    src: 'https://www.youtube.com/embed/qc5PgtdcUBU' },
  ...
]
You can see that marshaling code has transformed the data from the raw format returned from the YouTube API into a format your frontend expects and can digest. You can now move to the final requirement: creating records in the video model using the newly transformed data.
5.5. Creating multiple records
Now that you have the data from YouTube transformed into the correct format for your application, adding it to the database through the model is trivial. Open brushfire/config/bootstrap.js file in Sublime and add the following code.
Example 5.10. Creating multiple records in the database

The Video.create() model method is asynchronous, just like Video.count(). You pass the transformed foundVideos array as its argument, and then, like the Video.count() method, you pass an anonymous function to .exec(), which binds it as a callback to the Video.create() method. The callback will be triggered when Video.create() has completed its attempt to create the records. If it’s unsuccessful, you’ll return an error as an argument via err to the callback and return control to Sails. If it’s successful, you’ll log the results and return control to Sails.
For the final time, make sure there are no records in the video model. Restart Sails using sails lift, and you should see the records that were created logged to the console. A couple of the video model records are displayed here.
Example 5.11. The newly created video records
[
  {
    title: 'The Original Grumpy Cat!',
    src: 'https://www.youtube.com/embed/INscMGmhmX4',
    createdAt: '2016-03-04T01:13:49.417Z',
    updatedAt: '2016-03-04T01:13:49.417Z',
    id: 1 },
  { title: 'Happiness Finds Grumpy Cat',
    src: 'https://www.youtube.com/embed/qc5PgtdcUBU',
    createdAt: '2016-03-04T01:13:49.418Z',
    updatedAt: '2016-03-04T01:13:49.418Z',
    id: 2 },
   ...
]
You can see your newly created records in action via your frontend. Navigate your browser to localhost:1337/videos, and your browser should look similar to figure 5.11.
Figure 5.11. The transformed data from YouTube, now safely stored as new video records and displayed by the frontend

5.6. Summary
- Writing custom backend code in Sails.js isn’t all that different from the JavaScript you’re used to. But because you call
and implement asynchronous functions more often than you might be used to, you have some new rules to remember.
- If you’re implementing an asynchronous function, then instead of returning or throwing an error, you trigger your callback, for example, cb().
- If you’re calling an asynchronous function within some other code, instead of expecting the asynchronous instruction to return data or wrapping it in a try/catch block, you attach callback function(s) to receive either the result or the error.
- Sails allows you to configure a bootstrap function that executes every time you lift your app, specifically, just before the Sails server starts up. This is particularly useful for seeding initial records in your database.
- You can require() and use any Node module in your Sails app, including any of the more than 350,000 open source packages available on npm. But because npm packages often vary widely in their usage, it’s helpful to rely on machinepacks whenever possible. Machinepacks are standardized npm packages that provide a systematic, reliable way to organize and use Node.js modules. Like the other conventions we’ve looked at so far, machinepacks are another way to save time and avoid technical debt by enforcing consistency across your code base.
- A special file in your app’s config/ folder, called local.js, allows you to set custom configuration without checking it in to version control. This is particularly useful for plugging in sensitive credentials, like API keys.
- By default, model methods are automatically exposed on global variables that correspond with the names of each of your models. This allows you to fetch, analyze, and manipulate records in your database from custom code anywhere in your application.