Chapter 10. Policies and access control
- Documenting controllers, actions, and routes
- Understanding policies for access control
- Creating policies to manage access to controller actions
- Applying policies to controller actions access control list
- Adding a policy versus access control in the controller action
It’s hard to believe that the journey we’ve taken over the last few chapters was initiated by a love of cats and disdain for dogs. Our job is not to judge but instead fulfill the requirements of our client. In chapters 6 and 7, we created the model and controller actions necessary for a user to create and manage their own identity. In chapter 8, we introduced server-rendered views and backend routes as a way to communicate a hardcoded authenticated state of the user to the frontend using the hybrid approach to page navigation. This approach allows personalization of frontend content by passing the user’s simulated authenticated state via locals. The frontend uses locals to determine which markup assets are displayed. In chapter 9, we implemented authentication, which allows users to prove their claim to a specific identity. We also introduced Sails sessions, which allow us to save the user’s actual authenticated state between requests and then send that state securely to the frontend. All this functionality enables our client to restrict a user’s account if they violate the Brushfire terms of service. If a user violates the ToS, our client can ban the user by setting the user’s banned attribute to true. The restrictions are currently limited to the frontend. That same user could access Brushfire outside the browser by using Postman, for example, to make a POST request to /videos, which would trigger a backend controller action that adds content regardless of their authenticated state. To prevent such access, we’ll use the user’s stored authenticated state within a Sails policy to determine whether access should be granted. Policies allow or deny access to controllers down to a fine level of granularity. We’ll spend the remainder of this chapter implementing policies to secure the backend of Brushfire.
To secure the backend, we first need to determine the different rights and restrictions a user can have with regard to access in Brushfire. Then we need to identify the controllers and actions whose access will be affected. Finally, we’ll implement the actual policies that contain the logic necessary to manage access to the controller actions according to our defined requirements.
10.1. A farewell to blueprints
A user-agent can have access to Brushfire controller actions depending on four conditions. The first condition is whether the user-agent is authenticated or not. So a user who’s authenticated will have different access rights to a controller and its actions than a user who isn’t authenticated. The remaining conditions require that the user-agent first be authenticated and then have at least one of three other properties set to true: admin, banned, and/or deleted. Table 10.1 describes each condition in greater detail.
Table 10.1. User-agent conditions
|
Condition |
Description |
|---|---|
| unauthenticated | A user-agent is unauthenticated if req.session.userId is equal to null. |
| authenticated | A user-agent is authenticated if req.session.userId has a value. The value is the id property of a user record. |
| administrator | A user-agent is considered an administrator if the user record’s admin property is equal to true. |
| deleted | A user-agent is considered deleted if the user record’s deleted property is equal to true. |
| banned | A user-agent is considered banned if the user record’s banned property is equal to true. |
Keep each of the four conditions in mind as we review the API’s access control requirements to controller/actions.
10.1.1. Obtaining the example materials for this chapter
You have two options to set up your Brushfire assets for this chapter. If you’ve completed chapter 9, you’re all set and can use your existing project here. If you haven’t completed chapter 9, you can clone the end of the chapter 9 GitHub repo at https://github.com/sailsinaction/brushfire-ch9-end.git and start from there. Remember to use npm install in the terminal window from the root of the project after you clone the repo.
If you choose the cloning option, don’t forget to add the brushfire/config/local.js file with your Google API key from chapter 5 (section 5.4.6) and start your local PostgreSQL brushfire database from chapter 6 (section 6.4.2).
10.1.2. Designing custom backend endpoints
The decision of when to transition from blueprint routes to explicit custom routes is a matter of personal programming style. Inevitably, using explicit routes in production is considered a best practice in Sails. You’re now beyond the early stages of Brushfire. By consolidating your routes in one location, you can centralize the organization of your endpoints.
Figure 10.1 shows all the current Brushfire controller actions and a corresponding explicit route for each action.
Figure 10.1. Brushfire controller action list with corresponding custom routes

10.1.3. More explicit routes
Let’s now implement the explicit routes that are defined in figure 10.1 for the video and user controllers. Recall that both brushfire/api/controllers/VideoController.js and brushfire/api/controllers/UserController.js are empty. So the actions you’ll be triggering with explicit routes will trigger blueprint actions. In Sublime, open brushfire/config/routes.js, and add the following routes.
Example 10.1. Adding explicit routes for the blueprint actions in the video controller

Next, let’s add explicit routes that were previously created automatically with blueprint action routes. From the same brushfire/config/routes.js file, add the following routes.
Example 10.2. Adding explicit routes for the actions in the UserController
...
'POST /video': 'VideoController.create',

'POST /user/signup': 'UserController.signup',
'PUT /user/removeProfile': 'UserController.removeProfile',
'PUT /user/restoreProfile': 'UserController.restoreProfile',
'PUT /user/restoreGravatarURL': 'UserController.restoreGravatarURL',
'PUT /user/updateProfile/:id': 'UserController.updateProfile',
'PUT /user/changePassword': 'UserController.changePassword',
'GET /user/adminUsers': 'UserController.adminUsers',
'PUT /user/updateAdmin/:id': 'UserController.updateAdmin',
'PUT /user/updateBanned/:id': 'UserController.updateBanned',
'PUT /user/updateDeleted/:id': 'UserController.updateDeleted',
...
Now that you’ve successfully transitioned from blueprint routes to explicit custom routes, let’s examine how to disable blueprint routes.
10.1.4. Disabling blueprint routes
Up to this point, blueprint routes have accelerated your development efforts by allowing rapid design of your initial application without thinking about explicit routes. Now that you’ve transitioned blueprint routes to explicit custom routes in brushfire/config/routes.js, you can learn how to disable blueprint routes. In Sublime, open brushfire/config/blueprints.js, and set the properties for the actions, rest, and shortcuts blueprints in the following listing to false.
Example 10.3. Disabling blueprint routes

Table 10.2 details the impact of disabling each blueprint route type.
Table 10.2. The impact of disabling blueprint routes
|
Blueprint route type |
Description |
|---|---|
| Action routes | Each controller action will now require an explicit route in order to be triggered via a request. |
| RESTful routes | Disabling RESTful routes eliminates the automatic routes associated with CRUD operations. |
| Shortcut routes | Disabling shortcut routes removes your ability to access the model via the browser. |
10.2. Policies
Up to this point, you’ve provided access control to various frontend elements via your page controller. For example, the showVideosPage action passes the authenticated state via locals to the videos view. Angular then uses the locals to determine whether to display the submit-videos form on the page. Clicking the Submit New Video button triggers an Angular AJAX POST request to /video. So, from the front-end’s perspective, access to the AJAX request is restricted by whether the markup is displayed on the page. This doesn’t prevent a user from using a program like Postman to circumvent the user interface and instead make a POST request directly to /video. You need a way to restrict access to requests from outside the user interface. You have two choices. You can add code to manage access to a controller action in the action itself. But in your case, you’re using blueprint actions and therefore don’t have direct access to add to the action. Instead, you can use a policy to manage access to the action for you.
10.2.1. What is a policy?
Policies provide the ability to inject a reusable set of code before a request executes a controller action. Policies’ main benefits are that they can be written once and applied to any controller action. Policies can be used like middleware, meaning you can do almost anything you can imagine with them.
Definition
Middleware is code that can get in the middle of the request/response cycle. For example, the Sails router is middleware. Policies act like middleware and are executed before controller actions, making them ideal for managing access to endpoints.
That said, our experience using Sails to build all sorts of different applications has taught us that policies are best used for one specific purpose: preventing access to actions for certain users (or types of users). Policies are best used like preconditions. You can use policies to take care of edge cases that are possible only by a user trying to cheat the UI. If you could somehow trust the client, then you wouldn’t need policies. Anyone can access your application’s URL from different user-agents such as a browser, from Postman, from the command line, or even from a smart refrigerator. Policies provide an easy way to protect against these kinds of edge cases without cluttering up the business logic in your actions.
Policies are first defined in the brushfire/api/policies/ folder. Then, you associate that policy with an access control list in brushfire/config/policies.js. This file is used to map policies to your controllers and actions. When a request is made, Sails first checks whether a policy exists before passing the request to the controller action. Let’s create a policy and then implement it in your access control list.
10.2.2. Creating a policy
In figure 10.2, the blueprint find action is used to fulfill a request for all the videos in the video model when the page initially loads.
Figure 10.2. The videos page uses the blueprint find action to fulfill a request for all videos in the video model when the page loads.

There’s no requirement that the user-agent be authenticated to load videos. That is, there’s never a condition where the user-agent is restricted from accessing this particular blueprint action. When the user-agent is authenticated, however, additional UI markup is displayed, as shown in figure 10.3.
Figure 10.3. When the user-agent is authenticated, the videos page adds the submit-video form B, which, when clicked, triggers the blueprint create action.

The UI markup for the blueprint create action isn’t displayed unless the user-agent is authenticated. Therefore, because the action isn’t accessible to the UI under those conditions, you’ll want to protect this edge case with a policy. Create a policy named isLoggedIn that checks whether a user-agent is authenticated and restricts access if it’s not authenticated. In Sublime, create a new file named isLoggedIn.js in the brushfire/api/policies folder, and add the code shown in this listing.
Example 10.4. Creating the isLoggedIn policy

Your policy first checks whether the user-agent is authenticated via a value in req.session.userId. If a value is found, the request continues to the controller action. But if the property is null, not authenticated, Sails will either respond with JSON or redirect the page, depending on the requirements of the user-agent. But what is req.wants-JSON? The req.wantsJSON method provides a clean, reusable indication of whether the server should respond with JSON or send back something else like an HTML page or a 302 redirect. Now let’s connect the policy to the blueprint create action.
10.2.3. Configuring policies
Sails has a built-in access control list (ACL) located in brushfire/config/policies.js. This file is used to map policies to your controllers and actions. The file is declarative, meaning it describes what the permissions for your app should look like, not how they should work. This makes it easier for new developers to jump in and understand what’s going on, plus it makes your app more flexible as your requirements change over time. You have an isLoggedIn policy, but because it’s not mapped to any controller or controller action, it won’t get executed. Let’s apply your new policy to the blueprint create action of the video controller. That way, any time a request wants to execute the action, your policy will be executed first. In Sublime, open brushfire/config/policies.js, and add the following code.
Example 10.5. Applying isLoggedIn policy to create action of video controller

The isLoggedIn policy will be applied to an incoming request to the blueprint create action of the video controller. Check it out. Start Sails using sails lift, and make a POST request to /video in Postman, similar to figure 10.4.
Figure 10.4. Making a POST request  to /video
  with an unauthenticated user-agent returns a 403 forbidden status code and message
  .
.

If the user-agent is authenticated, the blueprint create action is executed and the record is created. Because the user-agent was not authenticated, the policy responded with a 403 Forbidden status code. You can also use this policy for other actions in Brushfire. Before moving on to the other pages, requests, and controller/actions, let’s look at some best practices surrounding policies.
10.2.4. Best practices
Working on countless Sails apps has taught us a number of rules of the road that, if followed, will help prevent your application from becoming tangled and confusing:
- Don’t look at parameters. Truly reusable policies should only look at req.session and the database, not at parameters! Relying on parameters makes your policy context-specific and usable only in very specialized circumstances. In that case, why not just put the code in the relevant action(s)?
- Policies should be nullipotent. They should not set, write, or, frankly, do anything to state.
Tip
In the past, we suggested the strategy of using custom properties of req (specifically req.options) to allow your policies to take on more responsibilities. In practice, we’ve learned that this ends up causing more pain than it alleviates.
- Policies shouldn’t be a core part of your business logic. Policies are not a good tool for structuring logic in your app. Using them this way makes them just as versatile as raw Express/Connect middleware, and, unfortunately, it also makes them just as dangerous and developer-specific. If you use policies to help with queries or create a complex chain of policies to manage permission systems in your application, you’re likely to create a code base that’s difficult for you or any other developer to understand.
You’ve created your first policy and applied it to a controller action. Let’s take what you’ve learned about policies and, guided by your UI, review each controller action for access control requirements. You have at least three choices for access control:
- Manage access within the controller action.
- Implement a policy to manage access.
- Leave the controller action as is.
When is a policy more appropriate than placing the code in a controller action to manage access? The best practice is to use a policy to protect those controller actions that are not accessible in the UI. To clarify, that doesn’t mean the controller action is never accessible in the UI. Instead, look for instances when the controller action is restricted in the UI by not being displayed, but is open to unwanted access outside the UI with programs like Postman.
10.2.5. Preventing an inconsistent user experience
Your initial entry point to Brushfire is a user-agent’s unauthenticated access to the homepage, which is managed by the showHomePage action of the page controller in figure 10.5.
Figure 10.5. The homepage when accessed via an authenticated user-agent has two actions that need protection: the showSignupPage action and the login action .

Does the homepage trigger any requests when loading? No. There are two requests that trigger controller actions that are not available to the UI when the user-agent is authenticated: showSignupPage and login. You don’t want to allow a user-agent to log in or sign up a new user when they’re already logged in. Although these endpoints aren’t displayed in the frontend, they’re vulnerable to direct access via programs like Postman. Therefore, you’ll create and apply one or more policies to manage access to them. In Sublime, create a new file named isLoggedOut.js in the brushfire/api/policies folder, and add the code in the following listing.
Example 10.6. Creating the isLoggedOut policy

Your new policy checks whether the user-agent is authenticated via req.session.userId. If the userId property is null, the request continues to the controller action. But if the userId property has a value, Sails will either respond with JSON or redirect the page depending on the requirements of the user-agent. Next, you’ll apply isLoggedOut to the showSignupPage and login controller actions. In Sublime, open brushfire/config/policies.js, and add the following code.
Example 10.7. Applying isLoggedOut to actions in the user and page controllers

The isLoggedOut policy will be applied to an incoming request to the login and showSignupPage actions. If the user-agent is not authenticated, control is passed to the action to be executed. If the user-agent is authenticated, a 403 status is returned if JSON is required, or redirected if HTML is required. You can also use this policy for other actions in Brushfire. The homepage also has an authenticated state, as depicted in figure 10.6.
Figure 10.6. The homepage when accessed via an unauthenticated user-agent with endpoints that trigger three different controller actions

There are three endpoints that trigger controller actions that are not available to the UI when the user-agent is not authenticated. You’ll manage access to them via the isLoggedIn policy. Because you’ve already created the policy, you simply have to apply it to the three controller actions. In Sublime, open brushfire/config/policies.js, and add the following code.
Example 10.8. Applying isLoggedIn to actions in the user and page controllers

The showAdminPage action needs restricted access to only those user-agents that have the admin flag set to true. Should the code be in the controller action or a policy? The showAdminPage isn’t available to the UI when a user is not an admin. You’ll implement a new isAdmin policy and apply it to the showAdminPage. In Sublime, create a new file named isAdmin.js in the brushfire/api/policies folder, and add the code in the next listing.
Example 10.9. Creating the isAdmin policy


Next, let’s apply the isAdmin policy to the showAdminPage controller action. In Sublime, open brushfire/config/policies.js, and add the following code.
Example 10.10. Applying isAdmin to the showAdminPage action in the page controller

10.2.6. Restricting access to account management endpoints
Take a look at the profile page, and specifically when a user-agent is authenticated, in figure 10.7.
Figure 10.7. The profile page, when accessed via an authenticated user-agent, adds two unprotected actions.

We’ve already addressed the showAdminPage, showProfilePage, and logout endpoints in earlier sections. There are two endpoints we haven’t addressed. These endpoints trigger controller actions that
are unavailable to the UI when the user-agent is not authenticated: the showEditProfilePage ![]() and removeProfile
and removeProfile ![]() actions. Access to these controller actions should be restricted unless the user-agent is authenticated. You’ll add the isLoggedIn policy to each action’s ACL. In Sublime, open brushfire/config/policies.js, and add the following code.
actions. Access to these controller actions should be restricted unless the user-agent is authenticated. You’ll add the isLoggedIn policy to each action’s ACL. In Sublime, open brushfire/config/policies.js, and add the following code.
Example 10.11. Applying isLoggedIn to showEditProfilePage and removeProfile

You also want to ensure that the user-agent who’s removing the profile is the same user-agent who’s currently authenticated. You could do this within a policy, but an easier way is to refactor the removeProfile action to use req.session.userId instead of relying on the frontend to send an id. In Sublime, open brushfire/apis/UserController.js, and make the following changes.
Example 10.12. Refactoring the removeProfile action to use req.session.userId

Notice that you remove the check for if (!req.param('id'). Because you’re no longer relying on an id parameter from the frontend, you need to change the AJAX PUT request to /user/removeProfile. In Sublime, open brushfire/assets/js/controllers/profilePageController.js, and add the following path.
Example 10.13. Changing the request path to eliminate the id parameter

10.2.7. Preventing users from messing with each other’s data
Next, let’s examine the edit-profile page shown in figure 10.8.
Figure 10.8. The edit-profile page, when accessed via an authenticated user-agent, adds three unprotected actions.

The edit-profile page will be displayed only if the user-agent is authenticated based on the isLoggedIn policy applied to the showEditProfilePage action. You’ve already addressed five of the eight controller actions that can be triggered within the page. The three actions that haven’t been addressed are updateProfile, restoreGravatarURL, and changePassword. Each of these controller actions has conditions when they won’t be accessible to the UI. Therefore, you’ll again use the isLoggedIn policy to restrict access to the actions if a user-agent isn’t logged in. In Sublime, open brushfire/config/policies.js, and add the following code.
Example 10.14. Applying the isLoggedIn policy to actions in the user controller

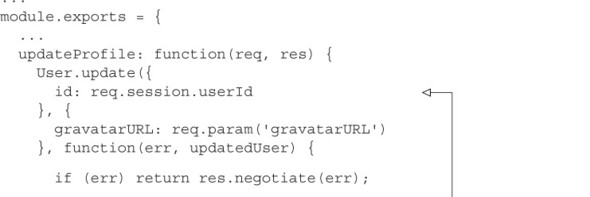
You also want to ensure that the user-agent who’s updating the profile or changing the password is the same user-agent who’s currently authenticated. You could do this within a policy. An easier way is to refactor the updateProfile and changePassword actions to use the req.session.userId instead of relying on the frontend to send an id. In Sublime, open brushfire/apis/UserController.js, and make the following changes.
Example 10.15. Refactoring updateProfile and changePassword

You’re no longer relying on an id parameter from the frontend for the update-Profile action, so you need to change the AJAX PUT request to /user/updateProfile. In Sublime, open brushfire/assets/js/controllers/editProfilePageController.js, and add the following path.
Example 10.16. Change request path to eliminate id parameter in updateProfile action

You’re no longer passing an id parameter for the changePassword action. In Sublime, open brushfire/assets/js/controllers/editProfilePageController.js, and remove the id parameter.
Example 10.17. Removing the id parameter in the request to the changePassword action

10.2.8. Preventing confusion for signed-in users
The signup page in figure 10.9 will be displayed only if the user-agent is logged out (for example, not authenticated) based on the applied isLoggedOut policy to the showSignupPage.
Figure 10.9. The signup page when accessed via an unauthenticated user adds two unprotected actions: showRestorePage and signup .

The signup page includes two controller actions we haven’t addressed: show-RestorePage and signup. Both these actions are unavailable when the user-agent is not authenticated. Therefore, you’ll add the isLoggedOut policy to each action’s ACL. In Sublime, open brushfire/config/policies.js, and add the the code in listing 10.18.
Example 10.18. Applying isLoggedOut to the showRestorePage and signup actions

The restore-profile page is displayed when a user-agent isn’t authenticated, similar to figure 10.10.
Figure 10.10. The restore-profile page, when accessed via an unauthenticated user-agent, adds one unprotected action.

The restore profile page contains one endpoint that triggers a controller action we’ve yet to address: restoreProfile ![]() . Because the restore-profile page isn’t displayed unless the user-agent is logged out, you’ll implement access control within
the existing isLoggedOut policy. In Sublime, open brushfire/config/policies.js, and add the code in listing 10.19.
. Because the restore-profile page isn’t displayed unless the user-agent is logged out, you’ll implement access control within
the existing isLoggedOut policy. In Sublime, open brushfire/config/policies.js, and add the code in listing 10.19.
Example 10.19. Applying the isLoggedOut policy to the restoreProfile action

10.2.9. Restricting access to administrative actions
The administrative page, depicted in figure 10.11, is displayed only when the user-agent is authenticated and the admin property is set to true. The administration page has four controller actions we haven’t addressed: adminUsers updateAdmin, updateBanned, and updateDeleted. Because these actions aren’t available via the UI when a user-agent is logged out, you’ll add two policies to their ACLs: isLoggedIn and isAdmin. In Sublime, open brushfire/config/policies.js, and add the code in listing 10.20.
Figure 10.11. The administration page, when accessed via an authenticated user-agent whose admin property is set to true, adds four unprotected actions.

Example 10.20. Applying isLoggedIn and isAdmin to actions in the user controller

10.3. Summary
- Policies provide a highly granular way to control access to controllers and their actions.
- Best practices for policies include not basing policies on parameters but instead relying on session properties and the results from database queries.
- Backend actions can be controlled from within the action itself or through policies.
- Policies have the advantage of being reusable across multiple actions.