
8. The Digital Darkroom
What would you say if I told you that you could perform color correction, use dodging and burning, build up density in overexposed areas, open up underexposed areas, and more—all with a minimum of image degradation and with an unlimited number of undos? You might just laugh. But in this chapter, you’ll find out how to do all of these things.
The previous chapter introduced the difference between using Levels or Curves in the traditional dialog versus the Adjustments panel. The Adjustments panel is a more streamlined way to use Photoshop adjustment layers. With adjustment layers you can go much further, and with more freedom to experiment, without permanently altering the actual image pixels. You can change your adjustment settings at any time, and you can vary their overall strength by changing the adjustment layer’s opacity. Even better, you can restrict corrections to specific areas by painting on the layer mask that every adjustment layer has. In effect, you have not just unlimited undo, but also selective, partial undo.
The techniques in this chapter can help you get a better image with little or no degradation and with unprecedented control. But just as importantly, they’re designed to give you maximum flexibility so that you can experiment and play with your images while still having an escape route back to safe territory if you push things too far. Making mistakes is one of the surest ways to learn lessons, so an environment where you can make mistakes safely is a great learning tool.
Adjustment Layer Basics
An adjustment layer is a tone or color edit stored in a Photoshop or TIFF document, on a layer apart from the image pixels themselves. It’s much easier to understand adjustment layers if you think of them as copies of the base image, particularly when you start using adjustment layers in conjunction with blending modes. Fortunately, using an adjustment layer takes less RAM and disk space than actually copying the base image.
You can’t do much harm to your image with adjustment layers, because your original image layer stays intact until you flatten the file. However, there’s no free lunch. When you flatten the image, the adjustment layers are calculated by their stacking order, so you should still avoid successive edits that go in the opposite direction from one another—avoid adding one Curves layer that darkens the entire image and another that lightens it, for example.
Why Use Adjustment Layers?
When you apply a Curves or Levels tweak (or even a Hue/Saturation adjustment) to an image, you’re degrading it a little by throwing away some image data, as you saw in Chapter 7. Once that data is gone, you can’t get it back. This degradation can be avoided when you can make edits to adjustment layers rather than editing the image pixels directly. It’s somewhat analogous to working with raw camera files, where the changes you make are stored alongside the original file and take effect only when you export or print a new version of the image. For example, you can apply a Curves adjustment layer, which you can turn off to see the unadjusted, original image.
There are several other reasons I love working in the digital darkroom.
• Changing your mind. With adjustment layers, you can change an edit at any time without increasing cumulative degradation. This gives you endless freedom to experiment. Because you can fine-tune your edits with no penalty, you’re more likely to get the results you want.
• Instant before-and-after. You can always tell exactly what you’re doing when you use adjustment layers. Because all your edits are on layers, you can easily see before-and-after views by hiding the adjustment layer you’re editing and then turning it back on again (by clicking on the eyeball icon in the left column of the Layers panel).
• Variable-strength edits. The Opacity slider in the Layers panel acts as a volume control for your edits.
• Applying the same edits to multiple images. You can drag an adjustment layer to other images, and even script the layer with actions to batch-apply the adjustment layer to a folder full of images.
• Brushable edits. By using a mask, you can make selective, local edits to a particular area of an adjustment layer. This means you have not only essentially unlimited undo, but also selective and partial undo.
• Storing alternative edits in the same file. Because you can hide an adjustment layer, you can create multiple versions of the same adjustment layer edit and display only the edit you want to use at any particular time. For example, you can store two different Curves adjustment layers that store curves for two different printers, and display only the adjustment layer for the printer you’re using at the moment.
• Doing the impossible. You can use adjustment layers in conjunction with blending modes to do things that are usually extremely difficult, if not impossible—such as building density in highlights or opening up shadows without posterizing the image.
Why Not Use Adjustment Layers?
With all these advantages, why not use adjustment layers for all your edits? Two reasons: file complexity and file size.
Tip
![]()
You can minimize the file-size increase caused by adjustment layers by turning off the Maximize Compatibility option (see “Setting Preferences” in Chapter 6, “Essential Photoshop Tips and Tricks”). However, this reduces compatibility with other software you may be using with Photoshop files, such as Adobe InDesign or Adobe Lightroom.
Adjustment Layers Add Complexity. If you open a file you made a year ago, and it contains 20 layers with names like Curves 13 and Hue/Saturation 5, you may have to spend quite a bit of time remembering what all those layers do! Naming your layers and organizing them into (informatively named) layer groups helps a lot.
Adjustment Layers Increase File Size. An adjustment layer is an additional component stored with an image, so it uses more RAM and hard drive space, both for scratch space and storage, than simply saving an edit directly into an image without layers.
Adjustment layers don’t enlarge file size as much as you’d think, though. Yes, the first adjustment layer you add to a file may double the file size. But don’t be alarmed—any adjustment layers you add after the first one add relatively little to the file size. The file size impact of an individual adjustment layer is much higher when you paint on its layer mask, because then you’re adding pixels to the document. In the big picture, computers are now loaded with much more RAM and disk space than when adjustment layers were introduced, and the advantages of adjustment layers now far outweigh the disadvantages. I can’t live without them!
Creating Adjustment Layers
Photoshop offers three ways to create an adjustment layer:
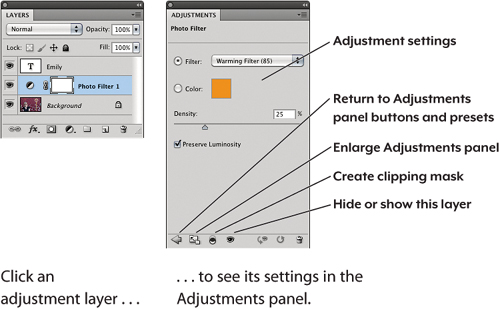
• The Adjustments panel. Click the icon for the type of adjustment you want (see Figure 8-1), or click a preset from the list under the icons.
Figure 8-1 Two ways to create an adjustment layer

Tip
![]()
The Layer menu may be the long way to add an adjustment layer, but it’s an important technique to know. When you’re editing keyboard shortcuts or creating an action, the Layer menu is how you give those features access to adjustment layers.
• The Layers panel icon. Click the New Content Layer icon in the Layers panel and choose the adjustment from the pop-up menu, where you can also add any of the fill layers—Solid Color, Gradient, and Pattern.
• The Layer menu. Choose an adjustment layer command from the Layer > New Adjustment Layer submenu.
When you use any of these methods, a new adjustment layer is added to the document, even if it already contains an adjustment layer of the same type. If you want to edit an existing adjustment layer, you must select it in the Layers panel; the controls and current settings for that adjustment layer then appear in the Adjustments panel.
Controlling Adjustment Layers
The critical difference between using adjustment layers and editing a flat (nonlayered) file is that adjustment layers give you reversible ways to control and refine your edits. I’ll introduce the basic techniques for doing this here and go into more detail and give examples a little later.
Click an Adjustment Layer to Edit It. When you click an adjustment layer in the Layers panel, its settings appear in the Adjustments panel (see Figure 8-2). This is a shortcut for choosing Layer > Layer Content Options. To get back to the buttons and presets in the Adjustments panel, click the arrow at the bottom left of the Adjustments panel.
Figure 8-2 Editing an adjustment layer
Use Opacity to Vary Strength. Control the opacity of the adjustment layer by changing the Opacity slider in the Layers panel. This lets you change the intensity of the overall adjustment. It’s common to make edits that are slightly more extreme than you really want, then back off the opacity of the editing layer to reduce the effect to just where you want it. This can be faster than trying to fine-tune settings in the Adjustments panel.
Tip
![]()
Use the Edit > Keyboard Shortcuts command for better keyboard access to your favorite types of adjustment layers. For example, you can reassign the keyboard shortcut for Image > Adjust > Curves to Layer > New Adjustment Layer > Curves.
Isolate Edits Using Multiple Adjustment Layers. You can stack adjustment layers to make successive edits. This technique is particularly useful when you want one layer to correct the image globally while another layer edits the image in selective places. To restrict the effect of an adjustment layer to specific areas, paint in an adjustment layer’s mask; see the next section, “Selections, Masks, and Channels.”
Adjustment layers apply to all visible layers beneath them. The stacking order makes a difference, because each layer’s result depends on the layers underneath it, although the actual amount of the difference can vary.
Isolate Areas Using Masks. Although the Opacity slider applies to an entire adjustment layer, you can vary the opacity of the layer locally by painting on the adjustment layer’s layer mask (see the next section, “Selections, Masks, and Channels”). To paint on the layer mask, click an adjustment layer thumbnail in the Layers panel and paint; the paint automatically goes on the layer mask. Black paint hides the effect of an adjustment layer; white paint reveals it; gray paint applies the effect partially (25 percent black ink applies 75 percent of an adjustment layer’s effect). By varying the brush opacity (in the Options bar or using shortcuts), you can achieve precise control over an adjustment layer’s opacity in specific areas.
Tip
![]()
When you select an adjustment layer in the Layers panel, an additional channel automatically appears in the Channels panel. That’s the channel for the layer mask.
Save Adjustment Layers. You can save an adjustment layer separately from an image. This is most useful when you want to apply the same color- and tonal-correction edits to multiple images.
To save an adjustment layer into either a new or a different document, select an adjustment layer and then choose Layer > Duplicate Layer. For Destination, you can either choose an open document or enter a name if you want Photoshop to create a new document containing the adjustment layer. When you’re done, click OK. If you duplicate the adjustment layer as a new document, it will have the same document specifications as the original—potentially a disk-space issue if it’s very large. You can use the Image > Image Size command to reduce the dimensions of the document you’re using to store the adjustment layer. If an adjustment layer’s mask is empty, the adjustment layer is resolution-independent.
Tip
![]()
You can also copy an adjustment layer between two existing documents by simply dragging it from the Layers panel in one document to another document window. To center a layer or mask precisely when you release the mouse, Shift-drag the layer or mask.
The ability to copy adjustment layers also opens up additional workflow possibilities. Without adjustment layers, you’d want to take care of retouching (dust and scratches, and so on) before editing for tone or color. However, with adjustment layers, the order of these tasks doesn’t matter as much. Two people can even work on the same image at the same time—one doing the retouching while the other edits tone and color—and then transfer the adjustment layer(s) to the same image later.
Selections, Masks, and Channels
The ability to restrict the effect of an adjustment layer to specific areas using its layer mask means that it’s important to understand how selections, masks, and channels work in Photoshop. This subject gets the full treatment in Chapter 9, “Making Selections,” but you’ll want to pick up the basics here, since I’ll be referring to masks shortly.
If you’ve ever carefully painted around a window in your home, you’ve probably used masking tape to mask out the areas you didn’t want to paint. If you apply the masking tape to the window, you can paint right over it, knowing that the window remains untouched. Selections, masks, and channels are like electronic masking tape.
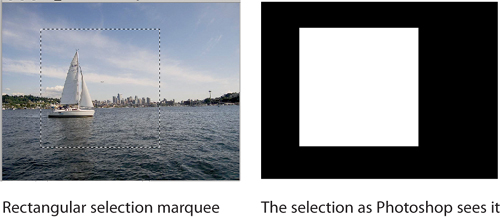
The key to understanding the relationship among selections, masks, and channels is to realize that deep down, they’re different forms of the same thing. No matter what kind of selection you make—whether you drag a rectangular marquee, draw a path with the Lasso, or use the Quick Selection tool to select a colored area—Photoshop sees the selection as a grayscale channel. In this selection channel, the areas that you selected (the parts with no masking tape over them) are white, and the unselected areas (the parts with masking tape over them) are black. This has led to a popular saying: Black conceals, white reveals. Photoshop offers three ways to interact with selection channel information:
• You can use the selection tools—Marquee, Lasso, Magic Wand, Color Range, and so on—to create a selection.
• When you save a selection, Photoshop saves it as an alpha channel—a grayscale channel stored alongside the color channels. Alpha channel is a fancy term for a simple concept: It’s just a saved selection.
• To apply selection information nondestructively to a layer (meaning that you can change or remove the selection), you use it as a layer mask—in other words, you’re attaching the masking tape to just that layer.
Let’s start with a simple example, a rectangular marquee (see Figure 8-3). A marquee is a very simple selection: Each pixel is either selected or not, and the channel that results when the selection is saved contains only black and white pixels. It works like real masking tape—the black pixels in the selection are the masking tape, protecting whatever’s underneath, and the white pixels represent the area without masking tape, letting the paint (that is, the adjustment) pass through.
Figure 8-3 How Photoshop thinks of selections
You’ll find out how to bounce the information back and forth among selections, channels, and masks as you progress through this chapter.
Feathered and Semitransparent Selections
There’s reality, and there’s Photoshop. In real life, light never forms solid edges; there’s always some transparency where light meets shadow. The ability to create feathered (soft-edged) selections and masks is key to making localized corrections blend into the image in a way that seems natural—and it makes Photoshop selections a lot more useful than hard-edged, solid, real-world masking tape.
Figure 8-4 shows a soft-edged selection. I created it by clicking the Refine Edge button in the Options bar while the selection was active, and then applying a 50-pixel Feather. Behind the scenes, rather than creating a simple bi-level channel, the feathered selection creates a channel that contains intermediate grays as well as black and white, which you can see if you click the rightmost button at the bottom of the Refine Edge dialog. The gray pixels are partially selected—lighter grays are more selected than darker ones—so any effect applied through the selection affects the fully selected pixels completely and the partially selected pixels in direct proportion to how selected they are, and it doesn’t affect the unselected pixels at all.
Figure 8-4 A selection with an edge feathered using Refine Edge

The ability to partially select pixels is useful in all kinds of situations, some of which are covered in Chapter 9. This chapter focuses on the role of partially selected pixels in layer masks.
Saving, Reusing, and Converting Selections
Another huge advantage of digital masking tape is that, unlike its real-world equivalent, you can easily copy it, move it, tweak it, or reuse it a year later. When you save a selection as a channel, you can recall it easily and either reuse it as a selection or apply it as a mask to a layer. Basically, the difference between a mask and a channel is that a mask currently affects its layer, while a channel is stored in the Channels panel without affecting the image in any visible way until you convert it to a selection or mask.
The flexibility with which you can turn a selection into a channel or mask is one of the major reasons for getting into the habit of always saving any selection that’s even slightly complex. Loading a saved selection from a channel is certainly much faster than having to build it all over again.
Saving Selections as Channels. To convert a selection to a channel, click the Save Selection as Channel button at the bottom of the Channels panel (see Figure 8-5). The selection appears as a new channel in the Channels panel. That’s a shortcut for choosing the Select > Save Selection command and filling out the dialog, although the dialog gives you more options.
Figure 8-5 Saving a selection as a channel

Converting Channels to Selections. To turn a channel into a selection, Command-click (Mac) or Ctrl-click (Windows) the channel in the Channels panel (see Figure 8-6). That’s a shortcut for selecting the channel and then clicking the Load Channel as Selection button in the Channels panel, or choosing Select > Load Selection.
Figure 8-6 Converting a channel to a selection

Converting Selections to Masks. Photoshop always adds a layer mask when you create an adjustment layer. Even better, if you have a selection active when you add an adjustment layer, that selection automatically becomes the layer mask for that adjustment layer.
Tip
![]()
In 16 bit/channel documents, masks exist at 16 bits per channel of precision, but selections always have 8 bits per channel of precision.
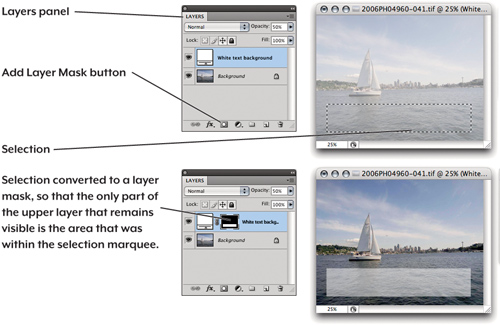
For other types of layers, select a layer and click the Add Layer Mask button at the bottom of the Layers panel (see Figure 8-7). If you’re in the Masks panel, click the Add Pixel Mask button. The long way to do this is to choose a command from the Layer > Layer Mask submenu (the menu also provides more options).
Figure 8-7 Converting a selection to a layer mask
Adding a Selection to a Mask. Sometimes I add an adjustment layer without remembering to first load the selection I want to use as a mask. In this case, the procedure is a little trickier.
If the selection is saved as an alpha channel, you can copy it into the mask channel. The trick is that you must make the channel visible before copying and make the mask visible before pasting. Otherwise, you’ll get a new layer instead of the mask you wanted (this still trips me up). Click the alpha channel’s thumbnail in the Channels panel to make it visible, choose Edit > Select All, then choose Edit > Copy. Click the layer mask thumbnail in the Channels panel, click the eyeball to make it visible, and choose Edit > Paste (see Figure 8-8). Of course, it all goes much faster if you’ve memorized the keyboard shortcuts for those Edit menu commands: Command-A for Select All, Command-C for Copy, and Command-V for Paste (Mac) or, respectively, Ctrl-A, Ctrl-C, and Ctrl-V (Windows).
Figure 8-8 Copying a channel to a layer mask

Tip
![]()
To quickly disable or enable a layer mask, Shift-click the layer mask thumbnail in the Layers panel. When the mask is disabled, it shows a red X. This is a shortcut for choosing Layer > Layer Mask > Disable.
If a selection is already active, you can use the following method instead. Target the mask channel, either by clicking its thumbnail in the Layers panel or by clicking its thumbnail in the Channels panel. Make sure that black is the background color (press D to set black and white as foreground and background, respectively, then press X to switch them), and press Delete to fill the selection with the foreground color (black) on the layer mask. This gives you the opposite selection from the one you want. To fix it, deselect the current selection (Command-D in Mac OS X, Ctrl-D in Windows), and then invert the layer mask (Command-I in Mac OS X, Ctrl-I in Windows). It’s a little fiddly, but it takes less time to do than to explain.
Tip
![]()
The Option (Mac) or Alt (Windows) key reverses the selected and unselected areas when you click the Add Layer Mask button in the Layers panel or the Save Selection as Channel or Load Channel as Selection buttons in the Channels panel.
Painting the Layer Mask. To restrict the effect of an adjustment layer to specific areas, first create an adjustment layer at the settings for the areas where you’d like to apply it at full strength. For the local corrections, edit the layer mask, painting white where you want the adjustment layer to apply completely, black where you don’t want to see the effects of the adjustment layer at all, and gray for a partially visible adjustment. Quite often I’ll use a gradient fill to apply a graduated change across the image, and sometimes I’ll even resort to using the selection tools. (Again, see Chapter 9 for more on selections and masking.)
Tip
![]()
If you want an adjustment layer to affect a small area, fill its mask with black and paint in the adjustment with white. Press D to set the default mask colors (white foreground and black background). Press Command-Delete (Mac) or Ctrl-Delete (Windows) to fill the layer with the background color (black). You’re ready to brush in the adjustment with white. If needed, press X to switch between foreground and background colors.
In some cases, using selection tools to create a selection and filling it with black or white may be faster than painting the mask with the Brush tool.
Using the Masks Panel
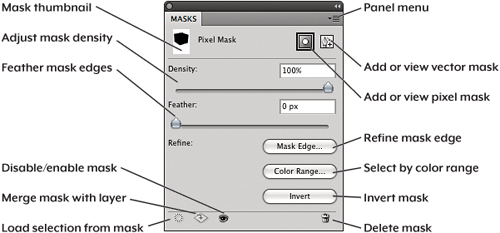
If you spend any significant amount of time working with masks, get to know the Masks panel (see Figure 8-9). Editing masks to get them just right has traditionally involved various power-user techniques. Like the Refine Edge dialog (discussed earlier in this chapter) and the Adjustments panel, the Masks panel is another example of how related features in Photoshop have been simplified and consolidated from a task-oriented point of view. For example, instead of having to control mask density by using the Output Levels sliders in the Levels dialog, all you have to do now is yank the Density slider in the Masks panel.
Up to this point I’ve been talking about pixel masks that are made up of pixels, but the Masks panel also accommodates vector masks made up of paths (see Figure 8-10). When you click the Pixel Mask or Vector Mask button in the Masks panel, the current layer gets a new mask of that type if it doesn’t already exist for that layer.
Figure 8-10 Pixel and vector masks

Tip
![]()
Clicking the Pixel Mask button is the same as clicking the New Layer Mask button in the Layers panel.
Pixel Masks. When you click the Pixel Mask button in the Masks panel, a new pixel mask is added to the current layer, if it doesn’t already have one. Use any painting tool to create black (transparent), white (opaque), and gray (semitransparent) areas in a pixel mask. The Masks panel provides these controls for a pixel mask:
• Density. Use this option to change the opacity of the mask so that you can control it independently of the layer opacity. Sure, you were able to do this in Photoshop CS3 and earlier by applying an image adjustment such as Levels to the mask, but repeated adjustments would degrade the mask. The Density slider is better because it’s nondestructive—you can easily dial it back at any time.
• Feather. This option controls the softness of the mask edges. This nondestructive option lets you freely adjust edge blur without having to apply a blur filter.
• Mask Edge. This button is the same as the Refine Edge feature discussed earlier in this chapter; it fine-tunes the edge of a selection. Because selections and masks are two forms of the same thing, it’s as helpful to have Refine Edge in the Masks panel as it is to have it in the Options bar for selections.
Tip
![]()
The controls in the Masks panel work best on mask edges that already fit the content well. When they don’t, you may still have to edit the mask by hand, using the painting, selection, and retouching tools.
• Color Range. This option is good for creating a mask if you just added one and you need to isolate an area by color. I discuss Color Range in Chapter 9.
• Invert. This option exchanges the opaque and transparent parts of a mask so that you can choose to paint the masked area with black or white and just swap those colors later. It’s yet another shortcut to the Image > Invert command, which you can also get by pressing Command-I (Mac OS X) or Ctrl-I (Windows).
Vector Masks. This type of mask is defined by paths you draw and edit using the Pen tool and shape tools (see Chapter 11, “Essential Image Techniques”). Areas outside the path are transparent, and areas inside it are opaque. Although a vector path is hard-edged by nature, you can use the Feather slider to apply a nondestructive feathered edge to a vector mask—this was not possible in earlier versions. The only other option for vector masks is Density. To make any other kind of change to a vector mask, you must either edit its path using the Pen tool group or convert its path to a selection or channel so that you can edit it as a selection or as pixels, respectively.
Tip
![]()
Vector masks work best for geometric shapes and smooth curves. Pixel masks work best when you anticipate painting irregular, soft-edged details in the mask or when you want mask areas of varying opacity.
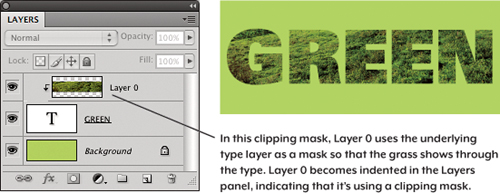
Clipping Masks. A clipping mask lets a layer act as a mask (see Figure 8-11). In the Layers panel, select one or more layers directly above the layer you want to use as a mask, and press Command-Option-G (Mac) or Ctrl-Alt-G (Windows), the keyboard shortcut for choosing Layer > Create Clipping Mask. You can also Option-click (Mac) or Alt-click (Windows) the dividing line between the base layer and the higher layers you want it to clip.
Figure 8-11 Using a layer as a clipping mask
Tip
![]()
One of the most popular uses for clipping masks is to make an adjustment layer apply only to the next layer down in the Layers panel, instead of to every layer below it.
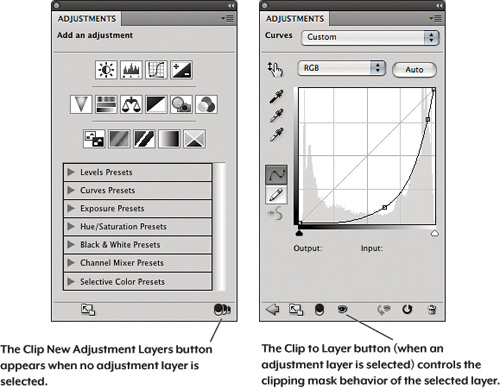
The Adjustments panel offers a clipping mask button, which can be confusing because it appears in two different ways. When no adjustment layer is applied, the button controls whether new adjustment layers are added as clipping masks. When an adjustment layer is selected (you see its controls in the Adjustments panel), the button appears near the middle and controls whether that specific layer acts as a clipping mask (see Figure 8-12).
Figure 8-12 The clipping mask buttons in the Adjustments panel
Viewing Masks. If you want to see only the layer mask (see Figure 8-13), Option-click (Mac) or Alt-click (Windows) on the layer mask’s thumbnail in the Layers panel. This is most helpful when touching up areas of the layer mask (it’s sometimes hard to see the details in the mask when a background image is visible). You can disable (hide) a mask by Shift-clicking a mask thumbnail or clicking the Disable Mask button in the Masks panel (see Figure 8-9); when you do this, a red X appears in the mask thumbnail in the Masks and Layers panels.
Figure 8-13 Mask views of the image that was shown in Figure 8-10

Tip
![]()
Because a mask is simply a grayscale channel, you can edit it using any of the painting, selection, and editing tools.
If you want to see the mask as a transparent overlay over the image, press the backslash key (). If you’re editing an adjustment layer, make sure you only tap the backslash key, since holding down that key displays the state of the image before the current adjustment (a before-and-after comparison).
Copying Layer Masks. To copy a layer mask, in the Layers panel Option-drag (Mac) or Alt-drag (Windows) the layer mask thumbnail to the layer where you want to apply the mask.
Tip
![]()
In a Photoshop document window, a checkerboard pattern behind an image represents a transparent area. You can customize how the checkerboard looks in the Transparency & Gamut pane in the Preferences dialog.
Adjusting Images Using Blending Modes
Applying Levels, Curves, Hue/Saturation, and the other adjustments as adjustment layers offers tremendous flexibility and power, but they aren’t always the quickest or easiest ways to fix your images. In some cases, you may find it easier and faster to do the heavy lifting with blending modes, and save Curves for fine-tuning.
Using Layer-Blending Modes
A blending mode takes the color values of two layers and combines them using a formula, so it’s more sophisticated than just changing opacity. Some blending modes happen to have effects that conveniently help you with basic tone and color edits, and all you have to do is stack two layers and apply a blending mode to the overlying layer. You can also add an adjustment layer and then change only its blending mode. That’s faster and easier than making a duplicate of an image layer, and it saves disk space. If the result of the blending mode isn’t quite perfect, just edit the adjustment layer (such as Curves) to make it the rest of the way. When blending modes and adjustment layers join forces, their powers multiply many times over. If the following blending mode descriptions make your eyes glaze over, hang on—visual examples are coming up.
How Blending Modes Think. The biggest question anyone has when using blending modes is, “How do I know which blending mode will do what I want?” To find out, ask yourself the following questions:
• Do I want to alter the light areas of the underlying layers, the dark areas, or both? Many blending modes have a neutral color that doesn’t change the layers under it. For example, for the Lighten, Screen, Color Dodge, and Linear Dodge blending modes, black pixels on the applied layer don’t alter the same pixels on the underlying layer, and the farther an applied pixel is from black (that is, the lighter it is), the more it affects the underlying layer.
Tip
![]()
When you’re happy with your adjustment layer edits, you can lower memory requirements by flattening the document (choose Layer > Flatten Image). Just remember that flattening is a one-way trip—once you save and close a flattened file, you can never get the layers back. Instead of flattening everything, you can select a few layers and choose Layer > Merge Layers.
• For other blending modes, white or 50 percent gray is the neutral color. When 50 percent gray is the neutral color, that means 50 percent gray pixels on the applied layer don’t affect underlying pixels at all, and the farther an applied pixel is from 50 percent gray (that is, the closer it is to black or white), the more it affects the underlying layer.
• How much additional contrast do I want? Part of the reason there are so many blending modes is that quite a few of them are merely variations of other blending modes that produce more or less contrast. For example, Hard Light is a higher-contrast version of Soft Light. Certain blending modes, such as Difference, take contrast to the extreme, inverting (creating the negative of) the original layer color. The blending modes that produce lower contrast tend to compare an applied pixel to an underlying pixel and simply keep one or the other, while the blending modes that produce higher contrast tend to mathematically amplify the differences between the applied and underlying layers.
Tip
![]()
You can, of course, use a layer’s Opacity value to reduce the effect of a blending mode.
• What do I want to change? Most blending modes affect any underlying pixel (other than those in the blending mode’s neutral color, if it has one), while some blending modes affect only color or tone.
The blending modes are arranged in logical groups, according to the way they answer those three questions.
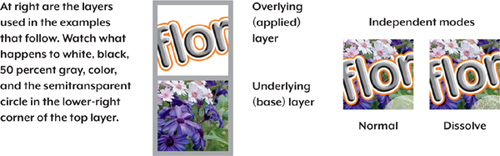
The Independent Modes. Normal and Dissolve both replace the underlying pixels with the pixels of the applied layer when the layer is at 100 percent opacity. At lower opacities, Normal blends the overlying pixels with the underlying ones according to the layer Opacity value, while Dissolve replaces pixels randomly (see Figure 8-14).
Figure 8-14 Blending mode examples
The Darken Modes. The neutral color for the Darken modes is white. White pixels on a layer set to a Darken mode leave the underlying pixels unchanged. Nonwhite pixels darken the result by varying amounts, depending on each blending mode’s math and the difference in value between the applied and underlying pixels (see Figure 8-15).

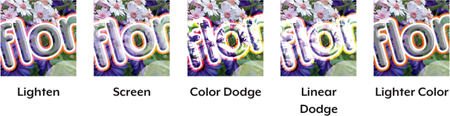
The Lighten Modes. The Lighten modes are the inverse of the Darken modes. The neutral color for the Lighten modes is black—black pixels on a layer set to a Lighten mode leave the underlying pixels unchanged. Nonblack pixels darken the result by varying amounts, depending on each blending mode’s math and the difference in value between the applied and underlying pixels (see Figure 8-16).
The Contrast Modes. These modes combine corresponding Darken and Lighten modes. The neutral color for the Contrast modes is 50 percent gray—50 percent gray pixels on a layer set to a Contrast mode leave the underlying pixels unchanged. Lighter pixels lighten the result and darker pixels darken the result; the amount depends on the blending mode and the value difference between the applied and underlying pixels (see Figure 8-17).
Figure 8-17 The Contrast modes
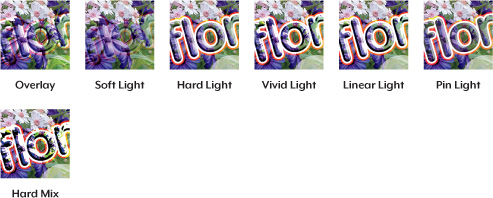
The odd man out is the Hard Mix blend, which has no neutral color but doesn’t fit anywhere else either. It reduces the image to eight colors—red, cyan, green, magenta, blue, yellow, white, and black—based on the mix of the underlying and blend colors, with a strength related to 50 percent gray.
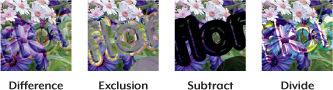
The Comparative Modes. The neutral color for Difference, Exclusion, and Subtract is black, and for Divide it’s white. Difference and Exclusion look at each channel and subtract the underlying color from the overlying color or the overlying color from the underlying color, whichever returns a result with higher brightness, and blending with white inverts the underlying color values (see Figure 8-18). Subtract always subtracts the overlying color from the underlying color, while Divide always divides the overlying color from the underlying color.
Figure 8-18 The Comparative modes
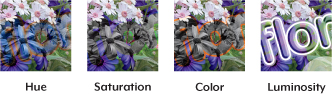
The HSL Modes. Blending modes in other groups generally operate on overall tone and color values. The members of the HSL group work with hue, saturation, and luminosity (HSL) instead (see Figure 8-19).
• Hue. This blending mode creates a result color with the brightness and saturation of the underlying color and the hue of the overlying color.
• Saturation. This mode creates a result color with the brightness and hue of the underlying color and the saturation of the overlying color.
• Color. This mode creates a result color with the luminosity of the underlying color and the hue and saturation of the overlying color.
• Luminosity. This is the inverse of the Color blending mode. It creates a result color with the hue and saturation of the underlying color and the luminosity of the overlying color.
Layer Blending in Practice
Despite the mind-numbing variety of blending modes, for tonal and color correction most people tend to use just a few of them. You can use Multiply to build density, Screen to reduce it, Soft Light and Hard Light to increase contrast, Color to change color balance without affecting luminosity, and Luminosity to sharpen images without introducing color fringes (sharpening layers are covered in more detail in Chapter 10, “Sharpness, Detail, and Noise Reduction”).
The practical example that follows doesn’t pretend to exhaust the power of blending modes, but I hope it fires your imagination and gives you alternative ways of approaching problems. Blending modes are so quick and easy for basic adjustments that the image practically edits itself.
Building Density Using Multiply. Multiply mode always creates a result that’s darker than both the layer you apply it to and the layer behind that. If you’ve worked in a darkroom, it’s like sandwiching two negatives in an enlarger. Mathematically, Multiply takes two values, multiplies them by each other, and divides by 255.
Tip
![]()
When you use an adjustment layer purely for layer blending, you often don’t actually need to edit that layer, other than changing the layer’s blending mode.
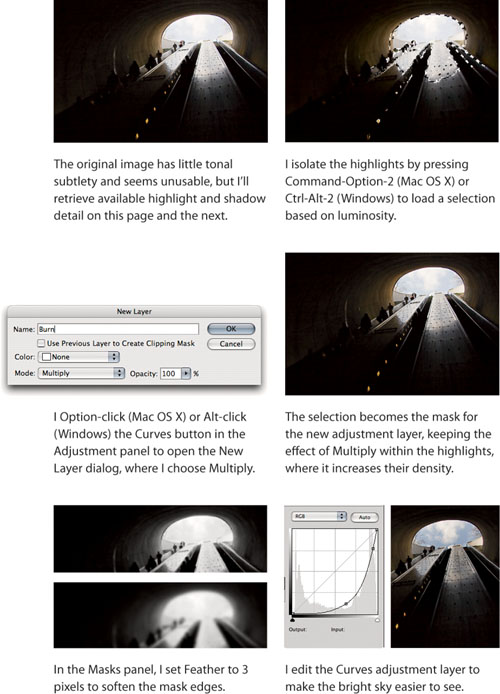
If a pixel is black in the base image, the result after applying an adjustment layer with Multiply is also black. If a pixel is white in the base image, the adjustment layer has no effect (because white is the neutral color for Multiply). You can use Multiply with Curves adjustment layers to build density, particularly in the highlights and midtones of washed-out images. In Figure 8-20, I use Multiply to knock down the near-blown-out sky highlights.
Figure 8-20 Using the Multiply blending mode to rescue highlights that are almost blown out to white
Opening Shadows Using Screen. Screen is literally the inverse of Multiply. A popular analogy is that Screen is like projecting two slides on the same screen. The result is always lighter than either of the two sources.
Tip
![]()
You can select the luminosity of the composite channel by pressing Command-Option-2 (Mac OS X) or Ctrl-Alt-2 (Windows). To select the luminosity of other channels, use the same shortcut but instead of pressing 2, press 3 and up (as with the channel viewing shortcuts). Alternatively, you can Command-click (Mac OS X) or Ctrl-click (Windows) a channel in the Channels panel.
If a pixel is white in the base image, the result is white, and if it’s black in the base image, the result is also black (black is the neutral color for Screen). Intermediate tones get lighter. I use Screen to open up dark shadows.
If you want to know the math, Photoshop inverts the two numbers (subtracts them from 255) before doing a Multiply calculation (multiplies them by each other and divides by 255); then the program subtracts the result from 255.
In Figure 8-21, I open up the shadows of the image I just worked on. To save time, I use an inverted copy of the mask I already made.
Figure 8-21 Using Screen to open up shadows

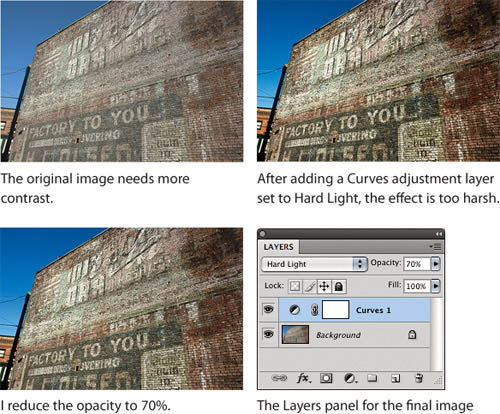
Adding Contrast Using Hard Light. You can use Soft Light, Hard Light, and Overlay to build contrast (since the overlying and underlying pixels are identical, Hard Light and Overlay produce exactly the same result). Soft Light is useful for smaller contrast boosts and Hard Light or Overlay for stronger ones. All three blending modes preserve white, black, and 50 percent gray while lightening pixels lighter than 50 percent gray and darkening those that are darker.
Figure 8-22 shows an example of using Hard Light. Not surprisingly, it gave me a rather extreme result. I backed it off by reducing the opacity of the Curves adjustment layer, but another way would have been to try a less intense contrast blending mode such as Soft Light.
Figure 8-22 Increasing contrast using Hard Light
Adjusting Color Balance Using Color. While I sometimes use Photo Filter adjustment layers for warming and cooling effects, a Solid Color layer set to the Color blending mode and low opacity can offer more control. Tweaking the color by double-clicking the layer thumbnail in the Layers panel is faster than tunneling through the Photo Filter dialog.
I start out by creating a Solid Color layer of approximately the color I want, then I reduce the opacity by up to around 20 percent. I then fine-tune the color to get the final result, usually tweaking the Hue and Saturation fields of the Color Picker by placing the cursor in them and pressing the up and down arrows on the keyboard. It’s similar to how I edited the target midtone value of the Auto Color Correction settings in Figure 7-10 in Chapter 7.
Dodging and Burning by Hand
The powerful one-two punch of adjustment layers and blending modes also comes in handy for those times when specific areas of your image aren’t successfully addressed by overall changes to curves or blending modes. You already saw forms of local corrections back when masking adjustment layers for edits based on Curves and the Multiply and Screen blending modes. For more free-form control, you can set up a single layer that gives you reversible dodging and burning without having to draw a curve, and it’s possible because of the Overlay blending mode.
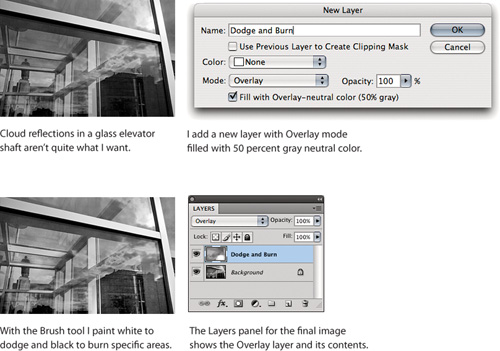
If you stayed awake during the descriptions of each blending mode a few pages back, you might remember me talking about a blending mode’s neutral color—the color that doesn’t change the image in that blending mode. For Overlay, the neutral color is 50 percent gray. The useful side effect of a 50 percent gray neutral color is that painting tones lighter than 50 percent gray into the layer lightens an image, and painting tones darker than 50 percent gray darkens the image.
Unlike other techniques in this chapter, this one doesn’t involve an adjustment layer. You create a new pixel layer, but instead of clicking the Create New Layer button in the Layers panel, Option-click (Mac OS X) or Alt-click (Windows) that button so that the New Layer dialog appears with its options (see Figure 8-23). Choose Overlay from the Mode pop-up menu and the “Fill with Overlay-neutral color (50% gray)” check box becomes available—turn it on and click OK. Now use the Brush tool to lighten (paint with white) or darken (paint with black) any areas of the image. Painting pure white or black on a 50 percent gray Overlay layer can produce high-contrast results, so you’ll probably prefer to reduce the Opacity value for the brush (in the Options bar) and build up the effect.
Figure 8-23 Dodging and burning using Overlay
Tip
![]()
Remember brush shortcuts when dodging and burning: Press D to reset the foreground and background colors to black and white (the brush paints the foreground color), X to swap them, and number keys to change the brush opacity.
At this point you might be asking, “Why not just use the Dodge and Burn tools?” While the Dodge and Burn tools were improved in Photoshop CS4, they are still destructive—you permanently change image pixels. The only way to reverse your changes is with Undo and the History panel, both of which you lose when you close a document. With an Overlay-based dodge-and-burn layer, if you change your mind you can simply paint a different tone on the Overlay layer (or paint 50 percent gray to restore the original image), all without ever altering the pixels of the original image’s layer.
Protect Tones. Although I prefer to use the nondestructive Overlay layer method instead of the Dodge and Burn tools in the Tools panel, if you do decide to use these two tools it’s worth mentioning that Adobe improved them back in Photoshop CS4. In previous versions, Dodge and Burn got out of control so easily that they were best used at a very low Opacity value, so that you could build them up. In Photoshop CS4, a Protect Tones check box was added to the Options bar for those tools; this option minimizes the chance of color shifts and ugly, clipped tones. Typically you should leave Protect Tones on. In addition, the Sponge tool (in the same tool group) now has a Vibrance check box in the Options bar that helps avoid extreme saturation or desaturation.
Tip
![]()
Get into the habit of naming layers descriptively. Instead of accepting default layer names such as “Curves 78” or “Color Fill 15,” use names like “Sky color cast” or “Foreground brightness.”
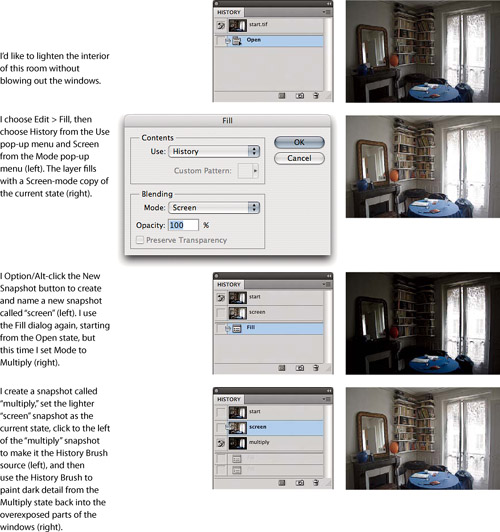
Using History to Mix Adjustments
A more free-flowing, seat-of-the-pants alternative to layers is the History panel. History does a lot more than give you as many as 1000 levels of Undo. When you use the History Brush together with edits such as filters or blending modes, you can apply effects that are very similar to those you can achieve with layers and masks. It helps to be familiar with how the History panel works. For that, see “History Panel Tips” in Chapter 6, “Essential Photoshop Tips and Tricks.”
You can think of History states as layers in time or frames in a sequence, instead of as a stack of structural layers in the Layers panel. Instead of painting masks to combine layers, you paint parts of one History state into another (see Figure 8-24). But let’s look at the important ways in which History Brush painting differs from using layers and masks:
• History is available only as long as your file is open. Once you close the file, its history is gone forever, so you have to get your edits right before you close. (In General Preferences you can turn on a History log, either in the file’s metadata or in a text file, but the log doesn’t let you apply the logged states.)
• History is easier to use than layers when you know exactly what you’re doing and can get things right on the first (or possibly second) try, but if you’re less decisive than that, it quickly becomes more work than using layers to achieve the same effects. On the other hand, layers require some advance planning and organization, and if that doesn’t fit your creative personality, you may find History more fluid and natural.
• With large files, history can be just as demanding on your hardware as adjustment layers. It requires plenty of scratch space and a fast disk.
Figure 8-24 Using History to combine different edits
Nevertheless, History is a powerful feature for making edits that are quick, but not dirty.
Applying History. You can apply History using either the History Brush tool or by choosing Edit > Fill. Fill is easier to use when you have a selection or you want to affect the entire image. The History Brush is useful for brushing in edits. When you use either one, you can immediately use the Fade command (on the Edit menu) to adjust the edit’s opacity (and hence its strength).
Soft-Proofing an Image for Print
Thanks to the wonders of color management, the digital darkroom offers a key advantage over the traditional, analog darkroom: You can see what will happen in the print before you actually produce it.
The beginner’s view of color management is that it makes your prints match your monitor. By now you’ve probably realized that this is an impossible goal—printers can’t print the range of color that a good monitor can display. Instead, color management tries to reproduce the image as faithfully as the limitations of the output process will allow. In other words, you can’t really make the print match your monitor, but you can use your monitor to tune the print for the specific printer you’re using. What makes this possible is the output profile, which describes the printer, ink, and paper.
But color management knows nothing about images, only about each image’s color space. No output profile, however good, does equal justice to all images. When you convert an image from a working space to the gamut and dynamic range of a composite printer, the profile treats all images identically, using the same gamut and dynamic range compression for all.
Fortunately, the soft-proofing features in Photoshop let you preview exactly how the profile will render your images, so that you can make the necessary corrections. If you want great rather than good, optimize images for different output processes, because each image requires its own compromises.
Tip
![]()
When you stare at an image, an afterimage of opposite colors builds up in your eyes that can distort your color perception. For example, if you stare at red for too long, a green afterimage builds up in your eyes. To avoid this, take regular breaks from editing.
You can use layers, layer groups, or Smart Filters to optimize the same master image for printing to different printers, or to the same printer on different paper stocks. This technique uses three basic elements:
• A reference image. Duplicate the image with Edit > Proof Colors turned off as a reference for the image appearance you’re trying to achieve.
• A soft-proof. Use the Proof Setup command to provide a soft-proof that shows how the output profile will render the image.
• A layer group. Group each set of optimizations for a specific output condition (printer, paper, ink) into a layer set, so that you can turn them on and off conveniently when you print to different devices.
Make a Reference Image. Choose Image > Duplicate to create a temporary copy of the image in another window. The duplicate will serve as a reference for the appearance you’re trying to achieve in the print.
You need to make a duplicate rather than simply open a new view, because you’ll be editing the master image to optimize it for the print, and the edits would show up in a new view. The duplicate isn’t affected by the edits you make to the master file, so it can serve as a reference—a reminder of what you want to achieve in the print.
Tip
![]()
It helps to master the tools for managing multiple document views, such as the n-up and tabbed document options described in Chapter 6.
Arrange Windows. Click the Arrange Documents button on the Application bar and then click the 2-up icon (see Figure 8-25). This arranges the reference and output documents side by side. If the Application bar is off, choose Window > Arrange > Tile.
Figure 8-25 Arranging the two images using 2-up view

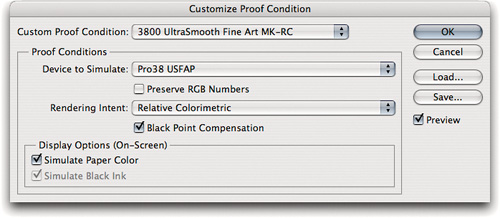
Set Up the Soft-Proof. In the image you’ll be editing, choose View > Proof Setup > Custom (see Figure 8-26). Load the profile for your printer and check Simulate Paper Color.
Figure 8-26 Setting up a soft-proof
When you click Save and name the proof setup, it becomes available in the Custom Proof Condition pop-up menu and at the bottom of the View > Proof Setup submenu.
Tip
![]()
The two most frequently used rendering intents are Relative Colorimetric and Perceptual. The correct one to use depends on each individual image; you should really view soft-proofs of both options before deciding.
All of the soft-proof views (using the different combinations of Paper Color and Black Ink) can be useful, but checking Simulate Paper Color is, in theory, the most accurate because it uses Absolute Colorimetric to account for the paper color. That doesn’t change the Rendering Intent you specified above that; both still apply. For example, if you create a soft-proof for a particular paper profile using the Relative Colorimetric rendering intent, Photoshop performs the following two stages of processing:
1. Figuring out the printed colors. Photoshop takes the document and uses the selected Device to Simulate profile and the selected Relative Colorimetric rendering intent to calculate how the document’s colors must be adjusted for the output conditions represented by the selected profile.
2. Figuring out the monitor preview. Photoshop takes the print colors it just calculated, applies the Display Options (and the Absolute Colorimetric rendering used by Simulate Paper Color), and runs all of that through your monitor profile to calculate exactly how to represent the document’s print appearance on your monitor.
Together, those two stages form the soft-proof, and you can tell how important it is that each profile in the chain is accurate. Upon switching to the soft-proof view, you’ll probably see the following:
• Simulate Paper Color makes the image appear much worse. A soft-proof typically shows washed-out shadows, compressed highlights, and an overall color shift caused by the difference between the white of your working space and the white of your paper. Don’t despair—Photoshop isn’t wrecking the image, it’s previewing the unavoidable dynamic range compression and gamut compression that occurs when printing.
Tip
![]()
When you turn on the Simulate Paper Color check box, look away from the monitor. Much of the shock you feel when you see Absolute Colorimetric rendering to the monitor stems from seeing the image change. If you look away, your eyes will adapt to the new white point more easily. It’s even easier if you use Full Screen mode (press F) and hide panels (press Tab). Panels don’t change with the image, so they can distract you.
• White appears dimmer. Photoshop can show you the gamut and dynamic range compression only within the confines of your monitor color space, and it can do so only by turning things down, so white in the image is always dimmer than your monitor’s white.
• Black may be slightly lighter than it will actually appear in the print, because in many monitor profiles, black has a Lightness value of 0 in Lab. But because most monitors actually have a Lightness of 3 or higher, some call a Lightness value of 0 a black hole black point.
• Some profiles, particularly older ones, may not be built with soft-proofing in mind. They do a good job of converting the source to the output, but they don’t do nearly as good a job of round-tripping—converting the output back to a viewing profile. A good third-party profiling tool can create custom profiles that tend to round-trip very well, as do many vendor-supplied profiles for recent professional-quality desktop printers.
Problems with profiles aside, the soft-proofs offered by Photoshop are not any less accurate than those offered by traditional proofing systems. You simply need to acclimate to them.
Make Your Edits. Start by viewing the soft-proof and the reference image side by side. After you’ve edited the soft-proofed image to more closely resemble the reference image within the limitations of the soft-proof, fine-tune your edits while looking at the soft-proofed image in Full Screen view.
Figure 8-27 shows an example of an image that looked fine on the monitor, but a soft-proof indicated that the shadow details should be brought up into a range where the printer could reproduce them. This page can accurately show only the final results, because the printing process for this book can’t show you the full tonal range of the reference image. In this example, I applied Image > Adjustments > Shadows/Highlights as a Smart Filter (see Chapter 11) so that I could later turn it off, since the adjustment was made only for a specific printing process.
Figure 8-27 Using soft-proofing to make output-specific edits
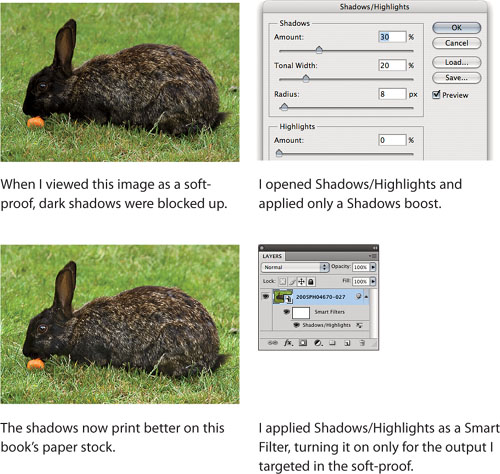
Handling Multiple Versions. It’s common to make output-specific edits as adjustment layers whenever possible, to keep them separate from the full-range image. (In Figure 8-27, I applied Shadows/Highlights as a Smart Filter because it isn’t available as an adjustment layer.) If there are a number of adjustment layers, you can put them in a layer group named for the print process it addresses. That way, you can easily optimize the master image for different print processes by turning the layer sets on and off without having to create a new file for each print condition. Using this technique, you can keep a single RGB master file with built-in optimizations for each print condition, and let Photoshop do the conversion from RGB working space to printer space at print time. It’s also valuable when preparing images for CMYK output, which often involves greater compromises. I may do a final fine-tuning on the converted CMYK image, but I make heavy use of soft-proofing to get the RGB image into the best possible state to withstand the CMYK conversion before I actually convert it. Figure 8-28 shows a Layers panel with layer groups optimized for two types of output.
Figure 8-28 Using layer groups to store output-specific edits

Tip
![]()
If you’re not the person who will be printing the final output of your image, or you need to make a copy for later printing from a page-layout program, turn on the correct layers for the final output and then choose Image > Duplicate so that you can save a flattened copy to send to the print service provider or to place in a layout.
Once I’ve edited the soft-proofed image to match the reference image, I use Full Screen view to take a final look at the soft-proofed image prior to printing. (I prefer the gray background, with the menu bar hidden—the black background makes the shadows look too light.)
Tip
![]()
If you made layers, layer groups, or Smart Filters for different kinds of output, always make sure the ones that are active are those that apply only to the output that’s currently targeted, and make sure you turned off the edits you created for all other types of output.
When You Print. It’s important to remember that the choices in the Customize Proof Condition dialog don’t actually change the image—they merely simulate how it will look if you print under those conditions. Use the same profile, Rendering Intent, and Black Point Compensation settings for both the soft-proof and the final print. For example, if you made your edits viewing a soft-proof using the Relative Colorimetric intent, be sure you also choose Relative Colorimetric in the Print dialog. Don’t duplicate all of the Customize Proof Condition settings in the Print dialog; the rest of the settings are for proofing only.