
9. Making Selections
You love the painting and retouching tools that Photoshop offers; you love layers; you even love all the options Photoshop gives you for saving files. But as soon as someone says alpha channel or mask, your eyes glaze over.
It doesn’t have to be this way. Masks, channels, and selections are actually really easy once you get past their reputation as complex concepts. Making a good selection is obviously important when silhouetting and compositing images—two of the most common production tasks. But perhaps even more important, selections are also a key ingredient for nondestructive tonal corrections, color corrections, sharpening, and even retouching. Some of these were discussed in the previous chapter, and I’ll explore them further in later chapters. But before you become a mask maven and a channel champion, you’ll want to master the techniques in this chapter.
Fortunately, newer tools like the Quick Selection tool and the Refine Edge dialog (made even more useful in Photoshop CS5) make it easier than ever to create selections in Photoshop, replacing old techniques that took much more time and effort.
Reviewing the Basics
Back in Chapter 8, “The Digital Darkroom,” I introduced a few concepts that are crucial to becoming a selection expert.
• Selections, channels, and masks are actually all the same thing in different forms, and you can convert one to another easily.
• A channel is a saved selection and looks like a grayscale image in which the black parts are fully deselected (masked out), the white parts are fully selected, and the gray parts indicate partially selected pixels.
• A layer mask is a selection or channel applied to a layer so that the black areas of the mask fully hide the layer and the white areas of the mask are transparent (they show the layer’s pixels). If an area in a layer mask (or channel) is 25 percent gray, that area is 75 percent visible. Remember: “Black conceals, white reveals,” and the lighter the gray, the more selected or visible the area.
• Smooth edge transitions between selected (white) and unselected (black) areas are incredibly important for compositing images, painting, correcting areas within an image—in fact, just about everything you’d want to do in Photoshop.
Selection Strategies
The key to using selection tools is knowing what each of them is good for. The whole point of selection is to separate the areas you want to change from the areas you don’t want to change, and being aware of that goal gives you a head start in choosing the right selection method. It helps if the area you want to select is visually distinct in some way, because Photoshop has ways of selecting areas based on visual differences such as tone or color, or by using intelligent edge detection.
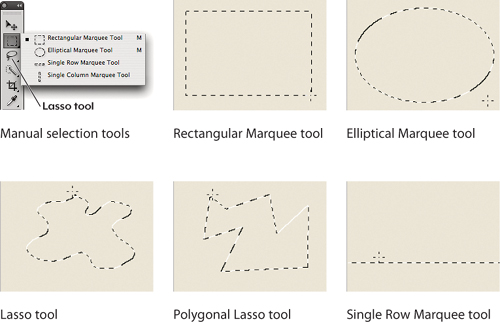
Selecting Manually. Manual selection tools, including the marquee and lasso tools (see Figure 9-1), date back at least as far as Apple MacPaint on the original 1984 Mac. These classic tools are simple and effective. However, they are 100 percent manual, so making complex selections is difficult and requires a steady hand. The Pen tool also falls into this category because you can draw a path and convert it to a selection. The advantage of the Pen tool is that paths can be much easier to edit than floating marquee selections; for this reason, storing selections as paths in the Paths panel is a useful alternative to storing selections in the Channels panel.
To cut down on manual labor, start with one of the following methods to rough out an initial selection, and then carve out details with a manual tool.
Selecting by Edge Detection. The most advanced Photoshop selection tools use intelligent edge detection. They don’t find an edge using contrast alone, they’re programmed to try to find edges based on content. The Magnetic Lasso is like a Lasso tool that follows a detailed edge based on your general dragging direction. The Quick Selection tool is more effective because it’s often capable of following complicated edges that include multiple tones and colors; because it works more like the Magic Wand (selecting areas instead of edges), it’s generally much faster than the Magnetic Lasso tool.
The bottom line: Don’t just randomly reach for a selection tool. Think about the ways in which the selection you want can be isolated, and then go for the tools and techniques that will isolate it that way for you.
Selecting by Color and Tone. If the area you want to select is already plainly visible, it’s worth using a tool that will just pick out that area for you. The Magic Wand tool is the traditional way to do this; click it on a pixel and it selects areas with similar tone or color values, such as a blue sky. If you want to select so many areas that using the Magic Wand would be tedious, the Select > Color Range command works similarly but using a dialog. Image > Adjustments > Selective Color (see Chapter 7) also selects color ranges, but it’s specifically tuned for tuning the color of CMYK images.
Another way to select by color and tone is to look through each channel of an image. Sometimes an area that isn’t distinct in the composite channel stands out in one of the image channels, or in a combination of multiple channels. You’ll see examples of this in “Alpha Channels” later in this chapter.
Selecting Areas Manually
If the shape of the area you want to select is so simple that you can quickly draw it, reach for one of the marquee or lasso tools (except the Magnetic Lasso). Use these tools by clicking and dragging. The Polygonal Lasso tool is a bit different; click to set each straight-line segment it creates. The marquee tools select an enclosed area from the start. With the lasso tools, the area you draw automatically closes when you finish drawing. To finish drawing with the Lasso tool, release the mouse button; with the Polygonal Lasso tool, double-click when you’re done. Figure 9-1 shows some examples of these techniques, and Table 9-1 is a quick reference for manual selection tool techniques.
Table 9-1 Manual selection tool techniques.

The Single Row Marquee and Single Column Marquee tools select a single row of pixels and don’t work quite like the others. They always extend across the width or height of the image. They’re useful for things like selecting individual scan lines in an interlaced television image, cleaning up screen captures, or painting a precise line for graphic design.
The last manual selection technique is to use the Pen tool and then convert the resulting path into a selection. But that technique is different enough from those in this section that the Pen tool is covered in Chapter 11, “Essential Image Techniques.”
Tip
![]()
To select an area of a specific size, choose Fixed Size from the Style pop-up menu in the Options bar, and then, after typing a value, enter the units you want (“in” for inches, “px” for pixels, and so on). Then press Return or Enter.
Selecting with Edge Detection Tools
If the area you want to select is recognizable as a distinct shape, it’s worth trying the edge detection tools. They try to identify an edge using methods such as looking for contrast in all of an image’s channels.
Magnetic Lasso
Where edges are distinct, you may be able to draw selections faster with the Magnetic Lasso tool than with the Lasso tool that it’s grouped with in the Tools panel. The Magnetic Lasso can seem like magic, or it can seem like a complete waste of time; it all depends on three things: the image, your technique, and your attitude. Use this tool only when you’re selecting something in your image that has a distinct edge. In fact, the more distinct the better, because the program is really following the contrast between pixels. The lower the contrast, the more the tool gets confused and loses the path.
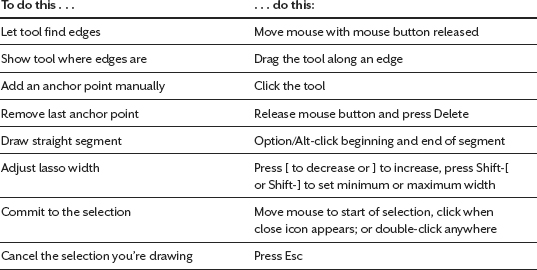
To use the Magnetic Lasso tool, click along the edge of the object you’re trying to select, then move the mouse along the edge of the selection. You don’t have to click or hold down the mouse button except in specific places where the tool isn’t following the edge you want; in those cases click to place points manually, or drag to show the tool where to go. As you move the mouse, Photoshop snaps the selection to the object’s edge (see Figure 9-2). When you’re done, click the first point in the selection again (or triple-click to close the path with a final straight line). Table 9-2 is a quick reference for Magnetic Lasso tool techniques.
Figure 9-2 Edge selection tools and using the Magnetic Lasso tool
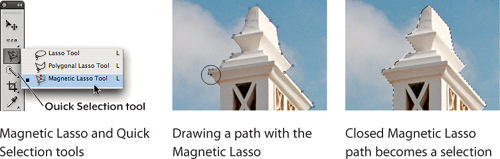
Table 9-2 Magnetic Lasso tool techniques.
The Magnetic Lasso tool has some key settings on the Options bar that can significantly influence how well it works for you.
Vary the Lasso Width as You Go. The Lasso Width option (in the Options bar; see Figure 9-3) determines how close to an edge the Magnetic Lasso tool must be to select it. In some respects it determines how sloppy you can be while dragging the tool, but it becomes very important when selecting within tight spots, such as the middle of a V shape. In general, use a large width for smooth areas and a small width for more detailed areas.
Figure 9-3 The Options bar for the Magnetic Lasso tool

Tip
![]()
To see the actual size of the Lasso Width and other brush and tool sizes, open the Cursors pane of the Preferences dialog and set Other Cursors to Precise.
Fortunately, you can increase or decrease this setting while you move the mouse by using the lasso width adjustment shortcuts in Table 9-2. If you use a pressure-sensitive tablet, select the Stylus Pressure button on the Options bar; the pressure then relates directly to the Lasso Width.
Tuning Frequency and Contrast. These settings (on the Options bar) control how often Photoshop drops an anchor point and how much contrast between pixels it’s looking for along the edge. In theory, a more detailed edge requires more anchor points (a higher frequency setting), and selecting an object in a low-contrast image requires a lower contrast threshold. To be honest, I’m much more likely to switch to a different selection tool or technique before fiddling with these settings.
Don’t work too hard to get a perfect selection with the Magnetic Lasso tool; it isn’t designed to make a perfect selection. It’s designed to create a great starting point that you can edit with other tools.
Quick Selection
If you’re more comfortable painting a selection area than with drawing an outline around a selection area, you may want to try the Quick Selection tool. You drag this tool as though you were painting a mask, but instead of getting painted bits back, you get a selection outline similar to a lasso selection. In other words, the Quick Selection tool lets you paint a selection (as if you were working with masks or channels) but see a marquee outline (as if you were dragging a lasso or marquee tool). Another way to look at this tool is that it lets you select while painting, saving you the step of converting a mask or channel into a selection.
Tip
![]()
When using the Quick Selection tool, keep your left hand camped out by the bottom-left corner of the keyboard. When it’s there, you’re always ready to press Command-Z/Ctrl-Z to undo, or Option/Alt to remove areas from the selection.
Use the Quick Selection tool as you would a brush. Drag it through the area you want to select (see Figure 9-4). Any additional areas you drag over with the Quick Selection tool are automatically added to the existing selection—no need to hold Shift to do that. For this reason alone, Magic Wand fans may want give the Quick Selection tool a try.
Figure 9-4 Using the Quick Selection tool
In this example, I want to select a car and its shadow, but the similar colors inside and outside my desired selection confuse most color-based selection tools. With the Quick Selection tool, I can indicate where my desired edges really are.

It’s important to realize that the Quick Selection tool remembers which colors you’ve included and excluded until you switch tools or switch to Quick Mask mode. For this reason, if you drag any part of the brush over a color you don’t intend to select, press Command-Z (Mac) or Ctrl-Z (Windows) to immediately undo, so that the tool doesn’t start thinking those are examples of areas to include. If you don’t do this, large unwanted areas may be added to the selection, which will make the tool much less effective.
To remove an area selectively, Option-drag (Mac) or Alt-drag (Windows) the tool. After you make your initial drag-selection, your second step should be to Option-drag/Alt-drag color outside your intended selection area to teach the tool about areas that should not be included in the selection. This marks those colors off limits, so that as you continue using the Quick Selection tool on the current image it can be much smarter about which areas it considers to be inside and outside.
Size and Pressure. If the tool consistently selects too much area, go to the Options bar and make the brush harder and its size smaller. If you’re using a pressure-sensitive stylus, apply less pressure for a smaller brush tip, or just turn off Pen Pressure in the Brush pop-up menu and use a small brush size.
Auto-Enhance. In the Options bar, the Auto-Enhance option tries to guess at making a better selection. If you think it’s guessing wrong, turn off Auto-Enhance and fine-tune the edge yourself by clicking Refine Edge. You’ll see the Refine Edge dialog later in this chapter.
Although the Quick Selection tool has gotten a lot of press as a miraculous selection tool, it’s really just another weapon in your selection arsenal. As with the Magnetic Lasso, the effectiveness of the Quick Selection tool depends in large part on the amount of contrast along the edges of the area you want to isolate. There are still many situations in which another selection method may be faster or easier.
Tips for Using Selection Tools
The important thing to remember about the selection tools (and, in fact, about every selection technique in Photoshop) is that you can freely switch among them as you work. Don’t get too hung up on getting one tool to work just the way you want it to; you can always modify the selection using a different technique. This idea of modifying selections is very important, and I’ll touch on it throughout the chapter. Here are more pointers that can help you use the selection tools most efficiently:
Move a Selection Marquee as You Draw It. If you start drawing a new selection with the Lasso tool or a marquee tool and realize the selection is not in position, keep the mouse button held down, hold down the spacebar, drag to reposition the selection, and release the spacebar.
Tip
![]()
There’s a fair chance that Photoshop will forget the last selection after you’ve made a few other types of edits, so if you have the slightest suspicion that you might need a selection again, choose Select > Save Selection to store it in the Channels panel.
Move a Selection Marquee After You Draw It. As long as you see the animated selection marquee, you can move the marquee without moving pixels, as long as you drag it using the Lasso tool or a marquee tool.
Scroll the Window While Selecting. It’s natural to zoom in close when you’re dragging a selection tool—nothing wrong with that. But unless you have an obscenely large monitor, you won’t be able to see the whole of the object you’re selecting. No problem; the grabber hand works just fine while you’re selecting—just hold down the spacebar and drag the image around. You can also press the + and - (plus and minus) keys to zoom in and out while you make the selection.
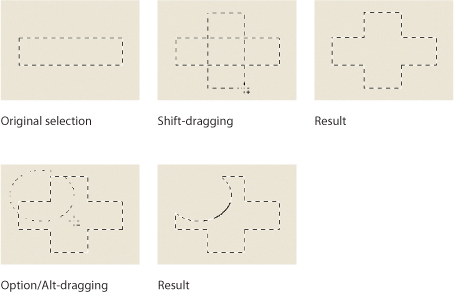
Add To and Subtract From Selections. You can add to the current selection by holding down the Shift key as you drag a selection tool outside the current selection area (see Figure 9-5). Conversely, you can subtract from the current selection by holding down the Option key (Mac) or Alt key (Windows). Or if you want the intersection of two selections, hold down the Option/Alt and Shift keys while selecting. If you don’t feel like remembering these keyboard modifiers, you can click the Add, Subtract, and Intersect buttons on the far left side of the Options bar instead.
Figure 9-5 Adding to and subtracting from selections
Inverse Selecting. One simple but nonobvious way to save time is to select a larger area with the Lasso or a marquee tool and then subtract the parts you don’t want, like sculpting marble.
Tip
![]()
You can often combine selection tool keyboard shortcuts. For example, to draw a circle outward from the center using the Elliptical Marquee tool, combine the shortcut for drawing from the center (Option/Alt) with the shortcut for drawing a circle (Shift): Option-Shift-drag (Mac OS X) or Alt-Shift-drag (Windows) the tool.
Select It Again. It’s common to charge ahead with edits after selecting an area and later realize you need that last selection back. You can often recall it by pressing Command-Shift-D (Mac) or Ctrl-Shift-D (Windows), the shortcut for Select > Reselect.
Transform Selections, Not Contents. When you choose Select > Transform Selection (Figure 9-6), Photoshop places the Free Transform handles around your selection and lets you rotate, resize, skew, move, or distort the selection as needed. When you’re done, press Return or Enter or click the check mark button (which appears only during a transformation) in the Options bar.
Figure 9-6 Using the Transform Selection command
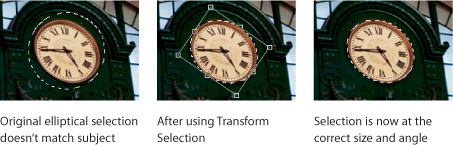
After you choose Transform Selection, you can pick options from the Edit > Transform submenu, or type transform values into the fields in the Options bar. For example, if you want to mirror your selection, turn on Transform Selection, drag the center point of the transformation rectangle to the place around which you want the selection to flip, then choose Flip Vertical or Flip Horizontal from the Edit > Transform submenu.
Don’t Forget About the Options Bar. Each tool has additional settings in the Options bar that may come in handy. The most useful is probably the Refine Edge button, which opens the Refine Edge dialog, which you’ll see later. For the marquee tools, the Style pop-up menu (see Figure 9-7) lets you specify a size or aspect ratio for the selection, making it easy to precisely select areas to fit the space set aside for an image in a Web page or page-layout program.
Figure 9-7 The Options bar for the Rectangular Marquee tool, showing the Style pop-up menu
![]()
Selecting by Tone or Color
The selection tools you’ve seen so far isolate a selection spatially (in terms of space)—either you’re drawing an edge or a Photoshop tool is looking for an edge. But there’s more than one way to look at an image. When the selection you want is easy to isolate by tone or color value, you can use this next set of Photoshop selection tools and tricks.
An important feature of the tone and color selection tools is the idea of tolerance—how similar a tone or color value should be to the value you’ve clicked before it’s considered part of a selection. For example, a blue sky is normally many shades of blue, so if you want to select it by color you’d typically set the Tolerance range wide enough to include all of the sky’s blues, without admitting nearby colors that aren’t part of the sky.
Magic Wand
The Magic Wand is named more for its icon than for its prestidigitation. When you click an image with the Magic Wand (dragging has no effect), Photoshop selects every neighboring pixel with the same or similar gray level or color. Neighboring means that the pixels must be touching on at least one side (see Figure 9-8). If you want to select all the similar-toned pixels in the image, whether they’re touching or not, turn off the Contiguous check box in the Options bar before clicking.
Figure 9-8 Using the Magic Wand tool
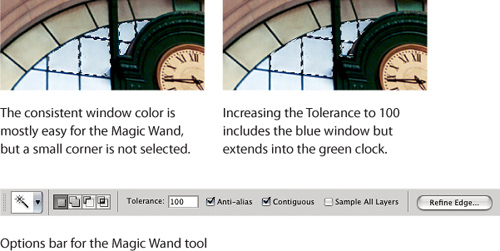
The Tolerance value on the Options bar refers to the number of gray levels from the sample point’s gray level. If you click a pixel with a gray level of 120 and your Tolerance is set to 10, you get any and all neighboring pixels that have values between 110 and 130.
Tip
![]()
If reaching for the Magic Wand tool is a long-established habit for you, consider reaching for the Quick Selection tool as your first choice instead; in many cases using the Quick Selection tool gets the job done much faster and easier than the Magic Wand tool.
In RGB and CMYK images, the Tolerance value is applied to the value in every channel value, not just the gray level. For instance, let’s say your Tolerance is set to 10 and you click a pixel with a value of 60R 100G 200B. Photoshop selects all neighboring pixels that have red values from 50 to 70, green values from 90 to 110, and blue values from 190 to 210. All three conditions must be met, or the pixel isn’t included in the selection (see the next section, “Grow and Similar”).
The Magic Wand involves a lot of careful trial-and-error clicking, which may be why some have dubbed this tool the Tragic Wand. The following techniques can increase your chances of success.
Try Selecting from a Channel. It can be difficult to predict how the Magic Wand tool is going to work in a color image. It’s often easier to make selections using a single channel of the image. The Magic Wand is more intuitive on the grayscale image in a channel, and when you switch back to the composite channel, the selection marquee is still there.
Sample Small, Sample Often. The Magic Wand tool can be frustrating when it doesn’t select everything you want it to. When this happens, novice users often set the Tolerance value higher and try again. Instead, try keeping the Tolerance low (between 12 and 32) and Shift-click to add more parts, or Option-click (Mac) or Alt-click (Windows) to take parts away.
Sample Points in the Magic Wand. When you select a pixel with the Magic Wand, you may not get the pixel value you expect. It all depends on the Sample Size pop-up menu on the Options bar (when you have the Eyedropper tool selected). If you select 3 by 3 Average or 5 by 5 Average in that pop-up menu, Photoshop averages the pixels around the one you click with the Magic Wand. On the other hand, if you select Point Sample, Photoshop uses exactly the one you click.
Select in Reverse. Sometimes it’s easier to first select a large area using a marquee or lasso tool, then subtract the areas you want selected by Option-clicking (Mac OS X) or Alt-clicking (Windows) unwanted areas.
Grow and Similar
The Select > Grow command can be useful when you have an active selection and you wish it was extended just a bit in terms of tone or color. Grow adds to an active selection according to the following criteria:
1. It finds the highest and lowest gray values of every channel of every pixel selected—the highest red, green, and blue, and the lowest red, green, and blue of the bunch of already-selected pixels (or the highest cyan, magenta, yellow, and black, and so on).
2. It adds the Tolerance value to the highest values and subtracts it from the lowest values in each channel. Therefore, the highest values get a little higher and the lowest values get a little lower (of course, it never goes above 255 or below 0).
3. Finally, Photoshop selects every adjacent pixel that falls between all those values (see Figure 9-9).
Figure 9-9 The Grow and Similar commands

In other words, Photoshop spreads the selection in all directions, but only in similar colors. It doesn’t always work the way you want, however. For instance, if you select a pure red area (RGB values 255, 0, 0) and a pure green area (RGB values 0, 255, 0), then choose Grow, Photoshop selects every adjacent pixel that has any red or green in it as long as the blue channel is not outside the Tolerance range. That means it’ll select dark browns, lime greens, oranges, and so on—even if you set a very small tolerance level.
Tip
![]()
You may find Grow easier to control if you use it within a single channel.
The Similar Command. The Grow command selects only contiguous areas of your image. To select similar pixels from throughout the entire image, choose Select > Similar (see Figure 9-9).
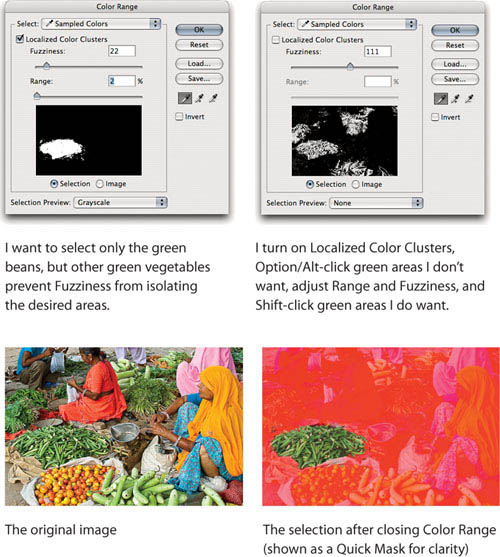
Color Range
To create a selection based on color, choose Choosing Select > Color Range. You can preview which pixels will be selected, and you can partially select far more pixels than the simple anti-aliasing of the Magic Wand tool. This can be incredibly helpful when you’re trying to tease a good selection mask out of the contents of an image. There’s quite a bit going on in the Color Range dialog, so let’s take a look. Figure 9-10 shows Color Range in action.
Adding and Deleting Colors. When you open Color Range, Photoshop creates a selection based on your foreground color. You can use the eyedroppers in the Color Range dialog to add or delete image colors from the selection or, better yet, hold down the Shift key to get the Add Color to Mask eyedropper, or Option/Alt to get the Remove Color from Mask eyedropper. You can sample colors from any other open image.
Tip
![]()
Color Range is always in Sample Merged mode. It sees your image as though all the visible layers were one. To exclude a layer from the selection mask, hide that layer before opening Color Range.
Fuzziness. Color Range uses the Fuzziness value to determine not only whether a pixel should be included but also how selected it should be. It’s similar to an alpha channel, in which a pixel can be any value from 0 to 255 on the scale between black and white; lighter values are more selected. Fuzziness is not the same as the Tolerance field on the Magic Wand Options bar. With Tolerance, the only partially selected pixels occur along the selection border. With Fuzziness, a partially selected pixel can be anywhere in the image because it’s based on color, not area.
Localized Color Clusters. One problem with Color Range is that because the default settings are purely color based, areas you don’t want may be added to the selection only because they’re too similar in color to the areas you do want. Reducing Fuzziness is not the answer if doing so excludes areas you want. The Localized Color Clusters option largely solves this problem. It does this by adding spatial selection, instead of just selecting by color.
When you turn on Localized Color Clusters, Color Range fully selects the pixels that are closest both in color and location to the spot where you clicked with the eyedropper. Pixels having the same color values are less selected farther from where you clicked, so that unwanted areas of the same color are excluded. If too much or too little is selected, use the Range slider to determine the distance used for the selection.
Tip
![]()
Fuzziness controls the selected color range by color, while Range controls the selected color range by the distance from where you click the sampler.
Preset Colors. The fastest way to select colors that are primary in RGB or CMYK, such as all the blues or all the greens, is to choose a color preset from the Select pop-up menu at the top of the Color Range dialog. The greater the difference between the color you choose and the other primaries, the more the pixel is selected. (To get really tweaky for a moment, the percentage the pixel is selected is the percentage difference between the color you choose and the primary color with the next highest value.)
Tip
![]()
Color Range is one of those dialogs that allows you to continue to navigate in the document window while the dialog is open.
You may find that choosing Highlights, Midtones, or Shadows is more useful than the preset colors. When you choose one of these, Photoshop decides whether to select a pixel (and how much) based on its luminance value in Lab mode. Selecting Highlights, Midtones, and Shadows tends to be most useful when selecting a subset of a color that’s already selected.
Selection Preview. When you select anything other than None (the default) from this menu, Photoshop previews the Color Range selection mask in different ways.
Tip
![]()
Instead of using the Image and Selection radio buttons, press the Command or Ctrl key (either one works on the Mac). This toggles between the Selection preview and Image preview much faster than by clicking buttons.
The first choice, Grayscale, shows you what the selection mask would look like if you saved it as a separate channel. The second and third choices, Black Matte and White Matte, are the equivalent of copying the selected pixels and pasting them on a black or white background. This is great for seeing how well you’re capturing edge pixels. The last choice, Quick Mask, is the same thing as clicking OK and immediately switching into Quick Mask mode. Selection Preview can be really helpful in making sure you’re selecting exactly what you want (no more and no less), but on older or slower machines you may find that it slows you down.
Tip
![]()
You can change your Quick Mask options settings while the Color Range dialog is open. Hold down the Option key (Mac) or Alt key (Windows) while selecting Quick Mask from the Selection Preview pop-up menu.
Anti-Aliasing and Feathering
You can partially select pixels in Photoshop. How is this possible? Remember that Photoshop internally handles a selection as a grayscale channel, so it’s a simple matter to store a partially selected pixel as a shade of gray in that channel. One of the most common partial selections is along the edges of a selection. The two most common ways of partially selecting the edges are anti-aliasing and feathering (see Figure 9-11).
Figure 9-11 Magnified views of anti-aliasing and feathering
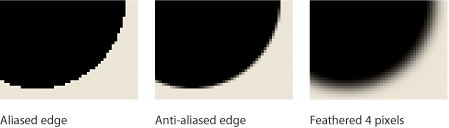
Anti-Aliasing. If you use the Rectangular Marquee tool, the edges of the selection are nice and crisp, which is probably how you want them. Crisp edges around an oval or irregular shape, however, are rarely a desired effect. That’s because of the stair-stepping required to make a diagonal or curved line out of square pixels. What you usually want are partially selected pixels in the notches between the fully selected pixels. This technique is called anti-aliasing.
Every selection in Photoshop is automatically anti-aliased for you, unless you turn this feature off in the selection tool’s Options bar. Unfortunately, you can’t see the anti-aliased nature of the selection unless you’re in Quick Mask mode, because anti-aliased (partially selected) pixels are often less than 50 percent selected. Once you’ve made a selection with Anti-alias turned off in the Options bar, you can’t anti-alias it—though there are ways to fake it, as you’ll see next.
Feathering. Anti-aliasing simply smooths out the edges of a selection, adjusting the amounts that the edge pixels are selected in order to appear smooth. But it’s often (too often) the case that you need a larger transition area between what is and isn’t selected. That’s where feathering comes in. Feathering is a way to expand the border around the edges of a selection. The border isn’t just extended out; it’s also extended in.
Tip
![]()
In Mac OS X, the traditional Photoshop keyboard shortcut for Feather is Command-Option-D. Mac OS X took over this shortcut for hiding and showing the Dock. If you want the Feather shortcut to work, either redefine it by choosing Edit > Keyboard Shortcuts in Photoshop, or open the Keyboard Shortcuts tab in Mac OS X System Preferences to redefine or disable the hide/show Dock shortcut.
To understand what feathering does, it’s important to understand the concept of the selection channel discussed earlier in the chapter. That is, when you make a selection, Photoshop is really seeing the selection as a grayscale channel behind the scenes. The black areas are totally unselected, the white areas are fully selected, and the gray areas are partially selected. When you feather a selection, Photoshop is essentially applying a Gaussian Blur to the grayscale selection channel.
There are several ways to feather a selection:
• Before selecting, specify a Feather amount in the Options bar.
• After selecting, click Refine Edge in the Options bar and adjust the Feather option.
• After selecting, choose Select > Modify > Feather.
• Apply the Gaussian Blur filter to the selection’s Quick Mask.
If you use the Refine Edge dialog, your entire selection is feathered. Sometimes, however, you want to feather only a portion of the selection. Maybe you want a hard edge on one half of the selection and a soft edge on the other. You can do this by switching to Quick Mask mode, selecting what you want feathered with any of the selection tools, and applying a Gaussian Blur to it. When you flip out of Quick Mask mode, the feathering is included in the selection.
Selecting Difficult Edges
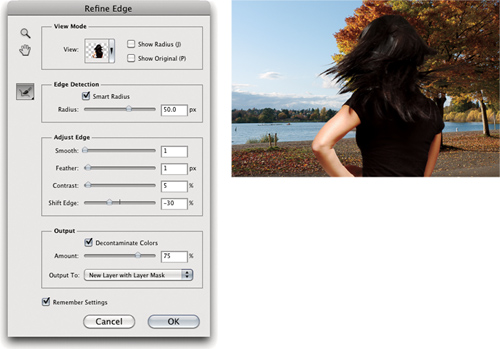
Certain features are conceived because someone sees an opportunity to streamline a multistep manual chore. The Refine Edge dialog (see Figure 9-12) is this kind of new feature. Until Photoshop CS4, if you applied the Select > Feather command, the only way to actually see the size of the feather was to view the selection as a Quick Mask or channel. And you already know by now that you can tweak a selection edge by converting the selection to a Quick Mask or a channel and then using image-editing commands (such as Levels and Gaussian Blur) to alter contrast along the edges of the selection channel. Of course, that meant you had to know which exact series of operations would get you the result you wanted.
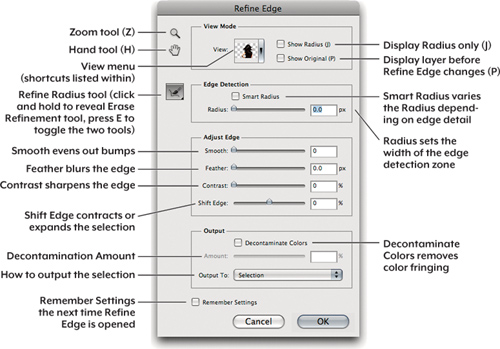
Figure 9-12 The Refine Edge dialog
Tip
![]()
Refine Edge isn’t just an Options bar button. It’s also a command (Select > Refine Edge), so you can open the dialog by pressing its keyboard shortcut—Command-Option-R (Mac) or Ctrl-Alt-R (Windows).
Tip
![]()
Refine Edge is also available in the Masks panel when you click the Refine Mask button.
The Refine Edge dialog relieves you of much of that brainwork. Now you can simply tell Refine Edge how you want to tune the selection edge, you get to preview and adjust it, and then it’s done. Behind the scenes, Refine Edge works with a selection as a channel so that you don’t have to go through tricky channel operations yourself. You can even use Refine Edge on a mask or channel. In Photoshop CS5, Adobe endowed Refine Edge with new super powers that make it easy to create selections from difficult edges, such as fine hair. In fact, I’ll use fine hair as an example (see Figure 9-13).
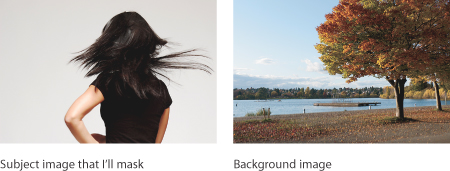
Before you use Refine Edge, you’ll need a selection. Because my example involves a human figure with complex edges such as clothing and hair, I decide that the amazing Quick Selection tool is the fastest way to arrive at a fast yet reasonably accurate selection. As I described earlier in this chapter, I drag the Quick Selection tool over the areas of the figure I want to show, and Option/Alt-drag the tool over the areas I want to hide, varying the brush size as needed. Once I have an edge I’m happy with (see Figure 9-14), with the selection still active I click the Refine Edge button in the Options bar (see Figure 9-15) to open the Refine Edge dialog (Figure 9-12).
Figure 9-14 My initial selection of the spinning girl doesn’t include every detail of the hair, but I can add to the selection in Refine Edge.

Figure 9-15 Refine Edge button in the Options bar
![]()
Using Radius and Smart Radius
Tip
![]()
It’s generally easier to add to your original selection in Refine Edge instead of subtracting from it, so don’t feel you have to select every last detail before you open the Refine Edge dialog.
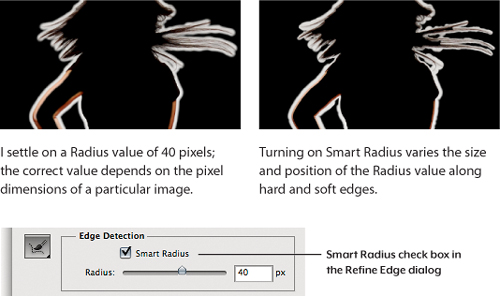
Starting from the initial selection edge you created, the Radius value tells Refine Edge how far out it should think about improving the selection edge. Radius is more sophisticated than a standard feather or edge blur because it protects existing hues and creates a less artificial-looking transition. A higher Radius value can help when the exact edge is hard to follow, as with hair or the edge of a soft shadow. For my example I found that I needed to start with at least a 15-pixel Radius for Refine Edge to properly surround the wide edge created by the flying hair, and I settled on 50 pixels. If I set Radius too low, Refine Edge ignores too many of the hairs that are outside my initial selection; if I set Radius too high, the half of the Radius that extends into the subject may make interior areas of the subject transparent, which is wrong. When working out the appropriate Radius value, it helps to set the View Mode to Radius (press J) so that you can see the exact width and position of the zone where Refine Edge will be doing its magic (see Figure 9-16), and it’s easier to see when you’ve gone too far. Use a value somewhere in the middle.
Figure 9-16 Extreme Radius values, previewed with the View Mode set to Show Radius

The problem with setting a single Radius value is that many subjects have both soft and hard edges. In my example, the subject has hard edges along the skin and clothes, but the flying hair has fine details and soft edges. To succeed with these mixed edges, Adobe added the Smart Radius option. When you turn on Smart Radius, it varies the Radius value and its position along the selection edge depending on the hardness of the subject’s edge. In my example, turning on Smart Radius increases the Radius around the hair where the subject’s edge is softer (see Figure 9-17). Along hard edges, Smart Radius may also slightly shift the Radius away from the subject so that edge refinements are concentrated a bit more on the transition area, instead of being perfectly centered over the outside and inside of the subject.
Tip
![]()
For a traditional feather, leave Radius at 0 and use the Feather slider instead—as long as you understand that Radius can usually do a more intelligent job.
Using the Radius Refinement Tools
In my Refine Edge example, there are wisps of hair that are pretty far out beyond the current Radius even with Smart Radius on, but if I increase the Radius to get to them, the Radius value will be too large for most of the edge. Fortunately, Refine Edge has two tools that address this problem. The Refine Radius tool lets you extend the Radius anywhere along the edge, and the Erase Refinement tool lets you exclude areas from the Radius.
Refine Radius. While my Radius value is a reasonable compromise for both the hard and soft edges, it still cuts off hair ends that should be included. I quickly discovered this by toggling between the On Layers and Reveal Layer view modes (see Figure 9-18), which is easiest to do if you simply alternate between pressing the L key and R key individually—you see these keys listed as the shortcuts in the View pop-up menu in the Refine Edge dialog.
Figure 9-18 Toggling between view modes to see where more hair needs to be brushed in using the radius refinement tools

Tip
![]()
Change the size of the Refine Radius and Erase Refinement tools the same way you would for any other brush tool: by pressing the [ or ] key.
To bring out those hair ends, I select the Refine Radius tool (press E) in the Refine Edge dialog and brush along the hairs until I get to the ends (see Figure 9-19). The areas you brush in appear light gray until you release the mouse button; after that Refine Edge calculates the new edge and you can see the results before continuing. While you should use a brush size that’s appropriate to the size of the details you’re trying to include, you don’t need to follow the edge tightly; in fact, a generously wide brush stroke helps bring out finer details and softens the transition. Because the On Layers view mode doesn’t show the details you’re trying to reveal, you might find that you can work more clearly with the Refine Radius tool in another view mode such as Overlay or Reveal Layer.
Figure 9-19 Using the Refine Radius tool to extend the Radius to the hair tips

Erase Refinement. This is the opposite of the Refine Radius tool. You can use the Erase Refinement tool to brush over areas that should not be used to calculate the edge, so that Refine Edge tightens up the edge and reduces transparency in those areas.
Adjusting the Edge
Once you’ve got the Radius down, you can use the Adjust Edge options to change the quality of the detected edge.
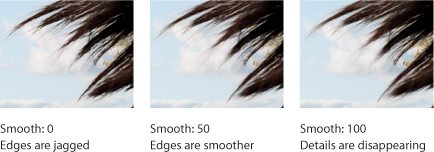
Smooth. The Smooth slider evens out bumps along the selection edge to help compensate for sloppy selections (see Figure 9-20). However, if your edge follows details like hair, a high Smooth value can obliterate them. If you have to set such a high Smooth value that you lose details, you may need to click Cancel and improve the precision of your initial selection.
Tip
![]()
To toggle the Refine Edge selection view off and on, press the X key.
Feather. The Feather slider simply blurs the edge (see Figure 9-21) like the traditional Select > Modify > Feather command in Photoshop itself. This is more useful for soft-edged subjects, because if your subject has hard edges you can’t turn up Feather very far before you lose that edge.
Figure 9-21 The Feather option

Contrast. This option determines the sharpness of the transition across the radius you set (see Figure 9-22). A higher value creates a sharper edge.
Figure 9-22 The Contrast option

Shift Edge. If your selection is a little bit inside or outside of the area you wanted to select, use Shift Edge to compensate (see Figure 9-23). Shift Edge can be an easy way to remove a color fringe when the edge is consistent.
Figure 9-23 The Shift Edge option
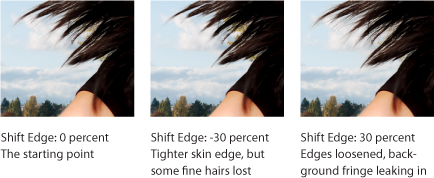
Tip
![]()
If you want a soft edge to be harder and the Feather value is zero, increase Contrast. If you want a hard edge to be softer and the Contrast value is zero, increase the Feather value.
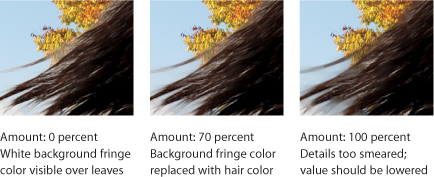
Decontaminate Colors. If you still see color fringing around your selection and you can’t get rid of it with the options above without losing detail or the edge, try selecting this option and increasing the Amount slider. As you increase Amount, Refine Edge replaces more of the background fringe color with color from the subject (see Figure 9-24). If patches of the original background still show through, grab the Refine Radius tool and brush them out.
Figure 9-24 The Decontaminate Colors option
Getting it Done
After everything looks as good as it’s going to be, but before you click the OK button, be mindful of what’s selected in the Output To pop-up menu. If you want to give yourself an escape route in case you don’t like the results, choose one of the options that creates a layer (or better, an editable layer mask) that you can easily discard without affecting the original layer. Once the Output To option is set, click OK to close the Refine Edge dialog and apply the new selection edge (see Figure 9-25).
Figure 9-25 The final Refine Edge dialog settings and image
Note
![]()
if you used the Decontaminate Colors option, you can’t use the Selection or Layer Mask options because some pixel colors have to change—a new layer or document must be created.
As you can see in my example, if you want a truly convincing composite, give your own subject and background more consistent lighting than mine! Although the Refine Edge dialog has greatly automated the selection of edges, there are still times when you have to build and modify selections by hand, using the traditional Photoshop selection features. I cover those in the rest of this chapter.
The Modify Submenu
When you think of the most important part of a selection, what comes to mind? If you answer, “what’s selected,” you’re wrong. No matter what you have selected in your image, the most important part of the selection is the boundary or edge. This is where the rubber hits the road, where the money slaps the table, where the invoice smacks the client. No matter what you do with the selection—whether you copy and paste it, paint within it, or what-ever—the quality of your edge determines how effective your effect will be.
When making a precise selection, you often need to make subtle adjustments to the selection boundaries. The four menu items on the Modify submenu under the Select menu—Border, Smooth, Expand, and Contract—focus entirely on this task.
Border. There’s a faster way to get a doughnut than driving down to the local Krispy Kreme. Draw a circle using the Elliptical Marquee tool, then choose Select > Modify > Border. You can even specify how thick you want your doughnut (in pixels, of course). Border transforms the single line (the circle) into two lines (see Figure 9-26).
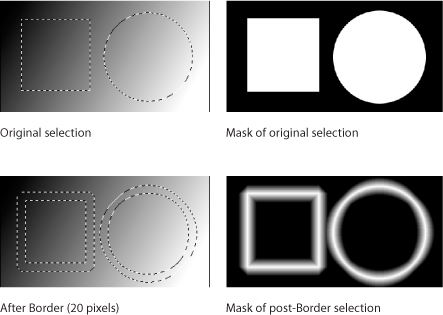
The problem with Border is that it creates only soft-edged borders. If you draw a square and give it a border, you get a soft-edged shape that looks more like an octagon than a square. To get a harder edge out of the Border command, click Refine Edge on the Options bar and turn up the Contrast.
Smooth. The problem with making selections with the Lasso tool is that you often get very jagged selection lines; the corners are too sharp, the curves are too bumpy. You can smooth these out by choosing Select > Modify > Smooth. Like most selection operations in Photoshop, this actually runs a convolution filter over the selection mask—in this case, the Median filter. That is, selecting Smooth is exactly the same thing as switching to Quick Mask mode and choosing the Median filter.
Smooth has little or no effect on straight lines or smooth curves, but it has a drastic effect on corners and jagged lines. Smooth looks at each pixel in your selection, then looks at the pixels surrounding it (the number of pixels it looks at depends on the Radius value you choose in the Smooth dialog). If more than half the pixels around it are selected, the pixel remains selected. If fewer than half are selected, the pixel is deselected.
Tip
![]()
Expand and Contract adjust a selection spatially, while the Grow and Similar commands discussed earlier adjust a selection by tone and color.
If you enter a small Radius value, only corner tips and other sharp edges are rounded out. Larger values make sweeping changes. In most cases you’ll probably use a value lower than 5 or 6, but it depends entirely on what you’re doing (and how smooth your hand is!).
Expand and Contract. The Expand and Contract commands let you enlarge or reduce the size of the selection. They’re similar to the Shift Edge option in the Refine Edge dialog.
Tip
![]()
If you enter 5 as the Radius value in the Expand or Contract dialog (or in the Maximum or Minimum dialog), it’s exactly the same as running the filter or selection modifier five times. The Radius value here is more of an iteration value: How many times do you want to apply the filter at a 1-pixel radius?
Once again, these modifiers simply apply filters to the black-and-white mask equivalent of your selection. Choosing Expand is the same as applying the Maximum filter to the mask; choosing Contract is the same as applying the Minimum filter. While these older selection modifiers are useful, they aren’t very precise because you can specify the radius only in 1-pixel increments. For a lot more control, use the Refine Edge dialog instead.
Floating Selections
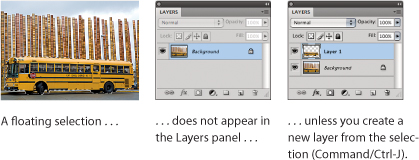
It’s time to take a short detour off the road of making selections and delve into the world of what happens when you select pixels and then move them: They turn into a floating selection, a temporary layer just above the current layer. As soon as you deselect the floating selection, it merges down into the current layer, replacing whatever pixels were below it. Although these floating selections act like layers, they don’t show up in the Layers panel and will merge down if you lose the selection.
You can manipulate a floating selection as you do a layer. You can change its blending mode by choosing Edit > Fade. (Unintuitive, but true.) However, as soon as you try to paint on it, or run a filter, or do almost anything else interesting to the floating selection, Photoshop deselects it and drops it back down to the layer below it. That’s one reason I’d rather just convert the selection into a real layer before messing with it. To do this, right after making a selection of pixels that you’re about to move, press Command-J (Mac OS X) or Ctrl-J (Windows)—that’s the shortcut for Layer > New > Layer from Selection (see Figure 9-27). After moving the new layer, drop it back into the underlying layer by pressing Command-E (Mac OS X) or Ctrl-E (Windows), the shortcut for Layer > Merge Layers (unless you want to preserve it as its own layer).
Figure 9-27 Floating selections and layers
Quick Masks
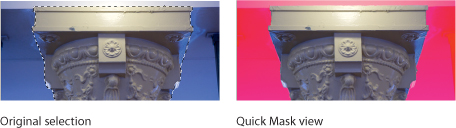
If Photoshop handles a selection as a grayscale channel, can’t you just work with it that way? You can if you switch to Quick Mask mode. Select the Quick Mask icon in the Tools panel or press Q; a red overlay indicates the Quick Mask. Solid areas of the mask are 50 percent opaque red, and the white (selected) areas are even more transparent than that (see Figure 9-28). The red is supposed to remind you of Rubylith, if you remember the amber-colored acetate that was once cut up to create masks for film. One of the advantages of Quick Mask mode is that if you’re finding it a challenge to edit a selection with the marquee and lasso tools, in Quick Mask mode you can sculpt your selection using the brush and retouching tools.
Figure 9-28 Quick Mask view of a selection
Tip
![]()
Select > Inverse won’t work on a Quick Mask because it’s pixels, not a selection. To swap selected and unselected areas in Quick Mask mode, choose Image > Adjustments > Invert instead.
Another advantage of Quick Mask mode is that you can actually see partially transparent pixels. In a typical selection, the selection marquee (also popularly called the marching ants) outlines the boundary of pixels that are selected 50 percent or more. There are often loads of other pixels that are selected 49 percent or less that you can’t see at all from the marching ants display. Quick Mask mode shows you exactly which pixels are selected and by how much.
Tip
![]()
For special effects ideas, experiment with running filters on the Quick Mask. When you exit Quick Mask, you can fill, paint, or adjust the altered selection, and your edit will affect only the filtered selection.
A disadvantage of Quick Mask mode is that, like a marquee selection, it isn’t permanent. The Quick Mask goes away when you deselect, and it isn’t saved with the document. Choose Save > Save Selection to save it for later.
While you’re in Quick Mask mode, a temporary Quick Mask channel appears in the Channels panel.
Customizing How a Quick Mask Appears. If you don’t like the red color that indicates a Quick Mask, double-click the Quick Mask icon in the Tools panel. You can change both the color and the transparency of the Quick Mask. You might want to increase the opacity of the color to about 75 percent so it displays more prominently against the background image.
Selecting with Channels
Back in “Reviewing the Basics,” I said that selections, masks, and channels are all the same thing down deep: grayscale images. This is not intuitive, nor is it easy to grasp at first. But once you really understand this point, you’ve taken the first step toward really surfing the Photoshop big waves.
A channel is an independent grayscale image. You can have up to 56 channels in a document—and that includes the three in an RGB image or four in a CMYK image. (Actually, there are two exceptions: Images in Bitmap mode can only contain a single 1-bit channel; second, Photoshop allows one additional channel per layer to accommodate layer masks, which you’ll read about later in this chapter.)
Color Channels
When a color image is in RGB mode (under the Mode menu), the image is made up of three channels: red, green, and blue. You can make any single color channel visible or invisible, but you can’t delete or add a color channel without first changing the image mode, because the channels are integral to the color mode (you can’t have an RGB image without a red channel).
The first thumbnail in the Channels panel (see Figure 9-29) is the composite channel. Actually, this isn’t really a channel at all. Rather, it is the full-color representation of all the individual color channels mixed together. The composite channel gives you a convenient way to select or deselect all the color channels at once, and also lets you view the composite color image, even while you’re editing a single channel.
Figure 9-29 The Channels panel

Viewing and Selecting Channels. The tricky thing about working with channels is figuring out which channel(s) you’re editing and which channel(s) you’re seeing on the screen. They’re not always the same!
The Channels panel looks a lot like the Layers panel, with the same eyeball icons that you can turn on and off to show or hide individual channels. Clicking a thumbnail or channel name displays that channel and makes it active for editing. The shortcuts for selecting multiple channels are the same as they are for layers. When you display more than one channel at a time, the alpha channels automatically switch from their standard black and white to their channel color (you can specify what color each channel uses in Channel Options by double-clicking the channel thumbnail).
Table 9-3 lists keyboard shortcuts that are useful with channels.

Alpha Channels
People get nervous when they hear the term alpha channel, because they figure that with such an exotic name, it must be complex. Not so. An alpha channel is really just another grayscale channel. The reason it needs its own name is that it isn’t one of the channels that make up the visible image. For example, although a typical RGB image has three channels—red, green, and blue—an RGB image with one alpha channel has four channels in all.
Alpha channels aren’t just another way of storing a selection marquee. They’re also used by various Photoshop features as a way of marking areas you want to alter or protect. For example, the Lens Blur filter can simulate depth of field by using gradients in an alpha channel as a depth map, and the Content-Aware Scale command can use an alpha channel to protect specific areas from being scaled.
Saving Selections. I said earlier that you can choose Select > Save Selection to store a selection with an image as an alpha channel (see Figure 9-30). If the Channels panel is visible, it’s faster to click the Save Selection icon in the Channels panel. Or if you want to see the Channel Options dialog first (for instance, to name the channel), Option-click (Mac) or Alt-click (Windows) the icon.
Figure 9-30 The Save Selection and Load Selection dialogs
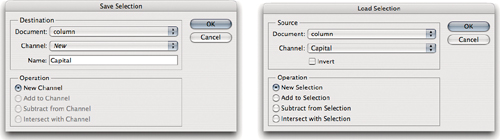
Loading Selections. To retrieve a selection you saved, in the Channels panel Command-click (Mac) or Ctrl-click (Windows) the channel that you want to use as a selection (the shortcut for choosing Select > Load Selection). Even better, press the Command and Option (Mac) or Ctrl and Alt (Windows) keys along with the number key of the channel you want (the numbers are listed along the right side of the Channels panel). For instance, if you want to load channel 6 as a selection on a Mac, press Command-Option-6.
Channels in TIFF Files. If you’re saving channels along with the image you’re working on, and you want to save the file as a TIFF, you should probably turn on LZW compression in the Save as TIFF dialog. ZIP compression is even better if the destination program supports it (Adobe InDesign does). Whatever the case, use some kind of compression—otherwise, the TIFF will be enormous. Of course, you could save in the native Photoshop format, but a ZIP-compressed TIFF is almost always smaller on disk.
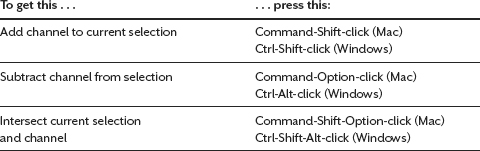
Adding, Subtracting, and Intersecting Selections. Let’s say you have an image with three elements in it. You’ve spent an hour carefully selecting each of the elements, and you’ve saved each one in its own channel (see Figure 9-31). Now you want to combine the three selections. After you load one channel as a selection, choose Select > Load Selection to add another channel to the current selection, subtract another channel, or find the intersection between the two selections. Even easier, use the key-click combinations in Table 9-4. Confused? Don’t forget to watch the cursor icons; as you hold down the various key combinations, Photoshop indicates what will happen when you click.
Figure 9-31 Combining channels

Table 9-4 Using the Channels panel to combine selections.
Moving Selections Between Documents
It’s easy to move selections between documents. You have more options if both documents have exactly the same pixel dimensions.
Drag and Drop. You can use one of the selection tools to drag an active selection to another document. Normally the selection drops wherever you release the mouse button; to drop the selection in exactly the same position in the destination document, hold down the Shift key just after you start dragging the selection from the original document. If the images don’t have the same pixel dimensions, the Shift key drops the selection at the center of the destination document.
You can also drag an entire channel from the Channels panel and drop it onto another open document of the same pixel dimensions.
Save Selection, Load Selection, and Duplicate Channel. If you choose Save > Save Selection or Duplicate Channel from the Channels panel menu, you’ll find a Document pop-up menu that lets you save a selection to the Channels panel of another document. If you choose Select > Load Selection, the Document pop-up menu in that resulting dialog lets you import a channel from another document. In all three cases, you’ll see other documents in that pop-up menu only if they’re currently open and they have the same pixel dimensions as the document that was in the foreground when you chose the command.
Selections, Layers, and Masks
By default, a Photoshop layer is transparent until you fill it with something. (The exception is the layer named Background that appears in italics in the Layers panel, which is always opaque.) All layer masks go away when you merge or flatten layers.
Layer Transparency and Layer Masks. Layer content can be made transparent using either layer transparency or a layer mask. Here’s the difference: When you create transparency by deleting areas of a layer, the deleted pixels are gone forever. When you create transparency using a layer mask, the mask carries transparency information independently of a layer while leaving the complete original layer intact. For this reason, layer masks are preferred because they’re nondestructive (see Figure 9-32).
Figure 9-32 Comparing layer transparency and layer masks; both achieve the same look, but with a layer mask you can easily “un-hide” transparent areas at a later time.

You can create layer transparency simply by selecting areas of a non-background layer and pressing Delete, or using any of the tools in the Eraser tool group in the Tools panel. You create transparency in a layer mask by adding one (using the Masks panel or Layers panel) and painting black onto it.
Selections and Masks. You can translate between selections and layer masks as easily as you can translate between selections and channels (see Chapter 8), since like a channel, a layer mask is simply a grayscale image. Many channel concepts and techniques carry over to layer masks, such as making and refining a selection and filling it with black or white.
More Layer Mask Tips. Add these tips to the ones I gave in Chapter 8:
• The Add a Pixel Mask button in the Masks panel, Add Layer Mask button in the Layers panel, and Layer > Layer Mask > Reveal All command all do the same thing.
• By default, a new layer mask is filled with white (the entire layer is opaque). If you Option-click (Mac) or Alt-click (Windows) the Add a Pixel Mask button in the Masks panel or the Add Layer Mask button in the Layers panel, the layer mask inverts (the layer becomes transparent).
Tip
![]()
By default, moving a layer also moves its layer mask. To move them independently, turn off the Link icon (click between the layer and layer mask preview thumbnails in the Layers panel).
• If a selection exists when you create a layer mask, everything outside the selection becomes transparent (filled with black) in the new mask. The Option/Alt key inverts this behavior too.
• When you’re editing a mask, its Layers panel thumbnail has a dashed border around it and the words “Layer Mask” appear in the document title bar. I’ve accidentally painted on the image instead of the mask enough times that I recommend always confirming what’s selected.
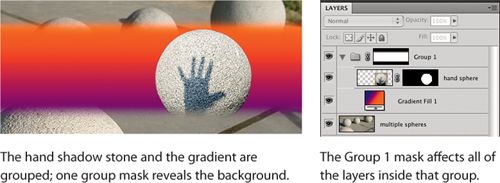
• A layer group can have a mask, and that’s handy for creating nested masks. Select the layers, group them by pressing Command-G (Mac) or Ctrl-G (Windows), which is the shortcut for choosing Layer > Group Layers, and then add a mask to that layer group (see Figure 9-33).
Paint It In Using Masks. Layer masks let you paint in any kind of effect you want. For example, duplicate the Background layer of an image in the Layers panel, apply a filter (such as Unsharp Mask) to the new layer, then Option/Alt-click the Add Layer Mask icon to mask out the entire effect. Now you can paint the effect back in using the Brush tool and non-black pixels. If you change your mind, you can paint away the effect with black pixels. This flexibility is addictive, and you’ll soon find yourself using this technique over and over, whether it’s painting in texture, sharpening or blurring, or whatever.
Table 9-5 lists more helpful shortcuts for viewing and editing layers.
Table 9-5 Layer mask shortcuts.

Getting Rid of the Mask. As soon as you start editing layer masks, you’re going to find that you want to turn the mask on and off to get before-and-after views of your work. You can make the mask disappear temporarily by choosing Layer > Layer Mask > Disable. Or do it the fast way: Shift-click a layer mask icon.
If you want to delete a mask forever, choose Layer > Layer Mask > Delete (or, faster, drag the Layer Mask icon to the Trash icon). Photoshop gives you a last chance to apply the mask to the layer. Note that if you do apply the mask, the masked (hidden) portions of the layer are actually deleted.