
10. Sharpness, Detail, and Noise Reduction
The human visual system depends to a great degree on recognizing edges. Our eyes pass information to our brain, where every detail is quickly broken down into whether it is or is not an edge. (Millions of years of evolution have developed our brains to ignore most of what’s going on in our field of vision and instead focus immediately on moving edges that might turn out to be a hungry tiger.) An image may have great contrast and color balance, but without good edge definition, you simply see it as less lifelike.
No matter how good your camera or scanner and how crisp your original may be, you always lose some sharpness when an image is digitized. Images from scanners and digital cameras always need a considerable amount of sharpening, though high-end scanners may sharpen as part of the scanning process. Even a high-resolution digital camera back mounted on a finely focused view camera produces images that will benefit from sharpening. You cannot solve the problem of blurry scans by scanning at a higher resolution. It just doesn’t work that way.
Your images also lose sharpness in the output process. Halftoned images (almost anything printed on a printing press) and dithered ones (such as those printed on inkjet or other desktop printers) are by far the worst offenders. But even continuous-tone devices such as film recorders and dye-sublimation printers lose a little sharpness.
What’s Sharpening All About?
Sharpening encompasses a wide range of factors that affect whether you perceive an image to be sharp. The central idea behind sharpness is that you’re trying to make image detail easier to see. However, there are many reasons that detail can be obscured. Sharpening is all about enhancing detail while suppressing the factors that obscure it.
Detail vs. Noise. In addition to detail, images contain noise—digital captures have sensor noise, and film scans have film grain that may be exacerbated by noise in the scanner sensor. You want to sharpen only the detail, not the noise. However, because it’s hard for software to tell the difference between noise and detail, all noise-reduction solutions have to walk the fine line between increasing edge detail and decreasing noise.
In Photoshop itself, noise-reduction techniques are generally needed only on very noisy images—scans of color negatives and digital captures at high ISO values are prime candidates. When working with digital raw captures, it’s better to apply the noise reduction in Adobe Camera Raw. Otherwise, concentrate on sharpening the available detail but not the noisy areas, partly because you don’t want to soften the image unnecessarily with noise reduction, and partly to avoid another workflow step.
Noise reduction is best applied before sharpening, for the simple reason that it works better than doing so afterward (why sharpen noise?). I’ll cover noise reduction further later on in this chapter.
Lens Defects. Lenses introduce their own quirks. Some lenses are simply sharper than others. (The Lens Blur mode in the Smart Sharpen filter specifically addresses lens softness.) A second lens problem is chromatic aberration, in which the lens fails to deliver the red, green, and blue wavelengths to the same plane of focus, producing color fringing. It’s a particular problem toward the wide end of wide-angle zooms.
Chromatic aberration is seen more with digital capture than with film, probably because digital is much less forgiving to lenses. Film grain and interlayer scattering of the light tend to mask chromatic aberration, while digital capture reveals it quite brutally—shooting film and digital with the same lens can show this. You can correct chromatic aberration in digital raw files using the Lens Corrections tab in Camera Raw (see Chapter 5), or using the Lens Correction filter in Photoshop (see Chapter 11).
I’ll cover noise reduction and lens corrections in the course of this chapter, but while only some images need noise reduction or lens fixes, every image needs sharpening, so that’s where I’ll start.
Photoshop Sharpening Tools. To counteract the blurries in both the input and output stages, you need to sharpen your images. Photoshop offers several sharpening tools and filters, but the Unsharp Mask and Smart Sharpen filters are the only ones that are truly effective in a production workflow. There are also advanced techniques that combine these sharpening filters with selections, masks, and other filters to address specific issues.
Why Unsharp Masking?
When you perceive an edge, you’re really seeing an area of high contrast between adjacent pixels. The higher the contrast, the sharper the edges appear. To increase sharpness, you need to increase the contrast along the edges. A common technique to achieve this is unsharp masking (often abbreviated as USM). That may sound like the last thing you’d want to do if you’re trying to make an image appear sharper, but the term actually makes some sense. It has its origins in a traditional film-based technique for enhancing photographic sharpness. Although Photoshop has several sharpening tools, unsharp masking is the basis for many of them.
Traditional Unsharp Masking
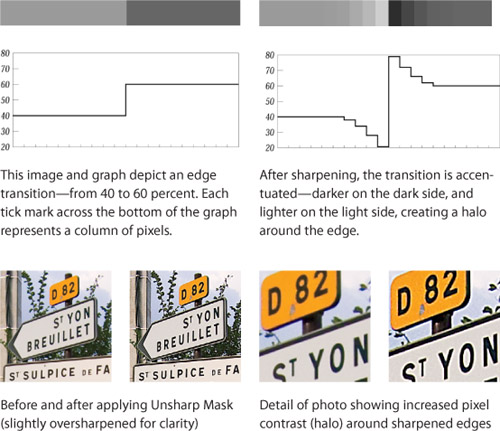
In the traditional film-based unsharp masking process, the photographic negative is sandwiched in the enlarger along with a slightly out-of-focus duplicate negative—an unsharp mask—and the exposure time for printing is approximately doubled. Because the unsharp mask is slightly out of focus and the exposure time has been increased, the light side of the edges prints lighter and the dark side of the edges prints darker, creating a halo around objects in the image (see Figure 10-1). As you’ll see throughout this chapter, this halo effect is both the secret of good sharpening and its Achilles’ heel, depending on the size and intensity of the halo and where it appears in the image. Photoshop lets you control the halo very precisely, but there’s no single magic setting that works for all images, so you need to know not only how the controls work, but also what you’re trying to achieve in the image.
Figure 10-1 Edge transitions and sharpening
Digital Unsharp Masking
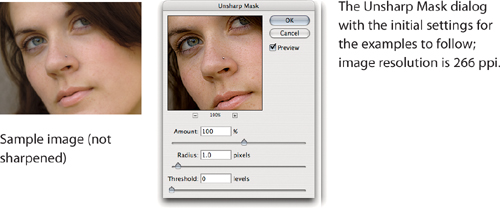
A digital sharpening tool such as the Unsharp Mask filter (see Figure 10-2) operates pixel by pixel, which explains why it can sometimes take a while to process. It compares each pixel to its neighbors, looking for a certain amount of contrast between adjacent pixels, which it assumes is an edge. It then increases the contrast between those pixels according to the parameters you set. This creates a halo that, at normal viewing distances, increases apparent sharpness.
Figure 10-2 The Unsharp Mask filter and the image I’ll use for the examples
Tip
![]()
You need to walk a fine line, sharpening only where your image needs it. Because the Unsharp Mask filter affects the entire image, I prefer running sharpening through a mask.
But Photoshop can’t actually detect edges—it just looks at contrast differences. So unsharp masking can also have the undesired effect of exaggerating texture in flat areas and skin tones and emphasizing any noise introduced by the scanner in the shadow areas.
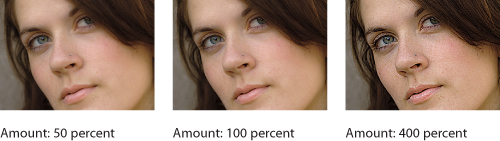
Amount. Think of this setting as the volume control. It adjusts the intensity, or contrast, of the sharpening halo (see Figure 10-3). High Amount settings produce intense halos with many pixels driven to pure white or solid black; low Amount settings produce less intense ones. Amount has no effect on the width of the halos; Radius deals with that.
Figure 10-3 The effect of different Amount settings
Tip
![]()
If your computer is on the slow side, try turning off the Preview check box to avoid the time-consuming full-screen redraw of the preview. You can still use the preview inside the Unsharp Mask dialog to check the results. Pressing and releasing the mouse button inside the dialog preview toggles between the before and after states.
I almost always start out by setting Amount much higher than I’ll eventually want it—between 400 and 500—just so I can clearly see the effect of the Radius option. Once I see what Radius will do to a specific image, I adjust Amount downward to a reasonable final value.
As you increase the Amount setting, the blips around big tonal shifts (edges) can be pushed all the way to white and black. At that point, increasing Amount has no effect—you can’t get more white than white! Worse, the all-white halos often stand out as artifacts and just don’t look good.
Radius. This option sets the width of the halo the filter creates around edges (see Figure 10-4). The wider the halo, the more obvious the sharpening effect. Choosing the correct Radius value is probably the most important choice in avoiding an unnaturally oversharpened look. There are several factors to take into account, starting with the content of the image itself, the output method, and the intended size of the reproduction (see the sidebar “Image Detail and Sharpening Radius”).
Figure 10-4 The effect of different Radius settings

As you increase the Radius, the apparent sharpness also increases—often to an undesirable extent. This is where the aesthetic considerations come in. Some people like more sharpening than others. I find highly sharpened images more distracting than slightly soft ones, but that’s a matter of taste. It’s up to you to decide how much sharpening you want.
Tip
![]()
Image resolution affects the Radius value you should set. The correct Radius value for a 300-ppi image will be far too strong for a Web page version of that image, which is likely to be displayed at 100 ppi or less.
Note that a Radius value of 1.0 does not result in a single-pixel radius. In fact, the halo is often between 4 and 6 pixels wide for the whole light and dark cycle—two or three pixels on each side of the tonal shift. However, it varies in width depending on the content of the image.
Threshold. Unsharp Mask only evaluates contrast differences: It doesn’t know whether those differences represent real edges you want to sharpen or areas of texture that you don’t want to sharpen. The Threshold control lets you specify how far apart two pixels’ tonal values have to be (on a scale of 0 to 255) before the filter affects them (see Figure 10-5). For example, if Threshold is set to 3, and two adjacent pixels have values of 122 and 124 (a difference of 2), they’re unaffected.
Figure 10-5 The effect of different Threshold settings (I used an Amount of 150 percent for this example)
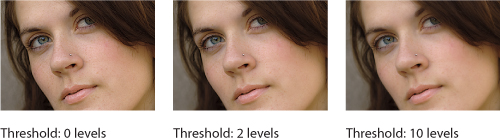
Low Threshold values (0 to 4) result in a sharper-looking image overall because fewer areas are excluded. High values (above 10) result in less sharpening but often produce unnatural-looking transitions between the sharpened and unsharpened areas. I typically start out with a zero Threshold value and then increase it only if necessary. Be careful at higher Threshold settings because dramatic, unnatural sharpening of high-contrast edges may combine with unsharpened smaller details, which can make the image appear as if something isn’t quite right.
Tip
![]()
You may need to set a higher Radius value to sharpen out-of-focus images or images with motion blur—there are no fine details, so naturally the Radius must be set to a higher value than normal.
When you use Threshold, your goal is to make the filter ignore the relatively slight differences between pixels in smooth, low-contrast areas while still creating a halo around details that have high-contrast edges. You can use Threshold with portraits, to avoid sharpening every last detail of a person’s skin, and to avoid sharpening noisy areas of digital images. In both cases low Threshold values are used.
Everything’s Relative. One of the most important concepts to understand about sharpening is that the three values you can set in the Unsharp Mask dialog are interrelated. As you increase the Radius setting, you generally need to decrease the Amount to keep the apparent sharpness constant. At higher Radius settings, you can use much higher Threshold values; this smooths out unwanted sharpening of fine texture while still applying a good deal of sharpness to well-defined edges.
Tip
![]()
If sharpening looks too strong after applying Unsharp Mask, choose Edit > Fade and lower the Opacity value (see “Filters and Effects” in Chapter 11, “Essential Image Techniques”).
A Practical Sharpening Workflow
To understand how to sharpen, you first have to understand why you’re doing it at all. It turns out that there are basically three reasons why an image might need to be sharpened. Each of those reasons imposes its own demands, and sometimes these demands contradict one another. Fortunately, the reasons break down nicely into three stages that are easy to handle separately and in sequence during a production workflow: sharpening the original digital capture, sharpening image content for creative purposes, and sharpening to optimize image detail for specific output.
If you don’t recognize all of the techniques and features I mention in this section, don’t worry—they’ll be explained later in this chapter.
Capture Sharpening
When a sensor turns photons into pixels, some sharpness is always lost. No matter how high the resolution of your capture devices, they sample based on a fixed grid. Inevitably, this means that the continuous gradations of tone and color that exist in the real world turn into discrete pixels. Also, each capture device imposes its own noise characteristics on the image.
Tip
![]()
For a deeper dive into the multistage sharpening workflow, pick up the book Real World Image Sharpening with Adobe Photoshop, Camera Raw, and Lightroom, 2nd Edition by Bruce Fraser and Jeff Schewe (Peachpit Press).
Strategy. You need to sharpen the image content to restore what was lost in the conversion to pixels, but you don’t want to also sharpen—and hence emphasize—the noise and grain. The goal of capture sharpening is to take into account the source of the image, compensating only for the amount of sharpness lost to a specific digital camera or scanner sensor.
This first round of sharpening must be done very gently indeed; otherwise the result is likely to be a hideously oversharpened mess. Remember, it’s only the first stage of sharpening, where you essentially perfect the capture. Don’t try to solve all of an image’s sharpening issues at this stage, because all you need to do here is set a solid baseline of overall sharpness that you’ll build on during the next two stages.
Tip
![]()
If noise reduction is required, I’ll do it before sharpening, by running the Despeckle filter through a mask, running Reduce Noise on its own merged layer, or if it’s a raw digital camera file, I may employ the noise reduction in Adobe Camera Raw or Lightroom. When extreme noise reduction is required, I’ll apply a mask to the noise reduction layer to protect the edges.
Tactics. The first sharpening pass aims to compensate for the shortcomings of the capture in a way that’s sensitive to the image content. You create a sharpening layer and apply an edge mask so that only the high-contrast edges get sharpened. You sharpen the layer with a Radius value that matches the image content, then constrain the tonal range to the midtones using the Blend If sliders in the Layer Style dialog. You use the Blend If sliders to focus the sharpening on the midtones, protecting highlights and shadows so that they don’t get driven to solid black and solid white.
With grainy or noisy originals such as high-ISO digital capture or film, first try applying noise reduction using the Reduce Noise filter or a third-party noise reduction plug-in. If you’re working with raw digital camera files, you can use the sharpening sliders in Adobe Camera Raw or Lightroom—those controls were specifically designed for the capture sharpening stage.
Creative Sharpening
The creative sharpening stage is unlike the capture and output stages in that it doesn’t optimize the image for a specific device. Instead, it directs the viewer to specific areas to help clarify the intended meaning of the image. If you want to apply different amounts of sharpening to various parts of an image, this is the time to do it. In other words, creative sharpening is about the content, not the devices.
Tip
![]()
One way to make an object appear sharper is to blur the rest of the image. You can create smoothing brushes using the same techniques as for sharpening brushes but substituting a blur for the sharpen.
After capture and creative sharpening, you end up with an idealized image—corrected and enhanced as far as possible without being shackled to one specific purpose, size, or output device.
Strategy. Apply creative sharpening after you’ve fine-tuned the tone and color both globally and locally, because changes to contrast and color can easily affect the perceived sharpness. When sharpening image content, you want to emphasize edges without overemphasizing textures such as skin tones and without introducing spurious texture into flat areas such as skies.
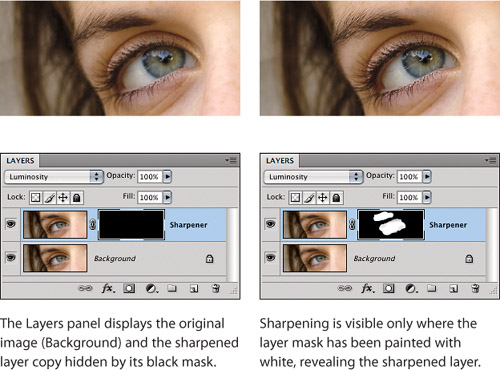
Tactics. You can build sharpening layers to paint sharpening just where you want it, such as the eyes of a portrait (see Figure 10-6). You’ll soon read about a technique that lets you add or remove sharpening with a brush.
Figure 10-6 Creative sharpening

If Camera Raw and Lightroom are part of your standard workflow and you’re using a version that includes the Adjustment Brush, that tool provides a nondestructive way to apply local, creative sharpening before you open a digital camera image in Photoshop.
Output Sharpening
When you print, you lose sharpness again. In most cases, one pixel isn’t directly translated into one dot of ink or dye, and even for those devices where it is, they’re often round dots instead of square pixels. These mismatches cause a loss of sharpness.
Strategy. Because the source-specific and image-specific concerns were already addressed in the capture and creative sharpening phases, output sharpening can concentrate solely on the requirements of the output process. Effective output sharpening must take into account the output process so that the amount of output sharpening is tightly matched to the output device—not oversharpened or undersharpened. Output sharpening must be done at the final size and resolution, often as the last step before converting an RGB file to CMYK and saving the file to disk. Similarly, apply output sharpening to a copy of a master file, since it’s tuned to a specific device. When you want to create output for another device, start from the master image and apply sharpening settings tuned to the other type of output.
Tip
![]()
If you aren’t sure about the correct output sharpening settings, run some tests. If you’re preparing images for a commercial press and sending out for a color proof, test sharpening by adding copies of the same image sharpened at different values.
Tactics. Unlike capture and creative sharpening, output sharpening should be applied across the entire image. You can do this using a sharpening layer with no layer mask. For halftone and inkjet output, I often use the Hard Light/High Pass sharpening technique. For monitor-based output, Smart Sharpen may be enough.
If you expect the image to be resized significantly after it leaves your hands, don’t apply output sharpening. Anyone who resizes the image will probably resharpen it anyway, and if you’ve done a reasonably good job in the capture and creative phases, the final result will still be sharp.
Tip
![]()
For the Web or video, sharpness can be lost because typically, several high-resolution original pixels are merged into fewer pixels at monitor resolution.
Previewing Output Sharpening. Correct output sharpening values may often look downright scary on the monitor. This is normal, because you’re viewing the sharpening values on a device that’s very different from the final output device. Light and dark contours that are 3 pixels wide may look hideous on the monitor, but if you’re printing at 300 ppi they’ll translate into contours (light and dark parts of the sharpening halo) that are only ![]() inch wide and won’t be obvious on the final print.
inch wide and won’t be obvious on the final print.
There’s really no way to get an accurate onscreen representation of how a sharpened halftone output will look—the continuous-tone monitor display is simply too different from the halftone. An image sharpened for halftone output can look a little crunchy onscreen. And the monitor resolution and view percentage can help or hinder your appraisal of an image’s sharpness. See the sidebar “Sharpening and the Display” for more on this subject.
Tip
![]()
To keep output-specific edits, such as output sharpening, from accidentally being saved with your layered master image, choose Image > Duplicate (with the Duplicate Merged Layers Only option enabled) to create a flattened duplicate document. You can then apply output-specific optimizations to the copy, such as the appropriate sharpening settings for the printer you’re about to use.
The onscreen appearance at Actual Pixels view varies dramatically over different display types and resolutions, but as you zoom in, the differences between display types become much less significant.
Suggested Formulas. Output sharpening is the only phase that easily lends itself to a formula, because once the image has been sized and the output process chosen, the physical size of the pixels, and hence of the sharpening halos, is a known quantity. For the capture and creative phases of the sharpening workflow, common sense, good taste, and, in the long run, experience are the best guides.
A guideline that works well is to aim for a sharpening halo that is approximately ![]() to
to ![]() inch (0.5 to 0.25 mm) wide. The idea is that at normal viewing distances, a halo this size falls below the threshold of human visual acuity, so you don’t see the halo as a separate feature; you just get the illusion of sharpness that it produces. For example, at 360 ppi each pixel is only
inch (0.5 to 0.25 mm) wide. The idea is that at normal viewing distances, a halo this size falls below the threshold of human visual acuity, so you don’t see the halo as a separate feature; you just get the illusion of sharpness that it produces. For example, at 360 ppi each pixel is only ![]() inch, so to produce a
inch, so to produce a ![]() -inch halo, you’d need a dark contour approximately 3.6 pixels wide (
-inch halo, you’d need a dark contour approximately 3.6 pixels wide (![]() inch) and a light contour the same size.
inch) and a light contour the same size.
For output sharpening, a good starting point for the Unsharp Mask filter’s Radius setting is image resolution ÷ 200. (Remember, we’re talking about final image resolution, after it’s been scaled to the final physical dimensions, such as 10 inches tall.) Thus, for a 300-ppi image, you’d use a Radius of 1.5 (300 ÷ 200). For a 200-ppi image, you’d use a Radius setting of 1. This is a suggested starting point, not gospel. As you gain experience, you’ll find situations where the rule has to be bent. When sharpening using methods that don’t involve Unsharp Mask, you’ll have to look closely and adjust the math.
On very large prints, you may have to use a slightly larger sharpening halo—if the resolution is less than 100 ppi, the halo will be larger than ![]() inch because it takes at least two pixels (one light, one dark) to create the halo. But large prints are generally viewed from farther away, so the longer viewing distance tends to compensate for the larger halo.
inch because it takes at least two pixels (one light, one dark) to create the halo. But large prints are generally viewed from farther away, so the longer viewing distance tends to compensate for the larger halo.
Sharpening Techniques
You can use a host of techniques in the sharpening workflow—some obvious, others less so. Some use a mask to avoid accentuating dust, scratches, noise, and film grain. Others make sharpening nondestructive and editable by applying it on a masked copy of the image.
Tip
![]()
Some people like to sharpen images by converting them to Lab and sharpening only the Lightness channel. You can get a nearly identical result by sharpening the RGB file, then choosing Edit > Fade, and setting the Mode to Luminosity. It’s faster, and you don’t lose layers through a mode change.
Sharpening with Layers
It’s best to do most of your sharpening on layers, for the same reasons that using adjustment layers is preferable to burning Curves or Levels directly into an image—it’s nondestructive, it’s always editable, and it lets you use masking when that would help. In the first stage of the sharpening workflow, layer-based sharpening also provides an easy way to concentrate the sharpening in the midtones through the Blend If feature.
Tip
![]()
If you have a pressure-sensitive stylus, you can control opacity using stylus pressure. If your stylus isn’t already set to do this, open the Brushes panel, click Other Dynamics, and choose Pen Pressure from the Control pop-up menu.
Layer-Based Sharpening. You’ll apply sharpening to the duplicate (see Figure 10-7), so first duplicate the image layer (drag a layer to the New Layer icon in the Layers panel). It’s usually a good idea to apply slightly more sharpening to the duplicate than you ultimately desire, because it gives you a wider range of sharpening to work with. Add a mask to the duplicate layer (click the Pixel Mask icon in the Masks panel). Next, fill the layer with black to hide the sharpened duplicate layer. Now paint the sharpening only where you want it: Make sure that the layer mask is targeted in the Layers panel, choose the Brush tool, set the foreground color to white, and simply brush where you want to reveal the sharpened duplicate layer. Use a brush set to substantially less than 100 percent opacity, because it gives you some headroom to increase sharpening by increasing opacity. Apply the Luminosity blending mode to the layer to avoid any color shifts or color fringes—it produces essentially the same result as converting the image to Lab and sharpening the Lightness channel.
Figure 10-7 Using layers for creative sharpening
Concentrating Sharpening on the Midtones. Because sharpening boosts contrast along edges, the severe contrast caused by high sharpening values can drive some edge pixels to pure black or white. You can address this using the Blend If sliders in the Layer Style dialog (see Figure 10-8). These sliders let you control which tonal values in the overlying (sharpening) layer get applied to the underlying layer (and, conversely, which tonal values in the underlying, unsharpened layers are affected by the sharpening layer). Bruce Fraser likened the overlying layer to a ton of bricks suspended over a basket of eggs (the underlying layers). The top Blend If slider controls which bricks fall, and the bottom Blend If slider dictates which eggs receive the impact. Another way to look at it is that the Blend If sliders are masks based on tonal levels, while pixel masks are based on area.
Figure 10-8 The Blend If sliders at the bottom of the Layer Style dialog
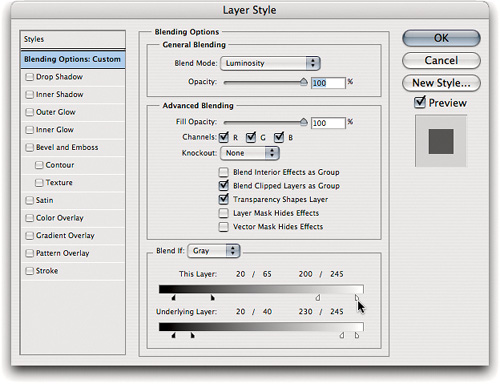
To use the Blend If sliders, double-click the thumbnail of the sharpened layer in the Layers panel. Now drag the Blend If sliders so that they mark the lowest and highest levels at which the layer’s effects (in this case, sharpening) should apply.
Of course, if the layer’s effects suddenly started and stopped at specific layers, the abrupt transition would be jarring. That’s why you can feather the right and left sliders (meaning the lower and upper tonal limits) by splitting the sliders—to do that, Option-drag (Mac OS X) or Alt-drag (Windows) half of a slider. The feathering creates a gradual transition from complete suppression to complete application of the layer.
Figure 10-8 shows some typical settings for the Blend If sliders for initial midtone sharpening. The This Layer slider is set so that nothing happens between levels 0 and 20 and between levels 245 and 255, the layer is applied full strength between levels 65 and 200 and is feathered from nothing to full strength between levels 20 and 65 and levels 200 and 245. The Underlying Layer slider works similarly. The meaning of the name Blend If is that the layer’s effects are blended with the underlying layer, but only if the value of the layer and the value of the underlying layer are not beyond the levels marked by the outermost sliders of both layers.
Tip
![]()
When evaluating a layer with Smart Filters off, avoid hiding or showing individual Smart Filters whenever possible, because it forces Photoshop to re-render the entire filter stack. Instead, click the eye icon next to a layer’s Smart Filters heading in the Layers panel, which hides and shows all Smart Filters. That’s dramatically faster because then all Photoshop has to do is hide or show the cached image for the entire layer stack.
The goal of applying the Blend If sliders is to reduce the contrast of the dark and light sharpening halos, allowing headroom for subsequent creative or output sharpening. Depending on the image source (film or digital) and the amount of noise present, you may find that the shadow values need to be set higher or lower, but the basic principle is to set the bottom sliders to protect extreme highlights and shadows and to set the top sliders to apply most of the sharpening in the midtones.
Sharpening with Smart Filters
With Smart Filters, you enjoy a freedom of choice with filters that’s similar to what you have with adjustment layers. Unlike Undo steps and the Fade command, the settings of a Smart Filter can be edited at any time without altering the original layer, even after you close and reopen a document.
You can apply a filter as a Smart Filter only to a Smart Object; if you’re working with a file from Adobe Camera Raw that you opened as a Smart Object, you’re ready to go. With any other layer, you must first select the layer and choose Filter > Convert for Smart Filters (which is actually the same as choosing Layer > Smart Object > Convert to Smart Object). As long as a layer is a Smart Object, applying any available filter from the Filter menu creates a Smart Filter, shown in the Layers panel under a Smart Filters heading indented under the layer that uses them (see Figure 10-9). Not all filters are available as Smart Filters, but many of the most useful production filters are, including Unsharp Mask and Smart Sharpen. To edit a Smart Filter, just double-click it in the Layers panel.
Figure 10-9 Using Unsharp Mask as a Smart Filter

One subtle aspect of Smart Filters is how to fade them. You can’t use the Layers panel blending mode or opacity controls to edit a Smart Filter independently of its layer or the layer’s other Smart Filters, and the Edit > Fade command isn’t available either. What do you do? Control-click (Mac) or right-click the Smart Filter thumbnail and choose Edit Smart Filter Blending Options; this displays a dialog with a Mode pop-up menu, an Opacity setting, and a preview thumbnail.
Tip
![]()
A stack of Smart Filters can have only one mask for all of the filters in the stack. If you want to apply a mask to one filter, you’ll have to duplicate the image layer.
Trade-Offs. Given the ways that Smart Filters preserve your options indefinitely, it sure sounds like Smart Filters could be editing nirvana. Unfortunately, they aren’t. Smart Filters suffer from the same gotchas that afflict Smart Objects: They place huge demands on the CPU and on disk space, slowing down operations and creating very large files. For this reason, I think of Smart Objects as “editing on credit.” That is, Smart Objects give you a lot of desirable power and flexibility, but overusing them can create an ongoing burden that can cost more than you expected.
Another disadvantage is that you can’t rename or group Smart Filters as you can with layers. For instance, if you apply multiple output-specific Smart Filter instances of Unsharp Mask, it won’t be easy to identify them so that you can figure out which ones to turn on or off.
I ran a quick test to see whether Unsharp Mask applied to a duplicate layer would take up more or less disk space than Unsharp Mask applied to the original layer as a Smart Filter. A 13.7 MB TIFF file became a 36.2 MB TIFF file after duplicating the original layer, running Unsharp Mask on the duplicate layer, and creating and painting on a layer mask for the duplicate layer. I took an unaltered copy of the original file and applied the same filter settings and mask, but this time as a Smart Filter, and ended up with a file size of 49.8 MB. The difference in RAM usage was similarly dramatic.
The trade-off is clear. If you’ve got the CPU, the RAM, and the disk space, Smart Filters can completely revolutionize your workflow, but on a machine with mediocre performance or limited available disk space, the old-school techniques will help preserve your sanity.
High Pass Sharpening
Unsharp Mask is the Swiss Army knife of sharpening tools, but it’s not the only way to sharpen images. Another way is to use the High Pass filter (Filter > Other > High Pass). The High Pass filter is a simple way to create an edge mask, but in this case you don’t use it that way. Instead, you apply the filter directly to the duplicate layer and set the layer’s blending mode to Soft Light or Hard Light. Because applying Soft Light increases local contrast, it has the side effect of sharpening details.
As with the other layer-based sharpening techniques, you can use a whole bag of tricks to refine the sharpening—like blurring noise in the mask or painting on the layer itself with 50 percent gray (the neutral color for both the Hard Light and Soft Light blending modes) to erase the sharpening in local areas. You can apply a layer mask to confine the sharpening to a specific area, and you can stack multiple sharpening layers to apply selective sharpening to different areas of the image.
The critical parameter in this technique is the Radius setting for the High Pass filter. If it’s too small, you’ll get little or no sharpening. If it’s too big, grain and noise will appear in the image as if by some evil magic. However, for optimum output sharpening, what will look good in print may look very ugly onscreen (see the sidebar “Sharpening and the Display,” earlier in this chapter). You’ll see an example of High Pass sharpening in the next section.
Tip
![]()
You can also use an edge mask when you apply noise reduction, to keep the noise reduction away from edges. When you do this, invert the mask (make edges black and broad areas white).
On soft subjects and skin tones, Hard Light can give too strong a sharpening effect. For these types of images, or in any case where you want a more gentle sharpening effect, try applying the Soft Light blending mode instead of Hard Light to avoid oversharpening skin texture. You can switch between Hard Light and Soft Light after running the High Pass filter to see which you prefer. If you need a level of sharpening between the two modes, apply High Pass and reduce that layer’s Opacity value.
Edge Masking
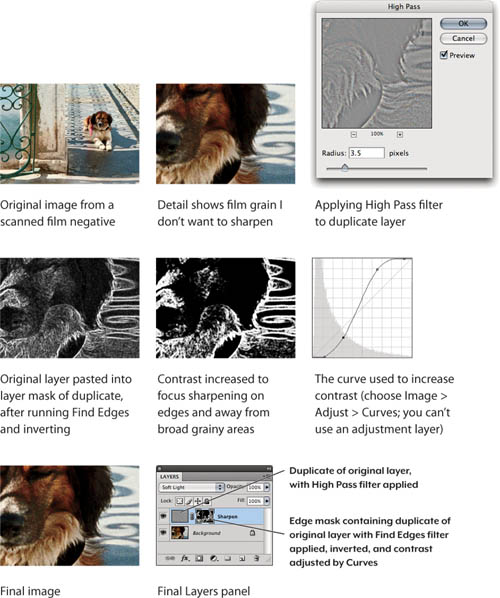
Edge masks are a valuable tool for both sharpening and noise reduction. When sharpening, use an edge mask to concentrate the effects of the sharpen on the edges, so that flat areas such as skies, and textured areas such as skin tones, don’t get oversharpened. Figure 10-10 shows an example of both High Pass sharpening and an edge mask built to restrict sharpening to the edges and keep it away from film grain in uniform areas of color.
Figure 10-10 Building an edge mask for a layer sharpened using the High Pass/Soft Light method
Tip
![]()
You don’t have to build an edge mask the way I do here, simply pasting the image into a layer’s grayscale mask. You can use techniques you’ve read about earlier in the book, such as customizing a grayscale edge mask with the Channel mIxer.
Building a High Pass Sharpening Layer. Duplicate the original layer and apply the High Pass filter with a Radius amount that creates acceptable halos around the edges. Then apply the Soft Light blending mode to the duplicate layer, and with that, the sharpening layer is done.
Tip
![]()
Building an edge mask may seem to involve a lot of steps, but fortunately it isn’t hard to record them as an action (I talk about that in Chapter 11). The Masking option in Camera Raw sharpening is another example of automated edge masking.
Building the Edge Mask. In the Layers panel, select the original layer and select all the pixels (Command-A on Mac OS X or Ctrl-A on Windows). Select the duplicate layer in the Layers panel and click the Add Layer Mask button at the bottom of the Layers panel. Next, Option-click (Mac OS X) or Alt-click (Windows) the layer mask to display only the mask, and paste the original image into it. Choose Filter > Stylize > Find Edges and invert the image by pressing Command-I (Mac OS X) or Ctrl-I (Windows); this gives you a mask that hides everything except the edges of the duplicate layer. Finally, press Command-M (Mac OS X) or Ctrl-M (Windows) to open the Curves dialog. You can edit the curve to adjust mask contrast, which controls the sharpening strength at edges (white and the lighter tones) and away from edges (black and the darker tones).
Sharpening in Photoshop vs. Camera Raw
When Bruce Fraser first wrote about many of the techniques in this chapter, such as High Pass sharpening and edge masks, Photoshop was pretty much the only place in town where you’d consider doing them. Today, far more images are being captured by digital cameras, and for many of them, the first stop after the camera isn’t Photoshop, but raw processing software such as Camera Raw or Lightroom, which have their own sharpening controls and include a form of edge masking based on the concepts in this chapter.
As the feature sets of Camera Raw and Lightroom have expanded so dramatically, where and how do they fit into the sharpening workflow? Should you do any sharpening in those programs, or leave it to Photoshop?
Camera Raw and Lightroom are not yet ready to replace all three stages of the sharpening workflow, but they’re quite effective at addressing capture sharpening. They do provide creative sharpening through the Adjustment Brush as well as output sharpening.
Tip
![]()
If you don’t want to apply Camera Raw sharpening to your images as you convert them, open the Camera Raw preferences and choose Preview Images Only from the Apply Sharpening To pop-up menu.
A major benefit of using Camera Raw and Lightroom for capture sharpening is ease of use. If you feel at all intimidated by this book’s multistep descriptions of manipulating layers, channels, masks, and blending modes, you owe it to yourself to study the Camera Raw and Lightroom sharpening controls, which automate and condense stacks of layers and channels into four simple sliders with a lot of intelligence built in. For more about Camera Raw sharpening, see Chapter 5; the Lightroom controls work the same way.
Another reason to perform capture sharpening in your raw processor is that you’re doing it at the raw development stage. Being able to balance noise reduction and capture sharpening together—and so early in the workflow—results in higher-quality images.
Smart Sharpen
The Smart Sharpen filter (Filter > Sharpen > Smart Sharpen) takes a bit longer on slower machines, both in execution and in updating the proxy image when you change settings. For high-resolution images, Smart Sharpen is most useful if you have the latest fast hardware.
If you need to make low-resolution images look good onscreen, Smart Sharpen is great. If the idea of making sharpening masks fills you with terror, Smart Sharpen does a fairly good job of differentiating edges from non-edges. It’s quite useful for capture sharpening, though it’s not always better than the traditional techniques. Smart Sharpen can be a rather slow way to do output sharpening, especially on a large batch of images. Smart Sharpen is also more effective on digital camera images than it is with scans.
Smart Sharpen Remove Modes
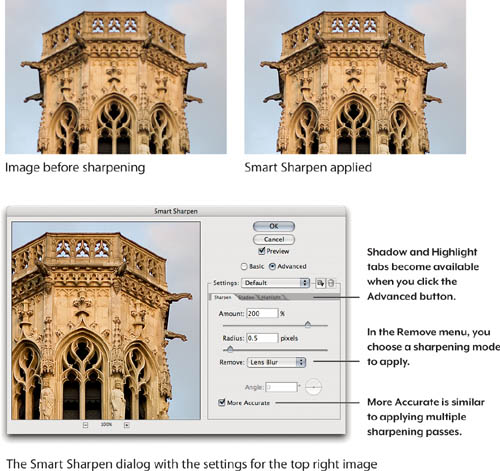
Smart Sharpen is really three sharpening filters in one. You select one by choosing an option from the Remove menu (see Figure 10-11).
Figure 10-11 Using Smart Sharpen
Gaussian Blur. The Gaussian Blur mode is the Unsharp Mask filter with a different user interface. If you turn on the More Accurate option, the result is a good deal gentler than Unsharp Mask at the same amount and radius, but it’s basically the same type of sharpening. The reason you have a choice of not using More Accurate is that it takes a lot more time to process.
Tip
![]()
If your machine isn’t fast enough to use Smart Sharpen for rapid production work, you can obtain very similar results running Unsharp Mask on masked layers set to Luminosity mode. When you automate the process with actions, it’s quite a bit faster than Smart Sharpen.
Lens Blur. In Lens Blur mode, Smart Sharpen is a whole different animal than Unsharp Mask. Lens Blur uses much more sophisticated algorithms than Unsharp Mask (or Smart Sharpen in Gaussian Blur mode) to detect edges and detail, and hence typically produces better sharpening with less-obvious sharpening halos.
Motion Blur. In Motion Blur mode, Smart Sharpen tries to undo the effects of blurring caused by either camera or subject movement. If the movement is truly unidirectional it does do a good job, but camera shake rarely happens in just one direction, and subject movement is often quite complex, so don’t expect blurred subjects to be rendered razor-sharp by the filter.
Advanced Mode
When you click the Advanced radio button, two additional tabs, labeled Shadow and Highlight, become available. They offer controls very similar to those offered by the Shadows/Highlights command found in the Adjust submenu (under the Image menu)—see “Using Shadows/Highlights” in Chapter 7, “Image Adjustment Fundamentals.”
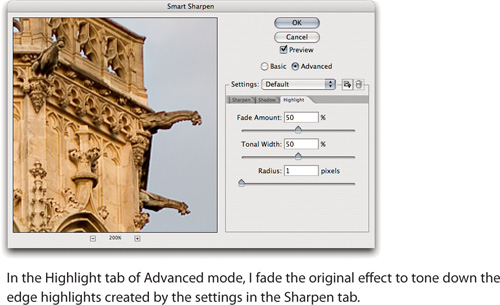
Each tab provides three sliders for Fade Amount, Tonal Width, and Radius. They let you reduce the strength of the shadow and highlight sharpening contours, allowing stronger sharpening of the midtones.
• Fade Amount controls the strength of the fade from 0 to 100 percent.
• Tonal Width controls how far up from the shadows or down from the highlights the adjustment extends into the tonal range.
• Radius controls the size of the neighborhood used to decide whether a pixel is in the shadows or the highlights. A useful guideline is to set the Radius in the Shadow and Highlight tabs to double the Radius setting in the main panel.
Most of the time, I use Smart Sharpen using the Lens Blur and Motion Blur modes, with the Advanced setting and More Accurate option turned on.
Smart Sharpen in Action
The key option in Smart Sharpen is Radius. As with Unsharp Mask, for good sharpening you typically need to match the Radius to the image content, unless you’re intentionally using very large Radius settings to create special contrast effects.
Tip
![]()
To sharpen a small area of a large image more quickly than using a mask, select the small area, press Command-J (Mac) or Ctrl-J (Windows) to duplicate the selection as a new layer, and run the filter on the new layer. This is faster than running the filter on an entire large image.
In Lens Blur mode, finding the right settings for all three tabs in Smart Sharpen is an iterative process—after adjusting the Shadow and Highlight tabs, I might go back and tweak the Amount in the main panel, then revisit the Shadow and Highlight tabs once again. Generally, though, I follow this sequence, which you’ll find similar to the procedure for Unsharp Mask:
1. In Basic mode, increase Amount to 500 percent just to be able to observe the effect of the Radius values, then adjust Radius to match the frequency of the detail in the content—enough to sharpen without obliterating important fine details.
2. When you reach the correct Radius value, decrease Amount.
3. If it looks as though the shadows and highlights need lower amounts of sharpening, click the Advanced button, click the Shadow tab, and fade back the sharpening effect as needed; repeat with the Highlight tab if needed (see Figure 10-12). In Smart Sharpen, these tabs are the place to dial back excessive contrast in the sharpening halos.
Figure 10-12 The Highlight tab of Smart Sharpen in Advanced mode
You’ll often find that you can apply a higher Amount setting than you could using the Unsharp Mask filter, thanks to the Shadow and Highlight tabs, together with the better overall sharpening in Smart Sharpen.
Motion Blur. When using Smart Sharpen to remove motion blur, the process is only slightly different. Set Angle to match the angle of the motion blur. For Motion Blur, Radius doesn’t follow the usual guidelines; here, it’s actually the length of the “smear” you’re trying to remove. After clicking OK, build a mask and paint the filter effect into the image where you want it. Few, if any, images benefit from applying Motion Blur removal to the entire image. And because motion blur often happens in more than one direction (think camera shake), you may have to apply multiple instances of Motion Blur at different angles. It gets tedious.
Noise Reduction
When you want to reduce image noise, you’ve got lots of choices.
• For raw digital camera images, reduce noise in Adobe Camera Raw—especially because Camera Raw 6 (which comes with Photoshop CS5) includes vastly improved noise reduction.
• For non-raw images, open them in Photoshop and try the Filter > Reduce Noise command, which I cover a little later.
• If you don’t get the results you want, try the Despeckle filter, downsampling, or image-stacking techniques you’ll read about soon.
• If you find that some parts of an image need significantly more or less noise reduction than the rest, apply noise reduction to a duplicate of the layer, create a mask, and brush in noise reduction where you want it.
• Consider using the various noise reduction plug-ins that you can add to Photoshop, such as PictureCode Noise Ninja, ABSoft Neat Image, and Imagenomic Noiseware.
Be aware that any noise reduction can potentially soften an image. Noise reduction is often a constant compromise between suppressing noise while not obscuring detail, because it’s difficult to program software that can tell the difference between detail and noise.
Light Noise Reduction with Despeckle. When you just need relatively light noise reduction, the Despeckle filter works well. A typical case is noisy skies from a transparency scanner. Try running Despeckle first on the red channel, then run it a few more times on the green channel and even more times on the blue channel, which tends to be the noisiest.
Downsampling. Reducing the pixel dimensions of an image merges pixels together, averaging out the noise. For example, if an image has noise from a digital camera or scanner, instead of editing the image from the beginning at its final size you can perform noise reduction and sharpening at the device’s maximum resolution and then downsample later to create a smaller but cleaner master image.
The Reduce Noise Filter
When you use the Reduce Noise filter, take care to tune the subsequent sharpening to the noise reduction to avoid exaggerating the characteristic artifacts that Reduce Noise produces. In some cases, mask edges and important textural detail so that Reduce Noise doesn’t destroy them.
In Basic mode, Reduce Noise (see Figure 10-13) offers four slider controls and a check box for reducing JPEG artifacts:
Strength. The Strength slider controls the strength of luminance noise reduction only—it’s not an overall strength control. When the value is zero, you can still apply color noise reduction or use the Advanced options on the individual channels.
Preserve Details. The Preserve Details slider attempts to do what it says—preserve details. Unfortunately, on anything except very low-resolution files, it also seems to preserve the noise you’re presumably trying to eliminate. The useful range tends to be between 1 and 5—beyond that, it’s difficult to get rid of the noise (see Figure 10-13).
Figure 10-13 Using the Reduce Noise filter
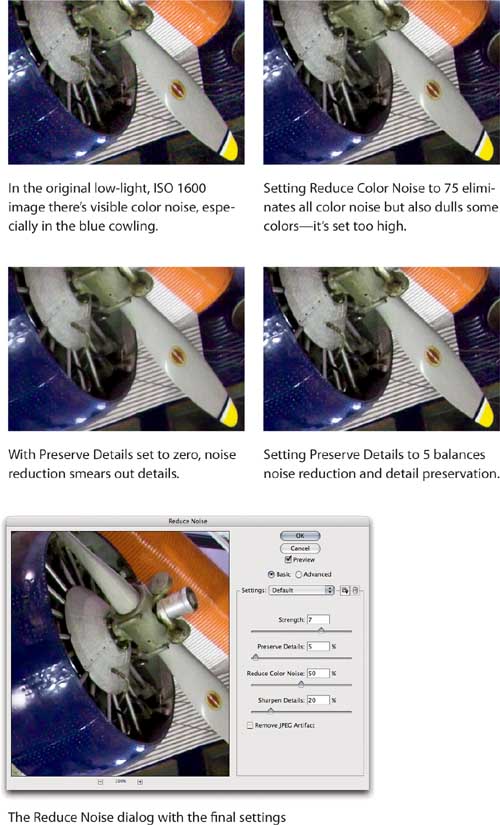
The Preserve Details and Sharpen Details controls seem designed to sharpen and reduce noise in one fell swoop. On Web-resolution images, this works reasonably well. But if you plan on sharpening later, you need to keep the Preserve Details slider at or near zero.
Reduce Color Noise. The Reduce Color Noise slider reduces color noise independently of luminance noise. At very high settings, Reduce Color Noise can lose saturation, but settings of 35 to 50 percent work well (see Figure 10-13).
Tip
![]()
A small Reduce Color Noise value can improve digital camera photos shot at a high ISO speed, and can also effectively reduce the appearance of color grain in scans of color negative film.
In many cases, images from a digital camera will not need color noise reduction in Photoshop. This is because noise reduction is typically applied by the camera for JPEG images, and for raw images you should be applying noise reduction in the raw converter. For film, transparency film has little or no color noise, while negative film typically has more.
Sharpen Details. Although the Sharpen Details slider works independently of Preserve Details, its effect depends very much on that slider’s value (and the effect of the slider depends on the image resolution). Feel free to try reducing noise and sharpening with Reduce Noise, but be aware that this may noticeably slow Reduce Noise on less powerful computers.
If you plan on sharpening the image after running Reduce Noise, leave Sharpen Details at zero to avoid creating artifacts that are almost impossible to deal with.
Remove JPEG Artifact. This option attempts to remove the characteristic 8-by-8-pixel artifacts caused by heavy JPEG compression, but it isn’t always very effective.
Tip
![]()
When you’re in the Advanced mode of the Reduce Noise dialog, you can use the same channel display shortcuts available in the Channels panel. For example, press Command-2 (Mac) or Ctrl-2 (Windows) to display only the green channel.
Advanced Mode. In Advanced mode, Reduce Noise lets you set values for Strength and Preserve Details for each channel individually. You can use this to apply noise reduction only to the noisiest channel, which is usually blue. Advanced Mode settings apply in addition to the settings you make in the main panel of the dialog. Piling all of these settings on top of each other can take a while to render, so on a slower or older machine, you may be better off running the Despeckle filter through a mask.
Reducing Noise with Image Stacks
The image stack feature in Adobe Photoshop Extended is designed primarily as a tool for scientific image analysis, but it turns out to be useful for noise reduction. Don’t confuse image stacks with the stack feature in Adobe Bridge—this is completely different. In Photoshop Extended, you process image stacks using the Stack Mode commands on the Layer > Smart Objects submenu. You can apply Stack Mode commands only to a Smart Object containing multiple images.
Tip
![]()
For best results with noise reduction using image stacks, try to shoot five or more images of the subject. The optimal number of frames depends on the anticipated level of noise, so it’s always a bit of a guess.
In my example (see Figure 10-14), I shot six handheld images under a fluorescent lamp using a Canon PowerShot S60 point-and-shoot camera in Raw mode. To achieve a decent shutter speed in such low indoor light, I set the camera to ISO 200, which happens to be a recipe for noise on that old pocket camera. I applied no noise reduction while processing the images using Adobe Camera Raw.
Figure 10-14 Reducing noise with image stacks
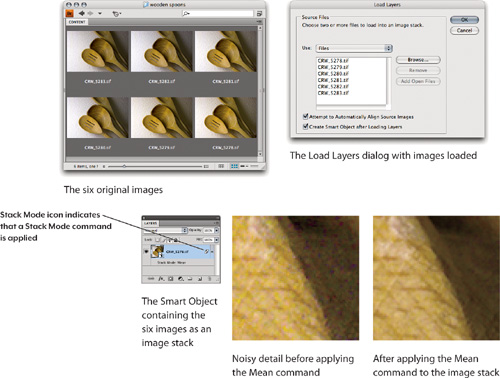
In Photoshop, I choose File > Scripts > Load Files into Stack, click Browse, and select my six images. I turn on the two check boxes at the bottom of the dialog, Attempt to Automatically Align Source Images (because my handheld shots are not perfectly lined up) and Create Smart Object After Loading Layers (required to create an image stack). Finally, I click OK and stand back as Photoshop aligns the images and gathers them into a Smart Object. In the finished Smart Object, it’s obvious how much noise is in this low-light scene, but I’m about to take care of that.
I select the Smart Object in the Layers panel, and then choose Layer > Smart Objects > Stack Mode > Mean. As you may remember from math class, mean means average—and the Mean command averages the color values of each pixel across the six images. This smooths out the noise in the image, as you can see in Figure 10-14.
This technique may seem like a godsend for high-noise, low-light situations, and sometimes it is. But keep in mind that you can use it only when you’re able to take several frames of a still subject. If the subject moves at all it may not be sharp after the frames are averaged, so this technique won’t work for sports or theater. You also can’t cheat by duplicating a single image—the noise won’t average out, because it will be in the same place in all the duplicates. Where this technique doesn’t work, you must fall back on the Reduce Noise or Despeckle filter.