
6. Essential Photoshop Tips and Tricks
The biggest speed boost you can give to Adobe Photoshop is to accelerate your own productivity. If you get paid by the hour, rather than by the amount of work accomplished, you may want to skip this chapter. If you want to realize the full potential of Photoshop as a lean, mean, pixel-processing machine, read on! You’ll learn how to break the habit of choosing tools by clicking on their icons, and avoid those lengthy mouse voyages up to the menu bar.
If you’re upgrading from Photoshop CS3 or earlier, you’ll want to review this chapter because you may be encountering, for the first time, the sweeping revisions Adobe made to the user interface back in Photoshop CS4. Many of the changes were made possible because Photoshop now gets help from the graphics processing unit (GPU) on your video card to take a load off of the central processing unit (CPU). Photoshop uses the GPU to drive many of the navigation tips that have been added since Photoshop CS4, such as smooth interactive zooming. You can review video card requirements in Chapter 1.
Window Tips
As applications pile up on the panels and options, screen space remains at a premium even as monitor sizes grow. Space is an even bigger challenge if you need to manage multiple windows. Photoshop gives you choices here.
Use Screen Modes or the Application Frame. Press F to cycle through the available screen modes (see Figures 6-1 to 6-3). You can also pick a screen mode from the Screen Mode submenu (under the View menu) or click and hold the Screen Mode icon in the Options bar. Pressing F is so easy that you’ll probably go to the View menu only if you’re recording an action that plays back a screen mode change.
Figure 6-1 Standard screen mode while clicking the Screen Mode button on the Options bar
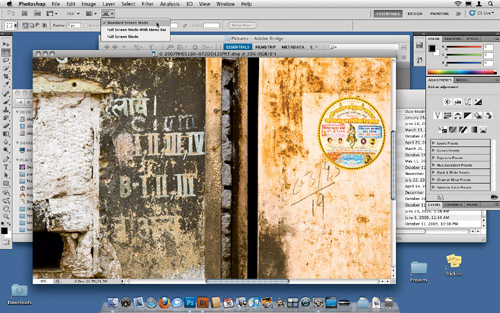
Figure 6-2 Full Screen with Menu Bar screen mode (and Mac OS X dock hidden)
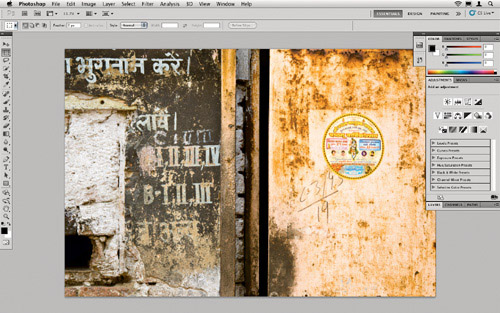
Figure 6-3 Full Screen mode; panels are hidden by default but tools are still accessible using shortcuts

When Windows Photoshop users switch to the Mac, many find it distracting to see the desktop picture and other programs behind their Photoshop windows and panels. To remove this distraction on the Mac, choose Window > Application Frame (see Figure 6-4) to put all Photoshop windows and panels inside a sort of master window with a gray background. While it’s common to fill the whole screen with the application frame, the example shows that the application frame can be made smaller than the screen so that you can have the best of both worlds: a solid gray background for Photoshop while still being able to interact with the desktop for operations such as drag and drop (you can’t easily do that with the Full Screen modes).
Figure 6-4 The application frame almost but not quite maximized, to allow drag and drop with other programs

Note
![]()
Some Mac users perceive the application frame concept as un-Mac-like, but iPhoto, iDVD, and other Apple programs use a similar application background.
If you’re a strict Mac traditionalist, don’t worry; the application frame is turned off by default on the Mac. One good reason to use the application frame is to use the n-up view to quickly arrange documents in panes, as described later in this section. When the application frame is off, n-up views use regular floating windows, which are harder to keep arranged.
Change the Surrounding Color and Border. All screen modes surround the document with gray except for Full Screen mode, which is black. To change the color, Control-click (Mac) or right-click the surrounding area and choose an option from the context menu that appears. You can also change these colors in the Color section of the Interface tab of the Preferences dialog. (You can’t change the application frame background color.) Next to the Color section is the Border section, where you can specify whether the image edge should be a line or a drop shadow. You can also get rid of the border altogether, which I prefer to do.
Tip
![]()
If you hide the Application bar and its controls for tabbed windows and n-up windows, you can still manage them using the Window > Arrange submenu.
Multiple Views of the Same Document. Are you often jumping back and forth between two views? For example, between different magnifications, color modes, or preview modes? If so, consider opening a second window by selecting Window > Arrange > New Window and setting it to the alternative view. Whenever you change something in one window, Photoshop updates the other window right away.
Tidy Up Your Windows. Photoshop offers tabbed and n-up windows to add to the traditional Cascade and Tile commands. When you have many windows open, these options can get your workspace organized quickly.
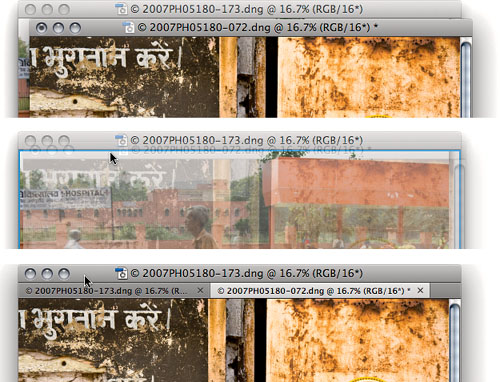
• Tabbed windows. If you’ve used tabs in your Web browser, you already know how this works. Instead of having to manage many windows, you collect them into a single window with a tab for each document. To combine windows into tabs, just drag one window’s title bar to another window’s title bar until you see a thick blue border at the bottom of the destination window, then release the mouse (see Figure 6-5). You can pull them apart in the same way. If you have many windows to tab together or many tabs to pull apart, choose Arrange > Consolidate Windows into Tabs or Arrange > Float All in Windows, respectively. You might find it faster to manage these windows through the Arrange Documents button on the Application bar. You can even have tabs within multiple floating windows—handy for multiple monitors.
Figure 6-5 Drag one document’s title bar to another title bar and release the mouse button when you see a blue border. The first document becomes a tab in the second document window.
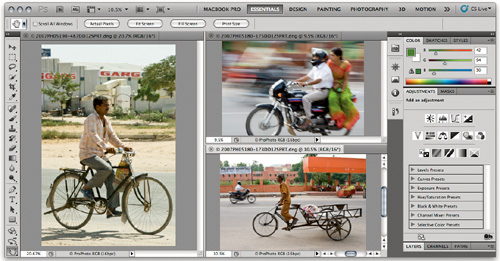
• N-up windows. N-up refers to a view that displays multiple documents side by side, such as 3-up or 8-up views (see Figure 6-6). For example, in a 3-up view, three documents appear as three panes in one window. N-up views are often faster than arranging windows by hand.
Figure 6-6 The Arrange Documents button in the Application bar lets you create n-up views quickly, such as this 3-up view.
Tip
![]()
Tabs are useful when you want to have multiple documents open yet give each individual image maximum area, while n-up display is useful for quickly arranging documents for comparison, or for dragging and dropping content between documents.
To use a preset n-up view, select one of the n-up icons from the Arrange Documents icon menu in the Application bar. In Mac OS X, if the application frame is off, the documents are arranged as floating windows instead of tabbed panes.
To manually create paned n-up views, drag a document title bar or tab to any edge of any document; when you see a blue border, release the mouse. (In Mac OS X, the target document must be in an application frame.) You can have multiple tabs within any pane in an n-up view, freely combining the two options. In addition, you can use floating windows along with the application frame.
Tip
![]()
If it takes too long to cycle to a specific document using the keyboard, it may be faster to choose the name of the document from the Window menu.
Flip Through Windows or Tabs. Use your operating system’s standard keyboard shortcut to cycle quickly through the open Photoshop windows and tabs—press Command-~ (tilde) in Mac OS X or Ctrl-Tab in Windows. This way you can cycle through every tab in every window without touching the mouse. Add the Shift key to cycle in the opposite order.
Tip
![]()
If your non-English Mac keyboard has no tilde key, the old Control-Tab shortcut still works for flipping through open windows.
From a Document to Its Folder. In Mac OS X, open the folder that contains a saved document by Command-clicking the filename in the document window’s title bar and selecting the folder from the pop-up menu that appears. This tells Photoshop to switch to the desktop and open that folder. In Windows, you can reveal a document’s file system path by holding the mouse over a document’s title bar until a tool tip appears.
Note
![]()
Revealing folder paths in Mac OS X works only for saved documents in floating windows, not in tabs.
Navigation Tips
Read this section even if you think you know all there is to know about navigating Photoshop—especially if you upgraded from a version that doesn’t have the GPU-accelerated navigation features that first appeared in Photoshop CS4. Even expert users might pick up a tip or two here.
Zooming Tips
Images have pixels. Computer monitors have pixels. But how does one type of pixel relate to the other? When one image pixel is displayed on one monitor pixel, you’re seeing every detail of the image. In Photoshop, this happens at 100 percent magnification, or the View > Actual Pixels command. This view doesn’t necessarily tell you how big the image will appear in print or even on the Web, because different monitors have different resolutions.
At 400 percent, the image is magnified four times, so each image pixel is displayed using 16 monitor pixels (see Figure 6-7). At 50 percent, you’re seeing only one-quarter of the pixels in the image, because zooming out causes Photoshop to downsample four image pixels to one monitor pixel. At percentages other than 100, then, you’re not seeing an accurate view of your image because you aren’t seeing the exact number of pixels in the image.
Figure 6-7 How magnification affects the image detail you see
![]()
When you’re viewing at an integral multiple of 100 (such as 25, 50, 200, or 400 percent), Photoshop displays image pixels evenly. At 200 percent, four screen pixels (two horizontal, two vertical) equal one image pixel; at 50 percent, four image pixels equal one screen pixel, and so on. However, at magnifications that aren’t a factor of two, Photoshop can’t cut a screen pixel or an image pixel in half, so instead it fakes the effect using anti-aliasing.
Magnifications other than Actual Pixels (100 percent) can give you a distorted view of resolution-dependent effects such as sharpening. Use Actual Pixels magnification to see your image most accurately. You’ll be doing this all the time, so learn the shortcuts: Command-Option-0 (zero) (Mac) or Ctrl-Alt-0 (Windows), or double-click the Zoom tool in the Tools panel.
Quick Access to the Zoom Tool. I don’t select the Zoom tool from the Tool panel—there are easier, faster ways to zoom. You can temporarily switch to the Zoom tool by holding down Command-spacebar to zoom in or Command-Option-spacebar to zoom out (Mac), or Ctrl-spacebar to zoom in or Ctrl-Alt-spacebar to zoom out (Windows). Each click is the same as choosing Zoom In or Zoom Out from the View menu.
Note
![]()
Zooming doesn’t extend the document under the edges of panels unless you’re in one of the Full Screen modes.
Zoom Precisely and Naturally. If you’re new to Photoshop, or you’re used to older versions, you might have the habit of zooming in to an area by clicking over and over again until you hit the right magnification and location. That works, but Photoshop CS5 gives you more interactive ways to zoom.
• Scrubby zoom. Position the Zoom tool over the area you want to magnify and drag to the right; the area you drag magnifies continuously. Drag left to zoom out. If you used the old way of dragging a zoom rectangle to magnify, this new way might throw you off at first!
Note
![]()
The interactive zooming features require an OpenGL video card that meets the specifications described in Chapter 1, “Building a Photoshop System.”
• Animated zoom. Position the Zoom tool over the spot you want to magnify and hold down the mouse button until you reach the magnification level you want. You can turn this off by deselecting the Use Gestures option in the Interface panel of the Preferences dialog.
• Pinch gesture zoom. If you use a Mac multitouch trackpad, you can zoom by using the two-finger pinch gesture in Mac OS X. You can turn this off by deselecting the Use Gestures option in the Interface panel of the Preferences dialog.
WIth any of those methods, you can zoom out by also pressing the Option key (Mac OS X) or Alt (Windows) key.
Zoom with Keyboard Shortcuts. Zoom in and out by pressing Command-+ (plus sign) or Command- − (minus sign) in Mac OS X, or by pressing Ctrl-+ (plus sign) or Ctrl- − (minus sign) in Windows. By default in Mac OS X, a window resizes when you zoom it; it doesn’t resize in Windows by default. If you prefer the opposite behavior, toggle the Zoom Resizes Windows check box in the General Preferences dialog.
Zoom with the Scroll Wheel. If your mouse has a scroll wheel, you can use it to scroll or zoom. To switch between scrolling and zooming, press Option (Mac) or Alt (Windows). To set the default behavior, toggle the Zoom with Scroll Wheel check box in the General Preferences dialog.
Fit the Image Within the Window. Double-clicking on the Hand tool is the same as clicking Fit Screen in the Options bar when the Zoom tool or Hand tool is selected, or pressing Command-0 (zero) (Mac) or Ctrl-0 (Windows)—it makes the image and the document window as large as possible without going outside the screen’s boundaries. The image may not zoom to the full width or height of the monitor if panels are present.
Zoom Numerically. At the bottom-left corner of the document window or Navigator panel is the current magnification percentage. This isn’t just a display: Double-click to select the whole field, type the zoom percentage you want, then press Return or Enter (see Figure 6-8).

Tip
![]()
The preset magnifications on the View menu, such as Print Size, are also present as buttons on the Options bar when the Zoom tool is selected.
Calibrate the Print Size Command. Generations of Photoshop users have been baffled by the View > Print Size command, because it never seems to match the size of the image when they actually print! In fact, there is a way to make it work. The only way the Print Size command can know the actual print size is to know the resolution of your monitor so that the rulers become accurate. To make Print Size work right, do the following:
1. Open the Displays system preferences pane (Mac) or the Displays control panel (Windows), and note your monitor’s current resolution setting (for example, 1280 × 854 pixels).
2. Grab an actual, real-world ruler and measure the width of your monitor image (not the frame in inches). Be careful not to scratch your screen!
3. Divide the horizontal pixel dimension of your monitor by the horizontal real-world dimension of your monitor. For example, my wide-screen LCD monitor is set to 1680 pixels across a physical width of 17 inches, and 1680/17 = 98.8 pixels per inch.
4. Open the Preferences dialog, click Units and Rulers, and enter your pixels per inch value into the Screen Resolution field (see Figure 6-9).
Figure 6-9 Setting the screen resolution for accurate Print Size

Now when you choose View > Print Size, Photoshop can take into account both your screen resolution and the resolution of the image in the Image > Image Size dialog, and correctly display the printed size of the image. Another wonderful result of all this is that your rulers now match the real world at Print Size magnification. If the rulers don’t match exactly, adjust the Screen Resolution field slightly until they do.
Sync Up Your Windows. When you’re working in multiple windows, it’s often helpful to sync up their views. Several commands on the Window > Arrange submenu automate this process. Match Zoom synchronizes the zoom level, Location synchronizes the positions of images in windows, and the Rotation command synchronizes the rotated views (more on that soon). The Match All command applies all of the Match commands at once.
Tip
![]()
After you match up windows, you can zoom or move them together using the Shift key tip below.
Moving the View
If you’re like most Photoshop users, you find yourself moving the image around a lot. There are much better ways than using the window scroll bars, which are so 20th century that I hardly use them anymore.
Tip
![]()
To use the Zoom or Hand tool on every open image window at the same time, hold down the Shift key as you click the Zoom tool or drag the Hand tool. The Options bar includes a Zoom All Windows or Move All Windows check box if you don’t want to hold down the Shift key.
Fast Window Panning. In addition to the traditional ways to push an image around the screen, Photoshop gives you GPU-assisted window navigation features such as the following:
• The Hand tool. Hold down the spacebar (to get the Hand tool) and drag. In Full Screen mode, use the Hand tool to slide past the edge of the image into the gray or black area, no matter how far you’re zoomed in; going past the edge is something scroll bars can’t do. Scrolling past the image edge is useful when you’re cropping or retouching close to the edge of an image.
Tip
![]()
I don’t cover the Navigator panel because the newer bird’s-eye view and interactive zooming features are now more convenient.
• Flick panning. If you’ve ever “tossed” an image across the screen on an iPhone or in Google Earth, you already know this gesture: Drag quickly and release the mouse button before you stop dragging. The image continues moving across the screen, slowing to a stop. If you don’t like this behavior, turn off Enable Flick Panning in the General pane of the Preferences dialog. Flick panning doesn’t help much for short moves, but it does save effort in a very large image such as a panorama.
Note
![]()
Flick panning and bird’s-eye view require a video card that meets the specifications described in Chapter 1.
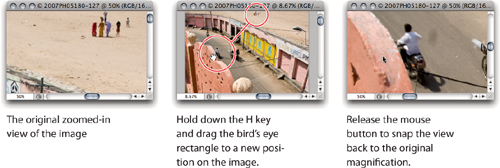
• Bird’s-eye view. Hold down the H key and drag; this temporarily zooms out a magnified view and displays a rectangle that represents the part of the image that fits the window at the current magnification. Drag the rectangle to another area of the document and release the mouse button to restore the original magnification at the new area (see Figure 6-10). If the document is smaller than its window, the same gesture zooms to fill the window. This is much cooler to try than to read about!
• View rotation. Don’t confuse view rotation with image rotation. When you rotate the image, it’s altered permanently. View rotation changes only the screen display, similar to view magnification. To rotate the view, select the Rotate View tool (press R) and drag it; you’ll see a compass icon in the middle of the window (see Figure 6-11) as well as view rotation options in the Options bar.
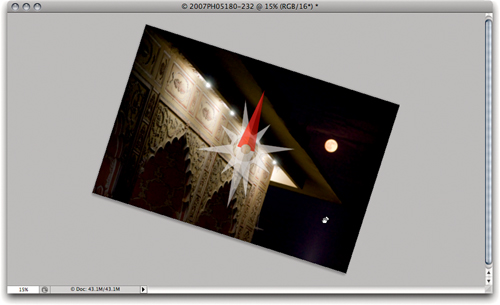
Figure 6-11 View rotation with compass indicator; red points to the original top edge
Tip
![]()
Rotating the view can be useful when working on a document with upside-down text (as in a card to be folded over) or when you’re painting or retouching with a tablet.
If you use a Mac multitouch trackpad, you can use the Mac OS X two-finger rotation gesture. If you don’t like this feature because you keep setting it off by accident, you can turn it off by deselecting the Use Gestures option in the Interface panel of the Preferences dialog.
End Up Down Home. Many people ignore the very helpful Page Up, Page Down, Home, and End keys when working in Photoshop, but they’re invaluable for perusing an image for dust spots or other defects.
Tip
![]()
If you’re on a laptop, the Page Up, Page Down, Home, and End key functions may be overlaid with the arrow keys. For example, to use Page Up on a Mac, add the Fn key at the bottom-left corner of the keyboard, so that you press Fn–up arrow to get Page Up.
When you press Page Up or Page Down, Photoshop scrolls the image by one whole window of pixels up or down. Although there’s no Page Left or Page Right button, you can jump one window of pixels to the left or right by pressing Command-Page Up or Command-Page Down in Mac OS X, or Ctrl-Page Up or Ctrl-Page Down in Windows. You can scroll in 10-pixel increments by adding the Shift key to any of these shortcuts. Bonus: Pressing the Home button jumps you to the top-left corner of the document, and the End button jumps you to the bottom-right corner.
Context-Sensitive Menus. When you right-click or Control-click (Mac), Photoshop displays a context-sensitive menu that changes depending on the tool you have selected in the Tool panel. Context menus are so accessible that they’re worth trying out with any tool you use (see Figure 6-12).
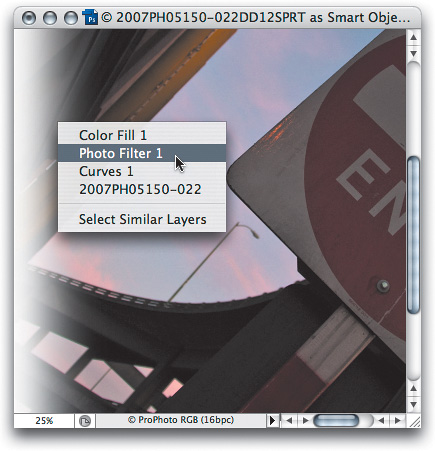
Figure 6-12 The context menu for the Move tool, displaying available layers under the cursor
Tip
![]()
The Home and End keys are very useful for closely checking the top-left and bottom-right corners of the Crop tool.
For brush or retouching tools, the context menu is a quick way to customize the brush. The context menu for the Move tool lets you quickly select a layer without having to see the Layers panel, saving a lot of time in documents with many layers. If the Move tool isn’t selected, you can almost always get its context menu by Command-Control-clicking in Mac OS X or Ctrl-right-clicking in Windows.
The context-sensitive menu for the Marquee tool contains a mishmash of features, including Delete Layer, Duplicate Layer, Load Selection, Reselect, Color Range, and Group into New Smart Object. Many of these features lack keyboard shortcuts, so the context menu is the fastest way to get to them.
Moving Tips
In Photoshop, more than one type of move may be available at any one time. For instance, if you’ve selected an area on a layer, you can move either the selection boundary or the selected content (such as pixels) (see Figure 6-13). Your choice will dictate which tool or keyboard shortcut you use.
Figure 6-13 Moving a selection versus moving layer content
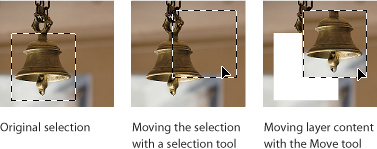
If you simply make a selection and then drag it with one of the selection tools, you move the selection boundary but not the selected layer content. If you want to move the content, use the Move tool (press M). When another tool is selected, you can always get the Move tool temporarily by holding down the Command (Mac) or Ctrl (Windows) key. You can also use the Move tool temporarily by holding down the V key and then releasing it when you are done. (Note that if you want to move a path or shape, use the Path Selection or Direct Selection tool instead.)
Tip
![]()
With the Move or Path Selection tool, you don’t have to worry about positioning the mouse before you drag—just drag anywhere within the document window.
When you move or copy selected pixels with the Move tool, you get a floating selection, which is like a temporary layer that disappears when you deselect. While the selection is still floating, you can use the Edit > Fade command to control how it blends in with the underlying layer.
These selection tips don’t apply only to selected pixels. They’ll also work on objects like a selected path, a type layer, or the currently selected layer or layer mask in the Layers panel. Most of the tips also work on the selection boundary itself if you choose Edit > Transform Selection first.
Move Precisely. If it’s hard to keep your hand steady when working precisely, try using the arrow keys and the Options bar instead of the mouse.
Tip
![]()
If you want to move an entire layer and the layer is already selected in the Layers panel, just drag the Move tool to drag the entire layer right away without any additional selection.
With the Move tool selected, each press of an arrow key moves the layer or selection by 1 pixel. To move 10 pixels, add the Shift key. Modifier keys work, too: Hold down the Option key (Mac) or Alt key (Windows) when you first press an arrow key to duplicate, float, and move the selection 1 pixel (don’t keep holding down the Option/Alt key after that unless you want a lot of duplicates). You can always get the Move tool temporarily by adding the Command key (Mac) or Ctrl key (Windows) to any of these shortcuts.
To move an object or layer by entering x and y coordinates, choose Edit > Free Transform. (If you’re moving the selection boundary, choose Select > Transform Selection instead.) In the Options bar, enter new coordinates.
Move Multiple Layers. To move multiple layers, select more than one layer in the Layers panel and then drag the Move tool. If you haven’t selected multiple layers before, it’s just like selecting multiple files in a folder on your desktop: Shift-select the first and last layers that you want; or to select a discontiguous range, Command-click (Mac) or Ctrl-click (Windows) each layer you want to add to the selection.
Tip
![]()
Is a selection snapping to an edge, and you don’t want it to snap? As you drag, press the Control key to temporarily override snap behavior.
Drag and Drop Selections and Layers. To move selected pixels (or a layer) from one document to another, drag it from one window into the other (if you’ve got a selection, remember to use the Move tool or you’ll just move the selection boundary itself). If you’re trying to copy an entire layer, click its thumbnail in the Layers panel and drag it to the other document’s window. Either way, if you want to drop the selection smack in the exact center of the destination document, Shift-drag instead.
Tip
![]()
Dragging requires less memory than copying and pasting.
Copy Pixels. If you select pixels and choose Edit > Copy, you get only the pixels on the currently active layer(s) (the one(s) selected on the Layers panel). To copy selected pixels across all visible layers, select Copy Merged instead (Command-Shift-C in Mac OS X, Ctrl-Shift-C in Windows).
Tip
![]()
To drag a layer to another tab, drag from the document window (not the Layers panel) and hold the mouse over the other tab for a moment until it switches over.
Some people use this technique to make a merged copy of the entire image (not of just a selection). It works, but it’s actually more efficient to choose Layer > Duplicate Layers and then choose New from the Destination pop-up menu to merge all layers and send them to a new document in one step. If you’re just trying to turn selected pixels into a new layer, press Command-J (Mac OS X) or Ctrl-J (Windows), the shortcut for Layer > New > Layer via Copy—it’s more efficient than copying and pasting.
Paste Pixels. In the most common color modes, such as RGB and CMYK, pasting pixels into a document automatically creates a new layer. When a selection is active, you’ll also see the Edit > Paste Into command (Command-Shift-V in Mac OS X, or Ctrl-Shift-V in Windows), which adds a new layer with a layer mask based on the selection so that the pixels you’re pasting appear only inside the selection. If you add the Shift key to the Paste Into keyboard shortcut, the pixels you’re pasting appear only outside the selection, because adding Shift inverts the layer mask that’s created.
Tip
![]()
Making a selection and using the Paste Into command (or the Paste Outside feature that you get by adding the Shift key) lets you create both a layer and a layer mask in one step.
Guide and Grid Viewing Tips
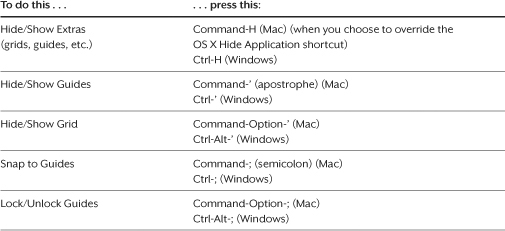
The ruler, guides, and grid are useful for marking important measurements, such as when you’re composing an image for a client’s specific layout or just trying to figure out whether your horizon is straight. Table 6-1 lists a number of grids and guides keystrokes.
Table 6-1 Grids and guides keystrokes.
Tip
![]()
You can position guides out on the area surrounding the canvas. This is useful when you want to extend layer content beyond the edge of an image.
Tip
![]()
To make a guide snap to ruler tick marks, hold down the Shift key as you drag a guide out of a ruler.
You can hide or show the ruler by pressing Command-R (Mac) or Ctrl-R (Windows). Wherever you move your cursor, you can track its position using the tick marks that appear in the rulers (or the coordinates on the Info panel). You can add a guide to a page by dragging it out from either the horizontal or vertical ruler. Or if you care about specific placement, you can watch the ruler tick marks or the Info panel coordinates, or select View > New Guide so you can type in a numeric position. (If you don’t think in inches, you can change the default measurement system; see “Switch Units,” later in this chapter.)
Dialog Tips
Dialogs seem pretty simple, but since you probably spend much of your time in Photoshop looking at them, wouldn’t it be great to be more efficient while you’re there? Here are a bunch of tips that will let you fly through them.
Not-So-Modal Dialogs. In Photoshop, just because a dialog is open doesn’t mean you can’t do anything else. For instance, when the Smart Sharpen dialog is open you can still scroll and zoom the document. You can also use any command that isn’t dimmed, particularly commands on the Window menu. The panel I end up opening most often from inside dialogs is the Info panel, because it displays readouts of color values.
Scrub-a-Dub-Dub. You can edit values in dialogs by scrubbing, or dragging horizontally over a value. For example, if you’re in the Image Size dialog, hold down Command (Mac) or Ctrl (Windows) as you position the mouse over any number field. When the cursor appears as a finger with a two-headed horizontal arrow, you can drag left to lower the value, or drag right to raise the value (see Figure 6-14). This also works in panels that have number fields, including the Options bar. For faster scrubbing, hold down the Shift key, which multiplies the normal adjustment by ten.
![]()
Save Your Settings. Many dialogs have Save and Load buttons that let you save to disk all the settings that you’ve made in a dialog. They’re particularly useful when you want to use the same dialog settings on many images.
Tip
![]()
In panels, such as the Adjustments panel, you might not see Load and Save buttons. Instead, look for Load Preset and Save Preset commands in the panel menu.
For instance, let’s say you’re adjusting an image with Shadows/Highlights. You increase this and decrease that, and after you click OK you realize that you’d like to apply the same settings to 50 other images shot under the same conditions. Instead of laboriously entering the same settings 50 times, just click the Save button in the Shadows/Highlights dialog to save the settings as a file. Now you can open the Shadows/Highlights dialog in any other image, click the Load button, and select the settings file you saved. This is useful when you build actions that automate your workflow, because you can have an action load a settings file. You can also send settings files to your colleagues so they can load them.
Instant Replay. There’s one other way to undo and still save any tonal-adjustment settings you’ve made. If you hold down Option (Mac) or Alt (Windows) while selecting a command from the Image > Adjust submenu, the dialog opens with the last-used settings. Similarly, you can add the Option/Alt key to the adjustment’s keyboard shortcut. For instance, in Mac OS X, Command-L is the shortcut for Levels, so Command-Option-L opens the Levels dialog with the same settings you last used. This is a great way to specify the same Levels or Curves (or Hue/Saturation, or any other adjustment) for several different images.
Previewing in Dialogs
Most of the tonal- and color-correction features and many filters offer a Preview check box in their dialogs. Plus, most filters that have a dialog include a proxy window that shows the effect applied to a small section of the image (some dialogs have both). If you’re working on a very large file on a relatively slow machine, and the filter you’re using has a proxy window, you might want to turn off the Preview check box so that Photoshop doesn’t slow down by drawing the screen while you’re making adjustments. Thanks to today’s powerful hardware, it’s practical to leave the Preview feature on.
Use the Preview check box to do before-and-after comparisons without leaving the dialog. Press the P key shortcut to toggle the Preview check box.
Note
![]()
The P key Preview check box shortcut doesn’t work in some dialogs.
Most of the tips that follow usually don’t apply to the dialogs for creative filters such as Dry Brush and Plastic Wrap. They use a different dialog that provides a large preview image inside the dialog but not in the main window. This book doesn’t cover those filters because they’re more about special effects, and this book’s more about image correction.
Proxies. The proxy in dialogs shows only a small part of the image, but it updates almost instantly. Previewing time-consuming filters such as Smart Sharpen or Reduce Noise on a large file can take a long time.
Before and After in Proxies. In most proxies, you can see a before-and-after comparison by clicking in the proxy. Hold down the mouse button inside the proxy window to see the image before the filter is applied, and release it to see the image after the filter is applied. This is obviously quicker than redrawing the whole window with the Preview check box.
Note
![]()
A proxy shows only the layer you’re working on at any one time, because a dialog affects only the current layer.
Change the Proxy View. To see a different part of the image, click and drag in the proxy (no modifier keys are necessary) or click in the document itself. Where you click becomes the detail area shown in the Preview window.
You can zoom the proxy in and out by clicking the little (+) and (-) buttons. Much faster is to click the proxy while pressing the Command (Mac) or Ctrl (Windows) key to zoom in, or the Option (Mac) or Alt (Windows) key to zoom out. However, you see the true effect of a filter only at 100 percent view.
Keyboard Shortcuts in Dialogs
I love keyboard shortcuts. They make everything go much faster, or at least they make me feel like I’m working faster. Here are a few shortcuts that I use all the time inside dialogs.
Option/Alt. Hold down the Option (Mac) or Alt (Windows) key in a dialog to change the Cancel button to a Reset button, letting you reset the dialog to its original state (the way it was when you first opened it).
Tip
![]()
Camera Raw is a dialog that allows more than one step of undo if you also press Option/Alt, or more than one step of redo if you also press Shift.
Command-Z/Ctrl-Z. You already know the shortcut Command-Z (Mac) or Ctrl-Z (Windows) because it’s gotten you out of more jams than you care to think about. You can use the same shortcut to undo within most dialogs, too. Inside dialogs, you get only one undo step.
Arrow Keys. When a dialog contains a number field, you can change those numbers by pressing the up or down arrow key. Press once, and the number increases or decreases by 1. If you hold down the Shift key while pressing the arrow key, the number changes by 10. (Note that some dialog values change by a tenth or even a hundredth; when you hold down Shift, they change by 10 times as much.) This is a great way to fine-tune adjustments without cramping your mouse hand.
Note
![]()
A few dialogs use the arrow keys in a different way. In the Lens Flare filter, for instance, they move the position of the effect.
Tab Key. As in most Mac and Windows applications, the Tab key selects the next text field in dialogs with multiple text fields. Press Shift-Tab to move to the previous field instead.
P for Preview. As was mentioned a little earlier, press P to toggle the Preview check box in any dialog that has one.
New Document Tips
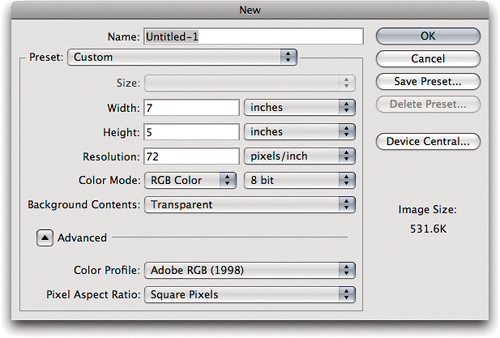
Before moving on to essential tips about tools, let’s take a quick look at the New dialog. How you start a new document affects what you’ll be able to do with it later, so it’s a good idea to familiarize yourself with the options.
Preset Document Sizes. The Preset pop-up menu in the New dialog lets you pick from among common document sizes. You may not see very many choices if you click the Preset pop-up menu, but that’s because it’s a two-stage process: First choose a category from the Preset pop-up menu, and then choose a size from the Size pop-up menu. If you need a preset other than the ones on the list, just set the New dialog the way you want it, then click the Save Preset button (see Figure 6-15). You can delete user-created presets with the Delete Preset button, but the built-in ones that ship with Photoshop are there to stay.
Tip
![]()
If you want the Height and Width to use different measurement units, hold down the Shift key while selecting a unit of measure.
When you save a document preset, you can use the check boxes to choose which settings to remember. For example, if you turn off the Profile check box, when you later choose your preset from the Preset pop-up menu, Photoshop will not override the current working space.
Note that some built-in presets (those having to do with video) can also automatically add guides to the document. Unfortunately, there’s currently no way to save presets with guides yourself.
Clairvoyant Image Size. If you have something copied to the Clipboard when you create a new document, Photoshop automatically selects Clipboard from the Preset pop-up menu and plugs the pixel dimensions, resolution, and color model of that copied piece into the proper places of the dialog for you. If you’d rather use the values from the last new image you created, hold down Option (Mac) or Alt (Windows) while selecting File > New, or press Command-Option-N (Mac) or Ctrl-Alt-N (Windows).
Copying Sizes from Other Documents. In the New dialog, notice that all open documents are listed at the bottom of the Preset pop-up menu. If you want your new document to match an open document, simply choose the name of that document in this menu.
Keyboard Shortcut Tips
You can change keyboard shortcuts you don’t like, and you can add shortcuts and save them as part of a workspace that also includes your favorite panel arrangement and menu customizations. If you share the machine and don’t want to confuse others, you can save your keyboard shortcut sets.
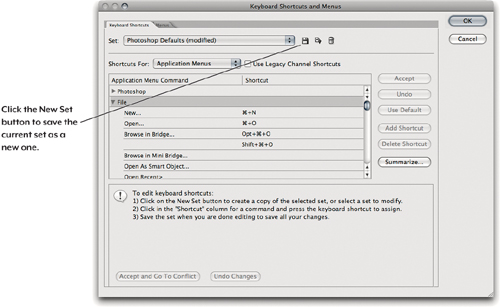
Use Your Own Set. To edit or add a keyboard shortcut, choose Edit > Keyboard Shortcuts or press Command-Option-Shift-K (Mac) or Ctrl-Alt-Shift-K (Windows). If you edit the default set, it’s saved as “Photoshop Default (modified)” so that you can revert to the default (just choose Photoshop Defaults from the Set menu). Give your sets useful names; otherwise they can be lost when you choose another set or if you need to reset your preferences while troubleshooting a problem. To save a new set, click the New Set button (see Figure 6-16); by default, Photoshop saves the set in the proper location on your hard drive (inside your Photoshop application folder, in Presets > Keyboard Shortcuts).
Figure 6-16 The Keyboard Shortcuts and Menus dialog, showing the Keyboard Shortcuts tab
Tip
![]()
To export a list of all the features and their shortcuts, click the Summarize button in the Keyboard Shortcuts and Menus dialog. This file is saved in HTML format, so you can open it in any Web browser and print it from there if you want.
To customize keyboard shortcuts, follow these steps:
1. Pick Application Menus, Panel Menus, or Tools from the Shortcuts For pop-up menu.
Tip
![]()
If you don’t want to apply a new keyboard shortcut and the Shortcut field is still highlighted, press Cancel to back out of the change. Be careful. If you press Cancel a second time, you’ll close the dialog without saving changes.
2. Click an expansion triangle to reveal menu commands, and then select a command or tool from the list.
3. When the field in the Shortcut column is highlighted, you can type the keyboard shortcut you want to apply to this feature. If the shortcut is already in use, Photoshop alerts you and gives you choices.
4. To create another shortcut for the same feature (the flexibility is nice sometimes), click the Add Shortcut button. If you’re done with this feature and want to change another, click the Accept button. When you’re done applying shortcuts, click OK.
Resolve Conflicts with Mac OS X Shortcut Keys. When Apple introduced Mac OS X, they started using some keyboard shortcuts that conflicted with several long-established Photoshop shortcuts. For example, Command-H (Hide Selection) was taken for Hide Application by Mac OS X, Command-M (Curves dialog) was taken for Minimize Application, and Command-~ (tilde) was taken for cycling application windows. This tripped up Mac users and Photoshop veterans switching among Mac programs.
Tip
![]()
You can edit or add keyboard shortcuts for panel menus and tools, not just for regular menu commands. You can even save shortcuts for commands added by third-party features, such as filters, scripts, and plug-ins added to the File > Import and File > Automate submenus.
By default the Photoshop keyboard shortcuts always win, although you can also customize your shortcuts in Photoshop so that they don’t conflict with Mac OS X. If you don’t do that, you can still use the Hide Application and Minimize Window shortcuts by adding the Control key to the Mac OS X shortcut (press Command-Control-H for Hide Application, for example). (When you press Command-H for the first time in Photoshop CS5, you’ll be asked which shortcut you want to use so that you don’t have to configure it.)
For you old-timers upgrading from Photoshop CS3 or earlier, in Photoshop CS4 Adobe decided to take another swing at resolving these shortcut conflicts. Command-~ now cycles through windows, to be consistent with Mac OS X (on both platforms Ctrl-Tab still matches the Windows convention). This change caused channel viewing shortcuts to change on both platforms (more about this in Chapter 9, “Making Selections”).
Menu Customization Tips
If you have trouble remembering which commands apply to your workflow, you can customize Photoshop menus by colorizing or hiding them. Menu customization works best when you spend most of your time using Photoshop in a very specialized way, or when you’re trying to train yourself or others in a specific workflow.
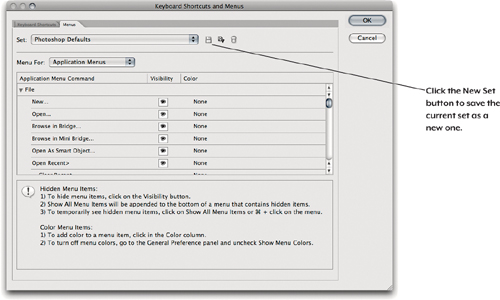
To edit menu commands, choose Edit > Menus or press Command-Option-Shift-M (Mac) or Ctrl-Alt-Shift-M (Windows). This is the same dialog used for customizing keyboard shortcuts, but when opened with the Menus command, it opens showing the Menus tab (see Figure 6-17). As with keyboard shortcuts, you can save your menus as a set. Note that you can’t hide the Quit or Close commands in Photoshop.
Figure 6-17 The Menus tab of the Keyboard Shortcuts and Menus dialog
Tips for Tools
While it’s best to talk about a tool in the chapter where it applies the most (for example, the Selection tool gets a good long look in Chapter 9), it’s good to have an overview of tools in general, especially those that apply to more than one task.
Single-Key Tool Shortcuts. One of the most important productivity tips in Photoshop is how to select any tool by pressing just one key—no need to press Command or Ctrl. Figure 6-18 shows the tool shortcuts.
Figure 6-18 Tools panel tool groupings and single-key shortcuts
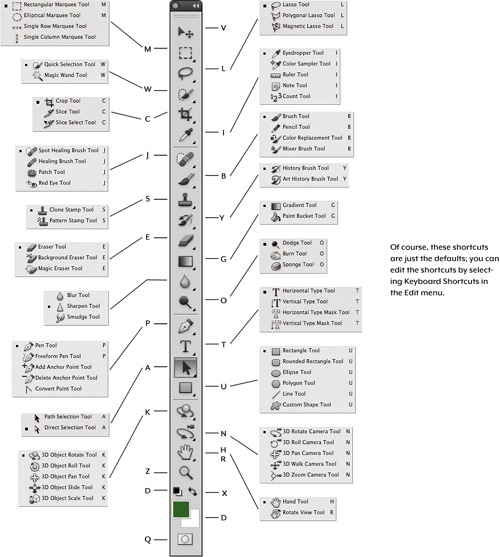
Some tools in the Tools panel keep multiple related tools undercover. For instance, the Dodge tool expands to reveal the Burn and Sponge tools. The slow way to access the different modes is to hold down the mouse button on the Tools panel icon to reveal the additional modes. A faster method is to press the tool’s keyboard shortcut once to select it, and then press it again with the Shift key to cycle through the choices. Press M once, and you jump to the Rectangular Marquee tool; then press Shift-M, and it switches to the Elliptical Marquee tool; press Shift-M once more, and it switches back to the Rectangular Marquee tool. (Note that this shortcut doesn’t cycle through the infrequently used Single Row marquee or Single Column marquee tools.)
Tip
![]()
A very efficient way to use Photoshop (or any Adobe Creative Suite software) is the two-handed method: Keep one hand on the mouse or stylus and the other hand over the keyboard, ready to press single-key tool shortcuts. By switching tools using your non-mouse hand on the keyboard, you can keep the mouse over the area you’re editing instead of repeatedly pulling the mouse or stylus over to the Tools panel.
Photoshop lets you change this behavior: If you turn off the Use Shift Key for Tool Switch check box in the General pane of the Preferences dialog, you don’t have to hold down the Shift key to rotate through the tools; each time you press M, you’ll get a different tool. I prefer to use Shift to cycle through tools, because it ensures that pressing a letter key selects the last tool you used in a tool group. If you cycle without Shift and the Tools panel is hidden (as in Full Screen mode), pressing a letter could cycle to another tool in the group that isn’t the tool you thought you were using.
Spring-Loaded Keys. Instead of switching tools all the time, you can switch to another tool temporarily by holding down a shortcut key instead of simply pressing and releasing it. For example, if you want to select an area and move it, without spring-loaded keys you have to press L to switch to the Lasso tool and then press V to move the pixels. In Photoshop CS4 and later, if you’re already using the Move tool, just hold down L and make the selection, and when you release L you’re back to the Move tool. The spring-loaded feature activates after you hold down a tool for a little more than one second.
Activate the Opposite Tool. Some tools have an opposite, kind of like an evil twin, except that the opposite tool isn’t evil (perhaps just misunderstood). When you’re using one of these tools, you can switch to its opposite by pressing Option (Mac) or Alt (Windows). For example, if you’re using the Blur tool, pressing Option/Alt temporarily changes it into the Sharpen tool. The same thing happens with the Dodge and Burn tools.
Change a Tool’s Blending Mode. You can change blending modes (Normal, Screen, Multiply, and so on) by pressing Shift- − (minus sign) and Shift-+ (plus sign). If a painting tool is selected (such as the Brush tool), this changes the mode of the selected tool. If the selected tool doesn’t use blending modes, the shortcut changes the mode of the current layer.
Belly Up to the Options Bar. To enter a value in the Options bar, there’s no need to move the mouse up there. Select a tool, press Return or Enter, and the first number field in the Options bar becomes selected and ready for you to enter a value. If the Options bar was hidden, press Return or Enter twice: once to display the Options bar, and again to activate a value.
Tip
![]()
As in any panel or dialog, in the Options bar you can move among fields by pressing Tab and Shift-Tab. Press Return or Enter to return to the image.
Brush Tips
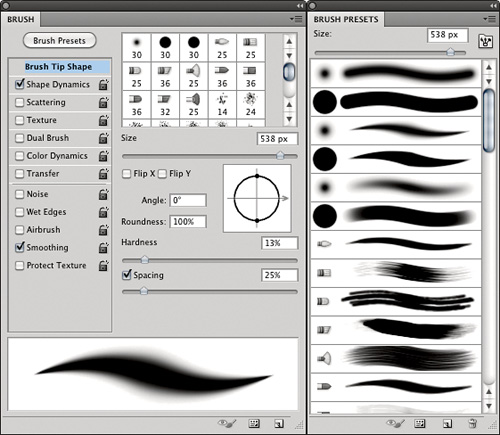
Use the Brush panel to customize Photoshop brushes and the Brush Presets to store saved brush settings (see Figure 6-19). Brush presets aren’t only for the Brush tool—they also work with any tool that paints, such as the Clone Stamp tool and the History Brush tool. The wide range of options is valuable for detailed retouching tasks.
Figure 6-19 The Brush panel on the left, and the Brush Presets panel on the right
Brush Shortcuts. You’ll find brush shortcuts in Table 6-2. Note that the Resize Brush and Change Brush Hardness shortcuts include ways to edit brush size and hardness by dragging the brush with modifier keys pressed.

Opacity By the Numbers. Table 6-2 includes shortcuts for brush opacity, but note that if the Airbrush feature in the Options bar is turned on, typing numbers affects the Flow percentage rather than the Opacity setting.
Fast Brush Preset Selection. With a brush tool selected, right-click or Control-click (Mac OS X) the document to bring up a mini-Brush-panel right under the mouse, then double-click the size preset you want and the panel closes. Otherwise press Esc, Return, or Enter to close the panel.
Sample Exactly the Right Layers. If you’re working on a multilayer image, tools like Smudge, Blur, Magic Wand, or Clone Stamp may frustrate you when you want to affect more source layers than just the one you’re working on. To solve this, use the Sample pop-up menu on the Options bar.
When Sample is set to Current Layer, the tool acts as though the other layers weren’t even there. If you choose All Layers, Photoshop samples from the other visible layers (both above and below it) and acts as though they were merged together. A third option, Current & Below, does what it says.
Tip
![]()
If you need to do a lot of cloning and retouching, the Clone Source panel is indispensable. I cover it in Chapter 11, “Essential Image Techniques.”
So what good are these options? One common use is when you want to patch or clone onto a new empty layer, leaving the original layers intact. If you’re unhappy with the results, you can simply erase the patches on the new layer and try again. Without the Sample menu options, you would be able to paint only on the layer you’re sampling. With the Sample pop-up menu, you can choose Current & Below or All Layers to paint on a blank layer while sampling from other layers that remain intact (see Figure 6-20).
Figure 6-20 Layer sampling options
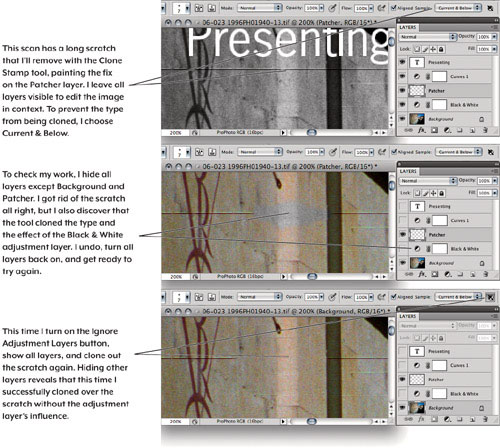
The button next to the Sample pop-up menu is the Ignore Adjustment Layers button. Before Photoshop CS3, if you cloned or healed in a document that included adjustment layers and you sampled multiple layers, the sample would include the effect of the adjustment layers. This was frustrating, because the sample would not match the rest of the layer, and the adjustment layer would be applied again to the merged sample. It was necessary to remember to turn off adjustment layers before sampling multiple layers and then turn them back on—very frustrating. Ignore Adjustment Layers means that you can leave adjustment layers on and sample multiple layers perfectly. If you want your samples or selections to use only one layer as the source, select the layer and choose Current Layer from the Sample pop-up menu.
Cropping Tips
The nice thing about the Crop tool (as opposed to the Crop feature on the Image menu) is that you can make fine adjustments before committing. Just drag one of the corners or side handles. But you can do a lot more than that.
See What Gets Cropped. By default, Photoshop darkens the area outside the cropping rectangle so that you can see what’s going to get cropped out before you press Enter. To adjust this shading, click the color swatch in the Options bar (when the Crop tool is selected) and pick a different color from the Color Picker. Opacity controls how much of the cropped area is visible.
Rotate and Move While Cropping. You can crop and rotate at the same time with the Crop tool: After dragging out the cropping rectangle with the Crop tool, just place the cursor outside the cropping rectangle and drag to rotate the rectangle. When you press Return or Enter, Photoshop crops and rotates the image to straighten the rectangle. It can be tricky to get exactly the right angle by eye—watch the Info panel. Also, if the cropping rectangle isn’t in the right place, you can always move it—just position the cursor inside the cropping rectangle and drag.
Retain Cropped Areas. When you crop, you don’t have to lose what’s beyond the newly cropped edges of the document. After you drag a crop rectangle, click the Hide button on the Options bar; after you commit to the crop, the cropped-out pixels will be remembered as big data—material that hangs outside the actual visible image rectangle. Then, if you didn’t get the crop just right, you can either move the image around with the Move tool or recrop using a different rectangle (see “Expand the Canvas by Cropping,” later in this section). This works only on layers other than the Background layer; to use the Hide feature on the Background layer, double-click it to convert it to a transparency-capable layer.
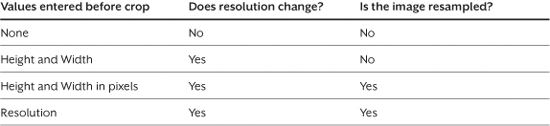
Cropping May Change Resolution and Resample. The Height, Width, and Resolution fields in the Options bar for the Crop tool save you the step of using the Image Size dialog after cropping, but beware! If you enter a Height and Width into the Options bar for the Crop tool, the resolution of your image will change, as shown in Table 6-3. And in some cases the image will also be resampled.
Table 6-3 How Crop tool options affect resolution and resampling.
Note
![]()
You can set the Height, Width, and Resolution values only before you start cropping. Once you draw a cropping rectangle, the Options bar changes to present different options.
What’s going on here? Simple math. Because resolution is the ratio of the image’s pixel dimensions to its physical dimensions (see Chapter 2), when you alter either variable the resolution must change. That’s why the only time resolution doesn’t change is when Height, Width, and Resolution are blank, so that dragging a crop rectangle applies no scaling and no resolution change—all it does is chop away a side or two of the image.
Tip
![]()
To empty the Width, Height, and Resolution fields in the Options bar, click the Clear button.
The reason resolution must change when you enter pixel dimensions is that Photoshop is forced to take the pixels that make up the crop area and resample them to the pixel dimensions you specifically asked for. There’s no mathematical way around that.
To completely eliminate the possibility of resampling when you crop, read on about cropping with the Rectangular Marquee tool instead of the Crop tool.
Tip
![]()
In previous versions of Photoshop, you might have used the Perspective check box in the Crop tool Options bar to correct keystone distortion, but in Photoshop CS5 the vastly upgraded Lens Correction filter is a far better way to fix this.
Crop to an Aspect Ratio. Let’s say you want to crop your image to a 4-by-6 aspect ratio (height to width, or vice versa), but you don’t want to resample the image (which adds or removes pixels, causing blurring) or change the image resolution. This is a common requirement in Web design, where pixel-perfect graphics would be ruined by resampling. The Crop tool can’t do this without resampling, so you’ll need a different technique. Select the Rectangular Marquee tool and choose Fixed Aspect Ratio from the Style pop-up menu in the Options bar. Then enter values in the Height and Width fields (here you’d type 4 and 6) in the Options bar. Select the area you want cropped, and then select Image > Crop.
Expand the Canvas by Cropping. Once you’ve created a cropping rectangle with the Crop tool, you can actually expand the crop past the boundaries of the image (assuming you zoom back until you see the gray area around the image in the document window). Then, after you press Enter, the canvas size actually expands to the edge of the cropping rectangle.
Tip
![]()
To toggle all snap-to options on or off, choose View > Snap. The shortcut is Command-Shift-; (Mac) or Ctrl-Shift-; (Windows).
Crop Near the Border. If you’re trying to shave just a sliver of pixels off one side of an image, you’ll find it incredibly annoying that Photoshop snaps the cropping rectangle to the edge of the image whenever you drag close to it. Fortunately, you can turn this behavior off temporarily by unchecking the command View > Snap > Document Bounds. Or you can hold down the Control key to disable snapping temporarily.
Eraser Tool Tips
The Eraser tool gets a bad rap because people assume you have to use a big, blocky eraser. No, you can erase using any brush—one that’s soft, or hard like an airbrush, or even textured. And you can control the opacity of the Eraser. Still, masking is usually better than erasing. The difference? Masks (covered in Chapter 8) can “erase” pixels without actually deleting them. They just hide the data, and you can always recover it later. Nevertheless, the Eraser tool can, on occasion, get you out of a jam. Here are a few tips:
Erase to History. The Erase to History feature (it’s a check box on the Options bar when you have the Eraser tool selected) lets you use the Eraser tool to replace pixels from an earlier state of the image (see “When Things Go Wrong,” later in this chapter, for more on the History feature). Erase to History more or less turns the Eraser into the History Brush tool. For instance, you can open a file, mess with it until it’s a mess, then revert parts of it to the original using the Eraser tool with Erase to History turned on.
Tip
![]()
When using the Eraser tool, you can temporarily switch to Erase to History by holding down the Option (Mac) or Alt (Windows) key.
Watch Preserve Transparency When Erasing. Note that the Eraser tool (or any other tool, for that matter) won’t change a layer’s transparency when you have the Preserve Transparency check box turned on in the Layers panel. That means it won’t erase pixels away to transparency; rather it just paints in the background color. Don’t forget that you can turn Preserve Transparency on and off by pressing / (forward slash).
Erase to Transparency. When you use a soft-edged brush to erase pixels from a layer (other than the Background layer), the pixels that are partially erased—that is, they’re still somewhat visible, but they have some transparency in them—cannot be brought back to full opacity. For example, if you set the Eraser to 50 percent opacity and erase pixels from a layer, there’s no way to get them back to 100 percent again. The reason: You’re not changing the pixel’s color, only the layer’s transparency mask. This isn’t really a tip; it’s just a warning. What you erase sometimes doesn’t really go away.
Gradient Tips
The Gradient tool (press G) is a quick way to create a transition between any two colors, or between color and transparency. A Gradient adjustment layer is an even more flexible way to use an entire layer as a gradient.
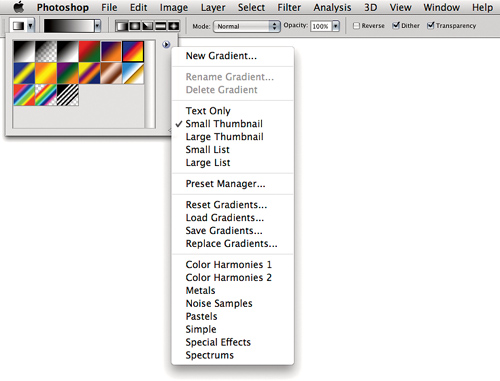
Gradient Presets. Some people work hard at creating a blend that fades away into transparency without realizing that it’s been done for them. The Options bar for the Gradient tool offers a pop-up menu with various gradient presets in it (see Figure 6-21). By default, these presets include gradients that use transparency. You can create or edit a gradient preset by clicking once on the gradient swatch in the Options bar. You can also select a different set of gradient presets from the pop-up menu to the right of the swatch.
Figure 6-21 Gradient presets and their pop-up menu
Maybe You Don’t Need to Use the Gradient Tool. If you’ve got a layer with nothing on it except a gradient, and you harbor even the slightest suspicion that you might need to edit that gradient later, consider creating it as a gradient layer. It’s a kind of adjustment layer that you can edit at any time. To create a gradient layer, choose Layer > New Fill Layer > Gradient or click the Create New Fill or Adjustment Layer button at the bottom of the Layers panel and choose Gradient Layer. You can edit its settings by double-clicking it in the Layers panel—much faster and easier than painting it all over again with the Gradient tool! However, if you’re creating a gradient on a mask, you’ll need to use the Gradient tool.
Avoid Banding in Gradients. On output, a blend in Photoshop can sometimes display banding—tonal or color breaks instead of a smooth transition. This is often a limitation of the specific type of output. A common remedy is to add noise to the blend, which Photoshop does using the Dither check box on the Options bar. Dither is on by default and in most cases should be left on. You can turn it off for uses such as scientific imaging or printing to a very high-quality output device that won’t cause banding.
If you still see banding even with Dither turned on, you could apply the Add Noise filter. But instead of applying noise to the entire gradient, try adding it in only a channel or two. View each channel separately (see Chapter 9) to see where the banding is more prevalent. Then add some noise just to the blend area in that channel.
Better CMYK Blends. If you’re going to make blends in images that will end up in CMYK mode, create them in CMYK mode. Sometimes changing modes from RGB to CMYK can give you significant color shifts in blends.
If you see problems with blue saturation in CMYK blends and you’re using a custom CMYK profile, try creating the blend in one of the CMYK working spaces that come with Photoshop and then assign your custom profile to the result. It sounds strange, but some custom CMYK profiles have a saturation “hole” that creates unexpected results in blues. For more about assigning profiles, see Chapter 4, “Color Settings.”
Notes Tips
You can leave notes in a Photoshop document to communicate anything that shouldn’t be output or printed with the image. For example, you can leave a note that includes processing guidance for the person on your team who’ll edit the image next, or include explanations for students or clients.
The Tools panel includes a Note tool grouped with the Eyedropper tool (see Figure 6-18). To create a new note, click the Note tool on the document; the Notes panel opens so you can enter text. Select a note to see its text in the Notes panel; if the Notes panel isn’t already open, double-click a note. If multiple notes exist in a document, you can use the arrow buttons in the Notes panel to see the previous and next notes.
To delete a note, select it and press the Delete key. To delete every note from a document, right-click or Control-click (Mac OS X) a note and choose Delete All Notes from the context menu.
Display Note Icons. You can drag note icons; I like to keep notes just visible in the corner of an image because in the past I’ve missed some that were outside the image area. To hide notes, press Command-H (Mac) or Ctrl-H (Windows), which toggles the View > Extras command. If you can’t see note icons in a Photoshop file but you suspect they’re there, make sure the Notes command is selected in the View > Show submenu.
Not Just for Photoshop. To send a Photoshop image with annotations to someone who doesn’t have Photoshop, relax. Choose File > Save As to save the image in Photoshop PDF format. In that format, notes can be read using Adobe Acrobat or the free Adobe Reader (in Mac OS X, you can also use Preview), and you can still edit the file using Photoshop.
You can load notes from a PDF document into a Photoshop document. To do this, in Photoshop choose the Note tool, right-click (or Control-click in Mac OS X) on the document, choose Import Notes from the context menu, select the PDF document, and click Load.
Tool Preset Tips
Each tool in the Tools panel offers options, such as the size of a brush’s diameter, or whether a selection is feathered, or what mode a tool will paint in (Multiply, Screen, and so on). It’s a hassle to remember to set all the tool options, especially if you need to change them frequently. Fortunately, the Tool Presets feature remembers multiple tool settings for you.
Tool presets live in two places: at the far left side of the Options bar and in the Tool Presets panel (see Figure 6-22). Choose Window > Tool Presets to open it. The panel is most useful for fine artists who switch among various tool presets, often within the same image. Production folks tend to keep the panel closed and select tools from the Tool Presets pop-up menu in the Options bar. One reason that tool presets live on the Options bar is that a tool preset includes the settings you’ve made in the Options bar.
Figure 6-22 Tool presets, their pop-up menu, and the Tool Presets panel
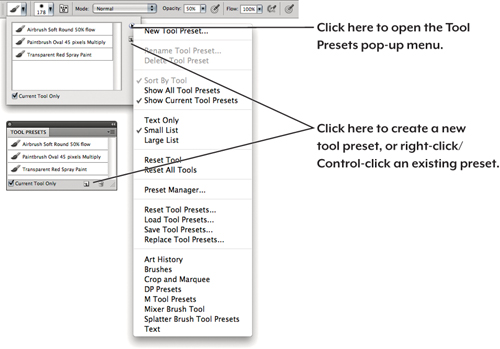
To create a new tool preset, select any tool in the Tools panel, change the Options bar to the way you want it, click the Tool Presets icon in the Options bar, then click the New Tool Preset button. Or even faster, Option-click (Mac) or Alt-click (Windows) the Tool Presets icon in the Options bar. When Photoshop asks you for a name, avoid confusion by giving the tool preset a descriptive name such as “Shape Tool Circle 50c20m.”
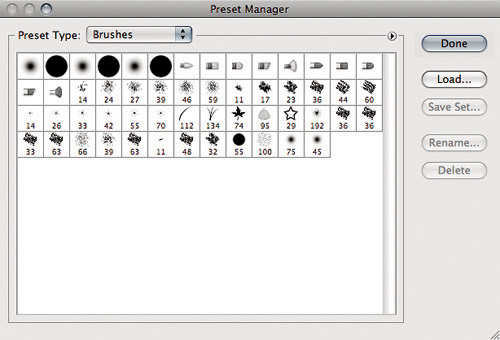
Photoshop comes with several premade collections of tool presets, such as Art History and Brushes. The trick to finding these (and to doing all sorts of other things with tool presets, like saving your own sets), is to open the Preset Manager dialog (see Figure 6-23) by choosing Preset Manager from the Tools panel menu; the same menu is available in the top-right corner of the Tool Presets pop-up menu from the Options bar.
Figure 6-23 The Preset Manager dialog with Brushes presets displayed
Unfortunately, there’s no way to edit a tool preset once you make it—you can only create a new one and delete the old one by choosing Delete Tool Preset from the Tool Preset menu. To reset tool options for either a single tool or for all the tools, Control-click (Mac) or right-click (Windows) on the Tool Presets icon on the Options bar.
Panels and Workspaces
Panels are both incredibly useful when you need them and incredibly annoying when they’re in your way, so it pays to get to know them. This section talks about panels and workspaces in general, and then discusses tips for individual Photoshop panels.
Panel Tips
Photoshop uses the same turbocharged workspaces that appear in the rest of the Adobe Creative Suite applications: You can group panels, dock them to the edge of the screen, or move panel groups to other monitors; collapse panels to save space; and collapse panel stacks to maximize screen space.
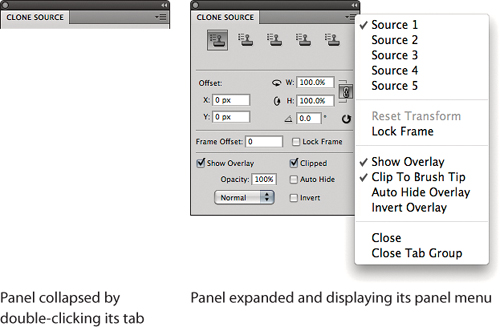
Save Space. Collapse or expand a panel by double-clicking the tab.
Panel Menus. Most panels have a pop-up menu at the top-right corner of the panel. To see it, click the icon that looks like a tiny menu (see Figure 6-24). Get to know the panel menus—sometimes it seems as though half of the power of Photoshop is inside the panel menus, which are easy to miss.
Scrubby Sliders. Earlier I mentioned scrubbing number fields in dialogs—Command-dragging (Mac) or Ctrl-dragging (Windows) over a number field (see “Dialog Tips” earlier in this chapter). This works in most panels too.
Rename Panel Items. To rename an item you created in a panel list, such as a layer name, double-click the panel item and type the new name. Text layers are special—they name themselves after the text you’ve typed and rename themselves if you edit the text. But if you manually rename a text layer, it will no longer update when you edit that layer’s text.
Tip
![]()
When entering a value in a panel, if you might change your mind, press Shift-Return in Mac OS X or Shift-Enter in Windows. This keeps the field selected so you can enter a different value.
Workspace Tips
Workspaces are extremely useful because there is no one right way to arrange things. When I connect my notebook computer to a color-calibrated desktop monitor, I like to use the higher-quality desktop monitor as the main image viewing area and place as many panels as possible on the laptop monitor. When I use the laptop by itself, there isn’t nearly enough room to replicate the two-monitor desktop arrangement so I become picky about which panels are visible. To switch instantly between the two panel arrangements, I saved each arrangement as its own workspace.
Tip
![]()
If there’s anything you want to change about how panels behave, check the Panels & Documents section of the Interface pane in the Preferences dialog. Your wish might already be granted.
Tip
![]()
A collapsed stack can be as narrow as a stack of unlabeled icons. If you’re still learning what the icons represent, widen a collapsed stack to reveal the labels; or to free up maximum screen space, collapse panels down to icons and use tool tips to see icon names.
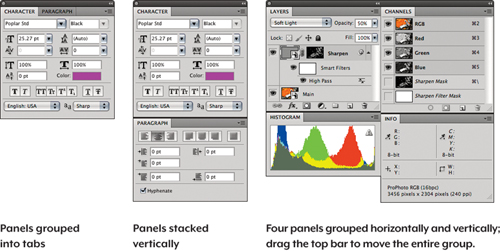
Ways to Combine. You can do so much more than just push panels around the screen. Table 6-4 describes how to get exactly the workspace you want; Figures 6-29 and 6-30 show you some of the many possibilities.
Table 6-4 Working with panels.
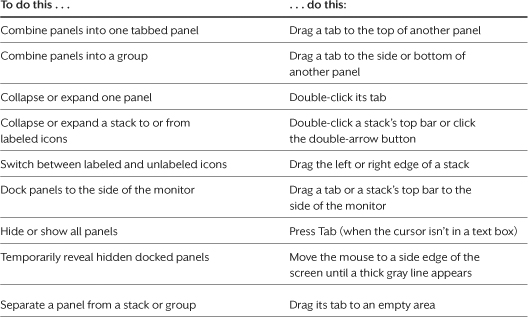
Figure 6-25 Workspace arrangements
Change Tab Order. It’s a minor thing, but when panels are in a tabbed group you can drag to change the tab order.
Workspaces are definitely personal. My friend David Blatner always keeps his Layers, Channels, and Paths panels together in one tabbed group. When he wants to work with one of these he clicks that panel’s tab heading or, better yet, uses a shortcut he defined for the panel. I always keep the Layers and Channels panels separate because I like to see multiple views of a document’s structure simultaneously. And I always keep the Info panel open because I’m always checking color values.
Figure 6-26 Display options for panels docked to one side of the monitor, and the workspace pop-up menu

Tip
![]()
The fastest way to get to a workspace with the mouse is to click the workspace pop-up menu at the right edge of the Application bar.
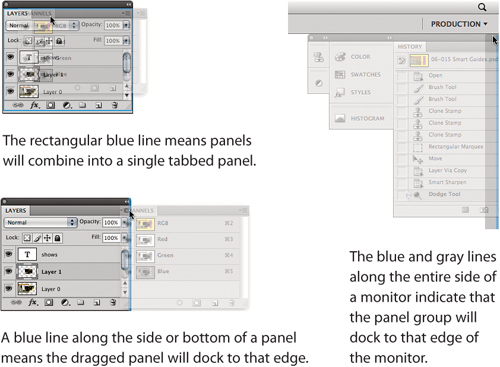
The Thin Blue Line. When dragging panels or document windows to combine them, always watch for the blue line at the edge of the destination panel or window (see Figure 6-27). It tells you when releasing the mouse will attach a panel to another one. If you see a blue rectangle, that means the panel you’re dragging will become a tab within the panel you’re dragging to. Figure 6-27 shows you what this looks like.
Figure 6-27 The blue line indicates that panels are about to group or dock.
Save Workspaces. To save a workspace, set up the panels the way you want them, optionally load any custom keyboard shortcut and menu sets, and choose Window > Workspace > Save Workspace. Saved workspaces appear on a workspace pop-up menu at the right edge of the Application bar as well as at the top of the Window > Workspace submenu. For even easier recall, use the Keyboard Shortcuts and Menus dialog to assign keyboard shortcuts to your favorite workspaces.
Workspaces and Monitors. You can dock only to the sides of your main monitor, not to the top or bottom. You can’t dock stacks at all on any other connected monitor. However, the ability to group panels both horizontally and vertically means you can create “flotillas” of grouped panels and drag the whole lot around on any connected monitor.
Tip
![]()
If you collapse panels to icons and don’t like expanded panels to stay open, open the Preferences dialog, click the Interface pane, and turn on Auto-Collapse Iconic Panels.
Self-Adapting and Resetting Workspaces. Workspaces adapt to you. For example, if you choose the Essentials workspace and move panels around, Photoshop updates the Essentials workspace with your adjustments. To revert to the workspace as it was last saved, choose Window > Workspace > Reset (workspace name).
Layers Panel Tips
It’s hard to conceive of a time when images were edited without multiple layers; many Photoshop users would never give up the flexibility that layers bring. Here’s an overview of the Layers panel (see Figure 6-28).

Display and Hide Layers. If you’re clicking the eye icons one layer at a time, there’s a faster way. Just click and drag through the column for all the layers you want to make visible. When you Option-click (Mac) or Alt-click (Windows) an eyeball in the Layers panel, Photoshop toggles the visibility of all the layers except the one you clicked on, which stays visible.
Create a New Layer. The fast way to create a new layer is to press Command-Shift-N (Mac) or Ctrl-Shift-N (Windows). If you want to bypass the New Layer dialog, press Command-Option-Shift-N (Mac) or Ctrl-Alt-Shift-N (Windows).
Duplicate Layers. Duplicating a layer is a part of my everyday workflow, so it’s a good thing there are various ways to do it.
• Drag the layer’s thumbnail on top of the New Layer button.
• Option-drag (Mac) or Alt-drag (Windows) the layer’s thumbnail to a new position in the Layers panel.
• Press Command-J (Mac) or Ctrl-J (Windows). If some pixels are selected, only those pixels will be duplicated to a new layer.
• Choose the Duplicate Layer command. This command is on the Layer menu, the Layers panel menu, and in the context menu when you right-click or Control-click (Mac OS X) a layer in the Layers panel.
• In the document window (not the Layers panel), Control-click (Mac) or right-click (Windows) a layer with a marquee, lasso, or Crop tool and choose Duplicate Layer from the context menu.
The method you use at any given time should be determined by where your hands are. (Keyboard? Mouse? Coffee mug?)
Select Layers. You can select layers using keyboard shortcuts. To select the next visible layer behind or in front of the current layer, press Option-[ or Option-] (Mac) or Alt-[ or Alt-] (Windows). To extend the selection to multiple layers, add the Shift key. To select the top or bottom layer, respectively, press Option-. (period) or Option-, (comma) in Mac OS X, or press Alt-. (period) or Alt-, (comma) in Windows.
Tip
![]()
You can delete multiple layers at once. Just select multiple layers in the Layers panel and then press the Delete key.
Automatic Layer Selection. Perhaps the fastest way to select a layer is to click it with the Move tool, but this doesn’t happen by default. To set this up, select the Move tool, turn on the Auto-Select check box in the Options bar, and then choose Layer from the Auto-Select pop-up menu. If it isn’t active when you want to select a different layer, activate the Move tool temporarily by pressing Command (Mac) or Ctrl (Windows) as you click.
A variation on Auto-Select is to click layer content while pressing modifier keys, skipping the context menu entirely. Using any tool, Command-Option-Control-click (Mac) or Ctrl-Alt-right-click (Windows).
On the other hand, Auto-Select can be irritating because it’s too easy to select the wrong layer. When that happens, right-click or Control-click (Mac) layer content and choose a layer name from the context menu that appears.
These techniques typically work only when you click on a pixel that has an opacity greater than 50 percent. (I say “typically” because it sometimes does work if the total visible opacity is less than 50 percent. See “Info Panel Tips,” later in this chapter.) In general, if you make sure you click on reasonably opaque areas of layers, these techniques should work fine.
Tip
![]()
If only one layer is visible when you press the layer arrangement shortcuts, Photoshop hides that layer and shows the next layer. This is great for cycling through a number of layers, though it doesn’t always work when you have layer groups.
Move and Duplicate Layer Masks. In the Layers panel, simply drag a layer mask’s thumbnail to a new layer. To duplicate a layer mask, Option-drag (Mac) or Alt-drag (Windows) a layer mask thumbnail.
Rearrange Layers. To move the selected layer down or up in the Layers panel with the keyboard, press Command-[ or Command-] (Mac) or Ctrl-[ or Ctrl-] (Windows). To move the selected layer to the bottom or top of the layer stack, add the Shift key to either shortcut.
Create Layer Groups. The more layers you have in your document, the more difficult it is to manage them. Fortunately, Photoshop offers layer groups in which you can work with adjacent layers as a unit. Layer groups work much like the folders on your desktop. Here are the basics:
• Layer groups act like a single layer. When you show, hide, move, or add a mask to the group, it affects all the layers in that group.
• To create a layer group, select the layers you want to group and then press Command-G (Mac) or Ctrl-G (Windows), which is the keyboard shortcut for Layer > Group Layers. You can also click the New Layer Group button in the Layers panel (see Figure 6-28), but then you have to drag layers into the group yourself.
• To add a layer to a group, just drag it on top of the group. Or to create a new layer inside the group automatically, select the group or any layer within the group (in the Layers panel) and click the New Layer button. You can remove a layer from a group simply by dragging it out.
• You can drag a layer group (with all of its layers) to another document.
• You can nest one layer group inside another, up to five levels deep.
Unfortunately, you can’t apply a layer effect to a layer group or use a layer group as a clipping mask (see Chapter 8).
Tip
![]()
To select groups more easily using the Move tool, choose Groups from the Auto-Select pop-up menu on the Move tool Options bar.
Layer Groups and Blending Modes. By default, a layer group’s blending mode is set to Pass Through, which means, “let each layer’s blending mode speak for itself.” In this mode, layers inside the group look the same as they would if they were outside the group. However, if you change the group’s blending mode, a curious thing happens: Photoshop first composites the layers in the group as though they were a single layer (following the blending modes you’ve specified for each layer), and then it composites that “single layer” with the rest of your image using the layer group’s blending mode. In this case, layers may appear very different depending on whether they’re inside or outside that group.
Similarly, when you change the opacity of the group, Photoshop first composites the layers in the group (using their individual opacity settings) and then applies this global opacity setting to the result.
Layer Comps Panel Tips
If you like to keep your options open, you’ll love layer comps. The Layer Comps panel is like a clever combination of the Layers panel and the History panel: It lets you save the state of your document’s layers so you can return to it later. It might seem that the Layer Comps feature should be part of the Layers panel, but perhaps Adobe figured that the Layers panel was already complex enough. Although the snapshots feature of the History panel can perform most of the same tasks as the Layer Comps panel, the History panel is significantly more memory intensive and—this is important—layer comps can be saved with the document, while snapshots disappear when you close the file. Saving a layer comp makes almost no difference to your file size (each comp is only a few kilobytes on disk).
Tip
![]()
To open the Layer Comp Options dialog, double-click a thumbnail of a layer comp.
To create a layer comp, click the New Layer Comp button in the Layer Comps panel (see Figure 6-29). Photoshop displays the New Layer Comp dialog, which lets you name the layer comp (it’s easy to lose track of what each layer comp represents), specify which settings Photoshop should remember, and insert a comment about the comp.
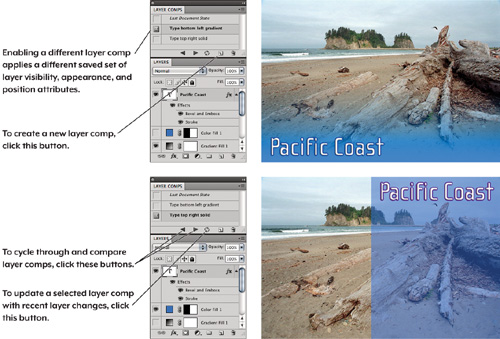
Photoshop can remember three kinds of information about your layer comps: visibility, position, and appearance.
• By default, layer comps just remember the visibility of each layer—that is, which layers and layer groups are visible and which are hidden.
• When you turn on the Position check box, the layer comp remembers the position of the layer content. For example, suppose that you save a layer comp with Position turned on and then reposition the image or text on that layer. When you return to the saved layer comp, the image or text reverts back to where it was when you saved the comp.
• The Appearance option remembers any layer effects and blending modes that you’ve applied to your layers. For example, let’s say you save a layer comp with Appearance turned off, then you change the blending mode of one or more layers in the Layers panel. When you return to the saved layer comp, the blending-mode changes remain because you hadn’t told the layer comp to retain the appearance of the layers.
To create a layer comp with a default name that uses the settings of the last layer comp you made (by default, just the Visibility option), hold down the Option/Alt key while clicking the New Layer Comp button.
View Layer Comps Quickly. You can apply a layer comp by clicking in the column to the left of the layer comp’s name. You can also click the left and right arrow icons at the bottom of the Layer Comps panel. Better yet, if you have ten comps but want to cycle through only three of them, select those three (Command- or Ctrl-click the comps to select more than one) and then use the arrow buttons in the panel.
You’ll see a layer comp called Last Document State in the Layer Comps panel. This is the state of your document before you chose a layer comp. For example, let’s say you display a layer comp, hide some layers, and move some text around. Now if you select any layer comp, your changes disappear—but if you click the Last Document State comp, the changes return.
Tip
![]()
If you frequently use layer comps, use the Keyboard Shortcuts feature (in the Edit menu) to apply keyboard shortcuts to the Next Layer Comp and Previous Layer Comp features so you don’t have to keep clicking buttons.
Update Comps. Need to change a layer comp? You don’t have to delete it and start over. Make your changes, then select the comp name in the panel (don’t click the left column!) and click the Update Layer Comp button—the one that looks like two rotating arrows.
Send Comps to Clients. The fact that Photoshop saves layer comps with your files, including notes, is pretty cool. You can save a document as a PSD, TIFF, or PDF file, and someone else can open the file in Photoshop and browse the Layer Comp panel. Also interesting are the Layer Comp scripts in the File > Scripts submenu: Layer Comps to Files and Layer Comps to WPG. They’re intended to save all (or the currently selected) layer comps to one or more flattened files on disk. Unfortunately, Layer Comps to Files is the only one that still works in Photoshop CS4 and later; if you choose Layer Comps to WPG you get a message that you should try the Output module in Bridge.
Clear Comp Warnings. If, after making one or more layer comps, you delete or merge a layer, you’ll notice that small warning icons appear in the Layer Comps panel. These tell you that Photoshop can no longer return to the layer comp as saved because you removed or permanently changed some content that the comp depends on. If you click such a comp, Photoshop will still display what it can, but if you don’t want to see the warning icons anymore, right-click (Control-click in Mac OS X) an alert icon and choose Clear All Layer Comp Warnings from the context menu.
Info Panel Tips
The Info panel (see Figure 6-30) isn’t flashy or colorful, but experienced Photoshop users can’t live without it because it constantly displays critical information about the current Photoshop document.
Figure 6-30 The Info panel and its pop-up menus that change display options
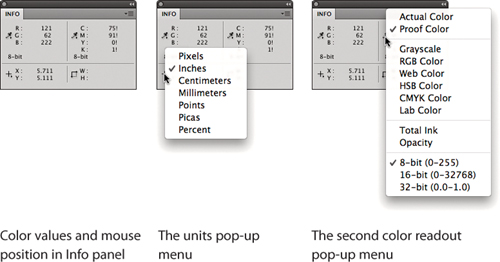
You’ll often encounter the Info panel working as a densitometer, where it shows the color values of the pixels under the mouse. You can use the color readout pop-up menus (click the eyedroppers) to set both color readouts to whatever color modes you like, but they are most useful when the first is set to Actual Color (the document’s current color mode) and the second is set to the color mode of the output you’re concerned with. When working in Levels or Curves, it displays before-and-after values (see Chapter 7, “Image Adjustment Fundamentals”). Especially note the Proof Color option, which shows the numbers that would result from the conversion you’ve specified in Proof Setup. This conversion may be different from the one you’ve specified in Color Settings (see Chapter 4). The Proof Color numbers appear in italics—a clue that you’re looking at a different set of numbers than the ones you’d get from a mode change. If you’re preparing photos for CMYK printing, the Info panel alerts you when the mouse is over a color that is out of the printer’s gamut, by displaying an exclamation point after the color value. When you rotate a selection, the Info panel displays the angle. And when you scale, it shows percentages.
Customize and Expand the Display. To display a wealth of data in the Info panel, choose Panel Options from the Info panel menu (see Figure 6-31), set the options the way you want them, and click OK. My favorite options are Document Profile (for color profile awareness), Document Dimensions (as a reality check on size and resolution), and Efficiency (as an indicator of Photoshop performance, as described in Chapter 1).
Figure 6-31 Customizing the Info panel
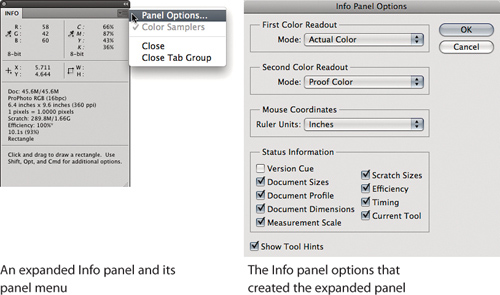
Find Opacity. When you have transparency showing (for example, on layers that have transparency when no background is showing), the Info panel can give you an opacity (Op) reading. To see this, click one of the little black eye-droppers in the Info panel and select Opacity (see Figure 6-30).
Tip
![]()
Another shortcut for switching units is to right-click or Control-click (Mac) either ruler. If the rulers aren’t visible, press Command-R (Mac) or Ctrl-R (Windows).
Switch Units. While you can switch among pixels, inches, and centimeters by opening the Units pane of the Preferences dialog, it’s faster using the units pop-up menu in the Info panel; just click the tiny coordinates icon (see Figure 6-30).
Color and Swatches Panel Tips
The Color and Swatches panels (see Figure 6-32) are closely related, so I almost always group them into one panel.
Figure 6-32 The Color and Swatches panels
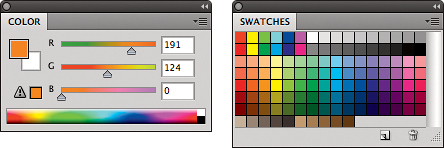
Switch Color Models. Are the fields labeled RGB when you want to enter a value as CMYK or something else? Just choose a different mode from the Color panel menu. To choose colors visually rather than numerically, click the color spectrum at the bottom of the panel.
Tip
![]()
You can also cycle through the spectrums by Shift-clicking the spectrum bar. Each successive Shift-click progresses through the spectra in this order: CMYK, Grayscale, foreground color to background color, and then back to RGB.
To switch to another color model’s spectrum, right-click (or Control-click in Mac OS X) the spectrum and choose one. Changing the color spectrum changes only the way you specify the color, because the color has to be stored in the color space of the document itself. For example, if you’re working in an RGB document and you specify a color in CMYK, the color must be translated into and stored as RGB.
Edit Color Swatches. You can add, delete, and edit the color swatches on the Swatches panel. Table 6-5 shows you how. Don’t ignore the panel menu . . . explore! On the panel menu are commands for managing swatches, and you can bring in swatches from a long list of color systems, such as Focoltone, PANTONE, TOYO, and TRUMATCH.
Table 6-5 Editing the Swatches panel.

You can’t actually edit a color swatch, so instead click the swatch to make it the current foreground color, edit the foreground color, then Shift-click the swatch to replace it with the current foreground color.
HUD Color Picker Tips
Note
![]()
The HUD Color Picker requires that you have an OpenGL video card that meets the specifications described in Chapter 1.
When you set the foreground or background color by clicking the Eyedropper tool on the desired color in a document, Photoshop used to simply update the foreground (or background) color swatch as you clicked (or Option/Alt-clicked) the Eyedropper tool. But Photoshop CS5 gives you a new choice: The HUD Color Picker. The advantage of the HUD Color Picker is that you aren’t limited to the colors in the document; you can use the current foreground color as a starting point from which you can choose a color that’s closely related, or even completely different. You can use the Hue Strip or the Hue Wheel (see Figure 6-33). The Hue Strip is more compact.
Figure 6-33 The two forms of the HUD Color Picker, with the eyedropper in the value square, picking up the foreground color—not the color clicked
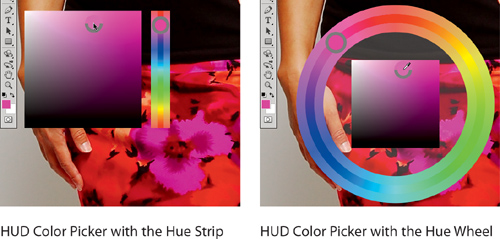
Tip
![]()
The most important thing to remember about the HUD Color Picker is to keep the mouse button held down until you’re done.
Both types of HUD Color Picker contain two components: a value picker and a hue picker. Because you must keep the mouse button down while picking (or else the picker goes away), I find that it’s better to pick the hue first and then pick the value; otherwise you’ll alter the value as you exit the value square on the way to the Hue Strip or Hue Wheel (though see the tip at left). To use the HUD Color Picker, follow these steps:
1. Select a painting tool and then Control-Option-click (Mac) or Shift-Alt-right-click (Windows) anywhere in the document. The HUD Color Picker appears with the current foreground color selected.
2. Keep the mouse button down and release your fingers from the keyboard, then drag along the Hue Strip or Hue Wheel to set the value of the color. If you only wanted to change the hue, stop here; if you also want to change the value, go on to step 3.
3. Drag to the value square to set the value you want, and release the mouse button there.
Note
![]()
To freely pick the hue and value in either order, as soon as you pick one component of the color hold down the spacebar to lock it down. You can release the spacebar as soon as you’ve “crossed over” to pick the other component.
History Panel Tips
The History panel remembers what you’ve done to your file and lets you either retrace your steps or revert back to any earlier version of the image. Every time you do something to your image—paint a brushstroke, run a filter, make a selection, and so on—Photoshop saves this change as a state in the History panel (see Figure 6-34). At any time, you can revert the entire image to any previous state, or—using the History Brush tool or the Fill command, which I’ll discuss in a moment—selectively paint back in time.
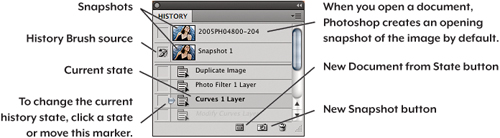
Tip
![]()
The list of history states is also the list of steps you can reverse with the Undo command.
The History panel has two sections: snapshots on top and states on the bottom. The History panel stores each state until it hits the History States limit in the Performance pane in the Preferences dialog. The default is 20 states, so when you create state 21, the oldest state is deleted. Adobe set the 20-state default as a balance between performance and flexibility; increasing it is fine if you have many gigabytes of scratch disk space available.
Snapshots. If you don’t want a particular state to be deleted when it becomes the oldest state, turn it into a snapshot. Snapshots aren’t deleted until you exit Photoshop. The other difference between a snapshot and a state is that states are created with every edit you perform, while a snapshot is created only when the document is first opened and when you manually create one yourself. To create a snapshot, click the New Snapshot button or choose New Snapshot from the History panel menu.
What’s in the Snapshot? When you create a snapshot, Photoshop saves the whole document, including layers. A large document can consume a lot of scratch disk space, so Photoshop offers two other, less storage-intensive snapshot choices: a version of the image with merged layers, or just the currently selected layer. If you want to conserve scratch disk space, you can limit the layers the new history state will include—Option-click (Mac) or Alt-click (Windows) the New Snapshot button to see these choices.
Tip
![]()
If you’re low on disk space or just want to avoid the History feature’s heavy scratch disk overhead, you can reduce the number of history states to just one. You won’t need more than one history state if you’re executing basic production steps or running batch actions, but you may need many more steps if you’re in the middle of trial-and-error image editing.
Change History Panel Behavior. To change how the History panel generates states, choose History Options from the History panel menu (see Figure 6-35). You’ll find options that let you alter some of the default behavior discussed in this section. The first two options create snapshots automatically, so they consume more scratch disk space. The third and fifth options can potentially add a lot more states to the History panel, so you’ll reach your limit sooner. Most are off by default to save disk space and to avoid generating an overwhelming number of states, but Automatically Create First Snapshot is on by default, as a safety net.
Figure 6-35 The History panel menu and History Options dialog
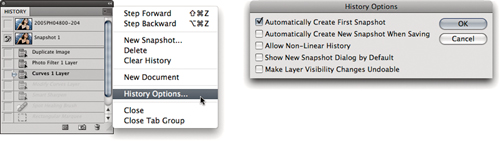
Step Through States. There are three ways to move among the states in the History panel:
• Click any state’s thumbnail in the History panel.
• Move the active state marker to a different state on the History panel.
• To step back to the last state, press Command-Z (Mac) or Ctrl-Z (Windows), which works like a standard undo. To move backward one state at a time, press Command-Option-Z (Mac) or Ctrl-Alt-Z (Windows); to move forward one state at a time, press Command-Shift-Z (Mac) or Ctrl-Shift-Z (Windows).
When you move to an earlier state, Photoshop dims every subsequent state on the History panel, indicating that whatever you do next will erase all of the subsequent dimmed steps. This is like going back to a fork in the road and choosing the other path. Photoshop offers another option: If you turn on the Allow Non-Linear History check box in the History Options dialog, Photoshop doesn’t gray out or remove subsequent states when you move back in time (though it still deletes old states when you hit the maximum number of states).
Note
![]()
Neither states nor snapshots are saved with a Photoshop document—they’re stored only in temporary scratch disk space and are all thrown out when you quit Photoshop. If you want to save a state as a separate file, click the New Document from State button and save the document it creates.
Using Non-Linear History is like returning to the fork in the road, taking the other path, and then having the option to return to any state from the first path. For example, you could run a Gaussian Blur filter on your image using three different amounts—returning the image to the preblurred state in the History panel each time—and then switch among the three states to decide which one you want to use. Just make sure you’re more intrigued by this option than you’ll be confused by all of the branches.
Tip
![]()
The History Brush tool is very similar to the Eraser tool when the Erase to History check box is turned on in the Options bar, but the History Brush lets you paint with blending modes such as Multiply and Screen.
The History Brush. The History Brush (press Y) lets you paint specific areas of one history state into another. To use the History Brush, set the History Brush source and the current state (see Figure 6-34), and paint over the area you want to restore. The pixels you paint will come from the History Brush source. For instance, let’s say you sharpen a picture of a face and find that the lips are now too sharp. You can select the History Brush, set the source state to the presharpened state, and brush around the lips to bring back the less sharpened state only in that area. (You’d usually lower the brush Opacity value so that you can gradually paint out the sharpening.)
Fill with History. One last nifty technique that can rescue you from a catastrophic “oops” is the Fill command on the Edit menu (press Shift-F5). This lets you fill any selection (or the entire image, if nothing is selected) with the pixels from the current source state on the History panel. When the area to be reverted is easily selectable, this can be faster than using the History Brush or Eraser tool. To fill the layer or selection with the current history source state, press Command-Option-Delete (Mac) or Ctrl-Alt-Backspace (Windows). To fill with Preserve Transparency turned on, add the Shift key.
Copy States. Although Photoshop lets you copy states from one document to another simply by dragging them from the History panel onto the other document’s window, this doesn’t need to be done very often. The copied state completely replaces the image that you’ve dragged it over.
When History Stops Working. When you change your image’s pixel dimensions, bit depth, or color mode, some history features can’t be used with history states before that point because the pixels no longer line up or are fundamentally incompatible between the states. You’ll see this with the History Brush or the Fill from History command. Avoid interrupting a series of history-based edits with changes to basic document properties.
Purge States. History states consume a lot of scratch disk space until you close Photoshop. If you find yourself running out of room on your hard disk, try clearing out the history states by either selecting Clear History from the History panel menu or choosing Edit > Purge > Histories. The former can be undone in a pinch; the latter cannot. Curiously, neither of these removes your snapshots, so you have to delete those manually if you want to save even more space. Closing your document and reopening it will also remove all snapshots and history states.
History Log. Although there’s no way to keep history states and snapshots after you close a document, you can keep a record of what you did, and it’s called the History Log. The History Log is text that records your edits, but you can only read it—you can’t play it back or reload it. You can use the History Log to track your edits down to the settings you used in dialogs, and you can use that data to manually reproduce the edits made to the file.
If you want to keep a History Log, turn on the History Log check box in the General pane of the Preferences dialog (see Figure 6-36). You can choose whether you want to save a log with each file (select Metadata) or maintain a central log for all files (Text File). You can also use the Edit Log Items pop-up menu to set the level of detail for the log.
Figure 6-36 General preferences

This all seems simple enough, but there are privacy issues you might want to think about. If you increase the History Log’s level of detail, the History Log can record minutiae like the folder paths and names of files you open and the text you enter on text layers. If you choose to store the History Log in metadata, it travels wherever the image travels. For example, if you type “My Stupid Boss” on a text layer because you’re just playing around, and you later delete the text, the original text entry is still in the log. If you store the log in the image metadata and your boss views the file in Adobe Bridge, which can display the metadata, your boss may come across the log entry containing that text. If you or your organization has an interest in restricting certain information, you may not want detailed editing records to travel with the file. In such cases, you might limit the level of detail or choose not to store the log in file metadata.
If you set up the History Log in a way that’s appropriate for your work, it can be a valuable tool in analyzing your processes and techniques.
Setting Preferences
Even though each person uses Photoshop differently, they think they need to use it just like everyone else does. Not true. You can customize Photoshop in a number of ways through its Preferences submenu (on the Photoshop menu in Mac OS X, and on the Edit menu in Windows).
I won’t cover every preference here—I’ll just discuss some of the key items. Instead, I’ll discuss individual preferences in the topics where they apply.
Return of Preferences. If you make a change in one of the many Preferences dialogs, and then after closing the dialog you realize you want to change some other preference, you can return to the last Preferences pane you saw by pressing Command-Option-K (Mac) or Ctrl-Alt-K (Windows).
Tip
![]()
In Windows, the Preferences folder may be hidden by default. To see it in Windows XP, in a folder window choose Tools > Folder Options, and in the Folder Options dialog, select Show Hidden Files and Folders. To see it in Windows Vista, in a folder window choose Organize > Folder and Search Options, click the View tab, and then select Show Hidden Files and Folders in the Advanced Settings list. In Windows 7, it’s in the Appearance and Personalization control panel.
Navigate Preferences. The Preferences dialog contains several panes (see Figure 6-36). Sure, you can select each one from the pop-up menu at the top of the dialog, or by clicking the Next and Prev buttons. But the fastest way to jump to any of the first nine panes while in the Preferences dialog is to press a number key along with Command (Mac) or Ctrl (Windows). For example, if you want to switch to the fourth Preferences pane (Performance) on a Mac, press Command-4. Instead of clicking Next, you can press Command-N (Mac) or Ctrl-N (Windows); instead of clicking Prev, press Command-P (Mac) or Ctrl-P (Windows).
Propagate Your Preferences. Any time you make a change to one of the Preferences dialogs, Photoshop remembers your alteration and, when you quit, saves it in the file Adobe Photoshop CS5 Prefs.psp. In Mac OS X, it’s in Users(username)LibraryPreferencesAdobe Photoshop CS5 Settings. In Windows XP, it’s in Documents and Settings(username)Application DataAdobeAdobe Photoshop CS5Adobe Photoshop CS5 Settings. In Windows Vista and Windows 7, it’s in Users(username)AppDataRoamingAdobeAdobe Photoshop CS5Adobe Photoshop CS5 Settings.
If anything happens to the Adobe Photoshop CS5 Prefs.psp file, all your hard-won preference settings are gone. Because of this, it’s good to back up that file, or even the whole settings folder (people often back up their images without realizing they should back up this sort of data file, too). Note that Photoshop doesn’t save changes to the preferences until you exit the program; if Photoshop crashes, preference changes don’t get saved.
Certain kinds of crashes can corrupt the Photoshop Preferences file. If Photoshop starts acting strange, the first step is always to replace the Preferences file with a clean copy (if no copy of the Preferences file is available, Photoshop will build a new one for you). To reset the Preferences to Photoshop defaults, hold down the Command, Option, and Shift keys (Ctrl, Alt, and Shift keys in Windows) immediately after launching the program—Photoshop will ask if you really want to reset all the preferences.
I don’t like going all the way back to the default preferences because there are so many performance-altering settings to remember (scratch disks and so on). I prefer to use the built-in ability of both Mac OS X and Windows to create a Zip archive of the Preferences file in the same folder as the original, so that when something goes wrong, I can trash the bad file and unzip the known good one.
Tip
![]()
In Mac OS X 10.5 or later, you create a Zip archive by choosing File > Compress [filename]. In Windows, it’s File > Send To > Compressed (Zipped) Folder.
If you administer a number of different computers that are running Photoshop, you may want to standardize the preferences on all machines. This is possible by copying the Photoshop Preferences file to each computer, but keep an eye out for machine-specific preferences that may not be preserved across machines, such as file paths.
UI Font Size. If you have a high-resolution monitor, you may want to increase the UI Font Size setting to keep text in the Photoshop user interface from becoming too small to read.
Export Clipboard. When the Export Clipboard check box is on, Photoshop converts whatever is on the Clipboard into your operating system’s clipboard format when you switch out of Photoshop. This is helpful—indeed, necessary—if you want to paste a selection into some other program. But if you’ve got 10 MB on the Clipboard, that conversion is going to take some time. In situations when you’re running low on RAM, the operating system may slow down. Since the Clipboard is probably the least reliable mechanism for getting images from Photoshop into some other application, it’s fine to leave Export Clipboard off until you really need it.
Resize Image During Place. When this option is off, if you place a graphic into a Photoshop document and the Photoshop document is much smaller than the incoming graphic, you’ll see only the center of the incoming graphic, and you won’t be able to grab its handles unless you zoom out. Turning on this option always scales down an incoming graphic to fit it within the current document. That sounds convenient, so why would you want to turn it off? If you regularly place graphics that need to maintain their original size, you don’t want Photoshop to scale them at all—in that case, you should keep this option off.
Use Grayscale Application Icon. By default, the Photoshop icon at the top of the toolbar is blue. If you would rather that your user interface be a neutral gray (a better background for color correction), you’ll want to turn on this option in the Interface preferences (see Figure 6-37) in addition to choosing a neutral gray user interface color in your operating system preferences. The screen shots in this book use this preference, combined with the nice, neutral Graphite color scheme in the Appearance system preference in Mac OS X.
Figure 6-37 Interface preferences
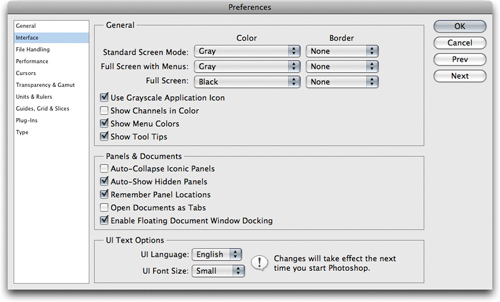
Show Menu Colors. This preference makes a difference only if you’ve used the Edit > Keyboard Shortcuts command to colorize menu commands. For example, if you choose Window > Workspace > New in CS5 and you can’t figure out why the new commands aren’t appearing in blue, as they’re supposed to, it’s because this preference is turned off.
Remember Panel Locations. This remembers which panels were open, which were closed, and where they were located on the screen the last time you quit. If you really like your panel arrangement, it’s best to use the Save Workspace feature to save it no matter what happens.
Note
![]()
Changing your monitor resolution or switching monitors may cause panels to revert to the default workspace. If you often change monitors or plug your notebook computer into a big monitor, try saving a workspace for the other configuration.
Image Previews. When you save a document in Photoshop, the program can save little thumbnails of your image as file icons. Image previews increase the file size by a small amount, so if you need the smallest possible files, you might set this option (see Figure 6-38) to Never Save or Ask When Saving. I prefer to see this option every time I save, so I set Image Previews to Ask When Saving.
Figure 6-38 File Handling preferences
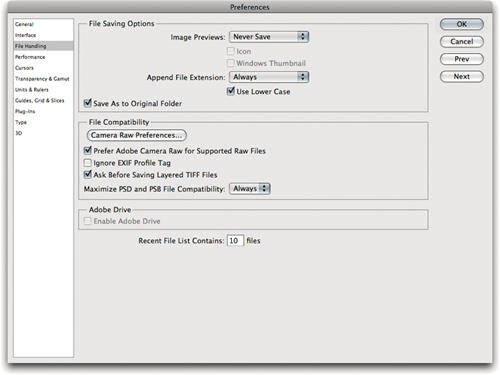
Ask Before Saving Layered TIFF Files. Many users still don’t realize that TIFF files are first-class citizens that can store anything a Photoshop (PSD) file can, including Photoshop layers. This is covered in detail in Chapter 12, but there’s an important thing to point out here: When the Ask Before Saving Layered TIFF Files option is turned on in Preferences (as it is by default), Photoshop will always alert you when you try to save a file that was a flat (nonlayered) TIFF but now has layers. For example, if you open a TIFF image and add some type, the text shows up on a type layer. Now if you press Command-S (Mac) or Ctrl-S (Windows) to save the file, Photoshop displays the TIFF Options dialog, in which you can either flatten the layers or keep them.
If you find yourself staring at this dialog too much and you keep thinking to yourself, “If I wanted to flatten the image, I would have done it myself,” turn this option off in the Preferences dialog. Then Photoshop won’t bother you anymore, and layered TIFF files will always save with their layers.
Ignore EXIF Profile Tag. This option exists because some early digital cameras embedded the wrong profile into their images, and turning on this option decreased the chance that Photoshop would misinterpret such an image’s color. If you use a recent camera or shoot in raw format, keep this option turned off.
Maximize PSD and PSB File Compatibility. People have strong opinions about this feature, which was known in earlier versions as Maximize Backwards Compatibility in Photoshop Format, Include Composited Image with Layered Files, or 2.5 Format Compatibility. Many users dislike the fact that turning on this option can greatly increase file size because Photoshop saves a flattened version of your layered image along with the layered version. Because Photoshop can open a file just as easily whether this option is off or on, a lot of people choose to turn it off and save the disk space.
However, there are good reasons for this preference to exist, and those reasons are enough to set this option to Ask.
• Some non-Adobe programs claim to view or open layered Photoshop files, but (of course) they don’t contain the entire Photoshop imaging engine. To view Photoshop files, they depend on the flattened compatibility copy that’s provided by the Maximize PSD and PSB File Compatibility option. Without it, you see a placeholder (see Figure 6-39). For example, if you save a Photoshop document with this option turned off and you try to view the document in a non-Adobe application such as Apple Preview, you won’t see the contents.
Figure 6-39 The placeholder that other programs may display when a layered Photoshop file doesn’t include a composite version

• If you use Photoshop files in other Adobe Creative Suite programs such as Adobe InDesign or Adobe After Effects, you need to leave this option on, for the same reasons I just discussed.
• If you use a digital asset manager such as Adobe Lightroom, chances are you won’t be able to view layered Photoshop files in it unless the files were saved with Maximize PSD and PSB File Compatibility turned on.
• Some programs can understand only 8-bit RGB Photoshop files, and they can’t handle Photoshop files saved in other color modes or at other bit depths unless Maximize PSD and PSB File Compatibility is turned on.
• Future versions of Photoshop may interpret blending modes slightly differently than they do today due to improvements or bug fixes. If changes occur that affect the look of your file, you would at least be able to recover the flattened version, if there is one.
I use Photoshop files in other Creative Suite applications, and on top of that I use a couple of different digital asset managers, so I like to leave this option set to Always.
Painting Cursors and Other Cursors. On the Cursors pane, I like to set my Painting Cursors (see Figure 6-40) to Normal Brush Tip or Full Size Brush Tip. Both display the diameter of the currently selected brush, but Normal marks only the diameter of the areas with 50 percent opacity or more based on the opacity and hardness of the current brush.
Figure 6-40 Cursor preferences

For Other Cursors, I prefer the Precise setting because it helps me position the cursor better than the default cursor icons do. If you set this option to Standard, you can temporarily display cursors in Precise mode; just press the Caps Lock key.
Gamut Warning. When you turn on View > Gamut Warning (or press Command-Shift-Y on the Mac or Ctrl-Shift-Y in Windows), Photoshop displays all the out-of-gamut pixels in the color you choose here. It’s a good idea to choose a really ugly color (on the Transparency & Gamut Preferences pane, see Figure 6-41) that doesn’t appear anywhere in your image, such as a bright lime green. This way, when you switch on Gamut Warning, the out-of-gamut areas will be quite obvious.
Figure 6-41 The Transparency & Gamut preferences
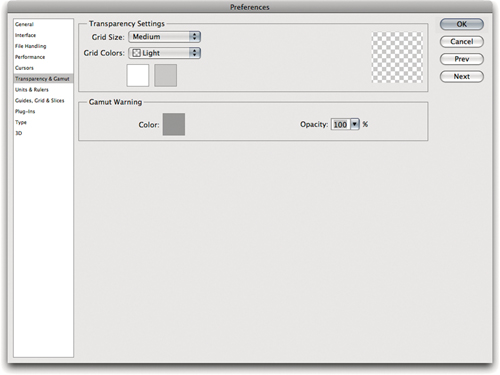
Note, however, that Gamut Warning is of limited use. It tells you which colors are out of gamut, but not how they look. It’s generally more informative to set up and use the View > Proof Colors command instead.
Transparency. Transparency is not a color—it’s the absence of any color at all, even black or white. Therefore, when you see it on a layer, what should it look like? Typically, Photoshop displays transparency as a grid of white and gray boxes in a checkerboard pattern. The Preferences dialog lets you change the colors of the checkerboard and set the size of the squares in case you come up with a reason to want to do that.
When Things Go Wrong
It’s 11 PM on the night before your big deadline. You’ve been working on an image for 13 hours, and you’re beginning to experience a bad case of “pixel vision.” After making a selection, you run a filter, look carefully, and decide that you don’t like the effect. But before you can reach Undo, you accidentally click on the document window, deselecting the area.
That’s not so bad, is it? Not until you realize that undoing will only undo the deselection, not the filter . . . and that you haven’t saved for half an hour. The mistake remains, and there’s no way to get rid of it without losing the last 30 minutes of brain-draining work. Or is there? Let’s find out.
Undo. The first defense against any offensive mistake is, of course, Undo. You can find this on the Edit menu, but it’s wise to keep one hand near the Command and Z keys (Mac) or the Ctrl and Z keys (Windows), ready and waiting for the blunder that is sure to come sooner or later.
Photoshop is smart enough not to consider some things undoable. Taking a snapshot, for instance, doesn’t count, so you can take a snapshot and then undo whatever you did just before the snapshot. Similarly, you can open the histogram, hide edges, change foreground or background colors, zoom, scroll, or even duplicate the file, and Photoshop still lets you go back and undo the previous action.
Revert. You’d think this command would be pretty easy to interpret. If you’ve really messed up something in your image, the best option is often simply to revert the entire file to the last saved version by selecting File > Revert. When you apply the Revert command, you don’t lose your undo/History steps—Revert simply becomes another step you can undo. This is useful, because it means you can undo a Revert!
Note that if the only changes you’ve made are in the Missing Profile or Profile Mismatch dialogs that may appear while opening a file, Photoshop doesn’t enable the Revert command.
History. If you get disoriented after using the Undo and Redo shortcuts too many times, or you want to see the entire list of undo steps, simply open the History panel and get oriented, then click on the history state on which you want to start over. See “History Panel Tips” earlier in this chapter.