
1. Getting Started with QuickBooks
Understanding QuickBooks
This comprehensive reference book offers the reader clear and concise, step-by-step, written instructions accompanied by detailed illustrations for using QuickBooks Pro and Premier 2012. Most of the content is also applicable to Enterprise Solutions 12.0. Written for the business owner, accountant, or bookkeeper, QuickBooks 2012 In Depth truly offers readers a complete guide to the software they use every day.
The QuickBooks software comes in a version that is just right for your business needs. For a complete comparison visit the following website: http://quickbooks.intuit.com/product/accounting-software/quickbooks-comparison-chart.jsp or Google “QuickBooks comparison.” A few of the differences are detailed in Table 1.1.
Table 1.1. QuickBooks Software Summary
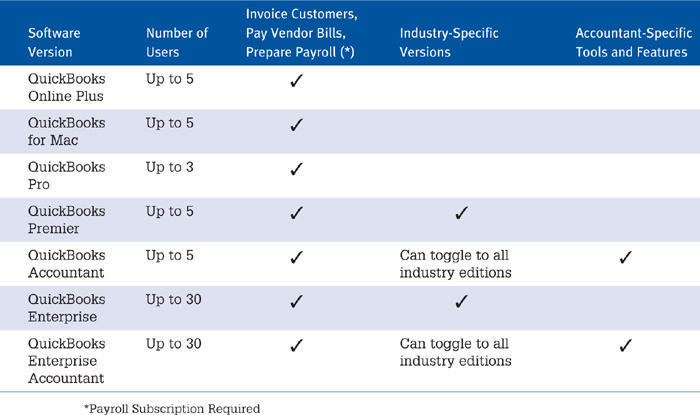
This book does not cover the setup or use of QuickBooks Online or QuickBooks for Mac. The illustrations and content are from working with QuickBooks Premier or QuickBooks Accountant. Often the author has included content specific for an industry edition or for QuickBooks Enterprise Solutions.
Additionally, this book is be a perfect companion to the QuickBooks LiveLessons video training, combining the best of audio learning and book reference functionality.
The primary purpose of this book is to teach the businesses owner or accounting professional how to use QuickBooks software quickly and accurately. Most chapters also include troubleshooting content that sets this book apart from other how-to books. This chapter helps you get started quickly and provides you with quick steps to begin using your QuickBooks software. If you would like to practice what you are learning, open one of the sample files installed with your QuickBooks software. I teach you how to do that first!
Over the years, I have helped hundreds of businesses troubleshoot problems with getting the proper financial and management information out of their QuickBooks data. I have found that improper setup of the data file was most often the primary cause, second only to judgment errors in posting transactions to the incorrect account.
A word of caution: It is not my intention to offer any tax advice; I make comments throughout the text encouraging you to consult your accounting or tax professional before making any data corrections that might have a significant impact on a company’s financials.
Using QuickBooks Sample Data
You can open one of the sample data files installed automatically with your QuickBooks software and begin trying what you are shown in this book. With this data you can test creating transactions, review how lists are set up, and process reports with ready-made data.
The number and type of sample data files installed will differ depending on the version of QuickBooks you purchased.
To open a sample file with sample data, follow these steps:
1. Launch QuickBooks from the icon on your desktop.
2. From the menu bar, select File, Close Company/Logoff. The No Company Open dialog box displays.
3. Click the Open a Sample File button and select a sample file from the drop-down list as shown in Figure 1.1.

Figure 1.1. Practicing with sample data can help you feel more confident about using QuickBooks.
Do not enter your own business data into the supplied sample files; they should only be used for testing how to create transactions and reviewing reports populated with the sample data. Additionally, any customizing that you do with the sample data will not be saved to other files, including your own business file.
After creating your own data file, the next time you launch QuickBooks your file (not the sample file) will default as the file that QuickBooks opens.
If you want to quickly access previously opened QuickBooks files, including the sample file, select File, Open Previous Company from the menu bar. QuickBooks displays a menu of previous files to choose from.
If you do not see other files listed, you might need to change the number of files displayed on this list. To do so, first open any data file. Then, select File, Open Previous Company, Set Number of Previous Companies from the menu bar, and enter a number between 1 and 20. The No Company Open dialog box will now display the most recent files you have opened with the software.
![]() For more information, see “Selecting a Company File to Open,” p. 54.
For more information, see “Selecting a Company File to Open,” p. 54.
This book uses the Sample product-based business file included automatically when you install QuickBooks on the computer. The company name associated with this fictitious data file is Sample Rock Castle Construction. The images and exercises used in the book are from this sample file, but you can read along and practice with any of the installed sample files.
New for QuickBooks 2012! Does the No Company Open dialog box include old, unused QuickBooks files? Would you like to only see QuickBooks files you currently are using?
Click the Edit List link (see Figure 1.2) and place a checkmark next to each company name you want to hide. Click OK to save the changes. Note that the file remains on your computer or server and can later be opened by selecting File, Open or Restore Company from the menu bar.
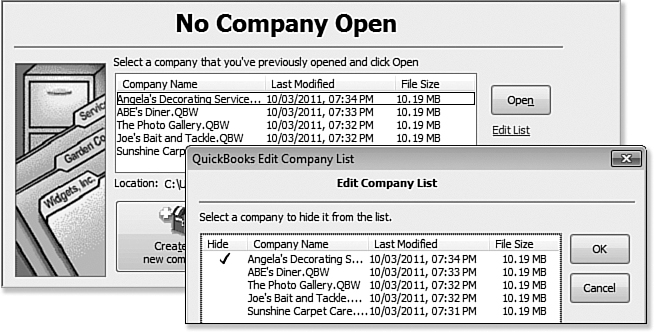
Figure 1.2. Edit the No Company Open dialog box to remove old, unused data files.
Creating a New QuickBooks File
If you are new to QuickBooks, the first task is to create a data file. In the No Company Open dialog box, click the Create a New Company button. The QuickBooks Setup dialog box displays with the following three options:
• Express Start—Create a file quickly with the least amount of initial setup time.
• Advanced Setup—Answer a series of questions to help you set up your new file. This feature was formerly known as EasyStep Interview in previous versions of QuickBooks.
• Other Options—Open an existing file, convert Quicken data, or convert other accounting software data.
![]() To learn more about other options your accounting professional might have with QuickBooks Accountant 2012, see “Creating a New File from an Existing Company File,” p. 33.
To learn more about other options your accounting professional might have with QuickBooks Accountant 2012, see “Creating a New File from an Existing Company File,” p. 33.
Choose from one of the three options that best suits your needs; each one is detailed in the following sections.
![]() To learn more about upgrading to QuickBooks 2012 from an older version of QuickBooks, see “Upgrading Your QuickBooks Version,” p. 559.
To learn more about upgrading to QuickBooks 2012 from an older version of QuickBooks, see “Upgrading Your QuickBooks Version,” p. 559.
Express Start
With Express Start you can be using your new file in just three easy steps. Express Start will guide you through the basics of entering your company information, contact information, and—optionally—contacts, products, services, and bank accounts.
From the menu bar, select File, Create a New Company, and then click the Express Start button in the QuickBooks Setup dialog box. Alternatively, click the Create a New Company button in the No Company Open dialog box and then click the Express Start button.
Step 1—Tell Us
Enter the required information about your business including Company Name, Industry, and Company Type. Click Help Me Choose to see the choices available for Industry and Company Type. (Based on your selections, QuickBooks will assign an industry-specific chart of accounts that can be modified.) Optionally, enter your company’s federal tax identification number as shown in Figure 1.3. When finished, click Continue.

Figure 1.3. With Express Start you can be using your file in no time!
Step 2—Contact Info
Enter your business contact information. This information can be included on your customer invoices and other forms in QuickBooks.
To open the Preview Your Company Settings dialog box, click the link with the same name. Here is where you can review your current settings. Click each of the displayed tabs to see the features, chart of accounts, and company file location QuickBooks suggests for you based on your answers in Step 1. If you need to change the location where your QuickBooks data file will be stored, click Change Location on the Company File Location tab.
Don’t worry too much about the other settings just yet, as they are easy to modify later in your file and will be addressed in later chapters of the book. Click OK to close the Preview Your Settings dialog box.
Click the Create Company File button to continue to the next step. QuickBooks now creates your file and saves it on your hard drive or to a specific location you selected in Step 2—Contact Info. Optionally, click the Back button to review or change previous settings.
Step 3—Add Info
In this step, you can add your contacts, products, services, and bank accounts to your new data file.
If you wish to skip this step, click the Start Working button in the lower-right corner (see Figure 1.4) to launch the QuickBooks Home page.

Figure 1.4. Adding your lists is easy with the QuickBooks Setup wizard.
Adding Contacts
Now would be the perfect time to add the people you do business with to your newly created file. This list includes customers, vendors, and employees. Adding contacts is a three-step process: choose how to add contacts, select who to add, and review and finish. Later, to learn more about these lists, see Chapter 7, “Setting Up Vendors” and Chapter 9, “Setting Up Customers.”
To add contacts using the QuickBooks Setup wizard, follow these steps:
1. Click the Add button in the Add the People You Do Business With box (or click Add More if you’ve already entered some names) to import or enter the names of people you do business with.
2. If you selected the Add option, you can choose how to add from these choices:
• Import From Outlook, Yahoo, or Gmail Email—Follow the instructions for importing from one of the listed mail carriers. You will be able to specify which contacts you want imported into QuickBooks. For Outlook, if you have more than one address book, you can choose which one to use for the import. For other mail carriers you might receive an email message that you have shared your address book with QuickBooks.
• Paste From Excel or Enter Manually—Your imported contacts will display in the spreadsheet-like form shown in Figure 1.5. Be sure to scroll to the right to see additional data fields. You can also copy and paste from Excel or manually enter contacts directly in the form before importing.
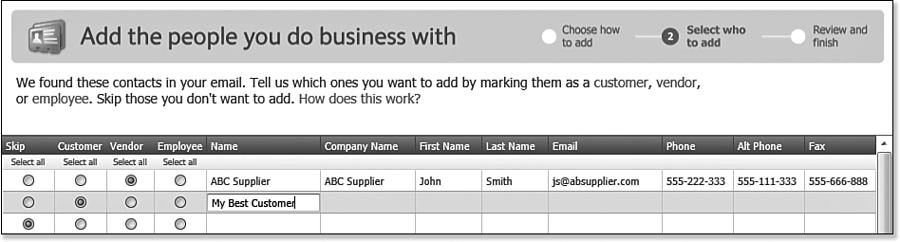
Figure 1.5. Adding the people you do business with is easy when getting started with QuickBooks.
If you are not sure how to enter information into this grid, you can skip this step and then enter your contact information later. QuickBooks also makes it easy to edit the information imported later.
3. If you selected Add More, you are returned to the Add the People You Do Business With dialog box with the same choices as listed in step 2 previously.
4. After importing or entering manually, click Continue to review and finish. QuickBooks Setup will check your list for duplicate names or emails. If any duplicates are detected, you will need to change the Name field (not the Company Name field) so no duplicates are imported.
5. Click the Fix button and QuickBooks displays any contacts that have duplicate names. Change the Name field to make it unique.
6. Click Continue after fixing. QuickBooks will show how many contacts are ready to be added and how many need to be fixed. Follow step 5 again if needed.
7. Click Continue. QuickBooks returns you to the dialog box for you to add more contacts or to add products, services, or bank accounts.
QuickBooks does not allow you to have duplicated entries in the Name field across the many lists. For example, an employee name cannot be the same as a vendor name. An easy fix for this is to add a “V” to the end of the Name field for the vendor listing who is also included on the employee list.
Adding the Products and Services You Sell
You can add the products and services you sell in just a few steps. If your business tracks inventory, you will not want to enter your items here.
To learn more about setting up inventory, see Chapter 6 “Managing Inventory.”
To add products and services, follow these steps:
1. In the Add the Products and Services You Sell section, click Add (or Add More if you’ve already entered some items).
2. Choose an item type and click the Continue button. Non-inventory item types can be changed to inventory later. Item type options in this menu feature include the following:
• Service—work performed by you such as an hour of labor
• Non-inventory part—products you sell but do not want to track as inventory
3. Copy and paste from a list you already have in Excel, or manually enter the item details including the optional description, price, and manufacturer’s part number. Click Continue.
4. QuickBooks will check for any item duplicates or if any items to be imported are already in your QuickBooks file. Click Fix if needed. Click Continue to add the items to your file.
Adding Bank Accounts
Click Add to create accounts to track deposits, payments and how much money you have. Enter the Account Name (required) such as Checking or Savings and optional Account number. You can choose to enter your opening balance here or wait until you have reviewed the information in Chapter 3. If you choose to enter your opening balance, QuickBooks will offset the entry to the Opening Balance Equity account. Ask your accountant to help you reassign this entry to the appropriate account.
The bank account information you enter is necessary for you to properly reconcile your QuickBooks bank account. For example, if you are going to use 10/1/16 as your new start date, you would enter your Opening balance which would be the 9/30/16 statement ending balance not including any uncleared checks or deposits. You will enter these individually later. For the Opening balance date you would use 9/30/16 in this example.
To add your bank accounts into your new QuickBooks file, follow these steps:
1. Click the Add button in the Add Your Bank Accounts dialog box.
2. Type your Account Name, Account Number (optional), Opening Balance (optional), and Opening Balance Date (optional).
3. Click Continue. QuickBooks displays information about ordering checks from Intuit.
• Select Yes, Remind Me Later (you will be prompted to create an alert); when done, proceed to step 4.
• Select No Thanks and proceed to step 4.
• Select Order Now, follow the prompts to complete this action, then proceed to step 4.
4. Click Continue and QuickBooks adds the bank account to your data file.
You are now ready to begin working with your QuickBooks file. Simply click the Start Working button. The Ready to Start Working dialog box displays with useful links to start entering transactions right away. Click the “X” in the red box top-right corner to close this dialog box.
Remember, everything you have entered so far is completely modifiable in your newly created QuickBooks file.
You can now skip to the section in this chapter titled, “Setting Up Users and Permissions.”
Advanced Setup Using EasyStep Interview
For help in creating a new file, earlier editions of QuickBooks did not have the Express Start option but instead offered the QuickBooks EasyStep Interview, which is now accessed from Advanced Setup in QuickBooks 2012.
If you select the Advanced Setup option, QuickBooks provides a series of question-and-answer type choices to help you properly set up your data file and certain default features.
Information to Collect
Having the following information on hand before starting the Advanced Setup can help you when entering the details:
• Company name—This should be the company name or a name that best describes the business. By default, this is the filename given to the data file (.QBW extension) on your computer.
• Legal name—The legal name displays on certain reports and federal tax forms.
• Tax ID—Although this ID is not required to begin using QuickBooks, it is required if you want to sign up for one of the QuickBooks payroll services or use QuickBooks to print 1099s.
• Remaining information—This includes a phone number, email address, website, and so on (see Figure 1.6). This information can optionally be included on a customer invoice.

Figure 1.6. Selecting Advanced Setup provides access to the EasyStep Interview.
If you need to leave the EasyStep Interview at any time after saving the file, QuickBooks returns to the point you left off when you open the data file again.
The EasyStep Interview now prompts you for certain information based on what industry you selected. Your answers to the remaining questions will make certain features in QuickBooks the default. The purpose of this chapter is not to define each of these choices; most are self-explanatory or are included in various chapters in this book. However, discussing the effect of several important choices is useful at this time.
Using Advanced Setup (EasyStep Interview)
You may prefer to have a bit more control of the setup process up front. This is exactly what the Advanced Setup (also known as the EasyStep Interview) offers.
To create a new file using Advanced Setup, from the menu bar, select File, Create a New Company, and then click the Advanced Setup button in the QuickBooks Setup dialog box. Alternatively, click the Create a New Company button in the No Company Open dialog box and then click the Advanced Setup button.
• Enter Your Company Information—Enter your Company Name, Legal Name, Tax ID, and other information that can be included on customer invoices and other forms within QuickBooks. Click Next.
• Select Your Industry—QuickBooks can help you get started quickly, by providing basic information for particular industries (see Figure 1.7). Pick an industry that closely matches your own. Click Next.

Figure 1.7. QuickBooks includes customized settings for your specific industry.
• How Is Your Company Organized?—Select the legal organization your company selected when obtaining your Federal Identification Number. This choice will create unique Equity accounts to match your legal selection. Click Next.
• Select the First Month of Your Fiscal Year—Select the month your fiscal year starts in. This will default certain reports to display the correct fiscal year dates. Click Next.
• Set Up Your Administrator Password—It is recommended that you set up an administrator password. If you do not set one during the EasyStep Interview, you can open a QuickBooks file with the default username of Admin and leave the password blank. Using a blank password is fine during the initial setup, but you should put more security in place after you enter sensitive information. You can also set up this password later. Click Next and QuickBooks will create your company file.
• Create Your Company File—QuickBooks requires that you store the company data file and provide a name for the file. Click Next. Browse to select a location to store your file or accept the default location and name suggested by QuickBooks. Click Save. QuickBooks displays a progressive message that your file is being created.
• Customizing QuickBooks for Your Business—After reading the information, click Next.
• What Do You Sell?—Choose from Services, Products, or Both Services and Products. This preference affects the type of default invoice form that is selected when you begin using QuickBooks. Click Next.
Do not worry if you cannot complete the entire set of questions at one time. After QuickBooks creates the file you can click the Leave button. QuickBooks saves your choices and when you reopen the data file, QuickBooks will return you to that same section.
• Do You Charge Sales Tax?—Specify whether or not you want to charge sales tax, choosing from the Yes or No option button. (You can change this later if necessary.) Click Next.
• Do You Want To Create Estimates in QuickBooks—Select the Yes or No option button. If you provide a proposal to your clients or multiple proposals, you will want to enable this feature. Click Next.
• Tracking Customer Orders In QuickBooks—Choose from Yes or No options. (This feature is only available in QuickBooks Premier, Accountant, or QuickBooks Enterprise Solutions.) For more information, see “Using QuickBooks Sales Orders,” p. 292. Click Next.
• Using Statements in QuickBooks—Choose between Yes or No. This option will enable you to print past-due statements for your customers. Click Next.
Not certain which choice to make when completing the Advanced Setup (EasyStep Interview)? No worries, QuickBooks will select the recommended option based on the industry you selected in Step 2.
• Using Invoices In QuickBooks or Using Progress Invoicing in QuickBooks—Choose from Yes or No. Selecting Yes enables the use of customer invoices. In selected industries you might be prompted to enable progress invoicing. Progress invoicing is “milestone billing” (when you invoice a customer progressively during a job).
• Managing Bills You Owe—Choosing Yes enables you to enter vendor bills and pay those bills at a later date. Working with vendors is discussed in Chapter 8, “Managing Vendors.” Click Next.
• Tracking Inventory in QuickBooks—Select Yes or No to enable this feature. Remember, these features can later be enabled in Preferences. To learn more about inventory review Chapter 5, “Setting Up Inventory” and Chapter 6, “Managing Inventory.” Click Next.
• Tracking Time In QuickBooks—Tracking time enables you to bill customers for time, analyze time on projects and pay hourly employees. Select Yes or No. Click Next.
• Do You Have Employees?—Choose either W-2 employees or 1099 contractors. If you selected Yes to W-2 employees, QuickBooks will create the needed Chart of Accounts items. This setting can be modified later. Click Next.
• Using Accounts In QuickBooks—Click the link “Why Is the Chart of Accounts Important” to learn more about this list in QuickBooks. This list is also discussed in Chapter 4, “Understanding QuickBooks Lists.” Click Next.
• Select A Date To Start Tracking Your Finances—Choose from Beginning of This Fiscal Year: 01/01/2016 (for example) or Use Today’s Date or The First Day of the Quarter or Month. These are examples of potential start dates. Click Next when completed with this selection.
• You start using QuickBooks immediately upon starting your business with no prior expenses or income. This date is the easiest one to work with because you have no historical balances or transactions to consider. You begin by paying vendors and invoicing customers. Everything else will fall into place.
• At the beginning of a calendar year, such as January 1, 20xx. This choice is common when the decision to begin using QuickBooks is at the end of a year or not very far into the new year. Again, if the company has previously had business transactions, there will be beginning balances to enter.
![]() To learn more, see “Setting Up a QuickBooks Data File for Accrual or Cash Basis Reporting,” p. 63.
To learn more, see “Setting Up a QuickBooks Data File for Accrual or Cash Basis Reporting,” p. 63.
• At the beginning of your fiscal year, (for companies whose tax year does not coincide with the calendar year).
• The first day of a month during the current calendar or fiscal year.
• Review Income and Expense Accounts—You are provided the opportunity to include or exclude certain default chart of accounts from your new data file. Click Next.
• Congratulations—You are finished with the Advanced Setup. Click Go to Setup.
• You’ve Got a Company File!—You can now add contacts, products and services, and bank accounts as discussed in the “Express Start” section earlier in this chapter.
If you select the incorrect first month of your fiscal year during the EasyStep Interview, you can easily change it by selecting Company, Company Information from the menu bar. Changing this month does not affect individual transactions but does ensure that the reports that are based on a fiscal year are correct.
Creating a New File from an Existing Company File
New for QuickBooks Accountant 2012 and QuickBooks Enterprise Solutions Accountant 12.0 is the option to use an existing QuickBooks data file to create a new data file from as shown in Figure 1.8. Your original file is left unchanged in the process.

Figure 1.8. Create a new file from an existing file, available only with QuickBooks Accountant 2012 or Enterprise Solutions Accountant 12.0.
To create a new file from an existing file, follow these steps:
1. From the QuickBooks Setup dialog box, click the Other Options button and select Create from Existing Company File from the drop-down list.
The Create from Existing Company File dialog box opens.
Use by accounting professionals that want to create a new file from an existing file. Sensitive data is not copied.
2. By default, the currently opened company is selected as the file to be copied from. To select a different QuickBooks file, click the Browse button.
3. Enter a Name for the new company file.
4. Click Create Company.
5. Accept the default Filename and location for saving your new file or modify as needed.
6. Click Save.
Using the Create from Existing Company File process, QuickBooks copies only the following information from one file to another:
• Preferences—Not including those for bank or credit card accounts
• Items List—Only sales tax items, no products or services
• Memorized Reports—Only those that do not filter for specific accounts, customers or jobs, vendors, items, or employees
• Type of Tax Form—Useful if you are going to integrate with tax preparation software
• Chart of Accounts—No bank accounts are copied
If you find that you wanted more details copied from the original file, or wanted to remove specific year’s transactions, ask your accounting professional to use QuickBooks Accountant 2012 software and provide you with a newly created “Condensed Data” file.
Not using the Accountant version of QuickBooks software? Or would you like to be able to copy the products and services from one file to another? Consider using the IIF (Intuit Interchange Format) export. From the menu bar, select File, Utilities, Export, Lists to IIF Files.
With this option, you are able to select a specific list (not transactions) that you want to import into another QuickBooks file.
Hopefully you found one of these options best for your needs in starting your new QuickBooks file. The next section in this chapter covers converting other accounting software to a QuickBooks file.
Converting from Other Accounting Software
QuickBooks has automated the process of converting files from other financial software into QuickBooks files. The other programs you can convert from include the following:
• Quicken
• Peachtree by Sage
• Microsoft Small Business Accounting
• Microsoft Office Accounting
This section provides specific details about how QuickBooks handles the conversions and what you need to consider when making the choice to convert existing data from one of the listed financial software programs to a QuickBooks data file.
![]() Before converting your company data to QuickBooks, make sure you have QuickBooks installed and registered/licensed and updated to the latest release. For more information, see “Managing Your QuickBooks Database,” p. 551.
Before converting your company data to QuickBooks, make sure you have QuickBooks installed and registered/licensed and updated to the latest release. For more information, see “Managing Your QuickBooks Database,” p. 551.
Even with the automation of the process, you should consider finding a QuickBooks Certified ProAdvisor in your area to assist with the conversion. From the Help menu in QuickBooks, select Find a Local QuickBooks Expert.
Converting from Quicken to QuickBooks
To begin the conversion from Quicken, open QuickBooks, select File, New Company from the menu bar, and then select Convert Quicken Data from the Other Options drop-down list in the QuickBooks Setup dialog box. The Conversion tool copies your Quicken data to a new QuickBooks file, leaving your original Quicken data file unchanged.
Table 1.2 shows you how the Quicken accounts are converted into QuickBooks accounts.
Table 1.2. Quicken Account Conversion
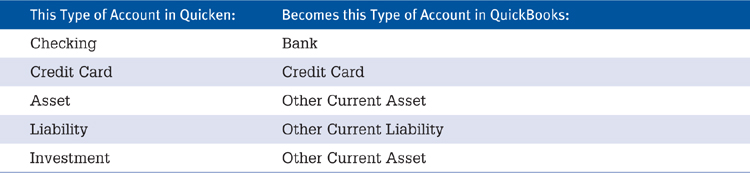
Because QuickBooks does not offer the Investment tracking feature that is in Quicken, you can choose whether to include or exclude the value of your investments in the resulting QuickBooks balance sheet. If you choose to include them, QuickBooks converts the investment accounts into the Other Current Asset chart of account type.
If you choose to exclude the investments, you are given the opportunity to delete the accounts before converting to QuickBooks. Any transfers that were recorded to or from the deleted accounts are recorded to your opening balance equity account. This is in keeping with the “debits equal credits” accounting that is going on behind the scenes in QuickBooks.
You are asked whether there is a Quicken Accounts Receivable account with customer payments. If you click Yes, the QuickBooks Conversion tool asks you to identify your Quicken Accounts Receivable account. QuickBooks then begins converting the Quicken transactions to QuickBooks Accounts Receivable transactions. This process can take several minutes.
• QuickBooks creates an Opening Balance Equity account to compensate for deleted Quicken accounts.
• Memorized Invoices in Quicken might need to be reviewed, making sure the items memorized in Quicken remain on the invoice in QuickBooks.
• Duplicate check, invoice, or credit memo numbers are stored in a QBwin.log for review. You will learn more about this log in Chapter 17., “Managing Your Quickbooks Database.”
• Every payee name in Quicken must be on a QuickBooks list.
Because QuickBooks cannot determine which list a name belongs to, it places all names on the Other Name list (see Figure 1.9).
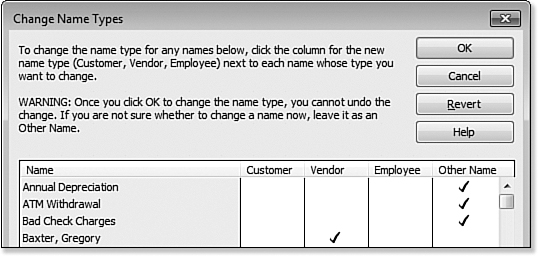
Figure 1.9. After converting from Quicken you will need to reassign most of the names on the other names list to the Customer, Vendor, or Employee Lists.
From the menu bar, select Lists, Other Names List to open the Other Name List dialog box. Right-click this dialog box and then select Change Other Name Types for a one-time option to change the payee from an Other Name list item to a vendor, employee, or customer. If you do not need to use a name on vendor form or customer form, you can leave the name on the Other Names list.
After you click OK to change the name type, you cannot undo the change. If you are not sure what list the payee belongs to, leave it as an Other Name.
Converting from Peachtree, Small Business Accounting, or Office Accounting to QuickBooks
Just as in the Quicken conversion, QuickBooks can convert your Peachtree, Small Business Accounting, or Office Accounting data to QuickBooks data directly from the EasyStep Interview dialog box. The conversion process leaves your original Peachtree, Small Business Accounting, or Office Accounting data untouched.
To download the free conversion tool, follow these steps:
1. From the menu bar, select File, New or, alternatively, click the Create a New Company button in the No Company Open dialog box. The QuickBooks Setup dialog box displays.
2. From the Other Options drop-down list, select Convert Other Accounting Software Data (Internet connection required).
3. Follow the helpful links to get the free conversion tool or to read a Conversion Tool FAQs document.
The free downloadable tool converts Peachtree (2001–2011 versions), Microsoft Small Business Accounting, or Office Accounting (2007–2009 versions). You can convert to a QuickBooks Pro, Premier 2008 or later, or Enterprise Solutions 8.0 or later. The tool can be used to convert multiple company files from any of the named software.
The download link as of the time of this writing for the free conversion tool: http://www.quickbooksdirect.com/convert (if you are not an accountant) or http://accountant.intuit.com/convert (if you are an accountant or QuickBooks ProAdvisor).
In the conversion process, you can select the specific Peachtree, Microsoft Small Business Accounting, Microsoft Office Accounting, or Office Accounting Express file and the QuickBooks product version to which you will be converting it. Additionally, you can specify the conversion of lists and transactions (including historical transactions) or lists only.
Because of the differences between the two products, you are also given a choice to identify customers and vendors in QuickBooks with the name of the Peachtree, Microsoft Small Business Accounting, Microsoft Office Accounting, or Microsoft Office Express ID value. You must choose to use the name or the ID value in QuickBooks, so making this decision before performing the conversion is best.
Key lists that are converted include the following:
• Chart of accounts
• Customer/prospects
• Jobs
• Employees/sales reps
• Vendors
• Inventory item
• Custom fields
• Balance information
Open transactions include the following:
• Open invoices
• Open vendor bills
Customer transactions include the following:
• Estimates
• Sales orders
• Invoices
• Payment receipts
• Deposits
• Credit memos
Vendor transactions include the following:
• Purchase orders
• Bills
• Bill payments
• Checks
• Bill credits
Setting Up Users and Permissions
QuickBooks always creates a default user with the username Admin. The Admin user has full rights to all settings and preferences in QuickBooks. If your company is going to have multiple users accessing the QuickBooks data file, it is recommended that you create a unique user login for each person and assign specific permissions if needed. With unique usernames for each person, QuickBooks will be able to tell you who entered, modified, or deleted a transaction on the Audit Trail report.
External Accountant
Business owners who plan to share data with their accountant at tax time or for other purposes should create a unique user for your accountant. The External Accountant user type has all the controls of the Admin, except that the accountant cannot:
• Add, delete, modify, or view sensitive customer credit card details
• Add, delete, or modify other QuickBooks user settings
To create a user login for your accountant, follow these steps:
1. From the menu bar, select Company, Set Up Users and Passwords, Set Up Users.
2. In the User List dialog box, click the Add User button.
3. Enter a User Name and Password (optional but recommended) and then enter the password again to confirm.
4. If you need to add additional licenses to your QuickBooks file, click the Explain link for more information about Intuit’s licensing policy.
5. Click the Next button. If you didn’t enter a password in step 3, QuickBooks opens the No Password Entered dialog box. Click Yes to create a password or No to skip this step.
Table 1.1 listed the number of users that can work in a company file at the same time, based on the version of the software that you have. If you need to buy additional licenses from the menu bar, select Help, Manage My License, Buy Additional User License.
6. Select the External Accountant option button, as shown in Figure 1.10, and click Next to continue.

Figure 1.10. Creating an External Accountant user for your accounting professional limits access to sensitive customer information.
7. In the Warning dialog box, click Yes to confirm you want to give the user access to all areas of QuickBooks, except credit card information.
8. Click Finish. If a Warning dialog box opens, click OK to confirm that you understand that the Admin user is being assigned to integrated applications.
9. Click Close to close the User List dialog box.
To log in to the file as the new External Accountant user, select File, Close Company/Logoff from the menu bar. From the No Company Open dialog box, select the file from the list. Click Open and enter the username and password.
If you are an accounting professional using QuickBooks Accountant 2012 you can use the QuickBooks File Manager 2012 to store your client’s assigned username and password for you. When you open the client’s file from within File Manager, QuickBooks will automatically log you in, bypassing the username and password dialog. This works with QuickBooks Pro, Premier, or Enterprise 2011 or newer files.
Other QuickBooks Users
Setting up users with permissions is recommended when you have multiple users working in the same QuickBooks file. Transactions are assigned to users and many changes to the file are also tracked to the user who logged into the file.
To create a user login and set permissions for additional users, follow these steps:
1. From the menu bar, select Company, Set Up Users and Passwords, Set Up Users.
2. From the User List dialog box, select Add User.
3. Enter a User Name and Password (optional but recommended) and enter the password again to confirm.
4. If you need to add additional licenses to your QuickBooks file, click the Explain link.
5. If you didn’t enter a password, click Yes to create a password or No to skip this step.
6. Select the access option:
• All areas—Provides access to all parts of QuickBooks except those which require Admin access.
• Selected areas—Allows you to choose the options for access to each sensitive area of your QuickBooks data.
7. You will now work through nine different permission screens and on the tenth screen (see Figure 1.11) you can review the permission settings. Each dialog box offers details about the access levels and most include some or all of the following permission levels:
• No Access
• Full Access
• Selective Access—Includes all or some of these options:
• Create transactions only
• Create and print transactions
• Create transactions and create reports

Figure 1.11. You can review a summary of the access rights assigned to a QuickBooks user.
If you are uncertain about the limitations of a permission setting, I recommend you set it for the Create Only option—the highest level of security. Then log in as that new user and attempt to access an area the employee will work in or an area they shouldn’t be in and determine if the permissions assigned provide the controls you need. QuickBooks will tell you what level of permission is needed for any task you attempt.
With QuickBooks 2012, you have gotten off to a quick start in setting up your new file (or converting from other accounting software) and setting up users with specific permissions. You will also find it helpful to use the QuickBooks sample data when you want to practice or follow along with much of the content in this book.