
17. Managing Your QuickBooks Database
The QuickBooks Database
If you are the typical QuickBooks user, you purchased the software to track the income and expenses of your business. By selecting software for this task, you have advanced from a manual recordkeeping system into the world of database technology.
A database is an automated version of a big file room, with information of different types stored in different cabinets, drawers, and files. Years ago, companies employed file clerks to keep track of the company’s paperwork. QuickBooks uses a Database Server to perform similar tasks to a file clerk, organizing and storing the data you create.
Depending on the number of licenses you purchased, you can choose to install the software as a single user application or install it in a network environment for use by multiple users (see Figure 17.1).
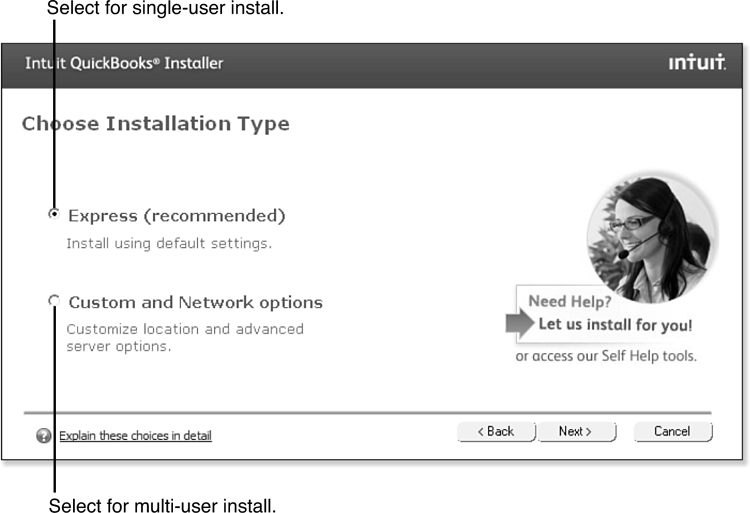
Figure 17.1. QuickBooks guides you through the install of the software.
Based upon your installation selection, QuickBooks either installs the personal Database Server or the network Database Server to control the flow of data from the QuickBooks application to your QuickBooks Company file. During the install, the computer operating system creates a Windows user account for this server in order to assign administrative-level access rights to the computer’s resources and the QuickBooks files. When you view your list of users for your computer, included will be QBDataServiceUser22 (the default Database Server for all QuickBooks 2012 versions). During installation, the QuickBooks Database Server Manager is also installed. This utility is discussed later in this chapter.
Do not delete the QBDataServiceUser22 (or whatever version you are running) from the user’s applet within the Control Panel.
System Requirements
Verify that your computer and network hardware meets the minimum requirements for QuickBooks. This list is applicable to QuickBooks 2012 versions, but you might want to check the requirements for your specific version.
Supported operating systems for QuickBooks for Windows products:
• Windows 7, either 32-bit or 64-bit versions
• Windows Vista, Service Pack 1 including either 32-bit or updated LM64-bit version
• Windows XP, Service Pack 3 and later
Computer processor, memory, and disk space requirements:
• Minimum of a 2.0 GHz processor, 2.4 GHz is recommended.
• Minimum of 1 GB of RAM for single-user configurations, 2 GB recommended.
• Minimum of 2 GB of RAM for multi-user configurations, 4 GB (or more) recommended.
• Minimum of 2.75 GB of disk space for the application, including space required for Microsoft .NET 4.0 Runtime installed with QuickBooks (if not preinstalled on your computer). Additional space is required for your QuickBooks data files.
Additional hardware, software, and Internet connectivity:
• Hardware
• 4x CD-ROM drive required for CD installations
• 1024x768 or higher screen resolution
• 100 Mbps network card, switch or router, 1000 Mbps recommended
• Software for integration capabilities
• Microsoft Word 2003, 2007, or 2010 (including either 32-bit or 64-bit version) for preparation of QuickBooks letters.
• Microsoft Excel 2003, 2007, or 2010 (including either 32-bit or 64-bit version) for spreadsheet integration including QuickBooks Statement Writer (optional).
• Microsoft Outlook 2003, 2007, or 2010 (including either 32-bit or 64-bit version). When installing contact synchronization via QuickBooks Contact Sync for Outlook. For more information on this synchronization, see Chapter 18, “Using Other Planning and Management Tools.”
• Adobe Acrobat Reader, version 5.0 or later.
• Internet Connectivity
• Internet access with at least 56 Kbps connection speed
• Cable or DSL modem is highly recommended over dial-up service
Antivirus and firewall compatibility considerations include:
• Antivirus
• Antivirus products (with/without firewalls) software compatibility
• Symantec/Norton AntiVirus, Internet Security, Norton 360
• McAfee Internet Security, Total Protection, AntiVirus Plus
• Trend Micro Titanium or Trend Micro Worry-Free Business Security
• ZoneAlarm
• Windows firewall compatibility
• Windows 7 firewall (all versions)
• Windows Vista firewall (all versions)
• XP firewall (all versions)
Installing QuickBooks for Single-User Mode
Select the Express option (as shown in Figure 17.1) when you need to use QuickBooks from a single computer. QuickBooks installs the application and database manager in the C:Program FilesIntuitQuickBooks 2012 folder; if you are using a 64-bit version of Windows the installation folder is C:Program Files(x86)IntuitQuickBooks 2012.
By default, QuickBooks uses the following locations for storing your data file, although you can select a different directory if desired:
• Windows 7: C:UsersPublicPublic DocumentsIntuitQuickBooksCompany Files
• Windows XP: C:Documents and SettingsAll UsersDocumentsIntuitQuickBooksCompany Files
• Windows Vista: C:UsersPublicPublic DocumentsIntuitQuickBooksCompany Files
QuickBooks prompts you to enter the license and product numbers; these numbers are provided on a bright yellow sticker on the QuickBooks CD sleeve or if you have downloaded the software, you will receive an email with the registration details. Follow the remaining instructions for installing the QuickBooks software.
Installing QuickBooks for Multi-User Mode
QuickBooks 2012 streamlines the process of installing QuickBooks for multi-user simultaneous access to your company data. As discussed in the introduction, when QuickBooks is going to be used in a multi-user configuration there must be one computer on your network that will act as the QuickBooks Server to host your data files and the QuickBooks Database Server.
It is not necessary to use an actual Windows Server as your QuickBooks host because QuickBooks runs equally well on peer-to-peer and client-server domain networks. When you install QuickBooks on a network, you should always perform the installation on the server before installing QuickBooks on any workstations.
During installation, QuickBooks will prompt you to select the installation type as shown in Figure 17.1. Select Custom and Network Option for all network installations, including server (host) and workstations (clients). Follow the remaining prompts to select the installation options that best fit your network requirements for the specific computer you are installing. The choices include
• I’ll Be Using QuickBooks on This Computer—If you are installing QuickBooks on a computer that will only access the Company files across the network.
• I’ll Be Using QuickBooks on This Computer, AND I’ll Be Storing Our Company File Here So It Can Be Shared Over Our Network—You will possibly run QuickBooks from this machine and have it act as your QuickBooks Server, which hosts your company files.
Using the “I’ll Be Using QuickBooks on This Computer, AND I’ll Be Storing Our Company File Here....” option is the preferred server option even if QuickBooks will not routinely be used on this machine. Selecting this option allows the QuickBooks application to be opened on the server to perform certain file-related functions, including back-up activities.
• I Will NOT be Using QuickBooks on This Computer...—You can elect to install only the QuickBooks Database Server and QuickBooks Database Server Manager Utility on the hosting computer. This install does not require a license.
You will then be prompted to enter your license and product numbers. Follow all additional prompts to complete the install process.
If you do not have a version of QuickBooks already installed, the Installation Location Options screen appears. Browse to select the desired location you want to install the new version to.
If you selected I Will NOT be Using QuickBooks... option, you should also review the section in this chapter titled, “The QuickBooks Database Server Manager.”
Once all your settings are correct for your network, click Install from the Ready to Install dialog box. As with the Express install, QuickBooks will display a progress bar indicating the status of the install process.. The Congratulations dialog box will display when the installation is finalized. You can either launch QuickBooks to begin creating a new file or open an existing file or practice file.
![]() For more information, see “Getting Started with QuickBooks,” p. 21.
For more information, see “Getting Started with QuickBooks,” p. 21.
The QuickBooks Database Server Manager
Automatically installed is the QuickBooks Database Server Manager Utility, if you selected the option I Will NOT Be Using QuickBooks on This Computer. I Will Be Storing Our Company File Here So It Can Be Shared Over Our Network (A License Is Not Required For This Option). This utility will launch automatically once the installation is complete.
The QuickBooks Database Server Manager is only needed if you are using QuickBooks in multi-user mode.
Changing to Multi-User Access
If you initially installed QuickBooks for single-user access and want to change it to multi-user access, follow these steps to enable the Database Server Manager utility:
1. From the menu bar, select File, Utilities, Host Multi-User Access.
2. Click Yes to the Start Hosting Multi-User Access message that displays.
3. Click Yes to the Company file must be closed. If prompted, click Continue to allow Windows administrator permissions and Yes to allowing the changes to be made to your computer.
QuickBooks installs the network database server as a windows service/process and it is configured to run under the QBDataServiceUser22 user account. (This is the user account assigned to QuickBooks 2012.)
The QuickBooks Database Server Manager utility provides users access to configure the database server. It is critical that this utility be running and properly configured to permit multi-user simultaneous access to your QuickBooks Company data files.
Opening the QuickBooks Data Server Manager
Your computer might display the utility in your system tray in the lower right of your computer task bar. If not, you can open the QuickBooks Data Server Manager by following these steps:
1. From the Windows Orb or Windows Start button (lower-left corner of windows taskbar), click All Programs.
2. Scroll to find and select the QuickBooks folder.
3. Click the QuickBooks Database Server Manager to launch it, as shown in Figure 17.2. The data path displayed in this figure might differ from your own data path.
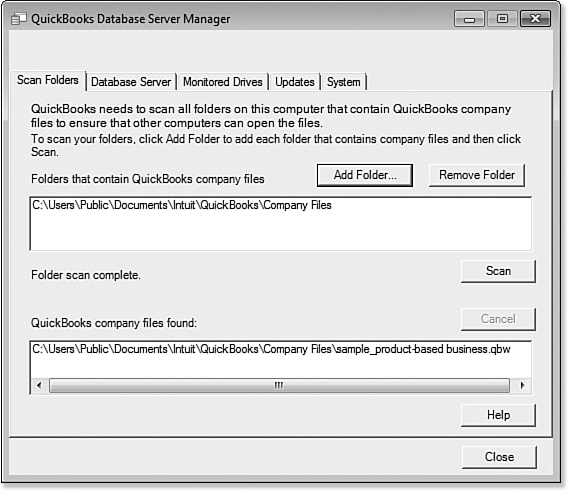
Figure 17.2. The Database Server Manager is used to configure proper multi-user hosting.
The Scan Folders tab consists of two main panels, each performing critical functions. The first is to identify the various windows folders on the QuickBooks server computer that contain QuickBooks data files. To add folders click the Add Folder button and use the Windows directory service display to locate all folders appropriate for your network configuration.
Once all folders containing QuickBooks data files are displayed in the top panel, perform a scan of those folders to locate your QuickBooks files; these files will then appear in the lower panel. A result of this scanning process is that the Database Server creates a *.QBW.ND file for every QuickBooks Company file. This Network Description file contains critical information about the Database Server’s location on your network including the server name and IP address. When a QuickBooks workstation accesses the Company file the companion *QBW.ND file advises QuickBooks where and how to find the Database Server.
The QuickBooks Administrator should also configure the Monitored Drives tab, selecting the computer disk drive(s) containing the folders where QuickBooks Company files are located. The utility will then monitor these drives to identify new *.QBW or *.QBA files that might be added to those drives and directories.
![]() For more information about these named QuickBooks file types, see “Choosing a Method to Share Data,” p. 520.
For more information about these named QuickBooks file types, see “Choosing a Method to Share Data,” p. 520.
The Database Server tab displays information about the Database Server, the current QuickBooks Company file(s) in use, and the name of the user logged in. The Updates tab provides information about the current version of the QuickBooks Database Server; it is essential the Database Server version always match the QuickBooks version in use.
For QuickBooks to operate properly, you should never close the QuickBooks Database Server Manager unless you must also shut down the Server for other reasons. A best practice is to minimize the utility.
If your QuickBooks network suddenly starts suffering from inability to connect one or more workstations in multi-user mode to your Company file, you should promptly check to ensure that the QuickBooks Database Server Manager is running and still configured on the hosting computer.
Some Windows updates require a reboot of the computer. The QuickBooks Database Server Manager Service might have been stopped in the process. Contact your IT professional to restart the process. You might also need to perform the Scan function again to locate the data files on your computer.
Windows Permissions Required for QuickBooks
Simply installing QuickBooks for single-user or multi-user configuration will not guarantee that it will work properly. Certain Windows user permissions must be established to ensure proper access. All QuickBooks users must have full control including read/write privileges for any directory from which Company data files will be accessed.
Setting Permissions in Windows 7 or Windows Vista
To properly configure Windows 7 or Windows Vista user permissions, follow these steps:
1. Using Windows Explorer, locate the folder containing your QuickBooks Company files.
2. Right-click the folder and select Properties.
3. Click the Sharing tab and then click the Share button.
4. In the File Sharing window, use the drop-down list to select each User needing access to QuickBooks and click Add.
5. In the Permission Level column, click the Read drop-down list and select Read/Write.
6. Click the Share button to close the File Sharing window, and then click the Security tab in the Properties window.
7. Click the Edit button for the Group or usernames section.
8. Click the QBDataServiceUser22 User.
9. In the Permissions for QBDataServiceUser22, check the Full Control checkbox in the Allow column, and click OK.
10. Click Close.
Setting Permissions in Windows XP Professional
To properly configure Windows XP Professional user permissions, follow these steps:
1. Using Windows Explorer, locate the folder containing your QuickBooks Company files.
2. Right-click the folder and select Properties.
3. Click the Sharing, Share this folder option.
4. Click the Permissions button.
5. In the Group or usernames section, select Everyone.
6. In the Permissions for Everyone section, check the Full Control checkbox in the Allow column.
Using the QuickBooks Connection Diagnostic Tool
The QuickBooks Connection Diagnostic Tool assists users in diagnosing and correcting various problems preventing proper connections between the QuickBooks application, the Database Manager, and QuickBooks Company files. This tool can troubleshoot the most common networking and multi-user errors (including H-series or 6000-series errors) that occur when trying to open a Company file.
To download this free tool, visit the QuickBooks support website (http://support.quickbooks.intuit.com) and search for Connection Diagnostic Tool. Click the supplied link for the tool.
Once it has downloaded, click the .exe file and follow the install prompts. To launch the tool (see Figure 17.3), follow these steps:
1. Click the QuickBooks Connection icon from your desktop.
2. Click OK, if an information message displays.
3. If necessary, click Yes to the User Account Control message, allowing the program to make changes to your computer.

Figure 17.3. Used to diagnose and assist in repair of network connection issues.
Browse to the location of your QuickBooks file and click the Test Connectivity button. QuickBooks will perform certain diagnostics. If any error messages display, click the appropriate links for more information or for help in resolving problems.
Keeping Your Software Current
Intuit has a service discontinuation policy on its software. Live technical support and add-on business services such as payroll, credit card processing, QuickBooks Email, and online banking will be discontinued for versions three years or older.
Typically, you will need to upgrade your software by May 31st of each year for versions of QuickBooks 3 years or older to retain these active services if you are using a version of QuickBooks that is three years or older.
Upgrading Your QuickBooks Version
To keep your QuickBooks software supported, you will need to upgrade at least every three years, and if you are like me, you will want to upgrade each year to take advantage of the newest features. I offer a document on my website each fall detailing the newest features with each release. You can access this by visiting my blog and searching for “What’s New” i the blog title: www.quick-training.com/blog.
If you are using QuickBooks Enterprise and you subscribe to the annual Full Service Plan, you will receive the newest software version each year at no additional cost, in addition to having access to elite technical support.
If you have used QuickBooks before, then when you purchase the newest year edition, you will be upgrading your QuickBooks file. QuickBooks Pro and Premier both can be upgraded to a QuickBooks Enterprise Solutions file. QuickBooks Enterprise Solutions cannot be downgraded to a QuickBooks Pro or Premier file.
The upgrade process is quite simple. If a prior installation of QuickBooks is detected, you will have the option to Upgrade or Change Installation location. If you want to upgrade the prior version, select Replace the Version Selected Below with the Version I’m Installing Now. From the drop-down list, select the version you want to upgrade. The windows path for your current version of QuickBooks displays.
However, if you want to install QuickBooks 2012 without upgrading any existing version, select the Change the Install Location option. Select a different location by clicking the Browse button and locating a new installation folder. If the folder you want to use does not exist, click the Create New Folder icon for your installation. Follow the instructions for completing the install process.
Installing a QuickBooks Maintenance Release
After a version is released, changes, improvements, and fixes are provided in the form of a maintenance release. Often, Intuit will offer the release as a manual download only. This is usually during the testing phase and you may not want to install the update in this phase.
To choose how QuickBooks detects if there is a maintenance release, follow these steps:
1. From the menu bar, select Help, Update QuickBooks.
2. The Overview tab displays on the Update QuickBooks dialog box. Read the provided information. Optionally, click Update Now if you want to complete the task.
3. Click the Options tab and select from the following:
• Automatic Update—If you select Yes, QuickBooks will automatically download the update and provide a dialog box for you to install the update the next time you launch QuickBooks.
• Shared Download—If you work with multi-users accessing QuickBooks, you should select Yes to share the download with the others. This will save time and ensure that other users can access the newly updated file.
• Download Location—QuickBooks displays the location and name of the downloaded file.
4. You can then choose which updates to install, choosing from:
• Payroll
• Federal Forms
• Forms Engine
5. Click Save if you have made your changes, click Revert to return to the original settings or Close if you have not made any changes. Optionally, click Help for more guidance.
6. Click the Update Now tab. From this tab, you can choose which updates to install, when they were last checked, and the status.
7. Optionally, select the Reset Update to reinstall the entire update or select Get Updates.
8. A progress message displays. Click Close when finished.
To confirm that the newest maintenance release installed, you may need to close QuickBooks and relaunch the software. You can also check the product information window from an open QuickBooks file by selecting the F2 key on your keyboard and reading the Product line at the top. Refer to Figure 17.7.
Protecting Your QuickBooks Database
It is a good practice to protect your QuickBooks data and safeguard it against some unforeseen catastrophic event. In addition to making a backup of your data regularly, you might also consider including power protection, virus protection, and computer disk defragmentation.
Creating a QuickBooks Backup
Even with the best planning and safeguards, unforeseen catastrophic events can happen. Safeguard your company data by creating a regular backup.
You can perform a backup with multiple users logged in to the file. However, the backup process will not perform the recommended verification of the data as part of the backup.
Ideally, you should back up your company at the end of each session. However, if you are working in a multi-user environment, you should routinely wait until the end of each workday to back up. If your computer has more than one drive, you can back up onto a different disk drive from the one where your QuickBooks data is normally stored. If you only have one hard drive then you should back up onto some type of removable media such as a USB flash memory drive.
To make a backup of your QuickBooks data, follow these steps:
1. From the menu bar, select File, Create Backup.
2. Select Local Backup.
3. Click Options. The Backup Options dialog box displays as shown in Figure 17.4. You can skip this step if you do not need to adjust your backup options.
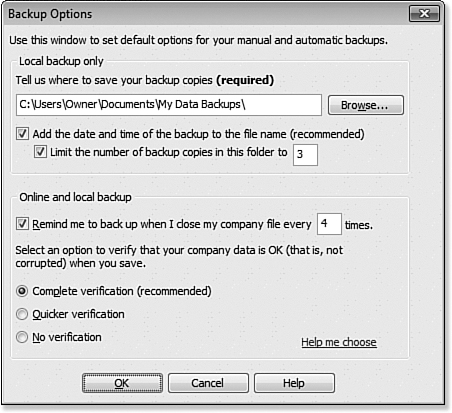
Figure 17.4. Create a backup of your QuickBooks file for safekeeping.
4. Choose the Browse button and browse to select a location to save your backup. It is recommended that you save your backup file to a location other than the location where the data is stored.
Complete Verification is only available when the file is in single-user mode when performing the backup.
5. Optionally, choose to Add the Date and Time, and to Limit the Number of Backup Copies in the selected folder.
6. Select the Complete Verification (recommended) option. For more information, see the section in this chapter titled “Using the Verify Data Utility.”
7. Click OK. If you have selected a location for the backup that is the same as the where the data is stored, a warning message might display recommending that you Change Location for the backup copy. Click Change Location (recommended) or Use This Location.
8. From the Create Backup dialog box, select Next.
9. Select Save It Now and click Next.
10. Type a filename for your backup, or accept the default filename.
11. Click Save.
Automating Your QuickBooks Backup
To create a schedule for automatically backing up your QuickBooks data file, follow these steps:
1. Follow steps 1–7 listed in the previous section titled “Creating a QuickBooks Backup.”
2. Select one of the following options: Save It Now and Schedule Future Backups or Only Schedule Future Backups. The Where Do You Want to Backup Your Company File? message will display if you have not previously set your file to backup automatically.
3. Optionally, select the Save Backup Copy Automatically... and define the number of times.
4. To set a Backup on a schedule, click the New button to display schedule details as shown in Figure 17.5. Type a description for the backup, browse to the desired location, and define the number of Backup Copies to Keep.

Figure 17.5. Schedule an automatic backup of the QuickBooks file.
5. Select the Start Time, how often the task is run, and on what specific days.
6. Optionally, click Store Password if your computer is password protected. Click OK to return to the Schedule Backup dialog box.
7. Click OK to close the Schedule Backup dialog box.
8. Click Finish to save the schedule.
9. Click OK to close the confirmation message that a backup has been scheduled.
Restoring a Backup
If you find you need to restore your data from a backup, follow these steps:
1. From the menu bar, select File, Open or Restore Company.
2. Select Restore a Backup Copy. Click Next.
3. Select Local backup. Click Next.
4. Locate the backup file and click Open.
5. Click Next after reading the message about Where Do You Want to Restore the File.
6. Browse to select the location and type a name to be given to the restored file. Click Save.
7. QuickBooks provides a progress bar as the file is being restored. Click OK to the information window that the file was restored successfully.
Protecting the QuickBooks Operating Environment
To prevent an unexpected, or unattended shutdown an uninterruptable power supply (UPS) should be installed on each of your computers running QuickBooks, as well as all network components that connect those computers. An adequately sized UPS can prevent power blackouts, brownouts, and surges. A Smart-UPS that automatically begins closing open programs and powering down the computer prior to depletion of the UPS battery should be used when QuickBooks must be left running during unattended periods.
Power Protection
Even if a UPS protects your server and workstation, if the connecting network hardware (switches, hubs, or routers) are not protected, a sudden power event will produce a loss of connection between the QuickBooks client and QuickBooks server, which might result in data corruption. It is recommended that all network hardware also be UPS protected.
Keep your computer safe by preventing power-related corruptions to your QuickBooks and not overloading your UPS with any non-essential computing components.
Do not plug printers, or other appliances into any UPS protecting your computers and network components. Often when a printer or other appliance launches, it pulls a significant load of power that can actually produce a brownout condition within your UPS itself and compromise power protection.
Virus Protection
The Internet has changed our lives, but one unfortunate side effect has been the contagion of computer viruses sent via email (or other data transfers). Because of the Internet no computer, or network, is immune from attack. Malware programmers are looking for weaknesses in the computers of not just big corporations, but small businesses and individuals, in order to steal financial information or create havoc and destruction of our computer applications. Because QuickBooks is the leading financial software on the market, it is a favorite target of many who would seek to invade your Company files for their personal gain.
Good behavior on the part of computer users is not enough to protect your QuickBooks data from attacks. While surfing certain kinds of websites puts users at higher risks of infection, even legitimate websites can be compromised. Seemingly innocent results in a search engine can open hostile sites that immediately download a computer virus. Some of these viruses collect information from your computer (spyware) and some install malicious (malware) software, but they almost all disguise themselves just long enough to take down your data or your network. Even if you never surf the Web you are still vulnerable as long as you have an open Internet connection, or ever access a flash drive or CD.
A high-quality antivirus program is essential if you are running QuickBooks on your computer or over a network. There are effective programs that can run with a minimum of computer resources and will block the overwhelming majority of threats. Set your antivirus program to run in an always-on mode and to perform a regular (preferably daily) scan of your computer. Ensure these programs are up to date; you should update your antivirus software to the most current virus definitions prior to each complete scan. Do not turn your Antivirus software off unless you unplug your computer from the Internet and your network.
Windows Disk Defragmentation Utility
Fragmentation refers to any condition where data is not recorded in a logical continuous order. QuickBooks is subject to two different kinds of fragmentation—disk fragmentation and database fragmentation.
![]() For more information on the latter, see “Database File Fragments,” p. 569.
For more information on the latter, see “Database File Fragments,” p. 569.
An example of disk fragmentation would be when a QuickBooks invoice was recorded on your hard drive adjacent to a picture of your pets. Although it seems ridiculous to anyone who ever worked as a file clerk, this is the normal function of the Windows operating system.
Your QuickBooks company file can be fragmented on your computer’s disk drive just like any of your other files. This occurs when the operating system cannot create, or insert new information into, the file in one logically contiguous space. Because the Windows operating system does not restrict the writing of data to only contiguous areas of your disk drive, as the total amount of data on your disk drive increases, fragmentation also increases.
Because of fragmentation, the hard drive’s disk head must repeatedly move back and forth over the disk when reading and writing various parts of the file. The more the disk head must move from one area to another, the less efficient the disk drive is, lengthening the response time of QuickBooks trying to find your data.
To correct this type of fragmentation we must force our Windows computer to rewrite all of the parts of files to contiguous space on the hard drive. This is called defragmentation and QuickBooks users should routinely run the Disk Defragmentation tool included with Windows software. After running this tool, QuickBooks users should see an increase in the speed of file access and data retrieval.
If your disk drive is less than 10% full, run defragmentation three or four times per year. If your disk drive is running at 25% to 30% of capacity, perform a monthly defragmentation. If your disk drive is at 50% or more of capacity or you have a QuickBooks Company file in excess of 50MB, you might need to run defragmentation once a week.
Defragmenting Your Windows 7 Computer
Choosing to defragment your computer can lead to a more responsive data file, providing quicker retrieval of data for reporting.
1. Click the Windows Orb or Start button in the lower-left corner of your screen.
2. Click All Programs.
3. Open the Accessories folder.
4. Open the Systems Tools folder.
5. Click Disk Defragmenter to open the utility displayed in Figure 17.6.
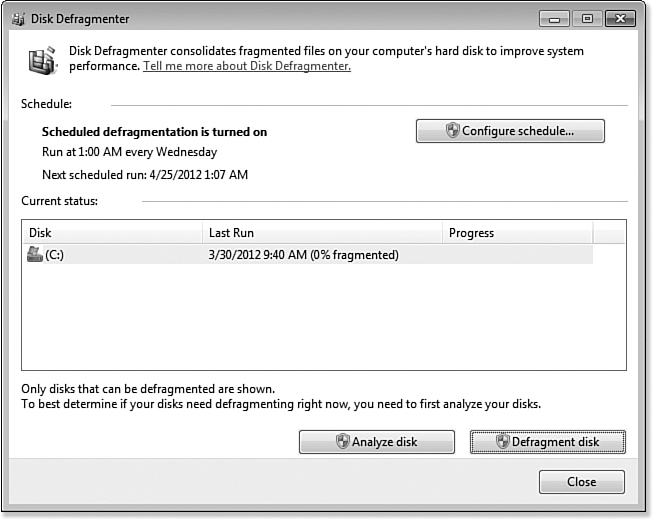
Figure 17.6. Run the defragmenter tool on your computer often.
6. Select the drive you want to defragment.
7. Click Analyze. A dialog box displays after the disk is analyzed, detailing if you need to perform the defragmentation.
8. To defragment the selected drive(s), click the Defragment Disk button. You can monitor the process in the Current status area (under the Progress column). After the process is complete, the results will be displayed.
9. To display more detailed information, click View Report.
10. To close the Disk Defragmenter, click Close.
Using Intuit Data Protect Online Backup Service
Intuit Data Protect is a subscription service that will automatically back up your company file(s) and optionally other important files from your computer. When you use Intuit Data Protect as your backup method all your data needed to restore your company file is saved to Intuit’s secure server. The backup files created by Intuit Data Protect are stored for 45 days enabling you to not only restore the most recent backup but any prior backup during the last 45 days.
Once you have set up your Intuit Data Protect subscription you do not need to establish a backup schedule or perform manual backups. Intuit Data Protect will perform a once-a-day backup of every QuickBooks file you have configured for backup. This is unlike the manual backups, which should be done when no one is working in the file. The Intuit Data Protect backups run in the background enabling you to continue working normally in QuickBooks. If a scheduled backup is missed because your computer is off, or can’t access the Internet, Intuit Data Protect will start a backup as soon as your computer is turned back on or Internet service becomes available.
To restore a backup made using the Intuit Data Protect Backup service, follow these steps:
1. From the QuickBooks Home page, open the Backup Status section in the lower-right corner and click View Details.
2. From the Backup Status dialog box, click Restore a Backup.
3. Select the Date and Time of the backup, and then select the File you want to restore, and click Continue.
4. Select the location where you want your file restored to, and click Restore.
5. Intuit Data Protect begins the process of restoring your file(s) to the designated location. This process can take a substantial period of time depending on the size and number of files you are restoring. Do not attempt to close either Intuit Data Protect or QuickBooks during the restore process.
Upon completion, Data Protect will display a message indicating that the restore completed.
Monitoring Your QuickBooks Database
Because QuickBooks is comprised of a series of tables that store your accounting records, it is important to monitor your data file from time to time to ensure your data has integrity and is of a proper size and configuration. There are a couple of methods in QuickBooks to monitor the database, including the Product Information dialog box and the Verify Data utility.
The Product Information Dialog Box
The Product Information dialog box provides valuable information about the health of your QuickBooks file. From an open QuickBooks file, press Ctrl+1 key or F2 on your keyboard. The Product Information dialog box provides a wealth of information including version, product license number, versions used, and much more. See Figure 17.7.

Figure 17.7. With QuickBooks open, press the F2 key on your keyboard to view useful information about the file.
If you would like more information about QuickBooks file size restrictions, from the QuickBooks support site (http://support.quickbooks.intuit.com), search for Knowledge Base article INF12412.
If you find your data file is becoming sluggish, you might consider starting a new data file or find companies listed on www.marketplace.intuit.com that will “shrink” your current file.
File Size
In Figure 17.7, about halfway down the left side is a section that provides data about the File Size, Total Transactions, Total Targets, Total Links, and DB File Fragments. This information can help you judge if your data file is becoming too large for efficient processing of transactions and reports.
Many experts debate over the maximum file size of QuickBooks data and Intuit has not published any formal guidelines regarding file size limits. To calculate the anticipated growth of a data file:
1. Take the number of transactions each month times 2KB to get the monthly growth rate.
2. Take that amount times 12 for the annual KB growth per year.
3. Then divide that amount by 1024 for the number of MB per year.
Typically the file should grow by 30MB per year or less for Pro or Premier and 50MB per year or less for Enterprise to maintain reasonable performance. New condense features are available in the QuickBooks Accountant editions that can help in removing data from prior years, contact your accounting professional for this service. Obviously, the age and processing speed of the computer with other factors might also affect the software’s performance.
Factors such as the number of lines of detail for each transaction significantly increase the number of links per transaction—this factor alone can greatly impact the size of the database. Based on personal experience, QuickBooks Pro or Premier data file in excess of 200 MB or QuickBooks Enterprise files in excess of 450 MB might experience sluggish performance. QuickBooks file performance is impacted by so many variables; it is not possible to name specifics.
Database File Fragments
As mentioned earlier, file fragmentation can negatively affect the performance of QuickBooks. Because file fragmentation is a normal part of using Windows, we must assume some fragmentation is also normal. So the question becomes how many file fragments is too many? Some experts say more than 10 fragments is too many, others say 20, and still others say 50.
As a general rule, if the file is performing without issue and file fragments are fewer than 50 you need not be alarmed; however anytime your file exceeds 50 fragments it is time to reduce fragmentation.
![]() For more information, see “Reducing Database File Fragments,” p. 575.
For more information, see “Reducing Database File Fragments,” p. 575.
QuickBooks List Limitations
As shown previously in Figure 17.7, the Product Information dialog box includes the List Information section. This section includes the size of the various QuickBooks lists (both active and inactive entries), and is another important database statistic to monitor. QuickBooks lists have been preconfigured to limit the number of entries the database can support.
One of the most significant limitations deals with the number of names you can have in QuickBooks Pro or Premier—the combined limit of customers, employees, vendors, and other names is 14,500. QuickBooks does not permit you to delete any names that have been used in a transaction, and the list limits include both active and inactive entries. This list size restriction can be a serious limitation to a growing business. According to Intuit, QuickBooks Enterprise can support up to 1 million combined names although they note some performance degradation is likely as you approach this upper limit.
Similar list limits exist for the Items list—14,500 in Pro or Premier and 100,000 from a functional standpoint for Enterprise. Most other lists in QuickBooks Pro, Premier, or Enterprise are limited to 10,000 entries. One noted exception is the Price Levels list, which is limited to 100 entries in Pro and Premier and 750 entries in Enterprise.
When running the Verify Data Utility, if QuickBooks shows the message Not Responding while the utility is running, do not attempt to close QuickBooks. Allow the utility to complete before closing.
Using the Verify Data Utility
Although the Verify Data utility can detect many forms of data corruption as well as test the integrity of the database, it also can be used to monitor the health of your Company file. Select this option when creating a backup of your QuickBooks Company file.
Additionally, if you use an external backup, or Intuit Data Protect, then run the Verify Data utility periodically to check the integrity of your Company file.
To Run the Verify Data Utility
To check the health of your QuickBooks data file, follow these steps for using the Verify Data Utility:
1. Close all open windows within QuickBooks.
2. From the menu bar, select File, Switch to Single-User Mode. If this option is not displayed, then you are currently using the file in Single-user Mode.
3. From the menu bar, select File, Utilities, Verify Data.
QuickBooks will then begin to verify your data. The technical results are reported in the QBWin.log file. For more information, see “The QBWin.log File,” p. 571. If no data integrity issues were detected, QuickBooks will display the prompt shown in Figure 17.8.
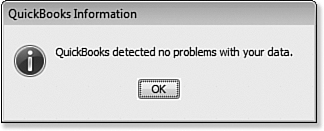
Figure 17.8. Message when the Verify Data utility detected no problems with the file.
The length of time the process will take will depend on the size of your Company file.
QuickBooks Database Corruption
On occasion, your QuickBooks Company file can become corrupted. Database corruption is any damage to a database that impacts its integrity or functionality.
Common Causes of Corruption
Database corruption can result from improper shut down of QuickBooks, as well as power issues (surges, spikes, and outages). It can also occur as a result of a fatal application (program) error. System hardware such as bad disk drives or raid controllers can corrupt data. Your operating system can produce QuickBooks data fragmentation.
In a multi-user environment, networking components (like wireless routers) might produce corruption because their failure can break the connection between the Application and Database Server.
A large QuickBooks file size does not necessarily cause data corruption, although there is more data in which corruptions can occur. Larger files will also have more fragmentation and performance issues if your hardware is not meeting the reported minimum requirements.
For more information, see the section in this chapter titled “System Requirements.”
Signs of Data Corruption
QuickBooks might report data corruption by displaying specific problem messages or error codes.
Often the first sign of data corruption does not appear until a QuickBooks user sees an accounting transaction irregularity. For example—when an out-of-balance balance sheet or accounts receivables or payables sub-ledger report doesn’t reconcile to the general ledger.
If you run the Verify Data utility and your Company file has lost integrity QuickBooks will display a warning such as the one shown in Figure 17.9, indicating you should run the Rebuild Data utility. In addition to the displayed message, additional information is provided in the QBWin.log file.
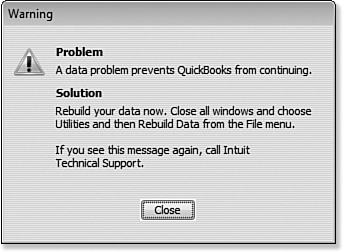
Figure 17.9. Some database corruption errors require using the Rebuild Data Utility.
The QBWin.log File
If the Verify Data utility detected an error in your data, you might want to get more information about the specific problem(s) within your data. QuickBooks records operational data, including information related to the Verify Data and Rebuild Data utilities within a log file called the QBWin.log.
To view the QBWin.log file, follow these steps:
1. With your QuickBooks Company file open, press the F2 key (or Ctrl+1) to display the Product Information dialog box.
2. Now press the F3 key (or Ctrl+2) to display the Tech Help dialog box.
3. Select the Open File tab.
4. Scroll down the list and click QBWIN.LOG file, and then click Open File. The file will open in Windows Notepad (see Figure 17.10).

Figure 17.10. Review the QBWIN.log to determine errors that might be causing the error messages.
5. The Verify Data section should be near the bottom of the log so scroll to the bottom and then scroll back up until you find the Verify portion of the log file, which will begin with:
= = = = = = = = = = = * BEGIN VERIFY LOG * = = = = =
The QBWIN.LOG file will end with:
= = = = = = = = == = = * END VERIFY LOG * = = = = = =
You can scroll through the log file to view errors detected with the file. I recommend you contact Intuit technical support or a local QuickBooks professional for reading and correcting any errors listed.
The QBWin.log is a snapshot of technical details during the current session of QuickBooks. It contains information about how the program performed when it was started, if it successfully connected with your Company file, and any errors experienced during operations or while performing the verify/rebuild utilities. There are many different messages that might be contained in your QBWin.log; some might represent minor errors and others might represent more severe forms of database corruption. The QuickBooks Support website contains many knowledge-based articles that correspond to the various errors. A few common error messages and possible solutions have been included in this section.
You might want to complete a rebuild of the company file after performing the suggested repairs.
![]() For more information, see “Rebuilding Your Company File,” p. 576.
For more information, see “Rebuilding Your Company File,” p. 576.
Error: Verify Memorized Report List...
A corrupted Memorized Report is usually associated with this error. QuickBooks will normally repair this problem if you re-sort the Memorized Report List followed by running the Rebuild Data Utility. To do so, follow these steps:
1. From the menu bar, select Reports, Memorized Reports, Memorized Report List.
2. From the Memorized Report drop-down list, select Re-sort list.
3. Click OK to the Re-sort prompt.
Error: Verify Names List (Such As Customers)...
This form of corruption occurs when one of the names lists has a database index error. Try resorting the Names List followed by running the Rebuild Data Utility to resolve this type of error.
To access the Names List, follow these steps while logged into the file in single-user mode:
1. From the menu bar, select Banking, Write Checks.
2. Place your cursor in the Pay to the Order of field.
3. On your keyboard, press Ctrl+L.
4. The Name List displays. From the Name drop-down list, select Re-sort List.
5. In the Re-sort List? message, click OK.
Error: Verify Name (Specific List): Duplicate Name Encountered...
QuickBooks might encounter a duplicate name. This might occur if you import data using the iif (Intuit Interchange Format) import file type or you use a third party application. Frequently one name might be marked as inactive or QuickBooks might have inserted an * (asterisk) in front of the duplicate name.
To locate the duplicate names and merge them together, follow these steps:
1. Find the names that are duplicated.
2. Edit one of the names to first change it to be unique; if QuickBooks has inserted an asterisk (*) remove that character from the name as part of this change. Save the new name.
3. Return to the name you just changed and edit it once again to change it to be identical to its duplicate, then click Save.
4. QuickBooks displays the Merge dialog box, as shown in Figure 17.11. Confirm the merge of both names by clicking Yes.

Figure 17.11. Certain lists in QuickBooks will let you merge duplicated names.
5. Run the Rebuild Data utility.
Error: Verify Target: Transaction Out of Balance...
This error usually results when the target record, (such as the check detail lines), do not equal the amount of the source record (such as the check total).
To correct this type of error, follow these steps:
1. Open the transaction identified in the QBWin.log report.
2. Verify if the amount in the header (such as check amount) is identical to the total of the amounts in the detail lines. If these amounts are different, you need to correct the erroneous amount(s).
3. Save the corrected transaction.
4. Run the Rebuild Data utility.
Error: Verify Target: Invalid Open Quantity...
This error can result when the link between an Estimate and Sales Order and its associated Invoice (for partial quantities) is broken.
To relink the transactions, follow these steps:
1. Open the transaction, reported in the QBWin.log.
2. Adding a “.” (period) to an empty detail line of the transaction will not change any values for the transaction. However, doing so can help ‘re-link’ the source and target transactions.
3. Save the transaction.
4. Run the Rebuild Data utility.
![]() For more information, see “Rebuilding Your Company File,” p. 576.
For more information, see “Rebuilding Your Company File,” p. 576.
Repairing List Corruptions
Several of the symptoms associated with data corruption, and QBWin.log messages detailed previously, involve problems with the various QuickBooks lists. For many lists you can resort the list simply by opening the list and clicking on the list’s menu button located at the bottom of the list (such as Items). Prior to actually resorting the list, check the box labeled Include Inactive (if available) and select the option to change the list view from Hierarchical to Flat (not all lists offer a hierarchical view).
One of the major lists in QuickBooks is a hidden list called the Name List, which is a combined list of all the names (customers, employees, vendors, other names).
To sort all the name lists at once, follow these steps:
1. From the menu bar, select Banking, Write Checks.
2. Place your cursor in the Pay to the Order of field.
3. On your keyboard, press Ctrl+L.
4. The Name List displays. From the Name drop-down list, select Re-sort List.
5. In the Re-sort List? message, click OK.
Reducing Database File Fragments
The highly compressed QuickBooks Portable Company File can be useful in dealing with some forms of index corruption as well as fragmentation. When a Portable Company (*.QBM) File is restored QuickBooks re-creates all indexes associated with the database. In addition, the extreme level of compression applied when the file is produced eliminates file fragments. Therefore, creation and restoration of a Portable File might resolve many file-related issues.
To create and restore a Portable Company File:
1. From the menu bar, select File, Create Copy. The Save Copy or Backup dialog box displays as shown in Figure 17.12.
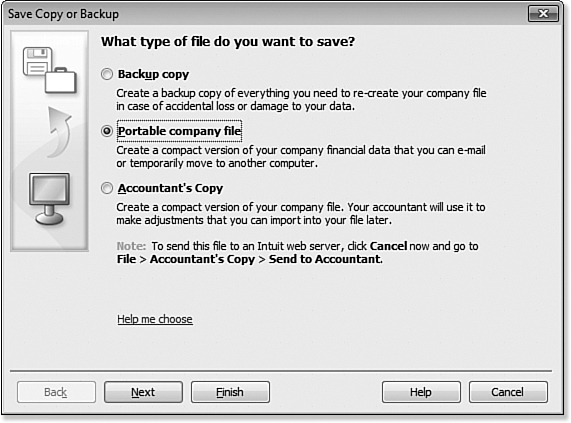
Figure 17.12. Create and restore a Portable Company File to help reduce database file fragments.
2. Choose Portable Company File and click Next.
3. Accept the default location and filename or select a location to save the file and type a desired name for the file.
4. A few individual progress messages will display; click OK on each of them.
5. Upon completion, QuickBooks displays an Information message indicating the file has been saved and details the designated location. Click OK.
6. To restore the Portable Company File, select File, Open or Restore Company from the menu bar.
7. Select Restore a Portable File and click Next.
8. Select the Portable Company File (ending in .QBM) you saved to the desktop (or your alternate location), and click Open.
9. In the Open or Restore Company dialog box, the Where Do You Want to Restore the File dialog displays. Review the message details regarding overwriting your current file and click Next as shown in Figure 17.13.

Figure 17.13. Review this information before restoring your Portable Company File.
10. Click Save and select a save location. Because you are intending to replace your current file, select your current file location and current filename.
11. Click Save. QuickBooks will replace your current file with the data restored from the QuickBooks Portable Company File.
Rebuilding Your Company File
The Rebuild Data utility can repair many QuickBooks Company file issues. The utility attempts to repair or update data found to be corrupted, which might include permanently deleting transactions or list entries that are damaged beyond repair or compromise overall integrity of the file.
Before running the rebuild utility, you should gather information for comparison after the rebuild is complete. This should include all summary reports including the Balance Sheet Standard and Profit & Loss Standard Report. You might also want to process additional reports such as those for payroll details or checkbook registers, and so on.
To use the QuickBooks Rebuild Data utility, follow these steps:
1. If you use your file in a multi-user install, you will need to log in to the file in single-user mode. From the menu bar, select File, Switch to Single User.
2. From the menu bar, select Utilities, Rebuild Data.
3. QuickBooks will display a warning message requiring a backup of the company file before actually starting the rebuild process. Follow the prompts to save a backup copy of your data.
4. When the backup is completed, the Rebuild Data utility will start. The time required to rebuild the database can vary depending on the size of your Company file. It is extremely important to permit the utility to finish completely.
5. QuickBooks will display a Rebuild Has Completed message. Click OK.
Never rebuild a company file on a remote drive, or across a network. You should always copy the file to a local computer before running the Rebuild Data utility.
Close all unnecessary programs and turn off your windows screen saver and any power-saver functions before starting a rebuild.
After the Rebuild Data utility finishes, the data file might still have corrupted transactions, which the first pass of the rebuild did not correct. It might be necessary to rebuild your data more than once. As a general rule, if the utility will not resolve an issue in three or fewer passes, the database error cannot be fixed using the Rebuild Data utility.
Although severely damaged transactions are usually removed during the rebuild process, you might need to manually correct or delete other transactions that Rebuild Data could not correct, and then reenter them. Transactional data removed or corrected will be listed in the QBWin.log file along with corrupted transactions, which the Rebuild Data utility could not correct.
For severe cases of database integrity issues, you will want to contact Intuit’s Technical Support.
Using the QuickBooks Company File Diagnostic Tool
The QuickBooks Company File tool helps to diagnose and repair several forms of damage that prevent company files from opening. The tool must be run on a corrupted QuickBooks file; you cannot run this tool across a network or a mapped drive.
Download this tool from the QuickBooks Technical Support website at http://support.quickbooks.intuit.com/support/Articles/HOW12723
To use the tool to diagnose and repair the type of file damage that prevents the file from opening normally, follow these steps:
1. Install the downloaded QuickBooks Company File Diagnostic Tool.
2. Click the installed icon to launch the tool. Figure 17.14 shows the dialog box that displays.
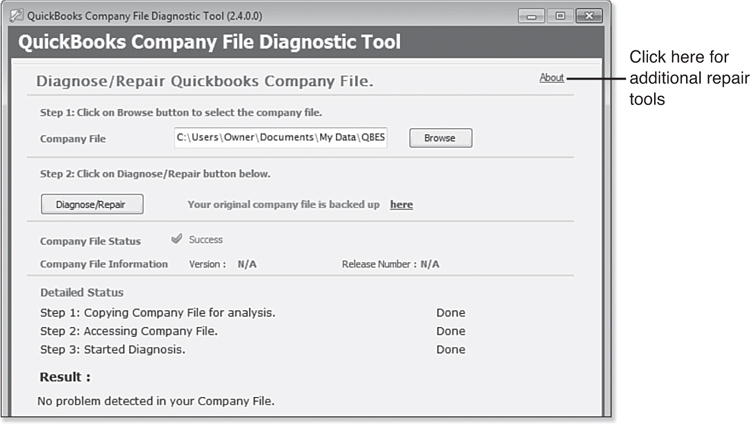
Figure 17.14. Use this tool to Diagnose/Repair a QuickBooks Company file.
3. Click the Browse button to select the QuickBooks Company (*QBW) file that needs to be diagnosed and/or repaired.
4. Once you have located the corrupted company file, select it and click Open.
5. The main dialog box reopens; click the Diagnose/Repair button.
6. Enter the admin username and password for the company file and click Login.
7. Once you have logged into the file, the tool will begin the diagnosis and repair procedures. When the tool has finished the process, there are three possible outcomes:
• The problem or error will be resolved and you should be able to open the QuickBooks file with full functionality restored.
• Data damage continues to exist, which precludes QuickBooks from opening the file despite the diagnosis/repair procedures.
• The tool detected no data damage that would preclude the file from opening.
8. If you receive a -6130, 0 error message, click the About link on the QuickBooks Company File Diagnostic Tool (see Figure 17.14).
9. In the About QuickBooks Company File Diagnostic Tool dialog box, select either the Force 6130 Fix or Force DataSync Fix check box, as shown in Figure 17.15.
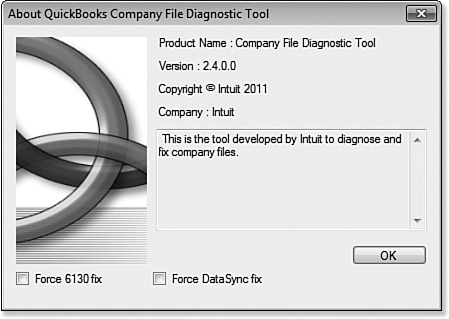
Figure 17.15. Additional tools available after selecting the Help link in the QuickBooks Company File Diagnostic Tool.
10. Open the repaired Company (*QBW) file with QuickBooks and run the Verify Data and/or Rebuild Data utilities.
Resolving QuickBooks Program File Corruption Issues
Some corruption can be the result of problems with the QuickBooks program files. This can occur during installation if there is a conflict with some required component such as Microsoft .Net or even the Windows Registry. Generally, QuickBooks runs normally but at some point the program experiences fault errors or might not install an update properly. Usually, these problems can be resolved by repairing the QuickBooks installation.
To repair your QuickBooks program files, follow these steps:
1. From your Windows taskbar, click the Windows Orb or Start button, and select Control Panel.
2. In the Control Panel, double-click Programs.
3. In Programs select QuickBooks and choose Uninstall/Change.
4. Select Repair and click Next. QuickBooks will begin the repair, displaying a progress bar during the process.
5. When the repair is complete, click Finish.
The preceding procedure usually, not always, resolves file issues. In the event that it does not work, you will need to Uninstall QuickBooks and then reinstall it. Use the preceding steps to remove QuickBooks by selecting the uninstall options rather than repair.