
8. Managing Vendors
Accounts Payable Reporting
Accounts payable mistakes often can be one of the primary reasons for misstated company financials. Knowing which reports are best to review will make you much more efficient at keeping your accounts payable “clean,” meaning the data is correct and up to date. Often, the thing that makes troubleshooting data errors most difficult is not knowing exactly what you should be looking for. This problem is addressed in the next section, which explains some of the more common reports used to identify whether your accounts payable information is correct.
Reconciling Balance Sheet Accounts Payable Balance to A/P Aging Summary Report Total
An important check to do with your file is to compare your Balance Sheet report balance for accounts payable with the A/P Aging Summary report total.
With QuickBooks, you don’t have to worry that the Balance Sheet accounts payable balance will not match the A/P Aging Summary report total because any transaction posting to the accounts payable account must have a vendor assigned. When providing year-end documentation to your accountant, be sure to include the A/P Aging Summary or Detail report and compare the total amount from these reports to the Balance Sheet balance for accounts payable.
To compare the Balance Sheet Standard report balance for accounts payable with the A/P Aging Summary report total, follow these steps:
1. From the menu bar, select Reports, Company & Financial, Balance Sheet Standard. On the Balance Sheet report that opens, select the As of Date you want to compare to. To accurately compare the Balance Sheet report Accounts Payable balance and the A/P Aging Summary report total, you must create your Balance Sheet in accrual basis. If your reporting preference default was for cash basis, you can change the reporting basis temporarily by clicking the Customize Report button on the active report window and selecting Accrual as the report basis. Click OK to return to the report.
2. Note the balance of your Accounts Payable account(s) on the Balance Sheet (see Figure 8.1).
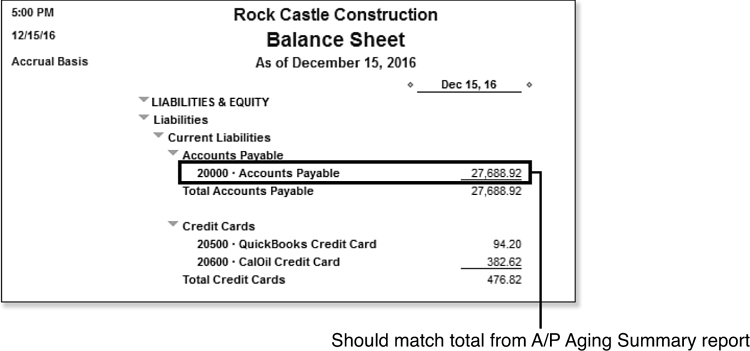
Figure 8.1. Use an accrual basis Balance Sheet report when reconciling your Accounts Payable Aging report.
3. From the menu bar, select Reports, Vendors & Payables, A/P Aging Summary. See Figure 8.2. Make sure the date is the same as the date you selected in step 1.
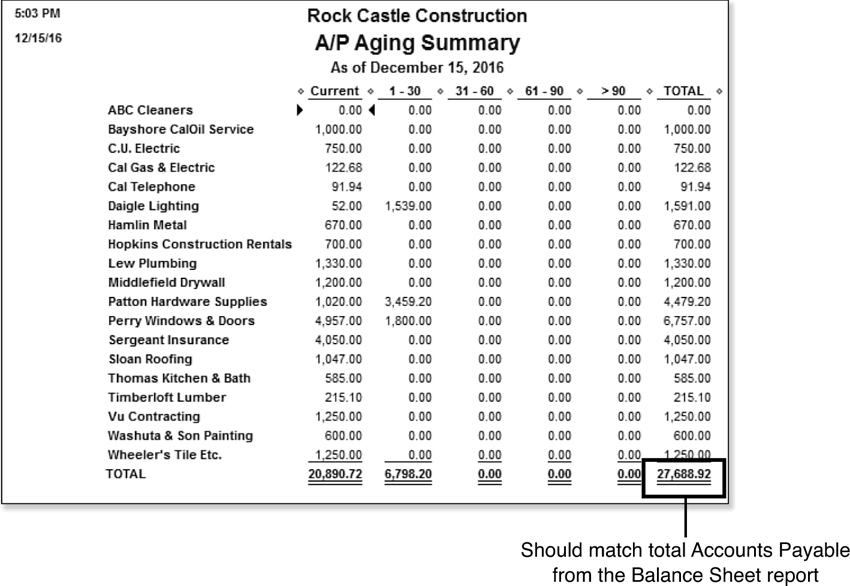
Figure 8.2. Your A/P Aging Summary report should always reconcile with the Accounts Payable total on an accrual basis Balance Sheet report.
Your Accounts Payable balance on the Balance Sheet Standard report should match the total on the A/P Aging Summary report. If it does not, the reason might be a data integrity issue. This is discussed in more detail in Chapter 17, “Managing Your QuickBooks Database.” If you find the two balances do not match first, make sure your Balance Sheet Standard report is created in the accrual basis. Then verify your data by selecting File, Utilities, Verify Data from the menu bar.
Reviewing the Unpaid Bills Detail Report
If you need more detail than the A/P Aging Summary report offers, consider the Unpaid Bills Details report instead. This report is helpful because it displays individual vendor bill lines for each open vendor transaction instead of grouping them together by aged date summarizing the information.
By default this report is perpetual, which means that even if you create it using a date in the past, QuickBooks will show those open vendor bills, or unapplied credit memos, as of today’s computer system date, including all payments recorded before and after the report date. You can override this default, and then properly reconcile the Unpaid Bills Detail report to your Balance Sheet and your A/P Aging Summary report for a date prior to today’s date. To do so, follow these steps:
1. From the menu bar, select Reports, Vendors & Payables, Unpaid Bills Detail. As mentioned previously, this report includes all payments made before and after the report date you have chosen.
2. If you are creating this report for a date other than today, you will likely want to have the report match your Balance Sheet totals as of that same date. To do so, click the Customize Report. The Modify Report dialog box opens, with the Display tab selected.
3. Click the Advanced button to open the Advanced Options dialog box.
4. Under Open Balance/Aging, select the Report Date option, as shown in Figure 8.3, and click OK to close the Advanced Options dialog box.

Figure 8.3. Modify the Unpaid Bills Detail report so it will agree with the Balance Sheet for a date in the past.
5. Click OK to return to the report.
Modifying this report enables you to see each open vendor bill or unapplied credit detail as of some date in the past. This report becomes very useful for reconciling your accounts payable unpaid bills or open credit detail to your Balance Sheet accounts payable total. You might want to send a copy of this modified report to your accountant after verifying that it agrees with the Balance Sheet.
If an amount is listed on this report, it is presumed you owe the money, or in the event of a credit, your vendor owes you.
Reviewing Aged Open Item Receipts
Often, when goods are purchased for inventory, non-inventory, or other item types, your vendor will ship the product with a packing slip and then send the final vendor bill later. One reason for doing this is that receiving departments in a warehouse should not necessarily know the value of the goods being delivered. Another reason might be that the vendor needs to add freight and handling to the final bill before sending it to your company.
The QuickBooks Create Item Receipts transaction is used to record the receipt of the stock into your place of business, increase the quantity on hand for this item (if an inventory item), and increase your accounts payable due to that vendor.
However, because you have not yet received the final bill from the vendor, QuickBooks does not include these item receipts in the Pay Bills dialog box. This is because QuickBooks recognizes an item receipt transaction as not yet having received the final bill to be paid.
New for QuickBooks Enterprise Solutions 12.0 is Enhanced Inventory Receiving. If you are using this version of QuickBooks and you are tracking inventory, you have the option to enable a different method of accounting for the items received.
With Enhanced Inventory Receiving enabled, when an item receipt is recorded without the final bill, QuickBooks will increase (debit) Inventory Asset and increase (credit) Inventory Offset account, a current liability account created automatically by QuickBooks.
Later when you enter the final vendor’s bill, QuickBooks will decrease (debit) the Inventory Offset account and increase (credit) Accounts Payable.
An error in your accounting can result if you entered a bill and ignored the warning message that outstanding item receipts existed for that vendor and created another bill, or perhaps you used the Write Checks transaction to pay for the same charge as recorded on the original item receipt. Both of these types of mistakes will overstate your expenses or inventory value.
First, to see if this issue is a problem for your data file, select Reports, Vendors & Payables, Unpaid Bills Detail. On the report, do you have line items with a transaction type of Item Receipt (see Figure 8.4)? If you do, these are from receiving inventory, non-inventory, or other types of items without receiving (or recording) the final vendor bill.
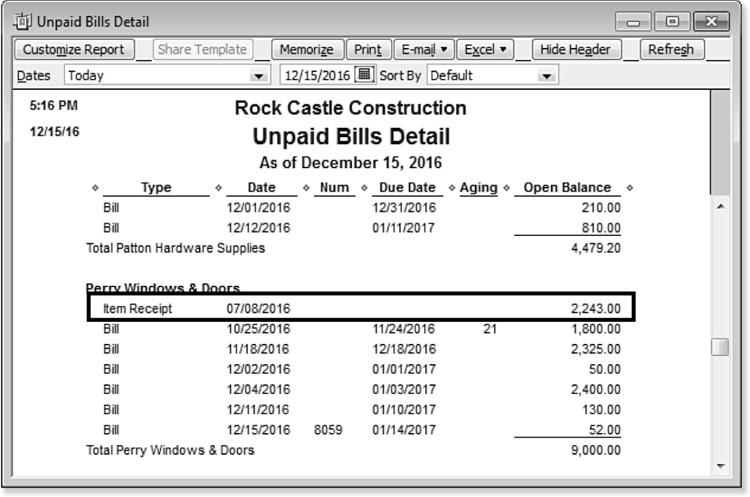
Figure 8.4. Aged item receipts are acceptable only when you have not yet received the vendor’s final bill.
If after reviewing your Unpaid Bills Detail report, you find outdated item receipts that you do not owe the vendor, determine whether they have been paid by requesting an open payables statement from your vendor. To see if the bill was paid with a Write Checks transaction instead of the proper Pay Bills transaction, follow these steps:
1. On the Home page, click the Vendors button.
2. Select the Vendor name on the left. You can also type the first letter of the name and QuickBooks will advance to the first list entry with that letter.
3. To the right, click the Show drop-down list to select the Checks transaction type, as shown in Figure 8.5.
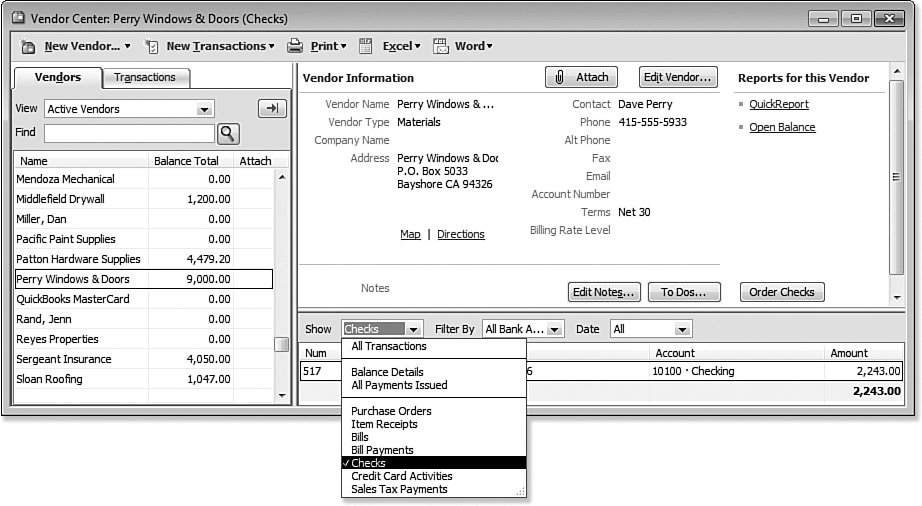
Figure 8.5. Use the Vendor Center to easily review checks written to a vendor as opposed to bill payment checks.
How exactly does QuickBooks manage the use of Item Receipt transactions?
• They age like other open payables on the A/P Aging Summary report.
• The Unpaid Bills Detail report does not show any days in the aged column, yet they are aging.
• QuickBooks does not let you pay an item receipt in the Pay Bills dialog box.
If it would be helpful, you can print the vendor transaction list via the Print drop-down list at the top of the Vendor Center dialog box.
In Figure 8.4, shown previously, Perry Windows has an open item receipt dated 07/08/16. To see whether a check was used to pay this vendor, follow the steps listed previously to see any Write Checks transaction (not Pay Bills) transaction type that was written to the vendor.
![]() For more information, see “Correcting Accounts Payable Errors,” p. 235.
For more information, see “Correcting Accounts Payable Errors,” p. 235.
Reviewing Item Setup
Items play an important part in the accounts payable process if you use purchase orders, item receipts, or the Items tab on a vendor bill or check.
Figure 7.10 (shown in the previous chapter) pictured a service type item with a checkmark placed in the box titled, “This Service Is Used....” Having this checkmark is important if you buy and sell the same item. If this option is not selected and you use the same item on a purchase and a sales transaction, QuickBooks will record both the revenue and the expense to the single account selected on the New Item dialog box or Edit item dialog box.
It is acceptable to create an item with only one account if you know you will never buy and sell the same item. However, I usually recommend each item be set up as two-sided, or needing an expense and an income account.
Properly setting up items is discussed in more detail in Chapter 4, “Understanding QuickBooks Lists.” This section focuses on how you can determine whether your items are the cause of errors on your financials for a company data file with transactions. If your data file does not have transactions in it yet, you will not be using this report to check your item setup.
Presume an item was created with only an income account assigned. The item was used on a vendor bill and the user has to decide whether to ignore the warning shown in Figure 8.6.
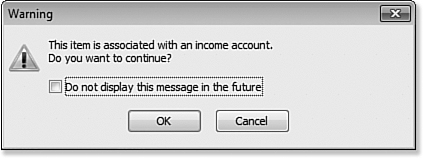
Figure 8.6. The warning you receive on an expense transaction when using an item that only has an income account assigned.
To see whether this type of error affects your or your data, create the following report:
1. From the menu bar, select Reports, Company & Financial, Profit & Loss Standard.
2. Double-click the Total Income account (see Figure 8.7). QuickBooks creates a Transaction Detail by Account report, displayed in Figure 8.8.

Figure 8.7. Double-click the Total Income amount to create a Transaction Detail by Account report.
3. On the top right of the resulting Transaction Detail by Account report, select Type from the Sort By drop-down list. QuickBooks groups all transactions by type within each income account or subaccount. Notice in Figure 8.8 that the Labor Income account has a vendor bill transaction posting to an income account.

Figure 8.8. A Bill transaction type should not post to an income account, unless the item is set up incorrectly.
Accounts Payable Balance on Cash Basis Balance Sheet
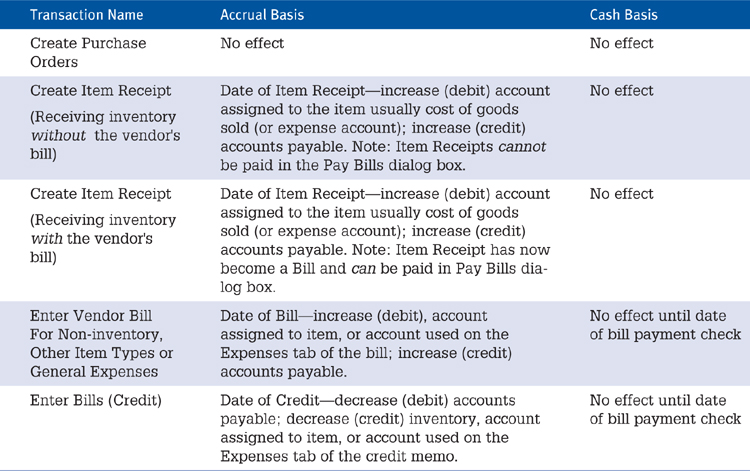
The nature of accounts payable suggests that when you are reviewing your financials in cash basis, you would not see an accounts payable balance. See Table 8.1 for a listing of the transactions you can use in accounts payable and the effect the transaction has on both accrual and cash basis reporting.
Table 8.1. Accounts Payable on Accrual or Cash Basis Balance Sheet
Why exactly do you have an accounts payable balance on a cash basis Balance Sheet report? Any of the following can be the cause:
• A/P transactions have expenses or items posting to other balance sheet accounts.
• Inventory items on an invoice or credit memo (typically, inventory management should be done in accrual basis reporting).
• Transfers between balance sheet accounts.
• Unapplied accounts payable vendor payments.
• Payments applied to future-dated vendor bills.
• Preferences that contradict each other. (This can happen if you select cash basis on your summary reports and accrual basis as your sales tax preference.)
• Data corruption. To confirm, (and hopefully resolve) this problem, select File, Utilities, Verify Data. More details are included in Chapter 17, “Managing Your QuickBooks Database.”
Some of the reasons why you might have an accounts payable balance on your cash basis Balance Sheet report, as shown in Figure 8.9, were listed previously.
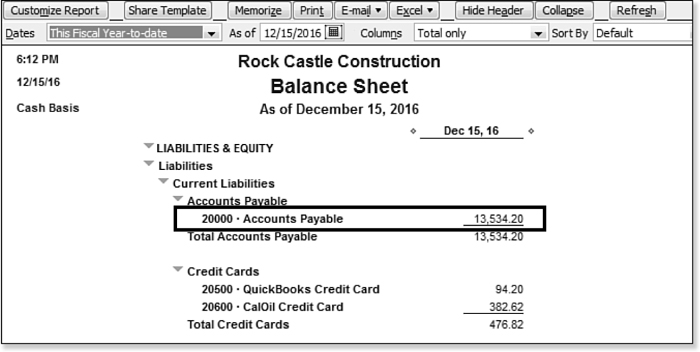
Figure 8.9. Cash basis Balance Sheet report with an Accounts Payable balance.
What can you do if you do have an accounts payable balance on your cash basis Balance Sheet? First, modify the following report to help you locate the transactions making up this balance:
1. From the menu bar, select Reports, Company & Financial, Balance Sheet Standard.
2. Click the Customize Report button to open the Modify Report dialog box with the Display tab selected.
3. Select Cash for the report basis.
4. Click OK.
5. Double-click the Accounts Payable amount in question. The Transactions by Account report is created.
6. Click the Customize Report button to open the Modify Report dialog box with the Display tab selected.
7. For the Report Date Range, remove the “From” date and leave the “To” date.
8. Click the Advanced button and from the Open Balance/Aging box, select Report Date as shown in Figure 8.10. Click OK to close the Advanced Options dialog box.

Figure 8.10. Use the Advanced button on the Modify Report dialog box to filter a report for transaction status as of a specific date in the past.
9. Click the Filters tab.
10. In the Choose Filter box, scroll down to select Paid Status.
11. Select Open for Paid Status.
12. Click OK to return to the report and look for transactions that fall into any of the categories described earlier. The Transaction Detail report in Figure 8.11 shows several inventory transactions and a prepaid insurance transaction. All of these transactions are posting to other balance sheet accounts, one of the common causes of having an Accounts Payable balance on a cash basis Balance Sheet report.

Figure 8.11. Filter for transactions that make up the Accounts Payable amount on a cash basis prepared Balance Sheet report.
Tracking and Reporting Vendor 1099-MISC Payments
If your company pays individuals and certain types of businesses, you might need to file a Form 1099-MISC at the end of the year. Currently, only vendors paid $600 or more in a calendar year are required to be reported to the IRS.
Accompanying Form 1096 is also required and summarizes the individual filed 1099 forms. QuickBooks will print both the 1096 summary and individual 1099 forms, using preprinted tax forms available through Intuit or most office supply stores. Or, new for calendar year ending 12/31/2011, Intuit is also offering the option to use Intuit’s E-File Service for filing your 1099 and 1096 tax forms.
Before you begin using the QuickBooks 1099 Wizard, review your vendor settings using the following reports. To access these, select Vendors, Print/E-file 1099s from the menu bar.
The newly designed QuickBooks 1099 Wizard was updated to assist with 2011 tax year reporting changes made by the IRS. Make sure you are on the latest release of the QuickBooks software. Instructions on updating your data file are included in Chapter 17.
Press Ctrl + 1 on your keyboard to view the Product Information dialog box. The Product field lists the QuickBooks version, year, and release you are currently using.
• Review 1099 Vendors—Lists vendor’s Tax ID, Address, and other useful information. Sort by Eligible for 1099 at the top of the report to help verify you have all the vendors selected you want to supply a Form 1099-MISC for.
• 1099 Summary Report—Lists Box 7:Nonemployee Compensation details by vendor.
• 1099 Detail Report—Lists individual transactions that are used to calculate the amount reported for the vendor’s Form 1099-MISC earnings.
Properly setting up your 1099 tax form preferences in QuickBooks will ensure compliance with federal tax reporting guidelines. If you have specific questions about what type of vendor should receive this document, refer to the www.irs.gov website or contact your company’s accountant or tax advisor. Let’s get your file ready to track and report your Form 1099-MISC payments to vendors using the six steps in the new QuickBooks 1099 Wizard.
Step 1—Select Your 1099 Vendors
Not all vendors are required to receive a Form 1099-MISC at the end of the year. Make sure you have reviewed the reporting requirements on the IRS website or have asked for advice from your company’s accountant or tax advisor.
To select your 1099 vendors, follow these steps:
1. Log into your file as the Admin or External Accountant user.
2. From the menu bar, select Edit, Preferences to open the Preferences dialog box, as previously shown in Figure 7.3 in Chapter 7.
3. Select the Tax:1099—Company Preferences tab. Select the Yes option for Do You file 1099-MISC Forms?
4. Select the Click Here link for If You’re Ready To Prepare Your 1099’s, Including Mapping Accounts. If the link does not display, close and reopen the preferences dialog.
5. Click Yes to the Save Changes message if displayed. QuickBooks opens the 1099 Wizard, displayed in Figure 8.12.

Figure 8.12. In just a few simple steps, you can use the 1099 Wizard to track vendor 1099 payments.
6. Review the steps and select Get Started.
7. Place a checkmark in front of those vendors you want to track Form 1099-MISC earnings for. Optionally click the Select All button. See Figure 8.13.

Figure 8.13. Select the vendors who will receive a Form 1099-MISC.
8. Click Save & Close if you are not ready to complete the remaining steps in the 1099 Wizard or click Continue to advance to the next step.
Select all the vendors who should get the required tax form. If they are not paid the IRS established threshold during the year (currently $600), QuickBooks will not include them in the forms that are to be printed. Do not worry here if you are uncertain which vendors to select. You can always come back and make changes.
Step 2—Verify Vendor Information
One of the important steps to take to properly tracking your vendors payments subject to 1099 filings is to record the vendors Tax ID and select the Vendor is eligible for 1099 as previously displayed in Figure 7.6 from Chapter 7. You can request this information from your vendor using the IRS form W-9, Request for Taxpayer Identification Number and Certification. This form can be downloaded from the www.irs.gov website.
If you didn’t have this information available when you initially created your vendor record, you can add this information at any time during the year and QuickBooks will include the vendor payments in your 1099 reporting.
To verify vendor information, follow these steps:
1. If you selected Continue after step 7 (select your 1099 vendors), you will now verify your 1099 vendor’s information.
2. For the vendors you selected, make sure you have the Tax ID, Company Name, Address, and other information for each of your selected vendors. See Figure 8.14.

Figure 8.14. Changes made in the 1099 Wizard will automatically update the vendor’s record in QuickBooks.
3. If information is missing, click in the field and enter the missing information.
The end of any calendar year is a busy time. Consider reviewing your vendor’s 1099 information throughout the year so you have time to collect the missing information before the tax forms are due.
Businesses must provide eligible vendors with their Form 1099-MISC by the end of January following a calendar year. Some will want their forms as early as possible in January, so be prepared early.
4. Click Save & Close if you are not ready to complete the remaining steps in the 1099 wizard or click Continue to advance to the next step.
Step 3—Map Your Accounts
QuickBooks provides you the option of including or excluding specific chart of accounts from being used when reporting your vendor’s payments. For example, you might pay your vendor for services and record it to a specific Subcontractors expense account. You might also reimburse that same vendor for materials purchases and record that portion of the expense to a different expense account.
It is not the intent of this book to provide tax filing advice, so please check with the IRS website for more details or ask your company’s accountant or tax advisor.
To map your accounts, follow these steps:
1. After verifying your 1099 vendor’s information (previous instructions), click Continue.
2. For the vendors you have selected, the 1099 Wizard will display the accounts that were assigned on the vendor payments. For each account displayed, you can choose to Omit these payments from Form 1099-MISC income reporting or select from several 1099 box reporting options; see Figure 8.15.

Figure 8.15. Selectively choose which accounts are reported or omitted from your 1099 reporting.
The only 1099 form that QuickBooks will print or that can be processed by Intuit 1099 E-File Service is the Form 1099-MISC. Accounts in QuickBooks can be assigned to any of the 14 boxes on the Form 1099-MISC.
Multiple cost of sales, ordinary expense, and other expense accounts can be assigned (mapped) to a single box on the Form 1099-MISC. However, a single account cannot be assigned to more than one reporting box on the form.
If a Balance Sheet account (such as a vendor prepayment) is used when recording a payment to a 1099 eligible vendor; that account will not display by default in the Map vendor payment accounts. However, if you select Show All Accounts, you are provided the option to omit the payments recorded to Balance Sheet accounts from 1099 or assign to the appropriate Form 1099-MISC box.
3. Optionally, click the Show 1099 Accounts drop-down list and select the Show All Accounts if you want to omit or map your 1099 reporting for all of your accounts on your chart of accounts.
4. Optionally, select the Report All Payments in Box 7 checkbox. By doing so, all the displayed accounts will now be assigned to Box 7:Nonemployee Compensation.
5. If you see the warning message “Your Settings Do Not Match the Current IRS Thresholds,” click the Show IRS 1099-MISC Filing Thresholds link.
6. Read the information displayed in the 1099-MISC IRS Thresholds dialog box. Click the Reset to IRS Thresholds button. QuickBooks updates the thresholds with current tax information.
7. Click Save & Close to return to the 1099 Wizard.
8. Click Save & Close if you are not going to complete the remaining steps in the 1099 Wizard or click Continue to advance to the next step.
Step 4—Review Vendor Payments
Do you pay your vendor bills by credit card? Beginning with the 2011 tax year, the IRS established new rules to exclude from Form 1099-MISC any payments you made by credit card, debit card, gift card, or third-party payment network such as PayPal. (The IRS reports that these payments are too be reported by the card issuers and third-party payment networks on Form 1099-K.) You will want to review both included and excluded payments on the Review Payments for Exclusions screen in the 1099 Wizard, displayed in Figure 8.16.
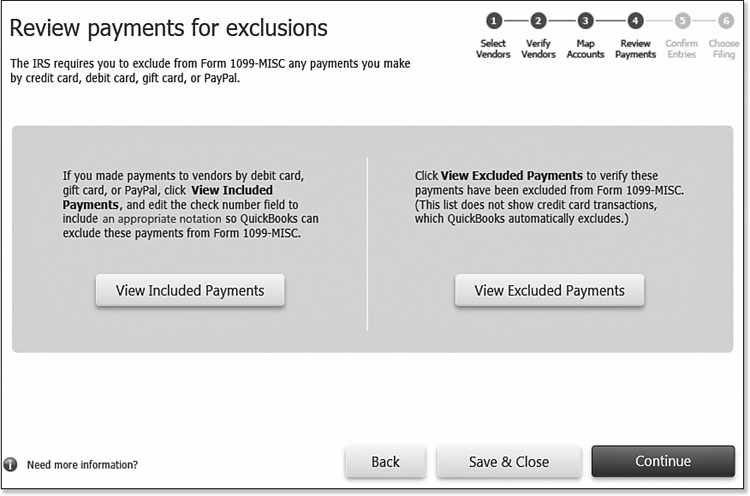
Figure 8.16. With the new 1099 rules beginning in 2011, verifying that the proper payments are included or excluded is provided as part of the 1099 Wizard.
For payments to vendors made by credit card but not recorded using the preferred Enter Credit Card Charges transaction type (such as the Pay Bills transaction using a check or the Write Checks transaction), special guidelines need to be followed. To record a vendor payment made with a credit card, debit card, or gift card, or using a third-party payment network such as PayPal, you should note the payment method in the No. field of a Write Checks dialog box. QuickBooks recognizes, and automatically excludes from Form 1099-MISC, these payments if the following notations in the check number field (limited to eight characters) are used:
• Debit
• DBT card
• Visa
• MCard
• Diners
• Debitcar
• DCard
• Masterc
• Chase
• Paypal
• DBT
• Debit cd
• MC
• Discover
Save yourself time from having to modify the check number assigned to bill payment checks or other checks when recording vendor 1099 payments made by credit card using these forms. Instead, when paying a vendor bill assign the payment to a credit card account or use the Enter Credit Card Charges dialog box to record the expense (select Banking, Enter Credit Card Charges from the menu bar).
QuickBooks automatically excludes from Form 1099-MISC any bill payment made using the credit card payment method.
To view the transactions included in your 1099 reporting, follow these steps:
1. Click the View Included Payments. QuickBooks creates a report titled “Check Payments Included on Forms 1099-MISC” (see Figure 8.17).

Figure 8.17. Review checks recorded as payments to vendors who might have been paid by credit card.
2. If any of these payments were made by credit card, debit card, gift card, or third-party payment network such as PayPal, you will need to edit the check number, displayed in the Num column on this report.
3. Double-click to open a single transaction that was paid by credit card. The associated check displays. Modify the information in the No. field using one of the accepted notations listed previously.
4. Click Save & Close to save your changes. QuickBooks no longer includes this payment in your 1099-MISC Income reporting.
5. Click the View Excluded Payments button. QuickBooks creates a report titled Check Payments Excluded from Forms 1099-MISC. Verify that the transactions listed on this report qualify to be excluded from 1099-MISC Income reporting.
6. Click the X in the top-right corner to close the report(s).
7. Click Save & Close if you are not going to complete the remaining steps in the 1099 Wizard or click Continue to advance to the next step.
Step 5—Confirm 1099-MISC Entries
The 1099 Wizard displays a list of the Vendors that will be receiving a Form 1099-MISC (see Figure 8.18).
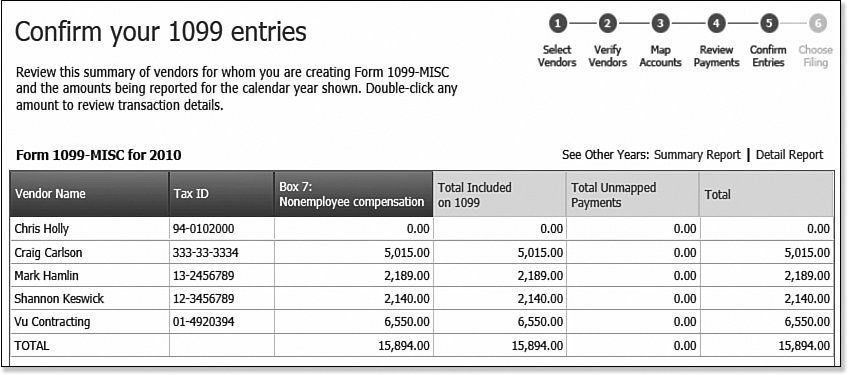
Figure 8.18. Preview vendor payments that will be included or not included in your Form 1099-MISC income reporting.
To confirm 1099-MISC entries, follow these steps:
1. Click the Summary Report link to see a summary for all vendors included in your Form 1099-MISC income reporting. Modify the dates and filters as needed.
2. Click the X in the top right to close the 1099 Summary report.
3. Click the Detail report to see a list of all transactions grouped by vendor. Modify the dates and filters as needed.
4. Click the X in the top right to close the 1099 Detail report.
5. Click Save & Close if you are not going to complete the remaining steps in the 1099 Wizard or click Continue to advance to the next step.
Step 6—Choose a Filing Method
The QuickBooks 1099 Wizard provides information to help you choose a filing method, either printing or electronically filing the forms (see Figure 8.19).
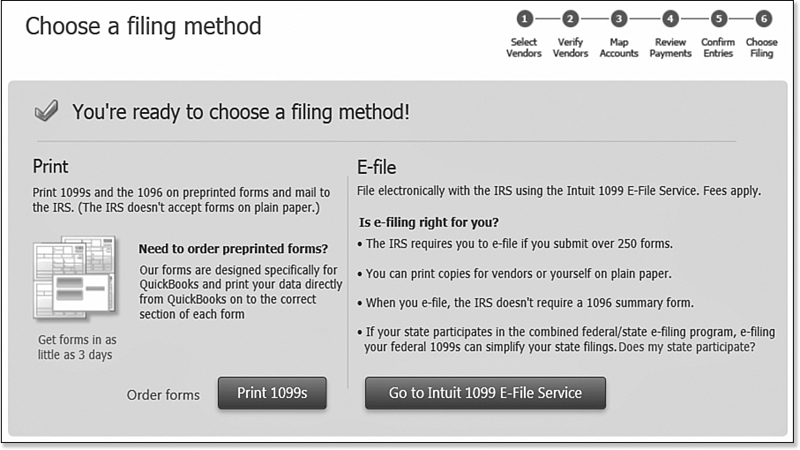
Figure 8.19. The 1099 Wizard makes it easy to print 1099 forms or file electronically.
To print the 1099-MISC Income forms, follow these steps:
1. Click the Order Forms link to order your tax forms from Intuit. You might also purchase tax forms from your local office supply store.
2. Click the Print 1099s button to print the documents on the preprinted forms you have purchased.
3. QuickBooks, 1099-MISC and 1096 Forms dialog box displays. Select the appropriate year you are printing your forms for. Typically, you would be selecting Last Calendar Year.
4. The Select 1099s to Print dialog box displays with each vendor selected. Optionally, click Select All or Select None if needed.
QuickBooks displays the number of vendors selected and the total dollar amount for the selected vendors.
5. Click Print 1099. The Print 1099s settings display. Place the tax forms in your printer and select Print. You will need to print on preprinted forms; unlike W-2s, the IRS does not accept 1099 forms on plain paper.
6. View the documents that printed. When you have completed printing 1099, click Print 1096 and insert in your printer the preprinted form.
7. Enter the Contact Name in the 1096 Information dialog box. If circumstances warrant select This is My Final Return.
8. Select your printer and click Print. QuickBooks returns to the Select 1099s to Print dialog box.
9. When complete, click the X in the top-right corner to close the Select 1099s to Print dialog box.
If you will be E-Filing, click the Go to Intuit 1099 E-File Service. Follow the instructions for filing. You will complete three steps:
1. Sign up for the Service—Using your Intuit Account username and password.
2. Set up Intuit Sync Manager—Enables QuickBooks to send your information to the Intuit E-File 1099 Service.
3. Purchase, Print and E-File—Print and E-File your returns with a click of a button.
The information window provides a toll-free number to call if you have any questions. 1099 forms for a given tax year cannot be filed until January of the following year.
You have successfully completed the steps to properly track and report your vendors’ Form 1099-MISC income payments.
Correcting Accounts Payable Errors
Chapter 7, “Setting Up Vendors,” provides a recommended workflow and preference settings that will help you avoid making mistakes with your accounts payable transactions. This chapter provides specific details about methods you can use to correct existing accounts payable errors.
The purpose of this book is not to give your business specific accounting or tax advice, but rather to introduce you to ways you might consider fixing specific mistakes you have found.
Before making any of the suggested changes, be sure you have made a backup of your data in case the change does not give you the desired result. Additionally, contacting your accountant and obtaining his advice on the changes you are going to make would be prudent.
Open Vendor Bills Paid with a Write Checks Transaction
Earlier in this chapter, in the “Reviewing the Unpaid Bills Detail Report,” section, you were provided a way to reconcile your A/P Aging Summary report total to your Balance Sheet accounts payable total (refer to Figure 8.2). As important as this task is, it is also necessary for you to review those items listed as unpaid to your vendor. If you notice an open vendor bill that you know you do not owe the vendor, it might be because you paid the vendor with a Write Checks transaction instead of the proper Pay Bills transaction type.
You should experience fewer of these types of mistakes in recent years because QuickBooks directs you to the Pay Bills dialog box, as shown in Figure 8.20, when you attempt to write a check to a vendor with open bills.

Figure 8.20. The warning provided if you attempt to create a check to pay a vendor with open bills.
If you choose to modify the original vendor check, carefully consider the accounting effect this type of correction will have on your financials:
• Is the change a significant dollar amount? Both cash and accrual basis reports will be affected.
• Consider the date of the check and the date of the bill—are they in different tax years?
• Is the correction going to affect a year where the data has already been used to prepare a tax return?
If you answered yes to any of these questions, be sure to discuss with your accountant the impact this change could have on your financials.
You can modify this check, making it become a vendor credit. In other words, it will decrease (debit) accounts payable and maintain the original decrease (credit) to your cash account. To do so, follow these steps:
1. Locate the Write Checks transaction used to pay the vendor. One easy way is to click the Vendors button on the Home page to open the Vendor Center. Select the vendor from the list on the left and select Checks from the Show drop-down list as displayed previously in Figure 8.5.
2. Double-click the check to open the Write Checks dialog box for the selected transaction.
3. On the Expenses tab, in the account column, replace the currently listed account with the accounts payable account as shown in Figure 8.21. This creates a decrease (debit) to the accounts payable account.

Figure 8.21. Using a check to record a vendor pre-payment (debit to Accounts Payable).
4. Select the vendor name from the drop-down list in the Customer:Job column. If you had previously listed a Customer:Job in this field you will be warned to choose a Vendor name instead. This assigns the accounts payable decrease to a specific vendor. You cannot save the transaction without assigning a vendor name.
5. Click Save & Close, and then click Yes to record your changes.
6. From the menu bar, select Vendors, Pay Bills, and use the arrow key on your keyboard to move up and down through the list of vendors in the Pay Bills dialog box. Or, optionally, select the vendor name from the Filter By drop-down list. Before placing a checkmark in the box next to the vendor’s specific invoice, QuickBooks will show the total number of credits and their total value in the Discount & Credit Information for Highlighted Bill section. (See Figure 7.18 in Chapter 7.)
7. When you have located the correct bill, place a checkmark in the box to the left of the Date Due column. When an invoice is selected, QuickBooks will automatically apply the available credits to the selected vendor invoice (if the preference was set). If not and you want to modify the amount or which credits are selected, click the Set Credits button. The Discount and Credits dialog box displays (previously shown in Figure 7.19 in Chapter 7). Users can modify which credit is selected by changing the checkmark from one credit to another or by manually overriding the amount of the credit.
8. Click the Done button when the credit is assigned.
9. QuickBooks shows in the Pay Bills dialog box that the bill is being paid by a credit (if the entire bill is being paid by the credit, QuickBooks will not create a check). Click Pay Selected Bills when you are finished.
10. QuickBooks offers you Pay More Bills or Done choices. Click Done, if you do not have any other transactions to correct using this method.
Misapplied Vendor Credit
Have you ever been given a credit from a vendor, only to find out later that your vendor applied the credit to a different open bill than you did in your data?
QuickBooks makes it easy to reassign a vendor credit from one accounts payable bill to another bill. You will temporarily assign the credit to another vendor, and then reapply it to the correct vendor. To do so, follow these steps:
1. On the Home page, click the Vendors button to open the Vendor Center.
2. Select the vendor with the misapplied credit.
3. From the Show drop-down list, select Bills (this will also list vendor credits).
4. From the transactions listed, select the misapplied credit memo by double-clicking it. The Enter Bills dialog box with the word Credit displayed, opens for the selected transaction.
5. On the vendor line of the credit, select a different vendor. (Remember to whom you assign it.)
6. Click Save & Close. QuickBooks removes the credit transaction from the vendor bill it was previously associated with.
7. QuickBooks also warns that the transaction you are editing will no longer be connected. Click Yes to continue (see Figure 8.22).
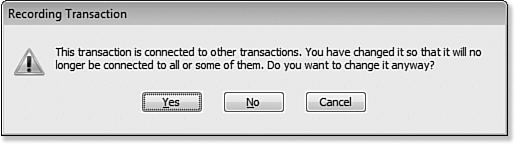
Figure 8.22. Warning when you unapply a previously applied vendor credit.
8. From the same Vendor Center, select the other vendor to which you assigned the credit. From the Show drop-down list, select Bills and double-click the credit you just assigned in step 5. The Enter Bills dialog box, with the word Credit displayed, opens for the selected transaction.
9. On the vendor line, select the original vendor.
10. Click Save & Close and Yes to making the change.
QuickBooks now shows the credit as unapplied to your original vendor, and you can follow the steps outlined previously for applying the credit to the correct open vendor bill.
Removing Aged Open Item Receipts or Vendor Bills
One of the more important tasks you can do to maintain a correct data file is to remove old, aged item receipts or payables you do not owe.
You have three options when you want to remove these aged (old) transactions:
• Create a credit memo and apply it.
• Void the item receipt or bill.
• Delete the item receipt or bill.
To create and apply a credit memo to a vendor bill, follow the same steps as listed in Chapter 7 in the section, “Applying Vendor Discounts or Credits.”
You must give special consideration to applying a credit memo to an open item receipt. First, convert the item receipt to a bill. To do so, follow these steps:
1. Locate the open item receipt using any of the methods suggested in Chapter 7.
2. When you select the open item receipt, QuickBooks opens the Create Item Receipts dialog box. Place a checkmark in the Bill Received box at the top right, as shown in Figure 8.23.

Figure 8.23. Converting an open item receipt to a bill is necessary before applying a vendor credit memo.
You can now apply your credit memo to the item receipt, which has been converted to a bill.
When considering whether to void or delete, I always prefer the void option because it leaves a record of the original transaction.
Before voiding or deleting, you need to verify that the aged open item receipts or bills do not have any other transactions associated with them. To verify this, follow these steps:
1. Open the item receipt or bill using any one of the many methods discussed in Chapter 7.
2. Open a previously recorded bill or create item receipts, click the transaction tab to the right. QuickBooks displays in the Summary box information about when the transaction was created and edited (if applicable). In the Related Transactions box, links are provided to the original transactions (if any).
If you had voided or deleted the vendor bill shown in Figure 8.24, you would have created an unapplied vendor payment (the Bill Pmt-Check listed in the Related Transactions section). In effect, you would have traded one correction for another problem. So be careful when making corrections to your accounts payable transactions.
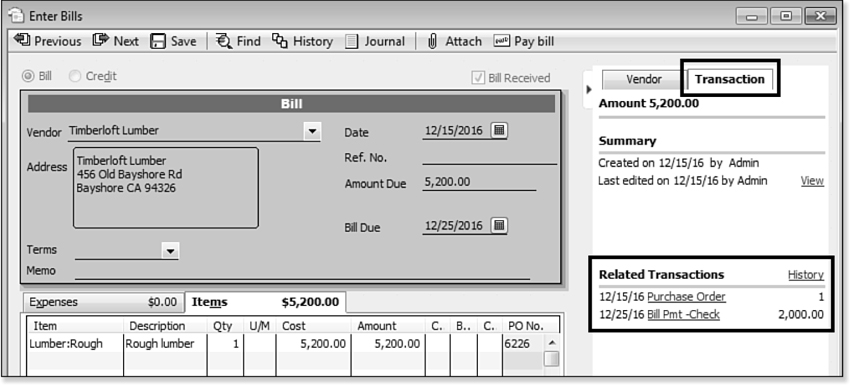
Figure 8.24. Before voiding, deleting, or modifying a bill, click the Transaction tab to the right to see whether any transactions are associated with this bill.
Making General Journal Adjustments to Accounts Payable
All too often, I find that accounting professionals are quick to make adjustments to accounts payable using the Make General Journal Entries dialog box, also referred to as a journal entry. The following are some of the issues surrounding the use of the journal entry transaction type:
• Only a single vendor or a customer name can be in the Make General Journal Entries dialog box, not both a vendor and customer in the same transaction, minimizing the usefulness of the transaction for large-volume corrections.
• General journal entries do not include the option to assign an item, including service, non-inventory, inventory, and so on. The adjustment would affect the Profit & Loss reports, but not specific QuickBooks reports that use item information, such as the Job Profitability reports or Inventory Valuation reports.
• You will still need to go to the Pay Bills dialog box to assign the balance generated by the general journal to the other related vendor transactions.
Often, the use of the general journal entries does not provide the desired results in your reporting. Did you know that the first line of any general journal entry is considered a “source” line? Specifically, this means that if the first line of a multiple-line general journal entry includes a vendor, customer, or any list item name in the Name column, as shown in Figure 8.25, that name element will display in reports on the lines below the first line, even if there is no relationship (see Figure 8.26).
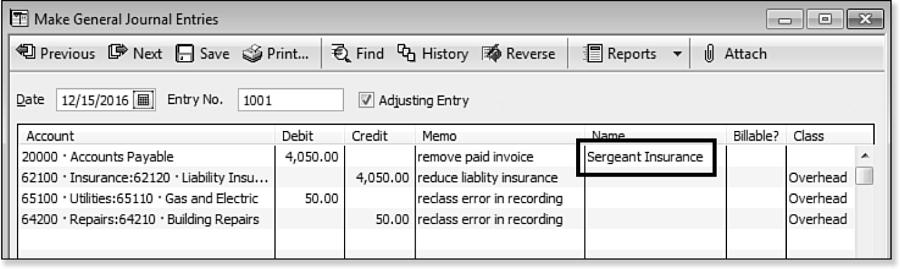
Figure 8.25. When the first line of a multiple-line general journal includes a list name in the Name column, QuickBooks associates the name entry with all lines of the form.

Figure 8.26. QuickBooks associated the vendor’s name with all lines of the journal entry because the vendor list name was on the first line of the general journal.
This type of error is more apparent when a Customer:Job Name is included on the first line of a multiple-line general journal entry form. When preparing a Profit & Loss by Job report, QuickBooks would include all lines of the general journal entry as belonging to that job!
A quick fix is to add a blank line at the beginning of each general journal entry. Another recommendation is to create a fictitious bank account and call it Adjusting Entries, but then leave the debit and credit fields blank. If you assign the first line of the entry to this account, QuickBooks provides a “register” for you to locate these types of transactions and at the same time avoid the issue addressed in this section. See Figures 8.27 and 8.28 to see how adding the line at the beginning of the transaction solves the problem in reporting.
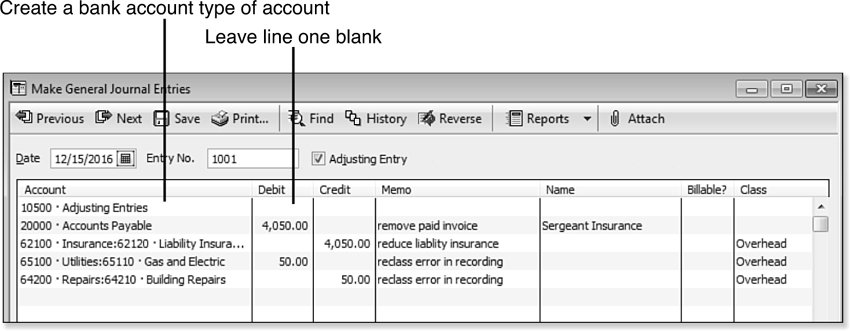
Figure 8.27. Including the fictitious bank account on the first line of a general journal entry prevents the source line (line 1) from being associated with additional unrelated lines.

Figure 8.28. QuickBooks no longer associates the vendor’s name with the unrelated general journal lines.
Often, just these simple tips can help make your QuickBooks reporting much more accurate!
If you have journal entries recorded to your accounts payable, your unpaid bills report might look something like Figure 8.29.
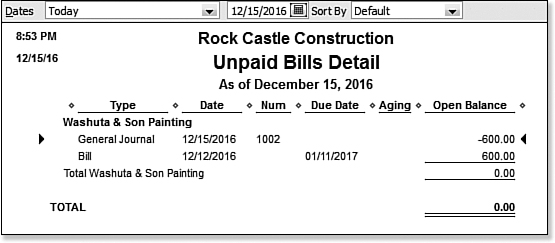
Figure 8.29. Your Unpaid Bills Detail report might show the general journal entry as unapplied.
![]() If your Unpaid Bills Detail report includes journal entries, see “Applying Vendor Credits,” p. 211.
If your Unpaid Bills Detail report includes journal entries, see “Applying Vendor Credits,” p. 211.
Handling Unique Accounts Payable Transactions
So far you have learned about the accounts payable forms and workflow, preferences you can set to improve your data entry, reports to review when troubleshooting errors, and methods of correcting accounts payable errors. This section offers specific solutions to some of those unique transactions you might need to record.
Bartering Services with Your Vendors
Having a vendor who is also a customer is commonly referred to as bartering. This is when your vendor also purchases your goods or services and you are going to “swap” and not pay each other for the items purchased from each other.
To track the exchange of goods, follow these steps:
1. From the menu bar, select Lists, Chart of Accounts.
2. From the Account drop-down list, select New to create a new bank account type named Bartering. If you have account numbering turned on, you will also need to assign an account number. This bank account will always have a net zero balance if the transactions are recorded properly.
3. Click Save & Close.
4. From the menu bar, select Vendor, Enter Bills to record your vendor bill as if you were going to make the purchase from the vendor.
5. From the menu bar, select Vendor, Pay Bills. The Pay Bills dialog box opens. Select the bill for the vendor you will barter with.
6. In the Pay Bills dialog box, select the Bartering Account as the payment account (as displayed in Figure 8.30). You can then choose to assign a fictitious check number.

Figure 8.30. When you are bartering goods with your vendor, choose the fictitious bank account when recording the “payment” of the vendor bill.
7. On the Home page, click the Customers button to open the Customers Center.
8. From the New Customer & Job drop-down list, select New Customer and complete the contact information for the new customer; otherwise, double-click the customer or job you will be bartering with to select it.
9. From the Customers Center, select Invoices from the New Transactions drop-down list. Prepare the invoice to the new customer (also your vendor) using the same items on the invoice as if you were selling them to a customer. Click Save & Close.
10. From the Customers Center, select Receive Payments from the New Transactions drop-down list. Record the fictitious payment from the customer (your vendor). Click Save & Close.
QuickBooks will not allow the same name to reside on multiple lists. To get around this limitation, when creating the customer name for your vendor, follow this convention: Johns Plumbing – C. I have added a – C after the “vendor name” on my customer list. This is helpful when picking the name from a list and you need to be certain to select the customer list item.
11. Depending on how your preferences are set up for customer payments, deposit the fictitious customer payment into the same Bartering bank account created earlier.
12. If the value of what you purchased is equal to the value of what you sold, your Bartering bank account will have a net zero ending balance. If not, you will need to enter an adjusting entry to remove the balance or adjust your purchase or sales transaction total. If needed, you can create this entry by selecting Banking, Use Register from the menu bar and selecting your Bartering bank account from the Use Register drop-down list. On the next available line in the account register, record a payment or deposit as needed to clear the account. You will want to ask your accountant what account is appropriate for the adjustment.
Recording Vendor Prepayments
If your business is required to prepay your vendor for purchases, you can choose from a couple of methods:
• Assign expenses to the other current asset type account typically named Prepaid Expenses.
• Record a decrease (debit) transaction to the accounts payable account.
Often you will have expenses that must be paid in advance of the benefit of the service or product being purchased. An example is a business’s general liability insurance. Typically, you pay several months in advance for this type of insurance. To record this annual or semi-annual expense all in one month would make that month unfairly take on the total expense.
A preferred method is to record the expense in equal monthly increments. The following steps show you how to record the original prepaid expense and record the expense to the individual months.
To accomplish this task, you will pay the insurance vendor, assign the expense to the other current asset account, and then create a recurring entry that QuickBooks uses to remind you to enter the expense; or QuickBooks will automatically enter the expense each month, depending on how you set up the reminder. This example shows how you would prepay a general liability insurance bill of $12,000 for 12 months of coverage.
To record vendor prepayments, follow these steps:
1. Complete an Enter Bills or Write Checks transaction payable to your insurance provider (or whatever type of prepaid expense you are recording). Instead of assigning the usual expense account on the transaction, assign the prepaid other current asset type account. In this example, the account is Pre-paid Insurance.
2. Pay the bill to the vendor as normal.
3. Set up a recurring transaction to charge 1/12 of the total to each month. If the amount remains the same from month to month, set up the recurring entry to automatically post to QuickBooks. To do so, select Company, Make General Journal Entries from the menu bar. Create a journal entry with a debit to your expense account and a credit to the prepaid other current asset type account.
Did you know that you can memorize repeating transactions and let QuickBooks remind you or even automatically record them? To do so, follow these steps:
1. Create the transaction you want to memorize. You can also use this process to memorize any of the QuickBooks transaction types, checks, bills, invoices, and so on.
2. With the transaction displayed, press Ctrl+M on your keyboard or select Edit, Memorize from the menu bar to open the Memorize Transaction dialog box.
3. Choose to have QuickBooks remind you on a specific frequency, or choose to have QuickBooks automatically enter the transaction (see Figure 8.31).
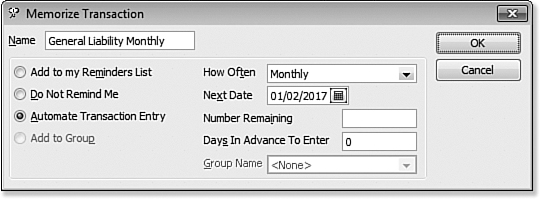
Figure 8.31. To automate data entry, memorize the transaction.
QuickBooks will list memorized transactions on the Memorized Transaction List, which is available by pressing Ctrl+T on your keyboard. You can also access by selecting Lists, Memorized Transaction List from the menu bar.
You might want to check your company reminders to be sure you enable a reminder for showing your memorized transactions. To do so, select Edit, Preferences from the menu bar, and then select the Reminders tab on the Preferences dialog box.
The other method discussed here is to record a debit balance to the vendor’s accounts payable account. This would be appropriate if you are going to be using the prepayment soon as payment towards the final vendor bill. To do so, follow these steps:
1. From the menu bar, select Banking, Write Checks.
2. In the Pay to the Order Of field, select the vendor’s name.
3. Enter the amount of the prepayment.
4. On the Expenses tab, in the account detail area, select the accounts payable account (see Figure 8.32).

Figure 8.32. Assign the Accounts Payable account and the vendor name to a check when recording a vendor prepayment.
5. In the Customer:Job column, enter the vendor’s name (must be a vendor type for this method to work).
6. Click Save & Close.
QuickBooks now records a vendor credit (debit to accounts payable) as shown in Figure 8.33.
Figure 8.33. QuickBooks records the vendor prepayment as a negative entry to accounts payable (or a debit to accounts payable).
At a later date, you would record a bill for the full purchase price and assign this credit.
Entering Mid-Year 1099 Balances
If you start your QuickBooks data file mid-year (or at some other time than the first of a new calendar year), you might have amounts paid previously to vendors who are eligible to receive the Form 1099-MISC.
To properly record the amounts paid to vendors in your prior accounting software and to make sure that QuickBooks reports all amounts paid to the vendor on the Form 1099-MISC, follow these steps:
1. From the menu bar, select Company, Make General Journal Entries. If you use any of the job profitability reports, leave the first line (source line) of the journal entry blank.
2. On the following lines (one line per vendor), in the Account column, enter the cost of goods sold account or expense account assigned in the preferences for Tax:1099.
3. For each Debit line amount, be sure to select the vendor’s list name (this must be a vendor type) in the Name column.
4. On the last line, enter one line total assigning the same account as the other lines so that the Debit column is equal to the Credit column (see Figure 8.34).

Figure 8.34. When starting a QuickBooks file mid-year, create a general journal entry to record year-to-date vendor Form 1099-MISC Income tax payments.
Your overall financials will not change because the same account was used for both the debit and credit side of the transaction. Including the vendor name on the debit side of the transaction lines causes QuickBooks to include the amount in the reported Form 1099-MISC income amount.
Memorizing Recurring Transactions
QuickBooks can also make help you not forget a recurring accounts payable bill. Memorized bills work best if the amount being paid is the same from month to month (or whatever frequency you set). An example might be your rent payment.
To memorize a recurring accounts payable transaction, follow these steps:
1. Create a vendor bill as normal, assigning the amount and expense account with which you want it to be associated.
2. With the Enter Bills dialog box open, press Ctrl+M to open the Memorize Transaction dialog box (see previous Figure 8.31).
3. Enter a name that identifies this transaction in the memorized transaction list.
4. Choose one of the available options:
• Add to My Reminders List—If you select this option, you need to choose how often and the next date you want to be reminded.
• Do Not Remind Me—Use this option if you want to stop permanently, or even temporarily, your reminders for this transaction.
• Automate Transaction Entry—Use this option if you want QuickBooks to create the entry automatically.
New for QuickBooks 2012: If you assign the Automate Transaction Entry option for memorizing a transaction, QuickBooks will provide a new reminder dialog box that will display when you log into the QuickBooks file.
From the Enter Memorized Transactions dialog box, you can enter all of the selected transactions, select those you want to enter, or enter them all later (see Figure 8.35).
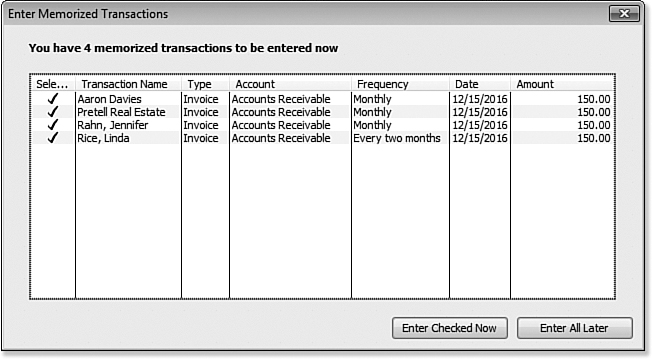
Figure 8.35. QuickBooks reminds you to process Memorized repeating transactions.
• Add to Group—You can assign multiple transactions to a group and then process them with one keystroke. First, create a group by choosing Lists, Memorized Transaction List from the menu bar. From the Memorized Transaction drop-down list, select New Group. Give the group a name and choose options for the group from the following options: Remind Me, Do Not Remind Me, or Automatically Enter.
5. Click OK to close the Schedule Memorized Transaction dialog box.
6. Click Save & Close on your bill only if you want to create the vendor bill now and also add it to your memorized transaction list. If not, select Clear to remove the bill details, knowing that QuickBooks will prompt you to enter it on the frequency and date you selected.
To manually enter the transactions (if they’re not set to Automate Transaction Entry), choose Lists, Memorized Transaction List from the menu bar, or press Ctrl+T on your keyboard to quickly call up the list. Select the group or individual transactions you want to post by double-clicking the group or individual item from the memorized transaction list.
If you clicked on a memorized group, QuickBooks will create each of the transactions in the group, asking you to assign a transaction date globally to all the transactions in the group. Use the memorized transaction tool to save time and to remind you to pay those important recurring bills.
Depositing a Vendor Refund
On occasion, you might receive a refund from your vendor whom you previously paid. To add a vendor refund check to your bank deposit, follow these steps:
1. Create your deposit (normally done with customer invoice payments) as usual.
2. On the next available deposit line, choose one of two options:
• If you do not have an open vendor credit in your Accounts Payable, enter the vendor name in the Received From column, and select the expense account you want to reduce in the From Account column.
• If you do have an open vendor credit that you want to associate this refund with, enter the vendor name in the Received From column, and select the Accounts Payable account in the From Account column. Then apply the deposit to the open credit.
3. Enter an optional memo.
4. Enter the amount.
5. Click Save & Close when the total of the deposit agrees with the bank deposit total.
Although this method is quite easy to use, it does not allow you assign an item so any refund recorded this way will not be included in certain job cost reports that are prepared from the use of items.
Instead, you would create a vendor credit memo to record the reduction in a job cost, then follow the preceding instructions for applying the deposit to the open vendor credit.
Paying and Recording a Credit Card Bill
You have flexibility in how you choose to record and pay your credit card bills. The decision is based on your own circumstances because no one way is the right way.
Options for recording credit card expenses include the following:
• Enter a bill to the credit card vendor, summarizing the total charges on one bill and entering a separate line for each expense account amount.
• Enter individual credit card charges. From the menu bar, select Banking, Enter Credit Card Charges. You might be prompted to add a credit card account to QuickBooks.
• Use the QuickBooks Online Banking feature and automatically download your credit card charges and payments directly into your QuickBooks data file. Not all credit card providers offer this functionality. To see whether your card offers this option, select Banking, Online Banking, Participating Financial Institutions from the menu bar.
![]() For more information, see “Online Banking Center,” p. 449.
For more information, see “Online Banking Center,” p. 449.
Options for paying your credit card bill include the following:
• If you selected to enter a bill to your credit card vendor, simply pay the bill as you do other bills, paying it partially or in full.
• If you selected one of the other two options, you need to create a vendor bill or check and in the Account column of the transaction assign the Credit Card type account you previously recorded the transactions to. The vendor bill simply decreases the balance owed on the credit card liability account.
The cash basis Balance Sheet often shows this amount if it is not paid by the date you prepare your financials.
![]() For more information about how QuickBooks handles certain accounts on a cash basis, see “Accounts Payable Balance on Cash Basis Balance Sheet,” p. 222.
For more information about how QuickBooks handles certain accounts on a cash basis, see “Accounts Payable Balance on Cash Basis Balance Sheet,” p. 222.
Have you ever found that QuickBooks users will assign a different expense account each time they create a check or bill to pay for costs of the business? This can make reviewing your specific expenses for the business less accurate.
QuickBooks offers two choices with the Automatically Recall Information preference (select Edit, Preferences from the menu bar and select the General—My Preferences tab):
• Automatically recall last transaction for this name—will recall both the account and the previous amount.
• Prefill accounts for vendor based on past entries—will only recall the account(s) used and will not recall the amount.
A more efficient process is to assign up to three different default chart of accounts to each vendor record. To add these accounts, follow these steps:
1. From the Home page, click Vendors to open the Vendor Center.
2. Select the vendor to which you want to assign accounts, and click Edit Vendor to open the Edit Vendor dialog box.
3. Click OK to close the New Feature message if it displays.
4. Click the Account Prefill tab. In the fields provided, select the desired accounts from the drop-down list, as shown on Figure 7.7 in Chapter 7.
If you rarely use the additional accounts, you might want to consider adding them only when needed. All newly created transactions will include up to the three lines assigned. If these lines are not removed, they will lead to blank lines of data in many reports.
The selected accounts will override any preference setting for Recall or Prefill and will instead insert these accounts automatically on a Write Checks or Enter Bills transaction. This is just another method you will find to help you keep your accounting accurate.