
7. Setting Up Vendors
Customizing Your Home Page for Vendor Activities
QuickBooks makes performing vendor activities easy with a customizable list of tasks on the Home page, as shown in Figure 7.1.
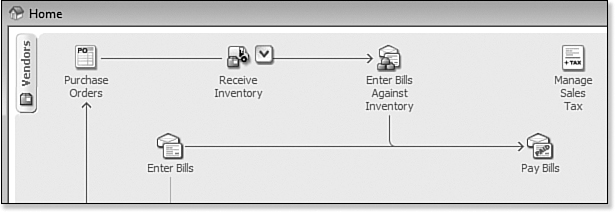
Figure 7.1. Access common vendor activities from the Home page.
When working with Accounts Payable, you can customize the Home page to include or exclude:
• The option to enter bills and pay bills
• Inventory-related activities
• Time tracking, which is useful if you pay vendors for time worked on jobs
![]() For more information on customizing the Home page, refer to Chapter 2, “Getting Around QuickBooks.”
For more information on customizing the Home page, refer to Chapter 2, “Getting Around QuickBooks.”
Preferences That Affect Accounts Payable
Did you know that you can streamline accounts payable processes by setting certain QuickBooks preferences? Setting preferences saves keystrokes, which in turn can save data entry time.
Not every preference that affects accounts payable impacts your financials; some preferences enable specific features. Set preferences in QuickBooks by selecting Edit, Preferences from the menu bar to open the Preferences dialog box.
Preferences in QuickBooks come in two forms:
• My Preferences—Settings that are unique to the current user logged in the data file and are not shared by other users. Click the My Preferences tab to modify the user-specific settings for the logged-in user.
• Company Preferences—Settings that are common for all users. Click the Company Preferences tab to modify settings globally for all users.
The following sections detail the preferences that can affect your use of the accounts payable functionality.
To set company preferences, you need to open the file as the Admin or External Accountant user and switch to single-user mode (if you are using the data file in a multi-user environment). The Admin user is the default user created when you begin using QuickBooks for the first time.
Proper data entry security includes limiting which employees have access to logging in as the Admin and setting company preferences that are global for all users.
Accounting
The Accounting preferences are important to review when you first create your data file. These choices affect much of how your accounting information is recorded in accounts payable.
Company Preferences
Company preferences are shared globally by all users. The Accounting preferences include:
• Accounts—These settings are important for proper management of recording revenue and expenses. The following are the preference settings for Accounts:
• Use Account Numbers—Requires the use of an account number in addition to account name when creating a new chart of account list item. Users can type either the number or the name when referencing an account on a transaction line.
• Show Lowest Subaccount Only—You can choose this option if account numbering is enabled and all the chart of account items have a number assigned. This setting changes how the account name is displayed. If you see an “other” named account on your financials, users recorded a transaction to the parent account and not to one of the available subaccounts.
• Require Accounts—Use this option to determine whether or not QuickBooks displays a prompt when you forget to choose an account on a transaction line. If you leave the option turned off, QuickBooks will assign the transaction to Uncategorized Income or Uncategorized Expense. When creating a new data file, this default is automatically selected.
• Use Class Tracking—Classes in QuickBooks provide a secondary means of grouping transactions, such as into profit centers. The optional Prompt to Assign Classes allows you to enforce class tracking in a similar fashion to the aforementioned Require Accounts option. See the QuickBooks Help menu for more information on how you can use class tracking to track multiple profit centers on your income statement and for some balance sheet accounts.
• Automatically Assign General Journal Entry Number—This preference sequentially numbers any general journal entries automatically. Each entry number can be modified at the time of input.
• Warn When Posting a Transaction to Retained Earnings—You can post to the Retained Earnings account but you should not because QuickBooks uses this account at year end to close out the year’s Profit or Loss totals. Note: When creating a new data file, this option is enabled by default.
• Date Warnings—When you create a new data file, the default date range set is from 90 days in the past to 30 days in the future, calculated from your current computer system date. Users can modify these date ranges, and QuickBooks will warn users when they enter or modify a transaction outside these dates.
• Closing Date—The Admin or External Accountant user login can set a date in the past for which transactions cannot be modified, added, or deleted prior to that date without entering the closing date password (if one was created).
My Preferences
My Preferences are unique to the username currently logged in to the data file. These settings are not shared globally.
Autofill memo in general journal entry—when creating a journal entry, each row memo column will autofill with the memo from the row above.
Bills
Review your Bills preferences to determine whether the defaults set by QuickBooks are appropriate for your company’s needs.
Company Preferences
Company preferences are shared globally by all users. The following are the Bills preferences:
• Entering Bills, Bills Are Due—Specifies the default number of days vendor bills should be paid within. You can change this global default on each vendor’s record information or on a specific transaction. By default, QuickBooks sets the default due date for bills (where a vendor record does not have payment terms set) to 10 days. Users can modify this for their company’s specific bill-paying terms.
• Warn About Duplicate Bill Numbers from Same Vendor—Ensures you don’t pay the same bill twice. This safeguard is an important reason for entering bills first, rather than skipping a step and instead using the write checks transaction type when you pay vendors.
• Paying Bills, Automatically Use Discounts and Credits—Enables QuickBooks to apply the discount to your vendor bill payments automatically if your vendor is set up with discount terms and the bill is being paid within the discount date defined. Be sure to select your preferred chart of account for recording these credits.
My Preferences
There are no My Preferences that would affect your workflow for accounts payable.
Checking
The Checking preferences improve the accuracy of your day-to-day data entry. Be sure to review them when setting up a new data file.
Company Preferences
Company preferences are shared globally by all users. The following are the Checking preferences:
• Print Account Names on Voucher—The default is to print the General Ledger account when using the Write Checks transaction. General Ledger accounts do not appear on checks printed via the Pay Bills transaction.
• Change Check Date When a Non-Cleared Check Is Printed—If you use the Pay Bills feature to queue bill payment checks ahead of printing them, this setting will change the check date to the current system date when you print the checks.
• Start with Payee Field on Check—This time-saving option places your curser in the Payee field when you use the write checks transaction type.
• Warn About Duplicate Check Numbers—QuickBooks will warn the user if she is using a check number that the system has already recorded.
• Autofill Payee Account Number in Check Memo—You can assign the account number your vendor has assigned to you and have this number print on the Memo field of the bill payment check. For more information, see “Assigning the Vendor Account Number to the Vendor Record” later in this section.
• Select Default Accounts to Use—You can assign the default bank accounts QuickBooks uses when creating paychecks or payroll liability checks.
• Online Banking—Users can select from two data viewing options when downloading transactions.
My Preferences
My Preferences are unique to the username logged in to the data file. These settings are not shared globally:
• Select Default Accounts to Use—Assign what account you want to use for:
• Opening the Write Checks
• Opening the Pay Bills
• Opening the Pay Sales Tax
• Opening the Make Deposits
Assigning the Vendor Account Number to the Vendor Record
To assign the vendor account number to the vendor record, follow these steps:
1. On the Home page, click the Vendors button.
2. On the left side of the page, select the vendor to which you want to assign the account number.
3. Click the Edit Vendor button.
4. If necessary, close the New Feature message by clicking OK. The Edit Vendor dialog box opens.
5. Click the Additional Info tab.
6. Type the account number the vendor has assigned to your account (see Figure 7.2). Click OK.

Figure 7.2. QuickBooks can optionally print the account number vendors assign to your business on the memo line of checks created via write checks or pay bills.
7. Press the Esc key on your keyboard to close the Vendor Center.
General
Everyone using QuickBooks should review the settings in General Preferences. Although I have named a couple here, many are worth selecting and customizing for your company’s specific needs.
Company Preferences
Company preferences are shared globally by all users. The following are the General preferences that might affect your use of Accounts Payable functions:
• Time Format—If you track your vendors’ time with QuickBooks time sheets, you can default how portions of an hour display.
• Never Update Name Information When Saving Transactions—When not selected and you change the payee name or address, QuickBooks will prompt you if you want to update the payee’s information. By default this preference is not selected in a newly created QuickBooks file.
• Save Transactions Before Printing—By default this preference is selected in a newly created QuickBooks file.
My Preferences
My Preferences are unique to the username currently logged in to the data file. These settings are not shared globally:
• Pressing Enter Moves Between Fields—When this option is not selected, using the Tab key will advance through fields in a transaction; using the Enter key will save a completed transaction. If the option is selected, both the Tab and Enter key can be used to advance through fields on a transaction. The keyboard combination of Ctrl+Enter will save a completed transaction.
• Automatically Open Drop-Down Lists When Typing—Time-saving feature that is selected by default. Useful if the chart of accounts has subaccounts.
• Warn When Editing a Transaction—By default this option is selected. Helps to avoid unintentional changes to a transaction being reviewed.
• Warn When Deleting A Transaction Or Unused List Item—By default this option is selected. Helps to avoid unintentional deletion of a transaction being reviewed.
• Automatically Recall Information—Select this option to recall both the previously assigned account and the amount or just the account when creating a new vendor transaction.
• Default Date to Use for New Transactions—Exercise caution to ensure that the appropriate choice is selected. If you are entering transactions from the past, you might want to choose the last entered date. Otherwise, I recommend setting the default to use today’s date.
Reminders
When setting the Company Preferences for reminders, do not forget to also set the My Preferences for this section.
The Company Snapshot is a digital dashboard that includes a view of your reminders. Defining these preferences specific for your company affects the information users see on the Company Snapshot, reminding them of important tasks.
Company Preferences
On the Reminders preference page, you default QuickBooks reminders to show a summary, or list, or to not remind users of all checks to print, bills to pay, or purchase orders to print.
My Preferences
If you would like reminders to display when you open the QuickBooks data file, select the My Preferences tab of the Reminders preference and choose to Show Reminders List when opening a Company file.
Reports and Graphs
The person responsible for how QuickBooks reports your Accounts Payable aging will want to review these preferences choices.
Company Preferences
Company preferences are shared globally by all users. The Reports and Graphs preferences include:
• Summary Reports Basis—This feature is important because it tells QuickBooks what basis you want to view your Balance Sheet and Profit & Loss report in by default. You can always override the default when you prepare the report. More details about the differences between Accrual and Cash report basis is included in Chapter 3, “Accounting 101.”
• Aging Reports—You can choose to age your reports from the due date or from the transaction date.
The remaining preferences affect the appearance of your reports.
My Preferences
My Preferences are unique to the username logged in to the data file. These settings are not shared globally:
• Prompt Me to Modify Report Options Before Opening a Report—By default this preference is not selected. If it is selected, each time you open a report the Modify Report dialog will display.
• Report and Graphs—These settings determine how a report is refreshed when the data used in the report changes. The default in a newly created QuickBooks file is the Prompt Me to Refresh. I recommend selecting the Refresh Automatically option. You can make this decision for yourself depending on the size of your QuickBooks data file and the speed of your computer’s processor.
Tax:1099
Setting up your vendors for proper 1099 status is important. However, be assured that if after reviewing this information you determine the original setup was incorrect, any changes made to this preference will correct prior- and future-dated reports and forms.
The Internal Revenue Service requires that a business provide a Form 1099-MISC at the end of the tax year to any person or unincorporated business paid $600 or more for services in a given calendar year. Most incorporated businesses are not required to get a Form 1099-MISC. You should contact your accountant for more information.
Company Preferences
You can select the Do You File 1099-MISC Forms? option to let QuickBooks know that you will be providing 1099 forms to your vendors at the end of the year.
The dialog box shown in Figure 7.3 is the first step in getting ready to track your Form 1099-MISC payments.
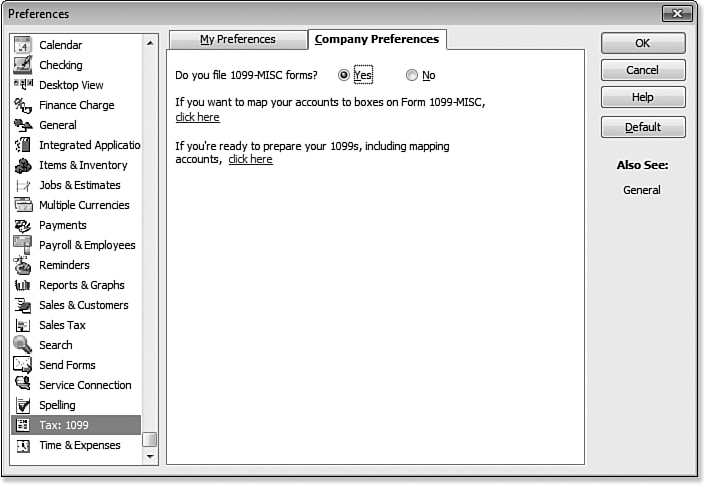
Figure 7.3. Choose Yes if you are required to submit 1099-MISC forms to the Internal Revenue Service.
![]() For more information, see “Tracking and Reporting Vendor 1099-MISC Payments,” p. 226.
For more information, see “Tracking and Reporting Vendor 1099-MISC Payments,” p. 226.
My Preferences
There are no My Preferences in the Tax:1099 that you can set.
Working with the Vendor Center
QuickBooks makes adding, modifying, and researching vendor activity easy using the Vendor Center. Vendors are individuals or companies that you purchase services or products from and they are managed in the Vendor Center as displayed in Figure 7.4.

Figure 7.4. Complete common vendor tasks from the Vendor Center.
From the Vendor Center, you view contact details for your vendors and can access many tasks including:
• Create a new or edit an existing vendor.
• Access the Add Multiple Vendors dialog box (using the Add/Edit Multiple List Entries feature discussed in Chapter 4).
• Record commonly used vendor transactions.
• Print the vendor list, information, or transactions.
• Export the vendor list or transactions; import or paste vendors from Excel.
• Prepare a vendor letter and customize the vendor templates.
• Filter your list of vendors to include All Vendors, Active Vendors, Vendors with Open Balances, or a custom filter of your choice.
• Attach documents to the vendor record, such as attaching a copy of the signed subcontractor agreement.
• Access a map and driving directions to the vendor’s location.
• Add and edit vendor notes and to do reminders.
• View and filter the list of transactions by vendor or by transaction type.
• Prepare a QuickReport or Open Balance Report for the given vendor.
Use the Vendor Center to access many of the common vendor transactions and reports you will learn about in this chapter and in Chapter 8, “Managing Vendors.”
The following sections provide more details about creating a vendor and using the Vendor Center for researching transactions.
Adding or Modifying Vendors
When you are ready to purchase materials or services for your business you will need to create a vendor. You might already have a head start on adding vendors to your file if you used the Adding Contacts feature available with the Express Start QuickBooks setup discussed in Chapter 1, “Getting Started with QuickBooks.”
However, there is also another less used list in QuickBooks worth mentioning here titled the Other Names list. One reason you might choose to add a payee to the Other Names list might be when you are recording a one time purchase. Later if you begin using the vendor regularly, you have the option one-time to remove the payee from the Other Names list and add it to your Vendor list.
This section offers instruction specific to setting up vendors. If your company will be using the Enter Bills process, you will have to use a payee from the vendor list; the bill will not allow you to use an Other Names list item in the Payee field.
To practice adding a new vendor record, open the sample data file as instructed in Chapter 1, “Getting Started with QuickBooks.” If you are working in your own file use these instructions to begin entering the vendors you purchase goods and services from:
1. Click the Vendors button on the Home page. Alternatively, select Vendors, Vendor Center from the menu bar.
2. If the New Feature message displays, read the information provided. Optionally, select the Do Not Display This Message in the Future box. Click OK to close the message.
3. Select New Vendor from the New Vendor drop-down list in the upper-left corner of the Vendor Center.
4. The New Vendor dialog box displays (see Figure 7.5). Enter ABC Cleaners in the Vendor Name field. It is important to mention that no two names from any of the lists in QuickBooks can be the same.

Figure 7.5. Completing the contact information for your vendor is good practice for your record keeping.
5. Leave the Opening Balance field blank. Chapter 3, “Accounting 101,” discusses entering beginning balances in a new QuickBooks file (when there have already been previous accounting transactions recorded in some other accounting software or method). If you are a new business, you will later enter a vendor bill to increase the balance owed to the vendor instead of entering an Opening Balance amount in the New Vendor record.
The As Of (date) field will not have any effect in your QuickBooks file if no dollar value was entered in the Opening Balance field.
6. On the Address Info tab, consider completing the salutation, first name, and last name fields so you have the option to send letters to your vendors in the future.
7. Complete any remaining fields you deem applicable, such as contact information and address.
8. Click the Additional Info tab. In the Account No. field enter the account number your vendor has assigned to you, if applicable. This account number can optionally be printed on the memo line of a vendor bill payment check.
9. Use the Type field in Categorizing and Defaults to create or assign a vendor type, which you can then use to filter your vendor and transaction reports.
10. Select the appropriate payment terms, such as Net 30 days, your vendor has assigned to your account. If the specific term needed is not displayed, click Add New to create a new term.
11. When applicable enter the Credit Limit established by your vendor.
12. If your vendor qualifies for receiving a Form 1099-MISC at the end of the year, enter the vendor’s Tax ID and place a check mark in the box for Vendor Eligible for 1099. Note that if you do not have this information handy when you are first creating the vendor, you can add this information at later date without any loss of tracking the details.
13. If you are using QuickBooks Accountant, Premier, or Enterprise you have the option of selecting a Billing Rate Level for your vendor. Billing rates allow you to mark up billable time you will later add to a customer invoice.
14. If you have created a Custom Field, complete the value for that field. In Figure 7.6 a custom field is displayed titled Discount Available. Custom fields allow you to track supplemental information about your vendors, such as if an additional discount is available beyond what you entered in the Payment Terms. Click the Define Fields button to add or remove custom fields.

Figure 7.6. More useful information can be recorded on the Additional Info tab.
15. Click the Account Prefill tab as shown in Figure 7.7. Assign the Repairs, Building Repairs expense account. You can assign up to three different accounts that will display automatically when you create a new transaction using this vendor as the payee. If you also download transactions from your bank or credit card, click the link (not shown) to review the information provided about how Account Prefill works with Online Banking.
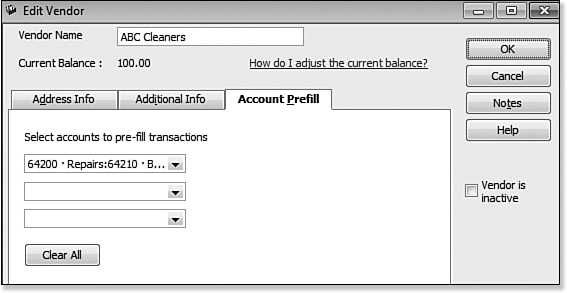
Figure 7.7. Streamline your data entry by storing the default accounts to assign to transactions for this vendor.
16. At any time you can select or deselect the Vendor Is Inactive checkbox. In such cases the vendor still appears on reports, but will not appear in drop-down lists you use for creating new transactions.
17. Click OK to save your changes and close the New Vendor dialog box, or click Cancel to discard your work. You can also click Next to add another new vendor.
Want a quick way to complete multiple name fields at once when creating a new vendor? Start with entering data in the Company Name field. When you move out of the Company Name field, QuickBooks will automatically populate the Vendor Name, Company Name, Billed From, and Print on Check as fields.
The Vendor Name field in QuickBooks is a “look-up” name; this field also controls how your vendors are automatically sorted in the Vendor Center.
If you prefer to use a different vendor “look-up” name, be sure to enter the proper vendor name in the Print On Check As field.
Now that you have created a new vendor in the sample file, you are prepared to create a list of your own vendors. Return to the Vendor Center any time you need to update a vendor’s information.
Finding Vendor Transactions
The Vendor Center not only provides access for adding to or modifying your vendor’s records in QuickBooks, but also includes convenient access to finding vendor transactions.
With the Vendor Center open, select a vendor to display a list of their transactions on the right. In the previously displayed Figure 7.4, vendor A Cheung Limited is selected and to the right are individual transactions for that vendor.
QuickBooks does not keep a time stamp on revisions made to your vendor’s contact information. Once you make a change, all previous records will reflect the change to the address or contact information.
However, changes to the Account Prefill selection will affect newly created transactions.
You can filter the resulting transactions by selecting options in the Show, Filter By, and Date drop-down lists. The options in the Filter By list change as you make a selection from the Show list.
Figure 7.8 shows representative vendor transaction types. Your transaction types might differ from the displayed types if you do not have the related feature enabled in Preferences. The only transaction type that can have a vendor record assigned that is not included in these options is Make Journal Entry.

Figure 7.8. You can filter vendor transactions based on multiple criteria.
![]() For more information, see “Correcting Accounts Payable Errors,” p. 235.
For more information, see “Correcting Accounts Payable Errors,” p. 235.
This chapter will discuss how to handle various situations, including incorrect journal entries that affect a vendor record.
The Transactions tab in the Vendor Center allows you to group transactions by type, rather than by vendor.
Researching Vendor Transactions
To practice finding vendor transactions by type, open the sample data file as instructed in Chapter 1. If you are working in your own file use these instructions to easily locate vendor transactions:
1. On the Home page, click the Vendors button to open the Vendor Center. Click the Transactions tab.
2. Select the Purchase Orders type as shown in Figure 7.9.

Figure 7.9. Use the Transactions tab of the Vendor Center to find like transaction types.
3. Optionally, from the Filter By drop-down list, select Open Purchase Orders.
4. Optionally, filter for a specific date range. This might be useful if you are looking specifically for older dated open purchase orders.
5. Optionally, click any column header to sort that column.
6. To view a transaction, double-click it, or right-click, and select Edit Transaction.
7. Click the Print icon to print the listed transactions.
8. Optionally, click the View Vendor Info button and click OK if the New Feature message displays. QuickBooks opens the Edit Vendor dialog box for the currently selected vendor. Click OK to close and return to the Vendor Center:Purchase Orders listing.
9. Click the Export icon to export the list of transactions to an Excel worksheet or to a comma-separated value file.
The Vendor Center provides one location to create or modify your vendor records and even research vendor transactions.
Next, you will learn about the proper Accounts Payable process so you can successfully track your vendor business expenses.
The Accounts Payable Process
QuickBooks includes a flexible payable process. Your company can choose to use the purchase order and receive item transactions for controlling and monitoring costs and delivery, or you can skip these steps and simply create a bill to be paid later.
An important reason for using a vendor bill to record your business expenses is the ability to track the vendor’s bill reference number. In the event your vendor invoices you more than once for the same services or items, QuickBooks will optionally warn you when you enter a reference number that was previously recorded.
If you created your data file using the Express Start option you might need to enable the features as discussed in the earlier section “Preferences That Affect Accounts Payable” of this chapter. If you are ready to work in your own data file, make sure you have created your new file as discussed in Chapter 1.
Accounts Payable Forms
Many of the accounts payable forms use QuickBooks items. If you are considering using the accounts payable process for the first time, be sure to review Chapter 4, “Understanding QuickBooks Lists,” which discusses the use of items and how to set them up properly.
If you choose to use the purchase order transaction, you will need to create items. Items are a list of the products or services you sell to customers or purchase from vendors. The primary purpose of items is to perform the accounting behind the scenes and to automate the data entry process by prefilling descriptions, costs, and sales price on purchase and sales transactions.
Many users inadvertently post revenue and expenses to the same account for Services, Non-Inventory Parts, Other Charges, and Discounts. The New Item dialog box includes a checkbox (see Figure 7.10) that enables you to avoid this problem and provide separate revenue and expense account fields. Choosing to set up items correctly can be one of the most important decisions you will make in using accounts payable.
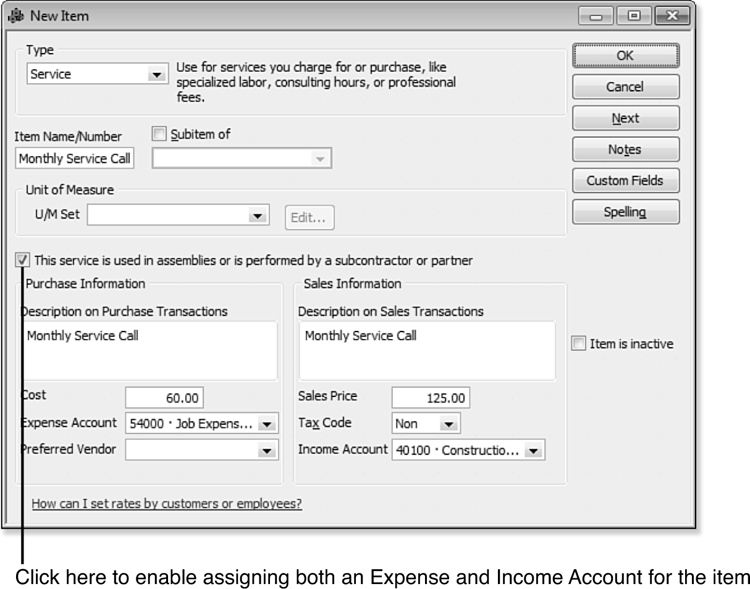
Figure 7.10. You can use the same item with both customers and vendor transactions.
Should you use items even if you do not plan on using the QuickBooks purchase order or item receipt transactions? I recommend that you do, especially if you follow the instructions in the preceding tip. A powerful feature of items is that each time the item is purchased or sold, QuickBooks records the amount to the specific account(s) defined in the Add New or Edit Item dialog box, reducing or eliminating potential errors created from recording the transaction to the wrong account when using the Expense tab of a purchase transaction.
How can items help you track your customer’s profitability? Many of the QuickBooks reports that provide profitability information are based on transactions recorded using items on the Items tab and will not provide the same information if the transaction is recorded using the Expenses tab.
For example, a home builder creates a budget for the project (using an estimate transaction) and wants to track actual versus budgeted expense. To take advantage of the many customer and job profitability reports, you must enter your expenses using the Items tab on an accounts payable bill (and use the same process for the check transaction), as shown in Figure 7.11.

Figure 7.11. Use the Items tab to record expenses you want to track in customer or job profitability reports.
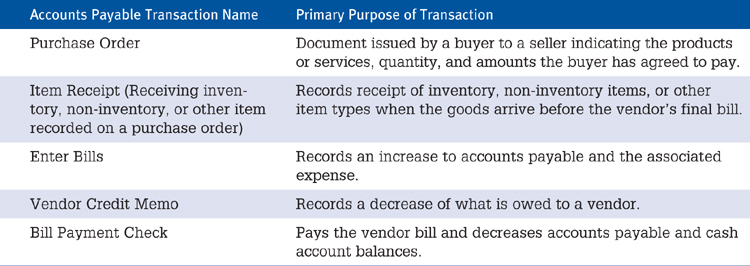
Table 7.1 lists the transaction types available in accounts payable and the purpose each type serves. You will also want to review Table 8.1 in Chapter 8, “Managing Vendors,” which outlines the accounting that goes on behind the scenes with these same transactions.
Table 7.1. Accounts Payable Transactions
Accounts Payable Workflow
In this section you will learn about the importance of using the accounts payable process instead of writing a check for your business expenses. The QuickBooks Home page and Vendor Center, as shown in Figures 7.1 and 7.4, respectively, make managing all your purchasing activities easy.
Your Home page workflow might vary, depending on the version of QuickBooks you are using and the preferences you have enabled.
To perform typical vendor-related activities from the QuickBooks Home page, as shown in Figure 7.1, follow these steps:
1. Access the Vendor Center.
2. Create a purchase order to the vendor (optional).
3. Receive inventory (optional).
4. Optionally, enter bills against inventory.
5. Enter a bill to the vendor.
6. Pay the bill (typically within the agreed-upon payment terms for that vendor; for example, 30 days from the bill date).
Some companies choose not to use accounts payable transactions, but instead pay their vendors with a check (select Banking, Write Checks from the menu bar). Often, this choice is made because the process of paying a vendor with a check is quick and easy and takes fewer steps than creating and paying a vendor bill.
However, by choosing not to use accounts payable transactions, you ignore several important controls for managing the purchases your company makes. These purchasing controls include:
• Associating the bill with the purchase order (or item receipt) to automatically calculate quantity and cost—As soon as you enter the vendor’s name on a bill, QuickBooks prompts you with an open purchase order (or item receipt) dialog box, as shown in Figure 7.12, and prefills the bill for you.

Figure 7.12. Warning provided when you enter a bill for a vendor that has an open purchase order.
• Receiving a warning when entering a vendor invoice number twice—It can happen: A vendor sends you a bill more than once and you pay it more than once. However, when you use a vendor bill (versus the Write Checks transaction) and you enter the vendor’s invoice number in the Ref No. field, QuickBooks warns you if the vendors reference number was used on a previous bill, as shown in Figure 7.13.
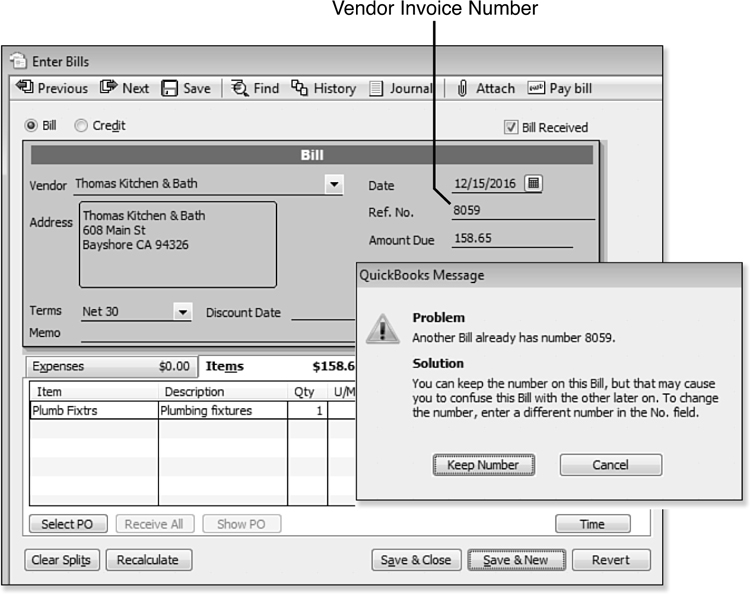
Figure 7.13. QuickBooks provides a warning message when you enter a bill with the same reference (vendor invoice) number.
• Not recognizing costs in the month they were incurred—When you opt to use the Write Checks transaction instead of a vendor bill, QuickBooks uses the date of the check as the date the expense is recorded (recognized). How often do you pay the vendor’s bill the same day or month you receive it? You might be overstating or understating the expenses incurred in a specific month if you use the check instead of the bill form.
• Taking advantage of discounts offered by your vendor—Only if you use vendor bills can you set a preference to have QuickBooks automatically calculate and record the discount if you’re paying the bill within the vendors discount terms.
The purchasing controls and warnings provided in QuickBooks make using the accounts payable process a smart choice for your company. Additionally, your company will benefit from having financial statements that can be viewed in cash and accrual basis.
Entering a Purchase Order
Your business might choose to record purchase orders to track the expected product or service cost. Purchase orders are non-posting, which in accounting vernacular means when you record a purchase order you are not recording an expense or liability. Instead, a purchase order serves as a reminder that you expect to receive a bill from the vendor at a later date.
![]() To learn more about working with purchase orders, see “Creating the Purchase Order,” p. 142.
To learn more about working with purchase orders, see “Creating the Purchase Order,” p. 142.
Recording Vendor Bills
You are on your way to properly using accounts payable forms to help track and report on your business expenses. Learn how to enter your vendor bills in this section.
Did you know by default QuickBooks requires you to use the Tab key on your keyboard to advance from one field to another on certain transactions?
If you inadvertently used the Enter key on your keyboard, QuickBooks might save and close the transaction. If this happens to you, use the Previous or Next menu at the top of the open dialog box to find the transaction you had not yet completed.
If you prefer to use the Enter key on your keyboard to advance between fields, you can set that preference in Edit, Preferences, General Preferences. On the My Preferences tab, select the Pressing Enter Moves Between Fields checkbox. Click OK to save and close your preference setting.
Practice Entering a Vendor Bill
To practice adding a new vendor bill, open the sample data file as instructed in Chapter 1. If you are working in your own file, use these instructions to begin entering bills for the products and services you have purchased:
1. On the Home page, click the Enter Bills icon to open the Enter Bills dialog box, as shown in Figure 7.14.

Figure 7.14. Using the bill allows you to record the expense when incurred, but pay the vendor at a later date.
2. From the Vendor drop-down list, type the first few letters of the vendor name ABC Cleaners (created earlier in this chapter). You might also select the vendor from the drop-down list by scrolling through the list and selecting a specific vendor.
3. Using the Tab key on your keyboard, advance to the Date field. If you are practicing, accept the default date, otherwise enter the actual date for your transaction. In your file you can use the (+) or (-) key on your keyboard to change the date by a single day forward or backward. Other shortcuts are detailed in the Appendix C, “QuickBooks Shortcuts.” This date will be used to record the expense when viewing your financial reports in accrual basis.
![]() More information on the accounting for transactions can be found in Table 8.1 in Chapter 8, “Managing Vendors.”
More information on the accounting for transactions can be found in Table 8.1 in Chapter 8, “Managing Vendors.”
4. Type 1234 in the Ref. No. field. This represents the invoice number supplied by your vendor on his bill. If your vendor did not provide an invoice number, I often recommend using the digits of the bill date. For example, I might use 011717 as the Ref. No. if I were also dating the bill 01/17/2017.
5. Using the Tab key again, advance to the Amount Due field and type 100. QuickBooks automatically formats the amount to be 100.00. In your own file, you can manage this preference by selecting Edit, Preferences, General, and selecting the My Preferences tab. If you enabled the Automatically Place Decimal Point option, QuickBooks would have formatted your input of 100 as 1.00 instead.
6. The Bill Due, Terms, and Discount Date will prefill from the vendor’s record. You can override these inputs on the specific vendor bill you are entering. If no defaults are included in the vendor record, QuickBooks will then use the default due date calculation found on the Bills—Company Preferences tab of the Preferences dialog box (see Figure 7.15). You must be logged into the file as the Admin user or External Accountant to change the Company Preferences settings for bills.

Figure 7.15. QuickBooks uses the Company Preference terms when a vendor record doesn’t specify terms.
7. Optionally, enter a Memo. This memo will print on the bill payment check. If your vendor record has a stored Account No. as detailed in the section on Adding or Modifying Vendors, leave the memo field blank and QuickBooks will include the Account No. on the printed bill payment check automatically.
8. In this exercise, QuickBooks automatically prefilled the Account column on the Expenses tab with Repairs:Building Repairs. In this exercise, the account was set as a default for this vendor.
9. Optionally, enter a memo for your reporting needs. This memo will not print on the final check. Although named similarly to the Memo field on the check, this field allows you to describe the transaction line for your reporting.
10. Select a customer or job name from the list when applicable.
11. Use the Billable? field when you specify a customer or job and you want to include this expense on a future customer invoice.
12. If you are using Class tracking, enter the appropriate class.
13. Click Save & Close.
Other buttons on the Enter Bills dialog box include:
• Clear Splits—Useful when you want to condense multiple account rows into a single account row.
• Recalculate—The Recalculate button updates the Amount Due field, which is helpful when you have added additional line items.
• Save & Close or Save & New—Choose Save & Close if you don’t need to add another bill, or Save & New to display a blank Enter Bills transaction.
• Revert—Click this button when you want to undo changes to a previously saved vendor bill.
Creating a Vendor Credit
Now that you are recording your business expenses with vendor bills, what about returning a product to the vendor or receiving a credit for a service not preformed to your specifications? The next section will show you how easy it is to create a vendor credit.
Practice Creating a Vendor Credit
To practice creating a vendor credit, open the sample data file as instructed in Chapter 1. If you are working in your own file, use these instructions to begin entering credits you receive from your vendors:
1. On the Home page, click the Enter Bills icon.
2. Select the Credit option at the top of the Enter Bills dialog box (see Figure 7.16). The dialog box now displays a credit, decreasing accounts payable and decreasing the account(s) assigned on the Expenses tab, or if you are using the Items tab, the account assigned to the item(s) being used.

Figure 7.16. Credits reduce what you owe your vendor and the account assigned on the credit or associated with the item.
3. To continue with the practice example we used earlier, begin typing the vendor name ABC Cleaners. Press the Tab key on your keyboard to advance to the Date field.
4. If you are practicing, accept the prefilled date. In your own file, you can select the date from the calendar.
5. Enter 1223 in the Ref. No. field. This is the credit memo number your vendor has assigned this record.
6. In the Credit Amount field enter 100.00.
7. Enter an optional memo. If you want the memo to display in reports based on your expense lines, be sure to use the memo field in the Expenses tab or the Description field on the Items tab.
8. In this exercise, QuickBooks used the Repairs:Building Repairs expense account assigned to the vendor record and the amount entered in the Credit Amount field. If needed, you can change the account or add additional lines.
9. Click Save & Close.
For ease in typing, QuickBooks will format the date for you. For example, if your current computer system year is 2016, you would only need to type 1220 in a date field and QuickBooks will format the date as 12/20/16.
This vendor credit is currently unapplied and available to be applied when you record a bill payment. If you know that a vendor has an unpaid bill pending, you can apply the credit against that bill now, or wait until the next time you need to pay the vendor.
Paying Vendor Bills
One of the benefits of entering vendor bills is that you can record the expense during the month you incur it, but pay the balance owed at a later date.
If you are ready to pay your bills, make sure you have a vendor bill or some record of the expense being incurred. Develop a process at your business for accurately reviewing your unpaid bills.
To practice paying a vendor bill, open the sample data file as instructed in Chapter 1. If you are working in your own file, use these instructions to begin paying the bills you owe your vendors:
1. On the Home page, click the Pay Bills icon.
2. For this exercise, leave the Show All Bills option button selected. When working with your own data, you can filter the bills that display in the Pay Bills dialog box by selecting the Due On or Before option button and entering a date (see Figure 7.17).

Figure 7.17. Use the Pay Bills dialog box to record payment by check, credit card, or online payment to your vendor.
3. In the Filter By drop-down list, select C.U. Electric or begin typing the name as you learned in an earlier exercise.
4. Review the choices available in the Sort By drop-down list, but leave Vendor selected.
5. Place a checkmark next to each of the bills for C.U. Electric, or optionally click the Select All Bills button. If you are printing checks, QuickBooks will create one check for the two selected bills displayed in Figure 7.17.
6. When working with your own data, if you did not want to pay the full balance you can manually type an amount in the Amt. To Pay column on a specific bill’s row. Later when you are prepared to pay the balance, QuickBooks will include the remaining balance due in the Amt. To Pay column.
7. With a bill selected, click the Go to Bill button. QuickBooks opens the Enter Bills dialog box where, if necessary, you could make changes. Click Save & Close to return to the Pay Bills dialog box.
8. Optionally view the discount terms or credits available, QuickBooks will display a special dialog box. More details are provided about working with discounts and credits in the next section.
9. When working with your own data, you can specify payment options in the Payment section of the Pay Bills dialog box, including the following fields (for this exercise, leave the choices as displayed in Figure 7.17):
• Date—This is the date that will print on your checks or will be assigned to the transactions in your accounting.
• Method—Select Check if you will be printing a check or recording a manually written check. Select Credit Card if you are paying the bill with the company’s corporate credit card. Select Online Bank Pmt if you are using online banking.
• To Be Printed or Assign Check Number—If you selected Check as your method of payment, you can select the To Be Printed option button. If you manually wrote the check, you can select Assign Check Number.
• Account—Depending on your Method selection, you will assign either the bank account or credit card account used to make the payment.
• Ending Balance—QuickBooks displays the ending balance for your bank or credit card account selected.
10. Click Pay Selected Bills. QuickBooks opens the Payment Summary dialog box.
11. Review the details displayed in the Payment Summary dialog box including payment date, account, and method.
12. Click the Print Checks button on the Payment Summary dialog box. Optionally, you can click the Pay More Bills button to return to the Pay Bills dialog box or click Done if you do not want to practice printing (using plain paper).
13. If you selected the Print Checks button, the Select Checks to Print dialog box displays. Leave selected the default Bank Account and the prefilled First Check Number.
14. Review the list of checks to be printed. Each will have a checkmark in the column to the left. Remove the checkmarks from any checks you do not want to print at this time.
15. Click OK to open the Print Checks dialog box. Select your printer from the Printer Name drop-down list, and then choose the proper Check Style from Voucher, Standard, or Wallet.
16. Click Print. For this exercise, make sure you have plain paper in your printer. A check printed to plain paper is not a negotiable document.
17. The Print Checks – Confirmation dialog box displays. In this exercise, click OK to close the confirmation.
New for QuickBooks 2012 is a feature to prepare a bill payment check for a single vendor directly from the Enter Bills dialog box.
To do so, open a previously saved vendor bill, select the Pay Bill option at the top of the Enter Bills dialog box. The Pay Bills dialog box opens with the Filter By field already selected for the same vendor as the open vendor bill.
You have now learned how to complete basic accounts payable tasks including using bills to record your expenses and preparing the payment for the vendor. In the next sections, you will learn how to work with vendor discounts and credits.
Applying Vendor Credits
Your vendor might offer discounts for timely payment or issue a credit for products or services that did not meet your expectations.
Continue your QuickBooks practice by applying the vendor credit created in an earlier practice section of this chapter.
Practice Applying Vendor Credits
To practice applying a credit, open the sample data file as instructed in Chapter 1. If you are working in your own file, use these instructions to apply vendor discounts or credits to your vendor’s open balances:
1. Review your preference for applying credits. From the menu bar, select Edit, Preferences, and go to the Bills—Company Preferences tab on the Preferences dialog box. (You must log into the file as the Admin or External Accountant user type.) Refer to Figure 7.15. These settings determine if QuickBooks automatically applies any open credits for you. If you don’t select the Automatically Use Credits checkbox, you will manually apply the credits. Pick the selection that best meets your business needs.
2. Click OK to close the Preferences dialog box.
3. On the Home page, click the Pay Bills icon. The Pay Bills dialog box opens.
4. For this practice, select the ABC Cleaners vendor in the Filter By drop-down list. Filtering can be useful if you have many open invoices for multiple vendors, but it is not required.
5. Place a checkmark next to the open bill you want to apply the vendor credit to. If you didn’t select to apply credits automatically in step 1, QuickBooks will show the total number of credits and their total value in the Discount & Credit Information for Highlighted Bill section (see Figure 7.18).

Figure 7.18. With a vendor bill selected, QuickBooks will show the number of available credits for that vendor.
6. If you want to modify the amount or which credits are selected, click the Set Credits button. The Discount and Credits dialog box displays as shown in Figure 7.19. You can modify which credit is selected by changing the checkmark from one credit to another or by manually overriding the amount in the Amt. To Use column.

Figure 7.19. The Discount and Credits dialog box allows you to manage how the credits are applied to open vendor bills.
7. Click Done to close the Discount and Credits dialog box. Click Pay Selected Bills to exit the Pay Bills dialog box. If you are only associating a credit memo with a vendor bill, no additional check transaction will be created.
8. Click Done in the Payment Summary dialog box or click Pay More Bills if you want to return to the Pay Bills dialog box.
If you are an accounting professional and using QuickBooks Accountant or QuickBooks Enterprise Accountant you might want to use the Client Data Review feature. From one convenient window, you can assign the vendor unapplied credit memo to the open accounts payable bill, replacing the previous steps numbered 3–8.
![]() To learn more about time savings features for accounting professionals, see “Client Data Review,” p. 601.
To learn more about time savings features for accounting professionals, see “Client Data Review,” p. 601.
Taking Discounts on Vendor Bills
Your company might be able to save money by paying your vendors within their allowed discount terms. Discounts are offered by some vendors to encourage quick payment of their invoices.
When you need to change a prior year’s open balance for a vendor, credit memos can be the safest way to not inadvertently affect prior year financials. With a credit memo you can date the correcting transaction in the current year, important if you have already used your prior year’s data to prepare and file a tax return.
Practice Taking Discounts on Vendor Bills
To practice applying a vendor discount, open the sample data file as instructed in Chapter 1. For this practice we will complete all of the steps necessary for QuickBooks to automatically calculate the discount when paying a vendor bill. If you are working in your own file, you will need to log in as the Admin or External Accountant user type to set the preference mentioned. You can then use these instructions to apply discounts to your vendors open balances:
1. From the menu bar, select Edit, Preferences and select the Bills—Company Preferences tab in the Preferences dialog box. Select the Automatically Use Discounts checkbox, as displayed previously in Figure 7.15.
2. Select Job Expenses:Less Discounts Taken as the Default Discount Account.
3. Click OK to save your selection and close the Preferences dialog box.
4. Next, you will need to assign discount terms to a vendor. From the menu bar, select Vendors, Vendor Center.
5. In the QuickBooks sample data, select Bayshore CalOil Service. To the right, click the Edit Vendor button. Click OK to the New Feature message if it displays.
6. In the Edit Vendor dialog box for Bayshore CalOil Service, click the Additional Info tab.
7. If it’s not already assigned, select the 2% 10 Net 30 terms in the Terms drop-down list. When selected, QuickBooks will calculate a 2% discount if the payment is dated within 10 days of the invoice date. Otherwise, the full amount is payable within 30 days.
8. Click OK to save your changes and close the Edit Vendor dialog box.
9. From the Vendor Center, with Bayshore CalOil Service, select Enter Bills from the New Transactions drop-down list.
10. Using the Tab key, advance to the Ref. No. field. Type 567.
11. In the Amount Due field, type 1,000.00. QuickBooks assigns the Terms and Discount Date and adds the amount to the Expenses tab.
12. Assign Overhead to the Class column on the Expenses tab.
13. At the top of the Enter Bill dialog box, select Pay Bill.
14. Select Yes to record your changes. The Pay Bills dialog box displays with the vendor bill you just created already selected.
15. Notice that as a result of selecting Automatically Use Discounts in step 1, QuickBooks displays the terms and the Sugg. Discount (see Figure 7.20).

Figure 7.20. QuickBooks automatically calculates early payment discounts.
16. Optionally, you can click the Set Discount button to change the amount of the discount, assign a different discount account, and assign a discount class. Click Done to close the Discounts and Credits dialog box.
17. For this practice, click Cancel to close the Pay Bills dialog box. If you are assigning discounts to your own vendor bills, continue with the check printing process.
If you are going to assign discounts to your vendor bills, record your bills at the “gross” amount, or total amount before any discount. Then, over time you can watch the amount you have saved grow!