
6. Managing Inventory
Adjusting Inventory
For companies that track inventory, I find inventory balances are one of the last numbers in QuickBooks that truly gets a good look. You review your accounts receivable because you have customers that need to pay you. You keep up with your accounts payable because you have vendors that won’t supply you without first getting paid. Why exactly is it then, that inventory “reconciling” is often at the bottom of the list, yet it can have the greatest impact on your company’s financials?
Experience has taught me that most companies simply do not know how in QuickBooks to properly review and audit their inventory balances. This section outlines specific reports and methods you can use in QuickBooks to make sure inventory balances are correct.
If you are using inventory in your QuickBooks data, it is recommended that you view your financial reports in accrual basis. Most companies that have inventory report their tax financials in accrual basis. However, a more important reason is that on accrual basis reporting, QuickBooks will match the cost with the related sale. The exception is when using non-inventory items. These items, when purchased, do not increase an Inventory Asset account. Instead, they are recorded directly to the Cost of Goods Sold account, or the Expense account that was assigned when the item was created.
Any company that manages inventory needs to manage inventory errors. Business owners will list any of the following reasons for having to correct their accounting inventory errors:
• Errors in the physical counted results
• Damaged goods
• Open vendor item receipts or bills that are not due to the vendor
• Incorrect valuation given to the inventory at the startup of a data file
This section discusses the methods for correcting inventory errors you might find in your QuickBooks data. If you have a good inventory count commitment and manage the resulting information from the QuickBooks Inventory Valuation Summary report, you should see little to no data entry errors and instead probably will be adjusting inventory only for damage or theft.
Performing a Physical Inventory Count
All too often, here is where I find a complacent attitude about inventory management. I agree that performing a physical inventory count is a time-consuming task. However, if effort is put to this task, your overall financials will be more accurate.
To make recording the count easier, select Reports, Inventory, Physical Inventory Worksheet from the menu bar. The report cannot be modified or filtered for specific dates, so you should run the report at the same time you plan to do your physical count (see Figure 6.1) and be certain that all your inventory-related transactions have been entered. If you want to keep a record of the original worksheet, you can export it to Excel or email it as a PDF attachment.

Figure 6.1. Create a physical inventory worksheet to record the actual inventory counts.
After completing a physical inventory count, you can then confidently create an inventory adjustment so the accounting records will match your actual physical inventory.
Quantity Adjustments
If you discovered quantity differences between your accounting records and your physical inventory account, you should record an inventory quantity adjustment to correct your accounting records.
To create an inventory quantity adjustment in your date, follow these steps:
1. On the Home page, click the Inventory Activities icon and select Adjust Quantity/Value on Hand from the menu. The Adjust Quantity/Value on Hand dialog box opens, as shown in Figure 6.2.

Figure 6.2. Use the Find & Select Items button to efficiently select multiple inventory items to adjust quantity.
Before creating the accounting adjustment, make sure you have created an account in the chart of accounts to hold the value of the inventory adjustment. The account type can be either a Cost of Goods Sold type or an Expense type. For the business owner, consult your accountant when making this decision.
2. From the Adjustment Type drop-down list, select Quantity.
3. Enter an Adjustment Date and optional Ref. No.
4. Select the appropriate Adjustment Account. This account is usually a Cost of Goods Sold account or an Expense account named Inventory Overage/Shortage.
5. Optionally assign a Customer:Job and select your Class if being tracked. However, Job Profitability reports will not include inventory adjustment transactions.
6. To efficiently select multiple items at once, click the Find & Select Items button. Click with your cursor to place a check mark (see Figure 6.2) next to those items you want to create a quantity adjustment for.
Inventory (and Value) adjustments assigned to a customer or job will be included in the Profit & Loss by Job reports, but will not be included in any of the other reports offered, when selecting Reports, Jobs, Time, and Mileage from the menu bar.
7. Click Add Selected Items to return to the Adjust Quantity/Value on Hand dialog box.
8. In the New Quantity column, enter your count from the completed physical inventory or optionally enter the change in the Qty Difference column.
9. Click Save & Close when completed.
QuickBooks provides details on the Item Info After Adjustment as well as summarizes the Total Value of the Adjustment and the Number of item Adjustments.
The accounting effect of the transaction in Figure 6.3 is to reduce the quantity on hand for each of the items shown, reduce (credits) the Inventory asset balance by $547.87, and increase (debits) the Inventory Adjustments account (either a Cost of Goods Sold type or Expense type).
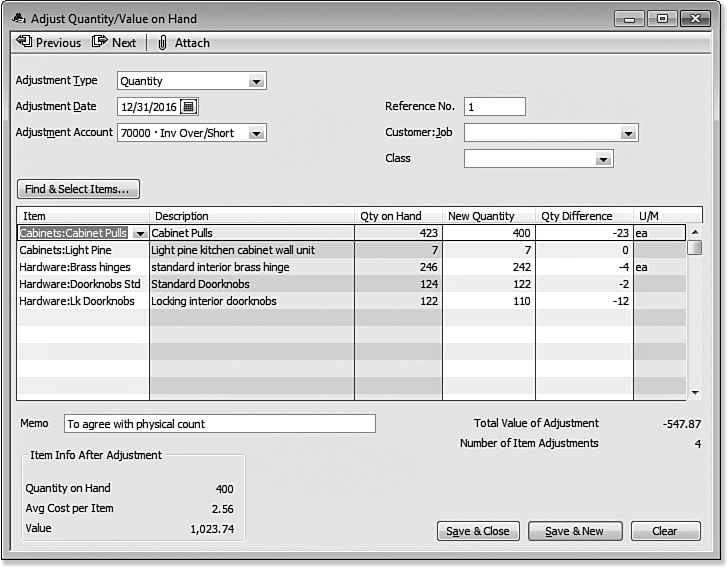
Figure 6.3. Use Inventory Adjustments to properly adjust your inventory in your accounting to match your physical counts.
Value Adjustments
Timing is important when doing a valuation adjustment. Value adjustments, if appropriate, should be carefully considered for their impact on the company’s resulting financials.
Value adjustments differ from quantity adjustments as they do not adjust the quantity but instead adjust the recorded value of the specific items in inventory.
To create a value-only inventory adjustment in your data, follow these steps:
1. From the menu bar, select Vendors, Inventory Activities, Adjust Quantity/Value on Hand. A dialog box with the same name opens, as shown in Figure 6.4.

Figure 6.4. Value adjustments are not used often, be sure to ask your accountant first if it is appropriate for your needs.
2. Select Total Value from the Adjustment Type drop-down list.
3. Enter an Adjustment Date and optional Ref. No.
Generally, this type of adjustment is not done as often as quantity adjustments. The purpose of this book is not to explore or offer tax advice, but certain guidelines exist for when an inventory valuation adjustment is appropriate. Ask your tax accountant to provide them for you.
4. Select the appropriate Adjustment Account. This account is usually an Expense account named Inventory Overage/Shortage.
5. Optionally, assign a Customer:Job and select your Class if being tracked.
6. To efficiently select multiple items at once, click the Find & Select Items button. Click with your cursor to place a check mark next to those items you want to create a quantity adjustment for.
7. Click Add Selected Items. You are returned to the Adjust Quantity/Value on Hand dialog box.
8. In the New Value column, enter your new calculated total value you want assigned to the item.
9. Click Save & Close when completed.
The accounting result of this inventory value adjustment, as shown in Figure 6.4, is no net change to inventory quantities, a decrease (credit) to your Inventory Asset account, and an increase (debit) to your Inventory Adjustments account (either a Cost of Goods Sold type or Expense type). A new average cost will be computed based on the (Original Asset Value + or – the Value Difference) / Quantity on Hand as recorded on the inventory value adjustment. You can view the newly assigned average cost in the lower left of the inventory adjustment.
Do you know how important the date is when assigning the inventory adjustment? If you backdate your inventory adjustment, QuickBooks will recalculate your Cost of Goods Sold from that date forward using the new average cost as of the date of the sales transaction. Care should be taken not to date an inventory adjustment in a prior year where tax returns have already been filed.
The new average cost will be recorded when a sales transaction uses this item, on or after the date of the inventory adjustment.
There are two preferences to control dating transactions. To access them, log in as the Admin or External Accountant user in single-user mode. From the menu bar, select Company, Set Closing Date to open the Preferences dialog box with the Accounting—Company Preferences tab selected (see Figure 6.5).
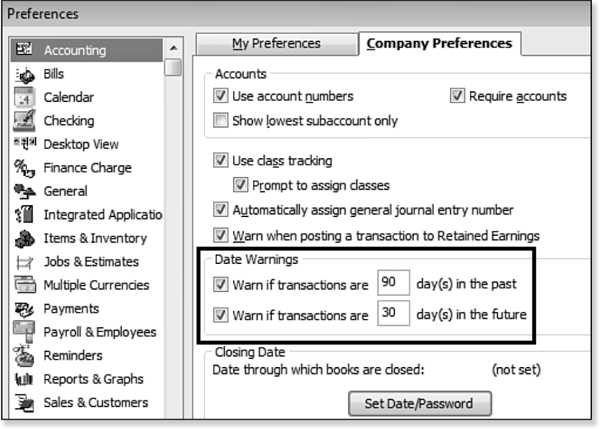
Figure 6.5. Choices for controlling past- or future-dated transactions.
Setting Date Warnings enables a user to be warned when a transaction is either dated so many days in the past or in the future. Set Date/Password is another option to “close” QuickBooks to prevent adding, modifying, voiding, or deleting transactions prior to a selected closing date. Setting a closing date and related features is discussed more fully in Chapter 16, “Sharing QuickBooks Data with Your Accountant.”
Inventory Reporting
You have learned just how easy it is to buy, sell, and adjust your inventory. Good inventory management will also include frequent reviews of inventory specific reports available in QuickBooks.
In this section, you will be introduced to some of the more common reports. However, take the time to review all available reports, as you may have a specific reporting need in addition to those mentioned here.
Inventory Center
New for QuickBooks Premier 2012 (all editions) and Enterprise Solutions 12.0 (all editions) is the Inventory Center. From the Home page click the Inventory Activities icon and select the Inventory Center from the menu bar as displayed in Figure 6.6. Similar to the other “centers” in QuickBooks, the Inventory Center offers one convenient location to manage your inventory reporting and activities including:
• New Inventory Items—Quick access to creating an individual new inventory item or to the Add/Edit Multiple List Entries functionality.
• New Transactions—Quick access to all inventory-related transactions.
• Print—Quick access to printing the item list, information, or transaction list.
• Excel—Exporting to Excel the item or transaction list. Importing item list from Excel.

Figure 6.6. Access the most common transactions and reports for your inventory from the Inventory Center.
Click with your cursor on a specific inventory item and to the right you will see displayed detailed information, transactions, and links to some of the more common reports for managing your inventory.
Access is also provided to attach a document to the inventory item using the new free QuickBooks Attached Documents. Click the Docs icon on your icon bar to open the Doc Center.
With an item selected in the Inventory Center, you can click the Edit Item button to make changes as discussed previously in Chapter 5 in the section titled “Adding or Editing Inventory Items,” p. 121.
With this new Inventory Center you can filter your inventory list by ready-made filters or custom filters of your choosing. One important selection is the ability to filter for inventory with a negative inventory quantity on hand (QOH < = zero). You will learn later in this chapter how important it is to accurate financials not to let your inventory get negative (where you have sold more than you have on hand).
Report Center
Use the Report Center to find the right report for your inventory management needs. See Figure 6.7.
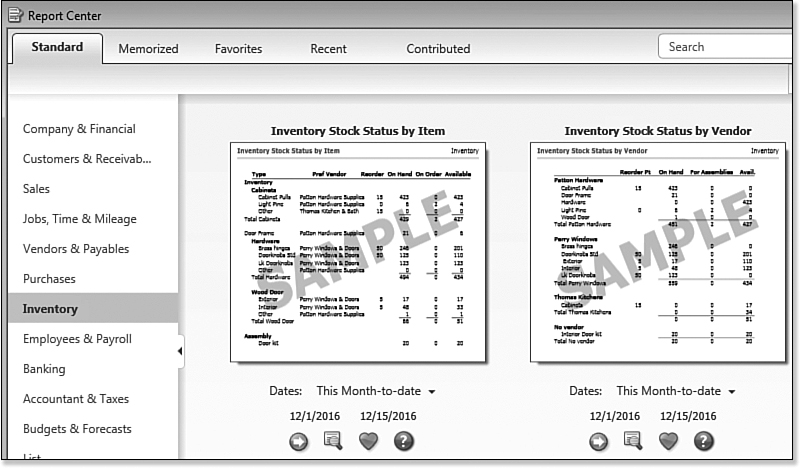
Figure 6.7. The Report Center makes finding the right inventory management report simple.
To open the Report Center, follow these steps:
1. From the menu bar, select Reports, Report Center.
2. Click the Close link to close the New! Contributed Reports! message. This feature will be detailed in Chapter 14, “Reporting in QuickBooks.”
3. On the Report Center’s Standard tab, select Sales.
4. Scroll down to the bottom of the page to find the Open Sales Orders—by Customer or by Item report, which is useful when managing inventory. This report is available only if you are using QuickBooks Premier or Enterprise Solutions.
5. Next, select Purchases on the Standard tab of the Report Center to view these inventory management reports:
• Purchases by Vendor—Summary or Detail
• Purchases by Item—Summary or Detail
• Open Purchase Orders—Summary or Detail
The Report Center provides a thumbnail image of how the data would look in the report.
6. Below each report you can change the dates, click Run to prepare the report with your data, click Info to preview a larger thumbnail image, click Fave to include the report in the Favorites section of the Reports Center, or click Help for more details.
7. Next, select Inventory on the Standard tab of the Report Center to view these inventory management reports:
• Inventory Valuation—Summary or Detail. More details in the next section.
• Inventory Stock Status—By Item or Vendor.
• Physical Inventory Worksheet—Used for recording your physical inventory count totals.
• Pending Builds—For QuickBooks Premier or Enterprise users who have assembly inventory items.
8. If you are using the Manufacturing & Wholesale edition of QuickBooks Premier or Enterprise Solutions, click Mfg & Wholesale on the Standard tab of the Report Center for additional useful inventory management reports.
Inventory Valuation and Your Financials
Another equally important task in inventory management is to compare your Inventory Valuation Summary report to your Balance Sheet Inventory Asset balance (accrual basis).
Comparing Inventory Reports to Financials
Using the sample company referred to in Chapter 1, use this exercise to practice how to compare the Inventory Valuation Summary report to the Balance Sheet Inventory Asset balance.
1. From the Report Center, select Inventory on the Standard tab. Find the Inventory Valuation Summary report and click the Run icon to display the report. Accept the defaulted report date; in Figure 6.8 the As of December 15, 2016 data is displayed.

Figure 6.8. Compare your total Asset Value with your Balance Sheet Inventory Asset balance.
2. Take note of the Asset Value column Total. In Figure 6.8 the total Asset Value is $31,566.37. Your sample data total might differ.
3. From the Report Center, select Company & Financial on the Standard tab, and then click Run below the Balance Sheet Standard report (scroll down to find this report). Accept the defaulted report date. In Figure 6.8 the As of December 15, 2016 data is displayed.
4. Compare the balance in the Inventory Asset account (in the Other Current Assets group) to the total from step 2.
What if the two balances do not match? The most common cause for the two reports not to match is entering a transaction that affects the Inventory Asset account, but does not affect inventory items. The Inventory Summary report only shows the results of transactions that use inventory items. For example, if a General Journal has been used to adjust the Balance Sheet balance, those transactions will not affect the Inventory Valuation Summary report.
When working with inventory adjustments, never use a General Journal transaction. The specific reason is because a General Journal transaction does not use Items, and any adjustments using this transaction affects only the Balance Sheet balance, not the Inventory Valuation Summary report.
It is also not appropriate to use the Inventory Asset account on the Expense tab of a Vendor Bill, Credit, or Write Checks transaction. To properly use these transactions, you would use the Items tab with the appropriate inventory item.
If you need to adjust inventory, select Vendors, Inventory Activities, Adjust Quantity/Value on Hand from the menu bar, as discussed earlier in this chapter.
To find General Journal entries in your own data that might be causing the out-of-balance amount, follow these steps:
1. Double-click the Inventory Asset balance on your Balance Sheet report.
QuickBooks creates the Transactions by Account report.
2. From the Dates drop-down list, scroll to the top and select All.
3. To locate the General Journal entries, select Type from the Sort By drop-down list (in the upper-right corner of the report), as shown in Figure 6.9. QuickBooks now organizes the data by transaction type. Look for General Journal type transactions.
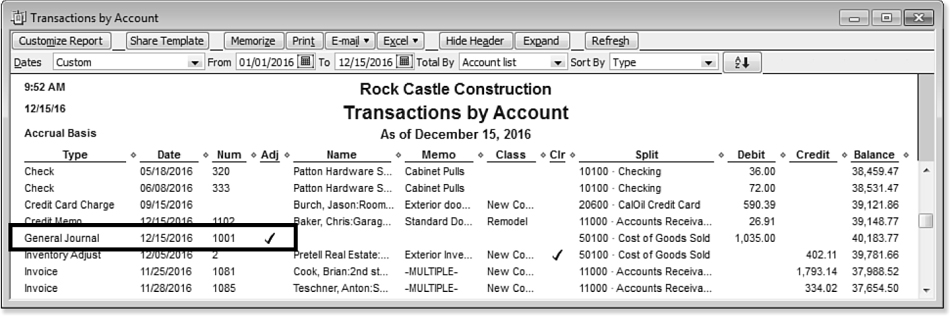
Figure 6.9. General Journal transactions should not be used to adjust inventory balances.
You should not modify, delete, or void these transactions, especially if they were used in accounting periods that have already had tax returns prepared using the current financial information. Continue with the remaining methods in the sections that follow, before making any corrections.
Reviewing the Recorded Average Cost Valuation
As mentioned earlier in this chapter, QuickBooks uses the Average Cost method for valuing inventory. From the menu bar, select Reports, Inventory, Inventory Valuation Summary. Figure 6.10 shows the value assigned to your costs when you sell an inventory item.
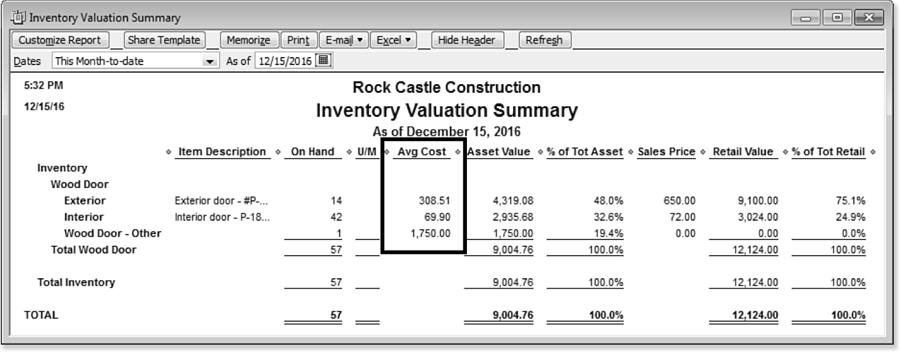
Figure 6.10. Use the Inventory Valuation Summary report to verify the cost being recorded when an inventory item is sold.
If you are using QuickBooks Enterprise Solutions 12.0 with FIFO (First In First Out) costing enabled, it might not be necessary to review this section because FIFO costing replaces Average Costing.
As an example, you are selling an inventory product with the following transactions as shown in Table 6.1.
Table 6.1. Calculating Average Cost

Sales transactions that are dated on or between 12/15/16 and 12/24/16 selling this item will record cost of goods sold at $10.00 per unit. (Assuming there are no other replenishing purchases made during that time.)
The average cost of the 150 units will be $9.50 each if none are sold prior to 12/26. However, any quantity sold from the first order will change the weighting of the unit cost so a different average cost will result when the second order is received.
To further explain how important it is to enter your inventory transactions daily (and not retroactively), Table 6.2 shows the resulting Average Cost calculations used when selling more inventory than is available.
In Table 6.2, the cost recorded on 12/20/16 is $10.00 per unit. However, after the replenishing transaction the actual average cost is $7.00 per unit. The costs in 2016 will be overstated by $3.00 per unit with the correcting entry to Cost of Goods Sold reported in the 2017 financials.
These details assume that no other transactions were recorded for this item except as noted in the following transactions:
Table 6.2. Calculating Average Cost When Selling Negative Inventory

Average costing is a perfect fit for a business that sells a product that does not fluctuate significantly in cost from one period to the next. However, this is not always the case, so it becomes important that you verify the relative accuracy of the average cost QuickBooks has recorded on the Inventory Valuation Summary report.
In Figure 6.10 shown previously, the average cost for the Interior Wood Door is listed as $69.90. Compare this amount to a recent vendor bill. If the amount is significantly different, you should review the purchase details for the item.
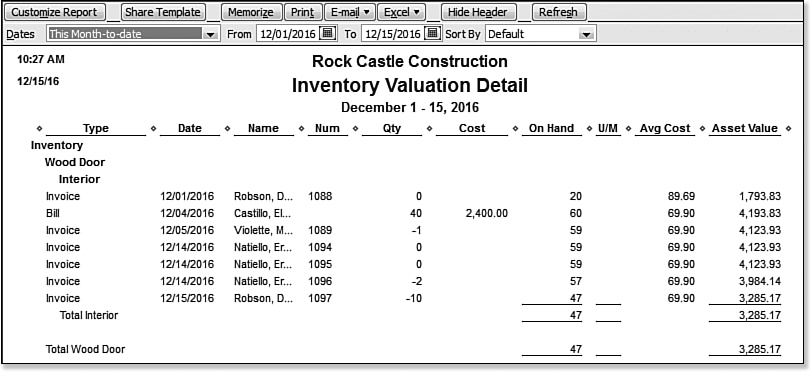
Figure 6.11. Create an Inventory Valuation Detail report to research changes in average cost.
From the menu bar, select Reports, Inventory, Inventory Valuation Detail. You might want to customize and filter the report for specific dates or items. More about working with reports is available in Chapter 14.
In Figure 6.11, the Inventory Valuation Detail is shown for the Interior Wood Door. Reviewing the individual lines in the Average Cost column can help you determine whether an issue exists with the average cost. If the average cost changes dramatically, you might want to review the specific bill or check details recorded when the product was purchased.
Reviewing and correcting the average cost of items is as equally important as adjusting the quantity on hand.
Reviewing Aged Item Receipts
The “Purchasing, Receiving, and Entering the Vendor Bill” section of Chapter 5 provided details about the inventory process; one of the methods of receiving inventory is without the vendor’s bill.
The effect of receiving inventory without a bill is to increase your inventory asset (debit) and increase your accounts payable (credit). The unique feature of this method is that QuickBooks creates an item receipt transaction that will not show in the Pay Bills window. QuickBooks recognizes that because you did not receive the bill, it is not likely you should be paying it without the final bill details.
Often, goods will arrive at your business without a bill. A couple of reasons exist for a vendor to ship the goods to your place of business without a final bill:
• Shipping charges need to be added to the bill. Often, the vendor will not know the shipping charges when the goods are initially shipped.
• Vendors do not want to disclose the value of the inventory, so that those who handle the inventory during shipping will not know the value of the goods being shipped.
What you might not know is that item receipts age just like an outstanding accounts payable bill. To see whether you have open, outdated item receipts, go to the Vendor Center and click the Transactions tab (see Figure 6.12). Select the Item Receipts transaction type. Filter by All Dates and click the Date column to sort the transactions by date.
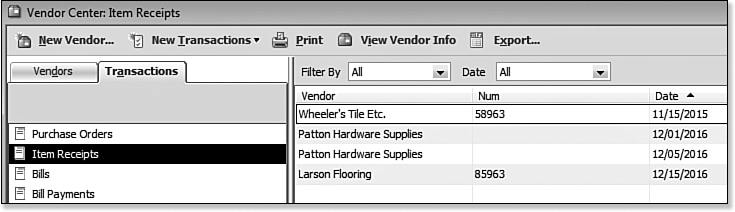
Figure 6.12. Use the Transactions tab of the Vendor Center to see all open item receipts.
If you find you have aged item receipts and you know you have paid the vendor, use the following steps to assign the check to the open item receipt. If you have also paid your vendors with a credit card, you might also want to use these same instructions substituting the credit card transaction for the check transaction:
1. From the Vendor Center, select the Item Receipts transaction type on the Transactions tab.
2. Unapplied item receipts display on the right. Click the header for the Date column to sort by date. You are looking for any old outdated item receipts.
3. If you find an aged item receipt that you know was paid to the vendor, double-click the item receipt to open the Create Item Receipts dialog box.
4. Select the Bill Received check box (top right) as shown in Figure 6.13.

Figure 6.13. The item receipt now becomes a vendor bill.
5. Click Save & Close.
6. Next, you need to locate the check that was written to the vendor. From the Vendors tab on the Vendor Center, select the same vendor the item receipt was created for.
7. On the right, select Checks from the Show drop-down list. Optionally, select a Filter By and Date range.
8. After locating the check in the Vendor Center, double-click the check to open the Write Checks dialog box. Modify the Account on the Expenses tab to be Accounts Payable, as shown in Figure 6.14.

Figure 6.14. Changing the Expenses account to Accounts Payable and adding the vendor name on the same line creates a vendor credit from the check.
9. Next, assign the Vendor name in the Customer:Job column. The effect of this updated transaction is to decrease (debit) Accounts Payable and decrease (credit) Cash.
10. Click Save & Close.
11. From the Home page, click the Pay Bills icon. The Pay Bills dialog box opens.
12. In the Filter By drop-down list, select the vendor you are correcting the records for.
13. Place a checkmark next to the bill (see Figure 6.15).
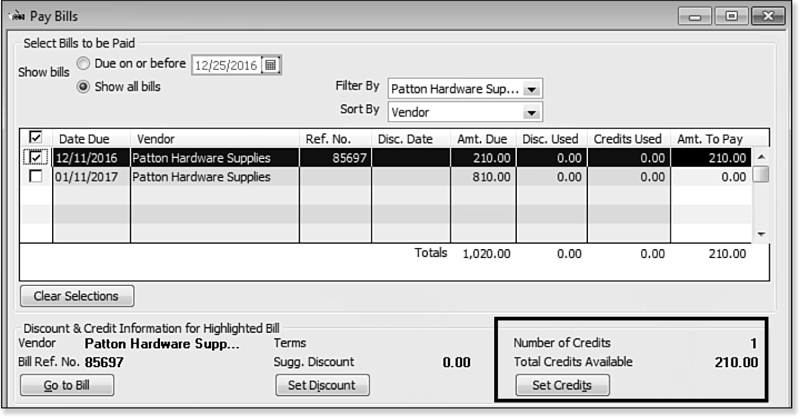
Figure 6.15. Once the bill is selected, the Set Credits option is available.
14. Click the Set Credits button to assign the modified check transaction from step 7 to the open vendor bill (see Figure 6.16).

Figure 6.16. QuickBooks automatically matches a credit with a bill of the same amount, or you can select the credit and modify the amount assigned.
15. Click Done to return to the Pay Bills dialog box. If your credit is the same amount as the open vendor bill, the Amt. To Pay column will be zero.
16. Click Pay Selected Bills. Click Done to close the Payment Summary dialog box.
Reviewing Aged Accounts Payable
At the same time you review your open item receipts, you should also review your accounts payable open invoices that have aged more than 60 days.
To review your accounts payable, select Reports, Vendors & Payables, Unpaid Bills Detail from the menu bar. If you see open vendor bills you are sure you have paid, it might be because you used the Write Checks dialog box to pay your vendor bills instead of using the Pay Bills dialog box (accessed from the Vendors, Pay Bills menu). Having both an open vendor bill and check paying for the same purchase overstates your costs or inventory.
QuickBooks tries to prevent you from doing this by providing a warning message when you try to write a check to a vendor for whom you have an unpaid bill, as shown in Figure 6.17.
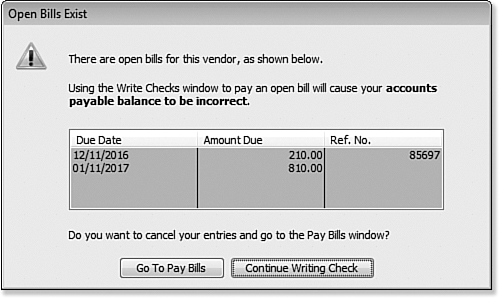
Figure 6.17. A warning displays if you try to use the Write Checks dialog box to pay a vendor instead of creating a bill payment from the Pay Bills dialog box.
If you did use the Write Checks dialog box to issue a vendor payment for a currently open vendor bill, you can resolve this problem by reassigning it. To do so, follow the steps outlined in the “Reviewing Aged Item Receipts,” page 173, starting with step 7.
After completing the steps, you will have successfully assigned the check you wrote using the Write Checks dialog box to the open vendor bill that should have been paid by a check in the Pay Bills dialog box. This correction has now removed the expected overstatement in your costs and removed the bill from being included in your open Accounts Payable balances.
If you are an accounting professional and using the QuickBooks Accountant 2012 software, you will find a tool in Client Data Review that will simplify the steps outlined in this section. For more information, refer to Appendix A, “Client Data Review.”
How QuickBooks Handles Negative Inventory
QuickBooks enables selling of inventory, even if you do not have enough quantity available for sale. This situation is referred to as selling negative inventory. What it means is that you can include an inventory item on a customer invoice or sales receipt before you have recorded the item receipt or bill for the purchase of the item into your inventory.
When a transaction will cause you to have a negative inventory balance the user is provided with the warning message shown in Figure 6.18. The warning does not prevent the user from completing the intended transaction, but should be viewed as a need to research why QuickBooks does not have enough stock of that item in inventory to record the sale.

Figure 6.18. Not enough quantity warning indicates an issue with not following the recommended processes for proper inventory management.
On the Items & Inventory—Company Preferences tab of the Preferences dialog box (select Edit, Preferences from the menu bar), you can enable a warning if there is not enough inventory quantity on hand (QOH) to sell (see Figure 6.18). Your preferences might differ depending on the version of QuickBooks you are using.
Although ignoring the warning message can be useful for getting the invoice to the customer, it can create issues with your company’s financials. The following sections detail how QuickBooks handles the costing of the inventory behind the scenes when you sell negative inventory and provides information on how to avoid or minimize the negative effect it can have on your company’s financials.
![]() For more information, see Appendix A, “Client Data Review,” p. 601.
For more information, see Appendix A, “Client Data Review,” p. 601.
When Inventory Has an Average Cost from Prior Purchase Transactions
If you review the Inventory Valuation Detail report (select Reports, Inventory, Inventory Valuation Detail from the menu bar) for the item(s) that have negative values, and there are previously recorded average cost amounts, QuickBooks will assign the most recent average cost dated on or before the invoice date that created negative inventory. When the purchase transaction is later recorded, QuickBooks will adjust Cost of Goods Sold or Expense type for any difference.
Figure 6.19 shows the average cost on the date of the invoice was $150.00 per unit. QuickBooks records a decrease (credit) to inventory for the two units of $300.00 total and an increase (debit) to Cost of Goods Sold of $300.00 for the two units sold.

Figure 6.19. QuickBooks records the Cost of Goods Sold for negative inventory items at the last known average cost.
Included with QuickBooks Accountant 2012 Client Data Review feature you can troubleshoot inventory discrepancies between the Inventory Valuation Summary report and the inventory balance on the Balance Sheet. This new troubleshooting tool will automatically compare the balances from the two reports and detail which transactions are potentially causing the discrepancy.
Additionally, this new tool will identify which items are negative (you have sold more than you have purchased) for the specific accounting period being reviewed as well as for a current date. You will find in this chapter just how important it is to not let your inventory go negative.
To show how important the date of the replenishing purchase transaction is, review the details provided below. Note, this example assumes that no additional transactions were recorded except as noted.
The new inventory asset value is calculated as

Actual inventory value is 2 remaining units at $200 each or $400.00 total

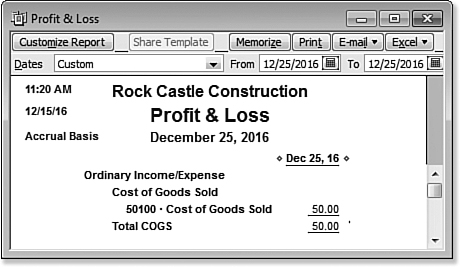
Figure 6.20. When you replenish inventory shortages, QuickBooks automatically makes an adjustment to agree with what the average cost would have been.
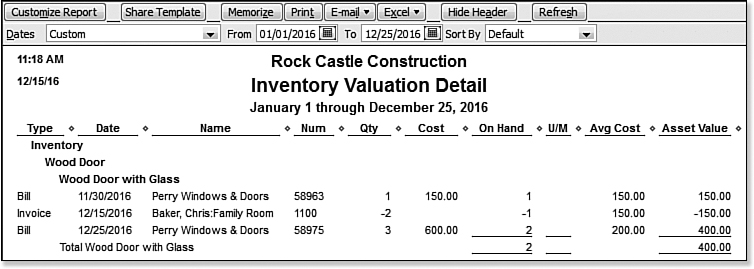
Figure 6.21. The Inventory Valuation Detail report shows the actual inventory value after recording the replenishment transaction.
When QuickBooks creates an adjustment to reflect what the average cost should have been, the adjustment is not assigned to customers or jobs—making it even more important to not sell negative inventory.
When Inventory Does Not Have a Prior Average Cost
There might be times when you stock a new item and you add it to a customer invoice before recording any purchase activity for the item. If this happens, you should at least record a default cost on the New Item (or Edit Item) dialog box.
When an Inventory Item Has a Default Cost
If you have assigned an inventory item that you have not yet purchased (that is, the quantity on hand is zero) to a customer invoice and if you did define a default cost when you first created the inventory item, QuickBooks will use this default cost as the suggested per-unit cost when the invoice is recorded.
Let’s suppose you stock a new inventory item for a Wood Door with Glass. When creating the item, you record a default cost of $150.00, as shown in Figure 6.22.
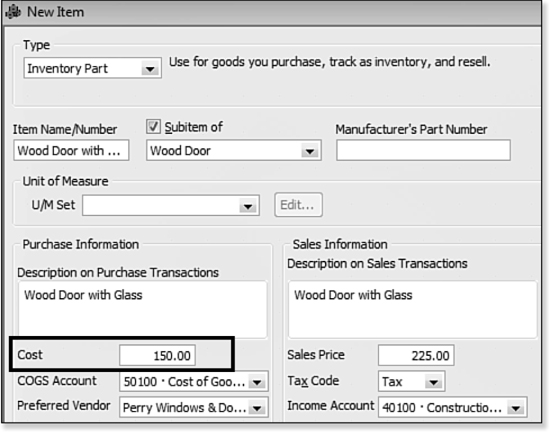
Figure 6.22. New stock item created in QuickBooks with a default cost of $150.00.
What is important to note here is that QuickBooks does not retroactively record the additional cost back to the customer’s negative inventory invoice date. In fact, QuickBooks records the adjustment as of the date of the purchase transaction and will not associate the adjustment with the original customer at all, overstating gross profit on a Profit & Loss by Job report.
The date of the replenishing purchase transaction becomes increasingly important to manage when you let inventory go negative at the end of a fiscal or tax year in your data.
Before any purchase is recorded for this item, it is sold on a customer invoice. When you create an invoice where there are not enough inventories, QuickBooks provides a warning, as previously shown in Figure 6.18.
QuickBooks has to estimate the cost of the item and, in this example, uses the cost assigned to the item in the New or Edit Item dialog box. When you save this invoice, QuickBooks will increase (debit) Accounts Receivable, increase (credit) Income, decrease (credit) Inventory Asset, and increase (debit) Cost of Goods Sold, and in this example, will also increase (credit) Sales Tax Payable. The Transaction Journal report details the accounting automatically recorded by QuickBooks (see Figure 6.23). You can access this report by clicking Journal found at the top of a displayed transaction in QuickBooks.
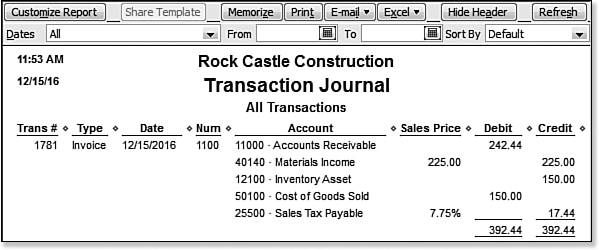
Figure 6.23. QuickBooks uses the cost assigned in the New or Edit Item dialog box when you sell inventory that you have not recorded any purchase transactions for.
This impact to your financials (positive or negative) can be significant if the actual purchase price is different from the recorded default cost on the New or Edit Item dialog box.
When an Inventory Item Does Not Have a Default Cost
If you have assigned an inventory item you have not yet purchased (that is, the quantity on hand is zero) to a customer invoice and if you did not define a default cost when you first created the inventory item, QuickBooks will use -0- as the default cost per unit when the invoice is recorded, showing a 100% profit margin for your financials and for that customer!
Now, using the same previous example, only not recording a default cost when setting up the item, as shown in Figure 6.24, QuickBooks will not calculate any cost or inventory reduction with the sale of the inventory (see Figure 6.25).

Figure 6.24. Setting up an item without including a default cost is not recommended.

Figure 6.25. No inventory decrease or cost is recorded when selling an item you do not have in inventory, have not purchased, and did not record a default cost for.
Imagine the impact this can have on your financials and the profitability reports you might review for your business or clients. Simply heeding the many warnings QuickBooks provides about the errors of selling negative inventory can prevent this from happening in your data file.
When a Replenishing Purchase Transaction Is Created
What exactly happens when you do record purchase transactions? The date recorded on the purchase transaction is important in how QuickBooks will handle this transaction.
For example, if a sale resulting in negative inventory was dated in October and the replenishing transaction (vendor bill) was dated in November, QuickBooks records the revenue in the month of October and the cost in the month of November. From month to month, it might not be noticeable, but if the transactions cross years, revenue would be overstated in one year and costs in another. Additionally, the revenue is tracked by the customer assigned to the invoice, but the cost is not tracked by the customer because the cost is recorded on the date of the purchase transactions.
To limit the negative impact, simply date your replenishing purchase transactions before the date of the customer invoice that caused the negative inventory. QuickBooks will recalculate the average cost of all sales transactions dated after this “replenishing” purchase transaction. And of course, it is simply best not to sell negative inventory altogether.
How to Avoid Incorrect Inventory Valuation
Troubleshooting negative inventory can be an eye opener as to how important proper inventory management is. To help with this task, rely on the Inventory Valuation Detail report, shown previously in Figure 6.21.
You can avoid these issues if the purchase transactions or inventory adjustments are dated on or prior to the date of the sales transactions creating the negative inventory. Backdating inventory adjustment transactions can be a powerful solution for correcting months of misstated financials, so use it where appropriate after discussing it with your accountant.
Solid inventory management processes and being current with your data entry will avoid recording negative inventory. If you do have negative inventory, be sure to correct it at the end of your tax year or your tax return information will potentially be incorrect.