
Chapter 4
Customizing MapReduce Execution
WHAT’S IN THIS CHAPTER?
- Customizing Hadoop execution to better adhere to requirements of your application
- Seamlessly including your non-Java code in the MapReduce executable
WROX.COM CODE DOWNLOADS FOR THIS CHAPTER
The wrox.com code downloads for this chapter are found at www.wiley.com/go/prohadoopsolutions on the Download Code tab. The code is in the Chapter 4 download and individually named according to the names throughout the chapter.
In Chapter 3, you learned what MapReduce is, its main components, and their roles in MapReduce execution. Each one of these components is implemented as a Java class adhering to a specific interface, defined by a MapReduce framework. Hadoop provides many different implementations of each component, but sometimes you need a specific component to do things slightly differently. One of the most powerful Hadoop features is its extensibility, so you can always roll out your own implementation.
In this chapter, you learn how you can leverage this extensibility for customizing MapReduce execution to better suit the requirements of particular applications. The examples presented in this chapter go through every major MapReduce component, and show how to create its custom implementation to do exactly what you need. Some of the examples can be directly leveraged in your applications; some can just serve as an illustration of how the “magic” happens, and how to approach your own customization.
This chapter starts with a discussion of InputFormat usage for controlling the number of maps and the location of a map’s execution.
CONTROLLING MAPREDUCE EXECUTION WITH INPUTFORMAT
As discussed in Chapter 3, the InputFormat class is one of the fundamental classes of the MapReduce framework. It is responsible for defining two main things: InputSplit and RecordReader. InputSplit defines both the size of individual map tasks (and, consequently, the number of map tasks) and its “ideal” execution server (locality). The RecordReader is responsible for actually reading records from the input file, and submitting them (as key/value pairs) to the mapper. RecordReader is discussed in detail later in this chapter. In this section you learn what a split is, and how to implement custom splits and input formats for specific purposes.
A split implementation extends Hadoop’s base abstract class — InputSplit — by defining both a split length and its locations. Split locations are a hint for a scheduler to decide where to place a split execution (that is, a particular TaskTracker). A basic JobTracker algorithm operates as follows:
Split size and locality can mean different things, depending on storage mechanisms and the overall execution strategy. In the case of HDFS, for example, a split typically corresponds to a physical data block, and the location is a set of machines (with the set size defined by a replication factor) where this block is physically located. This is how FileInputFormat calculates splits for a file:
A different approach is taken by HBase implementers. For HBase, a split corresponds to a set of table keys belonging to a table region, and location is a machine on which a region server is running. No explicit controls exist for the split size in the TableInputFormat class. The easiest way to control split size in the case of HBase is to change the way a table is split between regions, such as specifying a table’s region file size or pre-splitting a table in a certain way. (See Chapter 2 for more detail on how HBase works.)
This section examines several examples demonstrating how to build custom InputFormats that customize InputSplit calculation. The first two examples deal with the custom InputFormats for HDFS, and the third deals with HBase.
Implementing InputFormat for Compute-Intensive Applications
A special class of MapReduce applications is compute-intensive applications. (A common example of such applications might be the ones that use MapReduce mostly for parallelization, and employ complex calculation algorithm processing for every key/value, such as the face recognition application example discussed in Chapter 3.) The main characteristic of such applications is that execution of the map() function is significantly longer than the data access time (by an order of magnitude, at least).
public class Heartbeat extends Thread{

     private static final int sleepTime = 400; // time in seconds
     private boolean beating = true;

     private TaskInputOutputContext context = null;

     private Heartbeat(TaskInputOutputContext context){
          this.context = context;
     }

     @Override
     public void run(){
          while (beating){
               try{
                    Thread.sleep(sleepTime * 1000); // time in ms
               }
               catch (InterruptedException e){}
               context.setStatus(Long.valueOf
                    (System.currentTimeMillis()).toString());
          }
     }

     public void stopbeating(){
          beating = false;
     }

     public static Heartbeat createHeartbeat
            (TaskInputOutputContext context){

          Heartbeat heartbeat = new Heartbeat(context);
          Thread heartbeatThread = new Thread(heartbeat);
          heartbeatThread.setPriority(MAX_PRIORITY);
          heartbeatThread.setDaemon(true);
          heartbeatThread.start();
          return heartbeat;
     }
}Technically, such applications can still use a “standard” input format implementation. However, this might create a problem by overwhelming the DataNodes where the data resides, and leaving other nodes within the cluster underutilized.
Figure 4-1 (produced by Hadoop’s Ganglia monitoring tool) shows that utilization of “standard” data locality for compute-intensive applications can lead to huge variations in the node utilization. The three rows of graphic data at the bottom of the screen show overutilization of some (shown in red on screen, or shaded in this figure) and underutilization of the other ones (shown in yellow and light green on screen, but unshaded in the figure). This means that for compute-intensive applications, the notion of “locality” must be rethought. In this case, the ideal distribution is maximum utilization of compute capabilities of the cluster’s machines, and “locality” means even distribution of map execution between all available nodes.
FIGURE 4-1: Nodes utilization in the case of traditional data locality

Listing 4-1 (code file:class ComputeIntensiveSequenceFileInputFormat) shows an example of this. Here, a simple ComputeIntensiveSequenceFileInputFormat class (which assumes that the source data is available in the form of a set of sequence files) implements the generation of splits, which will be evenly distributed across all servers of the cluster.
LISTING 4-1: ComputeIntensiveSequenceFileInputFormat class
public class ComputeIntensiveSequenceFileInputFormat<K, V>
     extends SequenceFileInputFormat<K, V> {

     .........................................................................................................................................................
     @Override
     public List<InputSplit> getSplits(JobContext job) throws IOException {

          String[] servers = getActiveServersList(job);
          if(servers == null)
               return null;
          List<InputSplit> splits = new ArrayList<InputSplit>();
          List<FileStatus>files = listStatus(job);
          int currentServer = 0;
          for (FileStatus file: files) {
               Path path = file.getPath();
               long length = file.getLen();
               if ((length != 0) && isSplitable(job, path)) {
                    long blockSize = file.getBlockSize();
                    long splitSize = computeSplitSize(blockSize, minSize, maxSize);

                    long bytesRemaining = length;
                    while (((double) bytesRemaining)/splitSize > SPLIT_SLOP) {
                         splits.add(new FileSplit(path, length-bytesRemaining,
                          splitSize, new String[] {servers[currentServer]}));
                         currentServer = getNextServer(currentServer,
                              servers.length);
                         bytesRemaining -= splitSize;
                    }
                    ..........................................................................................

               } else if (length != 0) {
                    splits.add(new FileSplit(path, 0, length,
                              new String[] {servers[currentServer]}));
                    currentServer = getNextServer(currentServer, servers.length);
               }
               ..........................................................................................................

          }

          // Save the number of input files in the job-conf
          job.getConfiguration().setLong(NUM_INPUT_FILES, files.size());

          return splits;
     }

private String[] getActiveServersList(JobContext context){

          String [] servers = null;
                  try {
               JobClient jc = new JobClient((JobConf)context.getConfiguration());
               ClusterStatus status = jc.getClusterStatus(true);
               Collection<String> atc = status.getActiveTrackerNames();
               servers = new String[atc.size()];
               int s = 0;
               for(String serverInfo : atc){
                    StringTokenizer st = new StringTokenizer(serverInfo, ":");
                    String trackerName = st.nextToken();
                       StringTokenizer st1 = new StringTokenizer(trackerName, "_");
                       st1.nextToken();
                       servers[s++] = st1.nextToken();
               }
          } catch (IOException e) {
               e.printStackTrace();
          }

                  return servers;
     }

     private static int getNextServer(int current, int max){

          current++;
          if(current >= max)
               current = 0;
          return current;
     }
}This class extends SequenceFileInputFormat and overwrites the getSplits() method, calculating splits the same way as Hadoop’s FileInputFormat. However, it assigns the split’s “locality” differently. Instead of using physical location of the block as a “preferred” location of a split execution, locality is assigned here to any of the available servers in the cluster. This implementation leverages two supporting methods:
- The getActiveServersList() method queries cluster status to calculate an array of servers (names) currently available in the cluster.
- The getNextServer() method is a wraparound iterator over the array of available servers.
If you want to combine both strategies, you can place as many of the jobs as local to the data as possible, and then distribute the rest of them around the cluster. Listing 4-2 (code file:class ComputeIntensiveLocalizedSequenceFileInputFormat) shows an example of this. You can use this approach if network utilization becomes an issue.
LISTING 4-2: Optimized getSplits method
     public List<InputSplit> getSplits(JobContext job) throws IOException {

          List<InputSplit> originalSplits = super.getSplits(job);
          String[] servers = getActiveServersList(job);
          if(servers == null)
               return null;
          List<InputSplit> splits = new
               ArrayList<InputSplit>(originalSplits.size());
          int numSplits = originalSplits.size();
          int currentServer = 0;
          for(int i = 0; i < numSplits; i++, currentServer =
               getNextServer(currentServer,
                                                  servers.length)){
               String server = servers[currentServer]; // Current server
               boolean replaced = false;
               for(InputSplit split : originalSplits){
                    FileSplit fs = (FileSplit)split;
                    for(String l : fs.getLocations()){
                         if(l.equals(server)){
                              splits.add(new FileSplit(fs.getPath(), fs.getStart(),
 fs.getLength(), new String[] {server}));
                              originalSplits.remove(split);
                              replaced = true;
                              break;
                         }
                    }
                    if(replaced)
                         break;
               }
               if(!replaced){
                    FileSplit fs = (FileSplit)splits.get(0);
                    splits.add(new FileSplit(fs.getPath(), fs.getStart(),
                         fs.getLength(),
new String[] {server}));
                    originalSplits.remove(0);
               }
          }
          return splits;
     }
This implementation first leverages the superclass (FileInputFormat) to get splits with locations calculated to ensure data locality. Then, for every existing server, it tries to assign a split with data local to this server. For the servers that do not have a “local” split, remaining splits are assigned randomly.
<property>
    <name>mapred.fairscheduler.locality.delay</name>
    <value>360000000</value>
<property>
As you can see in Figure 4-2, when you use the ComputeIntensiveSequenceFileInputFormat class, you get a much better utilization of the cluster. Processing is distributed much more evenly between the DataNodes, and no CPU hot spots exist.
FIGURE 4-2: Node utilization in the case of execution locality

In reality, on a fully loaded cluster, the difference might not be as drastic as shown here, and a “standard” InputFormat might work well enough. The purpose of this example is not to propose a different InputFormat implementation, but, for the most part, to show the underlying concepts of the inner workings of InputFormat, and demonstrate programmatic approaches to its change.
Another common situation in MapReduce implementations is accessing resources (from the map code) outside of an Hadoop cluster (for example, database connections, HTTP connections, and so on). This typically requires explicit controlling of the number of maps.
Implementing InputFormat to Control the Number of Maps
Consider the example of copying a set of files from HDFS to another location, and assume that such copying is done through web services provided by that location. If in this case, you will use a standard FileInputFormat, assuming files are nonsplittable, the number of mappers used will be equal to the number of files. If you want to transfer, for example, 1,000 files, this will mean creating 1,000 mappers. This is not the best solution because of the following:
- Each mapper execution requires an overhead of creating and destroying a JVM for its execution. This overhead can be significant compared to execution for a single file.
- A huge number of splits can start “overwhelming” the JobTracker.
- Depending on the scheduler used on a given cluster, such a huge number of map tasks can negatively impact cluster utilization.
Let’s start by creating a special InputSplit. Listing 4-3 (code file:class MultiFileSplit) shows a multi-file split that contains both a list of files and information about execution “locality.” (This code snippet shows only the implementation of relevant methods.)
LISTING 4-3: MultiFileSplit class
public class MultiFileSplit extends InputSplit implements Writable{

         private long length;
         private String[] hosts;
         private List<String> files = null;

         public MultiFileSplit(){

              .............................
         }
         public MultiFileSplit(long l, String[] locations){
             .....................................................
        }
         ..............................................................
     @Override
         public long getLength() throws IOException, InterruptedException {
          return files.size();
     }

     @Override
     public String[] getLocations() throws IOException, InterruptedException {
          return hosts;
     }
         @Override
         public void write(DataOutput out) throws IOException {

                 .............................................................
         }

         @Override
         public void readFields(DataInput in) throws IOException {

                 .............................................................
         }
}
You must derive a custom split class from the InputSplit class and implement the Writable interface. Methods defined in this class and interface must be implemented. Additionally, no arguments constructor (used by the mapper) must be implemented.
With the custom split class in place, implementation of the InputFormat is fairly straightforward, as shown in Listing 4-4 (code file:class FileListInputFormat).
LISTING 4-4: FileListInputFormat class
public class FileListInputFormat extends FileInputFormat<Text, Text>{

     private static final String MAPCOUNT = "map.reduce.map.count";
     private static final String INPUTPATH = "mapred.input.dir";

     @Override
     public List<InputSplit> getSplits(JobContext context) throws IOException {
          Configuration conf = context.getConfiguration();
          String fileName = conf.get(INPUTPATH, "");
          String[] hosts = getActiveServersList(context);
          Path p = new Path(StringUtils.unEscapeString(fileName));
          List<InputSplit> splits = new LinkedList<InputSplit>();
             FileSystem fs = p.getFileSystem(conf);
          int mappers = 0;
          try{
               mappers = Integer.parseInt(conf.get(MAPCOUNT));
          }
          catch(Exception e){}
          if(mappers == 0)
               throw new IOException("Number of mappers is not specified");
          FileStatus[] files = fs.globStatus(p);
          int nfiles = files.length;
          if(nfiles < mappers)
               mappers = nfiles;
          for(int i = 0; i < mappers; i++)
               splits.add(new MultiFIleSplit(0,hosts));
          Iterator<InputSplit> siter = splits.iterator();
          for(FileStatus f : files){
               if(!siter.hasNext())
                    siter = splits.iterator();
               ((MultiFIleSplit)(siter.next())).addFile(f.getPath().toUri()
                    .getPath());
          }
          return splits;
     }

     public static void setMapCount(Job job, int mappers){
         Configuration conf = job.getConfiguration();
         conf.set(MAPCOUNT, new Integer(mappers).toString());
     }

}The static method setMapCount here provides an API for you to set the value of a desired number of maps in the job driver. Its implementation leverages a standard Hadoop approach to pass parameters between distributed Hadoop components — adding a value to the configuration, which is accessible by every component of a given job.
The actual implementation of the getSplits method is also fairly straightforward. It first tries to get the number of required mappers, and creates a split for every map. It then goes through all of the available files and adds each of them to one of the splits.
Although FileListInputFormat works well when files are about the same size, in the case when file sizes vary significantly, so does the execution time for individual mappers. The problem is that the split is done by the number of the files, not the data size. Moreover, for some of the MapReduce jobs, it is not just the data size itself, but rather the complexity of data (because it is used by map processing). As a result, achieving even-sized (in terms of execution time) splits in the InputFormat can be fairly complex.
Figure 4-3 shows how to use queuing as a general approach to evening up execution time for multiple workers (request processors).
FIGURE 4-3: Load balancing using a queue

In this case, all of the execution requests are written to the queue. Each worker tries to read a new request from the queue, and then executes it. Once execution is complete, a worker tries to read the next request. This type of load balancing is called worker-driven load balancing. In this case, the requester does not know anything about execution capabilities, or even the number of workers. A worker reads a new request only after a current one is completed, thus ensuring effective utilization of resources.
Let’s see how this approach can be applied to MapReduce job execution. A simple way to create a queue in the Hadoop environment is to use HBase, as shown in Listing 4-5 (code file: class HdQueue).
LISTING 4-5: Implementing a queue using HBase
public class HdQueue {

     ....................................................................................

     public void enqueue(byte[] data) throws IOException{

          long messageKey = 0;
          // Make sure that the pointer is >= 0
          while ((messageKey = table.incrementColumnValue
(COUNTER_KEY, MESSAGE_FAMILY, COUNTER_COLUMN, 1)) < 0){};
          // Put the message
          String sKey = Long.toString(messageKey);
          Put put = new Put(Bytes.toBytes(sKey));
          put.add(MESSAGE_FAMILY, MESSAGE_COLUMN, data);
          table.put(put);
     }

     public long getCurrentQueueSize() throws IOException{
          return table.incrementColumnValue(COUNTER_KEY, MESSAGE_FAMILY,
               COUNTER_COLUMN, 0);
     }

       ............................................................................

     public byte[] dequeue() throws IOException{

          long messageKey =
table.incrementColumnValue(COUNTER_KEY, MESSAGE_FAMILY, COUNTER_COLUMN, -1);
          if (messageKey  <  0){
               messageKey = table.incrementColumnValue
(COUNTER_KEY, MESSAGE_FAMILY, COUNTER_COLUMN, 1);
               return null;
          }
          String sKey = Long.toString(++messageKey);
          Get get = new Get(Bytes.toBytes(sKey));
          get.addColumn(MESSAGE_FAMILY, MESSAGE_COLUMN);
          Result result = table.get(get);
          return result.value();
     }

     ................................................................................................................
}
In this implementation, a queue is represented by a single table. Implementation is based on an atomic HBase increment operation, applied to a position of the queue pointer. An enqueue operation increments the pointer and uses its current position as a key. A dequeue method decrements the pointer and uses its previous value as a key for retrieving the data. The actual data is stored in the table with the row key equal to a position of the data in a queue. A special row key is dedicated to tracking the queue pointer.
With this simple queuing implementation in place, you can now modify the InputFormat implementation shown in Listing 4-4 to use it.
First, it is necessary to simplify the implementation of the InputSplit class. Because, in this case, a list of files is stored in the queue rather than in the split itself, you can remove a list of files and all methods related to file list processing from the MultiFileSplit class (Listing 4-3). Call this split a SimpleSplit class. With this class in place, your InputFormat implementation will look as shown in Listing 4-6 (code file:class FileListQueueInputFormat).
LISTING 4-6: FileListQueueInputFormat class
public class FileListQueueInputFormat extends FileInputFormat<Text, Text>{

     .................................................................................................
     @Override
     public List<InputSplit> getSplits(JobContext context) throws IOException {
          Configuration conf = context.getConfiguration();
          String fileName = conf.get(INPUTPATH, "");
          String[] hosts = getActiveServersList(context);
          Path p = new Path(StringUtils.unEscapeString(fileName));
          List<InputSplit> splits = new LinkedList<InputSplit>();
             FileSystem fs = p.getFileSystem(conf);
          int mappers = 0;
          try{
               mappers = Integer.parseInt(conf.get(MAPCOUNT));
          }
          catch(Exception e){}
          if(mappers == 0)
               throw new IOException("Number of mappers is not specified");
          HdQueue queue = HdQueue.getQueue(conf.get(QUEUE));
          FileStatus[] files = fs.globStatus(p);
          int nfiles = files.length;
          if(nfiles < mappers)
               mappers = nfiles;
          for(FileStatus f : files)
               queue.enqueue(Bytes.toBytes(f.getPath().toUri().getPath()));
          queue.close();
          for(int i = 0; i < mappers; i++)
               splits.add(new SimpleInputSplit(0,hosts));
          return splits;
     }
     public static void setInputQueue(Job job, String queue) throws IOException {
          Configuration conf = job.getConfiguration();
          conf.set(QUEUE, queue);
     }

     public static void setMapCount(Job job, int mappers){
         Configuration conf = job.getConfiguration();
         conf.set(MAPCOUNT, new Integer(mappers).toString());
     }
}
This implementation is similar to the one in Listing 4-4, with the exception that instead of storing filenames to the splits, files are stored in the queue. An additional static method is provided in this implementation to provide an input queue name.
Depending on your specific requirements, you can use both FileListInputFormat and FileListQueueInputFormat to explicitly control the number of maps in a MapReduce job. FileListInputFormat is simpler, so if load balancing of map execution is not required, you should use it.
The last example of the custom InputFormat discussed here is the one supporting multiple HBase tables.
Implementing InputFormat for Multiple HBase Tables
For MapReduce jobs leveraging HBase-based data sources, Hadoop provides TableInputFormat. The limitation of this implementation is that it supports only a single table. Many practical applications such as a table join (compare to joining of MapReduce jobs discussed in Chapter 3) require multiple tables as a job’s input. Implementation of such an input format is fairly straightforward.
You must first define a class that can hold information defining an individual table, as shown in Listing 4-7 (code file:class TableDefinition). This class enables you to completely identify a table for the MapReduce processing through the table itself, a scan defining which row span of the table you are interested in, and a set of column families (columns relevant for a specific problem).
LISTING 4-7: TableDefinition class
public class TableDefinition implements Writable {

     private Scan _scan = null;
     private HTable _table = null;
     private String _tableName = null;

     .....................................................................................................................
}
Because Hadoop’s implementation of TableInputFormat supports a single table/scan, all of the information about the table and scan is contained in the TableInputFormat implementation, and does not need to be defined in the InputSplit class. In this case, different splits can refer to different tables/scan pairs. As a result, you must extend the table split class to contain not only table-related information (name, start and end row, region server location), but also a scan for a given table. Listing 4-8 (code file:class MultiTableSplit) shows how to do this.
LISTING 4-8: MultiTableSplit class
public class MultiTableSplit extends TableSplit {

     private Scan scan;

     public MultiTableSplit() {
          ..................................................................................
     }

     public MultiTableSplit(byte [] tableName, byte [] startRow, byte [] endRow,
          final String location, Scan scan) {
          ..................................................................................
     }
     ....................................................................................................
}
With these two supporting classes in place, the implementation of the MultiTableInputFormat class looks as shown in Listing 4-9 (code file:class MultiTableInputFormat).
LISTING 4-9: MultiTableInputFormat class
public class MultiTableInputFormat extends InputFormat<ImmutableBytesWritable,
     Result> implements Configurable{
     .........................................................................................................................................................

     protected void setTableRecordReader(TableRecordReader tableRecordReader) {
          this.tableRecordReader = tableRecordReader;
     }


     @Override
     public List<InputSplit> getSplits(JobContext context) throws IOException,
     InterruptedException {

          List<InputSplit> splits = new LinkedList<InputSplit>();
          int count = 0;
          for(TableDefinition t : tables){
               HTable table = t.getTable();
               if (table == null) {
                    continue;
               }
               Pair<byte[][], byte[][]> keys = table.getStartEndKeys();
               if (keys == null || keys.getFirst() == null ||
                         keys.getFirst().length == 0) {
                    continue;
               }
               Scan scan = t.getScan();
               for (int i = 0; i < keys.getFirst().length; i++) {
                    String regionLocation =
                         table.getRegionLocation(keys.getFirst()[i]).
                    getServerAddress().getHostname();
                    byte[] startRow = scan.getStartRow();
                    byte[] stopRow = scan.getStopRow();
                    if ((startRow.length == 0 || keys.getSecond()[i].length == 0 ||
                              Bytes.compareTo(startRow, keys.getSecond()[i]) <
                                   0) &&
                              (stopRow.length == 0 ||
                                   Bytes.compareTo(stopRow, keys.getFirst()[i])
                                        > 0)) {
                         byte[] splitStart = startRow.length == 0 ||
                         Bytes.compareTo(keys.getFirst()[i], startRow) >= 0 ?
                              keys.getFirst()[i] : startRow;
                         byte[] splitStop = (stopRow.length == 0 ||
                              Bytes.compareTo(keys.getSecond()[i], stopRow) <=
                                   0) &&
                                             keys.getSecond()[i].length > 0 ?
                                   keys.getSecond()[i] : stopRow;
                         InputSplit split = new
                              MultiTableSplit(table.getTableName(),
                                        splitStart, splitStop, regionLocation,
                                             scan);
                         splits.add(split);
              }
          }
          if(splits.size() == 0){
               throw new IOException("Expecting at least one region.");
          }
          return splits;
     }

     @Override
     public RecordReader<ImmutableBytesWritable, Result> createRecordReader(
             InputSplit split, TaskAttemptContext context) throws IOException,
                  InterruptedException {
          MultiTableSplit tSplit = (MultiTableSplit) split;
          TableRecordReader trr = this.tableRecordReader;
          if (trr == null) {
               trr = new TableRecordReader();
          }
          Scan sc = tSplit.getScan();
          sc.setStartRow(tSplit.getStartRow());
          sc.setStopRow(tSplit.getEndRow());
          trr.setScan(sc);
          byte[] tName = tSplit.getTableName();
          trr.setHTable(new HTable(HBaseConfiguration.create(conf), tName));
               trr.init();
          return trr;
     }
     .................................................................................................
     public static void initTableMapperJob(List<TableDefinition> tables,
          Class<? extends TableMapper> mapper,
          Class<? extends WritableComparable> outputKeyClass,
          Class<? extends Writable> outputValueClass, Job job) throws IOException {
          job.setInputFormatClass(MultiTableInputFormat.class);
          if (outputValueClass != null)
                     job.setMapOutputValueClass(outputValueClass);
          if (outputKeyClass != null) job.setMapOutputKeyClass(outputKeyClass);
          job.setMapperClass(mapper);
          job.getConfiguration().set(INPUT_TABLES,convertTablesToString(tables));
     }
}
This class contains the following key methods:
- The getSplits method iterates through the list of tables, and for every table, calculates a list of regions with a set of keys inside scan boundaries. For every region, the implementation creates a new split and populates the MultitableSplit class with the appropriate information.
- The createRecordReader method creates a new record reader based on the table and scan information. By default, this InputFormat uses the default implementation provided by Hadoop — TableRecordReader. Additionally, the setTableRecordReader method allows subclasses of this InputFormat class to overwrite RecordReader implementation.
- Finally, initTableMapperJob is a helper method that simplifies setting up a MapReduce job. It takes a list of table definitions, a mapper class, output keys and values, and a job, and sets job parameters correctly. It also “stringifies” a list of table definitions, and sets the resulting string to the context object, which makes it available to the InputFormat implementation.
Now that you know how to write custom InputFormats to control a mapper’s execution, the next section looks at how to implement a custom RecordReader that enables you to control how input data is read, processed, and delivered to the mappers.
READING DATA YOUR WAY WITH CUSTOM RECORDREADERS
You can store input data for the MapReduce job in a lot of different (application-dependent) formats. For the job to be able to read a specific data format, it is often necessary to implement a custom RecordReader.
Several examples in this section demonstrate how to build custom RecordReaders.
Implementing a Queue-Based RecordReader
In the previous section, you learned how to implement a queue-based InputFormat that enables you to control the number of mappers and load balance their execution. This InputFormat stores filenames in the queue, and requires implementation of a custom queue RecordReader for its usage.
Listing 4-10 (code file:class FileListReader) shows an implementation of such a custom RecordReader. The implementation is based on the assumption that the map method of the mapper receives both a key and value as Text, where the key is not used, and the value containing filename.
LISTING 4-10: Queue data reader class
public class FileListReader extends RecordReader<Text, Text> {

     private HdQueue _queue;
     private Configuration _conf;
     private Text key = new Text("key");
     private Text value = new Text();

     @Override
     public void initialize(InputSplit split, TaskAttemptContext context)
               throws IOException, InterruptedException {
          _conf = context.getConfiguration();
          _queue = HdQueue.getQueue(_conf.get(QUEUE));
     }

     @Override
     public boolean nextKeyValue() throws IOException, InterruptedException {
          return getNextFile();
     }

     @Override
     public Text getCurrentKey() throws IOException, InterruptedException {
          return key;
     }

     @Override
     public Text getCurrentValue() throws IOException, InterruptedException {
          return value;
     }

     @Override
     public float getProgress() throws IOException, InterruptedException {
          return 0;
     }

     @Override
     public void close() throws IOException {
          _queue.close();

     }
     private boolean getNextFile(){

          byte[] f = null;
          try {
               f = _queue.dequeue();
          } catch (IOException e) {
               e.printStackTrace();
          }
          if(f == null)
               return true;
          value.set(new String(f));
          return false;
     }
}
Following are the key methods implemented in this code:
- initialize — This method implements all of the initialization required for proper RecordReader functioning. In this case, initialization amounts to connecting to the queue.
- nextKeyValue — This method is called by the mapper to check if there is more data to process. In this implementation, you are invoking a separate method — getNextFile — which stores the filename in the value class variable, and returns true if there is a file in the queue, or false otherwise. The result of the invocation is returned back to the mapper.
- getCurrentKey and getCurrentValue — These two methods are used for accessing the current key and value. In this implementation, you just return values, which are stored in the class. You pre-allocate those values at the class creation, and update the value every time you read a new filename from the queue. This approach can significantly save on memory allocation/deallocation, which is an important optimization technique in the MapReduce implementation discussed in Chapter 3.
- getProgress — This method is used by Hadoop to report on progress of the mapper execution. Because, in this case, you do not know how many files are still in the queue for you to process, you are always returning 0 here.
- close — This method is used to clean up resources at the end of the RecordReader execution. In this case, you are closing the queue.
Depending on the functionality of the mapper, the implementation shown in Listing 4-10 might have a problem. If a mapper instance is killed by Hadoop for any reason, the queue elements processed by this instance are lost. To avoid this situation, you must do the following:
- Run a job using this RecordReader with speculative execution disabled (see Chapter 3 for a definition of speculative execution and the ways to disable it).
- Implement an appropriate shutdown hook to ensure that if a job is killed for any reason, queue elements are restored (enqueued back to the queue). The implementation can store dequeued filenames in memory and enqueue them back to the queue inside of the shutdown hook implementation. The fact that the mapper cleanup method is invoked can be used, in this case, as an indicator that the mapper step has been completed successfully, and the list of dequeued filenames can be cleaned up.
- Their implementation must be thread-safe.
- They should not blindly rely upon services that may have registered their own shutdown hooks.
- The execution time of shutdown hooks is typically limited. When JVM is terminated because of a user logoff or system shutdown, the underlying operating system may only allow a fixed amount of time in which to shut down and exit. This means that when an exit method is invoked, it is expected that the virtual machine will shut down and exit within a fixed time interval.
- There is no special behavior for handling uncaught exceptions in shutdown hooks. The default implementation is to print the exception’s stack trace, and terminate the thread. It does not cause the virtual machine to exit or halt.
One of the common formats for the MapReduce input files is XML. Unfortunately, Hadoop does not provide a standard XML RecordReader. An implementation presented next demonstrates how such a RecordReader can work.
- An XML document is typically represented by a complete file. Although, technically, a single file can contain multiple XML documents, the assumption here is a one-to-one correspondence between a file and an XML document.
- An XML document contains markup and content. Markup consists of tags, where every tag starts with < and ends with >. XML defines three types of tags: start tags (defining the beginning of the content), end tags (defining the end of content), and empty element tags (all the content is contained inside a tag itself).
- An XML element is a logical component of the document located between start and end tags, or inside an empty tag. A tag name is an element name.
- XML elements can have attributes. Attributes provide additional information about an element.
Implementing RecordReader for XML Data
Several examples of XML RecordReader implementations are available on the Internet, but most of them suffer from several shortcomings, including the following:
- They typically support only a single tag, whereas in real life, a user can be interested in getting XML snippets for multiple tags.
- They typically do not support empty XML tags.
- They typically do not support zipped/gzipped files. Compression is a common technique to reduce a file size, and although a few reasons exist not to use zipped files for MapReduce processing (files can’t be split in this case), compressed files are still commonly used in the case of multi-file MapReduce jobs.
- In some applications, you may want to process only a starting tag (in order to get its attributes). A typical case is a starting tag of the document containing the document’s metadata in the form of attributes. If this snippet is processed as a whole, it will subsume all of the document’s content, and, consequently, no other tags will be found in the document.
Listing 4-11 (code file:class XMLReader) shows an implementation that is free of these shortcomings. The XMLReader class extends the RecordReader class provided by the Hadoop framework.
LISTING 4-11: XMLReader
public class XMLReader extends RecordReader<Text, Text> {


     @Override
     public void initialize(InputSplit inputSplit, TaskAttemptContext context)
throws IOException, InterruptedException {

          FileSplit split = (FileSplit) inputSplit;
          Configuration configuration = context.getConfiguration();
          String key = configuration.get(ELEMENT_NAME);

          long s = split.getStart();
          long e = s + split.getLength();
          final Path file = split.getPath();
          CompressionCodecFactory compressionCodecs = new
                              CompressionCodecFactory(configuration);
              final CompressionCodec codec = compressionCodecs.getCodec(file);

          // open the file and seek to the start of the split
          final FileSystem fs = file.getFileSystem(configuration);
          FSDataInputStream fileIn = fs.open(file);
          if (codec != null)
               init(0, Long.MAX_VALUE, key, codec.createInputStream(fileIn));
          else
               init(s, e, key, fileIn);
     }

     @Override
     public void close() throws IOException {

          if(_fileIn != null)
               _fileIn.close();
     }

     @Override
     public Text getCurrentKey() throws IOException, InterruptedException {

          return _key;
     }

     @Override
     public Text getCurrentValue() throws IOException, InterruptedException {

          return new Text( _value);
     }

     @Override
     public float getProgress() throws IOException, InterruptedException {

          if (_start == _end)
               return 0.0f;
          else
               return Math.min(1.0f, (_current - _start) / (float)(_end - _start));
}

     @Override
     public boolean nextKeyValue() throws IOException, InterruptedException {

          if((_eof) || (_current >= _end))
               return false;

          _firstOnly = false;
          if (readUntilMatch(_startTag, _matchingStartTag, false))
               return true;

          if(_eof)
               return false;

          String endtag = "</" + _key.toString() + ">";
          if(_firstOnly){
               _value += endtag;
               return true;
          }

          _endTag[0] = endtag.getBytes();
          readUntilMatch(_endTag, _matchingEndTag, true);
          if(_eof)
               return false;
          return true;
     }

     private boolean readUntilMatch(byte[][] match, int[] matchingTag,boolean
          withinBlock)
throws IOException {

          .........................................................................
     }

     private void init(long s, long e, String keys, InputStream in) throws
          IOException {

          .........................................................................
     }

     public static void main(String[] args) throws Exception {

          DataInputStream in = new DataInputStream(new FileInputStream(new
               File(args[0])));
          long start = Long.parseLong(args[2]);
          long end = Long.parseLong(args[3]);
          XMLReader reader = new XMLReader();
          reader.init(start, end, args[1], in);
          Map<String, Integer> occurences = new HashMap<String, Integer>();
          while(reader.nextKeyValue()){
               String key = reader.getCurrentKey().toString();
               System.out.println("key " + key);
               Integer count = occurences.get(key);
               if(count == null)
                    count = 1;
               else
                    count++;
               occurences.put(key, count);
          }
          for(Map.Entry<String, Integer> entry: occurences.entrySet())
               System.out.println("key " + entry.getKey() + " found " +
                    entry.getValue() + " times");

     }
}
The initialize method is invoked by Hadoop and is responsible for initialization of the reader. To allow testing of the implementation outside of Hadoop, it is split into two methods — initialize (which is implementing Hadoop-specific things) and init (which you can invoke either by initializing a Java main or Junit for testing).
The initialize method gets a FileSplit class that is passed in by Hadoop and extracts an input filename, as well as start and end bytes of the file block passed to this mapper. Additionally, it extracts a list of keys (a comma-separated list of tags) that are of interest to the user. Finally, the initialize method gets a compression codec, and, if one already exists, overwrites the start and end bytes. (Remember, zipped files are not splittable and, consequently, their start byte is always 0, and the actual length of an unzipped file is not known. Thus, the end byte is set to a very large number, Long.MAX_VALUE.) The initialize method uses the input stream from the codec (unzipper) instead of the input stream from the original file. The initialize method then invokes the init method, which does additional initialization for tag detection.
The set of tags for detection is passed in as a comma-separated list of strings, containing all of the tags of interest. Individual tags are extracted using stringTokenizer class. If the string starts with “+”, it means the reader will return not the full XML fragment, but only the content of the opening tag itself (including all the attributes contained in the tag). The information describing each tag of interest is stored in the KeyString class shown in Listing 4-12 (code file:class KeyString). Note how this contains both the tag string and firstOnly flag.
LISTING 4-12: KeyString class
public class KeyString {

     private String _string;
     private boolean _firstOnly;

     ...........................................................................
}
The start tag always starts with <, but can end either with either > or a space. Consequently, in the implementation code shown in Listing 4-11, for every tag, the method builds two byte arrays (one for each option) to check against tag completion. Because a closing tag is always searched for a corresponding opening tag, you do not populate the end tags byte array upfront — you are doing this just in time in the readUntilMatch method. Finally, the init method creates counter arrays for matching.
The close method is very simple — it just closes the input stream.
The GetCurrentKey and getCurrentValue methods return corresponding values pre-calculated by the nextKeyValue method.
The getProgress method first checks if the source file was zipped. Because the size of data is unknown upfront in the case of zipped input files, progress is reported as 0. Otherwise, map progress to this point is calculated based on the number of bytes read.
The nextKeyValue method is trying to prepare values for the next invocations of getKey and getValue methods. It returns true if these values are prepared and false otherwise. This method first checks if you must continue (that is, the end of the file has been detected, or you have advanced past the end byte) and returns false if you do not. It then tries to find one of the specified opening tags using the readUntilMatch method. If this method returns true it means that a complete tag is found. If the end of file flag was set during the tag search, the method returns false. Otherwise, it sets up a closing tag (based on a found opening tag). It then checks if you need only an opening tag for the given tag. If that is the case, it adds a closing tag to it and returns true. Finally, it uses the readUntilMatch method to find a closing tag and either returns false (if the end of file flag is set during the search) or true otherwise.
Now that you know how to split input data and read it, the next section takes a look at how to customize the way the results of execution are written out.
ORGANIZING OUTPUT DATA WITH CUSTOM OUTPUT FORMATS
As discussed in Chapter 3, the OutputFormat interface determines where and how (using a writer) the results of a MapReduce job are persisted. Hadoop comes with a collection of classes and interfaces for different types of output formats, but sometimes those implementations are not sufficient for the problem at hand. Two main reasons why you might want to create a custom OutputFormat class are to change where the data is stored, and how the data is written. This section demonstrates how to control where the data is stored.
Before you delve into specific implementation details, take a look at how the MapReduce framework writes output files to HDFS and components involved in the process. (If you are writing to HBase or custom data storage, the components are slightly different.)
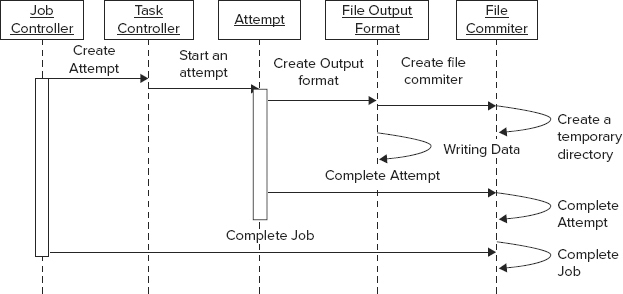
As you can see from Figure 4-4, once the job is split into multiple tasks, a task controller starts an “attempt” of task execution. An execution also creates one of the subclasses of FileOutputFormat, which, in turn, creates a FileCommitter class, creating a temporary directory in the output directory specified by FileOutputFormat. This allows multiple tasks and multiple attempts of each task to write their output independently from each other. Once an attempt is complete, a FileOutputCommitter is invoked again. If an attempt fails, the corresponding temporary directory is removed. If it succeeds, output is copied from the temporary directory to the main one, and the temporary directory is removed. When the whole job is completed, a FileCommitter is invoked yet again to finalize output data.
FIGURE 4-4: Processing output in Hadoop
The following example demonstrates how to implement a custom OutputFormat.
Implementing OutputFormat for Splitting MapReduce Job’s Output into Multiple Directories
In this section, you learn how to implement OutputFormat to split a MapReduce job’s output into multiple directories, and use different RecordWriters for different directories. This can be useful, for example, when you want to separate a successfully processed record from the ones requiring manual interventions, or geographically splitting processing results.
Hadoop already provides the MultipleOutputs class, which enables you to split output into multiple file (in the same directory) with different RecordWriter types. If such split is sufficient, you can use this class. Otherwise, you must create a subclass of this class to do both a name change and a directory change, as shown in Listing 4-13 (code file:class MultipleOutputsDirectories).
LISTING 4-13: MultipleOutputsDirectories class
public class MultipleOutputsDirectories<KEYOUT, VALUEOUT> extends
     MultipleOutputs<KEYOUT, VALUEOUT> {

     ................................................................................................

     @Override
     public <K, V> void write(String namedOutput, K key, V value,
               String baseOutputPath) throws IOException, InterruptedException {
          checkNamedOutputName(context, namedOutput, false);
          checkBaseOutputPath(baseOutputPath);
          if (!namedOutputs.contains(namedOutput)) {
               throw new IllegalArgumentException("Undefined named output '" +
                         namedOutput + "'");
          }
          TaskAttemptContext taskContext = getContext(namedOutput);
          getRecordWriter(taskContext, baseOutputPath).write(key, value);
     }

     private TaskAttemptContext getContext(String nameOutput) throws IOException {

          TaskAttemptContext taskContext = taskContexts.get(nameOutput);
          if (taskContext != null) {
               return taskContext;
          }

          Job job = new Job(context.getConfiguration());
          job.setOutputFormatClass(getNamedOutputFormatClass(context, nameOutput));
          job.setOutputKeyClass(getNamedOutputKeyClass(context, nameOutput));
          job.setOutputValueClass(getNamedOutputValueClass(context, nameOutput));
          String location = FileOutputFormat.getOutputPath(job).toString();
          Path jobOutputPath = new Path(location + "/" + nameOutput);
          FileOutputFormat.setOutputPath(job, jobOutputPath);
          taskContext = new TaskAttemptContext(
                    job.getConfiguration(), context.getTaskAttemptID());

          taskContexts.put(nameOutput, taskContext);
          return taskContext;
     }

     private synchronized RecordWriter getRecordWriter(TaskAttemptContext
          taskContext,
String baseFileName) throws IOException, InterruptedException {

          RecordWriter writer = recordWriters.get(baseFileName);

          if (writer == null) {
               FileOutputFormat.setOutputName(taskContext, baseFileName);
               try {
                   writer = ((OutputFormat) ReflectionUtils.newInstance(
                   taskContext.getOutputFormatClass(),
                        taskContext.getConfiguration()))
                              .getRecordWriter(taskContext);
               } catch (ClassNotFoundException e) {
                    throw new IOException(e);
               }

               recordWriters.put(baseFileName, writer);
          }
          return writer;
     }

     @SuppressWarnings("unchecked")
     public void close() throws IOException, InterruptedException {
              for (RecordWriter writer : recordWriters.values()) {
                     writer.close(context);
              }
     }
     @SuppressWarnings("unchecked")
     private static Class<? extends OutputFormat<?, ?>> getNamedOutputFormatClass(
               JobContext job, String namedOutput) {
          return (Class<? extends OutputFormat<?, ?>>)
          job.getConfiguration().getClass(MO_PREFIX + namedOutput + FORMAT, null,
                    OutputFormat.class);
     }
     .............................................................................................................
}
The most important method in this class is the write method. It takes not only a key and value, but also a name for the output. When obtaining execution context, the class overwrites the output directory with a new value — concatenation of the base output with the output name. (This creates a new desired folder in the base output directory.) It then obtains a directory name corresponding to this directory, and writes both the key and value using this writer.
The getRecordWriter method first checks whether a writer already exists, and, if it does not, creates a new one, based on the current context. Finally, the close method closes all currently opened writers.
Because, in this implementation, a signature of the write method is different from the signature defined in the base OutputFormat class, both the Apache MultipleOutput class and the implementation shown in Listing 4-13 are not derived from the OutputFormat class. Consequently, they cannot be directly associated with the MapReduce execution pipeline. As a result, you must use a slightly more complex implementation of the job driver, as shown in Listing 4-14 (code file:class Executor).
LISTING 4-14: Driver class for using MultipleOutputsDirectories
public class Executor extends Configured implements Tool{

     @Override
     public int run(String[] arg0) throws Exception {
          Configuration conf = ConfigManager.getCofiguration(CONFIGFILE);
          Job job = new Job(conf, "Test Multiple Outputs");

          .............................................................................................
             job.setOutputFormatClass(MultiTextOutputFormat.class);
          Path jobOutputPath = new Path(OUTPUTPATH);
          MultiFileOutputFormat.setOutputPath(job, jobOutputPath);
          MultipleOutputsDirectories.addNamedOutput(job, "even",
                     MultiTextOutputFormat.class,
                     Text.class,IntWritable.class);
          MultipleOutputsDirectories.addNamedOutput(job, "odd",
                     MultiTextOutputFormat.class,
                     Text.class,IntWritable.class);

          ........................................................................................................
     }
}
In Listing 4-14, the job is set up with the “normal” OutputFormat class, which is configured with the output directory. This is the directory that will be stored in the job context, and used as a base output directory. Then, the MultipleOutputsDirectories class is configured by adding desired subdirectories with the corresponding OutputFormat for every directory.
Once you have configured your job to use the MultipleOutputsDirectories class, using it for writing data is straightforward. You can do this in the reducer or mapper in the case of a map-only job. Listing 4-15 (code file class: ExecutorMapper) demonstrates how you can do this in a reducer.
LISTING 4-15: Using the MultipleOutputsDirectories class to write data
       @Override
       protected void setup(Context context){
          mos = new MultipleOutputsDirectories(context);
        }

      @Override
       public void reduce(LongWritable key, Iterable<Text> lines, Context context)
             throws IOException, InterruptedException {

          ............................................................................................................
             if (number == 0) {
                    mos.write("even", new Text(tokenizer.nextToken()),new
                         IntWritable(number));
          } else {
               mos.write("odd", new Text(tokenizer.nextToken()),new
                    IntWritable(number));
          }
          ..................................................................................................................
       }
       @Override
       protected void cleanup(Context context){
          try {
               mos.close();
          } catch (Exception e) {
               e.printStackTrace();
          }
       }
Here, notice that, instead of writing data to the context class, the MultipleOutputsDirectories class is used directly to write data.
For the OutputFormat code in Listing 4-13, Listing 4-14, and Listing 4-15 to work, you must also implement a custom FileOutputCommitter, as shown in Listing 4-16 (code file:class FileOutputCommitter).
LISTING 4-16: FileOutputCommitter class
public class FileOutputCommitter extends
     org.apache.hadoop.mapreduce.lib.output.FileOutputCommitter {
     ..............................................................................................................

     public FileOutputCommitter(Path outputPath, TaskAttemptContext context)
            throws IOException {
          Job job = new Job(context.getConfiguration());
          String outputDirectories =
               job.getConfiguration().get(MULTIPLE_OUTPUTS, "");
          if (outputDirectories != null) {
               StringTokenizer st = new StringTokenizer(outputDirectories, " ");
               while (st.hasMoreTokens()) {
                    pathNames.add(st.nextToken());
               }
          }
          if (outputPath != null) {
               this.outputPath = outputPath;
               outputFileSystem =
                    outputPath.getFileSystem(context.getConfiguration());
               workPath = new Path(outputPath,
                         (FileOutputCommitter.TEMP_DIR_NAME + Path.SEPARATOR +
                                   "_" + context.getTaskAttemptID().toString()
                         )).makeQualified(outputFileSystem);
               for(String p : pathNames){
                    if(outputPath.toString().endsWith(p)){
                         committers.put(p, this);
                         fake = false;
                         break;
                    }
               }
          }
     }

     public void setupJob(JobContext context) throws IOException {
          if (outputPath != null) {
               Path tmpDir = new Path(outputPath,
                    FileOutputCommitter.TEMP_DIR_NAME);
               FileSystem fileSys =
                    tmpDir.getFileSystem(context.getConfiguration());
          }
     }

     private static boolean shouldMarkOutputDir(Configuration conf) {
          return conf.getBoolean(SUCCESSFUL_JOB_OUTPUT_DIR_MARKER, true);
     }

     private void markOutputDirSuccessful(JobContext context, String path)
            throws IOException {
          if (outputPath != null) {
               Path p = (path == null) ? outputPath : new Path(outputPath, path);
               FileSystem fileSys =
                    outputPath.getFileSystem(context.getConfiguration());
               if (fileSys.exists(outputPath)) {
                    Path filePath = new Path(p, SUCCEEDED_FILE_NAME);
                    fileSys.create(filePath).close();
               }
          }
     }

     public void commitJob(JobContext context) throws IOException {
          pathNames.add(null);
          for (String path : pathNames) {
               cleanupJob(context, path);
               if (shouldMarkOutputDir(context.getConfiguration())) {
                    markOutputDirSuccessful(context, path);
               }
          }
     }

     public void cleanupJob(JobContext context, String path) throws IOException {
          if (outputPath != null) {
               Path p = (path == null) ? outputPath : new Path(outputPath, path);
               Path tmpDir = new Path(p, FileOutputCommitter.TEMP_DIR_NAME);
               FileSystem fileSys =
                    tmpDir.getFileSystem(context.getConfiguration());
               if (fileSys.exists(tmpDir)) {
                    fileSys.delete(tmpDir, true);
               }
               ..............................................................................................................
     }

     @Override
     public void abortJob(JobContext context, JobStatus.State state) throws
          IOException {
          pathNames.add(null);
          for (String path : pathNames) {
               cleanupJob(context, path);
          }
     }

     public void commitTask(TaskAttemptContext context) throws IOException {
          if (!fake || (committers.size() == 0)) {
               TaskAttemptID attemptId = context.getTaskAttemptID();
               if (workPath != null) {
                    context.progress();
                    if (outputFileSystem.exists(workPath)) {
                         // Move the task outputs to their final place
                         moveTaskOutputs(context, outputFileSystem, outputPath,
                              workPath);
                    }
               }
          }
          else{
               for(FileOutputCommitter c : committers.values()){
                    c.commitTask(context);
               }
          }
     }

     private void moveTaskOutputs(TaskAttemptContext context,
               FileSystem fs,Path jobOutputDir,Path taskOutput) throws
                    IOException {
          TaskAttemptID attemptId = context.getTaskAttemptID();
          context.progress();
          if (fs.isFile(taskOutput)) {
               Path finalOutputPath = getFinalPath(jobOutputDir, taskOutput,
                    workPath);
               if (!fs.rename(taskOutput, finalOutputPath)) {
                    if (!fs.delete(finalOutputPath, true)) {
                         throw new IOException("Failed to delete earlier output
                              of task: " +
                                   attemptId);
                    }
                    if (!fs.rename(taskOutput, finalOutputPath)) {
                         throw new IOException("Failed to save output of task: " +
                                   attemptId);
                    }
               }
          } else if(fs.getFileStatus(taskOutput).isDir()) {
               FileStatus[] paths = fs.listStatus(taskOutput);
               Path finalOutputPath = getFinalPath(jobOutputDir, taskOutput,
                    workPath);
               fs.mkdirs(finalOutputPath);
               if (paths != null) {
                    for (FileStatus path : paths) {
                         moveTaskOutputs(context, fs, jobOutputDir,
                              path.getPath());
                    }
               }
          }
     }

     @Override
     public void abortTask(TaskAttemptContext context) {
          if (!fake || (committers.size() == 0)) {
               try {
                    if (workPath != null) {
                         context.progress();
                         outputFileSystem.delete(workPath, true);
                    }
               } catch (IOException ie) {
               }
          }
          else{
               for(FileOutputCommitter c : committers.values()){
                    c.abortTask(context);
               }
          }
     }
}
The complexity of this class implementation stems from the complexity of its life cycle (Figure 4-4). Additionally, Figure 4-5 shows the actual HDFS layout used in this case.
FIGURE 4-5: Directories layout when using the MultipleOutputsDirectories class

The root output directory is defined by the initial OutputFormat class (MultiTextOutputFormat in Listing 4-14). This directory is using a FileOutputCommitter defined by this OutputFormat. The named directories are defined by the MultiTextOutputFormat (odd and even in Listing 4-14). These directories are using OutputCommitters defined by the corresponding OutputFormats specified in MultiTextOutputFormat definition (MultiTextOutputFormat in Listing 4-14).
Assuming that all directories are using same FileOutputCommitter class, it is created and invoked several times in several different Java processes. It is used by the job runner to execute task-related activities (setup, commit, and abort) and by the task runner to set up, commit, or abort the job.
Additionally, the task runner creates several instances of FileOutputCommitter. The first instance is created for the OutputFormat defined for the job (MultiTextOutput format in Listing 4-14), and then for every output format used by MultiOutputFormatDirectories. Though multiple instances are available in the task runner, only the first one is used to perform all the task-related activities. That is why this implementation keeps track of all FileOutputCommitters currently in use, so that appropriate actions can be taken on every used directory (Figure 4-5).
The constructor of this class checks whether the class was created for the named directory:
- Real — This FileOutputCommitter instance operates on the “true” output directories, or the root one (the default output format).
- Fake — This FileOutputCommitter instance operates on the root output directory that does not contain data — just the real named output directory.
All the real FileOutputCommitter instances are stored in the static map, so that operations on the default instance can invoke appropriate operations on the real ones. As a result, both task commit and abort operations check the committer type, and either execute an appropriate operation (for real ones), or loop through all the real ones invoking the operation (for fake ones). For the task commit operation, an implementation moves the result’s file for a given task attempt from a temporary directory into the desired directory, and deletes the temporary directory. In the case of abort, the temporary directory (along with its content) is deleted.
An additional method — getWorkPath() — returns a work path used by a given committer to store output information. This information can be used by the MapReduce task to determine the output path of the current attempt (for example, to implement custom writes to the same directory). This is the only “safe” way of writing output data directly from MapReduce code bypassing the output format class.
A different approach is used for implementing job functionality. A job cleanup is a separate process, creating a single instance of a committer — the default one. Because, during committer creation, a mapreduce.multipleoutputs variable is available, a committer constructor can still create a list of used directories, which is used to calculate how many times an appropriate job-level function should be executed. Each job-related function is executed N+1 times, where N is the number of output formats participating in MultiOutputFormatDirectories. The job commit method checks whether any of the temporary directories still exist, and deletes them. It also marks the output directory as successful. An abort method just does the cleanup.
As a final step, you set up execution with a new custom FileOutputCommitter. In the old MapReduce APIs, you did this by setting a FileOutputCommitter on the job object. In the new APIs, this support is deprecated. The only way to set a custom FileOutputCommitter is to overwrite the output format class, as shown in Listing 4-17 (code file:class MultiTextOutputFormat).
LISTING 4-17: Setting up a custom FileOutputCommitter
public class MultiTextOutputFormat<K, V> extends TextOutputFormat<K, V> {

     private FileOutputCommitter committer = null;

     @Override
     public synchronized
     OutputCommitter getOutputCommitter(TaskAttemptContext context) throws
            IOException {
          if (committer == null) {
               Path output = getOutputPath(context);
               committer = new FileOutputCommitter(output, context);
          }
          return committer;
     }
}
This example shows how to modify location of the output, but not its format. Next, you learn how to change the way data is written using a custom writer.
WRITING DATA YOUR WAY WITH CUSTOM RECORDWRITERS
There is certain symmetry in the MapReduce implementation of input and output support. For example, an OutputFormat serves as a factory for custom RecordWriters (similar to the InputFormat creating a RecordReader). Another similarity is separation of concerns — a reducer (or mapper) outputs key/value pairs, while it is the responsibility of the custom RecordWriter to massage these key/value pairs and output them in the form that is required.
Hadoop provides quite a few implementations of RecordWriter that support writing data to HDFS (in different formats), HBase, and even some external systems. But if you need to have output data in some specific proprietary format, you must implement a custom RecordWriter. You see how to implement a custom RecordWriter in the next section.
Implementing a RecordWriter to Produce Output tar Files
Assume that you have a mapper that generates a complete output file in every map function invocation. Writing this file directly to HDFS will create a lot of fairly small files. So, a better option is to combine all these files. A typical approach to this is to create a sequence file, storing every map’s output as a value, and using a key generated by a map as a key. Further assume that the application processing the results of this job cannot read a sequence file, but can consume, for example, tar files.
Listing 4-18 (code file:class TarOutputWriter) shows a custom RecordWriter creating a tar output file that extends Hadoop’s abstract RecordWriter class, and implements all required methods.
LISTING 4-18: Custom tar output writer
class TarOutputWriter extends RecordWriter<BytesWritable, Text> {

    ................................................................

    public TarOutputWriter(Configuration conf, Path output) throws
         FileNotFoundException,
            IOException {
        FileSystem fs = output.getFileSystem(conf);
        FSDataOutputStream fsOutStream = fs.create(output, REWRITE_FILES,
             BUFFER_SIZE);
        tarOutStream = new TarArchiveOutputStream(fsOutStream);
    }

    @Override
    public void write(BytesWritable key, Text value) throws IOException {

        if (key == null || value == null ) {
            return;
        }
      TarArchiveEntry mtd = new TarArchiveEntry(key.toString());
      mtd.setSize(value.getLength());
      tarOutStream.putArchiveEntry(mtd);
        IOUtils.copy(new ByteArrayInputStream(value.getBytes()), tarOutStream);
       ..............................................................
    }

    @Override
    public void close(TaskAttemptContext context) throws IOException {
        if (tarOutStream != null) {
            tarOutStream.flush();
            tarOutStream.close();
         }
    }
}
The workhorse of this class is the write method, which creates a tar entry out of keys and values. This entry is then added to the OutputStream created by the reader’s constructor. The close method flushes the output stream and closes it.
To use this custom writer, you must create a custom OutputFormat that creates your RecordWriter. Because, in this case, the only thing you need is to create a custom RecordWriter (in other words, you do not need to change where the file is stored, just its format), the simplest way to implement a custom OutputFormat is to extend Hadoop’s FileOutputFormat and overwrite the getRecordWriter method, as shown in Listing 4-19.
LISTING 4-19: tar output format using custom tar RecordWriter
public class TarOutputFormat extends FileOutputFormat<BytesWritable, Text> {

    public static final String EXTENSION = ".tar";


    @Override
    public RecordWriter<BytesWritable, Text> getRecordWriter(TaskAttemptContext
         job)
            throws IOException, InterruptedException {

        Path outpath = getDefaultWorkFile(job, EXTENSION);
        return new TarOutputWriter(job.getConfiguration(), outpath);
    }
}
An important part of this implementation is invoking the getDefaultWorkFile method (implemented by a super class) to get the location of output. In this case, the location will be in the temporary directory corresponding to a given attempt.
Now that you know how to customize the processing of input and output data, take a look at some of the optimization techniques that can be introduced into MapReduce execution.
OPTIMIZING YOUR MAPREDUCE EXECUTION WITH A COMBINER
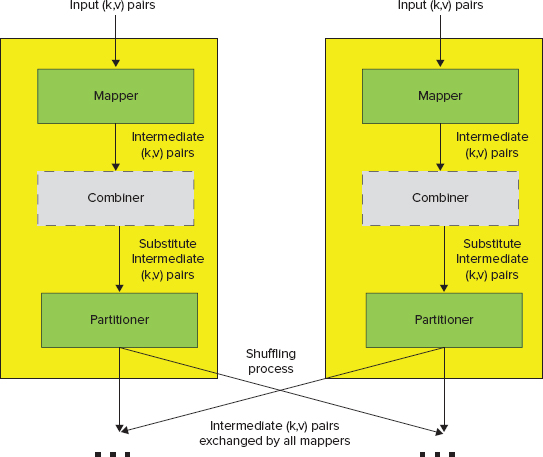
As discussed in Chapter 3, using the combiner is an important Hadoop optimization technique. The primary goal of combiners is to save as much bandwidth as possible by minimizing the number of key/value pairs that will be shuffled across the network between mappers and reducers. Figure 4-6 shows the extended Hadoop’s processing pipeline, including combiner and partitioner. (You learn more about the partitioner later in this chapter.)
FIGURE 4-6: Additional MapReduce components — combiner and partitioner
In Chapter 3, you learned about a link elevation example. Table 4-1 breaks down the first MapReduce job, where the mapper is generating key/value pairs — (tid, {lid [points array]}).
TABLE 4-1: Split Links into Pieces and Elevate Each Piece Job
| PROCESS PHASE | DESCRIPTION |
| Mapper | In this job, the role of the mapper is to build link pieces and assign them to the individual tiles. It reads every link record and splits them into fixed-length fragments, which effectively converts link representation into a set of points. For every point, it calculates a tile to which this point belongs, and produces one or more link piece records, which look as follows (tid, {lid [points array]}), where tid is tile ID, lid is the original link ID, and points array is an array of points (from the original link) that belong to a given tile. |
| Shuffle and Sort | MapReduce’s shuffle and sort will sort all the records based on the tile IDs, which will guarantee that all of the link’s pieces belonging to the same tile will be processed by a single reducer. |
| Reducer | In this job, the role of the reducer is to calculate elevation for every link piece. For every tile ID, it loads terrain information for a given tile from HBase, and then reads all of the link pieces and calculates elevation for every point. It outputs the record (lid, [points array]), where lid is original link ID and points array is an array of three-dimensional points. |
| Result | A result of this job execution contains fully elevated link pieces. It is necessary to implement the second map reduce job to merge them. |
If several million link processed, the map step will produce even more pairs. (Remember, a single link can belong to several tiles.) With combiners, it will potentially send much fewer key/value pairs of the form (tid, {lid [points access]}, ... , {lid [points access]}).
A combiner can be considered a “mini reducer” that is applied to an individual map output during the map phase before sending a new (hopefully reduced) set of key/value pairs to the reducer(s). This is why a combiner’s implementation must extend the reducer class.
Quite a few examples of combiners are available elsewhere (such as the MapReduce tutorial at http://hadoop.apache.org/docs/r1.0.4/mapred_tutorial.html), so one is not included in the book.
Combiner usage is explicitly configured through a setting on the job class, as shown in Listing 4-20.
LISTING 4-20: Configuring an application to use a combiner
job.setCombinerClass(Reduce.class);- It provides more precise control over when local aggregation occurs.
- An implementation can exploit different, application-specific aggregation techniques.
- No read/write of the intermediate data
- No additional object creation and destruction (garbage collection)
- No serialization or deserialization of objects (both memory and processing)
Although combiners can often improve both performance and scalability of MapReduce applications, if not used correctly, they can have a negative impact on the application performance.
Let’s return to the link elevation example from Chapter 3 and look at the second map reduce job, as shown in Table 4-2. Here, a mapper emits a set of (lid, [points array]) pairs.
TABLE 4-2: Combine Links Pieces into Original Links Job
| PROCESS PHASE | DESCRIPTION |
| Mapper | The role of mapper in this job is very simple. It is an identity mapper in Hadoop. It reads link piece records and writes them directly to the output in the form of (lid, [points access]) key/value pairs. |
| Shuffle and Sort | MapReduce’s shuffle and sort will sort all the records based on the link’s keys, which guarantees that all link piece records with the same key will come to the same reducer together. |
| Reducer | In this job, the role of the reducer is to merge link pieces with same ID. Once the reducer reads all of them, it merges them together and writes them out as a single link record. |
| Result | A result of this job execution contains elevated links ready to use. |
However, because the probability of having more than one key processed by a single mapper is low, in this case, the combiner will not produce any significant reduction in the number of key/value pairs, while additional combiner processing time can negatively impact the overall execution time.
A simple rule for deciding on the combiner usage can be as follows. If the probability of having multiple key/value pairs with the same key is high, combiners can improve performance. Otherwise, their usage will not provide any benefits.
Earlier in this chapter, you learned how you can use InputFormat to control the number and preferred location of mapper tasks. When it comes to the reducers, there is no way to control their number or location (their number is explicitly specified in the job configuration, and the JobTracker decides on their placement). One thing that is controllable in the behavior of reducers is data distribution between reducers. The next section shows how you can do this with custom partitioners.
CONTROLLING REDUCER EXECUTION WITH PARTITIONERS
As defined in Chapter 3, partitioning is the process of dividing up the intermediate key space, and determining which reducer instance will receive which intermediate keys and values. The important part of Hadoop architecture is that mappers are able to partition data independently (see Figure 4-6). They never need to exchange information with one another to determine the partition for a particular key.
This approach improves the overall performance and allows mappers to operate completely independently. For all of its output key/value pairs, each mapper determines which reducer will receive them. Because all the mappers are using the same partitioning for any key, regardless of which mapper instance generated it, the destination partition is the same.
Hadoop uses an interface called Partitioner to determine which partition a key/value pair will go to. A single partition refers to all key/value pairs that will be sent to a single reduce task. You can configure the number of reducers in a job driver by setting a number of reducers on the job object (job.setNumReduceTasks).
Hadoop comes with a default partitioner implementation (HashPartitioner), which partitions the keys based on their hash code. This is good enough for many applications with evenly distributed keys. In the case of non-even key distribution, using HashPartitioner can lead to surprising results. For example, assume that the following integer values are the keys:
Also assume that you are running your job with 10 reducers using the default HashPartitioner. If you look at the result of the execution, you will see that the second reducer is processing all 10 keys, while the other nine reducers are idle. The reason is that HashPartitioner calculates a partition as MOD of key value divided by the number of reducers, which in this example is 10. This example shows that even in the case of simple keys, depending on their distribution, it might be necessary to write a custom partitioner to ensure even distribution of load between reducers.
Another case that often requires a specialized implementation of a partitioner is when you use a composite key, such as the implementation of the value-to-key conversion pattern described in Chapter 3.
Implementing a Custom Partitioner for One-to-Many Joins
As described in Chapter 3, the basic idea behind the value-to-key conversion design pattern is to move part of the value into the key to form a composite key, and let the MapReduce execution framework handle the sorting.
This means that the key emitted by the mapper is a composite key. In the value-to-key example presented in Chapter 3, the purchase ID part of the key is the natural key, and the product ID is a group key (created by promoting the product ID value to the key). The group key is used by the partitioner and the group comparator. When you add a group key to a natural key, you get a composite key, as shown in Listing 4-21 (code file:class CompositeKey).
LISTING 4-21: CompositeKey
public class CompositeKey implements WritableComparable<CompositeKey> {

     private long productID;
     private long purchaseID;

     ..............................................................................................................................

     @Override
     public int compareTo(CompositeKey key) {
          int result = new Long(productID).compareTo(new Long(key.getProductID()));
          if(result != 0)
               return result;
          return new Long(purchaseID).compareTo(new Long(key.getPurchaseID()));
     }
}
The CompositeGroupComparator class shown in Listing 4-22 (code file:class CompositeGroupComparator) is used to determine to which reducer the mapper output row should go. This comparator does not sort a reducer’s value iterator. Instead, it sorts a reducer’s input, so that the reducer knows when a new grouping starts. In this example, the value-grouping comparator sorts by the product ID.
LISTING 4-22: CompositeGroupComparator class
public class CompositeGroupComparator implements RawComparator<CompositeKey> {

     @Override
     public int compare(CompositeKey k1, CompositeKey k2) {
          return new Long(k1.getProductID()).compareTo(new
               Long(k2.getProductID()));
     }

     @Override
     public int compare(byte[] key1, int start1, int length1, byte[] key2, int
            start2, int length2) {
          DataInput in1 = new DataInputStream(new ByteArrayInputStream(key1));
          CompositeKey k1 = new CompositeKey();
          DataInput in2 = new DataInputStream(new ByteArrayInputStream(key2));
          CompositeKey k2 = new CompositeKey();
          try{
               k1.readFields(in1);
               k2.readFields(in2);
               return compare(k1, k2);
          }
          catch(Exception e){
               return -1;
          }
     }
}
The values of the iterator that the reducer gets are sorted by a CompositeKeyComparator, as shown in Listing 4-23 (code file:class CompositeKeyComparator). An important thing to note is that the key comparator must also enforce the value-grouping comparator’s rules. In this example, this means that it must first check if the product IDs are equal. If they are not equal, it should return the same values as the group comparator. Only if the product IDs are equal should you apply value-level sorting (comparing the purchase ID). Because this is the way the comparison method in the composite key class (Listing 4-21) is implemented, that implementation can be used here directly.
LISTING 4-23: CompositeKeyComparator
public class CompositeKeyComparator implements RawComparator<CompositeKey> {

     @Override
     public int compare(CompositeKey k1, CompositeKey k2) {
          return k1.compareTo(k2);
     }

     @Override
     public int compare(byte[] key1, int start1, int length1, byte[] key2, int
            start2, int length2) {
          DataInput in1 = new DataInputStream(new ByteArrayInputStream(key1));
          CompositeKey k1 = new CompositeKey();
          DataInput in2 = new DataInputStream(new ByteArrayInputStream(key2));
          CompositeKey k2 = new CompositeKey();
          try{
               k1.readFields(in1);
               k2.readFields(in2);
               return k1.compareTo(k2);
          }
          catch(Exception e){
               return -1;
          }
     }
}
The partitioner class shown in Listing 4-24 (code file:class CompositePartitioner) has a single method that determines to which partition map output should go. In this implementation, it gets the product ID portion of the key and MODs it by the number of reducers.
LISTING 4-24: CompositeKeyPartitioner
public class CompositePartitioner extends Partitioner<CompositeKey, ByteWritable> {

     @Override
     public int getPartition(CompositeKey key, ByteWritable value,int
            numPartitions) {
          return (int)key.getProductID()% numPartitions;
     }
}
Finally, for the MapReduce run time to use the classes, you must set them in the job’s driver, as shown in Listing 4-25.
LISTING 4-25: Setting a custom partitioner
............................................................................................
job.setSortComparatorClass(CompositeKeyComparator.class);
job.setGroupingComparatorClass(CompositeGroupComparator.class);
job.setPartitionerClass(CompositePartitioner.class);
..............................................................................................
Although Hadoop is implemented in Java (at least the Apache version — other implementations such as MapR leverage a lot of C++ code), you can implement both a mapper and reducer in a multiplicity of languages. Take a look at the ways non-Java code can take advantage of the Hadoop ecosystem.
USING NON-JAVA CODE WITH HADOOP
Hadoop itself is written in Java, and, thus, accepts Java code natively for implementation of mappers and reducers. But this does not mean that code written in other languages can’t be used with Hadoop. (You have many reasons to use non-Java code with Hadoop, ranging from your existing skill set to legacy code and libraries for more performant implementations, thus leveraging native code.) You can include non-Java code in Hadoop in three basic ways:
- Using Pipes
- Using Hadoop Streaming
- Using the Java Native Interface (JNI)
Pipes
Pipes is a library that enables you to use C++ source code for mapper and reducer implementation. Both key and value inputs to Pipes programs are provided as STL strings (std::string). An implementation must still define an instance of a mapper and reducer. Unlike the classes of the same names in Hadoop itself, the map and reduce functions take in a single argument that is a reference to an object of type MapContext and ReduceContext, respectively. The most important methods contained in each of these context objects enable you to get input keys and values (as strings), and emit keys and values.
You implement a program using Pipes by writing classes that extend Mapper and Reducer (and, optionally, Partitioner), and then configuring the Hadoop run time (similar to a driver) so that it knows which classes to use to run the job. An instance of appropriate C++ program will be started by the Pipes framework on each machine.
The main method of these programs should perform any initialization required by the task, then invoke a factory to create mapper and reducer instances as necessary, and run the job by calling the runTask method.
Hadoop Streaming
Unlike Pipes, which is tailored specifically to running C++ application code in the Hadoop environment, Streaming is a generic API that allows programs written in virtually any language to be used as Hadoop mapper and reducer implementations. Both mappers and reducers receive their input on stdin and emit output (key/value pairs) to stdout.
In a Streaming implementation, input and output are always represented textually. The input (key/value) pairs are written to stdin for a mapper or reducer, with a tab character separating the key from the value. The Streaming programs should split the input on the first tab character on the line to obtain both keys and values. Streaming programs write their output to stdout in the same format: key and value separated by a tab, and pairs separated by a carriage return. The inputs to the reducer are sorted so that while each line contains only a single key/value pair, all the values for the same key are adjacent to one another.
You can use any Linux program or tool as the mapper or reducer when using Streaming, assuming it can handle its input in the text format described here. In this case, you can implement the mapper/reducer in any language of your choice (including bash, Python, Perl, and so on), provided that the necessary interpreter is present on all nodes in your cluster.
Using JNI
JNI is a programming framework that allows Java code running in a JVM to call and to be called by native applications. It enables you to include native methods in the Java program to handle situations in which an application cannot be written entirely in Java (for example, when the standard Java class library does not support the platform-specific features or program libraries). It is also used to modify an existing application — written in another programming language — to be accessible from Java applications. Including performance- and platform-sensitive API implementations in the standard library allows all Java applications to access this functionality in a safe and platform-independent manner.
Using JNI allows “standard” MapReduce implementations to include non-Java code to execute some of the functionality of the mapper and/or reducer.
One of the issues that must be addressed to make the JNI approach work is the distribution of *.so libraries. The two mechanisms that you can use for native code distribution are distributed cache and uber jars.
Hadoop’s distributed cache provides a convenient mechanism for efficient distribution of application-specific, read-only files. It is a facility provided by the MapReduce framework to cache files (text, archives, jars, and so on) needed by applications. Applications specify the files to be cached via URLs (hdfs://) in the job. The framework copies the necessary files to the slave node before any tasks for the job are executed on that node. Its efficiency stems from the fact that the files are copied only once per job, and the capability to cache archives that are unarchived on the slaves.
A simple native libraries loader such as the one shown in Listing 4-26 (code file:class NativeLibrariesLoader) enables you to store libraries in distributed cache, and then retrieve and load them for the execution.
LISTING 4-26: Native libraries loader
public class NativeLibrariesLoader {

     public static void storeLibraries(Configuration conf, String baseDir,
          Collection<String> libraries)
                                                  throws Exception{
             DistributedCache.createSymlink(conf);
             boolean first = true;
     StringBuffer sb = new StringBuffer();
     for(String library : libraries){
                  DistributedCache.addCacheFile(new URI(baseDir + library), conf);
                  if(first)
                       first = false;
                  else
                       sb.append(DELIM);
                       sb.append(library);
          }
          conf.set(LIBRARIES, sb.toString());
}

public static void loadLibraries(Configuration conf) throws IOException{
          Map<String, String> libPaths = new HashMap<String, String>();
          StringTokenizer st = new StringTokenizer(conf.get(LIBRARIES),DELIM);
          Path[] libraries = DistributedCache.getLocalCacheFiles(conf);
          for(Path library : libraries){
               libPaths.put(library.getName(), library.toString());
          }
          while(st.hasMoreTokens()){
               System.load(libPaths.get(st.nextToken()));
          }
       }
}
The storeLibraries method is executed during the job preparation phase, and should be invoked from the driver class. This method loads libraries from a specified directory into distributed cache, and builds a list of loaded libraries. The loadLibraries method should be invoked where libraries are actually used (mapper or reducer, or both). It reads the list of available libraries and loads all of them independently.
The important thing to watch for using this class is the order of names of the libraries in the libraries parameter. Because the loadLibraries method loads them sequentially, it is sensitive to loading order. If library A depends on library B, library B should be loaded before library A.
An alternative to using Hadoop distributed cache is using uber jars. In this case, the Hadoop execution jar (uber jar) will contain all of the executable libraries required by map/reduce execution. Because Hadoop distributes an execution jar to all nodes where execution happens, no additional library distribution mechanism is required. In this case, the only thing that is required is loading native libraries at mapper/reducer startup. You can do this using simple code, as shown in Listing 4-27 (code file:class SharedLibraryLoader).
LISTING 4-27: Loading native libraries from the uber jar
public class SharedLibraryLoader {
         private File tempPath;

         public SharedLibraryLoader() {
                  tempPath = Files.createTempDir();
         }

         private void loadLibrary(String libraryName) throws IOException {
                  URL url =
                       this.getClass().getClassLoader()
                       .getResource(libraryName);
                  File library = new File(tempPath, libraryName);
                  FileUtils.copyURLToFile(url, library);
                  library.setExecutable(true);
                  System.load(library.getAbsolutePath());
         }
}
Here, similar to the distributed cache approach, the order of libraries to load must be known upfront to the requesting application.
When choosing an approach for including non-Java code in a MapReduce implementation, you should weigh implementation simplicity against execution performance. Several publications show that the performance of Java (and, consequently, JNI) surpasses implementations of both Pipes (by roughly a factor of 2) and Streaming (by roughly a factor of 4).
SUMMARY
This chapter discussed options for customizing MapReduce implementations to better serve your application needs. You learned how to modify map distribution and executions using custom InputFormats, how to access proprietary data using custom RecordReaders, how to write data in a form that is most appropriate for your applications using custom OutputFormats, how to control reducer execution using custom partitioners, and how to incorporate non-Java code and RecordWriters into your application.
Chapter 5 discusses how to build reliable MapReduce applications.