
16.3. The User Interface
The key to any successful (and useful) web application is the design of the user interface. Because AjaxMail is meant to demonstrate the use of Ajax techniques, the user interface is quite simple and barebones. There are three different views of the user interface:
Folder view: Displays a folder of messages (either Inbox or Trash)
Read view: Displays a received message
Compose view: Displays a form so that you can send e-mails
All the views are designed to be very simple, and all are loaded when the main page, index.php, is initially loaded.
The basic layout of index.php is as follows:
<!DOCTYPE html PUBLIC "-//W3C//DTD XHTML 1.0 Transitional//EN"
     "http://www.w3.org/TR/xhtml1/DTD/xhtml1-transitional.dtd">
<html xmlns="http://www.w3.org/1999/xhtml" xml:lang="en" lang="en">
    <head>
        <title>Ajax Mail</title>
        <link rel="stylesheet" type="text/css" href="styles/AjaxMail.css" />
        <script type="text/javascript" src="scripts/zxml.js"></script>
        <script type="text/javascript" src="scripts/json.js"></script>
        <script type="text/javascript" src="scripts/AjaxMail.js"></script>
    </head>
    <body>
        <ul id="ulMainMenu">
            <li id="liCompose">
                <span class="link" id="spnCompose">Compose Mail</span></li>
            <li><span class="link" id="spnInbox">Inbox
                <span id="spnUnreadMail"></span></span></li>
            <li><span class="link" id="spnTrash">Trash</span>
                (<span class="link" id="spnEmpty">Empty</span>)</li>
        </ul>
        <div id="divNotice"></div>
        <div id="divFolder">
             <!-- folder view -->
        </div>
        <div id="divReadMail" style="display: none">
             <!-- read mail view -->
        </div>

        <div id="divComposeMail" style="display: none">
            <!-- compose mail view -->
        </div>
        <iframe id="iLoader" src="about:blank"></iframe>
    </body>
</html>
The page requires a style sheet, AjaxMail.css, along with three JavaScript files, the zXml library file (zxml.js), the JSON library (json.js), and the JavaScript file containing all the AjaxMail functionality (AjaxMail.js). Within the body is an unordered list containing three links, one each for Compose Mail, the Inbox, and the Trash. The Trash link also has a link for Empty next to it, which can be used to purge any messages in the Trash. Because each of these links is to call a JavaScript function, there is no need to use a regular <a/> tag. Instead, each link is implemented as a <span/> with a CSS class of link, which formats the text to look like a regular link. The first link, Compose Mail, is made bold to call it out from the others. The complete CSS for the main menu (contained in AjaxMail.css) is:
span.link {
    text-decoration: underline;
    color: blue;
    cursor: pointer;
    cursor: hand;
}

#ulMainMenu {
    position: absolute;
    left: 0px;
    top: 0px;
    margin: 0px;
    padding: 10px;
}

#ulMainMenu li {
    display: block;
    padding: 2px 0px 2px 0px;
    margin: 0px;
    font-size: 80%;
}

#ulMainMenu #liCompose {
    font-weight: bold;
    padding: 2px 0px 8px 0px;
}
Next in the index.php page is a <div/> element called divNotice. This element is used to display notifications to the user, which is critical in an Ajax application. Because the page itself doesn't reload or change to another page, there is no indication if a particular operation was successful. This area is used to relay such information.
AjaxMail needs two different types of notifications: one for general information and one for error information. General information includes such things as notifying the user when an e-mail is sent or deleted; error information is important when one of these actions is supposed to occur but doesn't. A general information notification appears as a yellow box with a small "i" icon to the left, whereas an error notification appears as a red box with an exclamation point icon to the left (see Figure 16-1).
Figure 16.1. Figure 16-1

The divNotice element is dynamically assigned text as well as an appropriate CSS class, info or error, to create the desired appearance. The styles are defined as follows:
#divNotice {
    -moz-box-sizing: border-box;
    box-sizing: border-box;
    padding: 4px;
    background-repeat: no-repeat;
    background-position: 4px 4px;
    padding-left: 24px;
    font-size: 60%;
    font-family: Arial,Helvetica,Sans-Serif;
    visibility: hidden;
    height: 16px;
    position: absolute;
    top: 5px;
    left: 150px;
    width: 600px;
}

div.info {
    background-color: #F7FFCD;
    background-image: url(../images/icon_info.gif);
    border: 1px solid #A5A54A;
}

div.error {
    background-color: #FFE6E6;
    background-image: url(../images/icon_alert.gif);
    border: 1px solid red;
}
By using the background-image property to assign the appropriate icon, you are able to completely control the appearance of the notification area by using styles instead of worrying about changing an <img/> element when the style is changed. The background-position property states where the image should appear, and setting the background-repeat property to no-repeat ensures that only one copy of the image will be visible.
After the notification element comes a <div/> for each of the three AjaxMail views. The <div/> element for the folder view, divFolder, is first in the page and is always visible by default. The other two <div/> elements, divReadMail and divComposeMail, each have their display property set to none so that they are not visible when the page is first loaded. The contents of each <div/> element will be discussed later.
The last part of the page is an <iframe/> called iLoader. This hidden frame is used to navigate back and forth throughout the three views of AjaxMail. Anytime a user interface switch is made, the request goes through the hidden frame to allow the use of the Back and Forward browser buttons.
16.3.1. The Folder View
The folder view is the first thing the user sees after the application is loaded. It consists of the title of the folder (either Inbox or Trash), a pagination control that displays which messages are being displayed and the total number of messages, and a list of e-mail messages (see Figure 16-2). Taking a cue from Gmail, AjaxMail doesn't use table headers for the list of messages because people are accustomed to seeing e-mail listed by the person who sent it, subject, and date.
Figure 16.2. Figure 16-2
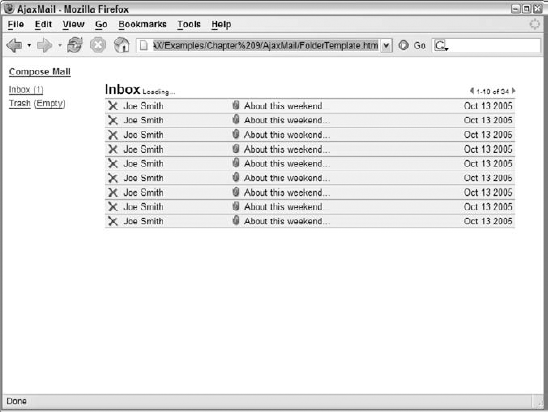
You may notice that the traditional check box next to each e-mail is missing. That's because there is only one thing you can do with an e-mail in AjaxMail: delete it. Instead of a check box, there is a red X next to each e-mail that can be clicked to delete it (move it to the Trash). When you switch to the Trash folder, the icons change to green arrows that, when clicked, moves the e-mail back into the Inbox (see Figure 16-3).
Aside from this difference, the folder view is the same regardless of which folder is displayed. Additionally, each e-mail has an optional attachment indicator that appears next to the subject if the e-mail contains an attachment. This icon is displayed only when an attachment is detected on the e-mail; otherwise, it is hidden.
There's also a small "loading" message next to the name of the folder. This is used to indicate when there is an open request to the server and disappears when the request is complete. While a request is processing, no other actions can be taken to prevent overriding of requests.
Figure 16.3. Figure 16-3

The HTML for the folder view is fairly simple because a large amount of the display is created by JavaScript depending on data received from the server:
<div id="divFolder">
    <div id="divFolderHeader" class="header">
        <h1 id="hFolderTitle">Inbox</h1>
        <div id="divFolderStatus" class="status">Loading...</div>
        <div id="divItemCount">
             <img src="images/btn_prev.gif" alt="Previous Page"
                  title="Previous Page" id="imgPrev" />
             <span id="spnItems"></span>
             <img src="images/btn_next.gif" alt="Next Page"
                  title="Next Page" id="imgNext" />
        </div>
    </div>
    <table border="0" cellpadding="0" cellspacing="0" id="tblMain">
        <thead>
            <tr id="trTemplate">
                <td><img src="images/icon_delete.gif" /></td>
                <td class="from"></td>
                <td class="attachment">
                    <img src="images/icon_attachment.gif" title="Attachment" /></td>
                <td class="subject"></td>
                <td class="date" nowrap="nowrap"></td>
            </tr>
<tr id="trNoMessages">
<td colspan="5">There are no messages in this folder.</td>
</tr>
</thead>
<tbody>
<tr style="visibility: hidden">
<td colspan="5"></td>
</tr>
</tbody>
</table>
</div>The first thing to notice about this code is that nearly every element has an id attribute assigned. Any element that must be accessed via JavaScript needs to have an id attribute so that it can be accessed using the document.getElementById() method directly. For example, hFolderTitle contains the name of the folder, which is assigned by JavaScript after the folder data is retrieved. Because this will happen frequently, the JavaScript needs a reference to this element. Likewise, the divFolderStatus element that contains the loading message needs an id attribute so that it can be shown and hidden when appropriate. The spnItems element will be filled in with information about which messages are being displayed. The trickiest part of the HTML is the table to display the messages.
Within the table is a <thead/> element that contains two rows: one called trTemplate and one called trNoMessages. These rows are used as templates by JavaScript to create rows on the fly. Since rows with these formats will be needed frequently, it is faster and more effective to create the HTML and hide it from the user then to duplicate it and fill in the necessary information. You'll see how this is done later in the chapter. For now, just know that neither of these rows is directly visible to the user.
The <tbody/> element contains a single hidden row. This is done to set the initial browser measurements for the table. Without this, each table row would be displayed incorrectly initially because the browser had no standards from which to base its measurements. Providing this hidden row gives the browser enough information to make sure that any further rows are displayed properly.
16.3.2. Read View
The read view is quite simply designed to display an e-mail message so that the user can read it (see Figure 16-4). It consists of a subject line followed by spaces for the sender's e-mail address, the recipient's e-mail address, and the message date. There are also additional spaces for displaying both CC and BCC information if necessary.
Under the message header information are links for Reply, Reply All, Forward, and View Attachments. The last link appears only if there are attachments on the message. Each of the first three links switches you to the compose view with some prefilled information allowing you to easily send an e-mail.
Below the links is the message body. Because AjaxMail supports only plain text messages, it's easy to format the text using CSS. If there are any attachments, they are listed below the main message text. You can click the name of an attachment to download it.
Figure 16.4. Figure 16-4

The read view HTML is also very simple for the same reason, because most of the information is added later on by JavaScript.
<div id="divReadMail" style="display: none">
    <div class="header">
         <h1 id="hSubject"></h1>
    </div>
     <div class="message-headers">
         <div id="divMessageFrom"></div>
         <div id="divMessageDate"></div>
     </div>
     <div id="divMessageTo"></div>
     <div id="divMessageCC"></div>
     <div id="divMessageBCC"></div>
     <ul class="message-actions">
         <li><span class="link" id="spnReply">Reply</span></li>
         <li><span class="link" id="spnReplyAll">Reply All</span></li>
         <li><span class="link" id="spnForward">Forward</span></li>
         <li id="liAttachments"><a href="#attachments">View Attachments</a></li>
     </ul>
    <div id="divMessageBody"></div>
    <a name="attachments" id="aAttachments">Attachments</a>
    <div id="divMessageAttachments">
        <ul id="ulAttachments">
        </ul>
    </div>
</div>
As with the folder view, nearly every element for the read view has an id attribute. The hSubject element is used to display the subject of the message, whereas the divMessageBody element is used to display the message text. The divMessageFrom, divMessageDate, divMessageTo, divMessageCC, and divMessageBCC elements are used to display each type of header information for the message. Immediately following those elements are the message actions, Reply, Reply All, Forward, and View Attachments. Note that only the View Attachments link uses an <a/> element. This is to take advantage of HTML anchors to move the screen's view down the page to the attachments list. All the other links are implemented using <span/> elements with the link CSS class. The attachments are listed in the ulAttachments element. If there are no attachments, the entire divMessageAttachments element is hidden.
16.3.3. Compose View
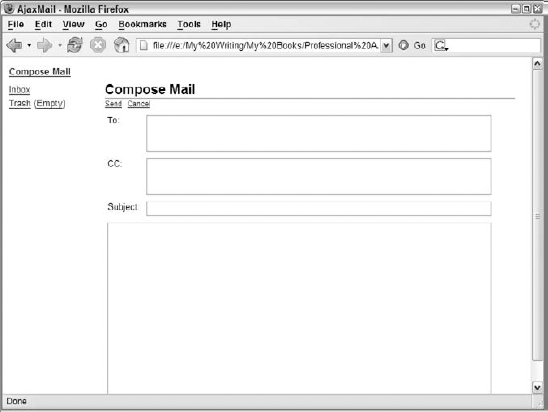
The compose view does a lot of work in the user interface for AjaxMail. It is used not only to create new e-mail messages, but also for replying to and forwarding e-mails. To keep things simple for this book, the compose view supports only the To and CC fields (no BCC) and does not enable you to send attachments.
This view consists of a text box for the To, CC, and subject fields, and the message of the e-mail (see Figure 16-5). There are also two links, Send and Cancel. Send begins the process of sending the e-mail, and Cancel places the user back into the previous view (either folder view or read view).
Figure 16.5. Figure 16-5
The HTML for this view consists mostly of a form with text fields:
<div id="divComposeMail" style="display: none">
    <div class="header">
         <h1 id="hComposeHeader">Compose Mail</h1>
    </div>
    <div id="divComposeMailForm">
         <ul id="ulComposeActions" class="message-actions">
             <li><span class="link" id="spnSend">Send</span></li>
             <li><span class="link" id="spnCancel">Cancel</span></li>
         </ul>
     <div id="divComposeBody">
         <form method="post" name="frmSendMail">
             <table border="0" cellpadding="0" cellspacing="0">
                 <tr>
                     <td class="field-label-container">
                            <label for="txtTo" class="field-label">To:</label></td>
                     <td class="field-container">
                            <textarea rows="2" cols="30" id="txtTo" name="txtTo"
                                      class="form-field"></textarea></td>
                 </tr>
                 <tr>
                     <td class="field-label-container">
                            <label for="txtCC" class="field-label">CC:</label></td>
                     <td class="field-container">
                            <textarea rows="2" cols="30" id="txtCC" name="txtCC"
                                      class="form-field"></textarea></td>
                 </tr>
                 <tr>
                     <td class="field-label-container">
                        <label for="txtSubject"
                               class="field-label">Subject:</label></td>
                     <td class="field-container">
                        <input type="text" id="txtSubject" name="txtSubject"
                               class="form-field" /></td>
                 </tr>
                 <tr>
                     <td class="message-container" colspan="2">
                          <textarea id="txtMessage" name="txtMessage" rows="15"
                                    cols="30" class="form-field"></textarea></td>
                 </tr>
             </table>
         </form>
     </div>
     </div>
     <div id="divComposeMailStatus" style="display: none">
         <h2>Sending...</h2>
         <img src="images/sendmail.gif" />
     </div>
</div>
There are two main parts of this view: divComposeBody, which contains the form, and divComposeMailStatus, which displays a notification that a message is being sent. When Send is clicked, divComposeMailStatus is shown with the Sending ... message as well as an animated image to indicate that the message is in the process of being sent. If an error occurs during the process, an alert will be displayed to the user and the form will once again be made visible. If, on the other hand, the message goes through without any problems, the user is returned to the previous view (as if he or she clicked Cancel) and a notification is displayed stating that the message was sent successfully.
16.3.4. Layout
To ensure the user interface has a consistent feel, each view must be laid out so that one can easily slide into the place of the others when necessary. To accomplish this, each view is positioned absolutely in the same location:
#divFolder,
#divReadMail,
#divComposeMail {
    position: absolute;
    top: 35px;
    left: 150px;
    width: 600px;
    -moz-box-sizing: border-box;
    box-sizing: border-box;
}
The last two CSS properties, -moz-box-sizing and box-sizing, are used to ensure that the measurements are the same across all browsers. By default, Internet Explorer renders everything using the border box calculations, whereas others don't. These two lines (the first for Mozilla, the second for others) ensure that the size remains consistent regardless of the browser. The rest of the style information places each view in the same location on the screen and makes each view have the same width (although the height is allowed to grow and shrink, as necessary).
Next, the iframe must be hidden so that it doesn't disrupt the page flow. Because the iframe's id attribute is set, you can refer to it directly:
#iLoader {
    display: none;
}
Also remember that the <thead/> element needs to be hidden so that it won't display the template rows in the folder view:
thead {
    display: none;
}