
12.1. Creating a Weather Widget
Weather information is popular to display both on the desktop and on the Web. Many applications and widgets are solely devoted to retrieving and displaying this information. Since weather changes constantly, Ajax is well suited to this type of widget.
12.1.1. The Weather.com SDK
The first step in creating this widget is to locate a source of weather information. Probably the most popular is the Weather.com XML weather service. The use of the Weather.com XML service hinges upon following their guidelines. To use their XML feeds, you must first register for a license at http://registration.weather.com/registration/xmloap/step1. After you register, Weather.com sends an e-mail with a link to the XML feed SDK and provides you with a license key and partner ID.
For web-based applications, like this widget, you must limit how often you retrieve information from the service. As specified in the SDK documentation, the refresh rate for the Current Conditions information is 30 minutes; therefore, the server application must cache the retrieved weather information and only refresh the information every 30 minutes. There are two ways to accomplish this:
Create a smart thread that runs independently of the web application and pulls the feed every 30 minutes. The application then solely uses the cached feed and never worries about the time span between information pulls.
With every page request, the application can keep track of the last time the feed was retrieved and allow refreshing of the data only after 30 minutes have passed.
Although the first option is ideal, limiting the amount of file system operations to once per half-hour, it is difficult to implement due to timeout restrictions. For instance, an ASP.NET application times out after 20 minutes of inactivity. The second option is simpler to implement and doesn't require any configuration changes on the server. The weather widget uses this option.
12.1.2. The Server-Side Component
At the heart of the server application lie two classes created within the Wrox.ProfessionalAjax.Weather namespace. These classes can be compiled into a class library (a .dll file) or used natively within an application. For the purposes of this example, the classes are used directly in the application, so no reference to an external library is needed.
12.1.2.1. The Settings Class
The Settings class is a static class that contains all of the information required to pull weather information from Weather.com. Static classes are used to create data and functions that can be accessed without creating objects of the class. Only three pieces of information are required to retrieve this data: your license key, your partner ID, and the location ID.
This information could be considered sensitive data, because you do not want anyone abusing the Weather.com's service with your information. Therefore, it's recommended that you use the Web.config file to store the license information by adding settings to the <appSettings/> element.
<appSettings>
    <add key="license" value="[license key]" />
    <add key="partner" value="[partner id]" />
    <add key="location" value="[location id]" />
</appSettings>
With this information added to the application settings, not only is it secure, but it is also easily accessible by your application.
Note that you need to replace the bracketed items with your own information.
The Settings class exposes three public properties to access this information.
By using the System.Configuration.ConfigurationManager class, you can extract the settings in the <appSettings/> elements in Web.config. Just pass the value used in the key attribute:
public static class Settings
{
    public static string LicenseKey
    {
        get
        {
            return ConfigurationManager.AppSettings["license"];
        }
    }

    public static string PartnerId
    {
        get
        {
            return ConfigurationManager.AppSettings["partner"];
        }
    }

    public static string LocationId
    {
        get
        {
            return ConfigurationManager.AppSettings["location"];
        }
    }
}
These properties provide read-only access to the application settings because there is no need for them to change.
Don't forget to add System.Configuration to the using statements before attempting to use ConfigurationManager without System.Configuration in front of it.
12.1.2.2. The WeatherInfo Class
The WeatherInfo class provides methods to retrieve the information from the Weather.com XML service; its constructor accepts one argument that contains the path to the application:
public class WeatherInfo
{
    private string _path;  //Path of the application
    private string _cachedFile; //Path of the cached file.

    public WeatherInfo(string path)
    {
        _path = path;
        _cachedFile = String.Format("{0}/weather_cache.xml",_path);
    }

    //more code here
}
This class has two private fields, path and cachedFile. The former is assigned the path argument, and the latter contains the path to the cached weather feed.
12.1.2.2.1. Reading Cached Weather Data
When the client requests data, and the 30 minutes have not yet passed from the last Weather.com request, then it should be read from the cached file. The _getCachedWeather() method retrieves data from the cached file and return its contents as a string.
private string _getCachedWeather()
{
    string str = String.Empty;

    //Open and read the cached weather feed.
    using (StreamReader reader = new StreamReader(_cachedFile))
    {
        str = reader.ReadToEnd();
    }

    //Return the contents
    return str;
}
First, the variable str is created and initialized as an empty string; this variable will contain the contents of the cached file when it is read. Next, a StreamReader object is created to open the cached weather feed; the contents are read via the ReadToEnd() method and stored in str. Finally, _getCachedWeather() exits and returns the data.
12.1.2.2.2. Getting Weather Data from the Web
When the cached data is too old, the server should retrieve new weather information from Weather.com. The _getWebWeather() method performs this operation.
private string _getWebWeather()
{
    //more code here
}
According to the SDK, the URL to retrieve the weather feed looks like the following:
http://xoap.weather.com/weather/local/[locID]?cc=*&prod=xoap&par=[partID]&key=[lic]
The information contained in brackets is the location ID, partner ID, and license key. Using the String.Format() method, you can format the URL to contain your own settings information:
private string _getWebWeather()
{

    //Get the base url for using the service.
    string baseUrl =
        "http://xoap.weather.com/weather/local/{0}?cc=*&prod=xoap&par={1}&key={2}";

    //Now format the url with the needed information
    string url = String.Format(baseUrl, Settings.LocationId, Settings.PartnerId,
        Settings.LicenseKey);

    //more code here
}
This is primarily where the Settings class is used. The resulting string returned from String.Format() is complete with the required information that the Weather.com guidelines dictate.
The next operation makes a request to the remote host and retrieves the weather feed:
private string _getWebWeather()
{
    //Get the base url for using the service.
    string baseUrl =
        "http://xoap.weather.com/weather/local/{0}?cc=*&prod=xoap&par={1}&key={2}";

    //Now format the url with the needed information
    string url = String.Format(baseUrl, Settings.LocationId, Settings.PartnerId,
        Settings.LicenseKey);

    //Use a web client. It's less coding than an HttpWebRequest.
    using (WebClient client = new WebClient())
    {
        //Read the results
        try
        {
            //Create an XmlReader to read the response
            XmlTextReader xml = new XmlTextReader(client.OpenRead(url));
        }
        catch (WebException exception)
        {
            //more code here
        }
    }
}
At the beginning of this new code, a WebClient object is created to connect to Weather.com's service. The server's response is read using the OpenRead() method, which returns a Stream object that can be read with an XmlTextReader object, which is used in an XSL Transformation.
Transforming the data on the server is advantageous for several reasons. For one, it greatly simplifies the client-side code. The data sent to the client is already in HTML, so it is easily added to the page. A server-side transformation also makes the client work less. The data is complete when it reaches the client; no other data manipulation, other than placing in the page, is required.
XSL transformations in .NET closely resemble the transformations provided by MSXML covered in Chapter 6. The first step in a transformation is to create the objects involved. Transformations in .NET 2.0 require an XslCompiledTransform object, an XmlReader object (XmlTextReader in this case), and a Stream object (a StreamWriter), which contains the resulting transformed data:
private string _getWebWeather()
{
    //String that the weather feed will be written to
    string xmlStr = String.Empty;

    //Get the base url for using the service.
    string baseUrl =
"http://xoap.weather.com/weather/local/{0}?cc=*&prod=xoap&par={1}&key={2}";
//Now format the url with the needed information
string url = String.Format(baseUrl, Settings.LocationId, Settings.PartnerId,
Settings.LicenseKey);
//Use a web client. It's less coding than an HttpWebRequest.
using (WebClient client = new WebClient())
{
//Read the results
try
{
//Create an XmlReader to read the response
XmlTextReader xml = new XmlTextReader(client.OpenRead(url));
//Get the XSLT object ready
XslCompiledTransform xslt = new XslCompiledTransform();
xslt.Load(_path + "/weather.xslt");
//Write the resulting XSLT to the cache file
using (StreamWriter writer = new StreamWriter(_cachedFile))
{
xslt.Transform(xml, null, writer);
}
//return the cached copy
return _getCachedWeather();
}
catch (WebException exception)
{
//more code here
}
}
}The first step in this process is to load the XSL document into the XslCompiledTransform object. Next, create a StreamWriter object to create or overwrite the cache file. This StreamWriter object, along with the XML data, is then passed to the Transform() method. The StreamWriter object serves as the transformation's output, so as the XslCompiledTransform object transforms the XML data, the transformed data is being written to the cache file. When the transformation is complete, the cached copy is returned to the caller by returning _getCachedWeather().
Handling Web-Related Errors
If for some reason this operation fails (most likely as a result of not finding the remote host), code execution drops the catch block where the error is handled. Since the weather data begins as XML and is transformed into HTML, having the error information follow the same pattern seems fitting. Therefore, the following code creates a simple XML document:
private string _getWebWeather()
{
    //String that the weather feed will be written to
    string xmlStr = String.Empty;

    //Get the base url for using the service.
    string baseUrl =
        "http://xoap.weather.com/weather/local/{0}?cc=*&prod=xoap&par={1}&key={2}";

    //Now format the url with the needed information
    string url = String.Format(baseUrl, Settings.LocationId, Settings.PartnerId,
        Settings.LicenseKey);

    //Use a web client. It's less coding than an HttpWebRequest.
    using (WebClient client = new WebClient())
    {
        //Read the results
        try
        {
            //Create an XmlReader to read the response
            XmlTextReader xml = new XmlTextReader(client.OpenRead(url));

            //Get the XSLT object ready
            XslCompiledTransform xslt = new XslCompiledTransform();
            xslt.Load(_path + "/weather.xslt");

            //Write the resulting XSLT to the cache file
            using (StreamWriter writer = new StreamWriter(_cachedFile))
            {
                xslt.Transform(xml, null, writer);
            }

            //return the cached copy
            return _getCachedWeather();
        }
        catch (WebException exception)
        {
            //Write up the XML, and put in the exception info
            string xmlStr = "<errorDoc>";
            xmlStr += "<alert>An Error Occurred!</alert>";
            xmlStr += String.Format("<message>{0}</message>", exception.Message);
            xmlStr += "</errorDoc>";

            //Load it into an XmlDocument
            XmlDocument doc = new XmlDocument();
            doc.LoadXml(xmlStr);

            //more code here
        }
    }
}
The next step is to perform the transformation on this XML document. This XSL Transformation is similar to that of the weather data, except that instead of the output being written to the file, the output is returned as a string to the caller.
private string _getWebWeather()
{
    //String that the weather feed will be written to
    string xmlStr = String.Empty;

    //Get the base url for using the service.
    string baseUrl =
        "http://xoap.weather.com/weather/local/{0}?cc=*&prod=xoap&par={1}&key={2}";

    //Now format the url with the needed information
    string url = String.Format(baseUrl, Settings.LocationId, Settings.PartnerId,
        Settings.LicenseKey);

    //Use a web client. It's less coding than an HttpWebRequest.
    using (WebClient client = new WebClient())
    {
        //Read the results
        try
        {
            //Create an XmlReader to read the response
            XmlTextReader xml = new XmlTextReader(client.OpenRead(url));

            //Get the XSLT object ready
            XslCompiledTransform xslt = new XslCompiledTransform();
            xslt.Load(_path + "/weather.xslt");

            //Write the resulting XSLT to the cache file
            using (StreamWriter writer = new StreamWriter(_cachedFile))
            {
                xslt.Transform(xml, null, writer);
            }

            //return the cached copy
            return _getCachedWeather();
        }
        catch (WebException exception)
        {
            //Write up the XML, and put in the exception info
            string xmlStr = "<errorDoc>";
            xmlStr += "<alert>An Error Occurred!</alert>";
            xmlStr += String.Format("<message>{0}</message>", exception.Message);
            xmlStr += "</errorDoc>";

            //Load it into an XmlDocument
            XmlDocument doc = new XmlDocument();
            doc.LoadXml(xmlStr);
//And put it into an XmlReader
XmlNodeReader reader = new XmlNodeReader(doc);
//XSLT
XslCompiledTransform xslt = new XslCompiledTransform();
xslt.Load(_path + "/weather.xslt");
//Load the XmlWriter data into the result document
XmlDocument resultDocument = new XmlDocument();
using (XmlWriter writer =
resultDocument.CreateNavigator().AppendChild())
{
xslt.Transform(reader, null, writer);
}
//Output the serialized XML
return resultDocument.OuterXml;
}
}
}Because of the XslCompiledTransform class's architecture, it does not support transforming XML data into an XmlReader. This XSL class is new in .NET 2.0, and it provides better performance than the XslTransform class in earlier .NET versions. Instead, the solution is to use an XPathNavigator object to load an XML tree into an XmlDocument from an XmlWriter object. By using the OuterXml property of the resulting XmlDocument object, the serialized HTML can be returned.
In order for the application to update the contents of weather_cache.xml, ASP.NET must have the proper modify permissions for the file.
12.1.2.2.3. Deciding Which Version to Use
The _getWebWeather() and _getCachedWeather() methods are the primary workhorses of the application. All that's left is to determine which method to call when weather information is required. This determination is made by a public method, GetWeather(), which decides whether to pull the feed from the Web or from the cache based on the time that the cached file was last modified. A public read-only property called LastModified provides easy access to this information:
public DateTime LastModified
{
    get
    {
        if ((File.Exists(_cachedFile)))
        {
            return File.GetLastWriteTime(_cachedFile);
        }
        else
        {
            return new DateTime(1,1,1);
        }
    }
}
This property gets the date and time that the cached file was last written to. Before checking the file modification time, you must be certain that the file exists by using File.Exists(). If it exists, the GetLastWriteTime() method returns the date and time of the last modification; if the file does not exist, a DateTime instance is created using the earliest possible values by passing the value of 1 for the year, month, and day. This ensures that the application will always pull a new feed if the cached file does not exist.
The GetWeather() method uses this information to decide whether to pull a newer feed:
public string GetWeather()
{
    DateTime timeLimit = LastModified.AddMinutes(30);

    //more code here
}
Using the AddMinutes() method, 30 minutes are added to the time LastModified returns. This new DateTime instance, timeLimit, must be compared to the current time by using the CompareTo() method:
public string GetWeather()
{
    DateTime timeLimit = LastModified.AddMinutes(30);

    if (DateTime.Now.CompareTo(timeLimit) > −1)
    {
        return _getWebWeather();
    }
    else
    {
        return _getCachedWeather();
    }
}
The CompareTo() method returns an integer value that's either greater than zero, equal to zero, or less than zero. If the current time (specified by DateTime.Now) is greater than timeLimit, the returned integer is greater than zero. If the two times are equal, the method returns zero. If the current time is less than timeLimit, then a negative integer is returned. The retrieval of a newer feed occurs only when at least 30 minutes have passed (CompareTo() returns zero or a number greater than zero); otherwise, the cached version is retrieved.
12.1.2.3. Using the WeatherInfo Class
The ASP.NET file weather.aspx serves as a proxy between the client and the Weather.com XML service. It is in this page that the WeatherInfo class is used. The first step in implementing the weather.aspx page is to create an instance of WeatherInfo. This should be done in the Page_Load event handler:
protected void Page_Load(object sender, EventArgs e)
{
    WeatherInfo weather = new WeatherInfo(Server.MapPath(String.Empty));
    string weatherData = weather.GetWeather();

    //more code here
}
In this code, an instance of the WeatherInfo class is created by passing the path to the application with Server.MapPath(String.Empty). The weather information is then retrieved using the GetWeather() method. The next, and final, step is to set the headers and to output the weather data:
protected void Page_Load(object sender, EventArgs e)
{
    WeatherInfo weather = new WeatherInfo(Server.MapPath(String.Empty));
    string weatherData = weather.GetWeather();

    Response.ContentType = "text/xml";
    Response.CacheControl = "no-cache";

    Response.Write(weatherData);
}
This completes the server portion of the weather widget. The next step is to create a client to consume the information.
12.1.3. The Client-Side Component
The client code for this widget is very simple due to all of the work performed by the server. It's the job of the AjaxWeatherWidget class to manage the widget on the client side. This class has one property and one method. The property is element, which is the element to attach weather information to. The getWeather() method is responsible for retrieving the data from the server and updating the display.
The AjaxWeatherWidget constructor is:
function AjaxWeatherWidget(oElement) {
    this.element = (oElement)?oElement:document.body;

    this.getWeather();
}
The AjaxWeatherWidget constructor accepts one argument: the HTMLElement on which to append the data, which is assigned to the element property. In the event that no argument is supplied, element becomes document.body. The constructor calls getWeather() to retrieve data from the server as soon as the object is created.
12.1.4. Getting Data from the Server
The getWeather() method contacts the server application and retrieves the weather information with XHR.
AjaxWeatherWidget.prototype.getWeather = function () {
    var oThis = this;

    var oReq = zXmlHttp.createRequest();

    //more code here

    oReq.open("GET", "weather.aspx", true);
    oReq.send(null);
};
The method starts by creating a pointer to the object and storing it in oThis. Then an XHR object is created, primed, and sent to the server. Next, handle the readystatechange event.
AjaxWeatherWidget.prototype.getWeather = function () {
    var oThis = this;

    var oReq = zXmlHttp.createRequest();

    oReq.onreadystatechange = function () {
        if (oReq.readyState == 4) {
            if (oReq.status == 200 || oReq.status == 304) {
                oThis.element.innerHTML = oReq.responseText;
            }
        }
    };

    oReq.open("GET", "weather.aspx", true);
    oReq.send(null);
};
When the request is successful, the server's response is added to the page with the HTMLElement's innerHTML property. Because the server does all the work, this is all that is required of the client code.
12.1.5. Customizing the Weather Widget
Out of the box, this widget fits nicely into a sidebar, providing visitors with the weather information you dictate. The look of the widget relies upon custom images as well as the weather images provided in the SDK (see Figure 12-1).
Figure 12.1. Figure 12-1
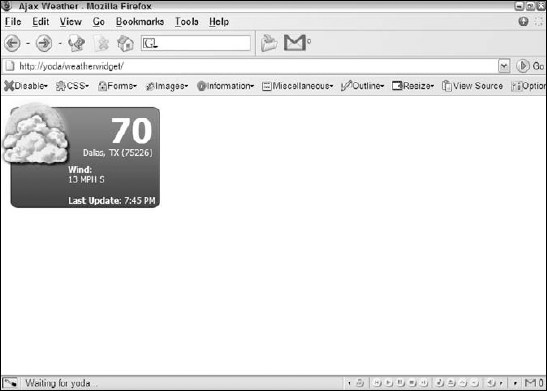
Giving the widget the look and feel in the example files relies heavily upon CSS positioning; nearly every element is absolutely positioned, so the HTML structure isn't extremely important. All you need is valid (X)HTML:
<div id="weatherContainer">
    <div id="weatherIcon"><img src="img/weather/32.png" /></div>
    <div id="weatherTemp">70</div>
    <div id="weatherLocation">Dallas, TX (75226)</div>
    <div id="weatherWind">Wind:
        <div>13 MPH S</div>
    </div>
    <div id="weatherTime">Last Update:
        <span>7:45 PM</span>
    </div>
</div>
This XHTML is a result of an XSL transformation. When going over each piece of information in this section, the XPath expression to the location of the information in the XML feed is given.
To achieve this look, it is important to note that the containing <div/> element, weatherContainer, does not have a default (inherit) position; otherwise, the contained, absolutely positioned elements will position themselves based on the document and not weatherContainer:
#weatherContainer {
    position: relative;
    background: url(../img/background.gif);
    width: 220px;
    height: 149px;
}
A relative position doesn't interfere with the page flow unless you provide top and left coordinates. The background of this <div/> element is a custom-made GIF file the same size as the <div/>: 220 pixels wide and 149 pixels high.
The SDK includes Weather.com's own images to provide a visual display of the current weather conditions. These image files are PNG images and are named xx.png, where xx is a number. This number, found in the XML feed, resides at weather/cc/icon (cc stands for current conditions). To achieve the look of the example, give this element an absolute position, which enables you to place it anywhere in its container and removes it from the document flow.
#weatherIcon {
    position: absolute;
    top: −25px;
    left: −25px;
}
This code places the image 25 pixels to the left and top from the top-left corner of the container. Because the images provided by Weather.com are PNGs, additional coding is required for Internet Explorer 6 because the browser ignores the transparency information.
Internet Explorer 7 correctly displays PNGs using their transparency channel.
Microsoft exposes a DirectX filter called AlphaImageLoader, which makes PNGs correctly display transparency. However, the use of this filter is limiting, because it must be applied with CSS. To resolve this issue, you can download the PNG Behavior at WebFX (http://webfx.eae.net/dhtml/pngbehavior/pngbehavior.html). It is an excellent tool, and is perfect in this situation. To use it, simply add the following rule to your CSS:
#weatherIcon img {
    width: 128px;
    height: 128px;
    behavior: url(css/pngbehavior.htc);
}
In Internet Explorer, this rule applies the PNG Behavior to every <img/> element in the widget, but it only applies the AlphaImageLoader filter for PNG files. All other <img/> tags with .gif, .jpg, or any other extension are left alone. The filter property is Internet Explorer–specific; therefore, all other browsers ignore the property and its value.
The next item in the widget is the temperature, contained in a <div/> element with an id of weatherTemp and located in the XML at weather/cc/temp. The styling of this information is:
#weatherTemp {
    position: absolute;
    color: white;
    font: bold 48px Tahoma;
    right: 12px;
    top: 5px;
}
Positioning this element as absolute enables you to place it anywhere in the container you want. In this situation, its location resides in the top-right corner. The text contained in this element is colored white and is 48 pixels tall.
Below the temperature is the weather location information. From the XML feed, this information is located in weather/loc/dnam. This text is colored white and uses a smaller font:
#weatherLocation {
    font: 12px Tahoma;
    color: white;
    position: absolute;
    right: 12px;
    top: 60px;
}
Once again, this element is absolutely positioned. The right edge is 12 pixels from the right edge of weatherContainer and is 60 pixels from its top. The font is 12 pixels tall and in the Tahoma typeface.
The wind is another important piece of information to display. In the XML document, the information is located in weather/cc/wind:
#weatherWind {
    position: absolute;
    font: bold 12px Tahoma;
    color: white;
    left: 85px;
    top: 85px;
}

#weatherWind div {
    font-weight: normal;
}
If you remember from the HTML structure discussed earlier in this section, weatherWind contains another <div/> element. This inner <div/> contains the actual wind information, whereas its parent merely serves as a label and positions the information. Unlike the previous elements, weatherWind is positioned using the left property, instead of right, to position the element horizontally, and the element is positioned 85 pixels from the top. The label text is bolded, whereas the wind information is not.
The final piece of information this widget displays is the time it was last updated. This information also exists in the XML data. Its location: weather/loc/tm. Like the wind information previously discussed, the HTML structure for the time information consists of a parent element (weatherTime) and a child element (<span/>). The outer element positions the information and serves as a label; the inner element contains the actual time information:
#weatherTime {
    position: absolute;
    font: bold 12px Tahoma;
    color: white;
    left: 85px;
    bottom: 5px;
}

#weatherTime span {
    font-weight: normal;
}
The premise behind the time is the same as the wind, except with a <span/> the data is displayed inline instead of on a new line.
In the event of an error, the HTML structure returned to the client looks like this:
<div id="weatherContainer">

    <div id="weatherIcon"><img src="img/error.png" /></div>
    <div id="weatherErrorAlert">An Error Occurred!</div>
    <div id="weatherErrorMessage">Error Description</div>
</div>
The weatherIcon <div/> element remains, and the <img/> element inside it contains an image called error.png. The next <div/> element, weatherErrorAlert, contains the text that tells the user an error occurred.
#weatherErrorAlert
{
    color: white;
    font: bold 14px Tahoma;
    position: absolute;
    right: 7px;
    top: 10px;
}
The text in this element keeps with the current theme. The color is white and bolded in Tahoma font. It is positioned absolutely 7 pixels from the right and 10 pixels from the top of the container <div/>. This puts the text to the right of the error icon.
The error message that contains the description of the error is in the weatherErrorMessage <div/> element.
#weatherErrorMessage
{
    font: 12px Tahoma;
    color: white;
    position: absolute;
    right: 15px;
    top: 85px;
}
This rule styles the text white in color. It's positioned 85 pixels from the top, placing it well into the "body" of the container, making it easily readable by the reader.
Because this widget depends on the XSL stylesheet, total customization essentially rests in your hands; you have the ability to completely change the markup, structure, and style of the data. In this section, the path to the information was given for each element. These few elements are by no means a full list of the available elements in the XML feed. The SDK does not cover these elements; however, this information resides within the Weather.com DTD, located at www.weather.com/documentation/xml/weather.dtd.
12.1.6. Setting Up the Weather Widget as an Application
Setting up ASP.NET web applications requires a few extra steps compared to other web applications.
The first requirement is to make sure that Internet Information Services (IIS) is installed on the machine. IIS is Microsoft's web server and is available only for owners of Windows 2000 Professional, Windows 2000 Server, Windows XP Professional, and Windows Server 2003. Installing IIS requires the Windows CD and can be done in the Add/Remove Windows Components section of the Add/Remove Programs Control Panel applet (see Figure 12-2).
Figure 12.2. Figure 12-2

Next, you also must install the .NET Framework version 2.0 or better. It is freely available at http://msdn2.microsoft.com/en-us/netframework/aa731542.aspx for users of Windows 2000 and later versions.
When IIS and the .NET Framework are installed, create a folder called WeatherWidget in the IIS wwwroot directory, located at c:Inetpub, and move all the widget's files and folders to the newly created WeatherWidget folder. After the files have been placed in the WeatherWidget directory, you need to register the application in IIS, which you can do in the IIS Management Console (see Figure 12-3). In the computer's Control Panel (Start![]() Control Panel), double-click Administrative Tools, and then double-click the Internet Information Services icon.
Control Panel), double-click Administrative Tools, and then double-click the Internet Information Services icon.
In the console, you will see a list of files and folders. These items are contained in the IIS root folder. In the left-hand pane, locate the WeatherWidget folder. Right-click the folder and choose Properties from the context menu. You are now looking at the web properties of the WeatherWidget folder (see Figure 12-4).
Figure 12.3. Figure 12-3

Figure 12.4. Figure 12-4

On the Directory tab, you see an Application Settings section in the bottom part of the window. Click the Create button, and the Properties window is displayed (see Figure 12-5).
Figure 12.5. Figure 12-5
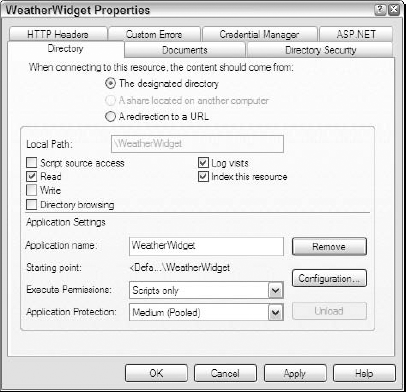
Now click on the ASP.NET tab. You should see a drop down box that allows you to change the ASP.NET version. Make sure that 2.0.xxxx is selected (Figure 12-6).
Figure 12.6. Figure 12-6

Click OK. IIS now knows to treat the contents of the WeatherWidget folder as an application, and will run it as one. The Weather widget is now installed.
12.1.7. Adding the Weather Widget to the Web Page
Because the back-end code consists mainly of a C# class, your options of implementation are twofold:
You can add the class to an already existing ASP.NET-enabled web site. Doing so would require a recompilation of your code. If you take this route, you will need to modify the weather.aspx page to fit your namespace.
You can use the code contained in the downloadable examples as its own freestanding mini-application (the steps outlined in the previous section).
The choice is ultimately yours, but the remainder of the section assumes that you chose the latter option. To implement the AjaxWeatherWidget class, you should reference the proper CSS and JavaScript files in your HTML:
<!DOCTYPE html PUBLIC "-//W3C//DTD XHTML 1.1//EN"
        "http://www.w3.org/TR/xhtml11/DTD/xhtml11.dtd">

<html xmlns="http://www.w3.org/1999/xhtml" >
<head>
    <title>Ajax Weather</title>
    <link rel="stylesheet" type="text/css" href="css/weatherwidget.css"/>
    <script type="text/javascript" src="js/zxml.js"></script>
    <script type="text/javascript" src="js/weatherwidget.js"></script>
</head>
<body>
</body>
</html>
The Weather widget's only outside dependency is the zXml library, which you also should reference in your HTML.
All that remains is to create an AjaxWeatherWidget object and append it to an HTML element:
<!DOCTYPE html PUBLIC "-//W3C//DTD XHTML 1.1//EN"
        "http://www.w3.org/TR/xhtml11/DTD/xhtml11.dtd">

<html xmlns="http://www.w3.org/1999/xhtml" >
<head>
    <title>Ajax Weather</title>
    <link rel="stylesheet" type="text/css" href="css/weatherwidget.css"/>
    <script type="text/javascript" src="js/zxml.js"></script>
    <script type="text/javascript" src="js/weatherwidget.js"></script>

    <script type="text/javascript">
    function init() {
        var divMyWeather = document.getElementById("myWeather");
        var oWeather = new AjaxWeatherWidget(divMyWeather);
    }

    onload = init;
    </script>
</head>
<body>
<div id="myWeather"></div>
</body>
</html>This new code adds another <script/> element containing a function called init(). Inside this function, retrieve a reference to the <div/> element with myWeather as its ID. This <div/> element will serve as the weather widget container. Also, it is important to run init() during the onload event, because the browser will not find the myWeather <div/> element and will not append the widget to it.
The Weather widget is a simple widget, especially in the client-side component; the ASP.NET classes do all the work. Compare this with the next widget, the Stock Watcher, where both the client and server side are more complex, yet they're easily implemented to retrieve stock information.