
8.4. Creating an Autosuggest Textbox
The best way to learn about any new programming concept is to put it into a practical example. Google Suggest (located at www.google.com/webhp?complete=1) is a very simple Ajax application that many programmers have spent time dissecting, analyzing, and re-creating. If you haven't yet taken a look at the live application, please do so now; it will greatly aid in your understanding of the following example.
Functionality such as this, suggesting to the user values to type in, has been around in desktop applications for some time now. Google Suggest brought the idea to the Web and generated a lot of excitement while doing it. As mentioned earlier in the book, Google Suggest was one of the very early Ajax applications that got developers excited about the concept. It seems fitting to attempt to emulate the behavior of Google Suggest to help others understand Ajax.
The example built in this section aids in the selection of states or provinces in a personal information form. For sites that deal with international customers, it is often vital to include the state or province along with the country. However, it's not optimal to load every state and province in the entire world into a drop-down box for the user to select from. It's much easier to let the user start typing and then retrieve only those results that would make the most sense. Autosuggest functionality is perfect for this use case.
8.4.1. Functionality Overview
Before building anything, it's always helpful to understand exactly what you're building. Anyone can say they are going to emulate the functionality of Google Suggest, but what does that mean? The example you will build in this section has the following functionality:
Typeahead: As the user is typing, the rest of the textbox fills in with the best suggestion at the time. As the user continues to type, the textbox automatically adjusts its suggestion. The suggested text always appears selected (highlighted). This should work no matter how fast the user types.
Suggestions list: Also as the user is typing, a drop-down list of other suggestions is displayed. These suggestions are generated automatically while the user types so that there is no discernible delay.
Keyboard controls: When the suggestions are displayed, the user is able to scroll up and down the list by using the up and down arrows on the keyboard and select a suggestion. Pressing Enter places the value into the textbox and hides the suggestion list. The Esc key can also be used to hide the suggestions.
Hide suggestions: The drop-down suggestion list is smart enough to hide itself whenever the textbox is not used or when the browser window is hidden.
As with many applications, it may be shocking how much is actually going on behind the scenes. This is the key with Ajax: you don't stop and think about what's going on, because it works in an intuitive way.
8.4.2. The HTML
The first step in any client-side component is to build the HTML to use. For the autosuggest textbox, this includes the textbox itself as well as the drop-down list of suggestions. You're probably familiar with the HTML textbox:
<input type="text" name="txtAutosuggest" value="" />
In most cases, this line would be enough to use a textbox. The problem is that some browsers (notably Internet Explorer on Windows and Mozilla Firefox on all operating systems) provide autocomplete functionality that drops down a list of suggestions based on values you've entered before. Since this would compete directly with the suggestions you'll be providing, this has to be turned off. To do so, set the autocomplete attribute to off:
<input type="text" name="txtAutosuggest" value="" autocomplete="off" />
Now, you can be assured that there will be no interference from the autocomplete browser behavior. The only other user interface component to design is the drop-down list of suggestions.
The suggestion drop-down list is nothing more than an absolutely positioned <div/> element that is positioned below the textbox so as to give the illusion of being a drop-down list (see Figure 8-1).
Figure 8.1. Figure 8-1

Inside of this <div/> element are several other <div/> elements, one for each suggestion. By changing the style of these elements, it's possible to achieve the look of highlighting a given suggestion. The HTML to create the list displayed in Figure 8-1 is as follows:
<div class="suggestions">
    <div class="current">Maine</div>
    <div>Maryland</div>
    <div>Massachusetts</div>
    <div>Michigan</div>
    <div>Minnesota</div>
    <div>Mississippi</div>
    <div>Missouri</div>
    <div>Montana</div>
</div>
This HTML isn't coded directly into the main HTML file; instead, it is created dynamically by JavaScript code. However, you need to know the general format of the HTML in order to create it appropriately.
Of course, some CSS is needed to make the drop-down list function properly. The outermost <div/> has a class of suggestions, which is defined as:
div.suggestions {
    -moz-box-sizing: border-box;
    box-sizing: border-box;
    background-color: white;
    border: 1px solid black;
    position: absolute;
}
The first two lines of this CSS class are for browsers that support two forms of box sizing: content box and border box (for more information, read www.quirksmode.org/css/box.html). In quirks mode, Internet Explorer defaults to border box; in standards mode, Internet Explorer defaults to content box. Most other DOM-compliant browsers (Mozilla, Opera, and Safari) default to content box, meaning that there is a difference in how the <div/> element will be rendered among browsers. To provide for this, the first two lines of the CSS class set rendering to border box. The first line, -moz-box-sizing, is Mozilla-specific and used for older Mozilla browsers; the second line is for browsers that support the official CSS3 box-sizing property. Assuming that you use quirks mode in your page, this class will work just fine. (If you use standards mode, simply remove these first two lines.)
The remaining styles simply add a border and specify that the <div/> element be absolutely positioned.
Next, a little bit of formatting is needed for the drop-down list items:
div.suggestions div {
    cursor: default;
    padding: 0px 3px;
}
The first line specifies the default cursor (the arrow) to be displayed when the mouse is over an item in the drop-down list. Without this, the cursor would display as the caret, which is the normal cursor for textboxes and web pages in general. The user needs to believe that the drop-down item is not a part of the regular page flow, but an attachment to the textbox, and changing the cursor helps. The second line simply applies some padding to the item (which you can modify as you wish).
Last, some CSS is needed to format the currently selected item in the drop-down list. When an item is selected, the background will be changed to blue and the text color will be changed to white. This provides a basic highlight that is typically used in drop-down menus:
div.suggestions div.current {
    background-color: #3366cc;
    color: white;
}
All of these styles are to be contained in an external CSS file named autosuggest.css.
8.4.3. The Database Table
In order to easily query the states and provinces that match a particular text snippet, it is necessary to use a database table. The database table can be very simple for this example, although you may need more information to make it practical for your needs. To get this to work, you really need only a single column to store the state and province names. However, it's always best to define a primary key, so this table will include a second column containing an auto-incremented ID number for each state or province. The following SQL statement creates a table named StatesAndProvinces with two columns, Id and Name:
CREATE TABLE StatesAndProvinces (
    Id INT NOT NULL AUTO_INCREMENT,
    Name VARCHAR(255) NOT NULL,
    PRIMARY KEY (Id)
) COMMENT = 'States and Provinces';
Of course, the time-consuming part is to fill in state and province names from various countries around the world. The code download for this example, available at www.wrox.com, includes a SQL file that populates the table with all U.S. states as well as one that will insert all Canadian provinces and -territories.
Setting up this information in a database table enables you to quickly get a list of suggestions for text the user has typed in. If the user has typed the letter M, for example, you can run the following query to get the first five suggestions:
SELECT *
FROM StatesAndProvinces
WHERE Name LIKE 'M%'
ORDER BY Name ASC
LIMIT 0, 5
This statement returns a maximum of five suggestions, in alphabetical order, for all names starting with M. Later, this will be used in the PHP code that returns the suggestions.
8.4.4. The Architecture
In Chapter 1, you saw the basic architecture of an Ajax solution involving the user interface and Ajax engine on the client. The autosuggest architecture follows this general format, where the user interface is the autosuggest control and the Ajax engine is a suggestion provider (see Figure 8-2).
In this architecture, the autosuggest control has no idea where the suggestions are coming from; they could be coming from the client or the server. All the autosuggest control knows is how to call the suggestion provider to get suggestions for the text contained within the textbox. The suggestion provider handles all the server communication and notifies the autosuggest control when the suggestions are available. To accomplish this, both the autosuggest control and the suggestion provider need to implement specific interfaces so that each knows what method to call on the other.
Figure 8.2. Figure 8-2

8.4.5. The Classes
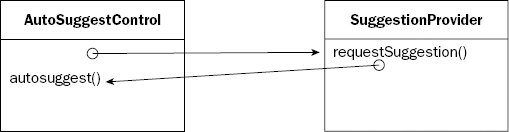
Two classes are necessary to represent the two client-side components of the autosuggest functionality, appropriately called AutoSuggestControl and SuggestionProvider. The AutoSuggestControl is assigned a SuggestionProvider when it is created so that all requests go through it. The SuggestionProvider has only one method, requestSuggestions(), which is called by the AutoSuggestControl whenever suggestions are needed. This method takes two arguments: the AutoSuggestControl itself and a Boolean value indicating whether the control should type ahead when the suggestions are returned.
When the suggestions have been retrieved, the SuggestionProvider calls the autosuggest() method of the AutoSuggestControl, passing in the array of suggestions as well as the typeahead flag that was passed into it. This allows for a delay between the request for suggestions and the response, making it possible to use asynchronous requests. This approach sounds more complicated than it is; Figure 8-3 represents the interaction between these two objects in a clearer manner.
Figure 8.3. Figure 8-3
With the architecture designed, it's time to start coding.
8.4.6. The AutoSuggest Control
The AutoSuggestControl class is the wrapper for all autosuggest functionality. To work properly, the control needs to know which textbox to work on and the suggestion provider to use. This makes for a relatively simple constructor:
function AutoSuggestControl(oTextbox, oProvider) {
    this.provider = oProvider;
    this.textbox = oTextbox;
}
It's upon this simple base that the complex functionality of an autosuggest textbox is built.
Since the AutoSuggestControl class is quite complicated, it's much simpler to break up its explanation into specific types of functionality. The following sections build on each other, and the complete code can be downloaded from www.wrox.com.
8.4.6.1. Implementing Typeahead
Typeahead textboxes look at what the user has typed and then make a suggestion, highlighting only the part that was added automatically. For example, if you were to type Ma into a textbox, the suggestion may be Maine, but only ine would be highlighted. Doing this allows the user to continue typing without interruption because any new characters simply replace the highlighted section.
Originally, the only type of highlighting possible using JavaScript was to highlight all the text in the textbox using the select() method, as follows:
var oTextbox = document.getElementById("txtState");
oTextbox.select();
This code gets a reference to a textbox with the ID of txtState and then selects all the text contained within it. Although this functionality is fine for many everyday uses, it's not very helpful for implementing typeahead. Thankfully, both Internet Explorer and Firefox have ways of selecting parts of the text instead of the entire item (for other browsers, this feature is not available). But as usual, the two biggest combatants in the browser world do things in two completely different ways.
The Internet Explorer solution is to use a text range. Not to be confused with DOM ranges, an Internet Explorer text range is an invisible selection of text on the page, beginning on a single character and ending on a single character. When a text range is filled out, you can highlight just the text contained within it, which is perfect for typeahead. To create a text range for a specific textbox, you use the createTextRange() method that Internet Explorer provides on every textbox.
Once you have a text range, its methods enable you to select certain parts of the text. Although there are many text range methods, the only ones of interest for this example are moveStart() and moveEnd(), both of which accept two arguments: a unit and a number. The unit can be character, word, sentence, or textedit, whereas the number indicates the number of units to move from the start or end of the text (this should be a positive number for moveStart() and a negative for moveEnd()). When the endpoints of the text range are set, you can call its select() method to highlight just those characters. For example, to select just the first three characters in a textbox, you could do this:
var oRange = oTextbox.createTextRange();
oRange.moveStart("character", 0);
oRange.moveEnd("character", 3 - oTextbox.value.length);
oRange.select();
oTextbox.focus();
Note that to get the appropriate value for moveEnd(), it's necessary to subtract the length of the text in the textbox from the number of characters to select (3). The last step is to set the focus to the textbox so that the selection is visible. (Text can be selected only when the textbox has focus.) The process is a bit involved in Internet Explorer, but pretty easy to script. Firefox, on the other hand, is very straightforward.
Textboxes in Firefox have a nonstandard method called setSelectionRange(), which accepts two arguments: the index of the character to start with and the index of character after the last character to select. So, to select the first three characters in a textbox using Mozilla, you need only two lines of code:
oTextbox.setSelectionRange(0,3);
oTextbox.focus();
The first method you'll need in the AutoSuggestControl class is a method to select a range of characters in a browser-specific way. This method, called selectRange(), handles all the dirty work for you:
AutoSuggestControl.prototype.selectRange = function (iStart, iEnd) {
    if (this.textbox.createTextRange) {
        var oRange = this.textbox.createTextRange();
        oRange.moveStart("character", iStart);
        oRange.moveEnd("character", iEnd- this.textbox.value.length);
        oRange.select();
    } else if (this.textbox.setSelectionRange) {
        this.textbox.setSelectionRange(iStart, iEnd);
    }

    this.textbox.focus();
};
This method uses feature detection, the process of detecting certain browser features, to determine how to select the characters. It tests for the existence of the createTextRange() method to determine whether the Internet Explorer text ranges should be used, and tests for the setSelectionRange() method to determine whether the Firefox method should be used. The arguments are the first character to select and the number of characters to select. These values are then passed to the browser-specific methods of text selection.
8.4.6.1.1. The typeAhead() Method
Now that you can select specific parts of the textbox, it's time to implement the typeahead functionality. To do this, a typeAhead() method is defined that accepts a single argument: the suggestion to display in the textbox. The suggestion being passed in is assumed to be appropriate (and assumed to have at least one character). This method then does three things:
Gets the length of the text already in the textbox.
Places the suggestion into the textbox.
Selects only the portion of the text that the user didn't type using the information from step 1.
Additionally, since typeahead can be supported only in Internet Explorer and Firefox, you should check to make sure that one of those browsers is being used. If the browser doesn't support text selection, then none of the steps should be executed so as not to interrupt the user's typing. Once again, testing for the createTextRange() and setSelectionRange() methods of the textbox is the way to go:
AutoSuggestControl.prototype.typeAhead = function (sSuggestion) {
    if (this.textbox.createTextRange || this.textbox.setSelectionRange) {
        var iLen = this.textbox.value.length;
        this.textbox.value = sSuggestion;
        this.selectRange(iLen, sSuggestion.length);
    }
};
With this method complete, you now need another method to call it and pass in the suggestion.
8.4.6.1.2. The autosuggest() Method
Perhaps the most important method in the control is autosuggest(). This single method is responsible for receiving an array of suggestions for the textbox and then deciding what to do with them. Eventually, this method will be used to implement the full autosuggest functionality (including drop-down suggestions), but for now, it's used to implement typeahead only.
Because autosuggest() will be passed an array of suggestions, you have your pick as to which one to use for the typeahead value. It's recommended that you always use the first value in the array to keep things simple. The problem is that there may not always be suggestions for a value, in which case an empty array will be passed. The typeAhead() method shouldn't be called if there are no suggestions, so it's important to check the length of the array first:
AutoSuggestControl.prototype.autosuggest = function (aSuggestions) {
    if (aSuggestions.length > 0) {
        this.typeAhead(aSuggestions[0]);
    }
};
But where do the suggestions come from? It's actually the job of the suggestion provider to call this method and pass in the suggestions. Implementation of this feature is discussed later in the chapter.
8.4.6.1.3. Handling Key Events
Of course, the autosuggest functionality has to be tied to the textbox using events. There are three events that deal with keys: keydown, keypress, and keyup. The keydown event fires whenever the user presses a key on the keyboard but before any changes occur to the textbox. This obviously won't help with autosuggest because you need to know the full text of the textbox; using this event would mean being one keystroke behind. For the same reason, the keypress event can't be used. It is similar to keydown but fires only when a character key is pressed. The keyup event, however, fires after changes have been made to the textbox, which is exactly when autosuggest should begin working.
Setting up an event handler for the textbox involves two steps: defining a function and assigning it as an event handler. The function is actually a method of the autosuggest control, called handleKeyUp(). This method expects the event object to be passed in as an argument (how to accomplish this is discussed later) so that it can tell whether the key being pressed should enact the autosuggest functionality. Since keyup fires for all keys, not just character keys, you'll receive events when someone uses a cursor key, the Tab key, and any other key on the keyboard. To avoid interfering with how a textbox works, suggestions should be made only when a character key is pressed. This is where the event object's keyCode property enters the picture.
The keyCode property is supported by most modern browsers (including Internet Explorer on Windows and Macintosh, Firefox, Opera, and Safari) and returns a numeric code representing the key that was pressed. Using this property, it's possible to set up behaviors for specific keys. Since the autosuggest functionality should happen only when character keys are pressed, you need to check this property for an appropriate value before proceeding. Believe it or not, the easiest way to do this is actually to detect the keys that you want to ignore. This approach is more efficient because there are more character keys than non-character keys. The following table displays the key codes for all keys that should be ignored.
| Key | Code | Key | Code |
|---|---|---|---|
| Backspace | 8 | Print Screen | 44 |
| Tab | 9 | Delete | 46 |
| Enter | 13 | F1 | 112 |
| Shift | 16 | F2 | 113 |
| Ctrl | 17 | F3 | 114 |
| Alt | 18 | F4 | 115 |
| Pause/Break | 19 | F5 | 116 |
| Caps Lock | 20 | F6 | 117 |
| Esc | 27 | F7 | 118 |
| Page Up | 33 | F8 | 119 |
| Page Down | 34 | F9 | 120 |
| End | 35 | F10 | 121 |
| Home | 36 | F11 | 122 |
| Left Arrow | 37 | F12 | 123 |
| Up Arrow | 38 | ||
| Right Arrow | 39 | ||
| Down Arrow | 40 |
You may notice a pattern among the key codes. It looks like all keys with a code less than or equal to 46 should be ignored, and all keys with codes between 112 and 123 should be ignored. This is generally true, but there is an exception. The space bar has a key code of 32, so you actually need to check to see if the code is less than 32 (but not 16, which is the Shift key), between 33 and 46, or between 112 and 123. If it's not in any one of these groups, then you know it's a character key.
Here's what the handleKeyUp() method looks like:
AutoSuggestControl.prototype.handleKeyUp = function (oEvent) {
    var iKeyCode = oEvent.keyCode;

     if ((iKeyCode != 16 && iKeyCode < 32) || (iKeyCode >= 33 && iKeyCode <= 46)
         || (iKeyCode >= 112 && iKeyCode <= 123)) {

        //ignore
    } else {
        this.provider.requestSuggestions(this);
    }
};
When a user presses a character key, the autosuggest functionality begins by calling the suggestion provider's requestSuggestions() method and passing a pointer to the autosuggest control as an argument. Remember, it's the suggestion provider that will call the autosuggest() method defined earlier. The requestSuggestions() method begins the process of retrieving suggestions for usage.
With this method defined, it must be assigned as the event handler for the textbox. It's best to create a separate method to handle initializations for the control such as this (there will be more in the future). The init() method serves this purpose:
AutoSuggestControl.prototype.init = function () {
    var oThis = this;
    this.textbox.onkeyup = function (oEvent) {
        if (!oEvent) {
            oEvent = window.event;
        }
        oThis.handleKeyUp(oEvent);
    };
};
The init() method starts by creating a pointer to the this object so that it may be used later. An anonymous function is defined for the textbox's onkeyup event handler. Inside of this function, the handleKeyUp() method is called using the oThis pointer. (Using this here would refer to the textbox instead of the autosuggest control.)
Since this method requires the event object to be passed in, it's necessary to check for both DOM and Internet Explorer event objects. The DOM event object is passed in as an argument to the event handler, whereas the Internet Explorer event object is a property of window. Instead of doing a browser detect, you can check to see if the oEvent object is passed into the event handler. If not, then assign -window.event into the oEvent variable. The oEvent variable can then be passed directly into the handleKeyUp() event handler.
The init() method should be called from within the AutoSuggestControl constructor:
function AutoSuggestControl(oTextbox, oProvider) {
    this.provider = oProvider;
    this.textbox = oTextbox;
    this.init();
}
That's all it takes to implement the typeahead functionality of the autosuggest control. At this point, you are displaying a single suggestion to the user as he or she types. The goal is, of course, to provide multiple suggestions using a drop-down list.
8.4.6.2. Showing Multiple Suggestions
Earlier in the chapter, you took a look at the HTML and CSS used for the drop-down list of suggestions. Now, the task is to create the HTML programmatically and apply the CSS to create the actual functionality; this is a multistep process. First, a property is needed to store the <div/> element because various methods of the AutoSuggestControl need access to it. This property is called layer and is initially set to null:
function AutoSuggestControl(oTextbox, oProvider) {
    this.layer = null;
    this.provider = oProvider;
    this.textbox = oTextbox;
    this.init();
}
The drop-down list will be created after you define a few simple methods to help control its behavior. The simplest method is hideSuggestions(), which hides the drop-down list after it has been shown:
AutoSuggestControl.prototype.hideSuggestions = function () {
    this.layer.style.visibility = "hidden";
};
Next, a method is needed for highlighting the current suggestion in the drop-down list. The highlightSuggestion() method accepts a single argument, which is the <div/> element containing the current suggestion. The purpose of this method is to set the <div/> element's class attribute to current on the current suggestion and clear the class attribute on all others in the list. Doing so provides a highlighting effect on the drop-down list similar to the regular form controls. The algorithm is quite simple: iterate through the child nodes of the layer. If the child node is equal to the node that was passed in, set the class to current; otherwise, clear the class attribute by setting it to an empty string:
AutoSuggestControl.prototype.highlightSuggestion = function (oSuggestionNode) {

    for (var i=0; i < this.layer.childNodes.length; i++) {
        var oNode = this.layer.childNodes[i];
        if (oNode == oSuggestionNode) {
            oNode.className = "current"
        } else if (oNode.className == "current") {
            oNode.className = "";
        }
    }
};
With these two methods defined, it's time to create the drop-down list <div/>. The createDropDown() method creates the outermost <div/> element and defines the event handlers for the drop-down list. To create the <div/> element, use the createElement() method and then assign the various styling properties:
AutoSuggestControl.prototype.createDropDown = function () {

    this.layer = document.createElement("div");
    this.layer.className = "suggestions";
    this.layer.style.visibility = "hidden";
    this.layer.style.width = this.textbox.offsetWidth;
    document.body.appendChild(this.layer);

    //more code to come
};
This code first creates the <div/> element and assigns it to the layer property. From there, the className (equivalent to the class attribute) is set to suggestions, as is needed for the CSS to work properly. The next line hides the layer, since it should be invisible initially. Then, the width of the layer is set equal to the width of the textbox by using the textbox's offsetWidth property (this is optional depending on your individual needs). The very last line adds the layer to the document. With the layer created, it's time to assign the event handlers to control it.
At this point, the only concern is making sure that the drop-down list is functional if the user uses the mouse. That is, when the drop-down list is visible, moving the mouse over a suggestion should highlight it. Likewise, when a suggestion is clicked on, it should be placed in the textbox and the drop-down list should be hidden. To make this happen, you need to assign three event handlers: onmouseover, onmousedown, and onmouseup.
The onmouseover event handler is used simply to highlight the current suggestion; onmousedown is used to select the given suggestion (place the suggestion in the textbox and hide the drop-down list), and onmouseup is used to set the focus back to the textbox after a selection has been made. Because all these events are fired by the drop-down list itself, it's best just to use a single function for all of them, as follows:
AutoSuggestControl.prototype.createDropDown = function () {

    this.layer = document.createElement("div");
    this.layer.className = "suggestions";
    this.layer.style.visibility = "hidden";
    this.layer.style.width = this.textbox.offsetWidth;
    document.body.appendChild(this.layer);

    var oThis = this;

    this.layer.onmousedown = this.layer.onmouseup =
    this.layer.onmouseover = function (oEvent) {
        oEvent = oEvent || window.event;
        oTarget = oEvent.target || oEvent.srcElement;

        if (oEvent.type == "mousedown") {
            oThis.textbox.value = oTarget.firstChild.nodeValue;
            oThis.hideSuggestions();
} else if (oEvent.type == "mouseover") {
oThis.highlightSuggestion(oTarget);
} else {
oThis.textbox.focus();
}
};
};The first part of this section is the assignment that makes oThis equal to the this object. This is -necessary so that a reference to the AutoSuggestControl object is accessible from within the event -handler. Next, a compound assignment occurs, assigning the same function as an event handler for -onmousedown, onmouseup, and onmouseover. Inside of the function, the first two lines are used to account for the different event models (DOM and IE), using a logical OR (||) to assign the values for oEvent and oTarget. (The target will always be a <div/> element containing a suggestion.)
If the event being handled is mousedown, then set the value of the textbox equal to the text inside of the event target. The text inside of the <div/> element is contained in a text node, which is the first child node. The actual text string is contained in the text node's nodeValue property. After the suggestion is placed into the textbox, the drop-down list is hidden.
When the event being handled is mouseover, the event target is passed into the highlightSuggestion() method to provide the hover effect; when the event is mouseup, the focus is set back to the textbox (this fires immediately after mousedown).
8.4.6.2.1. Positioning the Drop-Down List
To get the full effect of the drop-down list, it's imperative that it appear directly below the textbox. If the textbox were absolutely positioned, this wouldn't be much of an issue. In actual practice, textboxes are rarely absolutely positioned and more often are placed inline, which presents a problem in aligning the drop-down list. To calculate the position where the drop-down list should appear, you can use the textbox's offsetLeft, offsetTop, and offsetParent properties.
The offsetLeft and offsetTop properties tell you how many pixels away from the left and top of the offsetParent an element is placed. The offsetParent is usually, but not always, the parent node of the element, so to get the left position of the textbox, you need to add up the offsetLeft properties of the textbox and all of its ancestor elements (stopping at <body/>), as shown here:
AutoSuggestControl.prototype.getLeft = function () {

    var oNode = this.textbox;
    var iLeft = 0;

    while(oNode != document.body) {
        iLeft += oNode.offsetLeft;
        oNode = oNode.offsetParent;
    }

    return iLeft;
};
The getLeft() method begins by pointing oNode at the textbox and defining iLeft with an initial value of 0. The while loop will continue to add oNode.offsetLeft to iLeft as it traverses up the DOM structure to the <body/> element.
The same algorithm can be used to get the top of the textbox:
AutoSuggestControl.prototype.getTop = function () {

    var oNode = this.textbox;
    var iTop = 0;

    while(oNode != document.body) {
        iTop += oNode.offsetTop;
        oNode = oNode.offsetParent;
    }

    return iTop;
};
These two methods will be used to place the drop-down list in the correct location.
8.4.6.2.2. Adding and Displaying Suggestions
The next step in the process is to create a method that adds the suggestions into the drop-down list and then displays it. The showSuggestions() method accepts an array of suggestions as an argument and then builds up the necessary DOM elements to display them. From there, the method positions the drop-down list underneath the textbox and displays it to the user:
AutoSuggestControl.prototype.showSuggestions = function (aSuggestions) {

    var oDiv = null;
    this.layer.innerHTML = "";

    for (var i=0; i < aSuggestions.length; i++) {
        oDiv = document.createElement("div");
        oDiv.appendChild(document.createTextNode(aSuggestions[i]));
        this.layer.appendChild(oDiv);
    }

    this.layer.style.left = this.getLeft() + "px";
    this.layer.style.top = (this.getTop()+this.textbox.offsetHeight) + "px";
    this.layer.style.visibility = "visible";
};
The first line simply defines the variable oDiv for later use. The second line clears the contents of the drop-down list by setting the innerHTML property to an empty string. Then, the for loop creates a <div/> element and a text node for each suggestion before adding it to the drop-down list layer.
The next section of code starts by setting the left position of the layer using the getLeft() method. To set the top position, you need to add the value from getTop() to the height of the textbox (retrieved by using the offsetHeight property). Without doing this, the drop-down list would appear directly over the textbox. (Remember, getTop() retrieves the top of the textbox, not the top of the drop-down list layer.) Last, the layer's visibility property is set to visible to show it.
8.4.6.2.3. Updating the Functionality
In order to show the drop-down list of suggestions, you'll need to make several changes to the functionality defined previously.
The first update is the addition of a second argument to the autosuggest() method, which indicates whether the typeahead functionality should be used (the reason why will be explained shortly). Naturally, the typeAhead() method should be called only if this argument is true. If there's at least one suggestion, typeahead should be used and the drop-down list of suggestions should be displayed by calling showSuggestions(); if there are no suggestions, the drop-down list should be hidden by calling hideSuggestions():
AutoSuggestControl.prototype.autosuggest = function (aSuggestions, bTypeAhead) {
    if (aSuggestions.length > 0) {
        if (bTypeAhead) {
            this.typeAhead(aSuggestions[0]);
        }
        this.showSuggestions(aSuggestions);
    } else {
        this.hideSuggestions();
    }
};
It's also necessary to update the handleKeyUp() method for a couple of different reasons. The first reason is to add the bTypeAhead argument to the requestSuggestions() call. When called from here, this argument will always be true:
AutoSuggestControl.prototype.handleKeyUp = function (oEvent) {

    var iKeyCode = oEvent.keyCode;

    if ((iKeyCode != 16 && iKeyCode < 32) || (iKeyCode >= 33 && iKeyCode <= 46)
        || (iKeyCode >= 112 && iKeyCode <= 123)) {
        //ignore
    } else {
        this.provider.requestSuggestions(this, true);
    }
};
Remember, the requestSuggestions() method is defined on the suggestion provider, which is described later in this chapter.
This functionality now works exactly as it did previously, but there are a couple of other keys that require special attention: Backspace and Delete. When either of these keys is pressed, you don't want to activate the typeahead functionality because it will disrupt the process of removing characters from the textbox. However, there's no reason not to show the drop-down list of suggestions. For the Backspace (key code of 8) and Delete (key code of 46) keys, you can call requestSuggestions(), but this time, pass in false to indicate that typeahead should not occur:
AutoSuggestControl.prototype.handleKeyUp = function (oEvent) {

    var iKeyCode = oEvent.keyCode;
if (iKeyCode == 8 || iKeyCode == 46) {
this.provider.requestSuggestions(this, false);
} else if (((iKeyCode != 16 && iKeyCode < 32) || (iKeyCode >= 33 && iKeyCode <= 46)
|| (iKeyCode >= 112 && iKeyCode <= 123)) {
//ignore
} else {
this.provider.requestSuggestions(this, true);
}
};Now when the user is removing characters, suggestions will still be displayed and the user can click one of them to select the value for the textbox. This is acceptable, but to really be usable, the autosuggest control needs to respond to keyboard controls.
8.4.6.2.4. Adding Keyboard Support
The desired keyboard functionality revolves around four keys: the up arrow, the down arrow, Esc, and Enter (or Return). When the drop-down suggestion list is displayed, the user should be able to press the down arrow to highlight the first suggestion, then press it again to move to the second, and so on. The up arrow should then be used to move back up the list of suggestions. As each suggestion is highlighted, the value must be placed in the textbox. If the user presses Esc, the suggestions should be hidden and the suggestion removed from the textbox. When the Enter key is pressed, the suggestions should also be hidden, but the last suggestion should remain highlighted in the textbox.
In order for the user to use the up and down arrow keys, you'll need to keep track of the currently selected item in the suggestions list. To do this, you must add two properties to the AutoSuggestControl definition, as follows:
function AutoSuggestControl(oTextbox, oProvider) {
this.cur = −1;
this.layer = null;
this.provider = oProvider;
this.textbox = oTextbox;
this.userText = oTextbox.value;
this.init();
}The cur property stores the index of the current suggestion in the suggestions array. By default, this value is set to −1 because there are no suggestions initially. When the arrow keys are pressed, cur will change to point to the current suggestion. The second added property, userText, holds the current value of the textbox and changes to reflect what the user actually typed.
As cur changes, the highlighted suggestion changes as well. To encapsulate this functionality, a method called goToSuggestion() is used. This method accepts only one argument, a number whose sign indicates which direction to move in. For instance, any number greater than 0 moves the selection to the next suggestion; any number less than or equal to 0 moves the selection to the previous suggestion. Here's the code:
AutoSuggestControl.prototype.goToSuggestion = function (iDiff) {
var cSuggestionNodes = this.layer.childNodes;
if (cSuggestionNodes.length > 0) {
var oNode = null;
if (iDiff > 0) {
if (this.cur < cSuggestionNodes.length-1) {
oNode = cSuggestionNodes[++this.cur];
}
} else {
if (this.cur > 0) {
oNode = cSuggestionNodes[--this.cur];
}
}
if (oNode) {
this.highlightSuggestion(oNode);
this.textbox.value = oNode.firstChild.nodeValue;
}
}
};This method begins by obtaining the collection of child nodes in the drop-down layer. Since only <div/> elements containing suggestions are child nodes of the layer, the number of child nodes accurately matches the number of suggestions. This number can be used to determine if there are any suggestions (in which case it will be greater than zero). If there are no suggestions, the method need not do anything.
When there are suggestions, a variable named oNode is created to store a reference to the suggestion node to highlight, and the method checks to see which direction to go in. If iDiff is greater than 0, it tries to go to the next suggestion. In doing so, the method first checks to ensure that cur isn't greater than the number of suggestions minus 1 (because the index of the last element in a collection with n elements is n−1). Assuming that there is a next suggestion, cur is prefix incremented (meaning it assumes its new value before the line it's on executes) to retrieve the node for the next suggestion.
If iDiff is less than or equal to zero, then that means the previous suggestion needs to be highlighted. In that case, you must first check to ensure cur is greater than 0 (if cur isn't at least 1, then there isn't a previous suggestion to go to). Passing that test, cur is then prefix decremented to get a reference to the correct suggestion node.
The last step in the method is to ensure that oNode isn't null. If it's not, then the node is passed to highlightSuggestion() and the suggestion text is placed into the textbox; if it is null, then no action is taken.
Another part of keeping track of the selected suggestion is to be sure that cur is reset at the correct point; otherwise, you can get some very odd behavior. The correct place to reset cur to –1 is in the autosuggest() method, just before the drop-down list is displayed:
AutoSuggestControl.prototype.autosuggest = function (aSuggestions, bTypeAhead){
this.cur = −1;
if (aSuggestions.length > 0) {
if (bTypeAhead) {
this.typeAhead(aSuggestions[0]);
}
this.showSuggestions(aSuggestions);
} else {
this.hideSuggestions();
}
};Along the same lines, it's important to set userText to the correct value. This should be done in the handleKeyUp() method:
AutoSuggestControl.prototype.handleKeyUp = function (oEvent) {
var iKeyCode = oEvent.keyCode;
this.userText = this.textbox.value;
if (iKeyCode == 8 || iKeyCode == 46) {
        this.provider.requestSuggestions(this, false);

    } else if (((iKeyCode != 16 && iKeyCode < 32) || (iKeyCode >= 33 && iKeyCode <= 46)
               || (iKeyCode >= 112 && iKeyCode <= 123)) {
        //ignore
    } else {
        this.provider.requestSuggestions(this, true);
    }
};This small addition saves what the user typed before asking for suggestions. This will be very useful when dealing with the Esc key. With these two methods updates, all that's left is to make sure that goToSuggestion() gets called at the right time.
To handle the up arrow, down arrow, Esc, and Enter keys, a handleKeyDown() method is necessary. Similar to handleKeyUp(), this method also requires the event object to be passed in. And once again, you'll need to rely on the key code to tell which key was pressed. The key codes for the up arrow, down arrow, Esc, and Enter keys are 38, 40, 27, and 13, respectively. The handleKeyDown() method is defined as follows:
AutoSuggestControl.prototype.handleKeyDown = function (oEvent) {
    switch(oEvent.keyCode) {
        case 38: //up arrow
            this.goToSuggestion(-1);
            break;
        case 40: //down arrow
            this.goToSuggestion(1);
            break;
case 27: //esc
this.textbox.value = this.userText;
this.selectRange(this.userText.length, 0);
/* falls through */
case 13: //enter
this.hideSuggestions();
oEvent.returnValue = false;
if (oEvent.preventDefault) {
oEvent.preventDefault();
}
break;
}
};When the up arrow is pressed (key code 38), the goToSuggestion() method is called with an argument of –1, indicating that the previous selection should be selected. Likewise, when the down arrow is pressed (key code 40), goToSuggestion() is called with 1 as an argument to highlight the next suggestion. If Esc is pressed (key code 27), there are a couple of things to do.
First, you need to set the textbox value back to the original text that the user typed. Second, you need to set the selection in the textbox to be located after what the user typed so that he or she can continue typing. This is done by setting the selection range to the length of the text with a selection length of zero. Then, this case falls through to the Enter key's case (key code 13), which hides the suggestions list. This way, the code contains only one call to hideSuggestions() instead of two. Remember, when the user presses the up or down arrows, the suggestion is automatically placed into the textbox. This means that when the Enter key is pressed, you need only hide the drop-down list of suggestions.
For both Esc and Enter, you also must block the default behavior for the key press. This is important to prevent unintended behavior, such as the Enter key submitting the form when the user really just wanted to select the current suggestion. The default behavior is blocked first by setting event.returnValue equal to false (for IE) and then calling preventDefault() (if it's available, for DOM-compliant browsers).
8.4.6.2.5. Updating init()
Now that all this new functionality has been added, it must be initialized. Previously, the init() method was used to set up the onkeyup event handler; now it must be extended to also set up the onkeydown and onblur event handlers, as well as to create the drop-down suggestion list. The -onkeydown event handler is set up in a manner similar to onkeyup:
AutoSuggestControl.prototype.init = function () {

     var oThis = this;

    this.textbox.onkeyup = function (oEvent) {
        if (!oEvent) {
            oEvent = window.event;
        }

        oThis.handleKeyUp(oEvent);
    };
this.textbox.onkeydown = function (oEvent) {
if (!oEvent) {
oEvent = window.event;
}
oThis.handleKeyDown(oEvent);
};
//more code to come
};As you can see, the same algorithm is used with the onkeydown event handler: first, determine the location of the event object, and then pass it into the handleKeyDown() method.
Up to this point, the only time the drop-down list is hidden is when the user presses the Enter key. But what if the user clicks elsewhere on the screen or uses the Tab key to switch to a new form field? To prepare for this event, you must set up an onblur event handler, which hides the suggestions whenever the textbox loses focus:
AutoSuggestControl.prototype.init = function () {

    var oThis = this;

    this.textbox.onkeyup = function (oEvent) {
        if (!oEvent) {
            oEvent = window.event;
        }

        oThis.handleKeyUp(oEvent);
    };

    this.textbox.onkeydown = function (oEvent) {

        if (!oEvent) {
            oEvent = window.event;
        }

        oThis.handleKeyDown(oEvent);
    };

    this.textbox.onblur = function () {
        oThis.hideSuggestions();
    };

    this.createDropDown();
};
You'll also notice that the createDropDown() method is called to create the initial drop-down list structure. This completes the keyboard support for the autosuggest control, but there is one more thing to take into account.
8.4.6.3. Fast-Type Support
Because the handleKeyUp() method requests suggestions whenever a key is pressed, you may be wondering if it can keep up when someone is typing quickly. The answer is no. You may be surprised to know that it is possible to type too fast for the event handling to keep up. In this case, you get suggestions that are too late (including letters you never typed) and a very choppy user experience (with long pauses as you type). So, how can you make sure that fast typists aren't left out of this functionality?
Quite simply, you should wait a short amount of time before requesting suggestions from the server. This can be done using the setTimeout() method, which delays the calling of a function for a set time interval. The new functionality works like this: a timeout ID is saved in the AutoSuggestControl object. If another key is pressed before the timeout has been activated, the existing timeout is cleared and a new one is put in its place. So basically, when a user presses a key, the control waits a certain amount of time before requesting suggestions. If another key is pressed before the request is made, the control cancels the original request (by clearing the timeout) and asks for a new request to be made after the same amount of time. In this way, you can be sure that the request for suggestions goes out only when the user has paused during typing.
To implement this functionality, the first thing you need is a property to hold the timeout ID. You can add the timeoutId property directly to the AutoSuggestControl class, as follows:
function AutoSuggestControl(oTextbox, oProvider) {
    this.cur = −1;
    this.layer = null;
    this.provider = oProvider;
    this.textbox = oTextbox;
    this.timeoutId = null;
    this.userText = oTextbox.value;
    this.init();
}
Next, update the handleKeyUp() method to make use of this new property:
AutoSuggestControl.prototype.handleKeyUp = function (oEvent /*:Event*/) {

    var iKeyCode = oEvent.keyCode;
    var oThis = this;

    this.userText = this.textbox.value;

    clearTimeout(this.timeoutId);

    if (iKeyCode == 8 || iKeyCode == 46) {

        this.timeoutId = setTimeout( function () {
            oThis.provider.requestSuggestions(oThis, false);
        }, 250);

    } else if (((iKeyCode != 16 && iKeyCode < 32) || (iKeyCode >= 33 && iKeyCode < 46)
               || (iKeyCode >= 112 && iKeyCode <= 123)) {
        //ignore
    } else {
this.timeoutId = setTimeout( function () {
oThis.provider.requestSuggestions(oThis, true);
}, 250);
}
};The first new line in this method stores a reference to the this object, which is important when using the setTimeout() method. The second new line of code clears any timeout that may have already been started; this cancels any suggestion request that may have been initiated. The other two sections of new code change the call to the requestSuggestions() to occur after 250 milliseconds (which is plenty of time for this purpose). Each call is wrapped in an anonymous function that is passed in to setTimeout(). The result of setTimeout(), the timeout ID is stored in the new property for later usage. All in all, this ensures that no requests will be made unless the user has stopped typing for at least 250 milliseconds.
This completes the code for the AutoSuggestControl class. All of the functionality has been implemented, and all that's left is to create a suggestion provider to call.
8.4.7. The Suggestion Provider
The SuggestionProvider class is relatively simple compared to the AutoSuggestControl, since it has only one purpose: to request suggestions from the server and forward them to the control. To do so, SuggestionProvider needs an instance of XHR. Instead of using a new object for each request, the same object will be used over and over, to avoid the overhead of creating and destroying objects in rapid succession. This single instance is created using the zXML library's zXmlHttp factory and is stored in a property called xhr:
function SuggestionProvider() {
    this.xhr = zXmlHttp.createRequest();
}
The lone method of the suggestion provider is requestSuggestions(), which you may remember from the architecture discussion. This method accepts two arguments: the AutoSuggestControl to work on and a flag indicating whether typeahead should be used. The complete code is as follows:
SuggestionProvider.prototype.requestSuggestions = function (oAutoSuggestControl,
              bTypeAhead) {

    var oXHR = this.xhr;

    //cancel any active requests
    if (oXHR.readyState != 0) {
        oXHR.abort();
    }

    //define the data
    var oData = {
        requesting: "StatesAndProvinces",
        text: oAutoSuggestControl.userText,
        limit: 5
    };
//open connection to server
oXHR.open("post", "suggestions.php", true);
oXHR.setRequestHeader("Content-type", "text/html");
oXHR.onreadystatechange = function () {
if (oXHR.readyState == 4) {
if (oXHR.status == 200 || oXHRo.status == 304) {
//evaluate the returned text JavaScript (an array)
var aSuggestions = oXHR.responseText.parseJSON();
//provide suggestions to the control
oAutoSuggestControl.autosuggest(aSuggestions, bTypeAhead);
}
}
};
//send the request
oXHR.send( oData.toJSONString());
};The first line inside the method sets oXHR equal to the stored XHR object. This is done simply for convenience and to keep the code clean. Next, you check to make sure that there isn't already a request waiting for a response. If the XHR object is ready to be used cleanly, its readyState will be 0; otherwise, you must cancel the existing request (by calling abort()) before making another request.
Because the data being sent to the server is to be JSON-encoded, you first need to create an object (oData) to hold the information. There are three pieces of information being sent: the table to get the data out of, the current value in the textbox, and the maximum number of suggestions to retrieve (5). The maximum number of suggestions is important because it prevents long database queries from being executed repeatedly.
Next, a request is opened to suggestions.php, the server-side component of the control. This request is asynchronous (last argument of open() is set to true), so it's necessary to provide an onreadystatechange event handler. The event handler first checks to ensure that the readyState is 4, and then parses the returned text as a JSON array of values. This array, along with the original type-ahead flag, is then passed back to the AutoSuggestControl via the autosuggest() method.
The last step in this method is, of course, to send the request. Note that since the request is doing a POST, the data has to be passed into the send() method. The oData object is first encoded into JSON before being sent.
With that, the SuggestionProvider class is complete. The only thing left to do is to write the suggestions.php file that uses the data that is sent.
8.4.8. The Server-Side Component
In many ways, the server-side component for the autosuggest control is the most straightforward: it's just a single thread being executed from top to bottom, with no functions or methods to be concerned about. Note that because this is a PHP page, all the code discussed in this section must be contained within a PHP code block (<?php...?>).
The first part of the page is to set the content type to text/plain, indicating that this is a plain text file and shouldn't be handled as anything else. You can optionally specify a character set, but make sure that it is Unicode-compatible, such as UTF-8, since all Unicode characters are valid in JavaScript. Here's the line that assigns the content type:
header("Content-Type: text/plain; charset=UTF-8");Next, include the JSON-PHP library and create a new instance of the JSON object:
require_once("JSON.php");
$oJSON = new Services_JSON();
Normally when data is sent to a PHP page, you can use $_GET, $_POST, or $_REQUEST to retrieve it. In this case, however, the data isn't being sent in traditional name-value pairs; instead, it's being sent as a JSON string, and there is no built-in support for this specific type of data. Instead, you need to get the body of the request and decode it manually. The body of any request is available in PHP through $HTTP_RAW_POST_DATA, which contains the original, encoded content that was sent. Because the JSON string wasn't URL-encoded, however, you can just pass this directly into the decode() method to reconstitute the oData object:
$oData = $oJSON->decode($HTTP_RAW_POST_DATA);
You'll also need an array to store the suggestions in:
$aSuggestions = array();
If there are no suggestions, no values will be added to the array and an empty array ([]) will be returned to the client.
Before tapping the database for suggestions, make sure that there is actually text in the textbox. Suggestions are requested when the user hits Delete or Backspace, so there's a possibility that the textbox could be empty. You should check for this first by seeing if the length of the text is greater than 0; if so, you can continue on to query the database.
The query string itself is built up from the data submitting from the client. The name of the table, the LIKE statement, and the number of results to return are all incorporated into the SQL query. The following code creates a connection to the database, executes the query, and then adds the results of the query to the $aSuggestions array:
if (strlen($oData->text) > 0) {

    //create the SQL query string
    $sQuery = "Select Name from ".$oData->requesting." where Name like '".
              $oData->text."%' order by Name ASC limit 0,".$oData->limit;

    //make the database connection
    $oLink = mysql_connect($sDBServer,$sDBUsername,$sDBPassword);
    @mysql_select_db($sDBName) or die("Unable to open database");
if($oResult = mysql_query($sQuery)) {
while ($aValues = mysql_fetch_array($oResult,MYSQL_ASSOC)) {
array_push($aSuggestions, $aValues['Name']);
}
}
mysql_free_result($oResult);
mysql_close($oLink);
}This code should be fairly familiar to you as it is the same basic algorithm used throughout the book to access a MySQL database using PHP. (You must fill in the appropriate values for $sDBServer, $sDBUsername, and $sDBPassword to reflect your database settings.) The only unique part is that the results are being stored in an array, which facilitates the conversion into a JSON string to be sent back to the client.
The actual encoding is the very last step of the page. In one step, you can encode the array and output it to the page:
echo($oJSON->encode($aSuggestions));
Now, it's up to the client to parse the JSON code correctly.
8.4.9. The Client-Side Component
So far, you've built the HTML, CSS, JavaScript, and PHP to be used by the autosuggest control. The only thing left to do is to assemble it all into a page that you can use. The most important thing to remember is to include of all necessary JavaScript files. In this case, you need to include json.js, zxml.js, and autosuggest.js. Also important is the inclusion of the stylesheet file, autosuggest.css.
It's also necessary to instantiate the AutoSuggestControl after the page has completely loaded, using the onload event handler. The complete code for the example page is:
<html>
    <head>
        <title>Autosuggest Example</title>
        <script type="text/javascript" src="json.js"></script>
        <script type="text/javascript" src="zxml.js"></script>
        <script type="text/javascript" src="autosuggest.js"></script>
        <link rel="stylesheet" type="text/css" href="autosuggest.css" />
        <script type="text/javascript">
            window.onload = function () {
                var oTextbox = new AutoSuggestControl(document.getElementById("txtState"), new SuggestionProvider());
            }
        </script>
    </head>
    <body>
        <form method="post" action="your_action.php">
            <table border="0">
                <tr>
<td>Name:</td>
<td><input type="text" name="txtName" id="txtName" /></td>
</tr>
<tr>
<td>Address 1:</td>
<td><input type="text" name="txtAddress1"
id="txtAddress1" /></td>
</tr>
<tr>
<td>Address 2:</td>
<td><input type="text" name="txtAddress2"
id="txtAddress2" /></td>
</tr>
<tr>
<td>City:</td>
<td><input type="text" name="txtCity" id="txtCity" /></td>
</tr>
<tr>
<td>State/Province:</td>
<td><input type="text" name="txtState" id="txtState"
autocomplete="off" /></td>
</tr>
<tr>
<td>Zip Code:</td>
<td><input type="text" name="txtZip" id="txtZip" /></td>
</tr>
<tr>
<td>Country:</td>
<td><input type="text" name="txtCountry"
id="txtCountry" /></td>
</tr>
</table>
<input type="submit" value="Save Information" />
</form>
</body>
</html>Note that once the necessary files are included, you need to place only one line of JavaScript in the window.onload event handler to set up the functionality:
var oTextbox = new AutoSuggestControl(document.getElementById("txtState"),
                                      new SuggestionProvider());
This line creates a new AutoSuggestControl object, passing a reference to the textbox with the ID of txtState and a new SuggestionProvider() class. It's important that this line be executed in the onload event handler because document.getElementById() isn't 100 percent accurate until the entire page has been loaded.
The example itself is done in a way in which this control may be used: filling in personal information. This could be a page where customers can update their information or it could be a shipping form. Whichever way you choose to use this functionality, it is sure to improve the usability of your form. An autosuggest control, although not as flashy as some Ajax solutions, is a good example of how Ajax can be used in a noninterfering way.