
Creating Packages
Although it is very easy to consume packages with NuGet, there wouldn't be any packages to consume if people didn't also create them. This is why the NuGet team made package creation as simple as possible.
Before you create a package, make sure to download the NuGet.exe command-line utility from the NuGet CodePlex website at http://nuget.codeplex.com/. Copy NuGet.exe to a more central location on your hard drive and add that location to your PATH environment variable.
NuGet.exe is self-updatable via the Update command. For example, you can run:
NuGet.exe update -self
or use the short form:
Nuget u -self
This backs up the current version of NuGet.exe by appending the .old extension to its file name, and then replaces it with the latest version of NuGet.exe.
Once you have NuGet.exe installed, there are three main steps to create a package:
Install-Package NuGet.CommandLine
Packaging a Project
In many cases, a package contains a single assembly that maps nicely to a Visual Studio project (a .csproj or .vbproj). In this case, creating a NuGet package is trivially easy. From a command prompt, navigate to the directory containing your project file and run the following command:
NuGet.exe pack MyProject.csproj -Build
If the directory contains only a single project file, you can omit the project file name. This will compile the project and use the project's assembly metadata to fill in the NuGet metadata.
Typically, though, you'll want to customize the package's metadata. You can do this via the following command:
NuGet.exe spec MyProject.csproj
This creates a .nuspec file (covered later in this section) with special replacement tokens for information that will be retrieved from the assembly. The NuGet docs go into much more detail about this here: http://docs.nuget.org/docs/creating-packages/creating-and-publishing-a-package.
Packaging a Folder
NuGet also supports creating a package based on a folder structure. This makes sense when you don't have a simple mapping from a project to a package — for example, your package contains versions of your assembly for multiple versions of the .NET Framework.
By default, the NuGet Pack command recursively includes all the files in the folder where the specified .nuspec file is located. It is possible to override this default by specifying the set of files to include within the .nuspec file.
A package consists of three types of files, as outlined in Table 10.1.
Table 10.1 Package File Types
| Folder | Description |
| Lib | Each assembly (.dll file) in this folder gets referenced as an assembly reference in the target project. |
| Content | Files within the content folder are copied to the application root when the package is installed. If the file ends with the .pp or .transform extension, a transformation is applied before copying it. |
| Tools | Contains PowerShell scripts that may be run during installation or initialization of the solution, as well as any programs that should be accessible from the Package Manager Console. |
Typically, when creating a package, you'll set up one or more of these default folders with the files needed for your package. Most packages add an assembly into a project, so it's worth going into more detail about the structure of the lib folder.
If your package requires extra details for the developer who uses it, include a readme.txt file in the root of the package. When the package is installed, NuGet will open the readme.txt file when installation is complete. However, to avoid overwhelming users with a bunch of opened readme files, the readme is opened only when the developer installs that package directly, not when it is installed as a dependency to another package.
NuSpec File
When you create a package, you'll want to specify information about the package, such as the package ID, a description, the authors, and so on. All this metadata is specified in an XML format in a .nuspec file. This file is also used to drive package creation and is included within the package after creation.
A quick way to write a NuSpec file is to use the NuGet Spec command to generate a boilerplate spec file. Use the AssemblyPath flag to generate a NuSpec file from the metadata stored in an assembly. For example, if you have an assembly named MusicCategorizer.dll, the following would be the command to generate a NuSpec file from the assembly's metadata:
nuget spec –AssemblyPath MusicCategorizer.dll
This command generates the following NuSpec file:
<?xml version="1.0"?>
<package xmlns="http://schemas.microsoft.com/packaging/2010/07/nuspec.xsd">
 <metadata>
   <id>MusicCategorizer</id>
   <version>1.0.0.0</version>
   <title>MusicCategorizer</title>
   <authors>Haackbeat Enterprises</authors>
   <owners>Owner here</owners>
   <licenseUrl>http://LICENSE_URL_HERE_OR_DELETE_THIS_LINE</licenseUrl>
   <projectUrl>http://PROJECT_URL_HERE_OR_DELETE_THIS_LINE</projectUrl>
   <iconUrl>http://ICON_URL_HERE_OR_DELETE_THIS_LINE</iconUrl>
   <requireLicenseAcceptance>false</requireLicenseAcceptance>
   <description>
     Categorizes music into genres and determines beats per minute (BPM) of a song.
   </description>
   <tags>Tag1 Tag2</tags>
   <dependencies>
     <dependency id="SampleDependency" version="1.0" />
   </dependencies>
 </metadata>
</package>
All NuSpec files start with the outer <packages> element. This element must contain a child <metadata> element and optionally may contain a <files> element, which I cover later. If you follow the folder structure convention mentioned earlier, the <files> element is not needed.
Metadata
Table 10.2 outlines the elements contained within the <metadata> section of a NuSpec file.
Table 10.2 Metadata Elements
| Element | Description |
| id | Required. The unique identifier for the package. |
| version | Required. The version of the package using the standard version format of up to four version segments (ex. 1.1 or 1.1.2 or 1.1.2.5). |
| title | The human-friendly title of the package. If omitted, the ID is displayed instead. |
| authors | Required. A comma-separated list of authors of the package code. |
| owners | A comma-separated list of the package creators. This is often, though not necessarily, the same list as in authors. Note that when you upload your package to the gallery, the account on the gallery supersedes this field. |
| licenseUrl | A link to the package's license. |
| projectUrl | A URL for the homepage of the package where people can find more information about the package. |
| iconUrl | A URL for the image to use as the icon for the package in the dialog. This should be a 32x32-pixel .png file that has a transparent background. |
| requireLicenseAcceptance | A Boolean value that specifies whether the client needs to ensure that the package license (described by licenseUrl) is accepted before the package is installed. |
| description | Required. A long description of the package. This shows up in the right pane of the Package Manager dialog. |
| releaseNotes | A description of changes made in this version of the package. The release notes are shown instead of the description when looking at package updates. |
| tags | A space-delimited list of tags and keywords that describe the package. |
| frameworkAssemblies | List of .NET Framework assembly references that will be added to the target project. |
| references | Names of assemblies within the lib folder that will be added to the project as assembly references. Leave this blank if you want all assemblies in the lib folder to be added (the default behavior). If you specify any references, only those assemblies are added. |
| dependencies | The list of dependencies for the package specified via child <dependency> elements. |
| language | The Microsoft Locale ID string (or LCID string) for the package, such as en-us. |
| copyright | Copyright details for the package. |
| summary | A short description of the package. This shows up in the middle pane of the Package Manager dialog. |
It's very important to choose an ID for a package carefully because it must be unique. This is the value used to identify a package when running commands to install and update packages.
The format for a package ID follows the same basic rules as a .NET namespace. So MusicCategorizer and MusicCategorizer.Mvc are valid package IDs, but MusicCategorizer!!!Web is not.
Dependencies
Many packages are not developed in isolation, but themselves depend on other libraries. You could include those dependencies in your package, but if they are available as NuGet packages, an even better approach is to specify those packages as dependencies in your package's metadata. If those libraries don't exist as packages, contact the owners of the library and offer to help them package it up!
Each <dependency> contains two key pieces of information, as shown in Table 10.3.
Table 10.3 Dependency Elements
| Attribute | Description |
| id | The package ID that this package depends on |
| version | The range of versions of the dependency package that this package may depend on |
As mentioned in Table 10.3, the version attribute specifies a range of versions. By default, if you just enter a version number, for example <dependency id=”MusicCategorizer” version=”1.0” />, that indicates a minimum version for the dependency. This example shows a dependency that allows your package to take a dependency on version 1.0 and above of the MusicCategorizer package.
If more control over the dependencies is required, you can use interval notation to specify a range. Table 10.4 shows the various ways to specify a version range.
Table 10.4 Version Ranges
| Range | Meaning |
| 1.0 | Version is greater than or equal to 1.0. This is the most common and recommended usage. |
| [1.0, 2.0) | Version is between 1.0 and 2.0 including 1.0, but excluding 2.0. |
| (,1.0] | Version is less than or equal to 1.0. |
| (,1.0) | Version is strictly less than 1.0. |
| [1.0] | Version is exactly 1.0. |
| (1.0,) | Version is strictly greater than 1.0. |
| (1.0,2.0) | Version is between 1.0 and 2.0, excluding those versions. |
| [1.0,2.0] | Version is between 1.0 and 2.0 including those versions. |
| (1.0, 2.0] | Version is between 1.0 and 2.0 excluding 1.0, but including 2.0. |
| (1.0) | Invalid. |
| Empty | All versions. |
In general, the recommended approach is to specify only a lower bound. This gives the person who installs the package a fighting chance to make it work with a newer version of the dependency. If you specify an upper bound, it blocks them from even trying to make it work with a higher version of the dependency prematurely. In the case of strongly named assemblies, NuGet automatically adds the appropriate assembly binding redirects to the target project's configuration file.
For an in-depth discussion of the versioning strategy employed by NuGet, read the blog series by David Ebbo at http://blog.davidebbo.com/2011/01/nuget-versioning-part-1-taking-on-dll.html.
Specifying Files to Include
If you follow the folder structure conventions described earlier, you do not have to specify a list of files in the .nuspec file. But in some cases you may choose to be explicit about which files to include. For example, you might have a build process where you'd rather choose the files to include rather than copy them into the convention-based structure first. You can use the <files> element to choose which files to include.
Note that if you specify any files, the conventions are ignored and only the files listed in the .nuspec file are included in the package.
The <files> element is an optional child element of the <package> element and contains a set of <file> elements. Each <file> element specifies the source and destination of a file to include in the package. Table 10.5 describes these attributes.
Table 10.5 Version Ranges
| Attribute | Description |
| src | The location of the file or files to include. The path is relative to the NuSpec file unless an absolute path is specified. The wildcard character, *, is allowed. Using a double wildcard, **, implies a recursive directory search. |
| target | Optional. The destination path for the file or set of files. This is a relative path within the package, such as target=”lib” or target=”lib et40”. Other typical values include target=”content” or target=”tools”. |
The following example shows a typical files element:
<files>
 <file src="binRelease*.dll" target="lib" />
 <file src="binRelease*.pdb" target="lib" />
 <file src="tools***.*" target="tools" />
</files>
All paths are resolved relative to the .nuspec file unless an absolute path is specified. For more details on how this element works, check out the specifications on the NuGet Documentation website: http://docs.nuget.org/docs/reference/nuspec-reference.
Tools
A package can include PowerShell scripts that automatically run when the package is installed or removed. Some scripts can add new commands to the console, such as the MvcScaffolding package.
Let's walk through building a very simple package that adds a new command to the Package Manager Console. In this particular case, the package won't be particularly useful, but it will illustrate some useful concepts.
I've always been a fan of the novelty toy called the Magic 8-Ball. If you're not familiar with this toy, it's very simple. It's an oversized plastic 8-ball (the kind you use when playing pool or pocket billiards). First, you ask the 8-ball any yes or no question that pops in your head. You then shake it and peer into a small clear window that allows you to see one face of an icosahedral (20-sided) die with the answer to the question.
You'll build your own version of the Magic 8-Ball as a package that adds a new PowerShell command to the console. We'll start by writing a script named init.ps1. By convention, scripts with this name placed in the tools folder of the package are executed every time the solution is opened, allowing the script to add this command to the console.
Table 10.6 shows a list of all the special PowerShell scripts that can be included in the tools folder of a package and when NuGet executes them.
Table 10.6 Special PowerShell Scripts
| Name | Description |
| Init.ps1 | Runs the first time a package is installed into any project within a solution. If the same package is installed into additional projects in the solution, the script is not run during those installations. The script also runs every time the solution is opened in Visual Studio. This is useful for adding new commands into the Package Manager Console. |
| Install.ps1 | Runs when a package is installed into a project. If the same package is installed in multiple projects in a solution, the script runs each time the package is installed into the project. This is useful for taking additional installation steps beyond what NuGet normally can do. |
| Uninstall.ps1 | Runs every time a package is uninstalled from a project. This is useful for any cleanup your package may need to do beyond what NuGet does normally. |
When calling these scripts, NuGet will pass in a set of parameters, as shown in Table 10.7.
Table 10.7 NuGet PowerShell Script Parameters
| Name | Description |
| $installPath | Path to the installed package. |
| $toolsPath | Path to the tools directory within the installed package directory. |
| $package | An instance of the package. |
| $project | The project you are installing the package into. This is null in the case of init.ps1 because init.ps1 runs at the solution level. |
Your init.ps1 script will be very simple. It will simply import a PowerShell module that contains your real logic:
param($installPath, $toolsPath, $package, $project)
Import-Module (Join-Path $toolsPath MagicEightBall.psm1)
The first line declares the parameters to the script that NuGet will pass into the script when NuGet calls the script.
The second line imports a module named MagicEightBall.psm1. This is the PowerShell module script that contains the logic for this new command you plan to write. This module is located in the same directory as the init.ps1 script, which, as described earlier, must go in the tools directory. That's why you need to join the $toolsPath (path to the tools directory) with the name of your module to get the full path to your module script file.
The following is the source for MagicEightBall.psm1:
$answers =   "As I see it, yes",
                   "Reply hazy, try again",
                   "Outlook not so good"
function Get-Answer($question) {
      $rand = New-Object System.Random
      return $answers[$rand.Next(0, $answers.Length)]
}

Register-TabExpansion ‘Get-Answer' @{
      ‘question' = {
             "Is this my lucky day?",
             "Will it rain tonight?",
             "Do I watch too much TV?"
      }
}

Export-ModuleMember Get-Answer
Let's break it down:
- The first line declares an array of possible answers. While the real Magic 8-Ball has 20 possible answers, you'll start off simple with only three.
- The next block of code declares your function named Get-Answer. This is the new command that this package adds to the Package Manager Console. It generates a random integer number between 0 (inclusive) and 3 (exclusive). You then use this random number as an index into your array to return a random answer.
- The next block of code registers a tab expansion for your new command via the Register-TabExpansion method. This is a very neat way to provide IntelliSense-like tab completion to any function. The first parameter is the name of the function you will provide tab expansion for. The second parameter is a dictionary used to supply the possible tab expansion values for each parameter to the function. Each entry in the dictionary has a key corresponding to the parameter name. In this example, you only have one parameter, question. The value of each entry is an array of possible values. This code sample provides three possible questions you can ask the 8-ball, but of course the user of the function is free to ask any question.
- The last line of code exports the Get-Answer function. This makes it available to the console as a publicly callable command.
Now all you need to do is package these files up and install your package. In order for these scripts to run, they must be added to the tools folder of a package. If you drag these files into the Contents pane of Package Explorer (a useful tool we cover later in this chapter in the section “Using the Package Explorer”), it'll automatically prompt you to place them in the tools folder. If you're using NuGet.exe to create the package, place these files in a folder named tools.
Once you're done creating the package, you can test it out by installing it locally. Simply place the package in a folder and add that folder as a package source. After installing the package, the new command becomes available in the Package Manager, complete with tab expansion, as shown in Figure 10.18.

Building packages that can add powerful new commands to the Package Manager Console is relatively quick and easy, once you get the hang of PowerShell. We've only begun to scratch the surface of the types of things you can do with it.
Framework and Profile Targeting
Many assemblies target a specific version of the .NET Framework. For example, you might have one version of your library that's specific to .NET 2.0 and another version of the same library that takes advantage of .NET 4 features. You do not need to create separate packages for each of these versions. NuGet supports putting multiple versions of the same library in a single package, keeping them in separate folders within the package.
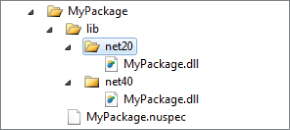
When NuGet installs an assembly from a package, it checks the target .NET Framework version of the project you are adding the package to. NuGet then selects the correct version of the assembly in the package by selecting the correct subfolder within the lib folder. Figure 10.19 shows an example of the layout for a package that targets both .NET 2.0 and .NET 4.
To enable NuGet to do this, use the following naming convention to indicate which assemblies go with which framework versions:
lib{framework name}{version}
There are only two choices for the framework name: .NET Framework and Silverlight. It's customary to use the abbreviations for these frameworks, in this case, net and sl, respectively.
The version is the version of the framework. For brevity, you can omit the dot character. Thus:
- net20 targets .NET 2.0.
- net35 targets .NET 3.5.
- net40 targets .NET 4.
- net45 targets .NET 4.5.
- sl4 targets Silverlight 4.0.
Assemblies that have no associated framework name or version are stored directly in the lib folder.
When NuGet installs a package that has multiple assembly versions, it tries to match the framework name and version of the assembly with the target framework of the project.
If an exact match is not found, NuGet looks at each of the folders within the lib folder of the package and finds the folder with a matching framework version and the highest version number that's less than or equal to the project's target framework.
For example, if you install a package that has the lib folder structure (as previously shown in Figure 10.19) into a project that targets the .NET Framework 3.5, the assembly in the net20 folder (for .NET Framework 2.0) is selected because that's the highest version that's still less than or equal to 3.5.
NuGet also supports targeting a specific framework profile by appending a dash and the profile name to the end of the folder:
lib{framework name}{version}
For example, to target the Windows Phone profile, place your assembly in a folder named sl4-wp.
Profiles supported by NuGet include:
- Client: Client Profile
- Full: Full Profile
- WP: Windows Phone
At the time of this writing, to target the Windows Phone profile the Silverlight 4 framework must be specified. It is anticipated that in the future, later versions of Silverlight will be supported on the phone.
Prerelease Packages
By default, NuGet displays only “stable” packages. However, you might want to create a beta version of your next big release and have it available via NuGet.
NuGet supports the concept of prerelease packages. To create a prerelease version, specify a prerelease version number according to the Semantic Versioning (SemVer) specification. For example, to create a beta for your 1.0 package, you might set the version as 1.0.0-beta. You can set this either in the NuSpec's version field or via the AssemblyInformationalVersion, if you are creating a package via a project:
[assembly: AssemblyInformationalVersion("1.0.1-alpha")]
For more details about the version string and SemVer, check out the NuGet versioning docs at http://docs.nuget.org/docs/Reference/Versioning.
Prerelease packages can depend on stable packages, but stable packages cannot depend on prerelease packages. The reason for this is that when someone installs a stable package, he or she may not want to take on the added risk of a prerelease package. NuGet requires people to opt into prerelease packages and the inherent risks that entails.
To install a pre-release package from the Manage NuGet Packages dialog, make sure Include Prerelease is selected in the drop-down in the middle pane, not Stable Only. In the Package Manager Console, use the –IncludePrerelease flag with the Install-Package command.