
Adding a Library as a Package
With NuGet installed, you can now easily add a library such as ELMAH into your project.
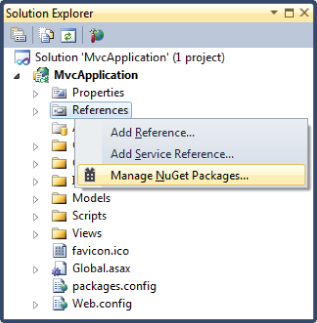
You have two ways to interact with NuGet: the Manage NuGet Packages dialog and the Package Manager Console. I'll cover the dialog first and the console later. You can launch the dialog from within a project by right-clicking the References node in the Solution Explorer, as shown in Figure 10.3. You can also launch it by right-clicking the project name.
The Manage NuGet Packages dialog looks very similar to the Extension Manager dialog, which leads to confusion for some people. The distinction between the two is very clear. The Visual Studio Extension Manager installs extensions that extend and enhance Visual Studio. These extensions are not deployed as part of your application. In contrast, the purpose of NuGet is to install packages that are included in and extend your project. In most cases, the contents of these packages are deployed as part of your application.
Unlike the Extension Manager, the Manage NuGet Packages dialog defaults to the section it was on the last time it was run. Be sure to click the Online node in the left pane to see packages available in the NuGet feed, as shown in Figure 10.4.

Finding Packages
If you're a glutton for punishment, you can use the paging links at the bottom to page through the list of packages till you find the one you want, but the quickest way is to use the search bar in the top right.
When you find a package, the pane on the right displays information about the package. Figure 10.5 shows the information pane for the SignalR package.

This pane provides the following information:
- Created By: A list of authors of the original library. At the time I write this, the pane does not list the owners of the package, just the authors. In some cases, the owners are different from the library authors.
- Id: The identifier for the package. This is the id used when installing the package using the Package Manager Console.
- Version: The version number of the package. Typically, this matches the version of the contained library, but it isn't necessarily the case.
- Downloads: Download count for the current gallery.
- View License Terms: Click this link to view the license terms for the package.
- Project Information: This link takes you to the package's project page.
- Report Abuse: Use this link to report broken or malicious packages.
- Description: This is a good place for the package author to display brief release notes for a package.
- Dependencies: A list of other packages that this package depends on.
As you can see in the screenshot, the SignalR package depends on two other packages: SignalR.Hosting.AspNet and SignalR.Js. The information displayed is controlled by the package's NuSpec file, which is covered in more detail later.
Installing a Package
To install a package, perform the following steps:
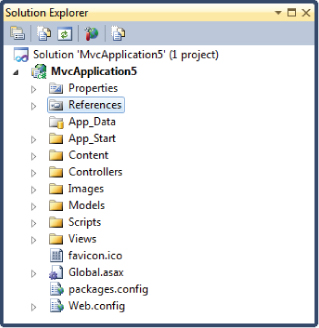
When NuGet installs the ELMAH package, it makes a few changes to your project. The first time any package is installed into a project, a new file named packages.config is added to the project, as shown in Figure 10.7. This file will already exist in an ASP.NET MVC 4 project since the project template itself includes several NuGet packages. This file keeps a list of packages installed in the project.
The format for this file is very simple. Here's an example showing that version 1.2.2 of the ELMAH package is installed:
<?xml version="1.0" encoding="utf-8"?>
<packages>
   <package id="elmah" version="1.2.2" />
</packages>
Also notice that you now have an assembly reference to the Elmah.dll assembly, as shown in Figure 10.8.

Where is that assembly referenced from? To answer that, you need to look at what files are added to your solution when a package is installed. When the first package is installed into a project, a packages folder is created in the same directory as the solution file, as shown in Figure 10.9.

The packages folder contains a subfolder for each installed package. Figure 10.10 shows a packages folder with multiple installed packages.
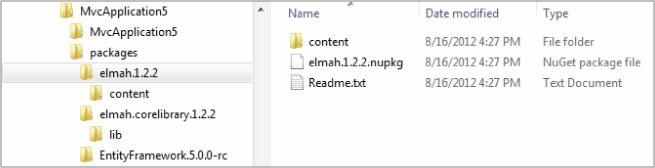
Note that the folders contain a version number because this folder stores all the packages installed for a given solution. It's possible for two projects in the same solution to each have a different version of the same package installed.
Figure 10.10 also shows the contents of the ELMAH package folder, which contains the contents of the package along with the original package itself in the form of the .nupkg file.
The lib folder contains the ELMAH assembly, and this is the location from which the assembly is referenced. This is why you may want to commit the packages folder into your version control repository. This allows everyone who works on the same code to get the latest version from version control and be in the same state. Not everyone likes the idea of including the packages folder in his or her version control repository. The “Package Restore” section later in this chapter covers an alternative workflow supported by NuGet that doesn't require committing packages to version control. Package restore is most commonly used with distributed version control systems, such as Git and Mercurial.
The content folder contains files that are copied directly into the project root. The directory structure of the content folder is maintained when it is copied into the project. This folder may also contain source code and configuration file transformations, which are covered in more depth later. In the case of ELMAH, there's a web.config.transform file, which updates the web.config with settings required by ELMAH, as shown in the following code:
<?xml version="1.0" encoding="utf-8"?>
<configuration>
   <configSections>
       <sectionGroup name="elmah">
           <section name="security" requirePermission="false"
               type="Elmah.SecuritySectionHandler, Elmah" />
           <section name="errorLog" requirePermission="false"
               type="Elmah.ErrorLogSectionHandler, Elmah" />
           <section name="errorMail" requirePermission="false"
               type="Elmah.ErrorMailSectionHandler, Elmah" />
           <section name="errorFilter" requirePermission="false"
               type="Elmah.ErrorFilterSectionHandler, Elmah" />
         </sectionGroup>
   </configSections>
   …
</configuration>
Some packages contain a tools folder, which may contain PowerShell scripts. We'll cover that in more detail later in this chapter.
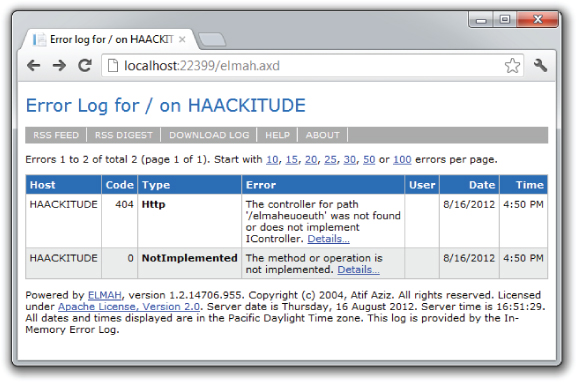
With all these settings in place, you are now free to make use of the library in your project, with the benefits of full IntelliSense and programmatic access to it. In the case of ELMAH, you have no additional code to write in order to try it out. To see ELMAH in action, run the application and visit /elmah.axd (see Figure 10.11).
Updating a Package
Even better, say you've installed 10 or so packages in your project. At some point, you're going to want to update all your packages to the latest version of each. Before NuGet, this was a time-consuming process of searching for and visiting the homepage of each library and checking the latest version against the one you have.
With NuGet, it's as easy as clicking the Updates node in the left pane. This displays a list of packages in the current project that have newer versions available. Click the Update button next to each package to upgrade the package to the latest version. This will also update all the dependencies of the packages, ensuring that only compatible versions of the dependencies are installed.
Recent Packages
The Recent Packages node shows the last 25 packages that were directly installed. Packages installed because they were a dependency of the package you chose to install do not show up in this list. This is useful for packages you use often or when you install a package into multiple projects.
To clear the list of recent packages, go to the General node of the Package Manager settings dialog and click the Clear Recent Packages button.
Package Restore
As I mentioned earlier, the default NuGet workflow assumes the developer will commit the Packages folder into version control. One benefit of this approach is that retrieving the solution from version control ensures that everything needed to build the solution is available. The packages do not need to be retrieved from another location.
However, there are a couple of downsides to this approach. The Packages folder is not part of the Visual Studio solution, so developers who administer version control via Visual Studio integration need to take an additional step to ensure the Packages folder is committed. If you happen to use TFS (Team Foundation System) for source control, NuGet automatically commits the Packages folder.
Developers who use a distributed version control system (DVCS), such as Git or Mercurial, face another downside. Typically, a DVCS is not great with binary files. If a project contains a large number of packages that change a lot, the DVCS repository can grow quite large. In this case, it might make sense not to commit the Packages folder to version control.
NuGet 1.6 introduced the package restore feature to address these downsides and support a workflow that doesn't require developers to commit packages to source control.
To enable package restore, right-click on the solution within Visual Studio and select the Enable NuGet Package Restore menu option, as shown in Figure 10.12. This brings up a dialog with information about the changes this will make to your solution (see Figure 10.13).


As the dialog states, this adds a folder named .nuget to the root of your solution. You absolutely must make sure this folder is committed to source control, as it contains the build tasks that enable package restore. The good news is that the contents of this folder will rarely need to change, so this is a one-time operation.
There are three to four files within this folder:
- NuGet.config: Contains configuration settings for NuGet. Currently, there is one setting, disableSourceControlIntegration, that is set to true when package restore is enabled, since the Packages folder will not be committed to source control any longer.
- NuGet.exe: The command-line version of NuGet that actually restores the packages. Note that as of NuGet 2.0, package restore requires the user's consent via a NuGet setting or an environment variable, EnableNuGetPackageRestore. See the NuGet blog post for more details: http://blog.nuget.org/20120518/package-restore-and-consent.html.
- NuGet.targets: The MSBuild tasks that shell out to NuGet.exe and ensure that missing packages are restored during compilation.
- Packages.config: If the solution contains packages that are only installed in the solution and not in any individual project, those packages are listed here. For example, a package that adds commands to the Package Manager Console (covered later) but doesn't contain any assemblies might be listed here.
With package restore enabled, the Packages folder need not be committed to source control; instead, only the source code is committed. When a new developer gets the source code from version control, he or she just needs to build the solution to restore all the package files.
NuGet will then look at each package entry in each Packages.config file and download and unpack the package. Note that it doesn't “install” the package. The assumption is that the package was already installed and all the changes it made to your solution are already committed. The only things missing are the files in the Packages folder, such as assemblies and tools.
Using the Package Manager Console
Earlier I mentioned that there were two ways to interact with NuGet. In this section I cover the second way, the Package Manager Console. This is a PowerShell-based console within Visual Studio that provides a powerful way to find and install packages and supports a few additional scenarios that the dialog doesn't.
To launch and use the console, follow these steps:
One nice thing about PowerShell commands is that they support tab expansions, which means you can type the first few letters of a command and hit the Tab key to see a range of options.
Get-Project -All | Install-Package log4net
The first command retrieves every project in your solution and pipes the output to the second command, which installs the specified package into each project.
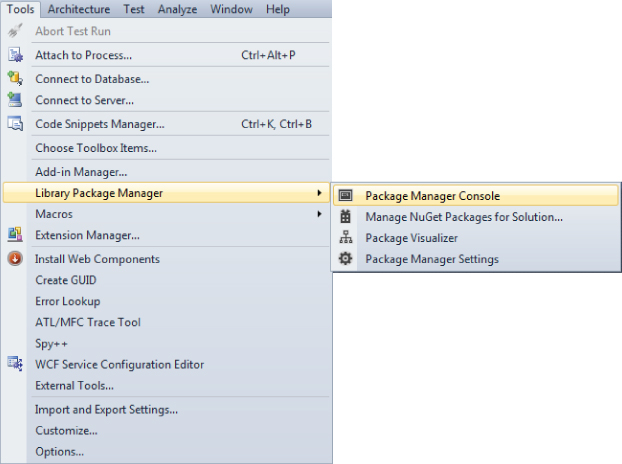

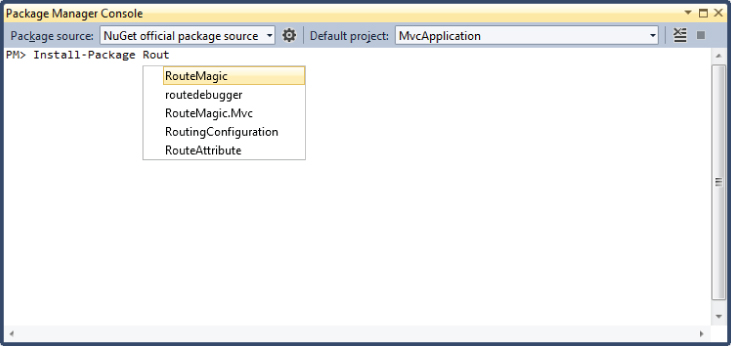
Figure 10.17 shows an example of installing MvcScaffolding and then running the new Scaffold command, which was added by the package.

By default, the Package Manager Console commands work against the “All” package source. This package source is an aggregate of all the configured package sources. To change the current package source, use the Package source drop-down at the top left of the console to select a different package source or use the -Source flag to specify a different package source when running a command. The flag changes the package source for the duration of that command. To change the set of configured package sources, click the button that looks like a gear to the right of the Package source drop-down. This brings up the Configure Package Sources dialog.
Likewise, the Package Manager Console applies its commands to the default project. The default project is displayed in a drop-down at the top right of the console. When you run a command to install a package, it only applies to the default project. Use the –Project flag followed by the project name to apply the command to a different project.
For more details about the Package Manager Console and a reference list of the available commands, visit the NuGet Docs website: http://docs.nuget.org/docs/reference/package-manager-console-powershell-reference.