
External Login via OAuth and OpenID
Historically, the huge majority of web applications have handled authorization based on a locally maintained account database. The ASP.NET Membership system is a familiar example: New users register for an account by providing a name, password, and possibly other required information. The application adds the user information to a local membership database and uses it to validate login attempts.
While traditional membership is a great fit in a lot of web applications, it comes with some serious downsides:
- Maintaining a local database of usernames and secret passwords is a large security liability. It's become common to hear about large security breaches involving hundreds of thousands of users' account information (often including unencrypted passwords). Worse, because many users reuse passwords on multiple websites, compromised accounts may affect your users' security on their banking or other sensitive websites.
- Website registration is annoying. Users have gotten tired of filling out forms, complying with widely differing password policies, remembering passwords, and worrying if your site is going to keep their information secure. A significant percentage of potential users will decide they'd rather not bother with registering for your site.
OAuth and OpenID are open standards for authorization. These protocols allow your users to log in to your site using their existing accounts on other trusted sites (called providers), such as Google, Twitter, Microsoft, and others.
Setting up your site to support OAuth and OpenID has been difficult to implement in the past for two reasons: These protocols are complex, and many top providers implement them a little differently. MVC 4 greatly simplifies this by including built-in support for OAuth and OpenID in the Internet project template. This support includes an updated AccountController, views to facilitate registration and account management, and utility classes built on top of the popular DotNetOpenAuth library.
The new login page now shows two options: “Use a local account to log in” and “Use another service to log in,” as shown in Figure 7.5. As implied by this page, your site can support both options, allowing users to continue to create local accounts if they prefer.

Registering External Login Providers
You need to explicitly enable external sites for login. Fortunately, this is extremely simple. Authorization providers are configured in App_StartAuthConfig.cs. When you create a new application, all authentication providers in AuthConfig.cs are commented out and will appear as follows:
public static class AuthConfig
{
       public static void RegisterAuth()
       {
               // To let users of this site log in using their accounts from
               // other sites such as Microsoft, Facebook, and Twitter,
               // you must update this site. For more information visit
               // http://go.microsoft.com/fwlink/?LinkID=252166
               //OAuthWebSecurity.RegisterMicrosoftClient(
               //    clientId: "",
               //    clientSecret: "");
               //OAuthWebSecurity.RegisterTwitterClient(
               //    consumerKey: "",
               //    consumerSecret: "");
               //OAuthWebSecurity.RegisterFacebookClient(
               //    appId: "",
               //    appSecret: "");
               //OAuthWebSecurity.RegisterGoogleClient();
       }
}
Sites that use an OAuth provider (Facebook, Twitter, and Microsoft) will require you to register your site as an application. When you do, you'll be provided a client id and a secret. Your site will use these to authenticate with the OAuth provider. Sites that implement OpenID (such as Google and Yahoo) do not require you to register an application, and you won't need a client id or secret.
The OAuthWebSecurity utility methods shown in the above listing work pretty hard to hide the implementation differences between OAuth and OpenID as well as differences between providers, but you'll notice some differences. The providers use differing terminology as well, referring to client id as consumer key, app id, etc. Fortunately, the OAuthWebSecurity methods for each provider use parameter names that match the provider's terms and documentation.
Configuring OpenID Providers
Configuring an OpenID provider is relatively simple, since no registration is required and there are no parameters to fill in. We'll walk through adding OpenID support for three OpenID providers: Google, Yahoo, and myOpenID.
The example code to implement Google provider support is already included in AuthConfig, so just uncomment it. To add support for Yahoo, add a call to OAuthWebSecurity.RegisterYahooClient().
The OAuthWebSecurity class doesn't have a utility method to register myOpenID directly, so we'll need to create and register a custom client, as shown in the following completed AuthConfig.cs code. (Note the additional using statements to bring in the DotNetOpenAuth namespaces.)
using DotNetOpenAuth.AspNet.Clients;
using DotNetOpenAuth.OpenId.RelyingParty;
using Microsoft.Web.WebPages.OAuth;

namespace MvcApplication23
{
    public static class AuthConfig
    {
        public static void RegisterAuth()
        {
            OAuthWebSecurity.RegisterGoogleClient();
            OAuthWebSecurity.RegisterYahooClient();

            var MyOpenIdClient =
              new OpenIdClient("myopenid", WellKnownProviders.MyOpenId);
            OAuthWebSecurity.RegisterClient(MyOpenIdClient, "myOpenID", null);
        }
    }
}
That's it — we're done. To test this, run the application and click on the Log In link in the header (or browse to /Account/Login). You'll see the three registered clients are displayed in the external sites list, as shown in Figure 7.6.

Next, click the Google login button. This redirects you to a Google confirmation page, as shown in Figure 7.7, that verifies you want to provide information (in this case, my e-mail address) back to the requesting site.

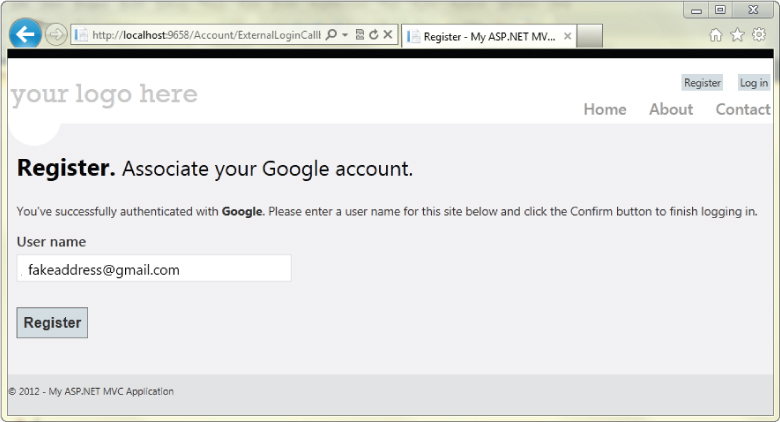
After clicking Allow, you are redirected back to the ASP.NET MVC site to complete the registration process (see Figure 7.8).
After clicking the Register button, you are redirected to the home page as an authenticated user, as shown in Figure 7.9.

Finally, you can click your username in the header to manage your account (see Figure 7.10). You can add a local password or associate additional external login providers.

Configuring OAuth Providers
While the code involved in configuring an OAuth provider is very similar to the OpenID case, the process of registering your site as an application varies by provider. The MVC 4 Internet project template includes support for OAuth support using the DotNetOpenAuth NuGet package. I recommend you follow the official documentation for OAuth rather than referring to printed material or blog posts. You can find it by clicking the article linked in the Login page (In the sentence which starts “See this article for details…”) or at the following location: http://go.microsoft.com/fwlink/?LinkId=252166. This documentation includes step-by-step instructions for registering applications with each supported OAuth provider.
When complete, the provider will issue you a client id and secret, and you can plug them right into the commented out methods shown in AuthConfig.cs. For example, assume you registered a Facebook application and were provided an App ID “123456789012” and App Secret “abcdefabcdefdecafbad.” (Note that these are examples and will not work.) You could then enable Facebook authentication using the following call in AuthConfig.cs:
public static class AuthConfig
{
       public static void RegisterAuth()
       {
               OAuthWebSecurity.RegisterFacebookClient(
                   appId: "123456789012",
                   appSecret: "abcdefabcdefdecafbad");
       }
}
Security Implications of External Logins
While OAuth and OpenID simplify your site's security code, they introduce other potential attack vectors into your application. If either a provider site or the security communication between your sites is compromised, an attacker could either subvert the login to your site or capture the user's information. It's important to continue to pay attention to security when you're using delegated authentication. Security for your site is always your responsibility, even if you're making use of external services for authentication.
Trusted External Login Providers
It's important to only support providers whose security you trust, which generally means sticking with well-known providers. This is important for a few reasons.
First, when you are redirecting your users to external sites, you want to make sure that they're not malicious or poorly secured sites that will leak or misuse your users' login data or other information.
Second, authentication providers are giving you information about a user — not just their registration state, but also e-mail addresses and potentially other provider-specific information. If this information is incorrect, you could be authenticating the wrong person or using wrong user information.
Require SSL for Login
The callback from an external provider to your site contains security tokens that will allow access to your site and contain user information. It's important that this information be transmitted over HTTPS to prevent interception while this information travels over the Internet.
In order to enforce HTTPS for this callback, applications that support external logins should require HTTPS for access to the AccountController's Login Get method using the RequireHttps attribute:
//
// GET: /Account/Login

[RequireHttps]
[AllowAnonymous]
public ActionResult Login(string returnUrl)
{
        ViewBag.ReturnUrl = returnUrl;
        return View();
}
Enforcing HTTPS during login to your site will cause all calls to external providers to occur over HTTPS, which, in turn, will cause the providers to make their callbacks to your site using HTTPS.
Additionally, it's important to use HTTPS with Google authentication. Google will report a user who logs in once via HTTP and later via HTTPS as two different people. Always requiring HTTPS will prevent this problem.